

Building blocks in Microsoft Word are pre-designed and customized blocks of text and formatting. This feature for inserting content makes document creation much easier.
When it comes to word processing, finding ways to save time is essential to maintaining productivity and mental quickness. Microsoft understands this, and it’s the primary reason behind building blocks in Microsoft Word. These pre-designed and customized blocks of text and formatting techniques make it easier to insert content, including text and graphics, thereby cutting down on typing.
Say Hello to Building Blocks
Located in the Microsoft Word Quick Part Gallery, these building blocks take many forms, including preformatted headers, footers, text boxes, cover pages, page numbers, quick tables, watermarks, table of contents, bibliographies, and equations. The often-used AutoText feature in Microsoft Word is a common type of building block. In fact, the feature grew out of AutoText in previous versions of Word.
Theme-enabled, building block content automatically changes with the many available styles. You can also customize the blocks to match your needs better. In the Quick Part Gallery, you can create, store, and reuse the blocks. The Building Blocks Organizer is where you can find or edit a building block.
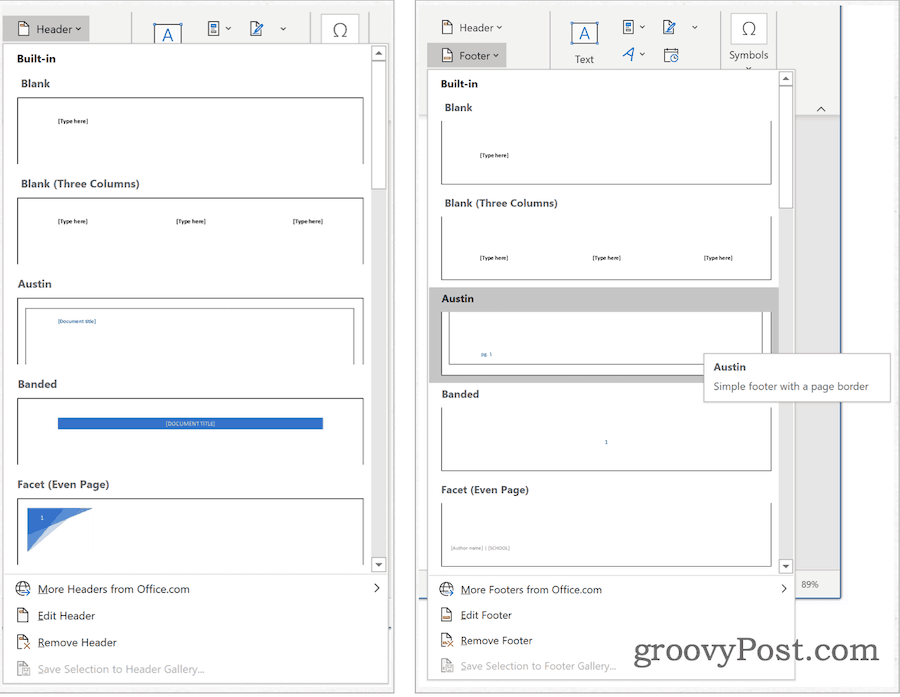
You can find many of the existing building blocks under the Microsoft Word Insert tab. In the example below, you can see the header and footer examples.
Quick Part Gallery
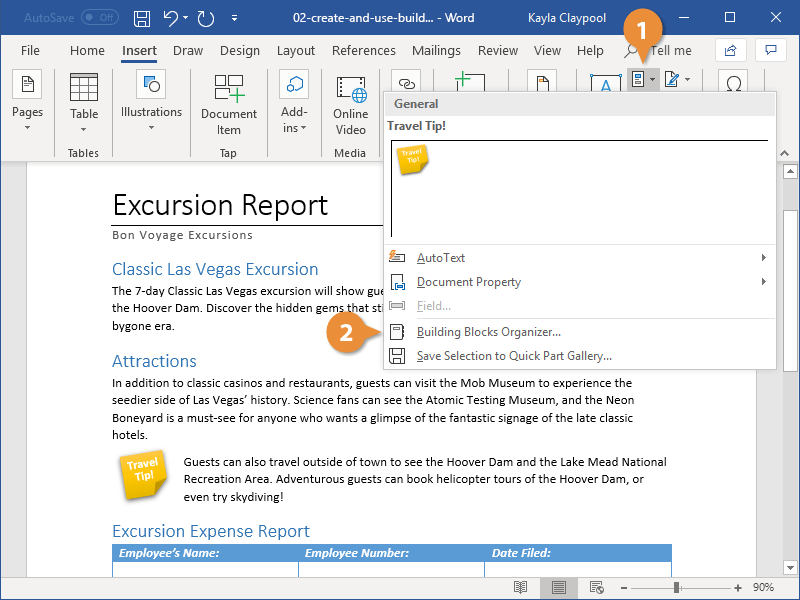
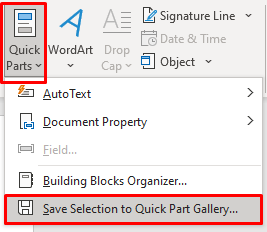
You can find the Quick Part Gallery under the Insert tab in Microsoft Word. From there, click Quick Parts under the Text group. Quick Parts is organized under five sections, including:
- AutoText: It’s here where you’ll find reusable content. By clicking on AutoText, you gain access to the AutoText gallery, which you create by clicking Save Selection to AutoText Gallery (see below).
- Document Property: This allows you to insert properties into your current document, such as author, category, and publish date.
- Field: With field codes, you can insert automatically updated information into your document. Examples include time, title, page numbers, and more.
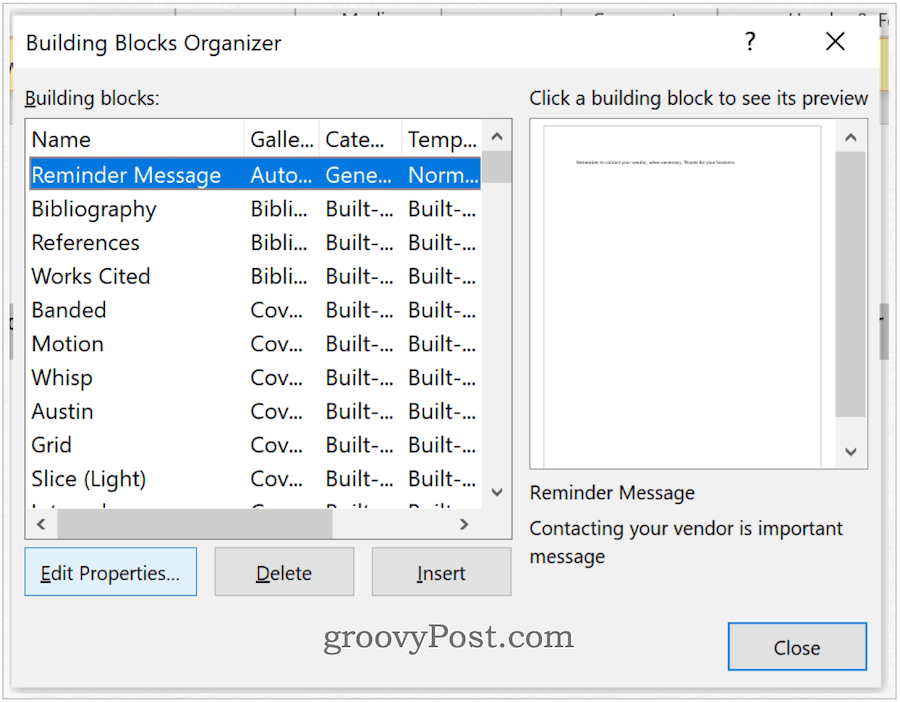
- Building Blocks Organizer: From this location, you’ll find all the building blocks available to you in Microsoft Word. You can also edit or delete existing blocks or create new ones from there.
- Save Selection to AutoText Gallery: the Highlighted text is easily added to the AutoText Gallery using this tool. Use this tool to add frequently required text.
Reviewing Existing Quick Part Building Block
You can take a look at existing building blocks in the Quick Part Gallery:
- Have your cursor in the correct spot in Microsoft Word.
- Under the Insert tab, click Quick Parts.
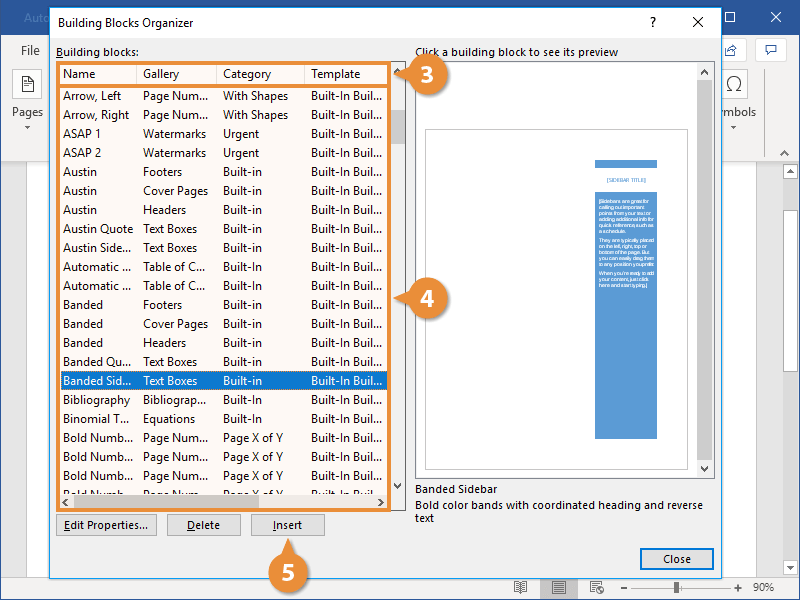
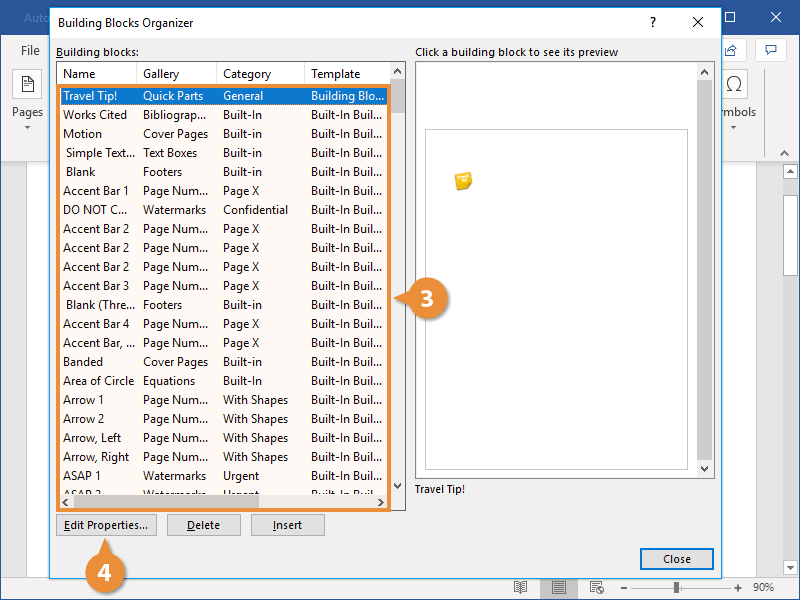
- Choose the Building Blocks Organizer.
- Click Name to sort by name.
- Highlight the building block you wish to review.
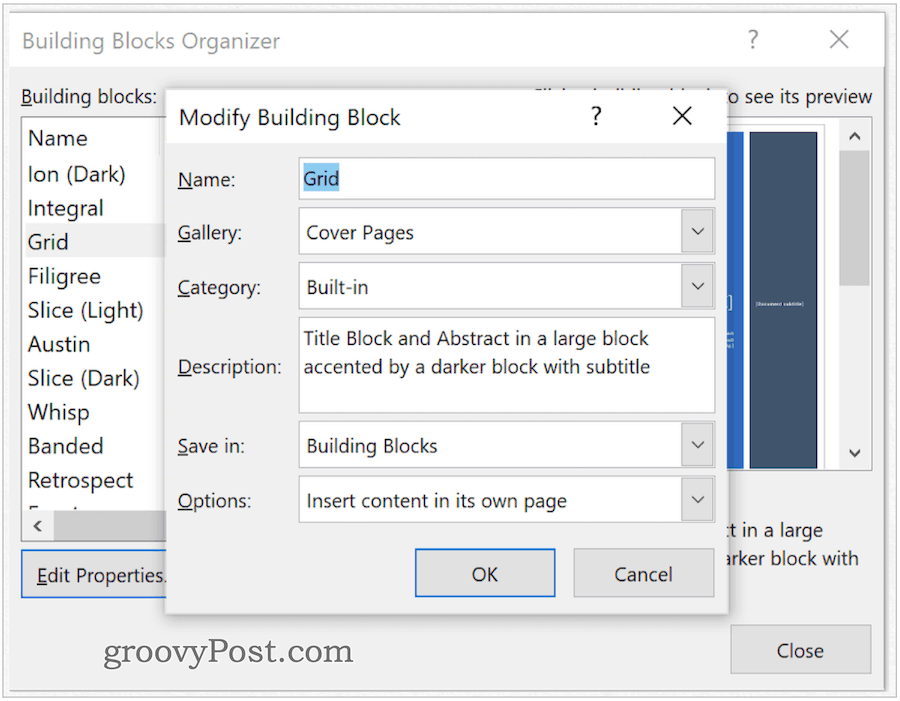
- Click Edit Properties.
- Review the information contained in the Quick Part.
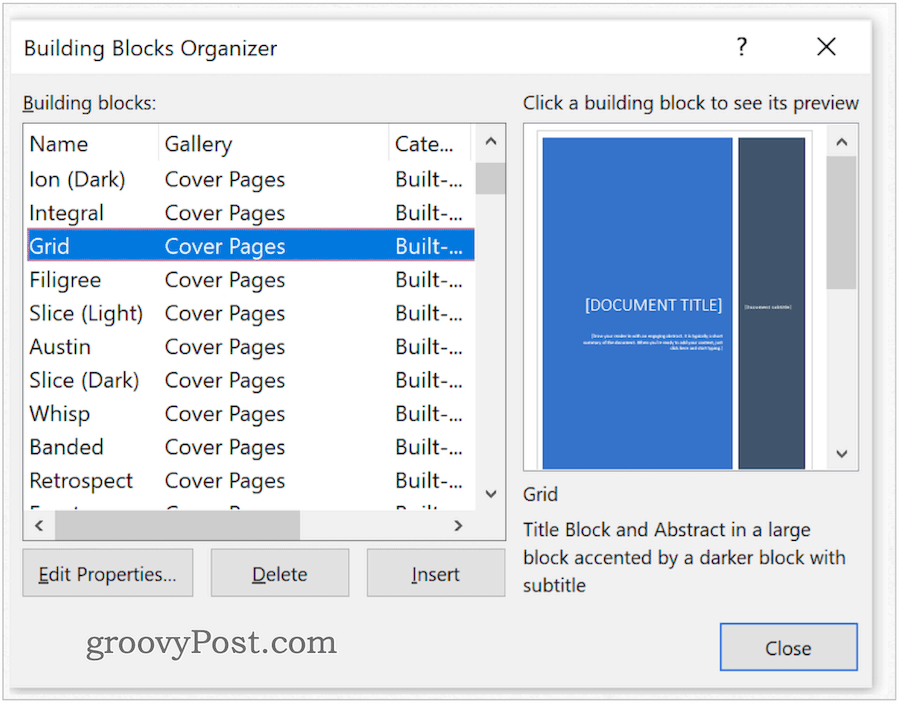
In the following screenshots, you can see a Cover Page building block:
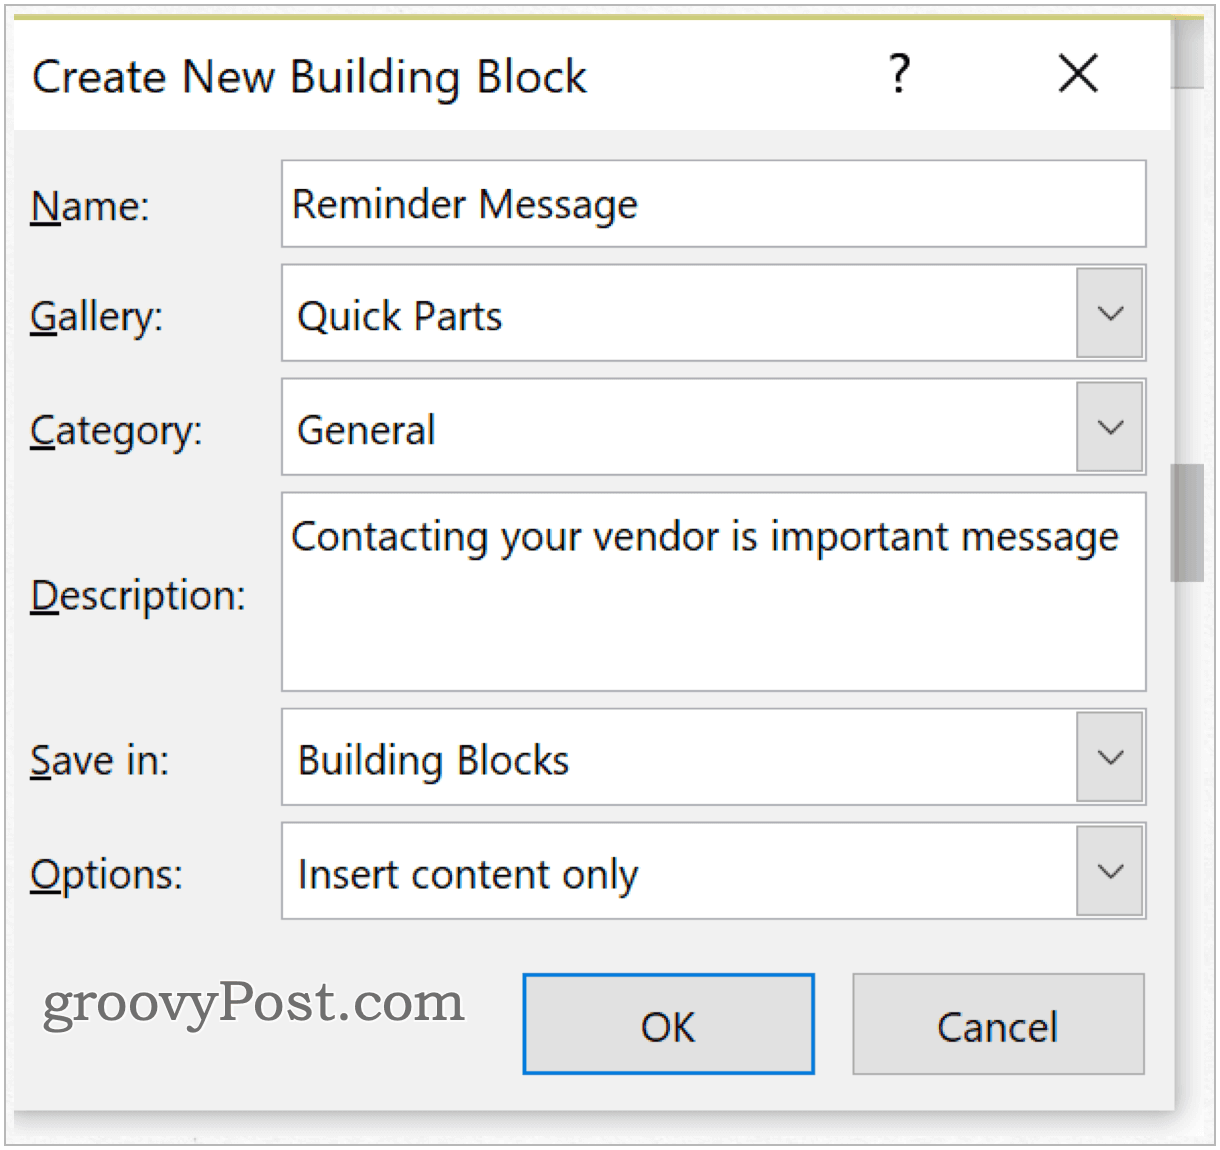
Creating a Quick Part
To add a new Quick Part:
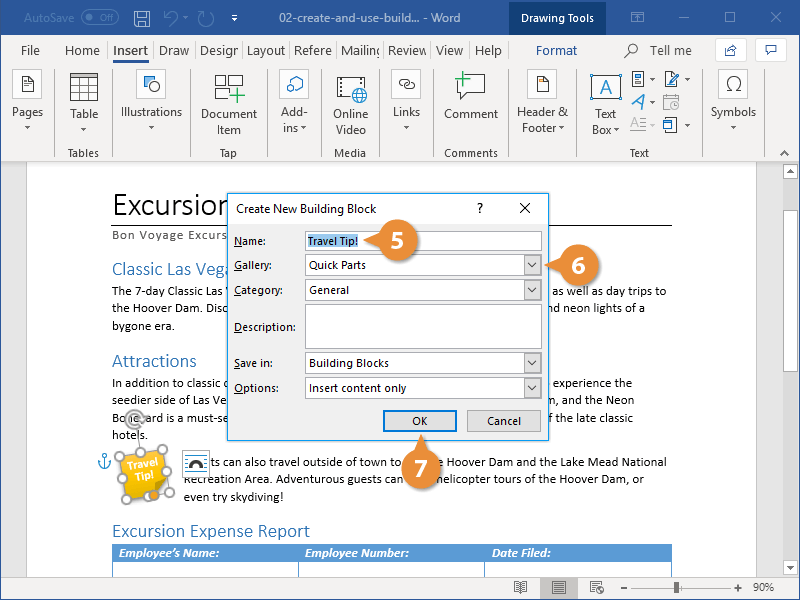
- Highlight the phrase, sentence, or another portion of your current document.
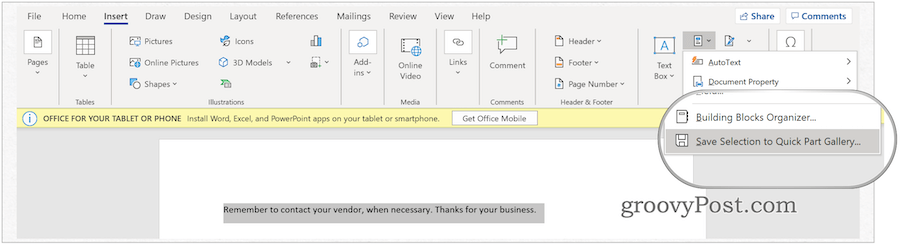
- Click Quick Parts under the Inset tab, Text group in Microsoft Word.
- Choose Save Selection to Quick Part Gallery.
- Change the name of the new Quick Part, if necessary.
- Add a description.
- Click OK to save the Quick Part.
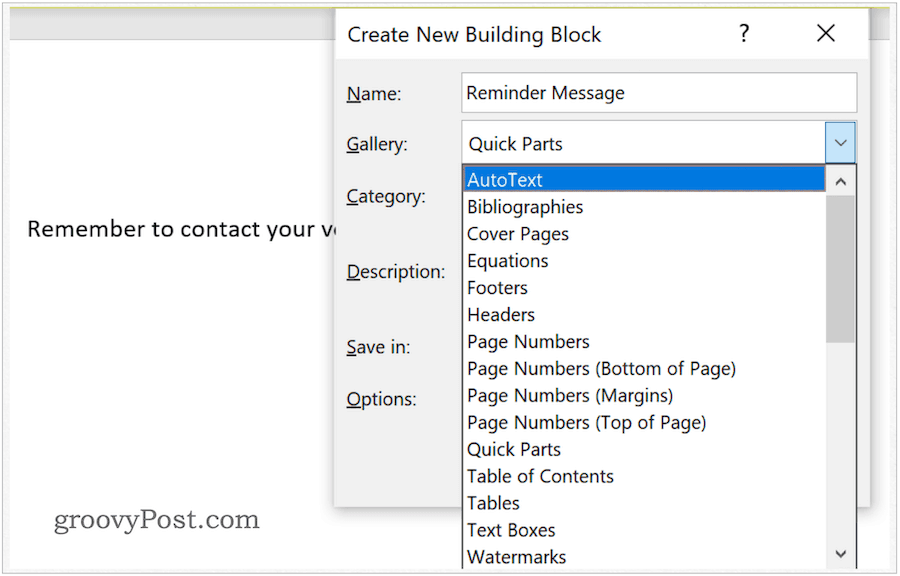
Which Gallery?
When you’re creating a new building block, you can assign it to whatever gallery you choose. During the Create New Building Block process (see above), use the pull-down to select a gallery. To insert the block into your existing document:
- Have your cursor in the correct spot in Microsoft Word.
- Under the Insert tab, click Quick Parts.
- Choose AutoText.
- Select the AutoText to insert.
The new building block has been assigned to the AutoText gallery and then inserted into the document in the following example.
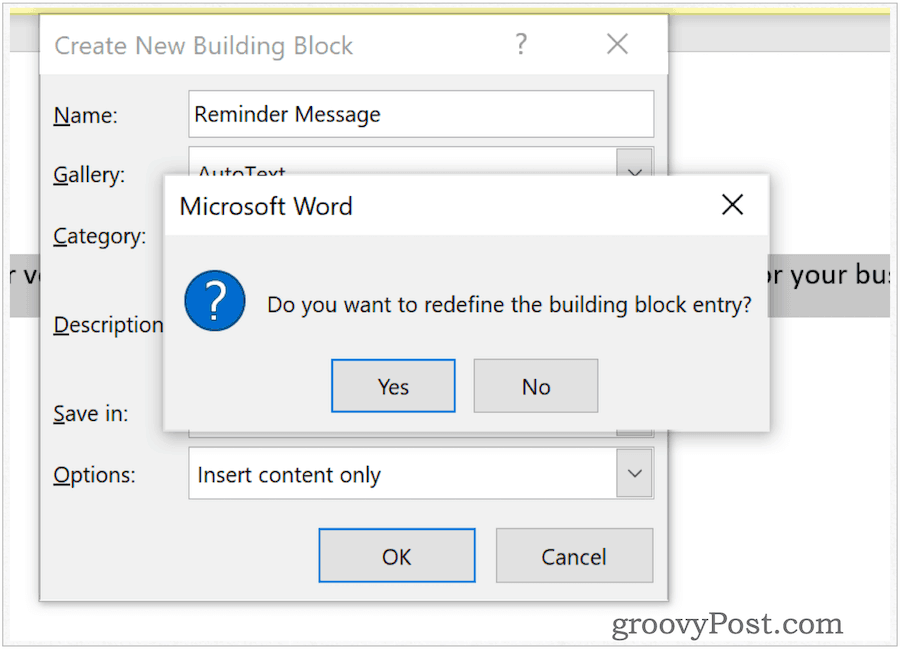
Adjust the Content of a Quick Part
You can change the content of a Quick Part by overriding it:
- Have your cursor in the correct spot in Microsoft Word.
- Under the Insert tab, click Quick Parts.
- Choose the Building Blocks Organizer.
- Click Name to sort by name.
- Highlight the building block you wish to change.
- Click Insert.
- Change the content of y0ur building block.
- Highlight the revised text.
- Click Quick Parts under the Inset tab, Text group in Microsoft Word.
- Choose Save Selection to Quick Part Gallery.
- Use the same name as the previously saved Quick Part.
- Click OK to save.
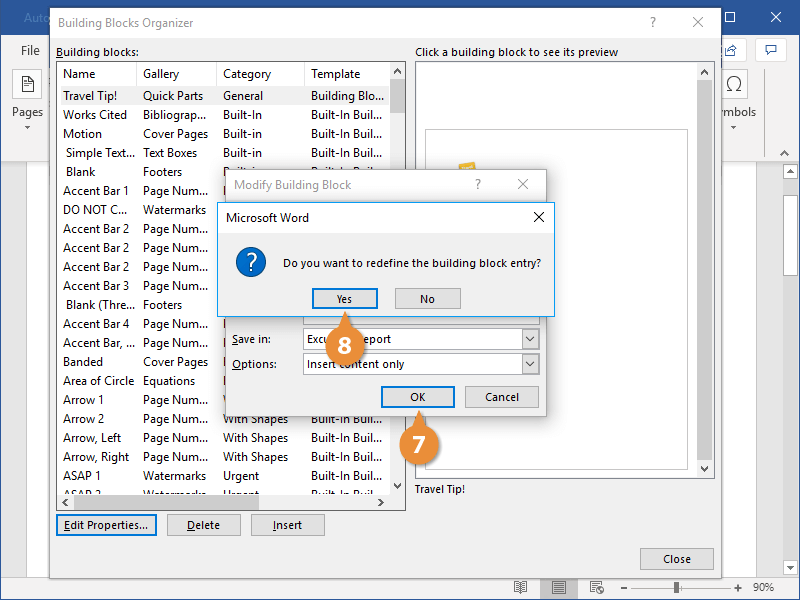
- Choose Yes to the message indicating whether you wish to change the building block.
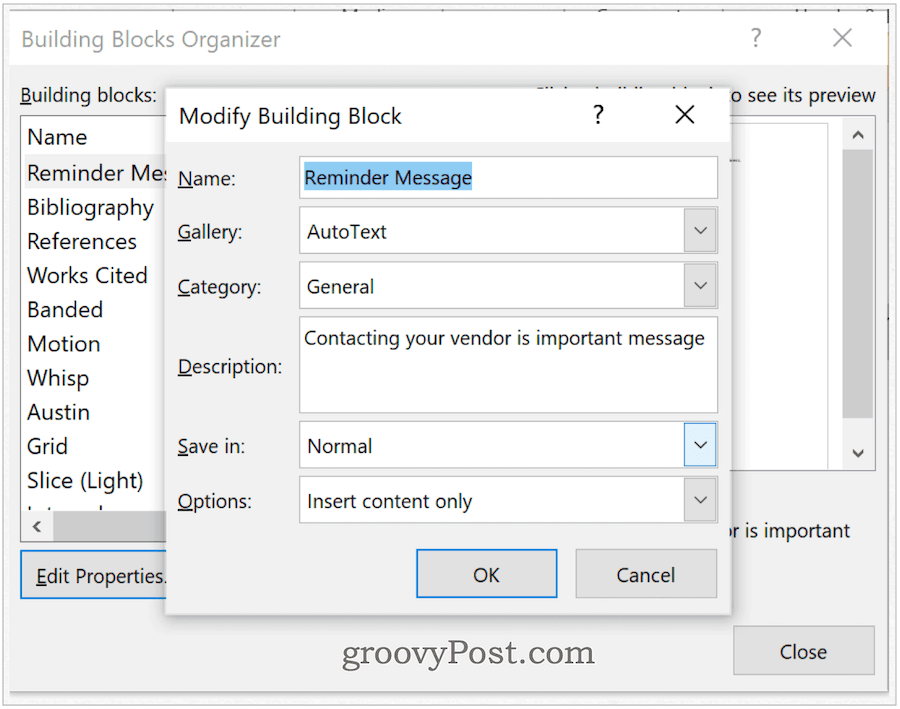
Renaming Quick Parts
At any time, you can change the name of Quick Parts. To do so:
- Under the Insert tab, click Quick Parts in Microsoft Word.
- Choose the Building Blocks Organizer.
- Click Name to sort by name.
- Highlight the building block you wish to change.
- Click Edit Properties.
- In the Name box, change the name.
- Select OK to save.
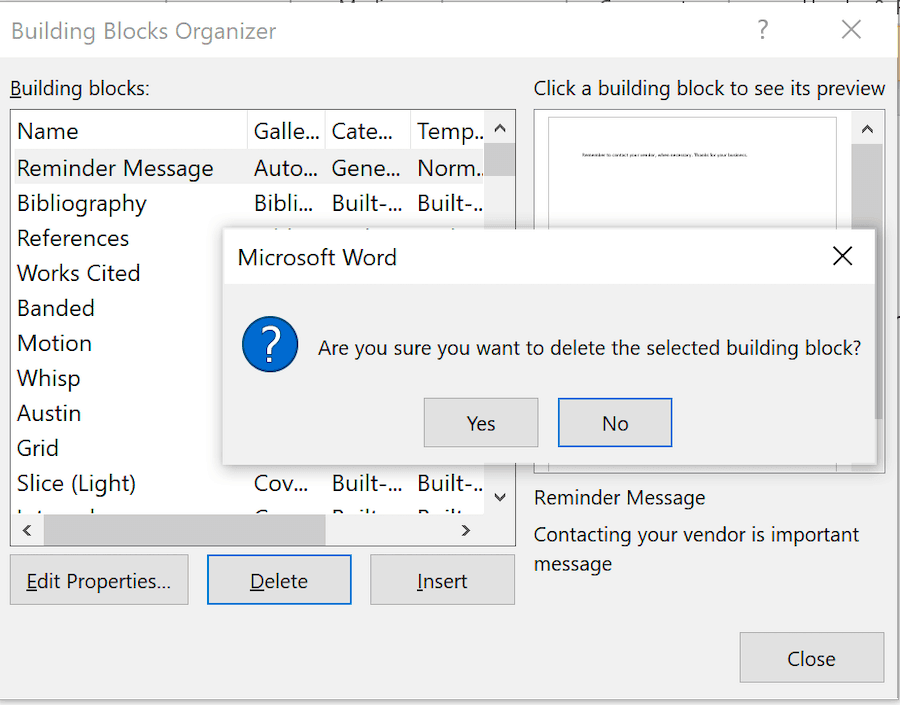
Deleting Quick Parts
To remove Quick Parts from Microsoft Word:
- Under the Insert tab, click Quick Parts in Microsoft Word.
- Choose the Building Blocks Organizer.
- Click Name to sort by name.
- Highlight the building block you wish to delete.
- Choose Delete.
- Select OK to confirm the deletion.
Using building blocks in Microsoft Word is a fairly straightforward process. Using these, you can quickly add text to your documents. These blocks are either pre-designed or customized. Use them to make your Microsoft Word experience more efficient.
![]()
Building blocks are pieces of reusable text, graphics, and objects that you can easily insert in your documents. They can be as simple as an opening line to a paragraph, or as complex as an entire cover page.
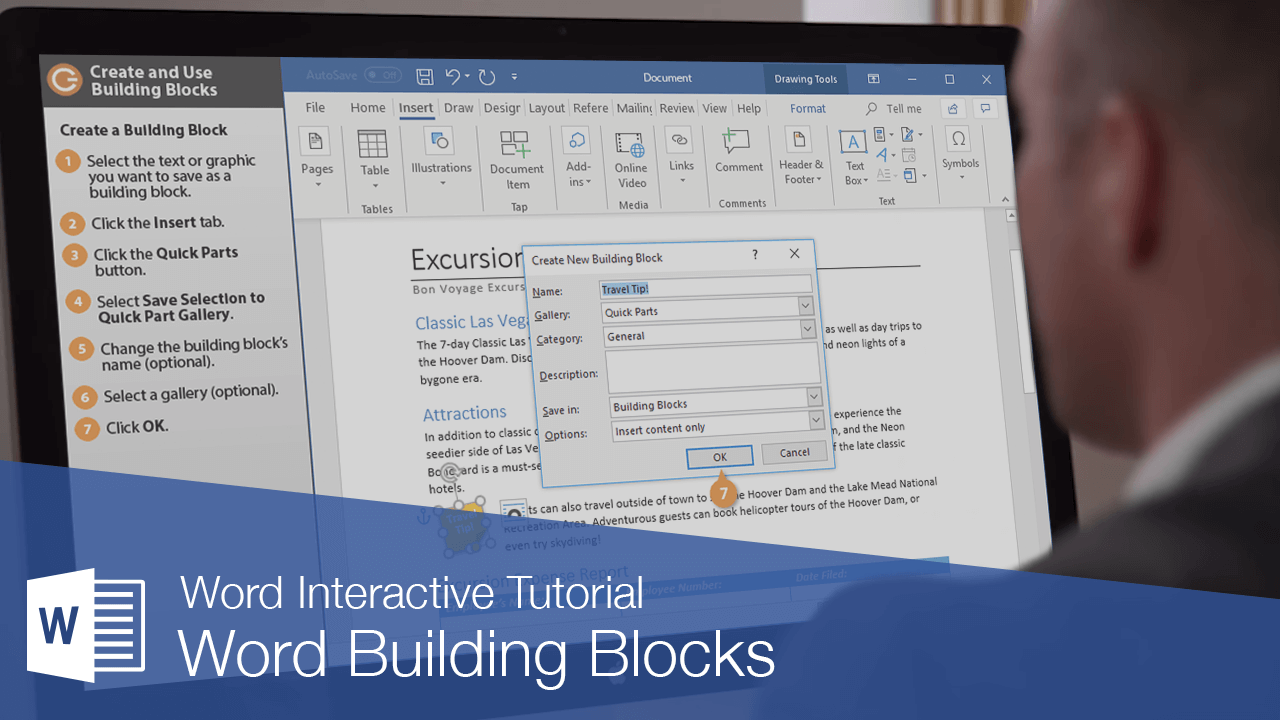
Create a Building Block
- Select the text or graphic you want to save as a building block.
- Click the Insert tab.
- Click the Quick Parts button.
- Select Save Selection to Quick Part Gallery.
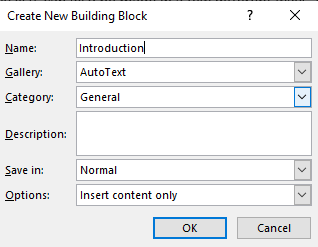
The Create New Building Block dialog box opens, where you can give the building block a name, category, and description.

- (Optional) Change the building block’s name, category, and description.
If the building block you’re creating is a cover page, page number, header, footer, quick table, or watermark, you can add it to one of those existing galleries. Otherwise, you can specify Quick Parts so that it will appear in the Quick Parts gallery.
- (Optional) Select a gallery.
- Click OK.
The building block is added to the selected gallery.
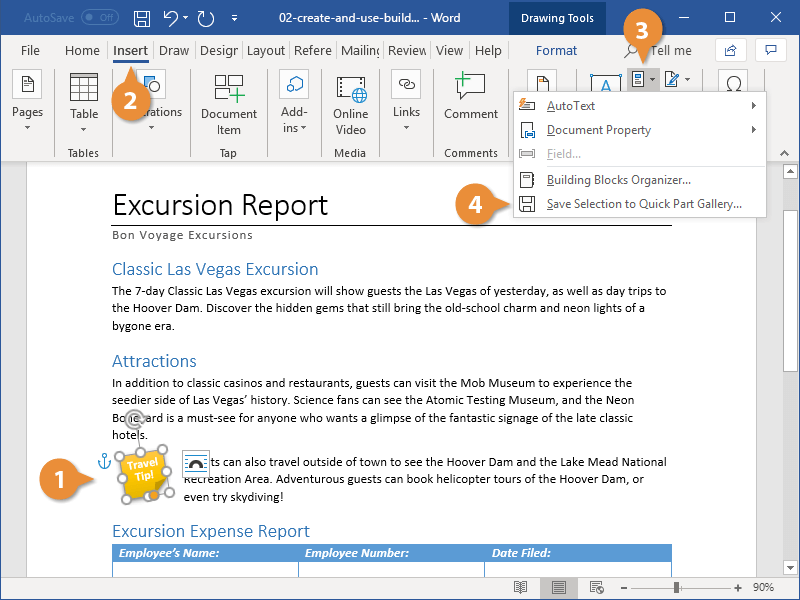
Insert a Building Block
Building blocks that you’ve added to certain galleries, such as the cover page, page number, or watermark galleries, will be available when you open those galleries.
If you want to see all the building blocks in one place, no matter which gallery you added them to, you can browse the Building Blocks Organizer.
- Click the Quick Parts button on the Insert tab.
The Quick Parts gallery will display the building blocks that you’ve added to that gallery. If the building block you want to insert is here, you can just select it.
- Select Building Blocks Organizer.
The Building Blocks Organizer window opens, listing all the building blocks available to insert.
- Sort the building blocks by name, gallery, or category by clicking the column headers.
- Select a building block.
A preview of the building block appears on the right side of the window, with its name and description below.
- Click Insert.
The building block is inserted.
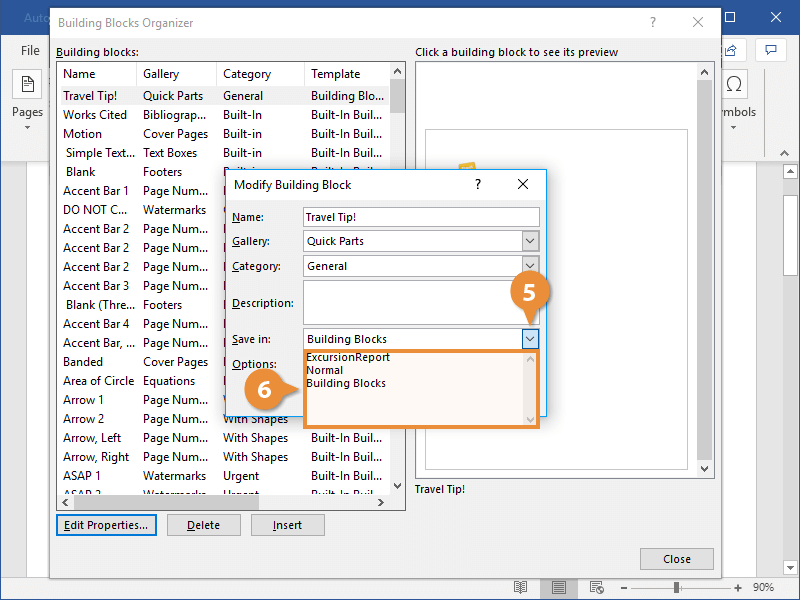
Move a Building Block to Another Template
When you create a building block, it’s saved as part of a special Building Blocks template. Anything saved in this template will be available in any document you work on, from the computer it was created on. If you’ll only need a certain building block in documents based off one template, or if you want to distribute a building block with that template, you can save a building block to another template instead.
- Click the Quick Parts button on the Insert tab.
- Select the Building Blocks Organizer.
As you can see in the Template column, building blocks can be stored in either document templates, or a special Building Blocks template.
- Select a building block that you want to move.
- Click the Edit Properties button.
The Modify Building Block window opens, where you can edit the same properties that are available when you first create a building block.
- Click the Save In list arrow.
This list displays the Building Blocks template, as well as the template or templates that the current document is based on.
- Select a template.
- Click OK.
- Click Yes.

The building block is moved to the selected template.

FREE Quick Reference
Click to Download
Free to distribute with our compliments; we hope you will consider our paid training.
Building blocks in Microsoft Word are pre-designed and customized blocks of text and formatting.These pre-designed and customized blocks of text and formatting techniques make it easier to insert content, including text and graphics, thereby cutting down on typing.
Contents
- 1 How do you create a building block in Word?
- 2 What are some common building blocks in Word?
- 3 What is a building block content control in Word?
- 4 What is the basic building blocks of a document?
- 5 What are the benefits of building blocks in Word?
- 6 How do I create a building block?
- 7 What is block building?
- 8 What are the five building block categories?
- 9 How do you remove building blocks in Word?
- 10 Where are building blocks stored in Word?
- 11 What is the difference between building blocks and quick parts?
- 12 What is building block signature?
- 13 Why is block area important?
- 14 What does save as building block mean?
- 15 What is word building?
- 16 How do you make a text block?
- 17 What is the first step to create an AutoText building block?
- 18 How do you create a building block in Excel?
- 19 What is the building block of sentence?
- 20 What are the uses of blocks?
How do you create a building block in Word?
How to Create and Use Building Blocks in Word
- Select the text or graphic you want to save as a building block.
- Click the Insert tab.
- Click the Quick Parts button.
- Select Save Selection to Quick Part Gallery.
- (Optional) Change the building block’s name, category, and description.
- (Optional) Select a gallery.
- Click OK.
What are some common building blocks in Word?
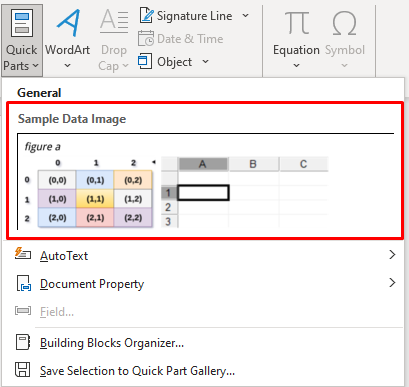
Using Building Blocks, you can quickly customize common documents. You might be surprised at what Word considers a Building Block — headers, footers, watermarks, equations, page numbers, and text boxes are all Building Blocks now. Figure A shows just one of Word’s Building Block galleries.
What is a building block content control in Word?
A document building block is a predesigned piece of content, such as a cover page or a header or footer. Word includes a library of document building blocks that users can choose from to insert into a document.
What is the basic building blocks of a document?
Building blocks are saved objects or elements that you insert into a document, such as text, logos, tables or images, for example. The Building Blocks Organiser, which acts like is like a library of these stored building blocks that you can select and then paste into your document as needed.
What are the benefits of building blocks in Word?
Instead of having to retype or insert the same information over and over, you can save these elements as building blocks. You can then easily insert the building block into your document as required. Building blocks streamline the process of building documents and save time.
How do I create a building block?
On the Insert tab, in the Text group, click Quick Parts, and then click Save Selection to Quick Part Gallery. In the Create New Building Block dialog box, type the original name, category, and gallery for the building block entry, and then click OK.
Definition of building block
: a unit of construction or composition especially : something essential on which a larger entity is based. Synonyms & Antonyms Example Sentences Learn More About building block.
What are the five building block categories?
The different frameworks and tools available to impact investors can be classified into five broad categories: objectives, standards, certifications, methodologies and metrics. These building blocks come into play at different stages of the impact management process.
How do you remove building blocks in Word?
To delete a building block, follow these steps:
- From the Insert tab, choose Quick Parts, Building Blocks Organizer. The Building Blocks Organizer dialog box appears.
- Click the item to delete.
- Click the Delete button.
- When you are finished deleting blocks, click Close.
Where are building blocks stored in Word?
templates
Building blocks are stored in templates. By default, the templates that are included with Word have building block categories like “General” and “Built-In”.
What is the difference between building blocks and quick parts?
Quick Parts is an item (button) on the Insert tab. It opens a menu that includes AutoText, fields, and document properties. The menu also includes the Building Blocks Organizer but no building blocks per se (though AutoText is a type of building block).
What is building block signature?
In Word, Building Blocks are simply pre-defined objects – including images and text – that you can save and subsequently recall in any document.When you store content as a Quick Part, you can recall it and insert it into your document very quickly.
Why is block area important?
Development in all areas.
Blocks enhance children’s problem-solving abilities, mathematics skills, and language and literacy abilities. And constructing “creations” builds selfesteem and feelings of success.
What does save as building block mean?
Building blocks are reusable pieces of content like business information, headings, calendars, borders, and advertisements that are stored in galleries. You can access and reuse the building blocks at any time.
What is word building?
Definition of word-building
: the act or process of forming words: a : word-formation. b : the act or process of spelling out words (as in a contest) with the use of only those letters found in a particular word or phrase.
How do you make a text block?
To create a block of text:
- Click the Text tool from the Basic palette, and select Horizontal from the Tool bar.
- From the Tool bar, set the Tight Fill mode and Text Style.
- Click and drag to create a text box of the approximate width needed.
- Enter the text.
- When the text block is complete, press the Esc key.
What is the first step to create an AutoText building block?
Follow these directions:
- Type the text you want to stick into an AutoText building block. For example, your name, street name, business, or any text you regularly type.
- Select the text.
- Click the Insert tab.
- In the Text group, click the Quick Parts button.
- Choose AutoText → Save Selection to AutoText Gallery.
- Click OK.
How do you create a building block in Excel?
In MS Word 365 there is an option to save a string to a “building block”. The procedure is to select the string and press ALT-F3. You are presented with a “CREATE NEW BUILDING BLOCK” dialog box containing the selected string and an option to “OK”.
What is the building block of sentence?
Clauses are the true building blocks of any sentence, and sometimes they form complete sentences on their own. Every sentence has at least one clause in it, but not every clause forms a complete sentence. Each clause contains a subject and a predicate (verb or verb phrase) of its own, and sometimes other modifiers.
What are the uses of blocks?
They are now used for a wide variety of purposes such as the construction of load-bearing walls, retaining walls, partitions and foundations. A standard block is 440 mm x 215 mm, the equivalent of 3 bricks high and 2 long, the maximum size that one person can comfortably lift.
When using Microsoft Word, there will be times you want to re-use a certain picture or text in different documents. There is a handy tool where you can save the content you want to re-use. This is known as a Quick Part or Building Block in word.
What are Quick Parts and Building Blocks?
Quick Parts is a feature in Word that lots you create, store and reuse pieces of content. These Quick Parts are also known as Building Blocks.
Word Building Blocks can be pieces of reusable text, images or objects that you can freely reuse in your documents. They can be made up of anything, all the way from a simple line of text to entire cover pages made of text and images. If you want to learn more about how to format your text using the ruler and paragraph tools, read our guide.
Therefore you won’t have to search and insert the same picture or type out the same text every time you want to use it. The Building Block will keep it ready for you.
This guide was written using Office365, but Building Blocks have been in Microsoft Word since Word 2007. The instructions will be the same, but the pictures will not match up with older versions.
This is how you can create a Building Block with text.
First you need to select the content you want to save, then go to the ‘Insert’ tab and under the ‘Text’ group, click the ‘Quick Parts’.
Then go to ‘AutoText’ and click on ‘Save Selection to AutoText Gallery’
Now the “Create New Building Block” dialog box will pop up. Here you can Name your building block, put in a Description and there are also other options you can change if you want to. Once you have done that then just click ‘OK’.
Go back to this QuickParts menu in the Insert Tab to create as many building blocks as you want.
To find your new Building Block just go back to ‘AutoText’ under ‘Quick Parts’ and it will be there for you to select quickly next time you want to use it.
Remember to use Save Selection to AutoText Gallery for text!
Image Building Blocks
If you want to save a picture or any other content then what you need to do is select the picture and then go to ‘Quick Parts’ under the ‘Insert’ tab in the ‘Text’ group.
This time you need to click on ‘Save Selection to Quick Part Gallery’
Then you can Name, Describe and change any options that you want to. Here it may be more important for you to choose which gallery you want to save the building block in. Here I have just used the General category, but you can create a new category for your image too! Once you have done this click ‘OK’

Now your image will be found in the Quick Parts Gallery.
Remember to use Save Selection to Quick Part Gallery for images!
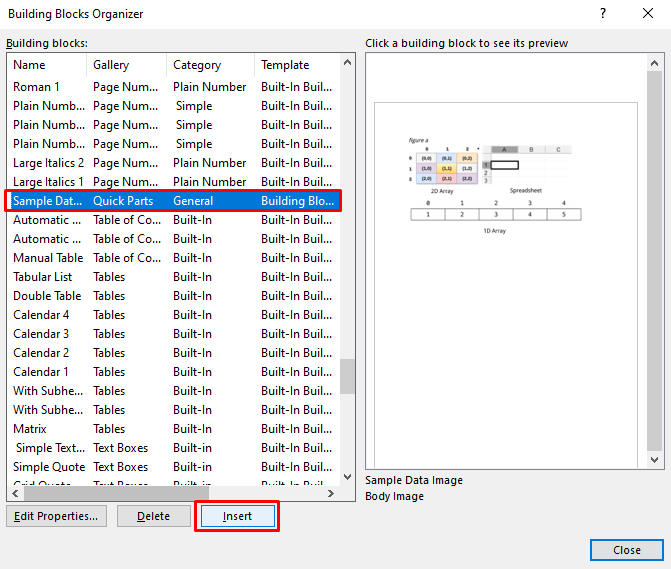
Building Blocks Organizer
To find your new picture Building Block you need to go to ‘Quick Parts’ and click on ‘Building Blocks Organizer’. This is where all existing Building Blocks are found.
Then you need to find the section you saved your building block in within the Building Blocks Organizer. This is where the category will come in handy. Your Building Block can also be found by navigating to the Building Blocks Template in the final field.
Once you have found your Building Block content, select it and click ‘Insert’. This will insert the Building Block to your current page!
Once you’ve created some building blocks, you can begin using them, which is described next.
Inserting a Building Block into Your Document
Inserting a building block is as simple as selecting it from the applicable menu. For example, if you save a cover page to the Cover Pages gallery, it will appear on the Insert > Cover Pages drop-down menu. You can also insert them from the Building Block Organizer, discussed next.
Managing Your Building Blocks
Word provides a screen for:
- Editing building block properties;
- Deleting building blocks;
- Viewing a preview of the building block; and
- Inserting a building block.
The columns on the Building Blocks Organizer are sortable so that you can easily find blocks based on name, gallery, category, template, or description.
To access the Building Blocks Organizer:
1. Click the INSERT ribbon.
2. Click the Quick Parts drop-down and select Building Blocks Organizer.
What you’ve learned so far is enough to dramatically increase your productivity but you can take it even further. So, let’s take a look at how you can build your own ribbon so you can organize your building blocks under menus that you define.
Building a Custom Ribbon
If you have a lot of building blocks, you may want to consider configuring a custom ribbon to make them easily accessible. For example, the screenshot below shows the custom ribbon that I created for KL&A’s proposal team. The first five options correlate to the Custom 1-5 galleries that I mentioned earlier; I’ve just renamed them to something meaningful for my team. That is, the Project Write-Ups option is actually the Custom 1 gallery and the Processes & Methods option is the Custom 2 gallery, and so on.
After you’ve created a custom ribbon, you can distribute the configuration and building block files to others in your organization so they too will have access to your library of assets.
To create a custom ribbon for your building blocks:
1. Select File > Options.
2. On the Word Options dialog:
a. Select Customize Ribbon from the pane on the left.
b. Under the Customize the Ribbon controls on the right, select the ribbon name after which you want to insert the new ribbon and then click the New Tab button. A new tab containing one group will be created.
c. Right-click on a tab or group name to rename the tab and group.
d. Use the New Group button to add groups to the ribbon. This places all the commands into a block on the ribbon that is labelled with the group name.
e. In the Choose commands from field above the left box, choose All Commands. Then select the commands you want to add to the custom ribbon and click Add. If you saved building blocks in the Custom Galleries 1-5, you will likely want to add them to your ribbon and rename them to match your categorization of content.
The screenshot above shows KL&A’s configuration for our proposal assets custom ribbon. The items under the Text (Custom) group are the renamed Custom Galleries 1-5.
The Objects and Layouts group contains an option called Graphics. This is actually the renamed Custom Text Box gallery to which I save all commonly used graphics.
To make creating and managing building blocks easier, I’ve also added Word’s building blocks commands to the ribbon under the Building Blocks Controls group.
Finally, I’ve added a couple of macros to the ribbon for formatting pictures, but that’s beyond the scope of this post.
After you build this wonderful new ribbon, it’s time to send the ribbon configuration file and the building blocks template file to your team so they can benefit from the fruits of your labor. I’ll explain how to do both these tasks, starting with distributing the building blocks first.
Distributing Building Blocks
In the first topic of this post, I explained that you choose where to store your building blocks when you are creating them. I also recommended creating your own template file (dotx) for this purpose with some sort of version identifier in the file name so that your users can easily determine if they have the latest. For example, I append the file name with a date indicator—BuildingBlocks20191014.dotx. I also explained that placing this file in Word’s STARTUP folder automatically loads it when you start Word. This ensures that your building blocks are available without having to find and open the building blocks template each time you want to use them and it makes them easily distributable.
After adding new building blocks or updating your existing building blocks, you can distribute the file in whatever fashion works best for your organization, such as email or posting to a shared drive. Simply copy the file, which is in your Word STARTUP folder and then email it or post it to your shared location.
Note: There may be other ways to automate distribution, such as creating a script that automatically downloads the latest building blocks whenever a user logs into the network. Talk to your IT department for help with something like this.
There is a caveat to this process. It demands that only one person at a time make revisions to the building blocks file. Be sure to define a process and protocols around who can revise the building blocks file, when, and how they will distribute the file once updates are made. Also, include a process for requesting building block updates. While this is a bit restrictive, it will not prevent users from using the blocks. They can plug in a building block and then edit the content. It’s just the process of writing the edits back to the library that needs to be managed.
If you’ve designed a custom ribbon for your building blocks, you can also export the configuration and distribute it to your authors so that they can quickly and easily enable the ribbon in their environments.
Sharing the Custom Ribbon Configuration
Rather than each author going through the steps of configuring the same custom ribbon, you can export your configuration which can then be imported by the other authors. Please note that if they’ve made other configuration changes, those changes may be overwritten when importing the new settings.
To import or export Word configuration:
1. Select File > Options.
2. On the Word Options dialog:
a. Click Customize Ribbon in the pane on the left.
b. Use the Import/Export button. The default name of the exported file is Word Customizations.exportedUI.
3. Email the exported file or place it in a shared location for your authors to download.
The recipients of the file will follow the same steps to import the configuration file.
Build Documents Faster than Ever Before
Now that you know how to create, manage, and insert building blocks, you can build a library of content assets for you and your team that will reduce or even eliminate redundant content creation and further the mission of consistency.
You also now know how to maximize these benefits with a custom ribbon that makes building block usage easy and intuitive for even the most novice Word users. Heck, you can even build ribbons and assets for different purposes. For example, you could create an engineering ribbon with design-focused assets, a project management ribbon with PM-related assets, and a proposal ribbon with marketing assets.
Finally, you can reduce editing time and potential errors related to content reuse by coupling building blocks with custom properties. The powerful combination provides the one-two punch needed to streamline leveraging your content.
Make sure you check out the rest of the Harnessing the Power of Microsoft Word series:
- Getting Started
- Creating & Accessing Templates
- Creating Paragraph & Character Styles
- Building Numbered Styles
- Creating & Managing Custom Properties
- Inserting Dynamic Cross-References
- Using Building Blocks