The Problem:
The genius who flew this desk before me created our sales database in a Word table. It’s huge, it’s ugly, and it doesn’t exactly run like a gazelle. I’m not an Access expert, but I kinda suspect that using a database program might be a better choice than using a word processor. Unfortunately, that means it’s up to me to shunt the Word table into Access.
The Solution:
Unless the table is really ugly, you can probably transfer its contents to Access without too many hairs going gray. Follow these general steps:
-
Delete from the document any text that isn’t in the table. (If this means major changes, use File » Save As to save a copy of the document under a different name, and then work on the copy.)
-
Make sure the table has a heading row that identifies the fields. If not, add a heading row: click in the first row, choose Table » Insert » Rows Above, format the new row differently from the other rows (for example, make the text bold and larger), and type the field names in it.
-
Check that no cell in the table contains two or more paragraphs. If any does, rearrange the table to eliminate the extra paragraphs. (For example, if an address cell contains two lines, you might split it into two separate cells.) The easiest way to check is to select the table (choose Table » Select » Table), press Ctrl+F, and search for
^p(the code for a paragraph mark). -
Click in the table, choose Table » Convert » Table to Text, select the Tabs option, and click the OK button.
-
Choose File » Save As, select Text Only in the «Save as type» drop-down list, and save the document as a text file.
-
Launch Access (or switch to it), open the database (or create a new database), right-click an empty space in the Tables list, and choose Import from the shortcut menu.
-
Select Text Files in the «Files of type» drop-down list.
-
Select the Word document you saved as a text file, click the OK button, and follow the steps in the Import Text Wizard.
Move Data from an Access Table to a Word Document
The Problem:
I need to use some data from an Access table in a Word document. I’ve tried selecting rows and then copying and pasting the data, but I don’t usually want full rows, and Word seems to give me different formatting each time I paste data from Access, anyway.
The Solution:
For more consistent results, export the entire table in a format that Word can read easily, open the resulting file in Word, and copy the parts you need to your document.
To export from Access, open the table, choose File » Export and select the appropriate format in the «Save as type» drop-down list: Rich Text Format if you want all the formatting in the Access table, or Microsoft Word Merge if you want only the text without any formatting. The former creates an actual table in the document, while the latter creates tab-delimited text that you can easily convert back into a table using Word’s Table » Convert » Text to Table command.
In Word, choose File » Open, select Rich Text Format or Text Files in the «Files of type» drop-down list, and then open the file you saved. Copy the appropriate parts of the table or text, and paste them into the Word document that needs them.
by updated Aug 01, 2016
Contact us
Solutions overview
-
By business application
-
By industry
-
By regulation
Serving all industries around the globe
Loftware’s combined platform–whether for labeling, artwork management or both – enables customers to uniquely meet regulatory mandates, mitigate risk, reduce complexity, ensure traceability, improve time to market and optimize costs as they meet customer-specific, brand, regional and regulatory requirements with unprecedented speed and agility.
-
End-to-end solutions
I am doing some research on minerals for a book. I will eventually need to track about two thousand minerals. This is currently done by a ~800 line Word table where each line more or less looks like this picture
The functionality I need is (a) to be able to sort the table on any set of columns (b) see the visual thumbnail for each line (c) but maintain a full resolution copy of the image (d) and be able to click on any active links in the table entry.
Currently the Word file is ~600MB in size and Word (Office 365 version) is clearly beginning to creak at the seams (the autosave no longer works, for example, and sometimes I am unable to select anything in the document.)
I currently run a python program that reads the Word file and produces a .pdf file because the output I need is to map each line of the table to one output page, with picture, notes, and other attributes appropriately scaled and positioned. The .pdf file is about ~2GB in size, so I run it through a .pdf file shrinker afterwards and get a reasonable ~200MB final output.
So my question is, is there a better way to do this? I did take a quick look at Access, and was unable to figure out how to get it to handle the pictures.
I can’t really split the Word file in two because I’d lose the sort functionality. While it’s true that once the table is finished, I would not need to sort it any more, I am continuing to add entries to the table still and the sorting allows me to check for several different error types.
So, is there a flag I can set in Word to allow «large» files safely? If so, then is there a way to have the same functionality but have one mineral per page, nicely formatted with appropriate styles? If not, should I switch to some other document software? (Note: I originally had this in Google Docs but that doesn’t offer the Sort functionality. Add-ons kind of offered sort but each one broke in one way or another on a much smaller table.)
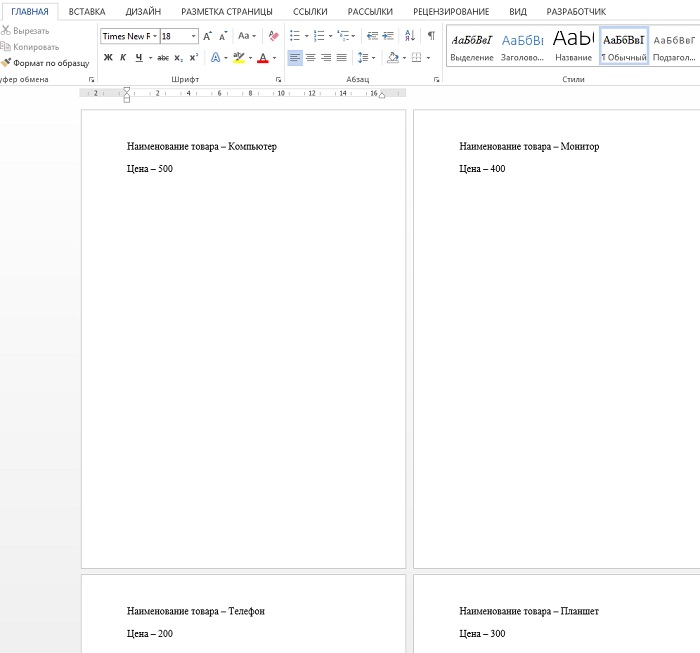
Сейчас мы с Вами рассмотрим пример реализации того, как можно выполнить слияние данных Word с данными Microsoft SQL Server, при этом данный процесс будет автоматизирован средствами VBA Access 2003.
Многие, наверное, уже умеют осуществлять слияние документов Word, например, с источником данных Excel или с тем же SQL сервером, но не все знают, как можно автоматизировать данный процесс или внедрить его в какую-нибудь программу.
Однажды у меня встала задача автоматизировать слияние некого шаблона Word с данными расположенными на SQL сервере, при этом все это необходимо было внедрить в программу, разработанную в Access 2003 (ADP проект). И сегодня я покажу пример решения данной задачи.
Содержание
- Исходные данные
- Создаем файл подключения к источнику данных MS SQL Server
- Создаем шаблон Word для слияния
- Код VBA Access 2003 для слияния документа Word с источником данных MS SQL Server
Исходные данные
И для начала давайте разберем исходные данные, т.е. что мы имеем.
Итак, в качестве клиента, как я уже сказал, у нас будет выступать ADP проект Access 2003. В качестве источника данных для примера будет выступать SQL Server 2012 Express. На компьютере установлен Microsoft Office 2013 (и Access 2003).
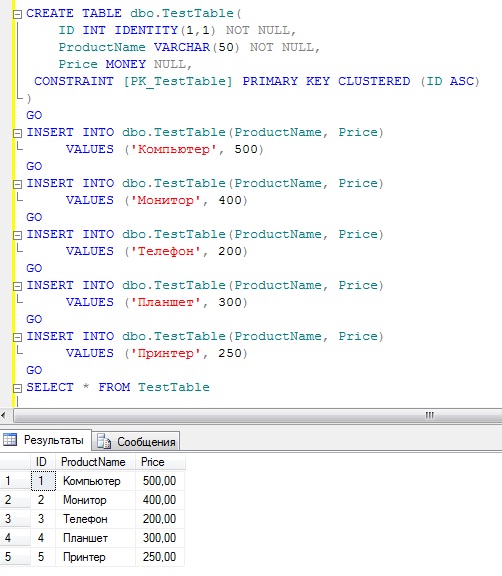
Создадим на сервере тестовую таблицу и заполним ее данными (допустим в базе данных Test). Для этого Вы можете запустить следующую SQL инструкцию.
Заметка! Начинающим программистам рекомендую почитать книгу «SQL код», с помощью которой Вы научитесь работать с языком SQL во всех популярных системах управления базами данных.
   CREATE TABLE dbo.TestTable(
        ID INT IDENTITY(1,1) NOT NULL,
        ProductName VARCHAR(50) NOT NULL,
        Price MONEY NULL,
   CONSTRAINT [PK_TestTable] PRIMARY KEY CLUSTERED (ID ASC)
   )
   GO
   INSERT INTO dbo.TestTable(ProductName, Price)
     VALUES ('Компьютер', 500)
   GO
   INSERT INTO dbo.TestTable(ProductName, Price)
     VALUES ('Монитор', 400)
   GO
   INSERT INTO dbo.TestTable(ProductName, Price)
     VALUES ('Телефон', 200)
   GO
   INSERT INTO dbo.TestTable(ProductName, Price)
     VALUES ('Планшет', 300)
   GO
   INSERT INTO dbo.TestTable(ProductName, Price)
     VALUES ('Принтер', 250)
   GO
   SELECT * FROM TestTable
Заметка! Если Вы не знаете, что делает вышеуказанная инструкция, рекомендую посмотреть мой видеокурс «T-SQL. Путь программиста от новичка к профессионалу. Уровень 1 – Новичок», который предназначен для начинающих. В нем подробно рассмотрены все базовые конструкции языка SQL, включая все вышеперечисленные.
Теперь давайте создадим файл подключения (ODC) к нашему источнику данных. Данный файл будет выступать своего рода «шаблоном файла подключения», так как впоследствии мы можем, и будем переопределять и базу данных и сам SQL запрос.
Для создания файла подключения к SQL серверу давайте откроем Word и стандартным способом создадим данный файл, т.е. с помощью функционала «Рассылки». (Кстати пример создания подключения к SQL серверу из Excel мы с Вами уже рассматривали в материале – Excel — Подключение и получение данных с SQL сервера).
Переходим на вкладку рассылки и в меню «Выбрать получателей» выбираем «Использовать существующий список».
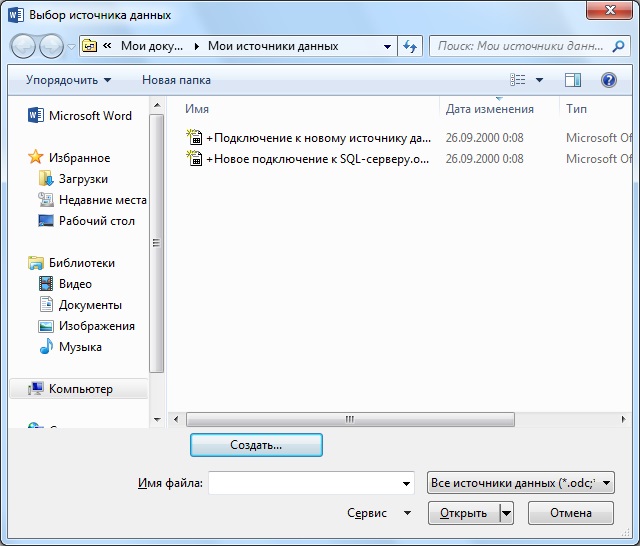
Затем в окне выбора источника данных нажимаем кнопку «Создать».
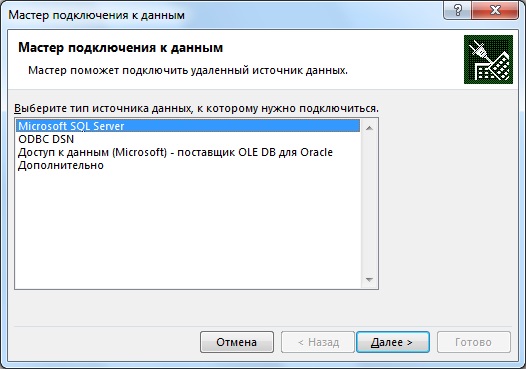
Далее выбираем тип источника данных, т.е. Microsoft SQL Server. Жмем «Далее».

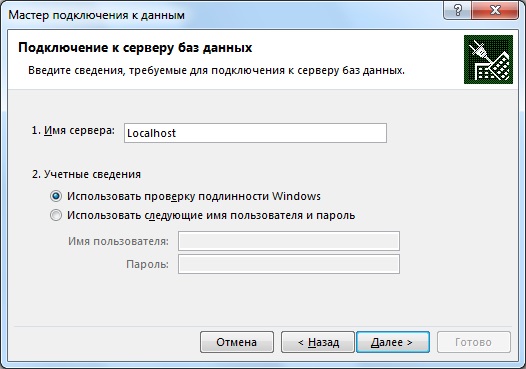
Потом вводим адрес сервера и нажимаем «Далее».
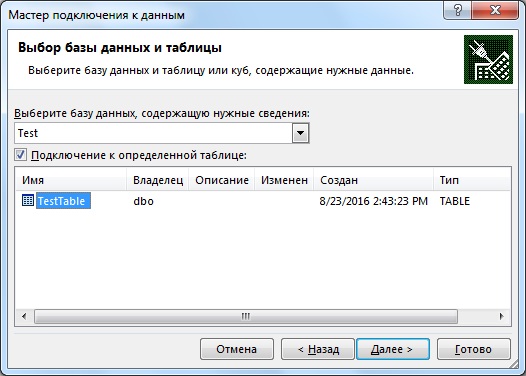
Затем выбираем базу данных и таблицу для подключения, еще раз напомню, это всего лишь шаблон, все эти параметры мы будем переопределять, жмем «Далее».
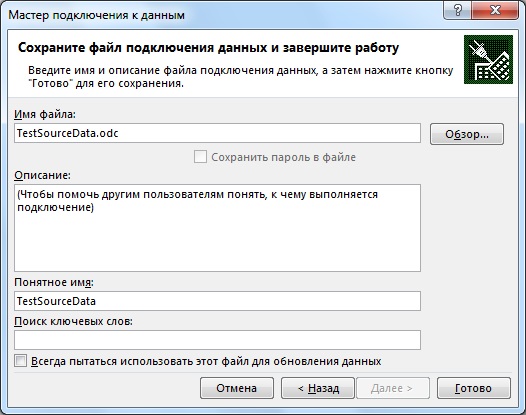
И в заключение вводим понятное название файла подключения, а также мы можем сразу его сохранить в нужный нам каталог путем кнопки «Обзор», по умолчанию он сохраняется в «C:UsersИмя_ПользователяDocumentsМои источники данных». Нажимаем «Готово».
Все, файл создан, Word можем закрыть без сохранения.
Создаем шаблон Word для слияния
Теперь давайте подготовим шаблон Word, т.е. это тот документ, в который мы будем подставлять данные из базы данных SQL сервера.
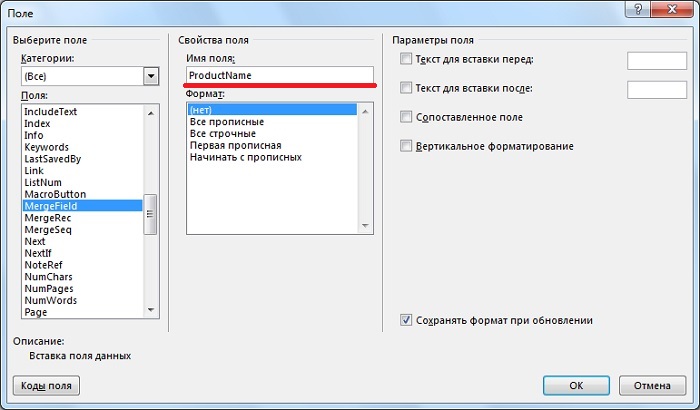
Вся подготовка сводится к тому, что нам необходимо вставить поля слияния там, где это нам нужно. Это делается следующим образом. Вкладка «Вставка -> Экспресс-блоки -> Поле».
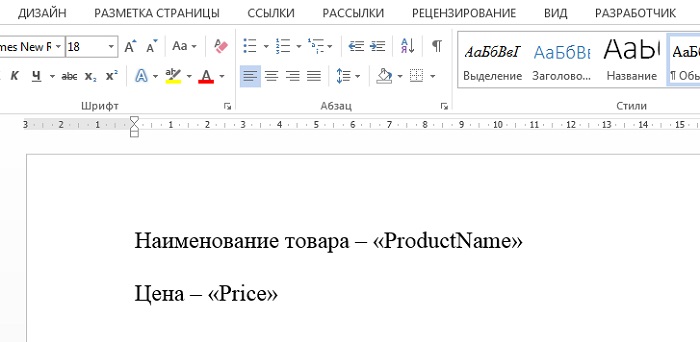
Ищем поле MERGEFIELD и вводим название поля, которое будет соответствовать полю в источнике данных (в моем случае это ProductName и Price). Жмем «ОК».
Так как у меня это тестовый шаблон в нем текста практически не будет, и выводить я буду всего два поля, у Вас скорей всего будет много текста и много полей слияния.
Код VBA Access 2003 для слияния документа Word с источником данных MS SQL Server
Осталось написать код VBA, который будет осуществлять слияние. Для примера давайте добавим на форму кнопку StartMerge и поле Price для фильтрации данных. Затем в редакторе Visual Basic напишем процедуру для слияния, допустим с названием MergeWord, и в обработчик события кнопки StartMerge (нажатие кнопки) вставляем код вызова этой процедуры. Весь код будет выглядеть следующим образом (я его прокомментировал). Сразу поясню, что шаблон Word и файл ODC у меня лежат в каталоге D:Test.
   'Процедура для запуска слияния
   Private Sub MergeWord(TemplateWord As String, QuerySQL As String)
   'Первый параметр - Путь к шаблону Word
   'Второй параметр - Строка запроса к БД
   On Error GoTo Err1
   Dim ConnectString As String, PathOdc As String
   Dim WordApp As Object
   Dim WordDoc As Object
   'Шаблон файла ODC для подключения к данным
   PathOdc = "D:TestTestSourceData.odc"
   If TemplateWord <> "" Then
    'Создаем документ Word
    Set WordDoc = CreateObject("Word.document")
    Set WordDoc = GetObject(TemplateWord)
    Set WordApp = WordDoc.Parent
    'Создаём подключение к источнику данных (MS SQL Server)
    'Некоторые данные берём из текущего подключения ADP проекта
    ConnectString="Provider=SQLOLEDB.1;  " & _
                  "Integrated Security=SSPI;" & _
                  "Persist Security Info=True; " & _
                  "Initial Catalog=" & CurrentProject.Connection.Properties("Initial Catalog") & "; " & _
                  "Data Source=" & CurrentProject.Connection.Properties("Data Source") & "; " & _
                  "Use Procedure for Prepare=1;" & _
                  "Auto Translate=True;" & _
                  "Packet Size=4096;" & _
                  "Use Encryption for Data=False;"
    'Задаем источник данных
    WordDoc.MailMerge.OpenDataSource NAME:=PathOdc, _
                                     Connection:=ConnectString, _
                                     SQLStatement:=QuerySQL
    'Делаем видимым Word
    WordApp.Visible = True
    WordApp.Activate
    'Начинаем слияние
    With WordDoc.MailMerge
                .Destination = wdSendToNewDocument
                .SuppressBlankLines = True
                .Execute Pause:=False
    End With
    'Закрываем шаблон без сохранения
    WordDoc.close (wddonotsavechanges)
    Set WordDoc = Nothing
    Set WordApp = Nothing
   Else
    MsgBox "Не указан шаблон для слияния", vbCritical, "Ошибка"
   End If
   Ex1:
    Exit Sub
   Err1:
    MsgBox Err.Description
    WordDoc.close (wddonotsavechanges)
    WordApp.Quit
    Set WordDoc = Nothing
    Set WordApp = Nothing
    Resume Ex1
   End Sub

   Private Sub StartMerge_Click()
   Dim Filter As String
   Filter = ""
   'Условие
   If Nz(Me.Price, "") <> "" Then
    Filter = "WHERE Price >= " & Me.Price
   End If
   'Вызов процедуры слияния
   Call MergeWord("D:TestШаблон.docx", "SELECT * FROM ""TestTable"" " & Filter & " ")
   End Sub
Сохраняем и проверяем работу.
После нажатия на кнопку (StartMerge) запустится Word, в котором уже все данные заполнены и документов будет столько, сколько строк в источнике.
Как видим, все работает. На этом у меня все, надеюсь, материал был полезен. Пока!
- Download source code — 126 KB
- Download documentation — 757 KB
Introduction
Office Business Applications (OBA) can be a powerful way to surface data for your users. Because nearly every worker uses Microsoft Office, your users are already familiar with the user interface. But how do you bring the data from your line of business (LOB) application into Word? In this lab, you will walk through the steps to bring data into a Word document and provide a Fluent Ribbon user interface to browse that data.
This lab is in two sequential parts. First, you will bind controls in a Word document to a data source. Next, you will customize the Ribbon with buttons to view the data.
Background
This demo assumes you have the following installed:
- Visual Studio 2008 Beta 2 or later.
- Windows Vista.
- Microsoft Office 2007.
You can use other versions of Visual Studio with Visual Studio Tools for Office installed. But Word Content Controls are a feature of Microsoft Office 2007. This demo will also work on Windows Server 2003 and Windows Server 2008 with minor changes in how you start Visual Studio.
This article assumes you have a database in Access. But you can connect the Word Content Controls to SQL Server or to data objects or Web Services. You can use the database provided in the code or build your own.
While this lab uses C#, you can adapt this lab to Visual Basic .NET with minor changes.
Using the code
Most of this article is about how to drag and drop the controls and how a few lines of code will build a powerful application in Word.
Create a document with controls bound to a database
In this lab, you use the drag and drop functionality to add controls to a Word 2007 template and add simple data binding to a local database.
First, you will create a solution that includes a Visual Studio Tools for Office (VSTO) project. This template will allow your users to customize the Word template by selecting the content of predefined areas, based on the data in the database. While this demo is in C#, you can also use Visual Basic. The objective of this process is to open a Word template within Visual Studio.
- Click Start, type Visual Studio 2008 in the start search textbox, right-click Visual Studio 2008, click Run as administrator
- Click Continue in the User Account Control dialog
- Click the File —> New —> Project… menu
- In the New Project dialog Project types panel, expand Visual C#, expand Office, click 2007
- In the Templates panel, click Word Template
- Set the location to your Visual Studio 2008 project folder, such as C:UsersbruceDocumentsVisual Studio 2008Projects
- Type CCTemplate in the Name textbox
- Check Create directory for Solution
- Click OK
- In the Visual Studio Tools for Office Project Wizard, click OK
- A dialog box appears that asks if you want access to Visual Basic for Applications
- Click OK
The Visual Studio Toolbox contains Word Controls. You can now add controls to the document.
- If the toolbox is not displayed, click View —> Toolbox
- Expand Word Controls
- Click on the document
- Type Company Name followed by a space and drag a
RichTextContentControlfrom the toolbox to the document; press Enter - Type Company Address followed by a space and drag a
RichTextContentControlfrom the toolbox to the document; press Enter - Type Invitation Date followed by a space and drag a
DatePickerControlfrom the toolbox to the document; press Enter - Click the Save disk icon in the document pane
You can adjust the properties of the control.
- Click the
RichTextContentControlthat follows the Company Name text - Press F5 to run your solution
- Click on each of the controls and type some data
- Close the document without saving
You have added controls that when bound to the data browse event handlers, will allow a user to browse a company database.
You can now reference a specific database and bind the controls to that database.
Create a database in Microsoft Office Access. Create a database named CompanyDatabase with a table named CompanyInfo with four columns:
- ID
AutoNumber - CompanyName
Text - CompanyAddress
Text - InvitationDate
DateTime
Enter some data in the database. Save the database in a known location, not necessarily in the project.
Next, you can bind the Word Content Controls to a database, as you will do in this example, or you can bind them to a Web Service or an object.
- Click Data —> Add New Data Source…
- Click Database in the Data Source Configuration Wizard
- Click Next>
- In the Choose Your Connection panel, click New Connection…
- In the Add Connection dialog, set the items as follows:
- Data Source: Microsoft Access Database File (OLE DB)
- Database file name to the location of your Access database
- Click OK
- In the Choose Your Connection panel of the Data Source Configuration Wizard, click Next>
- When asked if you want to add the database to your solution, click Yes
- In the Save the Connection String to the Application Configuration File panel, check Yes, Save the connection as and keep the default connection string; click Next>
- In the Choose Your Database Objects, expand Tables, check CompanyInfo
- Click Finish
Visual Studio automatically creates a dataset, table adapter, and a binding source. You will use these elements to bind your controls to the data and to manipulate the records in the database.
Next, bind the data to the specific controls. Use the DataBinding property in the Properties pane. Click the Text property and select the specific database record you want to associate with the content controls. You can also drag the specific data elements from the DataSources panel and drop them on the control.
- Make the property pane visible by clicking the Properties tab
- Click the
RichTextContentControlnext to the Company Name text in the Properties panel - Expand the (DataBindings) property
- Expand companyInfoBindingSource
- Click CompanyName
- If the Data Sources pane is not visible, click Data —> Show Data Sources
- In the Data Sources pane, expand CompanyDatabaseDataSet
- Expand CompanyInfo
- Click CompanyAddress and drag it to the
RichTextContentControlnext to the Company Address text in the document panel; the cursor will change to a plus and the control will be highlighted when you can drop the data source onto the control - Click Build —> Build Solution
Create data browse buttons for the Word Ribbon
Next, customize the Ribbon in Word with two buttons, a Next and a Previous button, for your user to browse data. Then, you add event handlers to each of the buttons.
The Ribbon Designer includes a visual designer and an extensibility object model. Office callbacks are mapped to the events on the VSTO Ribbon objects, so developers write event handlers instead of callback methods.
- In Solution Explorer, right-click the CCTemplate project. Click Add —> New Item…
- In the Add New Item dialog, click Ribbon (Visual Designer) in the Templates panel
- Type CCRibbon for the Name
- Click Add
You set properties of the ribbon in the Properties pane and drag and drop ribbon controls from the Office Ribbon Controls tab of the toolbox onto the ribbon.
- Click the Properties tab to make the Properties pane visible
- Click TabAddIns (Built-In)
- In the Label property, type Company Info
- Click group1 in the CCRibbon.cs ribbon designer
- In the Label property, type Browse Data
- Expand Office Ribbon Controls in the Toolbox if it isn’t already expanded
- Drag Button from the Toolbox to the Browse Data box
- In the (Name) property, type btnNext
- In the Label property, type Next
- Drag Button from the Toolbox to the Browse Data box
- In the (Name) property, type btnPrevious
- In the Label property, type Previous
You can add icons by creating an icon and adding each one to the Resources.resx file that is part of the solution. Then, set the Image property by importing images from the resource file. Set the ShowImage property to true.
When you double-click the button in the Ribbon Designer, the code view for the Ribbon opens and enables you to add the event handler code. Use the Globals object to access the document to access the binding source for the company database.
- Double-click the Next button.
- Insert this code into the method that is created.
- Double-click the Previous button.
- Insert this code into the method that is created.
Globals.ThisDocument.companyInfoBindingSource.MoveNext();
Globals.ThisDocument.companyInfoBindingSource.MovePrevious();
Now run the solution.
- Press F5
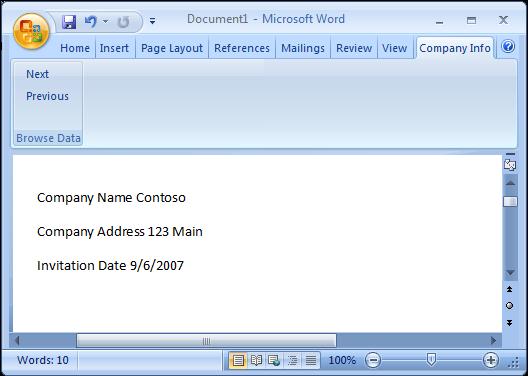
- Click the Company Data tab to view the Ribbon buttons that you created
- Click Next to view the next record
- Click Previous to view the previous record
- Close the document without saving
Points of interest
You can do a lot with Office Business Applications using very little code.
You have seen how you can browse data in a database or Web Service by binding Word 2007 Content Controls to a data source. You also added a panel in the Word Ribbon bar.
Next steps
Next, you’ll want to deploy your document. For more information on the various ways for deployment, see How to: Deploy Office Solutions. You will probably choose the Publish Wizard. For more information on the Publish Wizard, see How to: Deploy Solution Files Using the Publish Wizard.
Conclusion
Special thanks to Steve Fox and Paul Stubbs for their article: Office UI: New VSTO features help you customize Word And Outlook.
Microsoft, Office, Fluent, Word, Access, Windows, Windows Vista, Visual Studio are Microsoft trademarks and registered trademarks.
Bruce is an architect evangelist for Microsoft serving independent software vendors (ISVs) in the Pacific Northwest. In earlier lives he’s worked for Rogue Wave Software, Carnegie Mellon University’s Human Computer Interaction Institute, John Deere, and a couple startups including one that is now part of IBM. Bruce learned programming using punch cards (do not fold, spindle, mutilate, or shuffle). On weekends Bruce often writes code with his son on a project using .NET 3.5 technologies. Bruce lives in Carnation, Washington home to Carnation Dairy which was founded there about 100 years ago.


