
Содержание
- Inserting Excel into Word
- Linking or inserting Excel in Word: What’s the difference?
- How to insert (copy) an Excel file into Word: Step-by-step guide
- How to link (embed) an Excel spreadsheet in Word
- Linking an Excel spreadsheet in Word: Step-by-step instructions
- How to link an Excel spreadsheet in Word: shortcut version
- Linking an Excel spreadsheet in Word: Which changes are transferred?
- How to Link or Embed Excel Files in Word Documents
- In This Article
- What to Know
- How to Link Excel to Word
- What Happens When You Link Excel to Word
- How to Embed an Excel Spreadsheet in Word
- Embed an Excel Worksheet as an Object
- How to Embed an Excel Spreadsheet Table
Inserting Excel into Word
If you use Microsoft Word and Excel a lot, you know that an Excel spreadsheet gives you many more options than a simple table in Word. However, you often want to integrate the Excel spreadsheet into another document such as a Word file. Fortunately, inserting Excel projects into Word is quick and easy. The first step is to decide whether you want to insert the Excel spreadsheet into Word or link the two documents. We’ll explain the difference between these two methods and show how you can easily import and use your Excel projects in Word.
Linking or inserting Excel in Word: What’s the difference?
You can either embed (link) an Excel spreadsheet in Word or simply copy it into Word.
Inserting your Excel spreadsheet into Word using copy and paste is quick and easy. The disadvantage is that if you then want to customize the Excel table later in your Word document, you can only use the commands available in Word.
If you want to continue using Excel functions to edit your table, you should link the Excel worksheet in Word. This way you ensure that changes in your original Excel file are automatically inserted and updated in Word.
Excel with Microsoft 365 and IONOS!
Use Excel to create spreadsheets and organize your data — included in all Microsoft 365 packages!
How to insert (copy) an Excel file into Word: Step-by-step guide
Inserting your Excel spreadsheet into Word using copy and paste is the easiest way to connect the two data sources. Follow these simple steps:
- First, open your Excel worksheet and use your cursor to select the entire spreadsheet or the area that you want to insert into your Word document.
- Copy the selected area either by right-clicking and choosing Copy or by pressing Ctrl + C in Windows or cmd + C in MacOS.
- Open your Word document and position your cursor in the place where you want to insert the Excel table in the slide. Paste the copied area either by right-clicking and choosing Paste or by pressing Ctrl + V in Windows or cmd + V in macOS.
Keyboard shortcuts aren’t called shortcuts for nothing: They really do speed up your work. If you want to improve your workflow, it’s worth learning the most important and popular Word shortcuts and Excel shortcuts.
How to link (embed) an Excel spreadsheet in Word
Embedding an Excel spreadsheet in Word requires a few additional steps. However, by linking directly to your Excel data, any later changes will be automatically updated in the embedded version in the Word document. If you want to embed an Excel worksheet in Word, simply follow our detailed instructions with screenshots, or see the short version further below.
Linking an Excel spreadsheet in Word: Step-by-step instructions
- First, open your Excel file and select the entire worksheet or the area that you want to insert into your Word document.
- Then copy the selected area by right-clicking and choosing Copy or by using the appropriate keyboard shortcut.
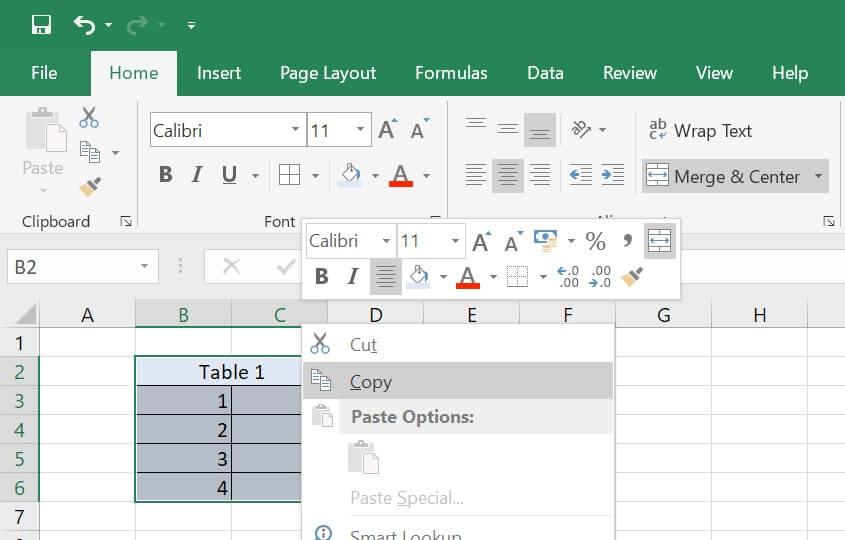
Select and copy the Excel worksheet.
- In the Word document, move the cursor to where you want to insert the Excel spreadsheet. On the Home tab, choose Paste and select Paste Special. . In macOS (Mac), the Paste Special. option is found under Edit:
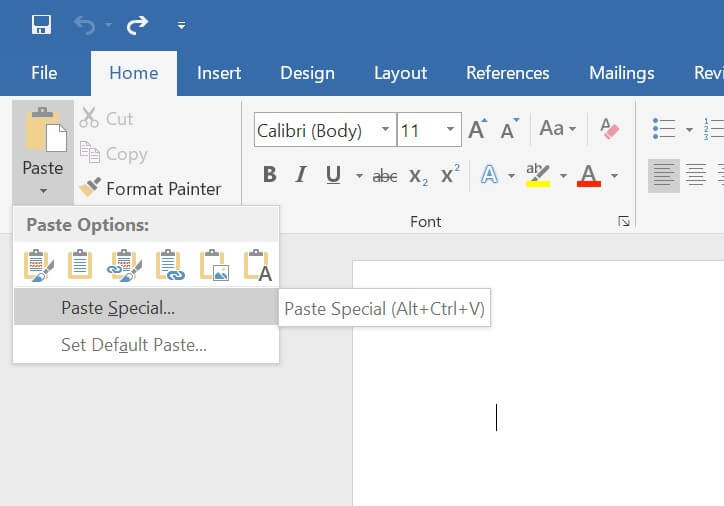
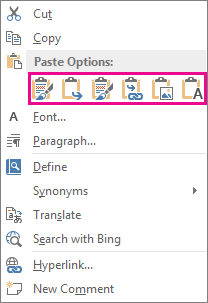
Choose “Paste Special” from the “Paste Options” dropdown menu in Word.
- In the dialog box that appears, select the Paste link option. In the list on the right, select Microsoft Excel Worksheet Object at the top. Confirm your selection by choosing Ok. Your Excel worksheet will now be inserted and linked.
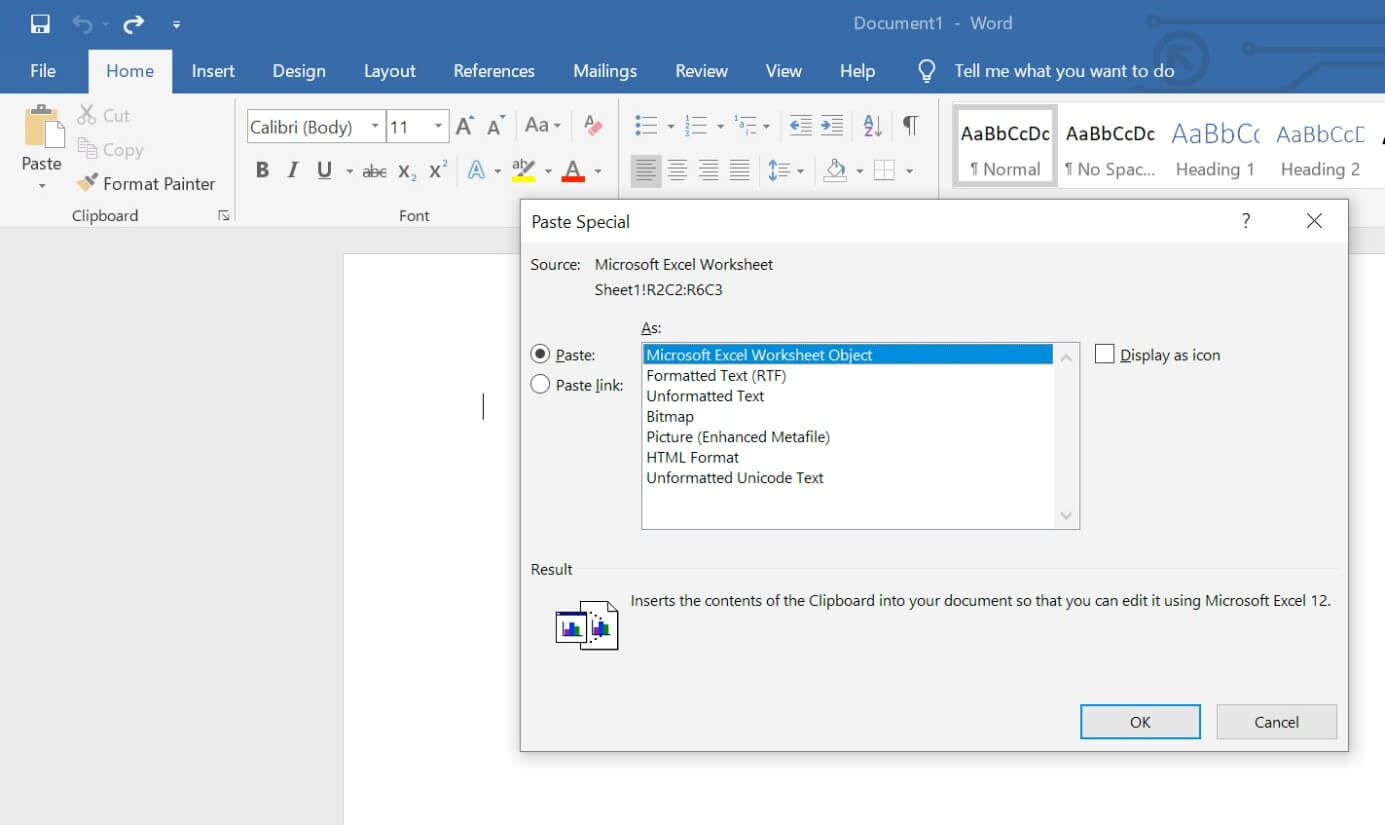
Select “Paste link” and then “Microsoft Excel Worksheet Object”.
How to link an Excel spreadsheet in Word: shortcut version
- Copy your Excel spreadsheet to the clipboard, either by right-clicking and choosing Copy, or by pressing Ctrl + C shortcut in Windows or cmd +C in macOS.
- Place the cursor in the desired location in your Word document. Select Paste Special. from the menu. In Windows, open the Home tab, click Paste and select Paste Special. . On a Mac, choose Paste Special. under Edit.
- In the dialog box, click Paste link and select Microsoft Excel Worksheet Object. Save your changes by choosing Ok.
Linking an Excel spreadsheet in Word: Which changes are transferred?
By linking your Excel spreadsheet in Word, you ensure that changes in your Excel table are automatically transferred to your Word document and displayed there. However, the changes you make to the table in Word are not automatically transferred to the Excel spreadsheet. So always remember to copy these changes to the linked original document. The same applies if you link an Excel table in PowerPoint or insert a Word document into PowerPoint.
- 12.03.21
- Online sales
- Wie gefällt Ihnen der Artikel? 0

There are many Excel functions and formulas that are useful for a wide range of tasks. They can help you make your workflows easier and more efficient. We’ll introduce you to the most important ones here, and you’ll be on your way to being an Excel expert.
In Word, tables prove useful in the most diverse situations, and you have several options for creating them. You can either use the table templates provided by the Microsoft tool, or you can design your own. This enables you to improve your reports, invoices or the performance of household tasks. Even data from Excel can be integrated as a table into a Word file.
In this guide, you’ll learn how to turn spell check on and off in Word. If you want to check your spelling in Word, you can set the application to automatically display misspelled words and grammatical errors. Word can also suggest corrections, which you can accept or ignore. You can show or hide these highlighted errors at any time.
Do you want to show an Excel spreadsheet in your PowerPoint presentation, but don’t know how to insert an Excel file into PowerPoint? Whether you want to create a new Excel spreadsheet in PowerPoint, edit it later or insert it as a picture, the presentation software has a feature for each one of these options. We’ll explain the differences and show you how to proceed, step by step.
If you want to compare data and run analyses, it is often necessary to merge data in Excel. This can quickly get messy though, depending on what kind of contents are in the table. Keep reading our article to find out how to use the Consolidate function as well as the Power Query Editor to successfully merge data in Excel.
Источник
How to Link or Embed Excel Files in Word Documents
Link an Excel file to a Word doc so the doc updates when the Excel data changes
In This Article
Jump to a Section
What to Know
- Link: Copy cells. Right-click Link & Use Destination Styles or Link & Keep Source Formatting in Word.
- Embed: In Word, go to Insert >Object >Object >Create from File >Browse > choose Excel file >OK.
- Embed a spreadsheet table: In Word, go to Insert >Table >Excel Spreadsheet.
This article explains two ways to display Excel data in Word.
Instructions apply to Word for Microsoft 365, Word 2019, Word 2016, Word 2013, Word 2010, Excel for Microsoft 365, Excel 2019, Excel 2016, Excel 2013, and Excel 2010.
How to Link Excel to Word
To insert any part of an Excel worksheet in a Word document:
Maddy Price / Lifewire
Open the Word document where the worksheet will display.
Open the Excel worksheet that contains the data you want to link to the Word document.
In Excel, select and copy the range of cells to include. If you plan to insert more columns or rows into the worksheet, select the entire worksheet.
To select the entire worksheet, select the cell located in the upper-left corner at the juncture of the row numbers and column letters.
In the Word document, position the cursor where you want to insert the linked table.
Right-click and select Link & Use Destination Styles or Link & Keep Source Formatting.
Destination Styles uses the default Word table formatting, which usually results in a better-looking table. Keep Source Formatting uses the formatting from the Excel workbook.
The Excel data pastes directly into the Word document where the cursor was positioned. If changes are made to the source Excel file, the Word document updates with those changes automatically.
What Happens When You Link Excel to Word
Linking an Excel file to a Word document ensures that the Word document is updated every time the data in the Excel file changes. It works as a one-way link feed that brings the updated Excel data into the linked Word document. Linking an Excel worksheet also keeps your Word file small because the data doesn’t save to the Word document.
Linking an Excel worksheet to a Word document has a few limitations:
- If the Excel file moves, the link to the Word document needs to be re-established.
- If you plan to transport the Word file or use it on another computer, you must transport the Excel file along with it.
- You must do data editing in the Excel worksheet. It isn’t a problem unless you require different spreadsheet formats in the Word document.
How to Embed an Excel Spreadsheet in Word
The process of embedding an Excel worksheet in a Word document is essentially the same as linking to an Excel worksheet. It does require a few extra clicks, but it brings all data from the worksheet into your document, not only the selected range.
There are two ways to embed an Excel worksheet in Word. The first is to embed the worksheet as an object. The second is to insert a table.
When you embed a worksheet, Word uses the formatting from the Excel worksheet. Make sure that the data in the worksheet looks the way you want it to appear in the Word document.
Embed an Excel Worksheet as an Object
To embed an Excel worksheet as an object:
Open the Word document.
Go to the Insert tab.
Select Object > Object. In Word 2010, select Insert > Object.
In the Object dialog box, select the Create from File tab.
Select Browse, then choose the Excel worksheet that contains the data you want to embed.
Select OK.
The Excel worksheet is embedded in the Word document.
How to Embed an Excel Spreadsheet Table
An alternative is to insert the Excel worksheet as a table. This method inserts the worksheet the same way as if you embedded it as an object. The difference is that it opens a blank Excel worksheet for you to fill out. Choose this method if you haven’t created the Excel file yet.
To insert an Excel worksheet as a table in Word:
Open a Word document.
Place the cursor where you want to insert the Excel worksheet.
Go to the Insert tab, then select Table.
Select Excel Spreadsheet.
This menu option opens a blank Excel worksheet that you can fill with data. Either enter new data or paste data from another spreadsheet.
When you insert and fill out a new Excel worksheet, you have an Excel file that you can update at any time. The data in the Word table automatically updates to match the data in the Excel file.
In Excel, select the Insert tab > Text > Object > Create from File. Next, select Browse to find the Word file > Insert > OK.
To create labels in Word from an Excel list, open a blank Word document > select Mailings > Start Mail Merge > Labels > choose the brand and product number for the labels. Then, choose Select Recipients > Use an Existing List > navigate to the Excel address list > OK. Add the merge mail fields to complete the merge.
Источник


:max_bytes(150000):strip_icc()/ryanperiansquare-de5f69cde760457facb17deac949263e-180a645bf10845498a859fbbcda36d46.jpg)
:max_bytes(150000):strip_icc()/link-embed-excel-files-in-word-3540000-9284e46842304acc92357823da7b3e9e-18cae6c0435049b7ae05a9d9e688d000.jpg)
:max_bytes(150000):strip_icc()/Capture-9cde6731206049949669889ec68ea234.JPG)
:max_bytes(150000):strip_icc()/001-link-embed-excel-files-in-word-3540000-8252a46b9be54368998ea44fe6f1a9c4.jpg)
:max_bytes(150000):strip_icc()/001-insert-horizontal-lines-in-word-4169481-499c6dd02c6943b78939bc056f3150a3.jpg)
:max_bytes(150000):strip_icc()/002-link-embed-excel-files-in-word-3540000-c332627c94cb41b899bf99181d9c9ccb.jpg)
:max_bytes(150000):strip_icc()/003-link-embed-excel-files-in-word-3540000-22bc6ac299e2423c8358e45a1cd4891d.jpg)
:max_bytes(150000):strip_icc()/004-link-embed-excel-files-in-word-3540000-6872419cca134e2f93d294c7d63a4e5f.jpg)
:max_bytes(150000):strip_icc()/005-link-embed-excel-files-in-word-3540000-7c60dcc176a44a47aba5c40b75e6e63c.jpg)
:max_bytes(150000):strip_icc()/006-link-embed-excel-files-in-word-3540000-4b6142baae0e4fc6b6ff96d57397f88a.jpg)
:max_bytes(150000):strip_icc()/007-link-embed-excel-files-in-word-3540000-e17eb7b8f6c24a439ef7a6abfa796e38.jpg)
Link an Excel file to a Word doc so the doc updates when the Excel data changes
Updated on March 11, 2022
What to Know
- Link: Copy cells. Right-click Link & Use Destination Styles or Link & Keep Source Formatting in Word.
- Embed: In Word, go to Insert > Object > Object > Create from File > Browse > choose Excel file > OK.
- Embed a spreadsheet table: In Word, go to Insert > Table > Excel Spreadsheet.
This article explains two ways to display Excel data in Word.
Instructions apply to Word for Microsoft 365, Word 2019, Word 2016, Word 2013, Word 2010, Excel for Microsoft 365, Excel 2019, Excel 2016, Excel 2013, and Excel 2010.
How to Link Excel to Word
To insert any part of an Excel worksheet in a Word document:
Maddy Price / Lifewire
-
Open the Word document where the worksheet will display.
-
Open the Excel worksheet that contains the data you want to link to the Word document.
-
In Excel, select and copy the range of cells to include. If you plan to insert more columns or rows into the worksheet, select the entire worksheet.
To select the entire worksheet, select the cell located in the upper-left corner at the juncture of the row numbers and column letters.
-
In the Word document, position the cursor where you want to insert the linked table.
-
Right-click and select Link & Use Destination Styles or Link & Keep Source Formatting.
Destination Styles uses the default Word table formatting, which usually results in a better-looking table. Keep Source Formatting uses the formatting from the Excel workbook.
-
The Excel data pastes directly into the Word document where the cursor was positioned. If changes are made to the source Excel file, the Word document updates with those changes automatically.
What Happens When You Link Excel to Word
Linking an Excel file to a Word document ensures that the Word document is updated every time the data in the Excel file changes. It works as a one-way link feed that brings the updated Excel data into the linked Word document. Linking an Excel worksheet also keeps your Word file small because the data doesn’t save to the Word document.
Linking an Excel worksheet to a Word document has a few limitations:
- If the Excel file moves, the link to the Word document needs to be re-established.
- If you plan to transport the Word file or use it on another computer, you must transport the Excel file along with it.
- You must do data editing in the Excel worksheet. It isn’t a problem unless you require different spreadsheet formats in the Word document.
How to Embed an Excel Spreadsheet in Word
The process of embedding an Excel worksheet in a Word document is essentially the same as linking to an Excel worksheet. It does require a few extra clicks, but it brings all data from the worksheet into your document, not only the selected range.
There are two ways to embed an Excel worksheet in Word. The first is to embed the worksheet as an object. The second is to insert a table.
When you embed a worksheet, Word uses the formatting from the Excel worksheet. Make sure that the data in the worksheet looks the way you want it to appear in the Word document.
Embed an Excel Worksheet as an Object
To embed an Excel worksheet as an object:
-
Open the Word document.
-
Go to the Insert tab.
-
Select Object > Object. In Word 2010, select Insert > Object.
-
In the Object dialog box, select the Create from File tab.
-
Select Browse, then choose the Excel worksheet that contains the data you want to embed.
-
Select OK.
-
The Excel worksheet is embedded in the Word document.
How to Embed an Excel Spreadsheet Table
An alternative is to insert the Excel worksheet as a table. This method inserts the worksheet the same way as if you embedded it as an object. The difference is that it opens a blank Excel worksheet for you to fill out. Choose this method if you haven’t created the Excel file yet.
To insert an Excel worksheet as a table in Word:
-
Open a Word document.
-
Place the cursor where you want to insert the Excel worksheet.
-
Go to the Insert tab, then select Table.
-
Select Excel Spreadsheet.
-
This menu option opens a blank Excel worksheet that you can fill with data. Either enter new data or paste data from another spreadsheet.
When you insert and fill out a new Excel worksheet, you have an Excel file that you can update at any time. The data in the Word table automatically updates to match the data in the Excel file.
FAQ
-
How do I embed a Microsoft Word document in Excel?
In Excel, select the Insert tab > Text > Object > Create from File. Next, select Browse to find the Word file > Insert > OK.
-
How do I create labels in Microsoft Word from an Excel list?
To create labels in Word from an Excel list, open a blank Word document > select Mailings > Start Mail Merge > Labels > choose the brand and product number for the labels. Then, choose Select Recipients > Use an Existing List > navigate to the Excel address list > OK. Add the merge mail fields to complete the merge.
Thanks for letting us know!
Get the Latest Tech News Delivered Every Day
Subscribe
Excel for Microsoft 365 Word for Microsoft 365 Excel 2021 Word 2021 Excel 2019 Word 2019 Excel 2016 Word 2016 Excel 2013 Word 2013 Excel 2010 Word 2010 Word 2007 More…Less
Insert an Excel chart in a Word document
The simplest way to insert a chart from an Excel spreadsheet into your Word document is to use the copy and paste commands.
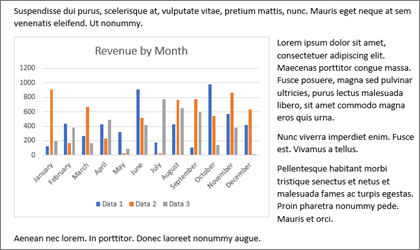
You can change the chart, update it, and redesign it without ever leaving Word. If you change the data in Excel, you can automatically refresh the chart in Word.
-
In Excel, select the chart, and then press Ctrl+C or go to Home > Copy.
-
In your Word document, click or tap where you want the chart to appear, and press Ctrl+V or go to Home > Paste.
Note: The chart is linked to the original Excel spreadsheet. If data in the spreadsheet changes, the chart updates automatically.
Update a chart
-
In Word, select the chart.
-
Go to Chart Design or Chart Tools Design > Data > Refresh Data.
You can change the design or data for a chart in Word.
Note: You can’t edit a chart that was inserted as a picture, but you can adjust it. Select the chart, and then on Picture Format or Picture Tools Format, choose an option.
Edit a chart in Word
-
Select the chart.
-
Go to Chart Design or Chart Tools Design > Data > Edit Data and choose one of the following:
-
Choose Edit Data to edit the chart in Word.
-
Choose Edit Data in Excel.
-
Note: For Word 2010 the chart opens in Excel for editing.
You also can modify the chart in Word by using any of the four buttons that appear when you select the chart.

The buttons are:
-
Layout Options
Choose how your object interacts with the text around it. -
Chart Elements
Add, remove, or change chart elements such as the title, legend, gridlines, and data labels. -
Chart Styles
Set a style and color scheme for your chart. -
Chart Filters
Edit what data points and names are visible in your chart.Select any button to view available options.
There are five options for pasting an Excel chart into Word. Two options embed a copy of the whole workbook, another two keep the chart linked to the original workbook instead of embedding it, and one converts the chart into a picture. If none of those options do exactly what you want, you also can select Paste Special.
From Excel
-
In Excel, select the chart you want to paste into Word, and then press Ctrl+C or go to Home > Copy.
In Word
-
In Word, select Home, and in the Paste list, choose one of the five Paste Options.
Note: Hover over a button to read a description of the option.
|
Paste option |
Color theme |
Data refresh |
|---|---|---|
|
Use Destination Theme & Embed Workbook |
Matches the Word theme |
Embeds a copy of the Excel workbook with the chart. The chart doesn’t stay linked to the original workbook. To update the chart automatically, change the data in the embedded workbook. |
|
Keep Source Formatting & Embed Workbook |
Keeps the Excel theme |
Embeds a copy of the Excel workbook with the chart. The chart doesn’t stay linked to the original workbook. To update the chart automatically, change the data in the embedded workbook. |
|
Use Destination Theme & Link Data This is the default paste option (Ctrl+V). |
Matches the Word theme |
Keeps the chart linked to the original workbook. To update the chart automatically, change the data in the original workbook. You also can select Chart Tools > Design > Refresh Data. |
|
Keep Source Formatting & Link Data |
Keeps the Excel theme |
Keeps the chart linked to the original workbook. To update the chart automatically, change the data in the original workbook. You also can select Chart Tools> Design > Refresh Data. |
|
Picture |
Becomes a picture |
You can’t update the data or edit the chart, but you can adjust the chart’s appearance. Under Picture Tools, select Format. |
The main differences between linked objects and embedded objects are where the data is stored and how you update the data after it’s inserted in the Word document.
-
Linked object
Information from a object that is linked in Word is stored in the source file and can be updated if the source file is modified. Use linked objects if file size is a consideration. -
Embedded object
Information from an Excel object that you embed in Word doesn’t change if you modify the source Excel file. Once embedded, the object is no longer part of the source file and won’t reflect any changes made.
-
Go to Insert > Text > Object.
-
Go to Create from file > Browse, and locate the file you want to insert in the Word document.
-
Choose one of the following:
-
To add the file as a linked object, select Link to file, and then select OK.
-
To add the file as an embedded object, select Display as icon, and then select OK.
-
Need more help?
![]()
Download Article
![]()
Download Article
Is there data in your Microsoft Excel sheet that you want to display in a Word document? This wikiHow will teach you how to copy data from your spreadsheet to your Word document using the Microsoft Office desktop suite.
Steps
-
1
Open your document in Excel. This method will walk you through the steps of copying and pasting data from Excel into Word using a Windows or Mac desktop application. You can either open your document from within Excel by going to File > Open or you can right-click on the file, select Open With, and then Excel.
- If you have data or a table of data, you’ll be able to change how the pasted information appears within the Paste Options, all steps are otherwise identical if you’re trying to copy and paste data or tables.
-
2
Select the data in your Excel sheet that you want to copy and paste into Word. Using your mouse, click the first cell of data you want to copy and drag it to include the range (if you want to copy more than one cell).
Advertisement
-
3
Press Ctrl+C (Windows) or ⌘ Cmd+C (Mac). You can also right-click and select Copy.
-
4
Open a document in Word. You can open a document you’ve been working on or you can create a new document.
-
5
Move your cursor in the Word document where you want to paste the Excel data. When you press the keyboard shortcut, the data you’ve copied from Excel will paste into the Word document.
-
6
Press Ctrl+V (Windows) or ⌘ Cmd+V (Mac). The data you copied from Excel will appear in your Word document.
-
7
Click Paste Options. You should see a «Paste Options» drop-down next to your pasted data or chart. If not, you’ll find «Paste Options» above the document editing space on the left side of the window under «Home.»
-
8
Choose your paste formatting. You’ll see these options from left to right:
- Keep Source Formatting: Keeps data as it was formatted in Excel.
- Use Destination Styles: Updates the data to reflect Word’s style. Use this paste style if you have data in a chart format with gridlines you want to keep.
- Link & Keep Source Formatting: Keeps the formatting as it was in the Excel document, however, the data in the pasted table will update any time you edit it in Excel.
- Link & Use Destination Style: Removes the original formatting and replaces it with that of your Word document. This also links the data to the original spreadsheet so that updating the spreadsheet will also update your Word document.
- Picture: Inserts the data as an image instead of a table and cannot be updated.
-
Keep Text Only: Pastes only the text from the table and ignores all formatting (such as the lines in the table). However, each row of data in the chart/table is separated by a new paragraph and each column is separated by tabs.[1]
-
9
Save your work. If you’re using a Mac, press ⌘ Cmd+S and if you’re using a Windows computer, press Ctrl+S.
- You want to save your progress after you paste data from Excel into your Word document.


Advertisement
Ask a Question
200 characters left
Include your email address to get a message when this question is answered.
Submit
Advertisement
Thanks for submitting a tip for review!
References
About This Article
Article SummaryX
1. Open your document in Excel.
2. Select the data in your Excel sheet that you want to copy and paste into Word.
3. Press Ctrl + C (Windows) or Cmd + C (Mac).
4. Open a document in Word.
5. Move your cursor in the Word document where you want to paste the Excel data.
6. Press Ctrl + V (Windows) or Cmd + V (Mac).
7. Choose your paste formatting.
8. Save your work.
Did this summary help you?
Thanks to all authors for creating a page that has been read 31,682 times.