
Excel 2010 Word 2010 PowerPoint 2010 Excel 2007 Word 2007 PowerPoint 2007 More…Less
If you are working with a Word document, Excel workbook, or a PowerPoint presentation that is saved to a library on a Microsoft Office SharePoint Server 2007 site where a policy requiring the insertion of a barcode is in effect as part of an information management policy, you may need to insert a barcode into your system file when you save or print it.
When you upload a file to a document library that has a barcode policy, a barcode is added to the item’s properties (metadata) but is not inserted into the file itself. Only when you choose to edit the document and then either save or print it is the barcode inserted into the file as an image. When you work with printed documents that contain these barcodes, you can use the barcode information displayed in the document to search for and locate the original copy of the document on an Office SharePoint Server 2007 site. This means you can easily view all of the associated workflow, metadata, audit history, and other information.
You cannot insert a barcode in a document until the site administrator or list manager configures the appropriate policy for the library. If such a policy exists, the Barcode command appears on the Insert tab so that you can insert barcodes.
Any document that already exists in the list or library when the policy is established is not assigned a barcode (which therefore can’t be inserted) until the document is checked out and checked back in. Documents uploaded to a list or library with a barcode policy already in effect are automatically assigned barcodes that can be inserted immediately.
When a site administrator or list owner configures a barcode policy for a list or library, barcodes are automatically generated on the server for the items or documents in that list or library when the items or documents are uploaded or edited.
Depending upon how a barcode policy is configured, you may also be required to insert barcode images into documents that reside in libraries on a SharePoint site.
-
If the library is not already open, click its name on the Quick Launch.
If the name of your library does not appear on the Quick Launch, click View All Site Content, and then click the name of your library.
-
Point to the document you want, click the arrow that appears, and then click the edit option for the Office program name — for example, Edit in Microsoft Office Word.
-
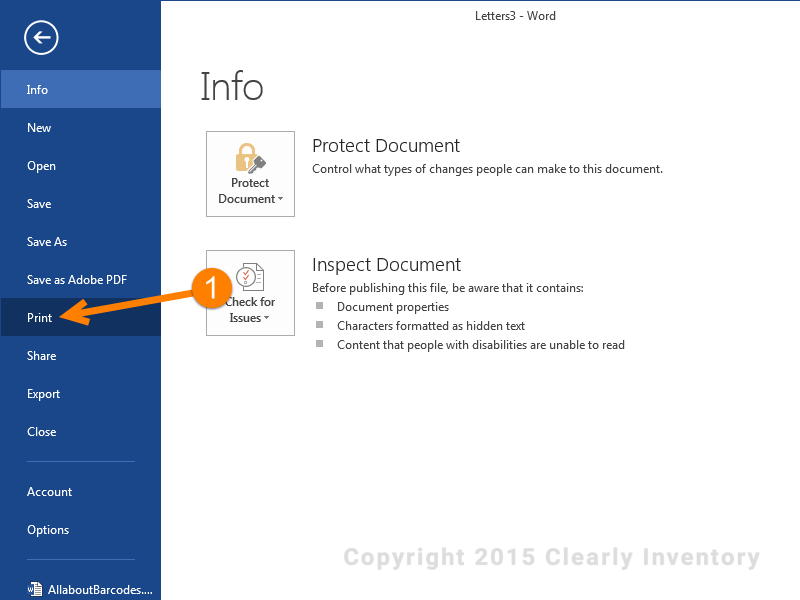
Place your cursor in the location in the document where you want to insert the barcode.
-
On the Insert tab, in the Barcode group, click Barcode.

Note: The Barcode command appears on the Insert tab only if a barcode policy is in effect for a server document.
-
Save your changes.
A library on a SharePoint site may have a barcode policy that requires you to insert a barcode when you save or print a document.
If the document does not already contain a barcode when you save or print, you are prompted to insert one. If you click Yes when prompted, the barcode is inserted in a default location.
-
If the file is read-only, the barcode is inserted at the cursor’s current location.
-
If the file is in Edit mode, the barcode is inserted in a default location.
-
In Word The barcode is inserted in the header of the first page of the document.
-
In Excel The barcode is inserted in the first cell on the first worksheet in the workbook.
-
In PowerPoint The barcode is inserted in the center of the first slide in the presentation.
-
Need more help?
Want more options?
Explore subscription benefits, browse training courses, learn how to secure your device, and more.
Communities help you ask and answer questions, give feedback, and hear from experts with rich knowledge.
Add barcodes to your Word documents

Highly accurate barcodes in your documents

Mail merge with barcodes

Automation of barcodes

Solving complex tasks using VBA

Easy to use
Step-by-step manuals

Use the Add-In in Word and embed barcodes into your document.

Embed the barcode control into a Word document.

Add an adapting barcode to your mail merge document.

Add barcode images into Word documents using the ActiveBarcode Generator.

Use and automate barcodes objects with Visual Basic for Applications in Word.
Run into something tricky and looking for help?
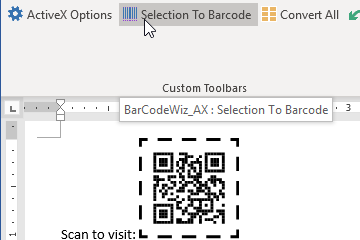
- After installation the following toolbar is available in Word
- Click ActiveX Options to view your options
- Click on Barcode Properties for additional options.
- To create a barcode simply select the text…
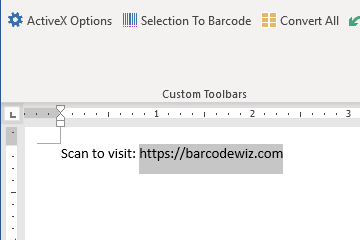
- …and click on Selection To Barcode on your toolbar
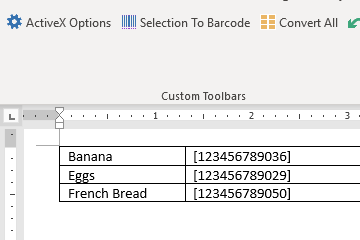
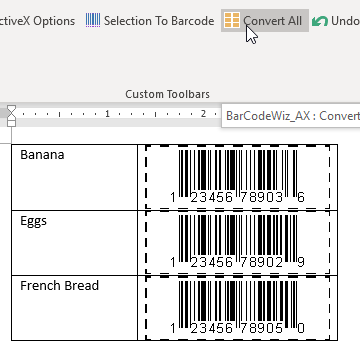
- To create multiple barcodes, enclose each piece of text within square brackets
- .. and click on Convert All.
- The barcodes created with BarCodeWiz Toolbar are stored in your documents as images. This means that anyone may view the document without BarCodeWiz installed on their machine.
NOTE: This Barcode Addin is a legacy product that is only compatible with Office 2010 and earlier.
-
Easily
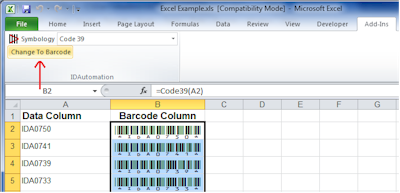
generate barcodes in Microsoft® Word and Microsoft® Excel® with a single click
after highlighting the data to be encoded in the barcode. - Quickly change an entire data column or row to barcodes.
- Royalty-free with the purchase of any IDAutomation
barcode font
package. - Supports all linear and 2D barcode fonts including DataBar and the
IDAutomation Universal fonts. -
Compatible with Word & Excel 2003, 2007, and 2010* for Microsoft Windows
or Word & Excel 2004 and 2011 for Mac OSX. - Windows Users: This barcode add-in will not be visible unless the
associated barcode fonts have also been installed. - Mac Users: The add-in will only encode the data, and will not
generate a readable barcode unless the appropriate font is installed.
 Easily
Download Now
*The Barcode Add-in is not compatible with online versions of Office 365 or
with versions after Office 2013. The
VBA Module is
the recommended solution for the latest versions of Office.
Installing the Barcode Add-in for
Windows
- If the barcode font of
choice is not already installed, be sure to install it on the system first. -
Download and install the Add-in for Word and Excel
- If using Office 2007 or
above, click the setup.exe install file located in the «2007 and Above» folder. - If using Office 2003, click the IDAutomation_WordExcelAdd-in.exe installation
located in the «2003» folder.
This will enable the add-in toolbar within Word and Excel. In the following screenshots, multiple barcode fonts have been installed.
The user will only see symbology options for the barcode fonts that are installed on the
computer.
Barcode Add-In Toolbar in
Microsoft® Office® 2003
Barcode Add-In Toolbar in Microsoft® Office® 2007, 2010 & 2013
- If using Office 2007 or


*The Barcode Add-in is not compatible with online versions of Office 365 or
with versions after Office 2013. The
VBA Module is
the recommended solution for natively installed versions of Office 365, Office
2013 and 2016.
Installing the Barcode Add-in
for Mac
- If the barcode font of
choice is not already installed, be sure to install it on the system first. - Quit Word and Excel if they are running.
-
Download and extract the Add-in for Word and Excel, and open the Mac folder.
- If using Office version 2004,
copy the IDAutomation_Excel_Addin.xla file to the Applications/Microsoft Office
2004/Office/Add-ins folder
and copy the IDAutomation_Word_Addin.dot file to the
Applications/Microsoft Office 2004/Office/Startup/Word folder. - If using Office version 2011,
copy the IDAutomation_Excel_Addin.xla file to the Applications/Microsoft Office
2011/Office/Add-ins folder and copy the IDAutomation_Word_Addin.dot file to the
Applications/Microsoft Office 2011/Office/Startup/Word folder.
- If using Office version 2004,
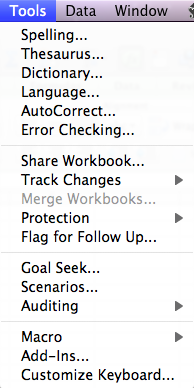
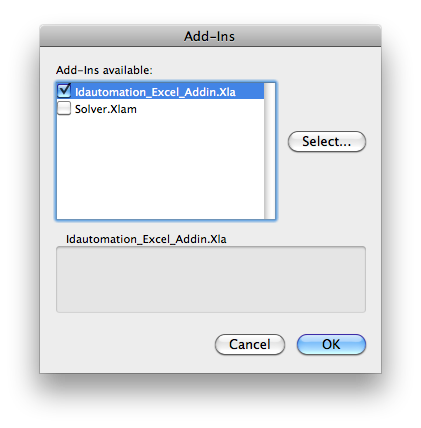
- Open Excel and select the Add-Ins option in the Tools menu
- Make sure the IDAutomation_Excel_Addin.xla option is selected with a check.
This will enable the add-in toolbar within Excel.
Barcode Add-In Toolbar in Microsoft®
Office® for Mac
The toolbar allows easy generation of barcodes by the click of a button. It
is important to note that if an IDAutomation font is not installed
on the computer, either licensed or demo, then the user will simply view the encoded data because the appropriate font is needed to display the barcode.

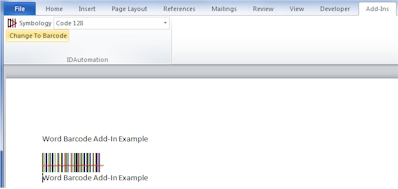
Barcode Add-in for Microsoft Word Tutorial
Creating Barcodes in Word
This tutorial will demonstrate how to create a static barcode in a Microsoft Word document.
- If the barcode font
required is not already installed, be sure to install it on the system first. -
Then
Download the Barcode Add-in for Word and Excel and install it to enable the add-in
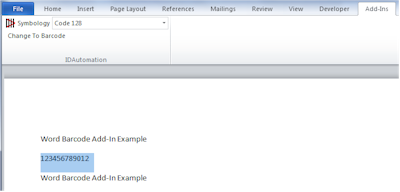
toolbar. - Open a Word document and the add-in toolbar should be displayed in the Add-Ins
tab. - Highlight the data that will be encoded in the barcode.
- Microsoft Word 2003: With the data highlighted, select the
appropriate barcode font from the list. Multiple
barcode fonts have been installed for the following screenshots, and users will see
only the barcode options for the fonts installed on their own computers.
Microsoft Word 2007 through 2013: Select the barcode font of choice from the
list and then click the Change To Barcode button to encode and generate
the barcode.
Microsoft Word 2004 or 2011 for Mac: Click the button of the desired barcode
type to generate the barcode. The barcode font will only be applied if the
appropriate barcode font is installed.
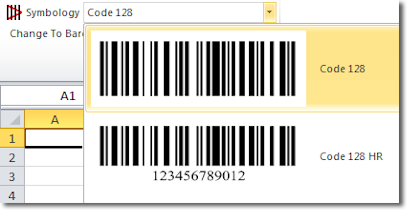
Following is an example of the same data shown above being changed
to a Code 128 barcode. A red line may appear in the barcode from the
spell-checker, but this is normal and may be ignored in barcode symbols.
- The data is formatted for the selected barcode type, and when the appropriate
font is applied to it, an accurate barcode will be displayed. Once the data is
formatted and changed to a barcode, it cannot be
modified to another barcode type. The only way to change to a different barcode
is by clicking the undo
button several times until the data is changed back to the original data before
formatting. - Print and scan the barcode to verify that the correct data is being encoded.
If a scanner is needed to verify barcodes, IDAutomation offers an easy
to use
USB barcode scanner. - When distributing a Word document, the
font should
be embedded so the barcode is visible without the need to install the font package.
This type of distribution requires at least a
Developer License
to the associated font.


Using the Barcode Add-In for Word Mail-Merge
How to Create a Dynamic Barcode in Mail-Merge for Word
This tutorial demonstrates how to generate a dynamic barcode for Word mail-merge.
When performing a mail-merge with Word using Excel, the add-in would only be
used to encode the data in Excel. Then this encoded data will be merged into the
Word document, at which time, the barcode font would be applied to the merged
field.
To create
a single static barcode in a normal Word document, refer to the
Word Barcode Add-In Tutorial.
-
Install
the barcode font
of choice if it is not already installed. - Download the Barcode Add-In for Word & Excel, then install it.
- Create an Excel spreadsheet as the mail-merge data source.
- The barcode columns in the Excel spreadsheet should be created in the
far-right column. The formula in the
column should contain the data that needs to be encoded in the barcode. - Row 1 in this column should be titled Barcode Column as in the
example. - Select the entire barcode column, excluding row 1, and convert this
row to barcodes by choosing the appropriate barcode type in the toolbar. - Save the spreadsheet.
- Follow the Word mail-merge process. When asked to «select
recipients» or for the «data source,» choose the newly-created Excel spreadsheet. Place the cursor where the barcode should appear and choose to
insert the barcode Column.
- Select the entire <<Barcode_Column>> (including the arrow
indicators), right-click and choose the appropriate barcode font.
The font type must match the font button that was clicked above in step 4.
- When the mail-merge is complete, barcodes will be generated in the <<Barcode_Column>>
merge field with the barcode font. - Print and scan the barcodes to verify the correct data is encoded.
If a scanner is needed to verify barcodes, IDAutomation offers an easy
to useUSB barcode scanner.
- When distributing a mail-merge document, the
font should
be embedded in Word and the Excel data source must be accessible. Distribution in this way requires at
least a
Developer License to the associated
font.
 Install
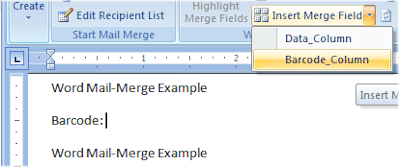

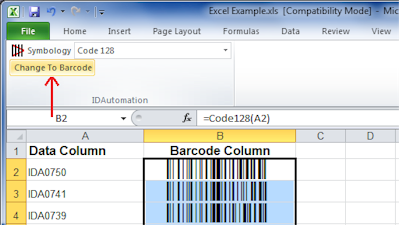
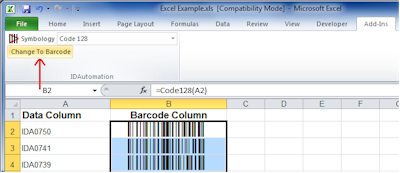
Barcode Add-in for Excel Tutorial
The unique method used in IDAutomation’s Barcode Add-In for Excel converts
selected cells, row,s and columns from data-to-encode to barcodes.
Because formulas and functions are used, the barcodes are dynamic in the
sheet; when data in Excel changes, the barcodes change automatically.
Excel Barcode Add-In Video
Tutorial
Create a Barcode in Excel
-
If not already installed, be sure to install the
barcode font of your choice. -
Download and install the
Barcode Add-in for Word and Excel to activate the
toolbar. - Open an Excel spreadsheet. The Barcode Add-In toolbar should now be visible.
- Select the cells that need to be changed into a barcode.
Microsoft Excel 2003: Click
the button of the desired barcode type.
In the following screenshots, multiple barcode fonts have been installed.
Users will only see symbology options for the fonts installed on their own computers.
Microsoft Excel 2007 through 2013: Click the Change To Barcode button to change the data to
the selected barcode type from the Symbology drop-down list.
*On Windows 8, Excel 2013 is unable to access the encoding routines to
format the data to encode and generate a scannable barcode. Toresolve this issue, the user must install the barcode fonts, install the
Barcode Add-In for Excel, and then import the
VBA functions.
Microsoft
Excel 2004 or 2011 for Mac: Click the button of the desired barcode type to generate the barcode.
The barcode font will only be applied if the appropriate font is installed.
Selecting the entire column may take a few seconds to calculate because
of the large number of rows. When selecting an entire column, be sure to
deselect the header row or it will also be converted to a barcode.
- Once clicked, the appropriate function is entered automatically
and the font is applied, generating a readable barcode. - If changing the barcode type, first select the cells containing the barcode,
then:Windows 2003 or Mac 2004 and 2011: Select the appropriate button.
Windows 2007 through 2013: Select another barcode type from the Symbology drop-down
list and click the Change To Barcode.The example
below shows the barcode changed to Code 39.
- Print and scan the barcodes to verify that the correct data is being encoded.
If a scanner is needed to verify barcodes, IDAutomation offers an easy-to-use USB barcode scanner.
Support
This is a legacy product that is only compatible with Office 2010 and earlier. Support is no longer available for this product.
Common Issues
- The Add-In Toolbar Does Not Appear
A demo or purchased
IDAutomation barcode font must be installed for the toolbar to appear. If the Add-in was installed
prior to the fonts, close
all instances of Microsoft Office, install the barcode font and then reopen
Excel or Word to activate the add-in. - There is no Button for the Desired Barcode Type
If the desired barcode button does not appear as an option, install the appropriate font
and restart Word or Excel to activate the button. For example, to enable
the Code 39 button, install the
Code 39 Fonts.
In some cases, it may be necessary to restart the entire computer so
that cached components are updated. - Changing the Barcode Size
The size of the barcode may be modified
by selecting a different size font or changing the point size. Here is how:
1. Highlight the entire barcode
2. Right-click and change the point size or font height. Common font heights are
XS (extra small) to L (large).
- Barcode Appears Truncated or Wraps in Excel and Will Not Scan
This issue will occur if the column is not wide enough to contain the entire
barcode. To resolve this issue, simply widen the column as necessary.
- Add-In Toolbar Does Not Appear for Additional Users on the Same PC
When the add-in is installed, it is only activated in Word and Excel for the
user profile where it is being installed. Therefore, each user must
install the add-in in order to make use of it within their own user profile. - The Undo Button Does Not Undo the Barcode
If the undo button does not undo the barcode, delete it and attempt to
create a new one using the same method. - Red Line Appears in the Barcode
A red line may appear in the barcode as a result of the spell checking process.
This is
normal and occurs when the spell checker cannot associate the converted
barcode with a defined word. The spellchecker symbol may be ignored in all
barcode symbols, as it will not impact scanning in any way. - ApplyTilde Required for GS1-128
When using the add-in,
ApplyTilde
is enabled by default. This enables GS1-128 barcodes to be easily generated
in Word or Excel with the
parentheses
method. To encode the Tilde directly, use ~126. - If Office 97, Office 2000 Compatibility is Needed
Compatibility for versions not mentioned here may be achieved by
implementing
IDAutomation’s VBA Macros. - Need More Barcode Functionality or Customization
More functionality and customization may be achieved by implementing
IDAutomation’s
VBA Macros which are functions that can be easily edited
in Visual Basic code. - Rectangular Boxes or Strange Symbols Appear with the Code-128-HR Button
The Code-128-HR button should not be used in a Word Mail-Merge from Excel.
The rectangular boxes indicate a Unicode or double-byte incompatibility. If rectangular boxes appear in a barcode generated
when selecting the Code-128-HR
button, use the standard Code 128 button instead. - Horizontal Lines Appear or Barcode Splits if Creating DataBar Stacked or
2D Barcodes
This may occur because of the
line
spacing property or the text justification issue with fonts that require
more than one line of encoding. - Additional Microsoft Excel barcoding
options - Video Tutorials:
- Create Barcodes using the Word-Excel Add-in with Excel
in Windows
- Create Barcodes using the Word-Excel Add-in with Excel
The Best-Kept Secret in Microsoft Office

Before you spend money on special fonts or software, you should take a look at one of the best hidden native features of Microsoft Office—creating and printing barcodes. You can print several different kinds of codes from within Word. 1D codes like CODE128, CODE39, UPC A and UPC E, and EAN are available, and the big daddy of 2D barcodes, the QR code, is also included. This guide will show you exactly how to take advantage of these features. Related content: How to Create Good Inventory Item Numbers.
Create a table in Excel, exactly like the one below…
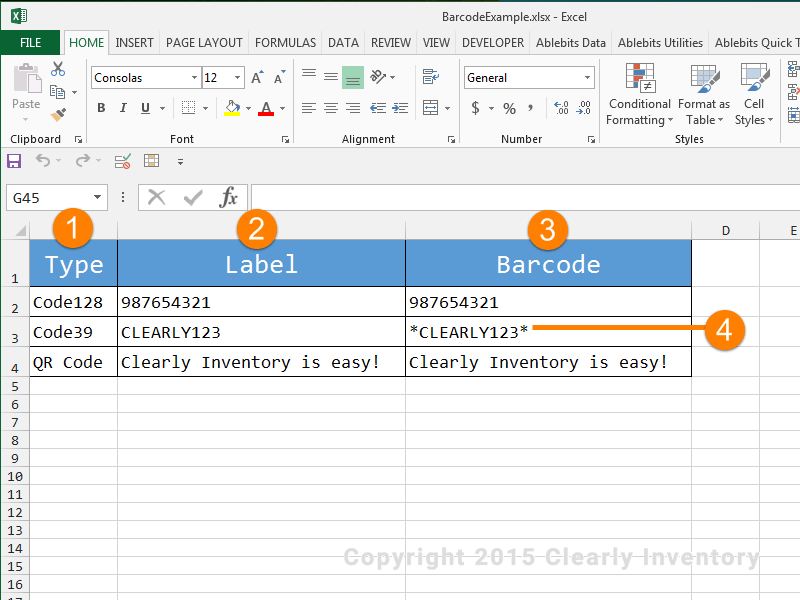
…By following these steps:
Label the first column “Type” and create three records: “Code128”, “Code39”, and “QR Code”, just like you see in this image.
Label the second column “Label” and create three records: “987654321”, “CLEARLY123”, and “Clearly Inventory is easy!”
Label the third column “Barcode” and create three records: “987654321”, “CLEARLY123“, and “Clearly Inventory is easy!” Yes, they look almost the same, but this is the actual information that we’ll be encoding in the barcode itself.
Those asterisks are CRITICAL. Without them, your barcode reader can’t decode the information as “CODE39”.
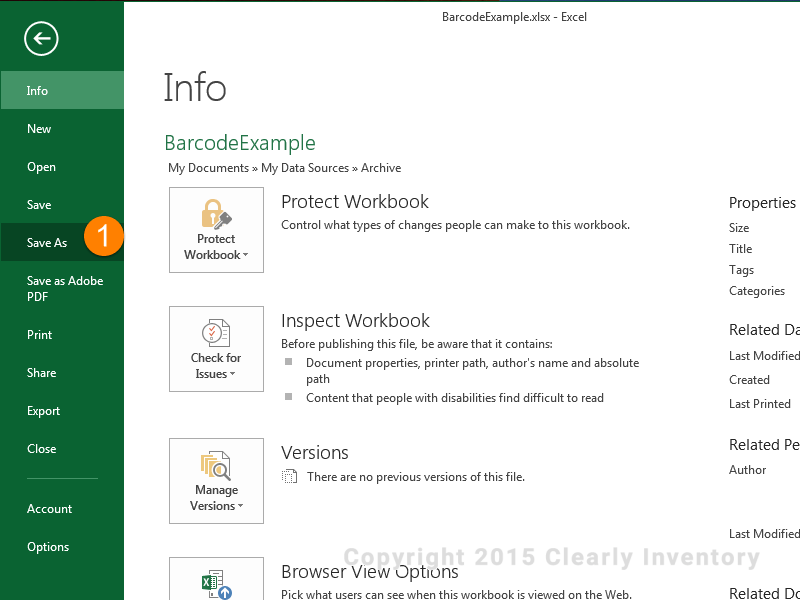
Click “Save As”…
…By following these steps
Save the file in this exact location…
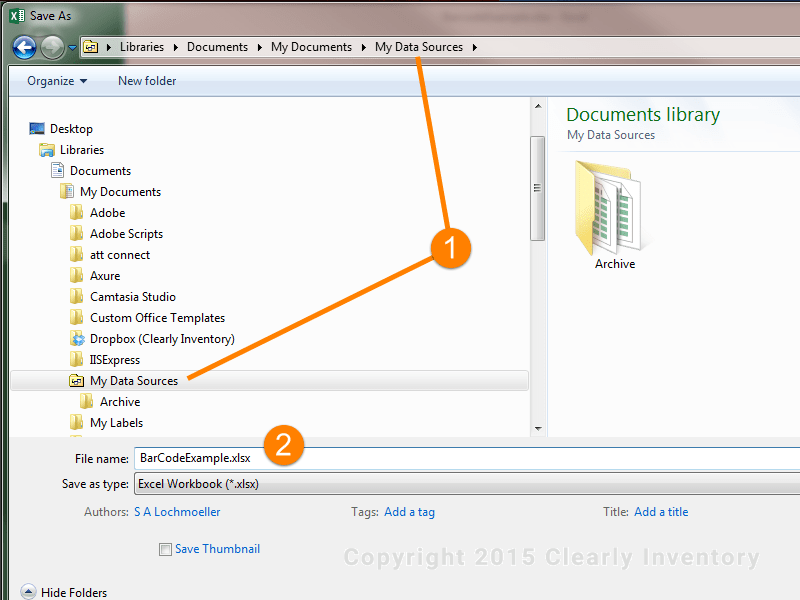
…By following these steps
By default, Windows creates a “My Data Sources” folder in your “My Documents” folder. This is where Word will look for your tables when doing mail merges. You don’t have to use this folder, but it will make this example, and life, easier to follow.
Please use the filename “BarCodeExample.xlsx”. We’ll be referring to it later on.
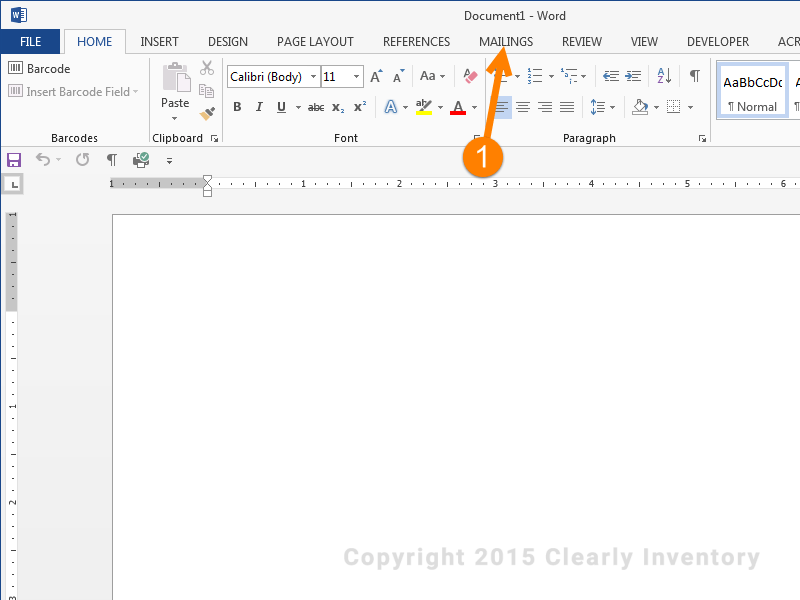
Open a new Word document and select “Mailings”…
…By following these steps
Open Word and click the “Mailings” tab. If you don’t have this tab, you might need to customize your toolbar to activate it. Google how to do that if necessary. You might notice that Word has a “Barcode” menu item. I did too. And to this day, I can’t get it to work properly. If you know how to, please drop us an email at support@clearlyinventory.com.
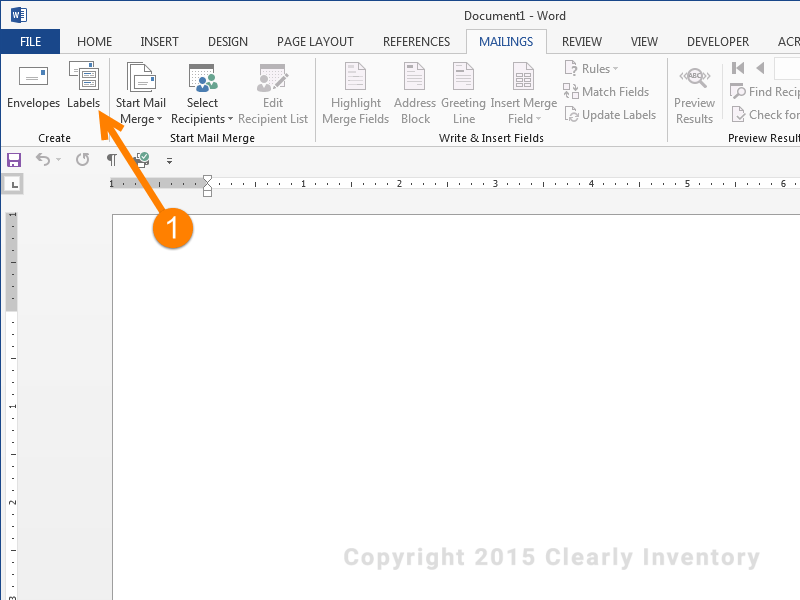
Click “Labels”…
…By following these steps
Once you’re in the “Mailings” tab, click on “Labels”. This will bring up a Label dialog window for you to select a label type.
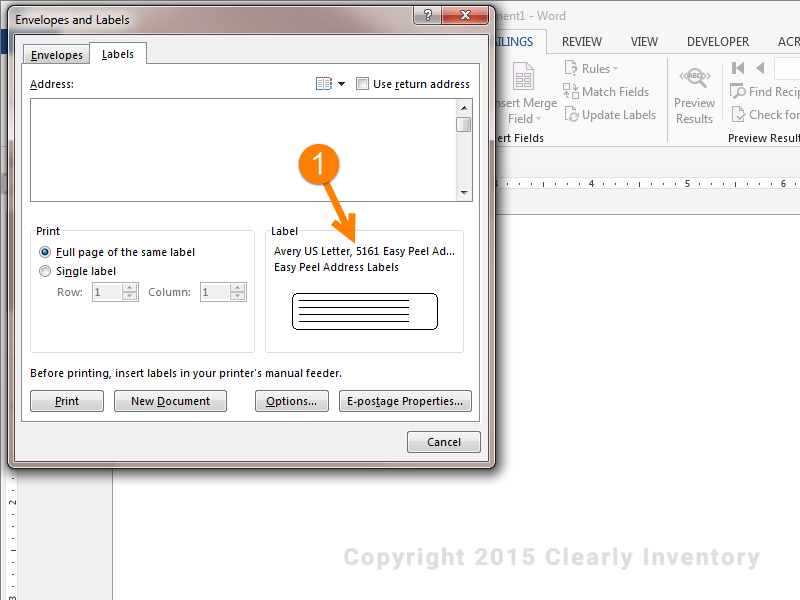
Select these exact labels…
…By following these steps
Click this area (you may not notice that it’s clickable, but it is, trust me). Then select the Avery US Letter, 5161 Easy Peel Address Labels. That’s what we’ll use for this example, but you can choose any number of labels when you do this on your own.
Click the “New Document” button…
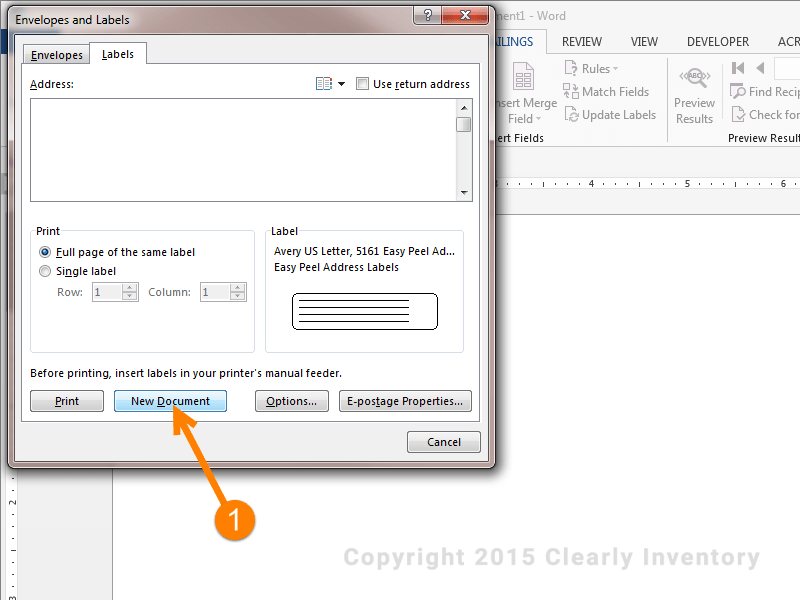
…By following these steps
A lot of people make the mistake of clicking “Print” from this dialog. Instead, click the “New Document” button. Don’t be one of those people who can’t follow directions and gets lost.
And your New Document should look like this…
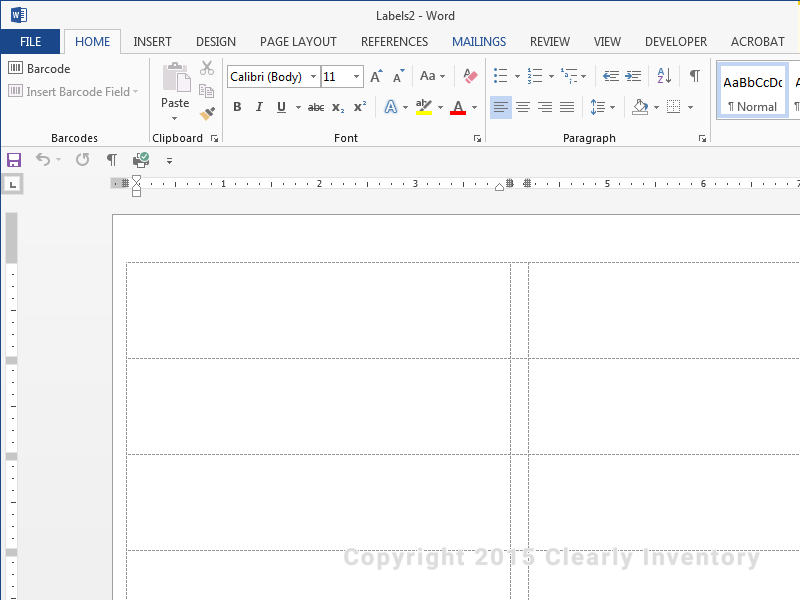
…By following these steps
Yeah, I forgot to put a “1” on this image, but just bear with me. The image at left is what your New Document will look like. I point this out because, at this point, you will probably have TWO Word documents open: the original one where we selected the label type and this New Document. Make sure you’re working with the document that has the outlines of the labels.
Make sure to click the “Mailings” tab in your new doc…
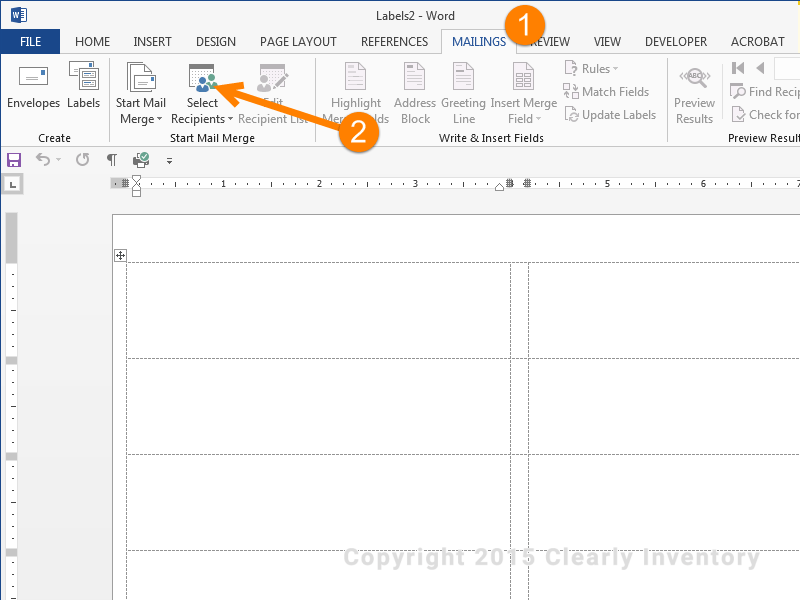
…By following these steps
Make sure you click the “Mailings” tab again so you can see the Mail Merge options; otherwise, step 2 won’t make sense.
Click “Select Recipients”. This may seem weird, but what we’re really doing is choosing a table or spreadsheet with values in it. Because the most common use of this feature is mailing lists, Microsoft calls the data “Recipients”. Just keep up, and it will all become clear.
Select your “recipients” (hint: they’re really your barcodes)…
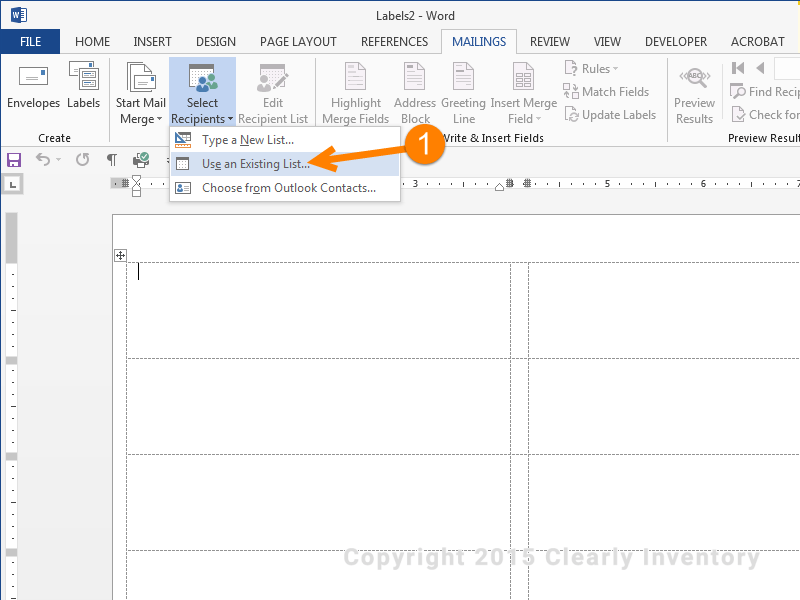
…By following these steps
Choose “Use an Existing List…”. Remember the spreadsheet we created and saved at the beginning of this tutorial? It’s about to come back into play.
Choose the file we saved earlier…
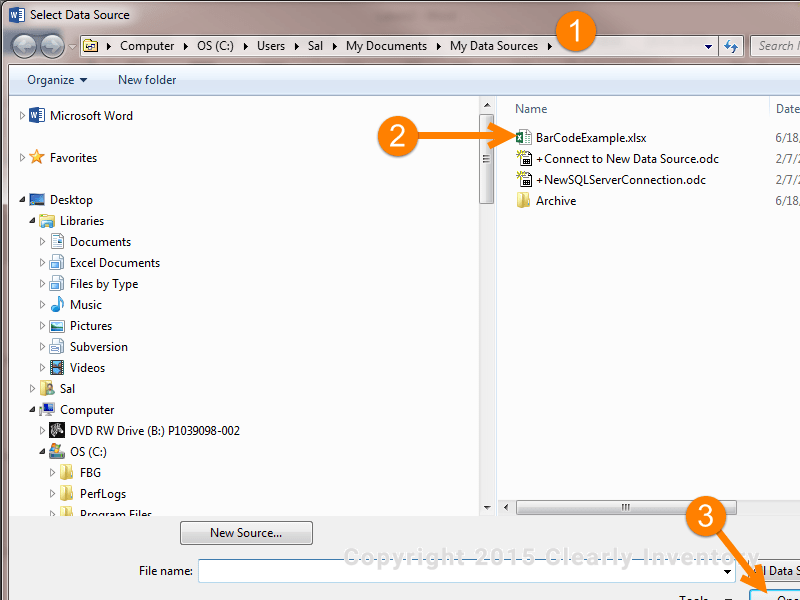
…By following these steps
Remember how I told you to use the default My Data Sources location? This is why. MS Word will automatically open it when you click “Select Recipients”. It’s a real time-saver.
Select “BarCodeExample.xlsx” (you did follow my instructions earlier and use this name, right?).
Yes, the image got clipped, but I didn’t have time to fix it. So go complain to your coworker about it. Any who, click the “Open” button, even though we’re not going to actually open the spreadsheet.
Choose the file we saved earlier…
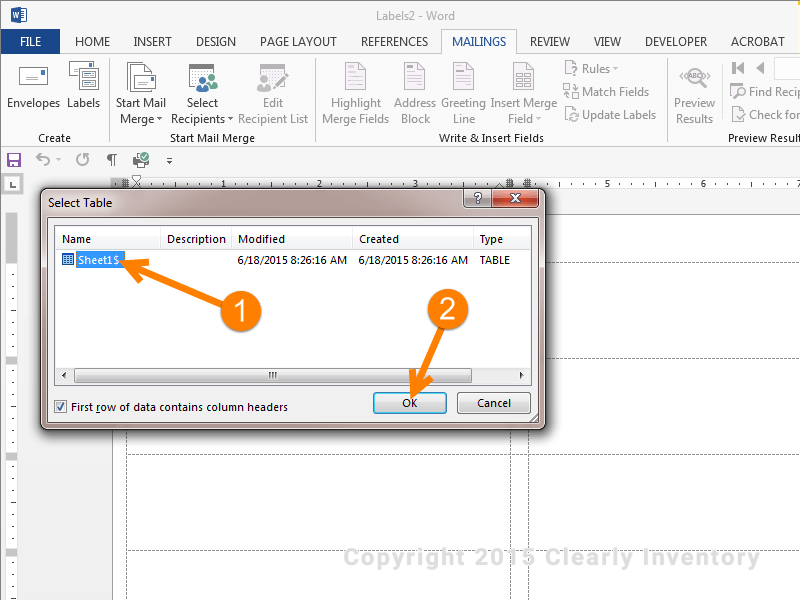
…By following these steps
Depending on your default Excel settings, you might have more than one worksheet. I only have one. But if you have multiple worksheets in your Excel document, you will be asked to select the table. Just make sure to select “Sheet1$” like the arrow says.
Then click “OK”. Why doesn’t Word spell it out as “Okay”? I don’t know, okay? OK.
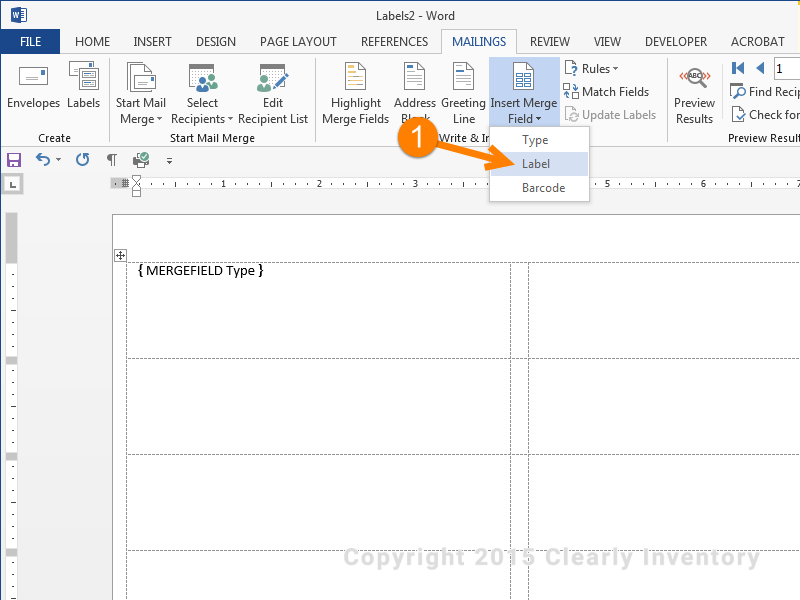
Insert a “Merge Field” called “Type”…
…By following these steps
Click on “Insert Merge Field”. Merge Fields are specially encoded fields that will pull data from data sources. Here, the Merge Fields will be showing information from our BarCodeExample table.
Hey, isn’t it interesting that the three options exactly match our table column headings? Not really. If you’ve been following directions, that’s what’s supposed to happen. But kind cool. Let’s select “Type” first.
Make sure the merge field is in the first label…
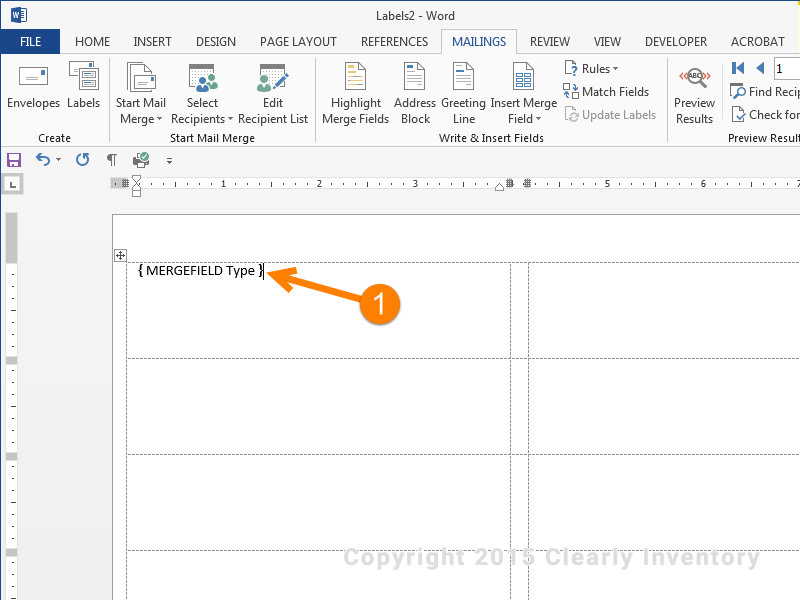
…By following these steps
Congratulations! You’ve inserted a MERGEFIELD. What’s going on here?
Everything between those curly brackets is code that tells Word “Go to that table, get the first value in the column titled “Type”, and put it here. It’s important to note that the stuff inside the curly brackets will not print in the final document “as is,” so it may appear that the label won’t fit the content. But as long as the data fits, everything is ok. Another important point: You can’t just create a MERGEFIELD by typing curly brackets and putting stuff in the middle. So don’t even think about it. Do it the way I’m showing you in this exercise.
Insert a second “Merge Field” called “Label”…
…By following these steps
Same deal as above, only now we’re putting the “Label” in. This can be useful when you want a “human readable” section of the label. That’s why we created this column. We could have just used the barcode column, but sometimes barcodes need to have special characters that people don’t need to see, so it’s good practice to keep them separated.
IMPORTANT: If your page doesn’t look like this one you probably see words inside of << >> like <>. Here’s what to do. Move your mouse to put your cursor inside of the << >> and right click to bring up Word’s contextual menu. Then click the menu item called “Toggle Field Codes”. That should reveal the codes you see on our example. If it doesn’t, well, I’m not sure what to tell you.
Make sure the “Label” field looks like this…
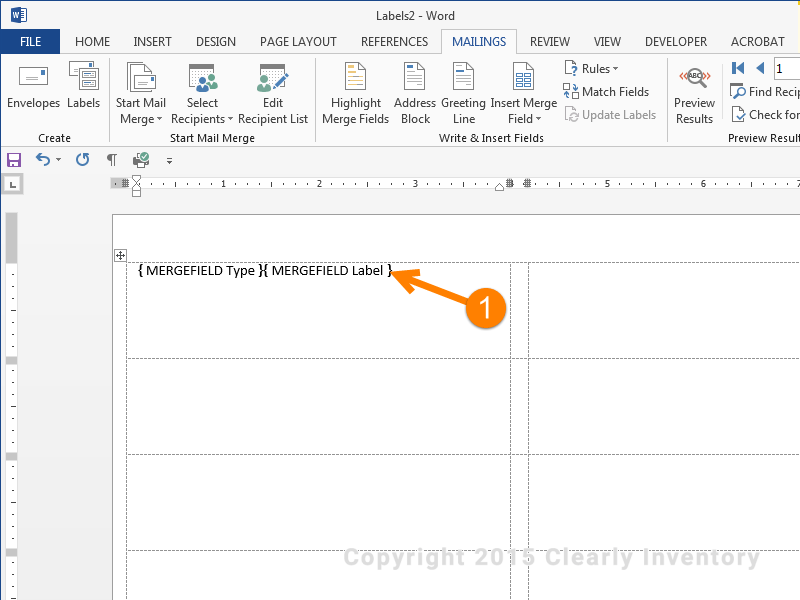
…By following these steps
Your label should now look like this, with two merge fields. If it doesn’t, go call your mom. She misses you.
Finally, insert the “Barcode” merge field…
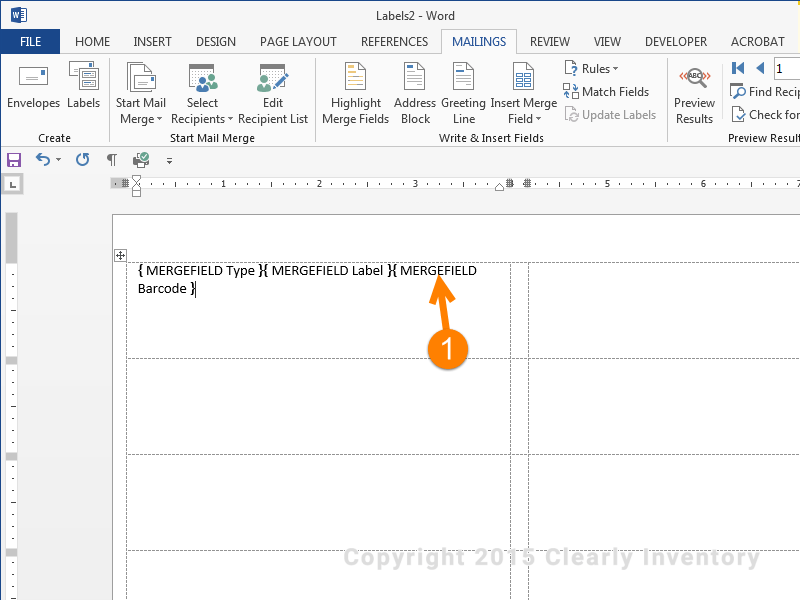
…By following these steps
Repeat the above steps for the Barcode field. You’ll notice that they are all together. This will be hard to read, so format your label a little. See the next image and steps.
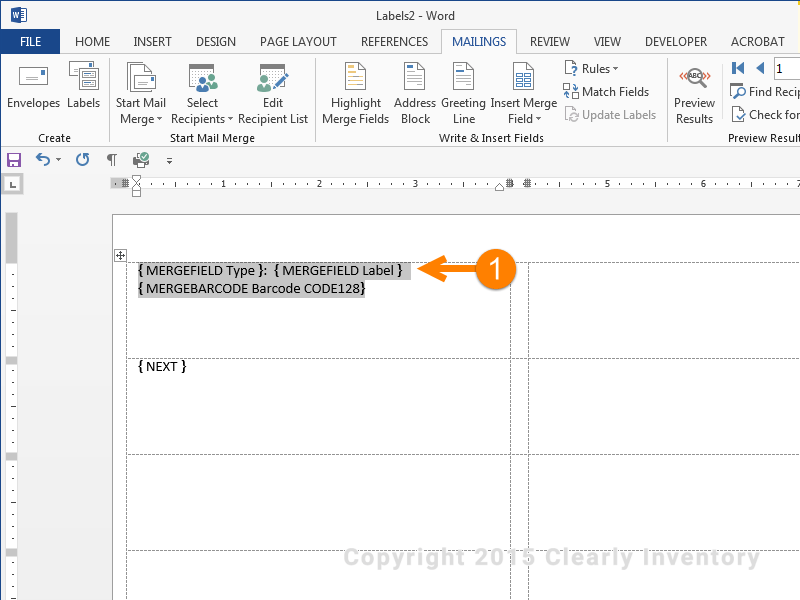
Format the label a little…
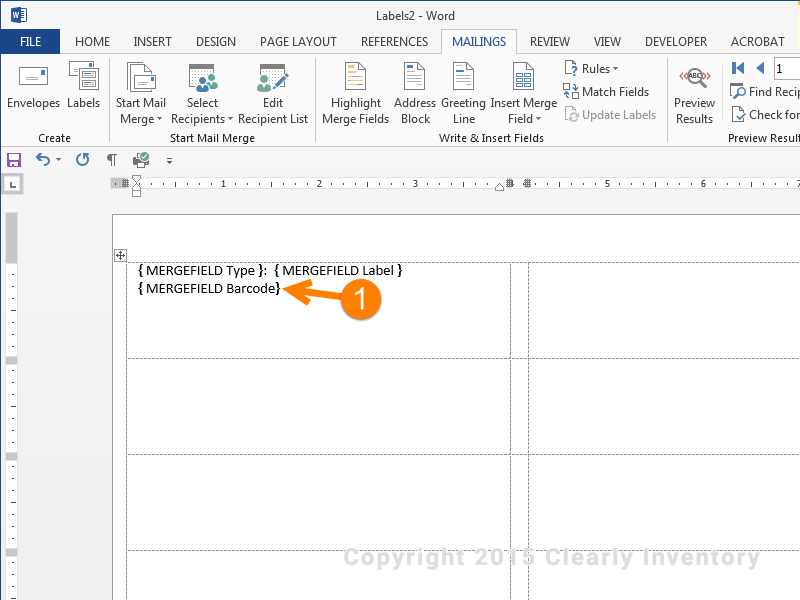
…By following these steps
Put a colon and space between the Type and Label fields, then add a hard “Return” or “Enter” to put the Barcode merge field on another line. When you’ve done that, it should look like the image to the left (except for the orange arrow and number).
This is the most important part of this tutorial…
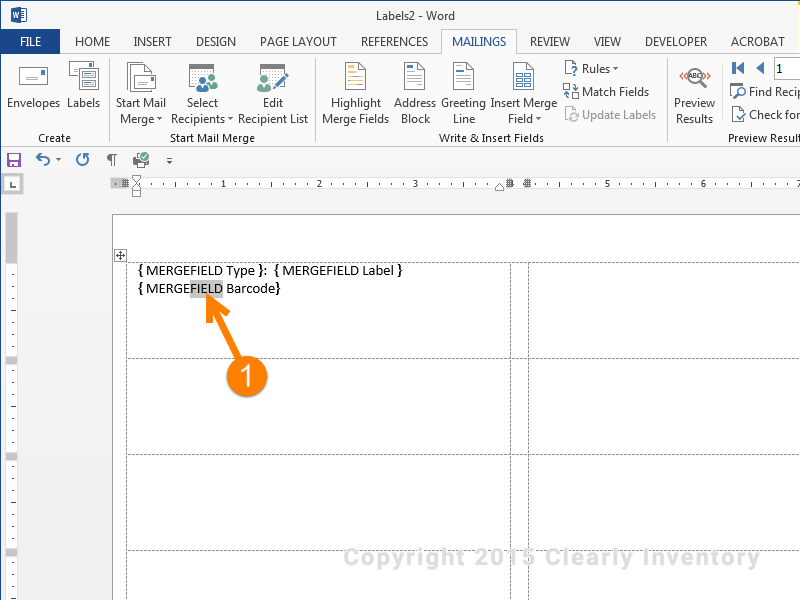
…By following these steps
I’m ashamed to say it, but this part took me over two hours of research to figure out. For some reason, Microsoft doesn’t want you to know about it. We’re going to need to change the word “FIELD” to “BARCODE”. First, highlight the word “FIELD” exactly as you see here.
Change the highlighted “FIELD” to “BARCODE”…
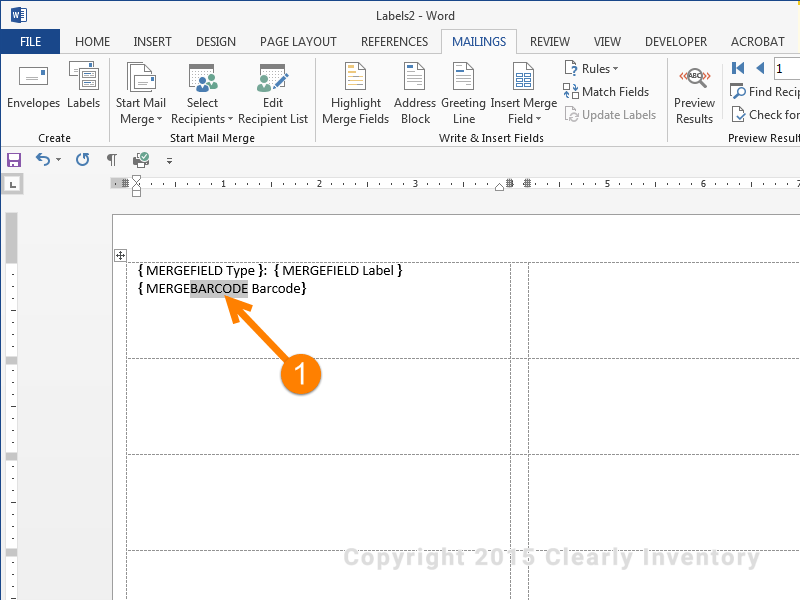
…By following these steps
Now, type the word “BARCODE” instead. THIS is the secret sauce that makes it all possible.
Add the type of barcode here…
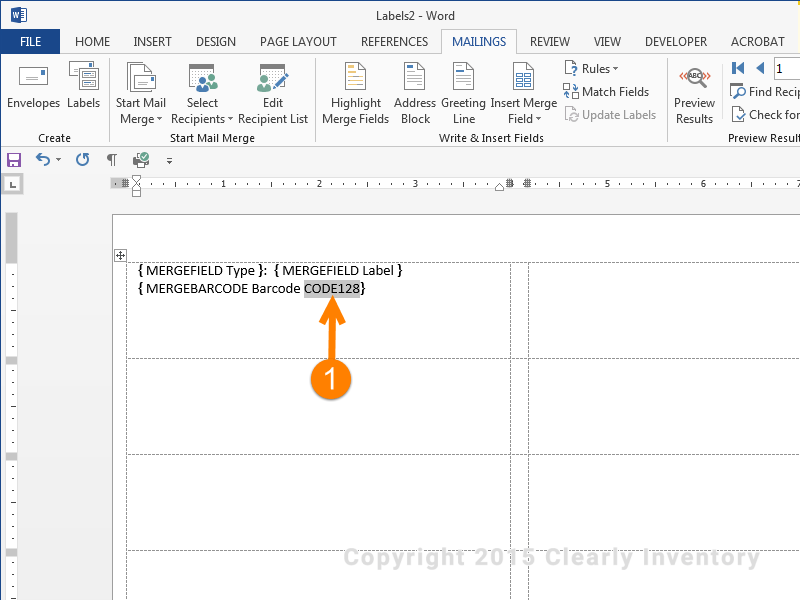
…By following these steps
Now you need to tell the MERGEBARCODE field what kind of barcode font to use. So you need to type “CODE128” here to tell Word that “When you get the data in the Barcode column and present it here, make sure the font is CODE128.” We could just as easily tell it to make the font “CODE39” or “QR”, and we will.
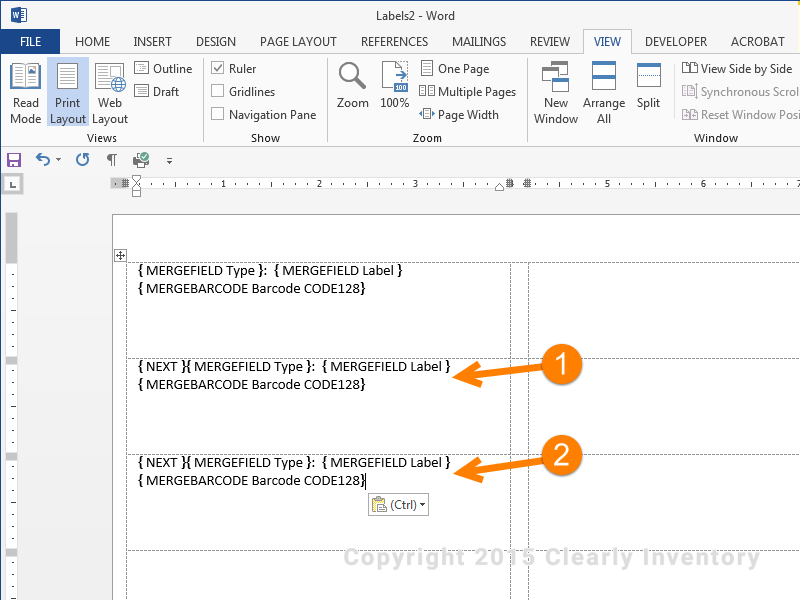
This is how you add the other barcode labels…
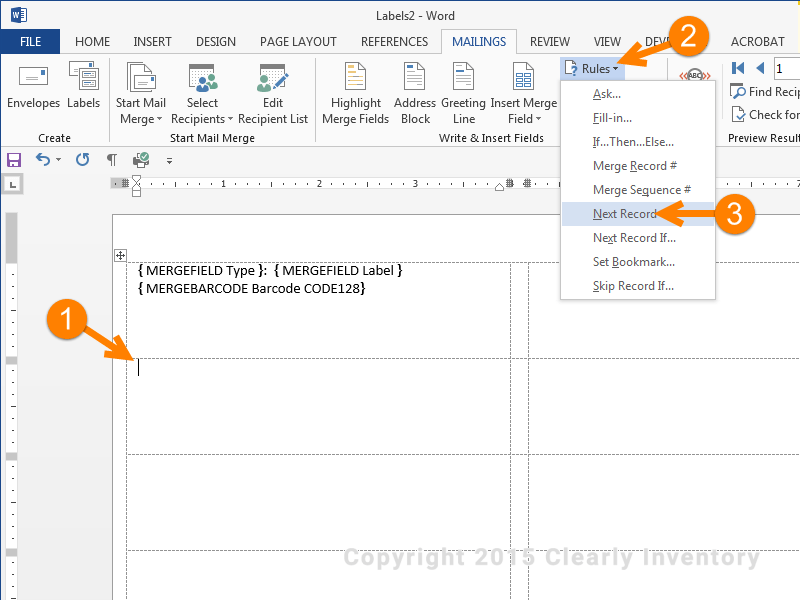
…By following these steps
Now we have to tell Word to print another label, so make sure your cursor is in the top left of the next label area, as shown, and click on the “Rules” menu option.
This is where the “Rules” menu option is. Please click it.
Make sure you precede the other labels with this code…
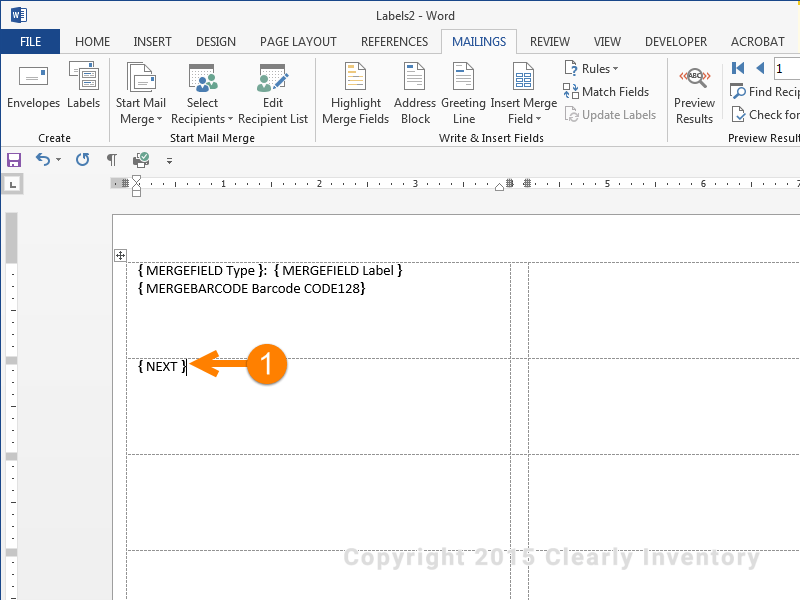
…By following these steps
You’ll now see the “NEXT” merge field. This tells Word to go to the same Excel table and use the next row of values when pulling data from the columns. If this field is not present, Word will just repeat data from the same row again and again.
Now it’s time to copy and paste, just like first grade…
…By following these steps
Now, select all of the merge fields from the first label, as you see here, and copy them.
And paste…

…By following these steps
Paste the fields here after the “NEXT” merge field.
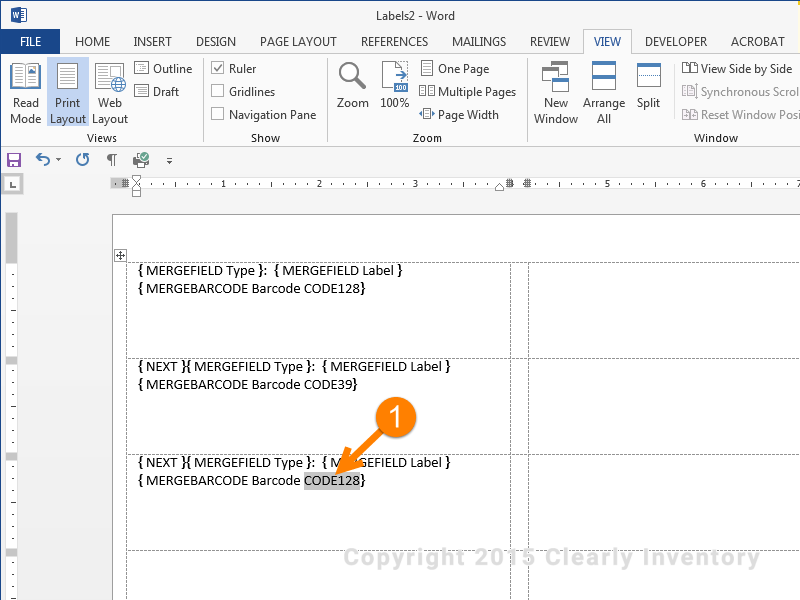
Rinse and repeat…
…By following these steps
Don’t forget to change the barcode type…

…By following these steps
Now, let’s tell Word to use a different type of barcode font. In this case, we’ll replace the “128” with a “39” for “CODE39”.
To this…
…By following these steps
Make sure it now looks like this.
And don’t forget to change this barcode…
…By following these steps
Do the same for the last label. Select “CODE128” and…
To this…
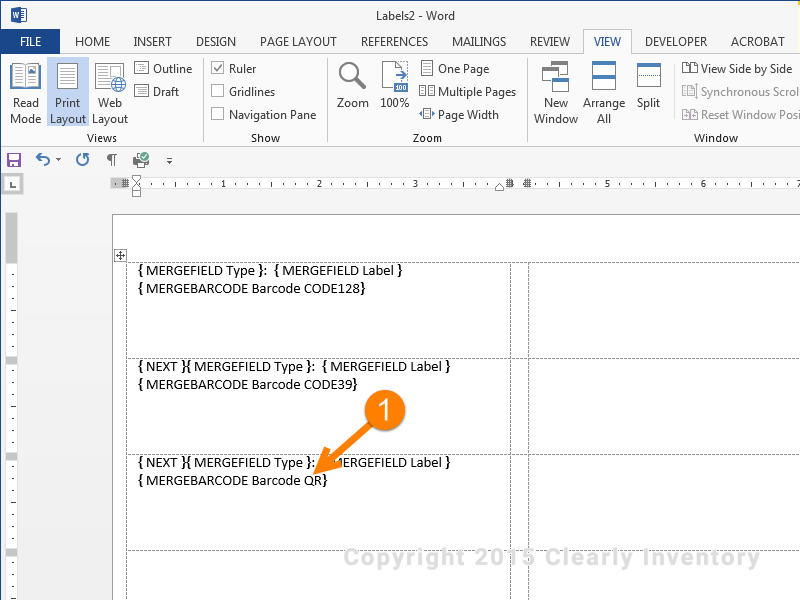
…By following these steps
…type “QR”. Do not type the word “CODE” before “QR”; just type “QR” like I said to.
Now it’s time to put it all together…
…By following these steps
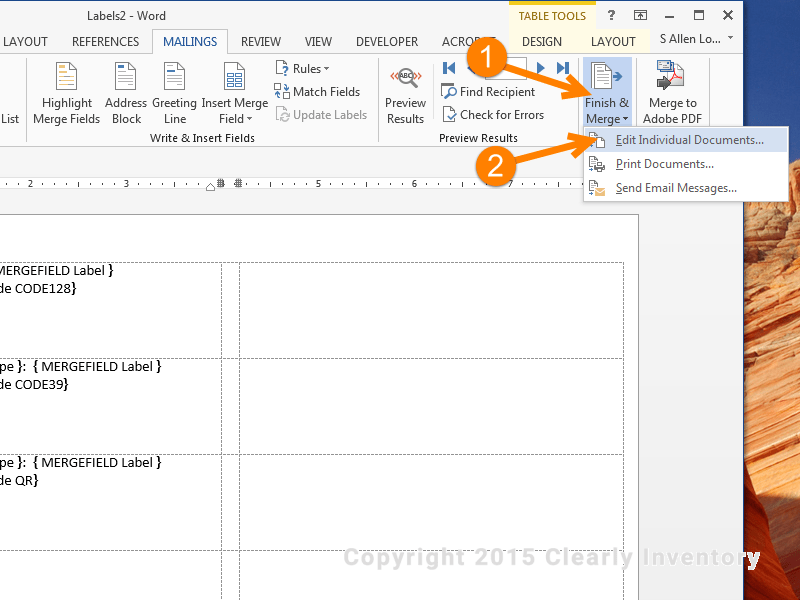
Click “Finish & Merge”. We are almost there now.
Select “Edit Individual Documents”. Do not select “Print Documents”. This will create a new completed document that you can edit.
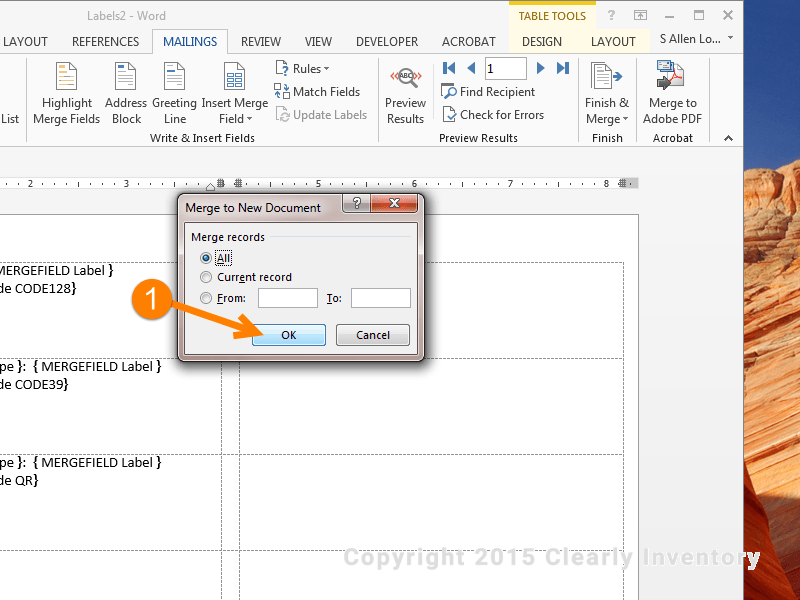
Make sure “All” is selected and click “OK”…
…By following these steps
Make sure the “All” option is selected and click “OK”.
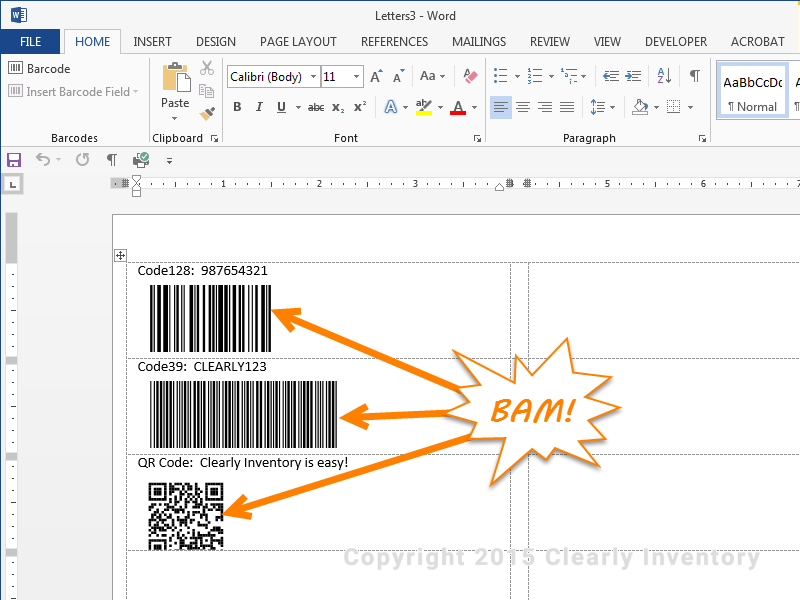
BAM! Call your Mom and let her know what you just did…
…By following these steps
Take a breath and enjoy the awesome sauce. You have just created barcodes of many varieties using only Microsoft Word and Excel.
Let’s arrange the codes a little better…
…By following these steps
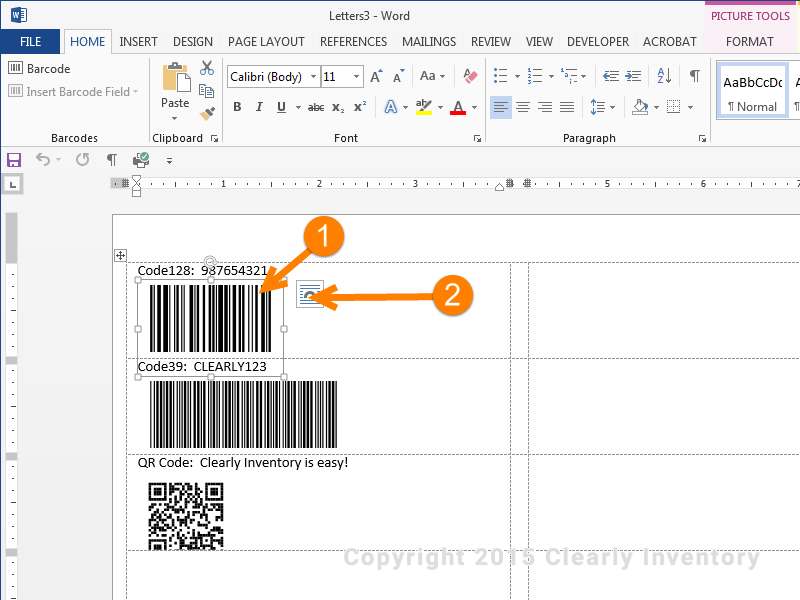
You will find that it’s difficult to move the barcode. This is because Microsoft defaults to the least usable image format. We’ll need to change that. Click the barcode.
Then click this little doohickey (I don’t know what it’s really called).
Select this option…
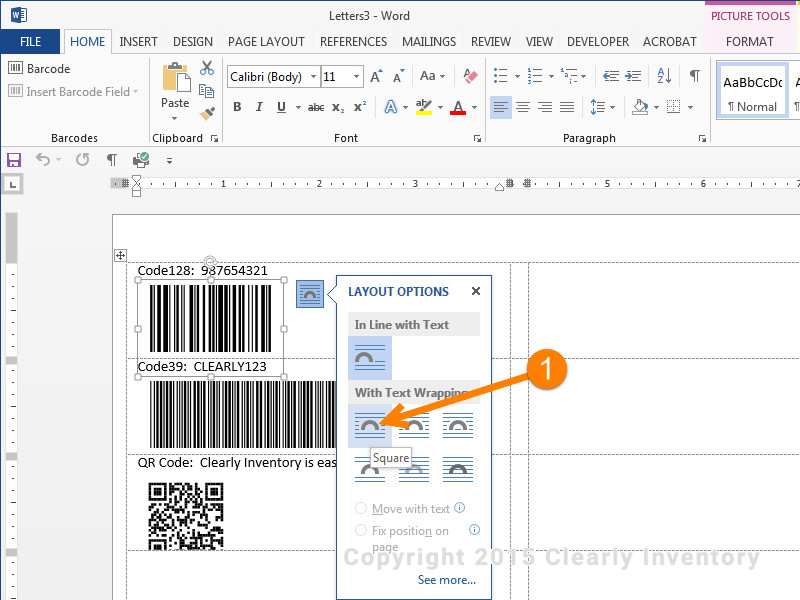
…By following these steps
Chose this option: “Square”.
Now you can easily move the barcode…
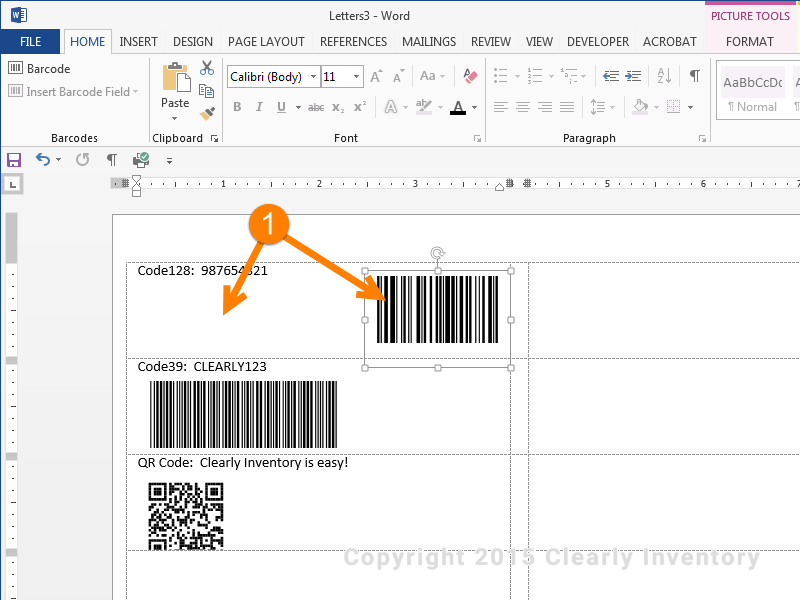
…By following these steps
Now you can easily move the barcode…
Arrange the other barcodes…
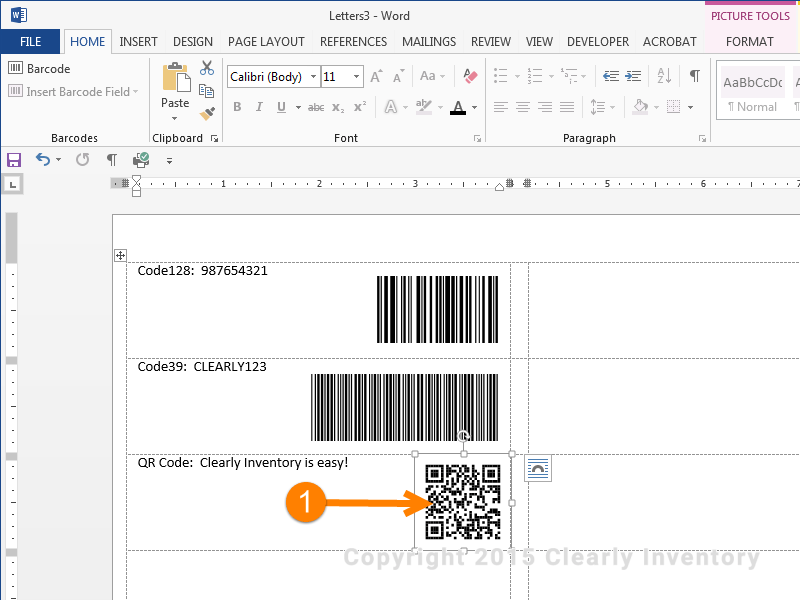
…By following these steps
Do the same with the other barcodes just to practice
Click “File”…
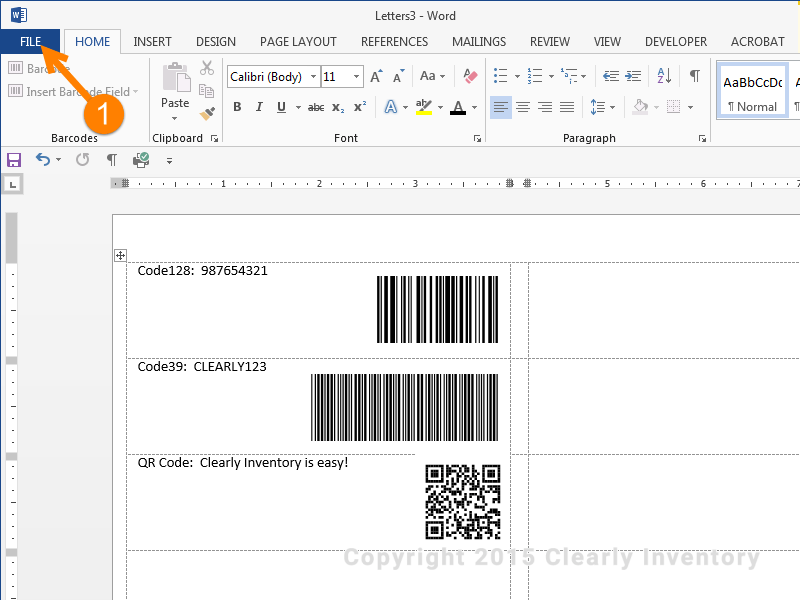
…By following these steps
And we’re ready to print these bad boys. Click “File”.
And print…
…By following these steps
Then click “Print” and follow the print dialogs. You don’t have to have label stock in your printer; just regular paper is fine for this test.
The above method is a great way to print lots of barcode labels without spending a lot of money or using new software or hardware. It’s also helpful when you’re doing a large batch of barcodes. You will find lots of software and hardware that is more “barcode friendly,” but those will all cost money, and some can be really expensive when using a database. For example, the Zebra GC420 line of thermal printers comes with some great barcode software for free, but if you want to hook it up to a table like we did here, it’s going to cost you around $400
Now that you know the basics, you can start to play around with different ideas. There are even more controls available for the barcodes. For a complete description, go to this website from Microsoft that explains how to write MERGEBARCODE fields and options. To learn more about good inventory management techniques, visit our Inventory Basics page.
![]()
Download Article
2 easy ways to create barcodes in Microsoft Word
![]()
Download Article
Barcodes are images that contain distributions of shapes, like lines, dots, or rectangles, which can be read by scanner to interpret the data contained in the code.[1]
This makes it easy to access product information, track product movement, and keep up with inventory, which might help you in your business endeavors. Knowing how to translate data from a common format, like the text of a word processor, takes only a little know-how and a basic understanding of the different symbologies used for barcodes.
-
1
Choose your barcode symbology. You may have noticed that there are a wide variety of barcodes, some appearing like thin lines and others, like QR codes, which are more blocky in appearance.[2]
These barcode types are called symbologies, some of which include:[3]
- Plessey: Used for catalogs, store shelves, inventory
- UPC: Used for North America retail
- EAN-UCC: Used for international retail
- Codabar: Used for libraries, blood banks, airbills
- Code 39: Used for various purposes
- Code 128: Used for various purposes
- Code 11: Used for telephones
- Code 16K: 1D version of Code 128.
- QR Code: Public domain code from Nippon Denso ID Systems. Has the ability to encode Japanese Kanji and Kana characters.[4]
-
2
Choose your data to convert. The information you want contained in your barcode will need to be translated to a suitable barcode format, like an alphanumeric string, for it to be properly read by scanners. You should have a general format in mind for how you will structure all barcodes for your particular purpose.
- Many different kinds of information can be included in your barcode, but generally this information pertains to: identification, tracking, and inventory.[5]
- Consistent formatting will help make the translated information easier to read, and will make human processing of barcode information more efficient.
- «Alphanumeric» refers to a system that uses both letters and numbers.[6]
Advertisement
- Many different kinds of information can be included in your barcode, but generally this information pertains to: identification, tracking, and inventory.[5]
-
3
Convert your data into proper barcode format with an online service. Now that you have your data properly organized, do an online search for a «String builder» for the barcode symbology you will be using. This will give you the converted text that you will need to use with a barcode font.
- For example, you might search, «barcode string builder code 128.»
- Some symbologies may use other inputs than simple alphanumeric. Do an online search of your chosen symbology to find how to convert your data to a suitable barcode format.[7]
-
4
Download the right font for your barcode. To have the text you’ve converted to show up properly as a barcode, you’ll need to input your barcode string into your Word document in the font for your symbology. There are many online sources for fonts, some free and some for pay, which you can find by searching your symbology (e.g. Code 39 font).
- Always exercise caution when downloading anything from the Internet. There is always the risk that you may get a virus or some other kind of malware.
-
5
Convert your barcode string into your word document. Cut and paste your converted barcode string into your word document. Highlight this text, and then change the font to the appropriate barcode font and your barcode should appear.


Advertisement
-
1
Navigate to your add-in interface. Some ad-ins might have a separate pane while some might be located under a general word setting option, like the «Insert Object» button. The add-in you have decided upon will determine where you will find your add-in interface.
- For the purposes of offering a guided example, this process will be outlined with the barcode add-in StrokeScribe, which is available to individual users for free. To access StrokeScribe’s interface, click on the «Insert» tab, then click the «Insert Object» button and select «StrokeScribe Document» from the list provided.
-
2
Find your symbology in the barcode add-in interface. Barcodes have many different types, and these are referred to as symbologies. There should be an extensive list of barcode symbologies in a submenu of your add-in interface. Search through this until you find the symbology that best suits your purposes.
- Continuing with the guided example, you should right-click the barcode image after selecting «StrokeScribe Document» and from the following menu choose StrokeScribe Control → Properties.
- Be sure that your barcode reading software/equipment has the capability of reading the symbology you have chosen for your code.
- Some common symbologies: UPS, Code 39, Code 128, QR
-
3
Input the appropriate information. You’ll need to input the text that you want to be converted to barcode format and the Alphabet you want the text to be converted into, which will be the same as the symbology you’ve already decided upon.
- In the guided example, after clicking «Properties» you should see the Control Properties window, in which you can type your data to be converted into barcode by the «Text» field, and you can select your symbology with the «Alphabet» dropdown menu.
-
4
Insert and position your barcode. Some add-ins might have a specific Insert Barcode button, or you may only need to press Ok. With most add-ins, the barcode you create will be treated like an image.
- For the guided example, you only need to click Ok to insert the image. To make the barcode a floating image, right click it, select «Format Object,» and change the text wrapping under the «Layout» tab.
- Right-click the barcode, select the «Format Object» option, and click the Layout tab in the following menu. This should list different styles in which your barcode will be wrapped with in-document text.
-
5
Adjust the size. Using the white manipulator boxes occupying the corners and midpoints around the border of your barcode, alter the size of your barcode until it is satisfactory. You may also be able to change the size within a «Properties» window associated with your barcode add-in.
- To complete the guided example, use the manipulator boxes to adjust width and height until it is positioned and sized best for your purposes.


Advertisement
Ask a Question
200 characters left
Include your email address to get a message when this question is answered.
Submit
Advertisement
-
The POSTNET barcode that could be automatically generated as a function of Microsoft Word is now obsolete, so be aware of this if trying to use a postal barcode through the «Envelopes and Labels» feature of Word.[8]
Thanks for submitting a tip for review!
Advertisement
About This Article
Thanks to all authors for creating a page that has been read 127,084 times.
Is this article up to date?
Contents
- 1 Can I create my own barcodes in Word?
- 2 Can Microsoft Office create barcodes?
- 3 Does Microsoft Word have a barcode font?
- 4 How do I create my own barcode?
- 5 How do I create a barcode for a document?
- 6 Can Excel make barcodes?
- 7 How do I insert a barcode in Powerpoint?
- 8 How do I create a text barcode?
- 9 How do I install a barcode font in Windows 10?
- 10 How do I create a EAN 13 Barcode in Word?
- 11 How do I create a barcode for my product?
- 12 How do I create a barcode for my website?
- 13 Can I make my own UPC barcode?
- 14 How do I use code 128 font in Word?
- 15 How do I create a 39 barcode?
- 16 How can I add a font to Microsoft Word?
- 17 How do I create a QR barcode?
- 18 How do I create a QR code for free?
- 19 How does code 39 work?
- 20 How does code 128 work?
Can I create my own barcodes in Word?
Word no longer has a built-in barcode tool. However you can generate barcodes using two field codes, DisplayBarcode and MergeBarcode. These field codes support 10 types of barcodes, including UPC, Code 39, and Code 128.
Can Microsoft Office create barcodes?
The Best-Kept Secret in Microsoft Office
Before you spend money on special fonts or software, you should take a look at one of the best hidden native features of Microsoft Office—creating and printing barcodes. You can print several different kinds of codes from within Word.
Does Microsoft Word have a barcode font?
Using the Barcode Font with Word
The Encoder can be started from the Windows Start Menu. In the Encoder, choose the barcode you will like to use and key in the data to encode.
How do I create my own barcode?
To create a barcode
- Select the barcode type: EAN-13, UPC-A, Code 39, or ITF.
- Fill in the product category information in the barcode data box.
- Click on the barcode title box and barcode note if you want to add them in the barcode.
- Add a name for the barcode in the title box and more details in the note box.
How do I create a barcode for a document?
Converting your Google word document into a QR code.
- Open your Google drive and select the Google document you want to use.
- Copy the Google document’s link.
- Open www.qrcode-tiger.com.
- Select the URL category and paste the Google document’s link.
- Generate and customize your QR code.
Can Excel make barcodes?
You can use Excel barcode add-ins to create individual barcodes, lists, or tables, and to set parameters.
How do I insert a barcode in Powerpoint?
Place your cursor in the location in the document where you want to insert the barcode. On the Insert tab, in the Barcode group, click Barcode. Note: The Barcode command appears on the Insert tab only if a barcode policy is in effect for a server document. Save your changes.
How do I create a text barcode?
Free Barcode Maker and QR Code Generator
- 1 Select Type of Code. Select a barcode symbology, or “type.”
- 2 Type Your Text. Enter the information you would like to encode into the barcode or QR code.
- 3 Enter Your Email. After selecting “Generate,” you will receive an email with your high-resolution barcode.
How do I install a barcode font in Windows 10?
To install the TrueType font in Windows:
Click on Fonts, click on File in the main tool bar and select Install New Font. Select the folder where the font is located. The fonts will appear; select the desired font that is titled TrueType and click on OK. Click Start and choose restart the computer.
How do I create a EAN 13 Barcode in Word?
Switch to “Add-Ins” tab in a Word document. Then, click “Create Barcode” and a barcode setting panel appears on the right. Next, select “EAN 13 +2” or “EAN 13 +5” in “Barcode Type”. After that, type valid data except the supplement data in the text box of “Data” and click “Generate” button.
How do I create a barcode for my product?
- Step 1: Register with GS1 India.
- Step 2: Generate numbers through DataKart.
- Step 3: Select a barcode printing process.
- Step 4: Select a “primary” scanning environment.
- Step 5: Select a barcode.
- Step 6: Pick a barcode size.
- Step 7: Format the barcode text.
- Step 8: Pick a barcode colour.
How do I create a barcode for my website?
How to create a QR code with QR Code Generator
- Using any web browser, go to the QR Code Generator website.
- Enter the URL of the website you want the QR code to send people to.
- Optional: You can also select a frame, change the shape and color, or add a logo to customize your QR code.
Can I make my own UPC barcode?
A company can not “make up” its own UPC number. To have a UPC code that will scan at Point of Sale, the UPC number must contain a GS1 assigned Company Prefix, also known as a manufacturer prefix.
How do I use code 128 font in Word?
How to Insert a Code 128 Barcode in Word. Switch to “Add-Ins” tab and click “Create Barcode”. After that, a panel called “Barcode Settings” pops up on the right. Then, select “CODE 128” in “Barcode Type” pull-down menu and input valid data in the text box of “Data”.
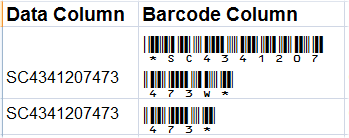
How do I create a 39 barcode?
How do I make a Code 39 barcode? Making a Code 39 barcode is easy. Simply add an asterisk (*) before and after the data – letters, numbers, or letter and numbers – that you want to encode. The asterisk is the Code 39 start and stop bar.
How can I add a font to Microsoft Word?
Add a font
- Download the font files.
- If the font files are zipped, unzip them by right-clicking the .zip folder and then clicking Extract.
- Right-click the fonts you want, and click Install.
- If you’re prompted to allow the program to make changes to your computer, and if you trust the source of the font, click Yes.
How do I create a QR barcode?
How To Make a QR Code
- Choose the type of content you’re promoting.
- Enter your data in the form that appears.
- Consider downloading a dynamic QR code.
- Customize your QR code.
- Test the QR code to make sure it scans.
- Share and distribute your QR code.
- Track and analyze performance.
How do I create a QR code for free?
How do I create a free QR Code?
- Select which type. You may choose from URL, vCard, Plain Text, Email, SMS, Twitter, WiFi, and Bitcoin.
- Fill in the details. Enter all the information needed in the fields that appear.
- Download the QR Code.
How does code 39 work?
CODE 39 Features
Since CODE 39 represents not only numbers but also letters and symbols, it allows also the item number to be represented. The start/stop character is an asterisk (*). 9 bars and spaces are used to represent one character.
How does code 128 work?
Code 128 enables you to encode all 128 ASCII characters, as Code 39 – Full ASCII does. Additionally, when you encode only numbers, Code 128 can encode them more densely than Interleaved 2 of 5 does.
FAQ: TBarCode Office Word Add-In
- Inserting Barcodes into Microsoft Word Documents
- Inserting Barcodes into Serial Letters
- Video: Barcodes in Word Documents and Serial Letters
- How To Create a Swiss QR Code
- How To Create a Barcode Using the vCard Format
- Mail Merge Errors
- Barcode Data Doesn’t Change When Using Mail Merge
- Scaled or Cropped EMF Barcodes with Remote Desktop
- No Barcode Visible / Cropped Barcode
- Barcode Control Blocked or Barcode Not Updated
- Barcode Shows «Adjust Properties» (V10)
- How to: Use Microsoft Word Programmatically with IIS Applications
- How Can I Verify if the Add-in Has Been Loaded?
- The Panel Does Not Show/Recognize the Selected Barcode
Inserting Barcodes into Microsoft Word Documents
To insert a bar code into a Microsoft Word document follow these steps:
- Switch to the Add-Ins tab.
- Open the TBarCode Panel.
- Select the barcode type (e.g. Code 128).
- Enter your barcode data.
- Adjust the size of the barcode (width, height, module width etc).
- Click the button Insert Barcode. Finished!

Inserting Barcodes into Serial Letters
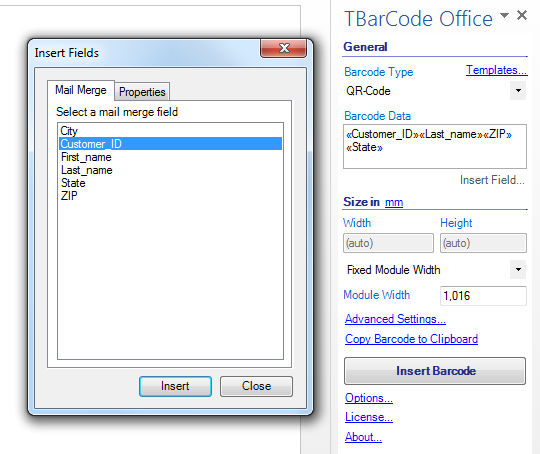
Mail merge fields (e.g. the customer number) can be selected directly and then printed as barcode:
Use the button Insert Field... to encode the required merge fields in the bar code.
A demo of our serial letter functionality you will find in our TBarCode Office Video.
Video: Barcodes in Word Documents and Serial Letters
Barcode Word Add-In: Create Barcodes in Word
The first part of the video demonstrates how to insert bar codes into Microsoft Word 2007, 2010 and 2013. The second part of the video shows how to generate a bar-coded mail merge/serial letter using a recipient list.
For more videos visit our TBarCode Office Tutorial Channel!
How To Create a Swiss QR Code
Swiss QR Code is available in TBarCode Office V11 — follow the link and download the new version.
Below we give you instructions on how to create Swiss QR Code 2.2 in a serial letter:
- Download the Excel Sheet for Swiss QR Bills (click the link). The sheet contains calculated columns, which create the data format for the Swiss QR Code 2.2 payment standard.
- Enter the payment information into columns A - Q.
Note the calculated columns SwissQRCode_Part1, SwissQRCode_Part2 and SwissQRCode_Part3, which will contain the bar code data for the bar code add-in. There are also more calculated columns at the right, which are used to validate your input. Line Feeds are encoded through the n escape sequence.
- In your Word mail merge document, select the Excel sheet as data source for the mail merge.
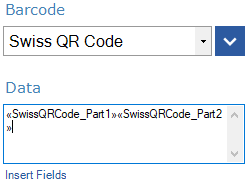
- Open TBarCode Panel, select Swiss QR Code and add the serial field placeholders via Insert Fields as shown below:

We split the data content into multiple fields, because in the serial letter you are limited to 255 characters in a single field. In the barcode this will be put back together correctly. The field SwissQRCode_Part3 is required if further data is coded after the EPD (Bill-Info, AV Parameter 1, AV Parameter 2).
TBarCode Office is the perfect solution for serial letters. If you only need to create a few Swiss QR Codes per year, you may create them also with our Swiss QR Bill Online Generator.
How To Create a Barcode Using the vCard Format
To create a vCard bar-code for business cards you have to enter the data using the correct data format. Below you can find some samples using the appropriate data structure.
vCard Data Structure:
BEGIN:VCARD
N:Doe;John
TEL:+43 7252 72720
EMAIL:support@tec-it.com
URL:http://www.tec-it.com
ADR:;;Wagnerstrasse 6;Steyr;;4400;Austria
END:VCARD
vCard structure using mail merge data fields:
BEGIN:VCARD
N: «lastname»;«firstname»
TEL: «phone»
EMAIL: «email»
URL: «url»
ADR:;; «address»;«city»;;«zip»;«country»
END:VCARD
Here is a Word Barcode-Add-In screenshot with such merge fields:

About choosing the correct QR code settings: You can use one of the vCard templates (small, medium, large) included in TBarCode Office.
vCard 3.0 Excel Sheet
Below we give you instructions on how to create a serial letter with our vCard 3.0 Excel sheet.
- Download the Excel Sheet for vCard 3.0 (click the link). The sheet contains a calculated column that creates the data format for the vCard 3.0 standard.
- Enter the contact information into columns A - O.
Note the calculated column vCard V3.0, which will contain the bar code data for the bar code add-in. Line Feeds are encoded through the x0A escape sequence.
- In your Word mail merge document, select the Excel sheet as data source for the mail merge.
- In the TBarCode Panel click the Templates icon and select vCard 3.0 Medium template. This loads the required QR code settings into the panel.
- Add the serial field placeholder via Insert Fields. Note that in serial letters you are limited to 255 characters in a single field (for workarounds please contact our support).
Mail Merge Errors
Mail Merge Stops After Two Records with TXT or CSV Datasource
Solution: The data-file for the mail merge must be connected as «OLE DB Datasource».
Connect your data-file with Select Recipients and select your text or CSV file. In the Confirm Data Source dialog, select «OLE DB Database Files» and click OK.
If the Confirm Data Source dialog does not appear you have to enable it in the Word Options. Go to Word Options | Advanced | General and activate the option «Confirm file format conversion on open». Then reconnect your data as described above (without attaching the data source again, the option may not be applied).

Fatal Error at MailMergeDataField.get_Value()
Access MDB Data Source: Please verify the table fields in your data source. The error can appear if a field name contains more than 32 characters. As a solution rename the fields in your import table or create a view with renamed fields.
Wrong Page Numbers in the Barcode
If your mail merge bar code references fields or document properties containing page numbers, wrong values can be read.
The behavior is caused by the internal update order in Word. It may occur that the bar code is created/drawn before the page numbers have been calculated (and an old value is read). Unfortunately we have no influence on this problem.
Barcode Data Doesn’t Change When Using Mail Merge
The same barcode data is inserted when creating mail merge barcodes. To workaround this problem, try one of the following steps:
Preview Mode
- In the preview mode the barcode is always shown using the data from the first record.
- To get the correct barcodes please do a mail merge into a new document or directly to the printer.
Layout Options
- The barcode must be insert in the layout options (Format Object) always as „In line with text“ („In Front of Text“ is partially supported since V10.8).
- If you use other wrapping styles, the bar code is not recognized in a mail merge.
- For flexible bar code positioning you can insert the barcode into a freely positioned text box or table.
Scaled or Cropped EMF Barcodes with Remote Desktop
Problem
If you connect to a PC through Remote Desktop, the EMF barcodes may look scaled or cropped after updating the bar codes. The problem occurs if you have scaled the size of text, apps and other items, that means the scaling in the Display Settings is set to 125% or higher.

Example for a scaled size, which triggers the problem.
Workaround
In order to fix the EMF bar code scaling, enable the following setting in Windows 10:
- Right click on the desktop and select Display Settings.
Alternatively open the Settings app, go to the System group of settings, then select the Display tab. - Scroll down to the Scale and layout section and click Advanced scaling settings.
- On the following screen, below “Fix scaling for apps”, enable the Let Windows try to fix apps so they are not blurry switch:
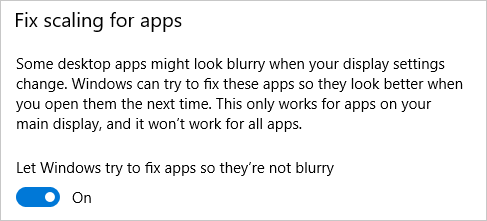
After that restart Excel (or Word) and refresh the bar codes in your document: Press SHIFT + Refresh in the add-in panel to force a refresh of all bar codes.
No Barcode Visible / Cropped Barcode
TBarCode is inserted in Word as „Inline Shape“. In case of Inline Shapes, the shape is clipped if the line height is configured to a fixed value.
The barcode should be visible again if you adjust line spacing to «Single».
Barcode Control Blocked or Barcode Not Updated
Please verify your security settings.
Network Path
By default documents from a shared network path containing active content (such as barcode controls) are opened in a safe mode, where active content may be disabled. If you see a yellow security warning on top of your document, go to the trust center in Word and/or Excel and allow the network path you use.
- Create, remove, or change a trusted location for your files
Security Alerts
TBarCode Office V10 is using ActiveX Controls for bar code creation. Depending on your security settings, ActiveX Controls may be blocked. If you see a yellow security warning on top of your document, you have to click «Enable Content» to allow access to the Barcode ActiveX Controls. The behavior of ActiveX Contols can be adjusted as shown below:
- Enable or disable ActiveX controls in Office documents
Barcode Shows «Adjust Properties» (V10)
The following information applies to Version 10 in case Barcode ActiveX Controls are embedded. The problem does not occur with EMF pictures.
Lost Settings After Saving the Document
Barcodes in a table can lose their settings when the document is saved. It seems the embedded Barcode ActiveX Controls are reset due to a Word bug. Customer reports show that the problem occurs in Word 2013 – but not with the latest service pack (15.0.4903.1002 or later).
Another reason for this problem can be that the document is opened and saved on a system where TBarCode/Office is not installed.
Solution
The solution is to update Office to the latest service pack or to re-install Office with the latest version. Make sure you edit the document always on a system where the add-in is installed and working properly.
- How can I find out my Office version?
- Update history for Office 2013
How to: Use Microsoft Word Programmatically with IIS Applications
In order to make the Add-In work properly you need the following IIS application settings
- Enable impersonation in the web.config file.
- Configure the Anonymous Authentication Identity and change it to a specific user.
- License the Add-In under the specified user account or ask for a user-independent license import (sales@tec-it.com).
Use of the Add-In is only permitted in Intranet applications (according to the terms of the site or enterprise license).
How Can I Verify if the Add-in Has Been Loaded?
You can use the following VBA code to verify if the add-in is available (loaded). You can show a warning (at startup or when clicking a button) if the add-in is missing.
Public Function IsTBarCodeWordAddInActive() As Boolean
Dim objAddIn As COMAddIn
IsTBarCodeWordAddInActive = False
For Each objAddIn In Word.Application.COMAddIns
  If objAddIn.ProgID = "TECIT.TBarCode.WordAddIn" And InStr(objAddIn.Description, "11") Then
    If objAddIn.Connect = True Then
      IsTBarCodeWordAddInActive = True
    End If
  End If
Next
End Function
How to check if available:
If IsTBarCodeWordAddInActive() Then
  MsgBox "All OK :-)"
Else
  MsgBox "TBarCode Word Add-In (V11) is missing!"
End If
The Panel Does Not Show/Recognize the Selected Barcode
In order for the panel to read the freely positioned barcode correctly, the text wrapping style must be set to „In Line With Text». Click here for more information.
For serial letters there is a preliminary, experimental support for freely positioned objects (so that in mail merge the barcode should be updated). But for editing the barcode in the panel, you must always switch to „In Line With Text».