
Word for Microsoft 365 Word for Microsoft 365 for Mac Word for the web Word 2021 Word 2021 for Mac Word 2019 Word 2019 for Mac Word 2016 Word 2016 for Mac Word 2013 Word 2010 More…Less
-
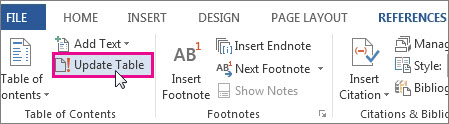
Go to References > Update Table.

-
Select one of the following:
-
Update page numbers only This only updates the pages that the headings are on, and ignores any changes to the heading text.
-
Update entire table This will reflect any updates to the heading text, as well as any page changes.
-
-
Select OK.
Note: Manually created tables (not created automatically from the headings), can’t be updated by Word. You’ll need to manually type your changes in the table of contents.
Need more help?
Want more options?
Explore subscription benefits, browse training courses, learn how to secure your device, and more.
Communities help you ask and answer questions, give feedback, and hear from experts with rich knowledge.
Updated: 07/31/2022 by
A table of contents helps readers know what information is contained in a document, and where it is located. In Microsoft Word, a table of contents can also allow a reader to jump to a specific section of a document by clicking a header. To add, edit, or update a table of contents in your Word document, select from the links below to view the appropriate steps.
Add a new table of contents
- Click a page in the document where you want the table of contents added.
- Click the References tab in the Ribbon.
- In the Table of Contents section, click the Table of Contents option.
- In the dialog box or pop-down window, select one of the available table of contents layouts to automatically insert it to the current page of the document.
Tip
In step 4, you can select the Custom Table of Contents option to add a customized table of contents.
Update an existing table of contents
- Locate and click the table of contents in the document.
- Right-click the table of contents and select Update Field in the pop-up menu.
- In the Update Table of Contents window, select the Update entire table option and click the
 button.
Format a table of contents
To format a table of contents, you can set automatic formatting settings or manually format individual entries in the table.
- Automatically format
- Manually format
Automatically format
After creating a table of contents, you can modify the formatting so that automatic updates replicate it.
- Click the References tab in the Ribbon.
- In the Table of Contents section, click the Table of Contents option.
- In the dialog box or pop-down window, select the Custom Table of Contents option near the bottom.
- In the Table of Contents window, click the Modify button near the bottom-right corner.
- Select one of the table of content styles in the Styles window and click the Modify button.
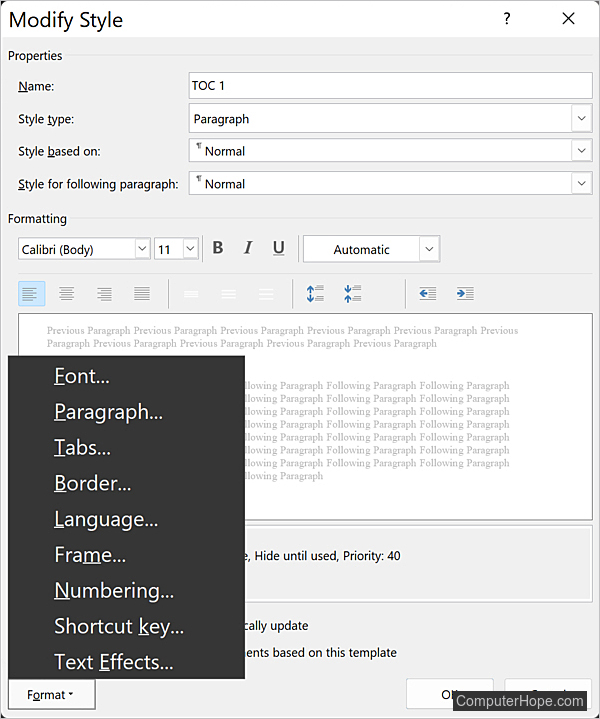
- Click the Format button in the bottom-left corner of the Modify Style window, and select an option to modify. For example, you can select Font and change the font type, size, and color, and set it to bold or italic.
- After making your desired modifications to the table of contents style you selected, click OK on each of the open windows to save the changes.
Now, when updating the entire table of contents, the formatting options you set are automatically applied.
Manually format
After creating a table of contents, you can manually modify the formatting of text and numbers, including text size, text color, bold, and italic.
- Select the text in the table of contents that you want to format.
- How to highlight or select text.
- In the Ribbon, on the Home tab, select the new font type, size, or color, or click the bold or italic button. All selected text is changed.
Using the steps above, you can select and format each line in the table contents to be different from other lines, if desired.
Note
If you make any manual formatting changes in the table of contents and later use the «Update entire table» option to update entries in the table, your formatting changes are overwritten.
Add entries to an existing table of contents
- Add new entry automatically.
- Add new entry manually.
Add new entry automatically
The most effective way to add entries to a table of contents is to create more content with headings in the document.
- Insert one or more headings in the document using the headings options in the Styles section of the Home tab in the Ribbon.
- Add content below each new heading.
- Follow the steps in the update an existing table of contents section above to automatically add the new heading entries.
Add new entry manually
If preferred, you can manually add entries to the table of contents.
Note
If you add a manual entry in the table of contents and later use the automatic «Update entire table» option, your manual entries are dropped from the table.
- Add new content to the document, if not already done.
- In the existing table of contents, determine where you want to add an entry. Then, place the text cursor at the end of the entry above where you want the new entry.
- Press the Enter key to add a new blank line in the table of contents.
- Type the text for the new entry.
- Type the page number where the new content exists in the document for the new table of contents entry.
- Move the text cursor to the left of the page number. Repeatedly type the character or symbol used to separate the entry text from the page number, until it is to the right. The page number should line up with the page numbers of other entries in the table of contents.
For example, in the table of contents below, the «New manual entry» text and page number 3 is separated by multiple periods.

![]()
Download Article
![]()
Download Article
- Adding a Table of Contents
- Updating the Table of Contents
- Stylizing the Table of Contents
- Video
|
|
|
This wikiHow teaches you how to customize and update the table of contents in your Word document. When you create a table of contents in Word, page numbers are added automatically based on the headings you’ve added to each section. Word makes it easy to customize the way the page numbers and section titles appear on the table. If you make changes to your document that affects your section headers or page numbers, you’ll need to choose the Update Table option so the table of contents remains correct.
-
1
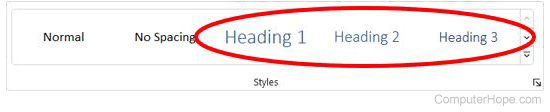
Format the headings of each section of your document. Word’s table of contents builder automatically generates a table of contents based on the headings in your document.[1]
This means each section that you want represented in your table of contents must have a properly-formatted heading.- If a section should appear as a primary section in the table of contents, select its heading, click the Home tab, and then select Heading 1 on the «Styles» panel.
- To add a sub-section to the primary section in the table of contents, give that section a Heading 2 header: Select its heading and choose Heading 2 from the Styles section.
- You can can also use Heading 3, Heading 4, etc., to add even more pages to your table of contents.
- Make sure any page you want to include in the table of contents has a heading.
-
2
Click the location where you want to insert the table of contents. Typically this will be at the beginning of your document.
Advertisement
-
3
Click the References tab. It’s at the top of Word.
-
4
Click Table of Contents on the toolbar. It’s at the upper-left corner of Word. A list of Table of Contents styles will expand.
-
5
Select an automatic style template. Several style options appear for your table of contents—choose one of the suggested styles to get started. Once selected, this will add a table of contents that lists the page numbers for each of your formatted sections.


Advertisement
-
1
Click the References tab. It’s at the top of Word.[2]
- Use this method if you’ve made a change (changing a heading, adding/removing pages) to your document and need to update the table of contents to reflect that change.
- The only way to change the name of a section on the table of contents is to change the name of the corresponding header in the document.
-
2
Click Update Table on the «Table of Contents» panel. It’s in the upper-left corner. Two options will appear.
-
3
Select an update option.
- Select Update page numbers only if you want to refresh the page numbers without applying any changes you’ve made to the headings.
- Select Update entire table to apply all heading and page number changes.
-
4
Click OK. The table of contents is now up-to-date.


Advertisement
-
1
Click the References tab. It’s at the top of Word.
-
2
Click Table of Contents on the toolbar. It’s at the upper-left corner of Word. A list of Table of Contents styles will expand.
-
3
Click Custom table of contents on the menu. This opens the Table of Contents dialog box.
-
4
Adjust your general preferences. The «Print Preview» box at the upper-left corner shows you how the printed table of contents will appear, while the «Web preview» box displays how it will look on the web.[3]
- Use the checkbox next to «Show page numbers» to show or hide page numbers. If you just want to hide page numbers on the web version of the table of contents, check the box next to «Use hyperlinks instead of page numbers.»
- Use the checkbox next to «Right align pages numbers» top adjust the alignment.
- To change the style of the line or pattern that separates the heading title and the page number, make your selection from the «Tab leader» menu.
- To choose another theme, select something from the «Format» menu.
- To adjust how many heading levels are displayed in the table, select an option from the «Show levels» menu (the default is 3).
-
5
Click the Modify button. It’s in the lower-right corner of the window. This is where you can change the properties of the text on the table of contents page.
- If you don’t see this button, click the «Formats» menu and select From template. It should appear then.
-
6
Select a style and click Modify. The styles you can change appear in the «Styles» box on the left side of the window. When you click a style (e.g., TOC 1), you’ll see the font size, spacing, and other details—clicking Modify allows you to change these details.
-
7
Make your changes and click OK. You can choose different fonts, alignments, colors, and numerous other details for each selected style. Alternatively, you can keep the defaults, which come from the table of contents template you selected.
-
8
Click OK. The style changes you’ve made will apply to your table of contents immediately.


Advertisement
Ask a Question
200 characters left
Include your email address to get a message when this question is answered.
Submit
Advertisement
Video
Thanks for submitting a tip for review!
About This Article
Article SummaryX
1. Click the References tab.
2. Click Update Table.
3. Select an update option.
4. Click OK.
Did this summary help you?
Thanks to all authors for creating a page that has been read 59,876 times.
Is this article up to date?
The good thing about Automatic Table of
Content is that you can effortlessly update it automatically to reflect changes
in the document without typing anything as in when you are doing it manually.
You may need to update Table of Content for
many reasons.
The most likely reasons include changes in the document by moving a chapter or two, inserting and deleting the body text or formatting body text with Heading styles which may affect the document page numbering.
This means that you need to update your Table of Content when the headings have changed or when some content moves to a different page (because you added or removed certain things from the document)
There are four methods to update Table of
Content in word (at least to my knowledge).
In today’s
quick tips, you’ll learn all the four approaches to Update table of content in
word.
Option 1: Update Table of Content shortcut (F9)
- Click
the Table of content to select it (It becomes grayed when selected) - Press
the F9 function key.

(The Update Table of Content dialog box
appears from which you have two options)

- Choose
option 1 to Update page numbers only if none of the headings have changed,
but just the page numbers; OR - Choose
option 2 to Update entire table if more substantial changes were made to
your document – like headings added or removed, or additional paragraphs
formatted with heading styles for inclusion in the TOC. - Click
OK
NOTE: The entries of Table of Contents are
fully editable: you can insert text and paragraphs between them, change the
entry titles or page numbers, and even delete the leading dots. If you choose
to update page number only (the first option), all changes you make manually
will be kept. But if you choose to update the entire table (the second option),
it rebuilds which will discard any changes you made manually.
When you edit Table of Content to include or exclude certain TOC features such as leading dots or page numbers, Word may prompt you whether you are sure to replace the table with your new changes. Click OK to accept changes.

Option 2: Update Table of Content in Reference
Another place to go to update table of content in word is the reference tab.
Without
further ado, below are the quick steps.
- Click
the Table of content to select it (It becomes grayed when selected) - Go to Reference>Table of Content>Update
Table

(The Update Table of Content dialog box
appears from which you have two options)
- Choose
option 1 to Update page numbers only if none of the headings have changed,
but just the page numbers; OR - Choose
option 2 to Update entire table if more substantial changes were made to
your document – like headings added or removed, or additional paragraphs
formatted with heading styles for inclusion in the TOC. - Click
OK
Option 3: Using the update bottom above the TOC object
- Click
the Table of content to select it (It becomes grayed when selected) - Click the Update Table button located above
the Table of Content object

(The Update Table of Content dialog box
appears from which you have two options)
- Choose
option 1 to Update page numbers only if none of the headings have changed,
but just the page numbers; OR - Choose
option 2 to Update entire table if more substantial changes were made to
your document – like headings added or removed, or additional paragraphs
formatted with heading styles for inclusion in the TOC. - Click
OK
Option 4: Update TOC by Right-Clicking
- Right-click any of the Table of Content fields
and select Update field.

(The Update Table of Content dialog box
appears from which you have two options)
- Choose
option 1 to Update page numbers only if none of the headings have changed,
but just the page numbers; OR - Choose
option 2 to Update entire table if more substantial changes were made to
your document – like headings added or removed, or additional paragraphs
formatted with heading styles for inclusion in the TOC. - Click
OK
Thanks for reading my tips.
When you work with a long Word document that includes headings, you may want or need to meet the requirements for creating a Table of Contents or several Tables of Contents. The Table of Contents lists the headings in a document, along with the numbers of the pages where the headings appear.
By default, adding a Table of Contents can make it easy for the reader to locate document content quickly. The Table of Contents allows jumping from one location to another.
Word offers several ways to create a Table of Contents. Some of the common ways:
1. Create a pre-defined Table of Contents (simplest way).
By default, Word creates a Table of Contents from the text formatted with sequential heading styles: Heading 1, Heading 2, Heading 3:

2. Create a custom Table of Contents.
You can include or exclude in a Table of Contents any of the used styles such as custom styles:

3. Create a Table of Content from parts of texts:

A Table of Contents created by the appropriate functionality has hyperlinks to navigate the document quickly. To use a hyperlink, hover the mouse over the appropriate entry in the table and Ctrl+Click to follow the link (see how open hyperlinks without holding Ctrl).
Notes:
- Some requirements recommend creating a Table of Contents if the document has more than 10 pages.
- You can also download templates and use them to fulfill the requirements.
Preparing a document for creating a Table of Contents
Before creating a Table of Contents in Word, ensure that all needed headings are formatted with Word’s heading styles. These allow Word to recognize and include them in the appropriate list.
You can create a Table of Contents, then apply a heading style to some paragraphs and update created Table of Contents to fulfill it.
Don’t forget to update headings and any related items in the document!
Create a Table of Contents – simplest way
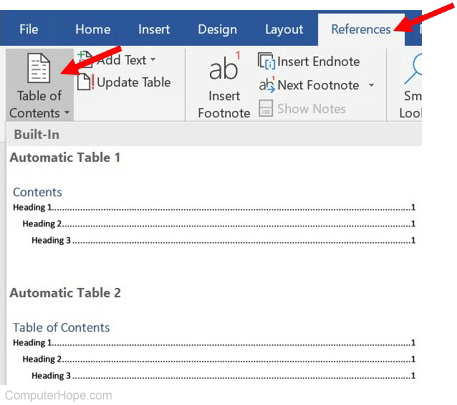
To create a Table of Contents in a Word document, do the following:
1. Position the cursor in the document where you want to insert the Table of Contents.
2. On the Reference tab, in the Table of Contents group, click the Table of Contents button:

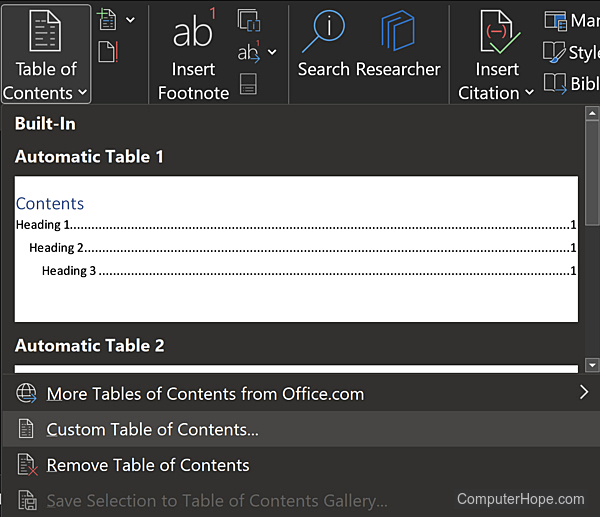
3. From the Table of Contents dropdown list, select one of the built-in Tables:

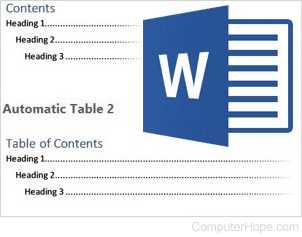
- Automatic Table 1 inserts a Table of Contents with the title Contents and includes all text styled as Heading 1, Heading 2, or Heading 3.
- Automatic Table 2 inserts a Table of Contents with the title Table of Contents and includes all text styled as Heading 1, Heading 2, or Heading 3.
- Manual Table inserts a Table of Contents with the title Table of Contents and includes placeholders that are not linked to the document content (see an example):

Note: See how to modify a style of Table of Contents.
After selecting any of the built-in tables, Word creates a Table of Contents using the selected template. E.g.:
Create a custom Table of Contents
To create a Table of Contents that contains not only Heading 1 – Heading 3 styles, do the following:
1. Position the cursor in the document where you want to insert the Table of Contents.
Note: The custom Table of Contents does not automatically create a title (e.g., Table of Contents or Contents).
2. On the Reference tab, in the Table of Contents group, click the Table of Contents button:
3. From the Table of Contents dropdown list, select Custom Table of Contents…:

In the Table of Contents dialog box, on the Table of Contents tab (is displayed by default, all other tabs are grayed):

- In the General section (we recommend starting from this section because its options can change the selected parameters in other sections):
- From the Format dropdown list, select a visual format:

- From template is based on the styles established in the current template
- Classic
- Distinctive
- Centered
- Formal
- Simple
Note: Choose any proposed formats and see how the new list will look in the Print Preview section. E.g., the Formal format:

- In the Show levels field, type or select the number of levels you want to include in the Table of Contents. Word will display headings starting from Heading 1 to the selected level (see how to customize which heading or styles should be displayed). E.g., 5 levels:
- From the Format dropdown list, select a visual format:


See all the changes and choices in the Print Preview and Web Preview sections:
- In the Print Preview section (the selected Format in the General section can change all options in that section):
- Clear the Show page numbers check box if you prefer to hide page numbers (see how to hide page numbers for some headings):
If you deselect this option, all other options in the Print Preview section will disappear.
- Clear the Right align page numbers check box to display page numbers right after items text:
If you deselect this option, you can’t choose the tab leader for page numbers.
- From the Tab leader dropdown list, select the tab leader you need. You can select dots, dashes, or lines that appear before the page numbers (see how to customize tab leaders for different headings):
- Clear the Show page numbers check box if you prefer to hide page numbers (see how to hide page numbers for some headings):
- In the Web Preview section of the Table of Contents dialog box (shows how your Table of Contents will look if you convert your Word file to a web page):
- Clear the Use hyperlinks instead of page numbers check box if you prefer to see the same view as in Print Preview:
- Clear the Use hyperlinks instead of page numbers check box if you prefer to see the same view as in Print Preview:
- Click the Options… button to customize which styles and in which order should be included in the Table of Contents. See Create a Table of Contents of non-predefined styles and Table entry fields for more details.


Customize a Table of Contents styles
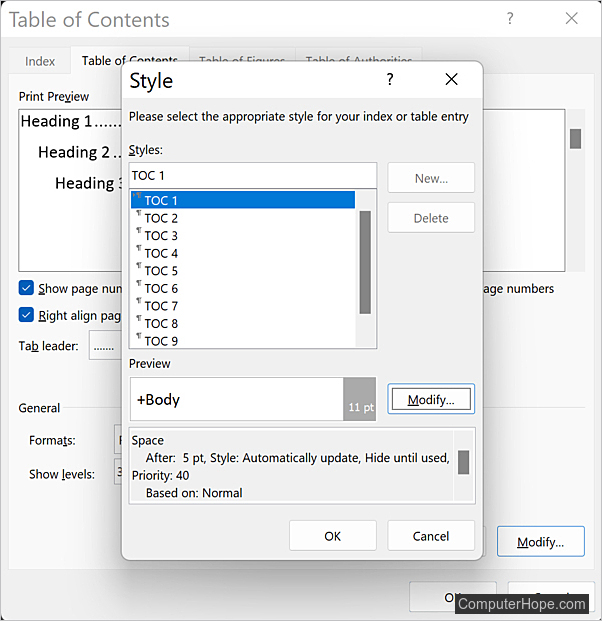
- Click the Modify… button to modify pre-defined styles for a Table for Contents.
In the Style dialog box, select the style you want to modify:

- In the Preview field, see how the selected style looks,
- Under the Preview field, see the main options of the selected style,
- If you need to change the selected style, click the Modify… button.
In the Modify Style dialog box, make changes you need, then click the OK button:


See how to customize Table of Contents styles for more details.
Add a title to the custom Table of Contents
After inserting a new Table of Contents, manually type a title above the list. E.g.:

To see the proposed field and have all the features of the standard Table of Contents, do the following:
1. Add the pre-defined Table of Contents in the simplest way (see above).
2. Edit the Table of Contents to apply any customization you need.
Attention! We highly recommend checking the formatting requirements, accepted by your college, university, company, or established on the project, etc.
Notes: See also how to customize a Table of Contents for more details.
Empty the Table of Contents
After creating a Table of Contents, it can be created with the message “No table of contents entries found”:
![]()
The main cause for this message is that Word could not find the text with style Heading 1, Heading 2, or Heading 3 in the document (by default, a Table of Contents contains only these three styles, see how to customize it to choose styles you need).
To solve that problem, for each heading that you want to be displayed in the Table of Contents, select the heading text (paragraph or block of text). Then do one of the following:
- On the Home tab, in the Styles group, choose any of the Headings:

- Right-click on the selection, click the Styles button in the Mini toolbar, then select a Heading style you want:

- Position the cursor in a paragraph with the text you want to change to the Heading. Then on the Reference tab, in the Table of Contents group, click the Add Text button, then choose the level you need:

- Use the shortcuts for Headings:
- Alt+Ctrl+1 to apply Heading 1,
- Alt+Ctrl+2 to apply Heading 2,
- Alt+Ctrl+3 to apply Heading 3.


Don’t forget to update headings and any related items in a document!
Update a Table of Contents
Word will not automatically update any Table of Contents after adding, deleting, or modifying included headings and pages. You need manually update them, follow the next steps:
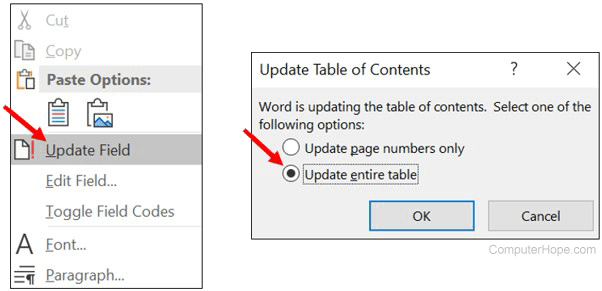
1. Click on the Table of Contents and do one of the following:
- On the References tab, in the Table of Contents group, click the Update Table button:

Note: If Word doesn’t recognize any Table or List in the document as a Table of Content, it shows the appropriate message (to solve that, fix or recreate a Table of Contents):

- Right-click the list and select Update Field from the shortcut menu:

- Click anywhere in the Table of Contents to show the field options. At the top of the field borders, click the Update Table… button:


See also how to lock and unlock updating for fields.
2. In the Update Table of Contents dialog box, select what you need to update:

We recommend selecting the Update entire table option always.
3. Click the OK button to start updating.
Select a Table of Contents
To make any changes, such as modifying the Table of Contents, you need to select the total Table of Contents lines, including the last, empty line right after the Table of Contents entries:

To select all the Table of Contents, you can also click the Field button:

Edit an existing Table of Contents
If you need to modify an existing Table of Contents, you can:
- Delete existing Table of Contents and create a new one,
- Edit an existing field.
To edit the existing Table of Contents, follow the next steps:
1. Do one of the following:
- Click anywhere on the Table of Contents, then on the References tab, in the Table of Contents group, click the Table of Contents button, then select Custom Table of Contents… from the dropdown list.
- Select all the lines of the Table of Contents (see how to select it above), then right-click on the selection and choose Edit Field… in the popup menu:

In the Field dialog box, click the Table of Contents… button:

Note: You can see that button only if you have selected all the existing Table of Contents lines.
2. In the Table of Contents dialog box, on the Table of Contents tab, select the options you need.
Be careful! Some options selected for the existing Table of Contents can be lost.
Delete a Table of Contents
To delete a Table of Contents, do one of the following:
- On the References tab, in the Table of Contents group, click the Table of Contents button, then choose Remove Table of Contents from the dropdown list:

- Click inside the Table of Contents to show the field options. At the top of the field borders, click the Table of Contents button, then choose Remove Table of Contents:


