
Word for Microsoft 365 Word for Microsoft 365 for Mac Word for the web Word 2021 Word 2021 for Mac Word 2019 Word 2019 for Mac Word 2016 Word 2016 for Mac Word 2013 Word 2010 More…Less
-
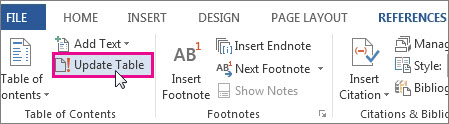
Go to References > Update Table.

-
Select one of the following:
-
Update page numbers only This only updates the pages that the headings are on, and ignores any changes to the heading text.
-
Update entire table This will reflect any updates to the heading text, as well as any page changes.
-
-
Select OK.
Note: Manually created tables (not created automatically from the headings), can’t be updated by Word. You’ll need to manually type your changes in the table of contents.
Need more help?
Updated: 07/31/2022 by
A table of contents helps readers know what information is contained in a document, and where it is located. In Microsoft Word, a table of contents can also allow a reader to jump to a specific section of a document by clicking a header. To add, edit, or update a table of contents in your Word document, select from the links below to view the appropriate steps.
Add a new table of contents
- Click a page in the document where you want the table of contents added.
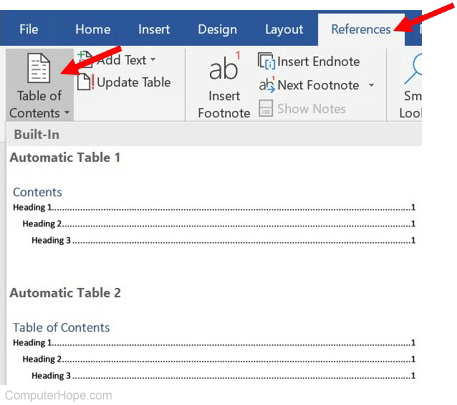
- Click the References tab in the Ribbon.
- In the Table of Contents section, click the Table of Contents option.
- In the dialog box or pop-down window, select one of the available table of contents layouts to automatically insert it to the current page of the document.
Tip
In step 4, you can select the Custom Table of Contents option to add a customized table of contents.
Update an existing table of contents
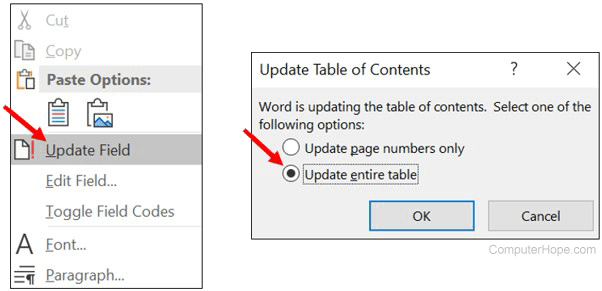
- Locate and click the table of contents in the document.
- Right-click the table of contents and select Update Field in the pop-up menu.
- In the Update Table of Contents window, select the Update entire table option and click the
 button.
Format a table of contents
To format a table of contents, you can set automatic formatting settings or manually format individual entries in the table.
- Automatically format
- Manually format
Automatically format
After creating a table of contents, you can modify the formatting so that automatic updates replicate it.
- Click the References tab in the Ribbon.
- In the Table of Contents section, click the Table of Contents option.
- In the dialog box or pop-down window, select the Custom Table of Contents option near the bottom.
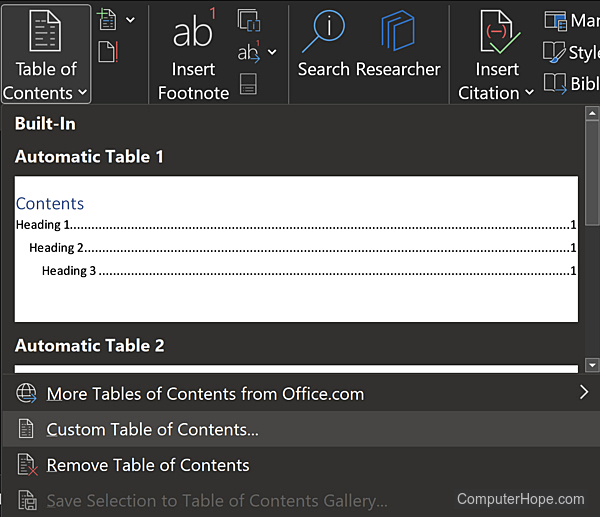
- In the Table of Contents window, click the Modify button near the bottom-right corner.
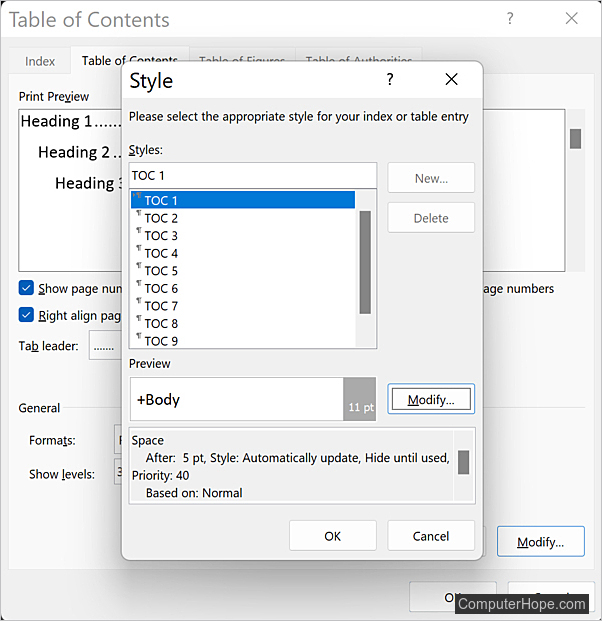
- Select one of the table of content styles in the Styles window and click the Modify button.
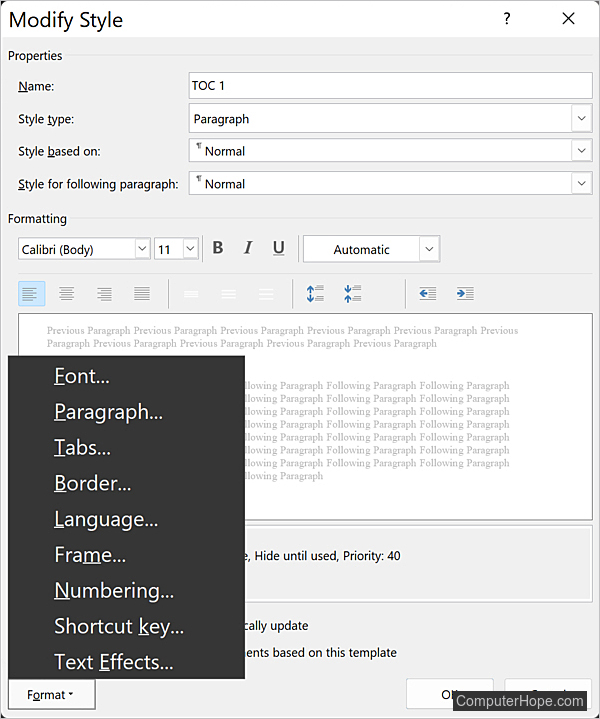
- Click the Format button in the bottom-left corner of the Modify Style window, and select an option to modify. For example, you can select Font and change the font type, size, and color, and set it to bold or italic.
- After making your desired modifications to the table of contents style you selected, click OK on each of the open windows to save the changes.
Now, when updating the entire table of contents, the formatting options you set are automatically applied.
Manually format
After creating a table of contents, you can manually modify the formatting of text and numbers, including text size, text color, bold, and italic.
- Select the text in the table of contents that you want to format.
- How to highlight or select text.
- In the Ribbon, on the Home tab, select the new font type, size, or color, or click the bold or italic button. All selected text is changed.
Using the steps above, you can select and format each line in the table contents to be different from other lines, if desired.
Note
If you make any manual formatting changes in the table of contents and later use the «Update entire table» option to update entries in the table, your formatting changes are overwritten.
Add entries to an existing table of contents
- Add new entry automatically.
- Add new entry manually.
Add new entry automatically
The most effective way to add entries to a table of contents is to create more content with headings in the document.
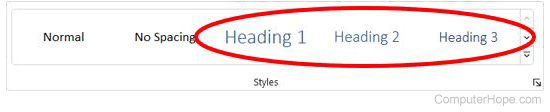
- Insert one or more headings in the document using the headings options in the Styles section of the Home tab in the Ribbon.
- Add content below each new heading.
- Follow the steps in the update an existing table of contents section above to automatically add the new heading entries.
Add new entry manually
If preferred, you can manually add entries to the table of contents.
Note
If you add a manual entry in the table of contents and later use the automatic «Update entire table» option, your manual entries are dropped from the table.
- Add new content to the document, if not already done.
- In the existing table of contents, determine where you want to add an entry. Then, place the text cursor at the end of the entry above where you want the new entry.
- Press the Enter key to add a new blank line in the table of contents.
- Type the text for the new entry.
- Type the page number where the new content exists in the document for the new table of contents entry.
- Move the text cursor to the left of the page number. Repeatedly type the character or symbol used to separate the entry text from the page number, until it is to the right. The page number should line up with the page numbers of other entries in the table of contents.
For example, in the table of contents below, the «New manual entry» text and page number 3 is separated by multiple periods.

The good thing about Automatic Table of
Content is that you can effortlessly update it automatically to reflect changes
in the document without typing anything as in when you are doing it manually.
You may need to update Table of Content for
many reasons.
The most likely reasons include changes in the document by moving a chapter or two, inserting and deleting the body text or formatting body text with Heading styles which may affect the document page numbering.
This means that you need to update your Table of Content when the headings have changed or when some content moves to a different page (because you added or removed certain things from the document)
There are four methods to update Table of
Content in word (at least to my knowledge).
In today’s
quick tips, you’ll learn all the four approaches to Update table of content in
word.
Option 1: Update Table of Content shortcut (F9)
- Click
the Table of content to select it (It becomes grayed when selected) - Press
the F9 function key.

(The Update Table of Content dialog box
appears from which you have two options)

- Choose
option 1 to Update page numbers only if none of the headings have changed,
but just the page numbers; OR - Choose
option 2 to Update entire table if more substantial changes were made to
your document – like headings added or removed, or additional paragraphs
formatted with heading styles for inclusion in the TOC. - Click
OK
NOTE: The entries of Table of Contents are
fully editable: you can insert text and paragraphs between them, change the
entry titles or page numbers, and even delete the leading dots. If you choose
to update page number only (the first option), all changes you make manually
will be kept. But if you choose to update the entire table (the second option),
it rebuilds which will discard any changes you made manually.
When you edit Table of Content to include or exclude certain TOC features such as leading dots or page numbers, Word may prompt you whether you are sure to replace the table with your new changes. Click OK to accept changes.

Option 2: Update Table of Content in Reference
Another place to go to update table of content in word is the reference tab.
Without
further ado, below are the quick steps.
- Click
the Table of content to select it (It becomes grayed when selected) - Go to Reference>Table of Content>Update
Table

(The Update Table of Content dialog box
appears from which you have two options)
- Choose
option 1 to Update page numbers only if none of the headings have changed,
but just the page numbers; OR - Choose
option 2 to Update entire table if more substantial changes were made to
your document – like headings added or removed, or additional paragraphs
formatted with heading styles for inclusion in the TOC. - Click
OK
Option 3: Using the update bottom above the TOC object
- Click
the Table of content to select it (It becomes grayed when selected) - Click the Update Table button located above
the Table of Content object

(The Update Table of Content dialog box
appears from which you have two options)
- Choose
option 1 to Update page numbers only if none of the headings have changed,
but just the page numbers; OR - Choose
option 2 to Update entire table if more substantial changes were made to
your document – like headings added or removed, or additional paragraphs
formatted with heading styles for inclusion in the TOC. - Click
OK
Option 4: Update TOC by Right-Clicking
- Right-click any of the Table of Content fields
and select Update field.

(The Update Table of Content dialog box
appears from which you have two options)
- Choose
option 1 to Update page numbers only if none of the headings have changed,
but just the page numbers; OR - Choose
option 2 to Update entire table if more substantial changes were made to
your document – like headings added or removed, or additional paragraphs
formatted with heading styles for inclusion in the TOC. - Click
OK
Thanks for reading my tips.
Picture yourself picking up a book from the library. What’s the first thing you do? The average human being would go through the TOC (Table of Contents) first.
As a result, creating a table of contents with relevant subheadings, subchapters and list of figures is essential for any writer out there. Most writers use Microsoft 365 suite because it allows you to automatically update and insert multiple tables of contents in your Word document.
However, recently, we’ve received numerous reports from users stating that their table of contents entry are not being updated. After analyzing this problem, I discovered some foolproof methods to ensure you can always update TOC wthout issues.
Enough talk. Let’s deep dive into the main discussion
Check out our separate post on how to insert word page numbers in MS Word.
Your Word Table of Contents (TOC) is not updating correctly because of your subheading’s incorrect style or paragraph’s incorrect style on the current document. If you use the heading style as a Title instead of Subheading 1-6, your heading does not appear in the TOC.
The headings within TOC allow users to navigate the entire document easily and quickly. Users can easily scan the whole document within a few seconds by rolling their eyes at the TOC.
However, the main concern is some MS Word users reported that the Table of Contents in MS Word is not updating correctly. Many reports about MS Word TOC are found on different forums, including Microsoft forums. This issue seems to be occurring more frequently in these versions of Word:
- Word 2007
- Word 2010
- Word 2013
- Word 2016
- Word 2019
There are three possible reasons for the Table of Contents not updating correctly on MS Word. These three are the main culprit causing the TOC not updating issue.
Here’s a complete guide on how to set background image on MS Word.
Here are the main reasons for the Table of Contents not updating on MS Word:
Incorrect Heading Style
If the heading style applied is not set in the correct heading format, your heading does not appear on the Table of Contents. For this reason, the TOC is not correctly updated when you try to update your Table of Contents.
Note that you need to choose the appropriate heading 1 or 2 style instead of simply changing the font for Word to recognize the header formatting changes.
Incorrect Paragraph Style
Another significant reason for the Table of Contents not updating correctly on MS Word is the incorrect paragraph style.
When a paragraph style is not matched with other paragraph styles in a document, the MS Word Table of Contents doesn’t update correctly.
Improper Placement of TOC
Improper placement of the Table of Content is another primary reason for this issue.
When the TOC is created in the middle of the end of the document, it may be possible your Table of Contents is not updating correctly.
Also, check out our separate post on how to make only one page landscape in Word.
How to Fix Word Table of Contents In Microsoft Word Not Updating
You can fix automatic table of contents not updating by editing or modifying styles included in the TOC. Note that you need to go to the references tab and manually select the option to update entries in the table every time since Word does not track changes to your document in real time.
There are three proven and effective methods to resolve the TOC contents page not updating issue on MS Word. Try to follow these three effective methods to fix the problem.
Here are the steps to fix Table of Contents in Word not updating issue:
1. Check the Heading Style
The first method to fix the word Table of Contents not updating issue is to check and ensure the heading style on your document.
If one of your headings is missing from your TOC, check the heading style to ensure your missing heading is formatted in the correct format, like Heading 2.
If your heading style is set as a Normal text style, it’s not included in TOC as a heading. To set a line as a heading or subheading, select the entire line and choose a heading format (Heading 1 to 6) to set a line as a heading or subheading.
After correctly formatting the subheading style, update your TOC to make the changes in your Table of Contents.
Check out the easiest way to enable equation editor in Microsoft Word.
2. Check the Paragraph Style
Another effective method to fix the Microsoft word Table of Contents not updating correctly is to check and ensure that all paragraph style is the same on your entire document.
If one of the headings and the page numbers are not showing correctly in your Table of Contents, select the paragraph under the heading and check the style of the selected paragraph.
When your selected paragraph style differs from other paragraphs, set the paragraph style chosen the same as others. Follow the steps below to copy and paste the format style.
Here are the steps to copy and paste the format style:
- Select a paragraph and press Ctrl+Shift+C on your keyboard to copy the style.
- Select the paragraph where you want to paste the style.
- Press Ctrl+Shift+V on your keyboard to paste the style.
- Update your TOC to make the changes.
Check out the Microsoft Refund policy to get absolutely full refunds to your products.
3. Use Paragraph Marks
Using the paragraph marks is another effective way to solve the Table of Contents not updating issue on MS Word.
If you face similar issues with the TOC, you can try this method to resolve the issue.
To use the paragraph marks, follow the steps below:
- Click on the ¶ symbol to show/hide paragraph marks under the Home button.

- Remove the final paragraph mark of the document.
- Copy all the content.
- Create a new document and paste all content.
- Try to update your TOC to check whether your problem is solved.

Quickly check out our epic guide on how to enable word wrap in notepad.
How to Update a Table Of Contents in Microsoft Word Document
You can update a table of contents in Microsoft Word and its headings automatically by choosing update the table of contents option in the reference tab. You can also choose to update table entirely or just the page number. It’s also possible to choose from the built-in heading styles and format it.
Do you want to know the update process of the Microsoft Word Table of Contents?
There are two effective and tested ways to update the Table of Contents on Microsoft Word. Here, I will describe these two methods to update the TOC.
Here are the steps to update the MS Word Table of Contents:
You can also update your Table of Contents using the TOC itself. Follow the steps below to do this.
Here are the steps to update the MS Word Table of Contents:
Go through our epic guide on how to Enable or Disable Autosave in Word
Final Thoughts
Creating a good Table of Contents in your document provides a road map, makes the document easier to discuss, and complements your training outline.
From the above explanations and fixes, I hope now you can efficiently resolve your problem without facing any further issues.
Which method helps you to resolve your problem? Let me know in the comment section to help others find the best one.
That’s all for now. Have a good day.

There are several ways to create a table of contents in Microsoft Word. In this tutorial, we are going to look at the two most convenient ways. Plus, we are going to update a table of contents after making changes to the document. We will also delete a table of contents.
- How to Create a Built-In Table of Contents
- How to Create a Custom Table of Contents
- How to Choose Individual Heading Levels for a Table of Contents
- How to Update a Table of Contents
- How to Delete a Table of Contents
 Important Note: To follow these steps, your headings must be formatted with Word’s heading styles. For information on heading styles, please see “How to Create and Customize Headings in Microsoft Word.”
This tutorial is available as a YouTube video showing all the steps in real time.
Watch more than 100 other writing-related software tutorials on my YouTube channel.
The images below are from Word for Microsoft 365. The steps are the same in Word 2021, Word 2019, Word 2016, Word 2013, and Word 2010. However, your interface may look slightly different in those older versions of the software.
Word’s built-in tables of contents are the easiest to create. However, they offer the fewest number of customization options.
- Place your cursor where you want to insert the table of contents.
- Select the References tab in the ribbon.

- Select the Table of Contents button.

- Select a built-in table of contents from the drop-down menu.

Your table of contents should appear in your document.

How to Create a Custom Table of Contents
Word’s custom tables of contents provide formatting options and allow you to include or exclude specific heading levels.
- Place your cursor where you want to insert the table of contents.
Pro Tip: The custom table of contents option does not automatically create a title (e.g., Table of Contents or Contents), so be sure to leave a blank line above your cursor where you can enter a title later.
- Select the References tab in the ribbon (see figure 1).
- Select the Table of Contents button (see figure 2).
- Select Custom Table of Contents from the drop-down menu.

- Select a visual style from the Formats menu in the Table of Contents dialog box. (The From Template option is based on the styles established in your current template.)

- Select the number of levels you want to include in the Show levels menu.

- (Optional Step) Select additional options concerning page numbers and tab leaders, which are the dots, dashes, or lines that appear before the page number.

How to Choose Individual Heading Levels for a Table of Contents
By default, Word’s tables of contents include text formatted with sequential heading styles (e.g., Heading 1, Heading 2, Heading 3, etc.). However, you can manually include or exclude individual heading levels within your custom table of contents.
- Select the Options button in the Table of Contents dialog box.

- Enter the sequence of the heading levels you want to appear in the TOC level text boxes in the Table of Contents Options dialog box.

In the example above, I entered 1 across from Heading 2 because I want my table of contents to begin with Heading 2 and exclude Heading 1.
- Select the OK button.

- Select the OK button.

Your table of contents should appear in your document.
- Type a title (e.g., Table of Contents or Contents) above your table of contents.
How to Update a Table of Contents
Your table of contents won’t automatically update as you add additional headings to your document. Instead, you can update your table of contents as you add headings or when the document is complete.
- Place your cursor in the table of contents.
- Right-click and select Update Field from the shortcut menu.

Pro Tip: You can also select Update Table in the Table of Contents group in the References tab.
- Select Update entire table from the Update Table of Contents dialog box.

- Select the OK button.

Your table of contents should update immediately.
How to Delete a Table of Contents
You don’t have to select the table of contents to delete it.
- Select the References tab in the ribbon (see figure 1).
- Select the Table of Contents button (see figure 2).
- Select Remove Table of Contents from the drop-down menu.

Your table of contents should be deleted immediately.
Related Resources
How to Create and Update a List of Tables or Figures in Microsoft Word
How to Cross-Reference Tables and Figures in Microsoft Word
How to Insert Figure Captions and Table Titles in Microsoft Word
Updated January 03, 2022