
Have you ever thought about what will you do if you need to transfer data from one Excel worksheet to another automatically?
or how will you update one Excel worksheet from another sheet, copy data from one sheet to another in Excel?
Keeping knowledge of these things is very important mainly when you are working with a large-size Excel worksheet having lots of data in it.
If you don’t have any clue about this, then this blog will help you out. As in this post, we will discuss how to copy data from one cell to another in Excel automatically?
Also, learn how to automatically update one Excel worksheet from another sheet, transfer data from one Excel worksheet to another automatically, and many more things in detail.
So, just go through this blog carefully.
Practical Scenario
Okay, first I should mention that I’m a complete amateur when it comes to excel. No VBA or macro experience, so if you’re not sure whether I know something yet, I probably don’t.
I have a workbook with 6 worksheets inside; one of the sheets is a master; it’s simply the other 6 sheets compiled into 1 big one. I need to set it up so that any new data entered into the new separate sheets is automatically entered into the master sheet, in the first blank row.
The columns are not the same across all the sheets. Hopefully, this will be easier for the pros here than it’s been for me, I’ve been banging my head against the wall on this one. I’ll be checking this thread religiously, so if you need any more information just let me know…
Thanks in advance for any help.
Source: https://ccm.net/forum/affich-1019001-automatically-update-master-worksheet-from-other-worksheets
Methods To Transfer Data From One Excel Workbook To Another
There are many different ways to transfer data from one Excel workbook to another and they are as follows:
Method #1: Automatically Update One Excel Worksheet From Another Sheet
In MS Excel workbook, we can easily update the data by linking one worksheet to another. This link is known as a dynamic formula that transfers data from one Excel workbook to another automatically.
One Excel workbook is called the source worksheet, where this link carries the worksheet data automatically, and the other workbook is called the destination worksheet in which it automatically updates the worksheet data and contains the link formula.
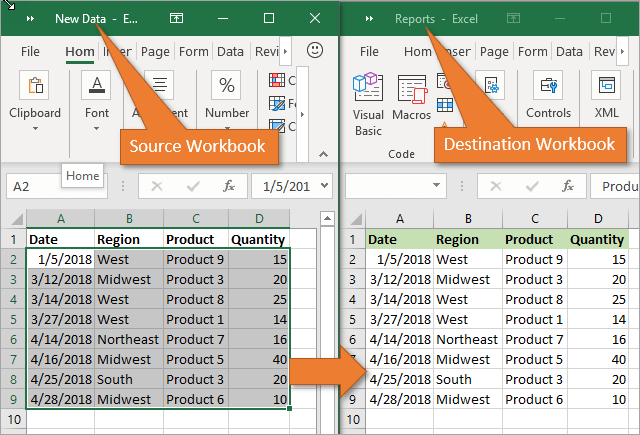
The following are the two different points to link the Excel workbook data for the automatic updates.
1) With the use of Copy and Paste option
- In the source worksheet, select and copy the data that you want to link in another worksheet
- Now in the destination worksheet, Paste the data where you have linked the cell source worksheet
- After that choose the Paste Link menu from the Other Paste Options in the Excel workbook
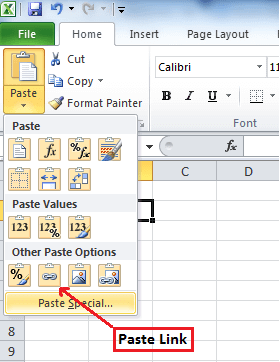
- Save all your work from the source worksheet before closing it
2) Manually enter the formula
- Open your destination worksheet, tap to the cell that is having a link formula and put an equal sign (=) across it
- Now go to the source sheet and tap to the cell which is having data. press Enter from your keyboard and save your tasks.
Note- Always remember one thing that the format of the source worksheet and the destination worksheet both are the same.
Method #2: Update Excel Spreadsheet With Data From Another Spreadsheet
To update Excel spreadsheets with data from another spreadsheet, just follow the points given below which will be applicable for the Excel version 2019, 2016, 2013, 2010, 2007.
- At first, go to the Data menu
- Select Refresh All option

- Here you have to see that when or how the connection is refreshed
- Now click on any cell that contains the connected data
- Again in the Data menu, click on the arrow which is next to Refresh All option and select Connection Properties
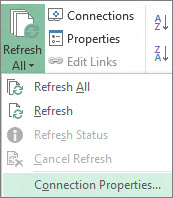
- After that in the Usage menu, set the options that you want to change
- On the Usage tab, set any options you want to change.
Note – If the size of the Excel data workbook is large, then I will recommend checking the Enable background refresh menu on a regular basis.
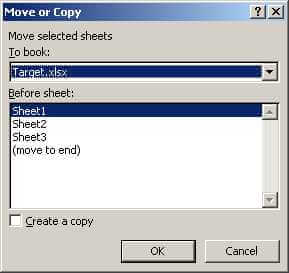
Method #3: How To Copy Data From One Cell To Another In Excel Automatically
To copy data from one cell to another in Excel, just go through the following points given below:
- First, open the source worksheet and the destination worksheet.
- In the source worksheet, navigate to the sheet that you want to move or copy
- Now, click on the Home menu and choose the Format option
- Then, select the Move Or Copy Sheet from the Organize Sheets part
- After that, again in the Home menu choose the Format option in the cells group
- Here in the Move Or Copy dialog option, select the target sheet and Excel will only display the open worksheets in the list

- Else, if you want to copy the worksheet instead of moving, then kindly make a copy of the Excel workbook before

- Lastly, select the OK button to copy or move the targeted Excel spreadsheet.
Method #4: How To Copy Data From One Sheet To Another In Excel Using Formula
You can copy data from one sheet to another in Excel using formula. Here are the steps to be followed:
- For copy and paste the Excel cell in the present Excel worksheet, as for example; copy cell A1 to D5, you can just select the destination cell D5, then enter =A1 and press the Enter key to get the A1 value.
- For copying and pasting cells from one worksheet to another worksheet such as copy cell A1 of Sheet1 to D5 of Sheet2, please select the cell D5 in Sheet2, then enter =Sheet1!A1 and press the Enter key to obtain the value.
Method #5: Copy Data From One Excel Sheet To Another Using Macros
With the help of macros, you can copy data from one worksheet to another but before this here are some important tips that you must take care of:
- You should keep the file extension correctly in your Excel workbook.
- It’s not necessary that your spreadsheet should be macro enable for doing the task.
- The code that you choose can also be stored in a different worksheet.
- As the codes already specify the details, so there is no need to activate the Excel workbook or cells first.
- Thus, given below is the code for performing this task.
Sub OpenWorkbook()
‘Open a workbook
‘Open method requires full file path to be referenced.
Workbooks.Open “C:UsersusernameDocumentsNew Data.xlsx”‘Open method has additional parameters
‘Workbooks.Open(FileName, UpdateLinks, ReadOnly, Format, Password, WriteResPassword, IgnoreReadOnlyRecommended, Origin, Delimiter, Editable, Notify, Converter, AddToMru, Local, CorruptLoad)End Sub
Sub CloseWorkbook()
‘Close a workbook
Workbooks(“New Data.xlsx”).Close SaveChanges:=True
‘Close method has additional parameters
‘Workbooks.Close(SaveChanges, Filename, RouteWorkbook)End Sub
Recommended Solution: MS Excel Repair & Recovery Tool
When you are performing your work in MS Excel and if by mistake or accidentally you do not save your workbook data or your worksheet gets deleted, then here we have a professional recovery tool for you, i.e. MS Excel Repair & Recovery Tool.
With the help of this tool, you can easily recover all lost data or corrupted Excel files also. This is a very useful software to get back all types of MS Excel files with ease.
* Free version of the product only previews recoverable data.
Steps to Utilize MS Excel Repair & Recovery Tool:
Conclusion:
Well, I tried my level best to provide the best possible ways to transfer data from one Excel worksheet to another automatically. So from now on, you don’t have to worry about how to copy data from one cell to another in Excel automatically.
I hope you are satisfied with the above methods provided to you about Excel worksheet update.
Thus, make proper use of them and in the future also if you want to know about this, you can take the help of the specified solutions.


Priyanka is an entrepreneur & content marketing expert. She writes tech blogs and has expertise in MS Office, Excel, and other tech subjects. Her distinctive art of presenting tech information in the easy-to-understand language is very impressive. When not writing, she loves unplanned travels.
There are many ways to do this. I’d recommend something like this, to push data from Excel to SQL Server.
Sub ButtonClick()
'TRUSTED CONNECTION
    On Error GoTo errH

    Dim con As New ADODB.Connection
    Dim rs As New ADODB.Recordset
    Dim strPath As String
    Dim intImportRow As Integer
    Dim strFirstName, strLastName As String

    Dim server, username, password, table, database As String


    With Sheets("Sheet1")

            server = .TextBox1.Text
            table = .TextBox4.Text
            database = .TextBox5.Text


            If con.State <> 1 Then

                con.Open "Provider=SQLOLEDB;Data Source=" & server & ";Initial Catalog=" & database & ";Integrated Security=SSPI;"
                'con.Open

            End If
            'this is the TRUSTED connection string

            Set rs.ActiveConnection = con

            'delete all records first if checkbox checked
            If .CheckBox1 Then
                con.Execute "delete from tbl_demo"
            End If

            'set first row with records to import
            'you could also just loop thru a range if you want.
            intImportRow = 10

            Do Until .Cells(intImportRow, 1) = ""
                strFirstName = .Cells(intImportRow, 1)
                strLastName = .Cells(intImportRow, 2)

                'insert row into database
                con.Execute "insert into tbl_demo (firstname, lastname) values ('" & strFirstName & "', '" & strLastName & "')"

                intImportRow = intImportRow + 1
            Loop

            MsgBox "Done importing", vbInformation

            con.Close
            Set con = Nothing

    End With

Exit Sub

errH:
    MsgBox Err.Description
End Sub
You can also try this, which uses a Where Clause.
Sub InsertInto()

'Declare some variables
Dim cnn As adodb.Connection
Dim cmd As adodb.Command
Dim strSQL As String

'Create a new Connection object
Set cnn = New adodb.Connection

'Set the connection string
cnn.ConnectionString = "Provider=SQLOLEDB.1;Integrated Security=SSPI;Persist Security Info=True;Initial Catalog=Northwind;Data Source=Excel-PCSQLEXPRESS"
'cnn.ConnectionString = "DRIVER=SQL Server;SERVER=Excel-PCSQLEXPRESS;DATABASE=Northwind;Trusted_Connection=Yes"


'Create a new Command object
Set cmd = New adodb.Command

'Open the Connection to the database
cnn.Open

'Associate the command with the connection
cmd.ActiveConnection = cnn

'Tell the Command we are giving it a bit of SQL to run, not a stored procedure
cmd.CommandType = adCmdText

'Create the SQL
strSQL = "UPDATE TBL SET JOIN_DT = '2013-01-22' WHERE EMPID = 2"

'Pass the SQL to the Command object
cmd.CommandText = strSQL


'Execute the bit of SQL to update the database
cmd.Execute

'Close the connection again
cnn.Close

'Remove the objects
Set cmd = Nothing
Set cnn = Nothing

End Sub
Introduction
I got the requirement to update the database table using the excel sheet data provided by the end-user. End-user will provide different database table names and the corresponding excel data, we need to upload that particular excel data into that corresponding database provided by the end-user.
Handling the field level validations i.e, the field order of that particular table with the field order of the excel data.
Here I am going to explain the step by step procedure to update the database table based on the excel data dynamically.
Step 1:
Go to the T-code SE 38.
Step 2:
Give the program as “ZR_DYNAMIC_TABLE_UPDATE_EXCEL” and click on create button a pop up should be displayed, where we need to provide the title as “Dynamically Update The Excel Data To Database Table” and type as “Executable Program”, Then click on Save button a pop up will be displayed.

Step 3: Need to provide the package name and click on the continue button.
Here we need to write the source code.
SOURCE CODE:
REPORT zr_dynamic_table_update_excel NO STANDARD PAGE HEADING.
*** --- Data Declarations
DATA:lt_excel       TYPE TABLE OF alsmex_tabline,
     lt_dref        TYPE REF TO data,
     ls_dref        TYPE REF TO data,
     lv_col         TYPE i,
     lo_alv         TYPE REF TO cl_salv_table,
     lt_table_filds TYPE TABLE OF dfies.
*** --- Field Symbols
FIELD-SYMBOLS : <fs_table> TYPE any .
FIELD-SYMBOLS : <ft_table> TYPE STANDARD TABLE.
FIELD-SYMBOLS : <dyn_field> .

*** --- Selection screen designing
SELECTION-SCREEN BEGIN OF BLOCK b1 WITH FRAME TITLE TEXT-001.
PARAMETERS:p_file  TYPE rlgrap-filename OBLIGATORY,
           p_table TYPE dd02l-tabname OBLIGATORY,
           p_test  AS CHECKBOX DEFAULT abap_true.
SELECTION-SCREEN END OF BLOCK b1.

*** --- value request for p_file
AT SELECTION-SCREEN ON VALUE-REQUEST FOR p_file.
  CALL FUNCTION 'F4_FILENAME'
    IMPORTING
      file_name = p_file.
*** --- START-OF-SELECTION
START-OF-SELECTION.
*create OBJECT lr_descr.
*** --- Assigning fields symbols for Tables
  CREATE DATA lt_dref TYPE TABLE OF (p_table).
  CREATE DATA ls_dref TYPE (p_table).
*** --- Assign field symbol with table type of DDIC
  ASSIGN lt_dref->* TO <ft_table>.
*** --- Assign field symbol with Structure type of DDIC
  ASSIGN ls_dref->* TO <fs_table>.
*** --- Call the Function module ALSM_EXCEL_TO_INTERNAL_TABLE
  CALL FUNCTION 'ALSM_EXCEL_TO_INTERNAL_TABLE'
    EXPORTING
      filename                = p_file
      i_begin_col             = 1
      i_begin_row             = 1
      i_end_col               = 99
      i_end_row               = 999999
    TABLES
      intern                  = lt_excel
    EXCEPTIONS
      inconsistent_parameters = 1
      upload_ole              = 2
      OTHERS                  = 3.
  IF sy-subrc EQ 0.
*** --- Sort
    SORT lt_excel BY row.

    LOOP AT lt_excel INTO DATA(ls_excel).

*** --- Adding count to skip the mapping for MANDT field
      lv_col = ls_excel-col + 1.
      ASSIGN COMPONENT lv_col OF STRUCTURE <fs_table> TO <dyn_field>.
      IF sy-subrc = 0.
***-- Compare Excel sheet column data and Dynamic table fields
            IF ls_excel-row = 1.
              CALL FUNCTION 'DDIF_FIELDINFO_GET'
                EXPORTING
                  tabname        = p_table
                TABLES
                  dfies_tab      = lt_table_filds
                EXCEPTIONS
                  not_found      = 1
                  internal_error = 2
                  OTHERS         = 3.
              READ TABLE lt_table_filds INTO DATA(ls_table_fields) INDEX lv_col.
              IF sy-subrc = 0.
                IF ls_table_fields-fieldname NE ls_excel-value.
                  WRITE: 'Excel sheet data and Dynamic table fields are not matching'.
                  EXIT.
                ENDIF.
              ENDIF.
            ELSE.
              <dyn_field> = ls_excel-value.
            ENDIF.
      ENDIF.
      IF ls_excel-row GT 1.
        AT END OF row.
          APPEND <fs_table> TO <ft_table>.
          CLEAR <fs_table>.
        ENDAT.
      ENDIF.
    ENDLOOP.

    IF <ft_table> IS NOT INITIAL.
      IF p_test IS INITIAL.
*** --- Modify
        MODIFY (p_table) FROM TABLE <ft_table>.
        IF sy-subrc EQ 0.
          COMMIT WORK.
          DATA(lv_lines) = lines( <ft_table> ).
          WRITE: TEXT-002,lv_lines.
        ELSE.
          ROLLBACK WORK.
          MESSAGE TEXT-003 TYPE 'E' DISPLAY LIKE 'I'.
        ENDIF.
      ELSE.
*** --- Factory Method
        cl_salv_table=>factory(
          IMPORTING
            r_salv_table   =  lo_alv   " Basis Class Simple ALV Tables
          CHANGING
            t_table        = <ft_table>
        ).
*** --- Display
        lo_alv->display( ).
      ENDIF.
    ENDIF.
  ENDIF.
Step 4:
Before uploading the data, check the table entries.

Step 5:
Provide the file name, table name and check the test checkbox click on execute button.

Negative Test Case:
Uploading the excel with end-user preferred columns order, irrespective of the corresponding table fields.

Output:
We are validating the particular table fields order with the end-user provided excel fields order and throwing the error if both the fields differ.

Positive Test Case

Output:
The excel data will be as like as below.

Step 6:
Provide the file name, and table name and Uncheck the Test checkbox, click on the execute button.

Output:

Step 7:
Go to the T-code (SE16N), provide the table name as “ZMARA_TABLE1″, and click on execute button the updated data will be reflected the database table.

Conclusion:
By following the above steps, we have successfully updated the database table with the excel data.
Hope this will help.
Thanks for reading.
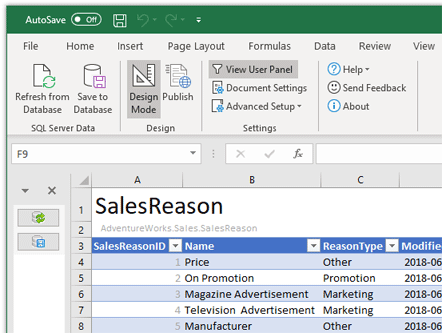
SQL Spreads solves some common data management problems for Microsoft SQL Server. It makes it fast and simple to update an SQL table from an Excel spreadsheet. And it gives you the control you need to manage data entered by various users on a collaborative team.
End users love working in Excel
End users love working in Excel. They know the tool, and they are free to do what they want. That’s the heart of the much-loved Excel application, but also the start of problems for the people taking care of the data. The freedom to add cells and enter “whatever-you-like” values causes huge problems when trying to store and summarize the data in a structured way.
Updating or collecting some “not-available-in-our-systems” data from colleagues is often done by mailing out some Excel file or putting a spreadsheet on a file share.
When users update data in an Excel spreadsheet that should be saved or update in an SQL table, problems like these usually occur:
- Cells in the spreadsheet can contain invalid data types.
- There will be problems when users change the layout of the sheet.
- Difficulties to keep track of previous versions of the Excel spreadsheet.
- Hard to track who has changed a specific value in a sheet.
- Troublesome to extract Excel data (with a tool such as SSIS).
- There can be a delay of several hours between when a user enters the figures and when they appear in the database.
In finance, IT and other fields, structured data is a vital part of the operations. In those fields, you can — literally in minutes — let your end-users update data in structured SQL tables themselves – using Excel. No coding experience or extensive training is necessary.
Here’s information on how you can use SQL Spreads, an Microsoft Excel Add-In, to efficiently and accurately update an SQL Server database from Excel. I will show how to easily bring in your SQL Server tables into Excel for easy updating/management. Then show you how to share the document with your end users and how to keep track of data quality.
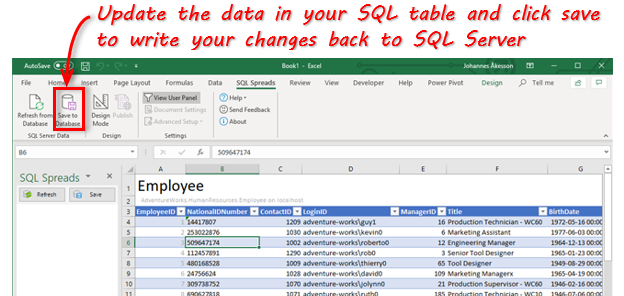
How to Update an SQL Table from Excel
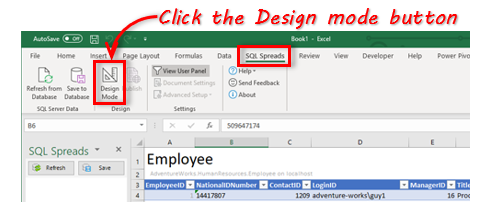
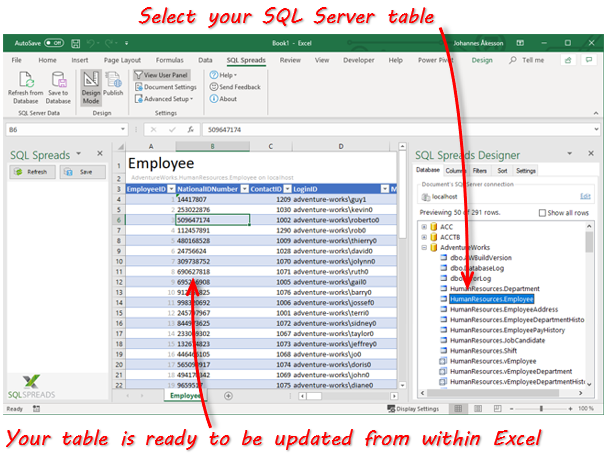
To set up an Excel document to work with the data in an SQL Server table, follow these few simple steps:
- Download and install the SQL Spreads Excel Add-In.
- Go to the SQL Spreads tab in Excel and select Design mode.

- A list of databases will appear on the right. Chose the database you are using and select an SQL table to update from Excel.

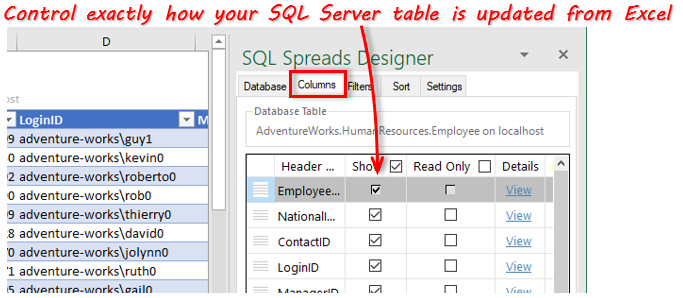
- From the Columns tab you can fine-tune how your table is presented in Excel. You can select the columns you want to update, rearrange them into the order you prefer, and change their names if desired.

- When you finished fine-tuning your table, go to the spreadsheet and start updating the data from SQL Server. When you press the Save button the changes will be saved back to your SQL Server table.

There are also several other great benefits of the Designer to easily connect an Excel spreadsheet to a table in SQL Server. For example:
- Set which columns are editable and which are “read-only”
- Select which rows in the database are loaded into the Excel spreadsheet
- Enable Change Tracking and the application will then insert the date and time when a row is changed, as well as the user making the change.
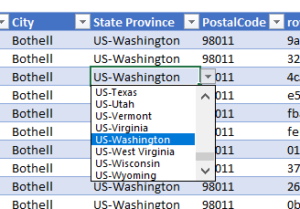
- Show drop-down lists where the user can select a readable text instead of a key value for columns relating to other tables.
Let your non-technical users update and manage the SQL Server data
After you exit the Design mode you can share your Excel document like any other Excel file. All the settings will follow the document and other users can use your Excel file to update the SQL tables from Excel.
But maybe one of the biggest benefits of SQL Spreads is its ease of use. And the benefits are not only for administrators but also for authorized users throughout your business or enterprise. Non-technical users can use SQL Server-connected Excel documents that you create and share with them. The result will be an accurate and effective collaboration with safeguards including built-in conflict detection.
Assured Data Quality
To get the highest possible quality of data, SQL Spreads uses several methods to guarantee the validity of the entered data:
- When figures are entered, they are validated against the types of the database columns, and the user receives immediate feedback.
- Each changed row is tracked in the database to see when a row was changed and by who.
- A built-in conflict detection system enables safe and easy collaboration.
- When sharing the document with others, they can be given an Editor role to disable the Design mode to protect the Excel sheet set up that you’ve created.
Automatic Lookup of key values from other tables
Databases contains relations, and a table with keys relating to other tables can be hard to update manually.
When updating a SQL Server table from within Excel, SQL Spreads can lookup those key values in other tables and show drop-down lists where the user can select a readable text instead of a keys value. When the changes are saved to the database, the looked up key will be saved to the database.
Familiar and User-friendly Excel Interface
The data in SQL Server tables can be directly updated from Excel. Users are authenticated using their Windows Login and can only work with the Excel documents for which they are authorized.
Data is automatically validated when users enter their figures through SQL Spreads. And data from other Microsoft Excel documents can be pasted directly into the SQL Server connected documents.
A Low-Stress Solution with High Value to Your Organization
With SQL Spreads, you can:
- Use Excel to work with data in SQL Server tables.
- Let non-technical users work with the SQL Server data.
- Ensure that the entered data is valid.
But more far-reaching benefits can be offered to your business or enterprise by using SQL Spreads. You will immediately see time savings across the board.
- First, the setup is really fast and simple.
- Second, when end-users enter data, SQL Spreads will guide them through the right way to enter the data.
- Third, data owners will have the advantage of being able to easily access centralized data through Excel.
- Fourth, you can put an end to struggling with importing Excel data using SSIS or maintaining VBA scripts.
- Lastly, no more troubleshooting and correcting problems created by users altering the spreadsheet.
Those time-consuming processes and frustrations are replaced by SQL Spreads with fast, reliable data management.
Try SQL Spreads First-Hand to Take Control of your SQL Server Data Management
Try SQL Spreads by downloading ![]() the new SQL Spreads trial from this page.
the new SQL Spreads trial from this page.
There is also a demo video available showing how you can use SQL Spreads to create an Excel document to update the SQL table from Excel.
Editors note: This blog post was originally published for a previous version of SQL Spreads and has been completely revamped and updated for accuracy and comprehensiveness.

Johannes Åkesson
Worked in the Business Intelligence industry for the last 15+ years.
Founder of SQL Spreads – the data management
solution to import, update and manage
SQL Server data from within Excel.
In Excel, copying data from one worksheet to another is an easy task, but there is not any link between the two. But we can create a link between two worksheets or workbooks to automatically update data in another sheet if it changes in the first worksheet. This article explains how this is done.
Automatically data in another sheet in Excel
We can link worksheets and update data automatically. A link is a dynamic formula that pulls data from a cell of one worksheet and automatically updates that data to another worksheet. These linking worksheets can be in the same workbook or in another workbook.
One worksheet is called the source worksheet, from where this link pulls the data automatically, and the other worksheet is called the destination worksheet that contains that link formula and where data is updated automatically.
Remember one thing that formatting of cells of source worksheet and destination worksheet should be the same otherwise the result could be viewed differently and can lead to confusion.
Two methods of linking data in different worksheets
We can link these two worksheets using two different methods.
- Copy and Paste Link
- From source worksheet, select the cell that contains data or that you want to link to another worksheet, and copy it by pressing the Copy button from the Home tab or press CTRL+C.
- Go to the destination worksheet and click the cell where you want to link the cell from the source worksheet. On the Home tab, click on the drop-down arrow button of Paste, and select Paste Link from “Other Paste Options.” Or right-click in the cell on the destination worksheet and choose Paste Link from Paste Options.
- Save the work or return to the source workbook and press ESC button on the keyboard to remove the border around the copied cell and save the work.

- Enter formula manually
- In the destination worksheet, click on the cell that will contain link formula and enter an equal sign (=)
- Go to the source sheet and click on the cell that contains data and press Enter on the keyboard. Save your work.
Using these two methods, we can link a worksheet and update data automatically depending upon your requirements. In this article, we will discuss some examples using the following cases.
Update cell on one worksheet based on a cell on another sheet
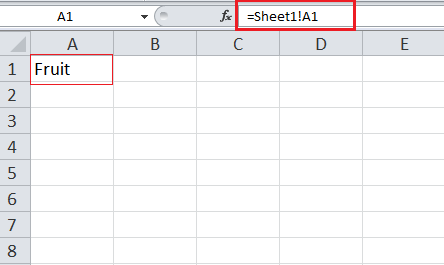
Suppose we have a value of 200 in cell A1 on Sheet1 and want to update cell A1 on Sheet2 using the linking formula. We can do that by using the same two methods we’ve covered.
Using Copy and Paste Link method
Copy the cell value of 200 from cell A1 on Sheet1.

Go to Sheet2, click in cell A1 and click on the drop-down arrow of Paste button on the Home tab and select Paste Link button. It will generate a link by automatically entering the formula =Sheet1!A1.


Or right-click in the cell on the destination worksheet, Sheet2, and choose Paste Link from Paste Options: It will generate linking formula automatically.

Entering formula manually
We can enter the linking formula manually in cell A1 on the destination worksheet Sheet2 to update data by pulling it from cell A1 of Sheet1.
In cell A1 on Sheet2, manually enter an equal sign (=) and go to Sheet1 and click on cell A1 and press ENTER key on your keyboard. The following linking formula will be updated in destination sheet that will link cell A1 of both sheets.
=Sheet1!A1
Update cell on one sheet only if the first sheet meets a condition
By entering the linking formula manually, we can update data in cell A1 of Sheet2 based on a condition if the cell value of A1 on Sheet1 is greater than 200. We can do that by entering this logical condition in an IF function. If cell A1 on Sheet1 meets this condition then IF function returns the value in cell A1 on Sheet2 otherwise it will return blank cell.
Here is the formula to link the cells of both sheets based on this condition. We will enter this formula manually in cell A1 of Sheet2
=IF(Sheet1!A1>200,Sheet1!A1,"")

Update cell on one sheet from another sheet with a drop-down list
Suppose we have a drop-down list in cell A1 of Sheet1 and we can update cell A1 on Sheet2 by entering link formula in cell A1 on Sheet2.

In cell A1 on Sheet2, we will manually enter this linking formula to update data automatically based on the cell value selected from the drop-down list.
=Sheet1!A1
Linking data in a real data set is more complex and depends on your situation. You might need to use techniques other than those listed above. If you are in a rush and want your problem answered by an Excel expert, try our service. The experts are available to help you 24/7. The first question is free.