
Word for Microsoft 365 Word 2021 Word 2019 Word 2016 Word 2013 More…Less
Sometimes you need to manually trigger an update of the information in fields like those used in a table of contents, headers and footers, cross-references, bookmarks, and formulas in tables. You can update fields one by one, or you can update all the fields in your document at once.
In this article
-
Update a field
-
Update all fields in a document
Update a field
-
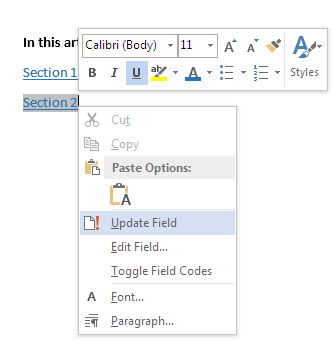
In a document you have open, right-click a field, such as a table of contents, a page number, or a cross-reference, and click Update Field.

Notes:
-
If you’re updating a table of contents, in the Update Table of Contents dialog box, select whether you want to update page numbers only or the entire table. Updating page numbers only simply updates the page numbers for the existing sections. It doesn’t add new sections to your table of contents. To update your table of contents with new sections from your document, select Update entire table.
-
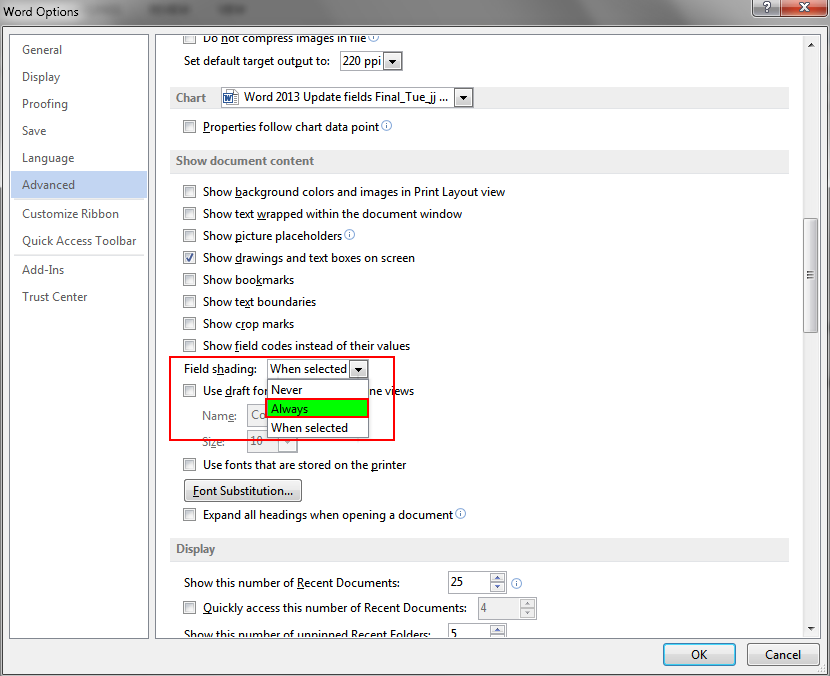
If you’re having trouble distinguishing which parts of your text are fields, you can set all fields to show up with grey background. To do this, click FILE > Options > Advanced, and under Show document content, from the Field shading drop-down menu, select Always.
-

Top of Page
Update all fields in a document
-
Press Ctrl + A.
-
Press F9.
-
If your document has tables with fields or formulas, you might need to select each table separately and press F9.
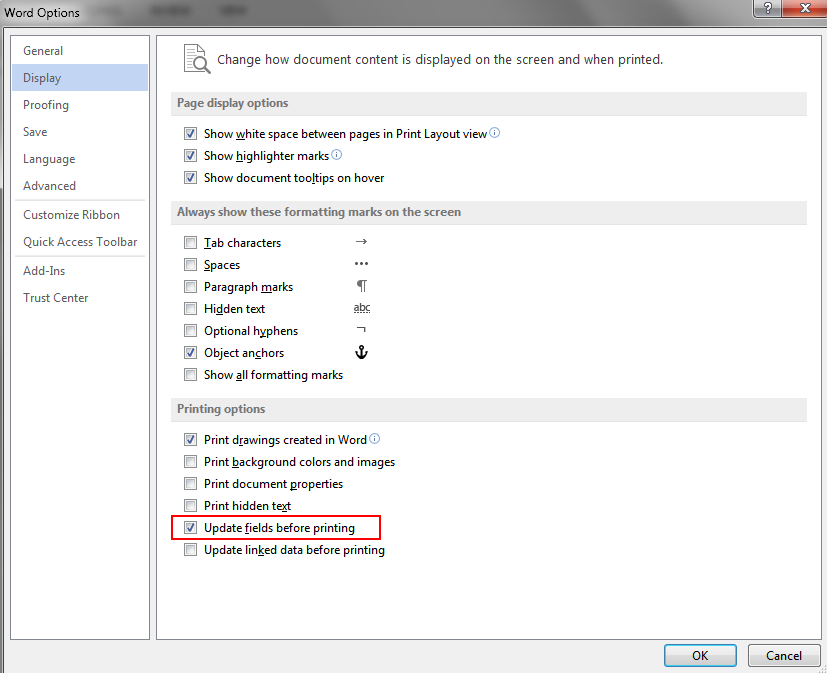
Tip: To make sure that you don’t forget to update your table of contents before you print the document, set Word to update fields automatically before printing. Click FILE > Options > Display, and under Printing options, select the check box for Update fields before printing.
Note: Sometimes a field is not updated because the item the field refers to no longer exists. The link or bookmark might also be broken. For more information, see Troubleshoot bookmarks.
Top of Page
See Also
Insert fields
Field codes in Word
Create or update a cross-reference
Update a table of contents
Use a formula in a Word or Outlook table
Create a table of contents
Need more help?
Want more options?
Explore subscription benefits, browse training courses, learn how to secure your device, and more.
Communities help you ask and answer questions, give feedback, and hear from experts with rich knowledge.
To update all references in a document, select Edit – Select All (or press Ctrl A), then press F9 or right-click and select Update Field. You can set Word to always update cross-references before printing your document.
Contents
- 1 How do I update all fields in a Word document?
- 2 How do you update all references in Word for Mac?
- 3 How do you update cross references?
- 4 How do I highlight all cross references in Word?
- 5 How do I get Word to automatically update links?
- 6 How do you update links in Word?
- 7 How do I update all figure numbers in Word?
- 8 How do you fix references in Word?
- 9 How do you link references in Word?
- 10 Why cross-reference does not update automatically?
- 11 How do you update footnotes with cross-references in Word?
- 12 How do you highlight all fields in Word?
- 13 How do you update multiple hyperlinks in Word?
- 14 How do you update a link?
- 15 What are automatic links in Word?
- 16 How do I fix Reference source not found?
- 17 How do I update a list of figures?
- 18 How do you update figures?
- 19 How do you update bookmarks in Word?
- 20 How do you align references?
How do I update all fields in a Word document?
Update all fields in a document
- Press Ctrl + A.
- Press F9.
- If your document has tables with fields or formulas, you might need to select each table separately and press F9.
How do you update all references in Word for Mac?
Updating cross references in word for MAC
- Right-clicking an individual field & selecting Update Field from the contextual menu.
- Selecting the field then pressing F9 to update that field.
- Using Command+A then pressing F9 to update all fields in the document.
How do you update cross references?
You can update cross-references manually by pressing Ctrl + A to select all and then pressing F9. Cross-references will also be updated when you switch to Print Preview or when you print (if the Word option Update fields before printing is turned on).
How do I highlight all cross references in Word?
Press Ctrl-A to select all paragraphs. Press F9 to update all cross-references. (This will also update other fields in your document, such as the table of contents.)
How do I get Word to automatically update links?
Updating Automatic Links
- Display the Word Options dialog box. (In Word 2007 click the Office button and then click Word Options.
- At the left side of the dialog box click Advanced.
- Scroll through the available options until you see the General section.
- Set the Update Automatic Links At Open check box as you desire.
How do you update links in Word?
Figure 1.
- Display the File tab of the ribbon.
- Click Info and then click Edit Links to Files. (If this option is not available, it means that Word doesn’t think there are any links in the current document.) Word displays the Links dialog box.
- Select the link you want to update.
- Click on Update Now.
How do I update all figure numbers in Word?
Instead of searching and replacing all the figure numbers in the text, click “Edit” -> “Select All” (or, Ctrl + A), which select the entire document, then, press “F9”. This updates all the figure number automatically.
How do you fix references in Word?
Use the Citations tool to edit a source
- On the Document Elements tab, under References, click Manage.
- In the Citations List, select the citation that you want to edit.
- At the bottom of the Citations tool, click. , and then click Edit Source.
- Make the changes that you want, and then click OK.
How do you link references in Word?
Insert the cross-reference
- In the document, type the text that begins the cross-reference.
- On the Insert tab, click Cross-reference.
- In the Reference type box, click the drop-down list to pick what you want to link to.
- In the Insert reference to box, click the information you want inserted in the document.
Why cross-reference does not update automatically?
This problem occurs because, when you create a cross-reference link, a hidden bookmark is created at the beginning of the heading. When you split the heading, the bookmark does not move. When you update the cross-reference link, the link is not updated.
How do you update footnotes with cross-references in Word?
In order to update the cross-references, place your cursor in a footnote and select the text of all footnotes by pressing Ctrl – A. Once the footnote text is selected, press F9. A dialogue box will open saying “Word cannot undo this action.
How do you highlight all fields in Word?
Word has a number of options for field highlighting: File | Options | Advanced | Field Shading (under the “Show Document Content” heading). Also in advanced find, expand (more button) and under the special button is “field”.
How do you update multiple hyperlinks in Word?
Changing Many Link Locations
- Open the document in which you want to change the links.
- Change to Draft view.
- Press Alt+F9 so that field codes are showing.
- Press Ctrl+H.
- In the Find box, enter the portion of the link you want to change.
- In the Replace box, enter the new portion of the link.
- Click Replace All.
How do you update a link?
Manually update only some of the links to other workbooks
- Open the workbook that contains the links.
- Go to Data > Queries & Connections > Edit Links.
- In the Source list, click the linked object that you want to update. You can select individual workbooks with Ctrl+click, or all of them with Ctrl+A.
- Click Update Values.
What are automatic links in Word?
Word can update links in two ways, automatically and manually:
- With automatic links, Word updates the links whenever you open the destination file and whenever the source information changes while the Word document is open.
- With manual links, Word updates the links only when you decide to update them.
How do I fix Reference source not found?
Reference source not found.” when you update a field that has a broken link to a bookmark. You can restore the original text by pressing Ctrl+Z immediately after receiving the error message. You can press Ctrl+Shift+F9 to convert the text in the field to regular text.
How do I update a list of figures?
Update a table of figures
- Click on the table of figures in your document. This will highlight the entire table.
- Click References > Update Table. Note: Update Table becomes an option only when you click the table of figures in your document.
- Select an Update in the in the Update Table of Figures dialog box.
- Click OK.
How do you update figures?
Update caption numbers
- Click anywhere in the document and press CTRL+A to select the entire document.
- Right-click, and then choose Update Field on the shortcut menu. All of the captions in the document should now be updated.
How do you update bookmarks in Word?
Method 1: Change the Bookmark Name and Update Cross-references Manually
- To start off, click “Insert” tab then click “Bookmark” in “Links” group.
- Next click to select the target bookmark and click “Go To”.
- You will see the bookmark texts are in selection by then.
- Then enter a new bookmark name and click “Add”.
How do you align references?
Format each reference with a hanging indent, which means that the first line of each reference entry is aligned flush with the left margin and each subsequent line has a hanging indent of 1.27 cm or 0.5 in (American Psychological Association, 2020, p. 303).
Insert and Manage Dynamic Cross-Reference Fields in Microsoft Word
by Avantix Learning Team | Updated October 9, 2021
Applies to: Microsoft® Word® 2010, 2013, 2016, 2019 or 365 (Windows)
In Microsoft Word, you can insert a cross-reference to content in another part of your Word document and then update it if the target of the cross-reference changes. A cross-reference can refer to a heading, bookmark, the caption of a table or figure as well as other target items. Since a cross-reference is a field, it can be updated and formatted manually, using styles or using switches in the field.
Recommended article: How to Keep Text Together in Microsoft Word (Paragraphs, Lines or Words)
The information inserted by a cross-reference field can be text, a page number, a section number, a paragraph number, a caption number, a caption label or a combination of items. The cross-reference field is a code so it can also include special information in the code (called a switch) that make the field act or appear in a specific way. For example, a cross-reference field may act as a hyperlink so you can jump directly to the target of the cross-reference by Ctrl-clicking the field.
It’s easiest to create cross-references to built-in heading styles but they can also be used with bookmarks, footnotes or endnotes.
For example, you could insert a cross-reference to a built-in heading style as follows:
See Section 4: About Our Services on page 5.
In this case, the cross-reference refers to a style’s paragraph number, paragraph text and a page number so you would need to insert three separate cross-references and type some of the text (like the word See) as well as appropriate spacing.
Inserting a cross-reference to a built-in heading
It’s common to create a cross-reference to a built-in heading in Microsoft Word.
To insert a cross-reference to a built-in heading in the current document:
- Position the cursor where you want to insert your cross-reference.
- Type text that you want to precede the cross-reference (such as See) and any necessary spacing.
- Click the References tab in the Ribbon.
- In the Captions group, click Cross-reference. A dialog box appears.
- In the Reference type drop-down menu, select Heading.
- In the Reference to drop-down menu, select Heading text, Page number, Heading number, Heading number (no content) or Heading number (full content).
- In the For which heading list, click the item you want to reference.
- Ensure Insert as hyperlink is selected If you want to be able to Ctrl-click the cross-reference to jump to the referenced item.
- Click Insert. Word inserts an invisible bookmark to the target.
- Repeat for other items you want to include in the cross-reference. The dialog box can remain open.
- Click Close.
In the following example, note that Heading has been selected as the Reference type in the Cross-reference dialog box:

In the Cross-reference dialog box, the Separate numbers with and Include above/below check boxes are enabled under some conditions.
All paragraphs that are formatted with one of the built-in heading styles (Heading 1-9) are automatically shown in the dialog box. Although you can use outline levels, it’s best to use the built-in heading styles (these appear in the Home tab in the Ribbon in the Styles group and in other areas in Word).
Inserting a cross-reference to a bookmark
You can also insert a bookmark and then insert a cross-reference to the bookmark.
To insert a cross-reference to a bookmark in the current document:
- Position the cursor where you want to insert a bookmark.
- Click the Insert tab in the Ribbon.
- Click Bookmark in the Links group. A dialog box appears.
- Type a name for the bookmark without spaces.
- Click Add.
- Click where you want to insert the cross-reference to the bookmark.
- Type text that you want to precede the cross-reference (such as See) and any necessary spacing.
- Click the References tab in the Ribbon.
- In the Captions group, click Cross-reference. A dialog box appears.
- In the Reference type drop-down menu, select Bookmark.
- In the Reference to drop-down menu, select Bookmark text, Page number or one of the other options as required.
- In the For which heading list, click the item you want to reference.
- Ensure Insert as hyperlink is selected If you want to be able to Ctrl-click the cross-reference to jump to the referenced item.
- Click Insert.
- Repeat for other items you want to include in the cross-reference. The dialog box can remain open.
- Click Close.
The following is an example of a bookmark created in the Bookmark dialog box:

Inserting a cross-reference to a table or figure
You can cross-reference tables and figures in Word if you have inserted captions using Insert Caption on the References tab in the Ribbon.
To insert a cross-reference to a table or figure in the current document:
- Click where you want to insert the cross-reference to the table or figure (which has already been captioned).
- Type text that you want to precede the cross-reference (such as See) and any necessary spacing.
- Click the References tab in the Ribbon.
- In the Captions group, click Cross-reference. A dialog box appears.
- In the Reference type drop-down menu, select Table or Figure.
- In the Reference to drop-down menu, select the required option – Entire caption (which includes the figure caption or table title with the label and number), Only label and number (such as Table 10), Only caption text (which includes the figure caption or table title without the label and number), Page number or Above/below (which inserts the word above or below with no additional text related to the table or figure).
- In the For which heading list, click the table or figure you want to reference.
- Ensure Insert as hyperlink is selected If you want to be able to Ctrl-click the cross-reference to jump to the referenced item.
- Click Insert.
- Repeat for other items you want to include in the cross-reference. The dialog box can remain open.
- Click Close.
In the following example, note that Table has been selected as the Reference type in the Cross-reference dialog box:

Showing or hiding field codes
Cross-references are fields. Normally, the result of a field is displayed but you can also view the field codes.
To show or hide all field codes in your document, press Alt + F9.
The following is an example of a field code:
{ REF _Ref46507086 h }
Understanding cross-reference field codes
When you insert a cross-reference, a field code will be inserted based on what the reference refers to.
There are three types of cross-reference fields in Word – PAGEREF, NOTEREF and REF. The first part of the field code of a cross-reference field indicates which type of field it is.
A cross-reference field that refers to the page on which the target is found is a PAGEREF type. When you select Page number as the Reference to insert in the Cross-reference dialog box, the inserted cross-reference field will be PAGEREF.
A cross-reference field with a footnote or an endnote as the target will be the NOTEREF type.
All other cross-reference fields will be the REF type.
Part of the field code inside a cross-reference field refers to a bookmark that points to the target. A bookmark in Word is a named location or a named block of text or other content in a document.
If you refer to a built-in heading style in a cross-reference, Word automatically adds a bookmark around the heading text at the beginning and the end (excluding the paragraph mark) if a bookmark is not already found. The name of the bookmark is included in the field code of the cross-reference field. Bookmarks that are automatically added are named _Ref followed by eight or nine digits.
If you are inserting a cross-reference to a caption, a bookmark will also be added to enclose the part of the caption content to be displayed by the cross-reference field. The bookmark will include different parts of the caption depending on the kind of caption reference you select (such as the entire caption or only the label and number).
The following is an example of a cross-reference for a REF field:
{ REF _Ref449977221 p h d».»* CHARFORMAT }
The syntax for REF fields is:
{ REF Bookmark [* Format Switch ] [Switches ] }
Switches are optional.
The underscore at the start of the bookmark name means that the bookmark is being treated as a hidden bookmark in Word. You cannot add hidden bookmarks manually.
Hidden bookmarks are invisible in the document even if you turn on display of bookmarks. You can view invisible bookmarks in the Bookmarks dialog box, but you must turn on Hidden bookmarks to display them.
Formatting cross-references
Cross-references can be formatted manually, using styles or using switches in the field code. A switch holds special information that causes the field to act or appear in a specific way.
One easy way to format a cross-reference is by using a character style such as Emphasis or Intense Emphasis.
To apply the Emphasis, Intense Emphasis or Intense Reference character style to a cross-reference:
- Select the cross-reference as well as any surrounding text that refers to it.
- Click the Home tab in the Ribbon.
- Click the More down arrow in the Style gallery in the Styles group.
- Click Emphasis, Intense Emphasis or Intense Reference.
The benefit of this method is that you can later modify the style or find and replace the style with a different style.
In a future article, we’ll take a look at more advanced formatting techniques for cross-references.
Updating cross-references
If a document has been edited, you will likely need to update the cross-references since cross-references do not update automatically.
It is important that the markers that are added at the beginning and end of the target of a cross-reference are not deleted or moved during editing. If they are, you will need to reinsert the cross-reference because you will receive an error when you update.
You can update cross-references manually by pressing Ctrl + A to select all and then pressing F9.
Cross-references will also be updated when you switch to Print Preview or when you print (if the Word option Update fields before printing is turned on).
To ensure that fields are updated before printing:
- Click the File tab in the Ribbon.
- Click Options.
- Select Display in the categories on the left.
- In Printing options, select Update fields before printing.
- Click OK.
Be sure to check after update to see if there are any errors in your cross-references.
Subscribe to get more articles like this one
Did you find this article helpful? If you would like to receive new articles, join our email list.
More resources
14 Timesaving Microsoft Word Selection Shortcuts
How to Update All Figure Numbers in Microsoft Word
How to Insert the Not Equal Sign in Word (5 Ways to Type or Insert ≠)
How to Keep Text Together in Microsoft Word (Paragraphs, Lines or Words)
How to Create a Table of Contents in Word (Insert, Format and Update a TOC)
Related courses
Microsoft Word: Intermediate / Advanced
Microsoft Excel: Intermediate / Advanced
Microsoft PowerPoint: Intermediate / Advanced
Microsoft Word: Long Documents Master Class
Microsoft Word: Styles, Templates and Tables of Contents
Microsoft Word: Designing Dynamic Word Documents Using Fields
VIEW MORE COURSES >
Our instructor-led courses are delivered in virtual classroom format or at our downtown Toronto location at 18 King Street East, Suite 1400, Toronto, Ontario, Canada (some in-person classroom courses may also be delivered at an alternate downtown Toronto location). Contact us at info@avantixlearning.ca if you’d like to arrange custom instructor-led virtual classroom or onsite training on a date that’s convenient for you.
Copyright 2023 Avantix® Learning
Microsoft, the Microsoft logo, Microsoft Office and related Microsoft applications and logos are registered trademarks of Microsoft Corporation in Canada, US and other countries. All other trademarks are the property of the registered owners.
Avantix Learning |18 King Street East, Suite 1400, Toronto, Ontario, Canada M5C 1C4 | Contact us at info@avantixlearning.ca
I want a way of updating all fields in a Word 2013 document. (If it works in other versions, all the better; I originally had this problem with Word 2007, and nothing seems to have changed since then.) This includes cross-references, page numbers, tables of contents, indexes, headers, etc. If it can be updated by pressing F9, I want it updated.
(In theory updating fields can cause other fields to need updating, e.g. a longer table of contents changes some page numbers in the main text. Taking care of the common cases is good enough for me. In fact, it’s ok if I have to run the macro two or three times before it stabilizes. I just want to have a single macro that finds everything.)
My attempt so far doesn’t update fields in text boxes inside figures. How do I update them, and what else have I missed?
EDIT: Combining the answer given with what I already had gives a macro that seems to update everything (with a known defect).
'' Update all the fields, indexes, etc. in the specified document.
Sub UpdateAllFieldsIn(doc As Document)
    '' Update tables. We do this first so that they contain all necessary
    '' entries and so extend to their final number of pages.
    Dim toc As TableOfContents
    For Each toc In doc.TablesOfContents
        toc.Update
    Next toc
    Dim tof As TableOfFigures
    For Each tof In doc.TablesOfFigures
        tof.Update
    Next tof
    '' Update fields everywhere. This includes updates of page numbers in
    '' tables (but would not add or remove entries). This also takes care of
    '' all index updates.
    Dim sr As range
    For Each sr In doc.StoryRanges
        sr.Fields.Update
        While Not (sr.NextStoryRange Is Nothing)
            Set sr = sr.NextStoryRange
            '' FIXME: for footnotes, endnotes and comments, I get a pop-up
            '' "Word cannot undo this action. Do you want to continue?"
            sr.Fields.Update
        Wend
    Next sr
End Sub
'' Update all the fields, indexes, etc. in the active document.
'' This is a parameterless subroutine so that it can be used interactively.
Sub UpdateAllFields()
    UpdateAllFieldsIn ActiveDocument
End Sub
Table of Contents
- 1 How do I update all cross reference fields in Word?
- 2 How do I update all fields?
- 3 Is Office 2013 still supported?
- 4 How do I update Excel 2013 to 2016?
- 5 Can you upgrade Microsoft Office for free?
- 6 How do I update Excel 2013 to Windows 10?
- 7 How do I turn off automatic updates for Microsoft Office?
- 8 How can I disable automatic updates in Windows 10?
- 9 How do I block Office 2013 from accessing the Internet?
- 10 How do I block Microsoft Office?
How do I update all cross reference fields in Word?
To update all references in a document, select Edit – Select All (or press Ctrl A), then press F9 or right-click and select Update Field. You can set Word to always update cross-references before printing your document.
How do I update all fields?
Update all fields in a document
- Press Ctrl + A.
- Press F9.
- If your document has tables with fields or formulas, you might need to select each table separately and press F9.
What is the latest word version?
Microsoft Software Updates. Office 365 and Microsoft 365 subscribers always have the latest version of Microsoft Office — currently Office 2019.
How do I update Office 2013 to 2019?
This article describes update 2986234 for Microsoft Word 2013 that was released on April 23, 2019. Be aware that the update in the Microsoft Download Center applies to the Microsoft Installer (. msi)-based edition of Office 2013….
- Go to Start, enter Run, and then select Run.
- Enter Appwiz.
- Select View installed updates.
Is Office 2013 still supported?
To make sure enterprises make the most effective use of their Office 365 packages, Microsoft has announced it will no longer provide technical support or software and security updates for Office 2010 and Office 2013 from October 13, 2020.
How do I update Excel 2013 to 2016?
So if you’re running Office 2013, you’ll get the latest stable version of 2013. To upgrade, you will need to use the Office website and sign in with your Microsoft account. Once signed in, you’ll simply need to click the area under “Install” where it says “New: Office 2016 is now available.”
How do I update Word 2013?
Office 2013
- Open any Office 2013 application, such as Word and create a new document.
- Click File > Account (or Office Account if you opened Outlook 2013).
- Under Product Information, choose Update Options.
- Click Enable Updates if the option is available.
- Choose Update Now to manually check for and install Office updates.
How can I upgrade my Microsoft Office 2010 to 2013 for free?
Upgrade to Office 2013 from Office 2010
- Step 1: Download your copy of Office 2013 ISO file.
- Step 2: Double-click on the Setup file and click Yes for the UAC prompt.
- Step 3: Accept the license agreement, click the Continue button.
Can you upgrade Microsoft Office for free?
If you have a Microsoft Office 365 subscription, you can upgrade to Office 2016 for free either from within your Office program or through Microsoft’s website.
How do I update Excel 2013 to Windows 10?
- Go to Start, enter Run, and then select Run.
- Enter Appwiz. cpl, and then select OK.
- Select View installed updates.
- In the list of updates, locate and then select update KB4022244, and then select Uninstall.
How do I stop Microsoft Office 2013 from updating?
How to disable automatic updates for Microsoft Office
- Open an Office app, such as Word.
- Create a new blank document.
- Click on File.
- Click on Account.
- On the right side, click the Update options menu.
- Select the Disable Updates option.
- Click the Yes button to confirm.
How do I disable Microsoft Office 2013 Upload Center?
Remove Office Upload Center Permanently Locate the Office Upload Center and select Settings on the toolbar. In the new menu box for the Microsoft Office Upload Center Settings, go to Display Options. Locate the Display icon in notification area option and uncheck that box.
How do I turn off automatic updates for Microsoft Office?
- Click Start and then click “All Programs.”
- Click “Windows Update” and then click the “Change Settings” link.
- Uncheck the check box next to “Give me updates for Microsoft products and check for new optional Microsoft software when I update Windows” to stop Microsoft Office updates.
How can I disable automatic updates in Windows 10?
To disable automatic updates on Windows 10 permanently, use these steps:
- Open Start.
- Search for gpedit.
- Navigate to the following path:
- Double-click the Configure Automatic Updates policy on the right side.
- Check the Disabled option to turn off automatic updates permanently on Windows 10.
- Click the Apply button.
How do I roll back office updates?
Revert to the previous version of Office
- Step 1: Set a reminder to enable automatic updates at a future date. Before you revert an Office installation, you should disable automatic updates.
- Step 2: Install the previous version of Office.
- Step 3: Disable automatic updates for Office.
How do I stop Microsoft Office from accessing the Internet?
Go to Windows Firewall > Allow an app or feature through Windows Firewall. A list of applications currently allowed through the Windows Firewall will be displayed. To prevent an app from accessing the internet, click Change Settings and uncheck the Public or Private boxes next to the app.
How do I block Office 2013 from accessing the Internet?
Click on Trust Center Settings. e. Under Privacy Options, remove the tick mark from Allow office to connect to the internet within the Office applications.
How do I block Microsoft Office?
Navigate to add or remove programs. Click on “Microsoft Office…” (version information will be in place of ellipsis). Click “Change” then when the dialog box appears for the Change process click the “Add or Remove Features” then Next then disable Microsoft Word and continue through the process.
How do I disable Microsoft Office in Windows 10?
Uninstall Office from Settings in Windows 10
- Select Start > Settings. > Apps.
- Under Apps & Features select the version of Office you want to uninstall. Note: If you installed an Office suite such as Office Home and Student or you have an Office subscription, search for the suite name.
- Select Uninstall.
How do I block Microsoft Office 2016 from the Internet?
If you do not want to have any new update, click on it, a drop-down menu will appear. Select the option of “Disable updates”. So you are done with disabling Microsoft Office notification through its Built-In option available in it.