
When editing documents in Word, sometimes we can insert some graphic symbols to make the content more intuitive and lively, like arrows with different shapes and directions. Since they can’t be typed directly like numbers and characters, here I’d like to introduce 3 common used ways to insert arrows in Word. The method 1 and method 2 can also be applied in Microsoft Excel. Let’s have a look.
Insert Arrow Shape
1. Open the Word (or Excel) document.
2. Switch to Insert tab, click Shape button to expand the drop-down menu.
2. There are many different types of arrows with different directions, you can choose any one you like.

3. Hold your mouse to draw a shape you selected, and drag its frame to adjust the size and direction of the arrow.

4. You can also change its color or effect in Format (Drawing Tools) tab.

Insert Arrow Symbol
1. Open the Word document (or Excel file).
2. Go to Insert tab, click Symbol button on the right of the ribbon and choose More Symbols… in the menu.

2. Change the Font into Wingdings in the popping out Symbol window, scroll down till the end and you’ll find many different arrow symbols here. Select the one you want and hit Insert button to add it to your document.

Insert Arrow by Code
Alternatively, you can also insert different arrows in Word only by keyboard.
1. First you should make sure that your numeric keypad is enabled, otherwise, tap [Num Lock] to turn on it.
2. Press and hold [Alt] key while tapping corresponding numeric code. Then release the [Alt] key and the arrow will show in your document.
3. Here I collect a list of arrow code (all in Unicode 11), you can find the arrow you want and use its corresponding code.
| Arrow | Code |
| Left Arrow ← | 8592 |
| Right Arrow → | 8594 |
| Up Arrow ↑ | 8593 |
| Down Arrow ↓ | 8595 |
| Left-right Arrow ↔ | 8596 |
| Up-down Arrow ↕ | 8597 |
For example, if you want to insert a right arrow ↓ in Word document, you just need to hold [Alt] key and enter 8594 on numeric keypad. Then release the [Alt] key, you will see the right arrow is successfully inserted.
Copyright Statement: Regarding all of the posts by this website, any copy or use shall get the written permission or authorization from Myofficetricks.
Word for Microsoft 365 Word 2021 Word 2019 Word 2016 Word 2013 Word 2010 Word 2007 More…Less
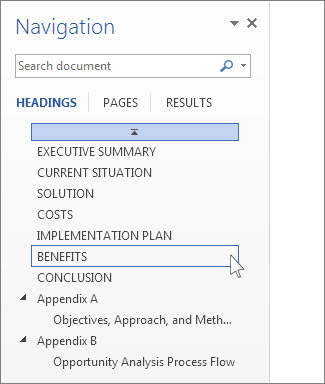
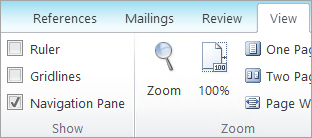
To go to a page or a heading in a Word document without scrolling, use the Navigation pane.
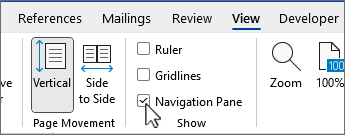
To open the Navigation pane, press Ctrl+F, or select the View tab and choose Navigation Pane.
Browse by headings
If you’ve applied heading styles to the headings in the body of your document, those headings appear in the Navigation pane. The Navigation pane doesn’t display headings that are in tables, text boxes, or headers or footers.
-
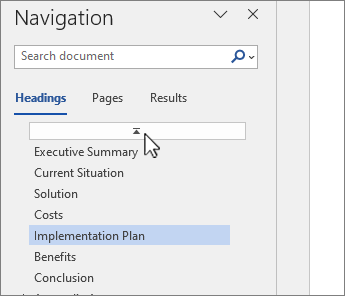
In the Navigation pane, select the Headings tab.
-
To go to a heading in your document, click that heading in the Navigation pane.
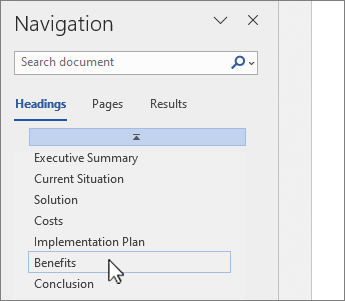
Tip: To show or hide the subheadings under a heading, click the arrow next to the heading.
If you scroll through your document, Word highlights the heading in the Navigation pane to show you where you are. To go back to the top, select Jump to the beginning.
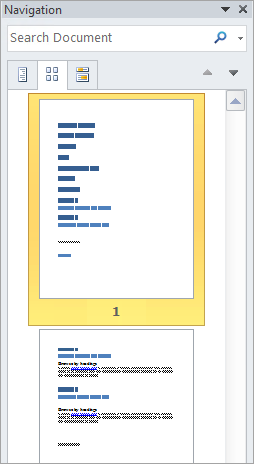
Browse by page
Select Pages. Then choose a thumbnail image to go to that page.
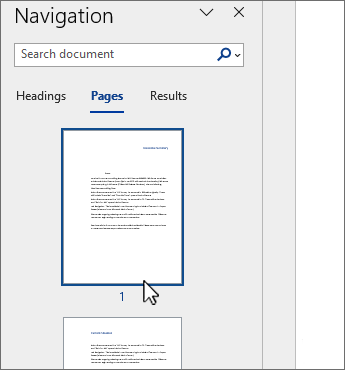
When you do scroll through your document, Word highlights the page you’re on in the Navigation pane to show you where you are.
Search in your document
-
In the search box at the top of the Navigation pane, type the text that you want to find.
-
Select a result to see it in your document, or browse through all the results by clicking the up and down arrows.
Reorganize your document
You can move parts of your document around by moving them in the Navigation pane. You can also change the level of headings, and you can add new headings.
-
In the Navigation pane, select the Headings tab.
-
Do any of the following:
-
To move part of the document, select the heading and drag it to a new location.

-
To change the heading’s level or add a heading, right-click the heading, and then choose the action you want.
Note: If a document contains regions that are protected, you might be unable to drag a section beyond the last protected region.
-

To open the Navigation pane, press Ctrl+F, or click View > Navigation Pane.
Browse by headings
If you’ve applied heading styles to the headings in the body of your document, those headings appear in the Navigation pane. The Navigation pane doesn’t display headings that are in tables, text boxes, or headers or footers.
-
In the Navigation pane, click the Browse the headings in your document tab.
-
To go to a heading in your document, click that heading in the Navigation pane.

Tip: To show or hide the subheadings under a heading, click the arrow next to the heading.
If you scroll through your document, Word highlights the heading in the Navigation pane to show you where you are.
Browse by page
Click the Browse the pages in your document tab. Then click a thumbnail image to go to that page.
When you do scroll through your document, Word highlights the page you’re on in the Navigation pane to show you where you are.
Search in your document
-
In the search box at the top of the Navigation pane, type the text that you want to find.
-
Click a result to see it in your document, or browse through all the results by clicking the Next Search Result and Previous Search Result arrows.
Reorganize your document
You can move parts of your document around by moving them in the Navigation pane. You can also change the level of headings, and you can add new headings.
-
In the Navigation pane, click the Browse the headings in your document tab.
-
Do any of the following:
-
To move part of the document, click the heading and drag it to a new location.
-
To change the heading to a higher or lower heading level, right-click the heading, and then click Promote or Demote.
-
To add a heading, click New Heading Before or New Heading After.
Note: If a document contains regions that are protected, you might be unable to drag a section beyond the last protected region.
-
Important:
Office 2007 is no longer supported. Upgrade to Microsoft 365 to work anywhere from any device and continue to receive support.
Upgrade now
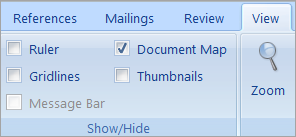
The Navigation pane in Word 2007 is called the Document Map.
To open the Document Map, click View > Document Map.
Browse by headings
If you’ve applied heading styles to the headings in the body of your document, those headings appear in the Document Map. The Document Map doesn’t display headings that are in tables, text boxes, or headers or footers.
-
In the Document Map, click the a heading to jump to that location in your document.
Tip: To show or hide the subheadings under a heading, click the plus or minus sign next to the heading.
If you scroll through your document, Word highlights the heading in the Document Map to show you where you are.
Browse by page
Click the arrow next to Document Map, and then click Thumbnails. Then click a thumbnail image to go to that page.
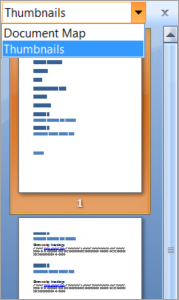
When you do scroll through your document, Word highlights the page you’re on in the Document Map to show you where you are.
Need more help?
Want more options?
Explore subscription benefits, browse training courses, learn how to secure your device, and more.
Communities help you ask and answer questions, give feedback, and hear from experts with rich knowledge.
Sometimes it is necessary to add images in a Word document to display several points concisely. Adding arrows with different shapes, sizes, and directions pointing to the specific point in the image serves to further emphasize each point.
Word allows you to insert / draw many types of arrows:
- Keyboard arrows
- Arrows by Unicode
- Arrows as symbols
- Line arrows
- Block, curved, and connector arrows
Depending on your requirement you can use any or all of them in your document. We provide you step-by-step instructions here.
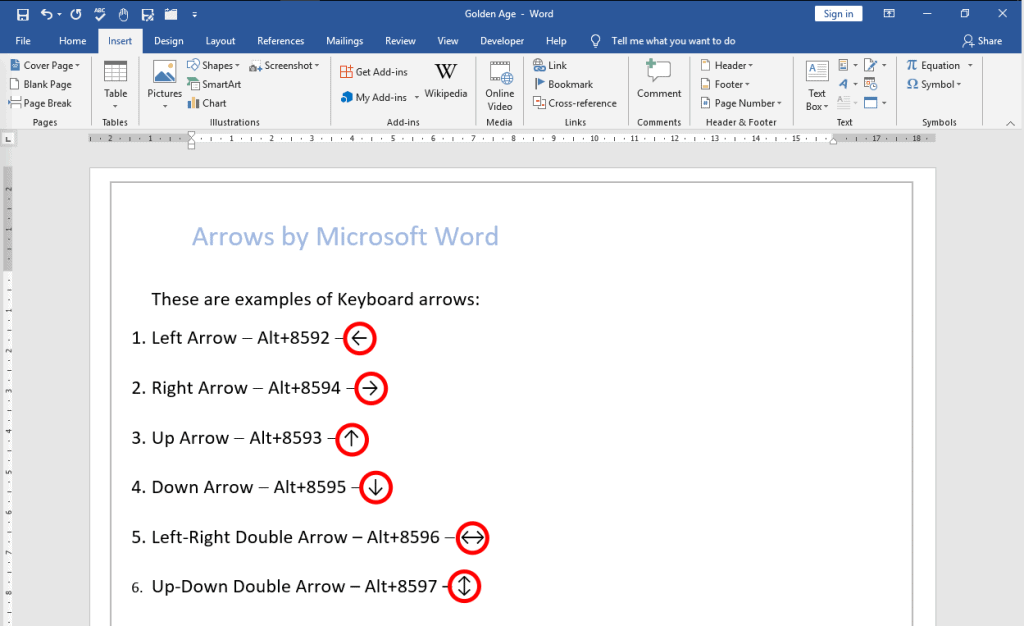
Method #1: Insert Keyboard Arrows
Step #1: Open a Word Document
Open the Word Document in which you want to insert arrows. Place your cursor at the position where the arrow should appear.
Step #2: Insert keyboard arrows
- Type two Hyphens and a More Than sign to insert a Right arrow.
- Type a Less Than sign and two Hyphens to insert a Left arrow.
- Type two Equal signs and a More Than sign to insert a Bold Right arrow
- Type a Less Than sign and two Equal signs to insert a Bold Left arrow
- Type a Less Than sign, one Equal sign, and a More Than sign to insert a Double arrow.
This is how the arrows look.

Method #2: Insert Arrows by Unicode
Step #1: Open a Word Document
Open the Word Document in which you want to insert arrows. Place your cursor at the position where the arrow should appear.
Step #2: Insert unicodes for arrows
Hold down the Alt key on your keyboard and type the following numbers on the numeric keypad. Release the Alt key only after you have finished typing the complete string. Follow the table for the type of arrow you want to insert.
| Arrow Type | Alt+Unicode (on numerical keypad) |
| Left Arrow | Alt+8592 |
| Right Arrow | Alt+8594 |
| Up Arrow | Alt+8593 |
| Down Arrow | Alt+8595 |
| Left-Right Double Arrow | Alt+8596 |
| Up-Down Double Arrow | Alt+8597 |
This is how the arrows look.
Method #3: Insert Arrows as symbols
Step #1: Open a Word Document
Open the Word Document in which you want to insert arrows. Place your cursor at the position where you want the arrow to appear.

Step #2: Open the Symbols Table
Click on the Insert tab on the top menu bar to change the ribbon. In the Symbols section, click on Symbols, and then on More Symbols to open the Symbols Table.

Step #3: Select and insert the Symbol
Scroll up and down to see various symbols, and click on the one you want to insert. Click on the Insert tab to insert the symbol and then click on the Close tab to close the table. This is how your document will look.

Method #4: Insert Line Arrows
Step #1: Open a Word Document
Open the Word Document in which you want to insert line arrows.

Step #2: Select the Shape
Click on the Insert tab on the top menu bar to change the ribbon. In the Illustrations section, click on Shapes to open the choice of Shapes.

Under Lines, click on the second shape from the left. If you prefer, select any other line shape instead. Word closes the choice of Shapes and changes the cursor to a cross.

Step #3: Draw the arrow
Move the cursor to the position where you want the tail of the arrow to be, hold down the left mouse button and drag the mouse and the cross to where you want the arrow to point. Word will insert the arrow, and when you release the mouse button, will place the arrow.

Step #4: Modify the arrow
Notice that the ribbon has changed and Word has opened the Format tab under Drawing Tools. The section Shape Styles allows changing the shape of the arrow such as:
- Style
- Outline
- Effects
- Shape
Style — Click on the downward arrow on the right of Subtle Shapes [1] to open the Theme Styles and Presets choice. Proceed from Step #5.
Outline — Click on the small triangle on the right of Shape Outline [2] to open the Theme Colors dialog. Proceed from Step #6.
Effects — Click on the small triangle on the right of Shape Effects [3] to open the Effects selection. Proceed from Step #7.
Shape — Click on the small triangle at the bottom right of Shape Styles section [4] to open the Format Shape dialog. Proceed from Step #8.
Step #5: Change the style of the arrow

In the Theme Styles and Presets choice, Word offers some preset styles. Click on the one you like best, and the arrow will change accordingly.
Step #6: Change the outline of the arrow
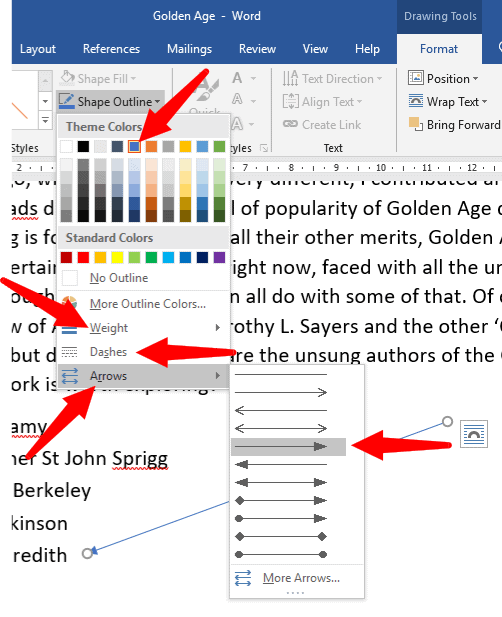
In the Theme Colors dialog, Word allows you to change many features of your arrow:
- Color
- Weight
- Dashes
- Arrow
You can change the color of the arrow, weight (thickness) of the arrow, Dashes (solid line or dotted) of the arrow, and Arrows (type of the arrow head). Simply hover the mouse pointer over the tabs—Weight, Dashes, and Arrow—to see the choices available. Click on the choice you like.
Step #7: Change the shape effects of the arrow

The Effects selection allows introduction of different effects on the arrow. The selection offers several effects such as:
- Preset
- Shadow
- Reflection
- Glow
- Soft Edges
- Bevel
- 3-D Rotation
Simply hovering the mouse pointer over the choices will show the various choices available, and you can pick anything you like. Word will store your choice in Preset on the top.
Step #8: Change the Shape of the arrow

The Format Shape dialog offers three choices:
- Fill and Line
- Effects
- Layout and Properties
Fill and Line — You can select various fill and line properties for the arrow.
Effects — Offers the same choices as in Step #7.
Layout and Properties — This dialog allows you to assign a Title to your arrow and give it a description.
Once you have made your choice, click on the cross to close the dialog.
Your arrow may look like this

Method #5: Insert Block, Curved, and Connector arrows
Step #1: Open a Word Document
Open the Word Document in which you want to insert arrows.

Step #2: Select the Shape
Click on the Insert tab on the top menu bar to change the ribbon. In the Illustrations section, click on Shapes to open the choice of Shapes.

Under Block Arrows, select the type of arrow you need. Word will display the name of the arrow when you hover the mouse pointer over it. Click on the arrow you prefer, and Word will close the dialog, and change the mouse pointer to a cross.

Step #3: Insert the arrow
Position the cross where you want the arrow to start, and holding down the left mouse button, drag the cross to where you want the arrow to end.

Notice that Word has changed the ribbon to include a Format tab under Drawing Tools.
Step #4: Modify the arrow
You can change the position and shape of the arrow by clicking and dragging the appropriate circles around it. You can rotate the arrow in 3-D by clicking and dragging the circular handle on its top.
For modifying the arrow further, follow Method #4, Step #4 onwards.
Finally, your arrow may look like this.

Conclusion
You can add many types of arrows to beautify and emphasize your Word document. Although the process looks involved with too many steps, following our instructions above should make the task easier.
Fonts, Microsoft 365, Microsoft Excel, Microsoft Office, Microsoft Office for Mac, Microsoft Outlook, Microsoft Powerpoint, Microsoft Word, Office 2016, Office 2019, Office 2021 / Office LTSC, Office 365 /
Symbols & Emoji in Microsoft Office, Windows and Mac /
16 December 2021
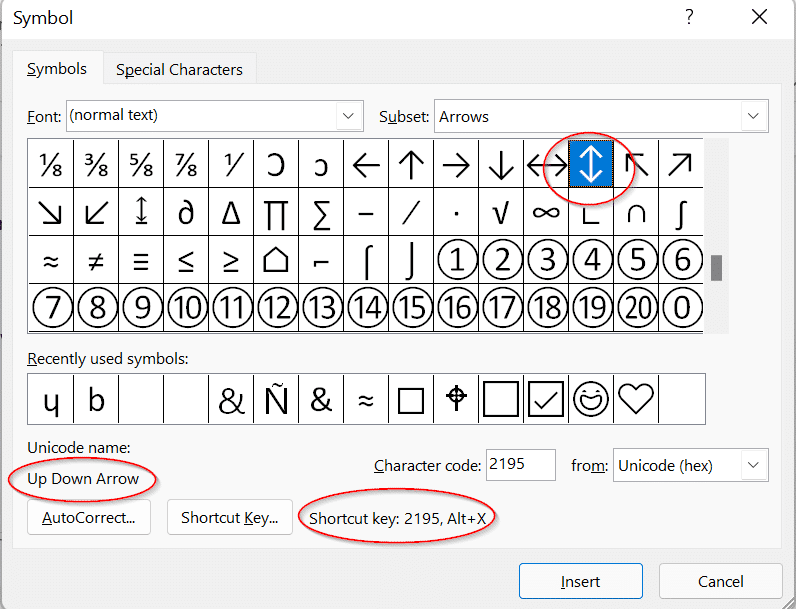
Type the Up Down Arrow ↕ into Microsoft Word, Excel, PowerPoint or Outlook. Both in Office for Windows and Office for Mac.
Up Down Arrow ↕ symbol is a vertical line with arrowheads on both ends, pointing up and down.
How Up Down Arrow ↕ looks in different fonts.
Here’s some examples of how Up Down Arrow ↕ looks in common Office fonts.

Up Down Arrow ↕ codes
These are the important code numbers or values you’ll need to enter the Up Down Arrow or ↕
Decimal: 8597 Hex: 2195
Web: ↕ or ↕
(web codes aren’t used in Microsoft Office, we’ve included them for the sake of completeness.)
Word and Outlook
The Up Down Arrow ↕ sign does NOT have an inbuilt shortcut in Word.
Use the standard Word Alt + X symbol shortcut 2195 + Alt + X
Once in a document you can copy it to AutoCorrect and make your own shortcut.
Word, Excel, PowerPoint and Outlook
Insert | Symbols | Symbol and look for the Up Down Arrow symbol.
Windows
In Windows there are several shortcuts to enter the Up Down Arrow ↕ character into any program, but they use a numeric keypad, not the number row above the letters.
Alt + 8597
Window 11 Emoji Panel
The Windows 11 Emoji Panel has the Up Down Arrow↕. Use Win + . (period/fullstop) to open the panel.
Choose the Symbols tab (the fifth of the top row icons), then the Geometric Symbols section. To find the Up Down Arrow, scroll down the list.

Windows Character Map
The Windows Character Map accessory in all Windows releases.

Character Map has a search feature, something missing from the Insert | Symbol in Office.
MacOS and Office for Mac inserting characters
On a Mac, to enter the Up Down Arrow ↕ symbol:
- Command + Control + Spacebar shortcut to open the Character Viewer.
- Search for “Up Down “and the Viewer should find the symbol you need.
Click on the Insert tab on the top menu bar to change the ribbon. In the Illustrations section, click on Shapes to open the choice of Shapes. Under Block Arrows, select the type of arrow you need. Word will display the name of the arrow when you hover the mouse pointer over it.
Contents
- 1 How do you insert an arrow in Word?
- 2 Is there an arrow symbol in Word?
- 3 How do you make an arrow on the keyboard?
- 4 How do I show the ruler in Word?
- 5 What is the Alt code for an arrow?
- 6 What does ➡ mean?
- 7 How do I make symbols with my keyboard?
- 8 How do I show vertical and horizontal rulers in Word?
- 9 How do I keep the Ruler from disappearing in Word?
- 10 Where can I find Ruler in Microsoft Word 2010?
- 11 How do I type an arrow in Windows?
- 12 How do I type a down arrow?
- 13 What does bows mean in texting?
- 14 What is Hammer slang for?
- 15 What are arrows a symbol of?
- 16 How do I get symbols on my keyboard Windows 10?
- 17 How do you type Alt codes?
- 18 How do you add an outside border in Word?
- 19 How do I add a horizontal scroll bar in Word?
- 20 What is vertical ruler in MS Word?
How do you insert an arrow in Word?
On the “Insert” tab on the Ribbon, click the “Shapes” button. In the Lines group on the drop-down menu, click the “Line Arrow” option. A crosshair symbol will display. Press and hold your mouse button, then drag to draw the arrow.
Is there an arrow symbol in Word?
Either use the Insert → Symbol dialog and then choose the arrow symbol you want from one of the symbol fonts (Wingdings, Webdings)… … or just type two dashes and a “greater than” symbol “- – >” (without spaces), and Word will convert this into a right-pointing arrow symbol.
How do you make an arrow on the keyboard?
To type up ↑,down ↓, right →, and left ← arrows, make sure activate Num Lock then Press Alt , while pressing the Alt button type 24, 25, 26, or 27 respectively and release the Alt button and the arrows will appear.
How do I show the ruler in Word?
Show the rulers
- Go to View and select Ruler.
- If the vertical ruler doesn’t show, make sure you’re in Print Layout view. If it still doesn’t show, you might need to turn the ruler on. Go to Word > Preferences > View (under Authoring and Proofing Tools). Then, in the View dialog box, select the Vertical ruler box.
What is the Alt code for an arrow?
Keyboard Shortcuts – Windows ALT-Codes and Unicode Symbols
| To type this symbol | Press this on your keyboard | Description |
|---|---|---|
| ↑ | Alt+24 | Up Arrow |
| ↓ | Alt+25 | Down Arrow |
| → | Alt+26 | Right Arrow |
| ← | Alt+27 | Left Arrow |
What does ➡ mean?
➡️ Meaning – Right Arrow Emoji
This is one of the most simple and generic emoji.Since it is a very simple emoji it can be used in almost any context: to indicate a direction or an object that is on the right. Sometimes Right Arrow Emoji can also mean the next thing, stop or person in a group.
How do I make symbols with my keyboard?
To insert an ASCII character, press and hold down ALT while typing the character code. For example, to insert the degree (º) symbol, press and hold down ALT while typing 0176 on the numeric keypad. You must use the numeric keypad to type the numbers, and not the keyboard.
How do I show vertical and horizontal rulers in Word?
To see both horizontal and vertical rulers, you must be in Print Layout view.
- To make sure you’re in Print Layout view, click Print Layout on the View tab.
- Select the Ruler check box.
How do I keep the Ruler from disappearing in Word?
Click the View drop-down menu at the top of Word. Check Ruler to enable the Ruler or uncheck Ruler to disable the Ruler.
Where can I find Ruler in Microsoft Word 2010?
Answer: Select the View tab in the toolbar at the top of the screen. Then check the Ruler option in the Show group. Now the horizontal and vertical rulers should appear.
How do I type an arrow in Windows?
Make the arrows with keyboard shortcuts under Windows
Make the “up and down” arrow : Alt + 1 8 : ↕ Make the “up and down with a bar” arrow : Alt + 2 3 : ↨ Make the “left and right” arrow : Alt + 2 9 : ↔
How do I type a down arrow?
It is quite easy, and the quick steps are:
- Press the Alt key button.
- And type 25 uses the numeric keypad, which will be present on the keyboard’s right side.
- Make sure that num lock is off. Because only then you can type 25 and then get the Down Arrow Symbol Text (↓) on your screen.
What does bows mean in texting?
BOWS means “Elbows.”
What is Hammer slang for?
If you say that someone hammers another person, you mean that they attack, criticize, or punish the other person severely.
What are arrows a symbol of?
An arrow symbolizes reaching your goals and achieving your targets. Protection – An arrow has traditionally been used to protect a person from potential harm. Arrows have come to represent protection and defence from any evil that can come to you.
How do I get symbols on my keyboard Windows 10?
To insert symbols or kaomoji on Windows 10, use these steps:
- Open a text file, document, or email.
- Use the Windows key + (period) or Windows key + (semicolon) keyboard shortcut to open the emoji panel.
- Click the Omega button to access the symbols.
- Select the symbols you want to insert.
How do you type Alt codes?
To use an Alt code, press and hold down the Alt key and type the code using the numeric key pad on the right side of your keyboard. If you do not have a numeric keypad, copy and paste the symbols from this page, or go back try another typing method.
How do you add an outside border in Word?
How to highlight or select text.
- Once the text is highlighted, click the Home tab.
- On the Home tab, click the down arrow on the border to get border options, like those shown in the picture.
- Select the type of border you want to use. If you want a single border around the text, click Outside Borders.
How do I add a horizontal scroll bar in Word?
Show scroll bars in Word and Excel for Windows
- Click File > Options.
- On the Advanced tab, scroll to the Display section.
- Select Show horizontal scroll bar and Show vertical scroll bar, and then click OK.
What is vertical ruler in MS Word?
The vertical ruler along the left edge of the document lets you adjust top and bottom margins and change table row heights. You can hide the rulers to get more room for your document.