
Use a union query to combine multiple queries into a single result
Access for Microsoft 365 Access 2021 Access 2019 Access 2016 Access 2013 Access 2010 Access 2007 More…Less
Sometimes you might want to list the records from one table or query with those from one or more other tables to form one set of records — a list with all the records from the two or more tables. This is the purpose of a union query in Access.
To effectively understand union queries, you should first be familiar with designing basic select queries in Access. To learn more about designing select queries, see Create a simple select query.
Note: The content in this article is intended for use with Access desktop databases. You can’t create or use a union query in Access web databases or Access web apps.
Study a working union query example
If you’ve never created a union query before, you might find it useful to first study a working example in the Northwind Access template. You can search for the Northwind sample template on the getting started page of Access by clicking File > New or you can directly download a copy from this location: Northwind sample template.
After Access opens the Northwind database, dismiss the login dialog form that first appears and then expand the Navigation Pane. Click the top of the Navigation Pane and then select Object Type to organize all the database objects by their type. Next, expand the Queries group and you’ll see a query called Product Transactions.
Union queries are easy to differentiate from other query objects because they have a special icon that resembles two intertwined circles representing a united set from two sets:

Unlike normal select and action queries, tables are not related in a union query, which means the Access graphic query designer can’t be used to build or edit union queries. You’ll experience this if you open a union query from the Navigation Pane; Access opens it and display the results in datasheet view. Under the Views command on the Home tab, you’ll notice that Design View is not available when you work with union queries. You can only switch between Datasheet View and SQL View when working with union queries.
To continue your study of this union query example, click Home > Views > SQL View to view the SQL syntax that defines it. In this illustration, we’ve added some extra spacing in the SQL so you can easily see the various parts that make up a union query.

Let’s study the SQL syntax of this union query from the Northwind database in detail:
SELECT [Product ID], [Order Date], [Company Name], [Transaction], [Quantity]
FROM [Product Orders]

UNION

SELECT [Product ID], [Creation Date], [Company Name], [Transaction], [Quantity]
FROM [Product Purchases]

ORDER BY [Order Date] DESC;
The first and the third parts of this SQL statement are essentially two select queries. These queries retrieve two different sets of records; one from the Product Orders table and one from the Product Purchases table.
The second part of this SQL statement is the UNION keyword which tells Access that this query will combine these two sets of records.
The last part of this SQL statement determines the ordering of the combined records by using an ORDER BY statement. In this example, Access will order all of the records by the Order Date field in descending order.
Note: Union queries are always read-only in Access; you can’t change any values in datasheet view.
Create a union query by creating and combining select queries
Even though you can create a union query by directly writing the SQL syntax in the SQL view, you might find it easier to build it in parts with select queries. You can then copy and paste the SQL parts into a combined union query.
If you’d like to skip reading the steps and instead watch an example, see the next section, Watch an example of building a union query.
-
On the Create tab, in the Queries group, click Query Design.
-
Double-click the table that has the fields that you want to include. The table is added to the query design window.
-
In the query design window, double-click each of the fields that you want to include. As you select fields, make sure that you add the same number of fields, in the same order, that you add to the other select queries. Pay careful attention to the data types of the fields, and make sure that they have compatible data types with fields in the same position in the other queries that you are combining. For example, if your first select query has five fields, the first of which contains date/time data, make sure that each of the other select queries that you are combining also has five fields, the first of which contains date/time data, and so on.
-
Optionally, add criteria to your fields by typing the appropriate expressions in the Criteria row of the field grid.
-
After you have finished adding fields and field criteria, you should run the select query and review its output. On the Design tab, in the Results group, click Run.
-
Switch the query to Design view.
-
Save the select query, and leave it open.
-
Repeat this procedure for each of the select queries that you want to combine.
Now that you created your select queries, it’s time to combine them. In this step, you create the union query by copying and pasting the SQL statements.
-
On the Create tab, in the Queries group, click Query Design.
-
On the Design tab, in the Query group, click Union. Access hides the query design window, and shows the SQL view object tab. At this point, the SQL view object tab is empty.
-
Click the tab for the first select query that you want to combine in the union query.
-
On the Home tab, click View > SQL View.
-
Copy the SQL statement for the select query. Click the tab for the union query that you started to create earlier.
-
Paste the SQL statement for the select query into the SQL view object tab of the union query.
-
Delete the semicolon (;) at the end of the select query SQL statement.
-
Press Enter to move the cursor down one line, and then type UNION on the new line.
-
Click the tab for the next select query that you want to combine in the union query.
-
Repeat steps 5 through 10 until you have copied and pasted all of the SQL statements for the select queries into the SQL view window of the union query. Do not delete the semicolon or type anything following the SQL statement for the last select query.
-
On the Design tab, in the Results group, click Run.
The results of your union query appear in Datasheet view.
Watch an example of building a union query
Here is an example that you can recreate in the Northwind sample database. This union query collects the names of people from the Customers table and combines them with the names of people from the Suppliers table. If you’d like to follow along, work through these steps in your copy of the Northwind sample database.
Here are the steps necessary to build this example:
-
Create two select queries called Query1 and Query2 with the Customers and Suppliers tables respectively as data sources. Use First Name and Last Name fields as display values.
-
Create a new query called Query3 with no data source initially and then click the Union command on the Design tab to make this query into a Union query.
-
Copy and paste the SQL statements from Query1 and Query2 into Query3. Be sure to remove the extra semicolon and add in the UNION keyword. You can then check your results in datasheet view.
-
Add in an ordering clause into one of the queries and then paste the ORDER BY statement into the union query SQL view. Notice that in Query3, the union query, when the ordering is about to be appended, first the semicolons are removed, then the table name from the field names.
-
The final SQL that combines and sorts the names for this union query example is the following:
SELECT Customers.Company, Customers.[Last Name], Customers.[First Name]
FROM Customers

UNION

SELECT Suppliers.Company, Suppliers.[Last Name], Suppliers.[First Name]
FROM Suppliers

ORDER BY [Last Name], [First Name];
If you’re very comfortable writing SQL syntax, you can certainly write your own SQL statement for the union query directly into SQL view. However, you might find it useful to follow the approach of copying and pasting SQL from other query objects. Each query can be much more complicated than the simple select query examples used here. It can be to your advantage to create and test each query carefully before combining them in the union query. If the union query fails to run, you can adjust each query individually until it succeeds and then rebuild your union query with the corrected syntax.
Review the remaining sections of this article to learn more tips and tricks about using union queries.
In the example from the previous section using the Northwind database, only data from two tables are combined. However, you can combine three or more tables very easily in a union query. For example, building on the previous example, you might want to also include the names of the employees in the query output. You can accomplish that task by adding a third query and combining with the previous SQL statement with an additional UNION keyword like this:
SELECT Customers.Company, Customers.[Last Name], Customers.[First Name]
FROM Customers

UNION

SELECT Suppliers.Company, Suppliers.[Last Name], Suppliers.[First Name]
FROM Suppliers

UNION

SELECT Employees.Company, Employees.[Last Name], Employees.[First Name]
FROM Employees

ORDER BY [Last Name], [First Name];
When you view the result in datasheet view, all employees will be listed with the sample company name, which probably isn’t very useful. If you want that field to indicate if a person is an in-house employee, from a supplier, or from a customer, you can include a fixed value in place of the company name. Here’s how the SQL would look like:
SELECT "Customer" As Employment, Customers.[Last Name], Customers.[First Name]
FROM Customers

UNION

SELECT "Supplier" As Employment, Suppliers.[Last Name], Suppliers.[First Name]
FROM Suppliers

UNION

SELECT "In-house" As Employment, Employees.[Last Name], Employees.[First Name]
FROM Employees

ORDER BY [Last Name], [First Name];
Here’s how the result appears in datasheet view. Access displays these five example records:
|
Employment |
Last Name |
First Name |
|
In-house |
Freehafer |
Nancy |
|
In-house |
Giussani |
Laura |
|
Supplier |
Glasson |
Stuart |
|
Customer |
Goldschmidt |
Daniel |
|
Customer |
Gratacos Solsona |
Antonio |
The query above can be reduced even further since Access only reads the names of the output fields from the first query in a union query. Here you see we’ve removed the output from the second and third query sections:
SELECT "Customer" As Employment, [Last Name], [First Name]
FROM Customers

UNION

SELECT "Supplier", [Last Name], [First Name]
FROM Suppliers

UNION

SELECT "In-house", [Last Name], [First Name]
FROM Employees

ORDER BY [Last Name], [First Name];
In an Access union query, ordering is allowed only once but each query can be filtered individually. Building on the previous section’s union query, here’s an example of where we’ve filtered each query by adding a WHERE clause.
SELECT "Customer" As Employment, Customers.[Last Name], Customers.[First Name]
FROM Customers
WHERE [State/Province] = "UT"

UNION

SELECT "Supplier", [Last Name], [First Name]
FROM Suppliers
WHERE [Job Title] = "Sales Manager"

UNION

SELECT "In-house", Employees.[Last Name], Employees.[First Name]
FROM Employees
WHERE City = "Seattle"

ORDER BY [Last Name], [First Name];
Switch to datasheet view and you’ll see results similar to this:
|
Employment |
Last Name |
First Name |
|
Supplier |
Andersen |
Elizabeth A. |
|
In-house |
Freehafer |
Nancy |
|
Customer |
Hasselberg |
Jonas |
|
In-house |
Hellung-Larsen |
Anne |
|
Supplier |
Hernandez-Echevarria |
Amaya |
|
Customer |
Mortensen |
Sven |
|
Supplier |
Sandberg |
Mikael |
|
Supplier |
Sousa |
Luis |
|
In-house |
Thorpe |
Steven |
|
Supplier |
Weiler |
Cornelia |
|
In-house |
Zare |
Robert |
If the queries to union are very different, you might encounter a situation where an output field must combine data of different data types. If so, the union query most often will return the results as a text data type since that data type can hold both text and numbers.
To understand how this works, we’ll use the Product Transactions union query in the Northwind sample database. Open that sample database and then open the Product Transactions query in datasheet view. The last ten records should be similar to this output:
|
Product ID |
Order Date |
Company Name |
Transaction |
Quantity |
|
77 |
1/22/2006 |
Supplier B |
Purchase |
60 |
|
80 |
1/22/2006 |
Supplier D |
Purchase |
75 |
|
81 |
1/22/2006 |
Supplier A |
Purchase |
125 |
|
81 |
1/22/2006 |
Supplier A |
Purchase |
200 |
|
7 |
1/20/2006 |
Company D |
Sale |
10 |
|
51 |
1/20/2006 |
Company D |
Sale |
10 |
|
80 |
1/20/2006 |
Company D |
Sale |
10 |
|
34 |
1/15/2006 |
Company AA |
Sale |
100 |
|
80 |
1/15/2006 |
Company AA |
Sale |
30 |
Let’s assume you want the Quantity field split into two — Buy and Sell. Let’s also assume you want to have a fixed zero value for the field with no value. Here’s how the SQL will look for this union query:
SELECT [Product ID], [Order Date], [Company Name], [Transaction], 0 As Buy, [Quantity] As Sell
FROM [Product Orders]

UNION

SELECT [Product ID], [Creation Date], [Company Name], [Transaction], [Quantity] As Buy, 0 As Sell
FROM [Product Purchases]

ORDER BY [Order Date] DESC;
If you switch to datasheet view, you’ll see the last ten records now displayed like the following:
|
Product ID |
Order Date |
Company Name |
Transaction |
Buy |
Sell |
|
74 |
1/22/2006 |
Supplier B |
Purchase |
20 |
0 |
|
77 |
1/22/2006 |
Supplier B |
Purchase |
60 |
0 |
|
80 |
1/22/2006 |
Supplier D |
Purchase |
75 |
0 |
|
81 |
1/22/2006 |
Supplier A |
Purchase |
125 |
0 |
|
81 |
1/22/2006 |
Supplier A |
Purchase |
200 |
0 |
|
7 |
1/20/2006 |
Company D |
Sale |
0 |
10 |
|
51 |
1/20/2006 |
Company D |
Sale |
0 |
10 |
|
80 |
1/20/2006 |
Company D |
Sale |
0 |
10 |
|
34 |
1/15/2006 |
Company AA |
Sale |
0 |
100 |
|
80 |
1/15/2006 |
Company AA |
Sale |
0 |
30 |
Continuing this example, what if you want the fields with zero to be empty? You can modify the SQL to display nothing instead of zero by adding in the Null keyword like the following:
SELECT [Product ID], [Order Date], [Company Name], [Transaction], Null As Buy, [Quantity] As Sell
FROM [Product Orders]

UNION

SELECT [Product ID], [Creation Date], [Company Name], [Transaction], [Quantity] As Buy, Null As Sell
FROM [Product Purchases]

ORDER BY [Order Date] DESC;
However, as you might have observed switching to datasheet view, you now have an unexpected result. In the Buy column, every field is cleared:
|
Product ID |
Order Date |
Company Name |
Transaction |
Buy |
Sell |
|
74 |
1/22/2006 |
Supplier B |
Purchase |
||
|
77 |
1/22/2006 |
Supplier B |
Purchase |
||
|
80 |
1/22/2006 |
Supplier D |
Purchase |
||
|
81 |
1/22/2006 |
Supplier A |
Purchase |
||
|
81 |
1/22/2006 |
Supplier A |
Purchase |
||
|
7 |
1/20/2006 |
Company D |
Sale |
10 |
|
|
51 |
1/20/2006 |
Company D |
Sale |
10 |
|
|
80 |
1/20/2006 |
Company D |
Sale |
10 |
|
|
34 |
1/15/2006 |
Company AA |
Sale |
100 |
|
|
80 |
1/15/2006 |
Company AA |
Sale |
30 |
The reason this happens is because Access determines the data types of the fields from the first query. In this example, Null is not a number.
So what happens if you try and insert an empty string for the blank value of fields? The SQL for this attempt might look like the following:
SELECT [Product ID], [Order Date], [Company Name], [Transaction], "" As Buy, [Quantity] As Sell
FROM [Product Orders]

UNION

SELECT [Product ID], [Creation Date], [Company Name], [Transaction], [Quantity] As Buy, "" As Sell
FROM [Product Purchases]

ORDER BY [Order Date] DESC;
When you switch to datasheet view, you’ll see that Access retrieves the Buy values, but it converted the values to text. You can tell these are text values since they are left-aligned in the datasheet view. The empty string in the first query is not a number which is why you see these results. You’ll also notice that the Sell values are also converted to text because the purchase records contain an empty string.
|
Product ID |
Order Date |
Company Name |
Transaction |
Buy |
Sell |
|
74 |
1/22/2006 |
Supplier B |
Purchase |
20 |
|
|
77 |
1/22/2006 |
Supplier B |
Purchase |
60 |
|
|
80 |
1/22/2006 |
Supplier D |
Purchase |
75 |
|
|
81 |
1/22/2006 |
Supplier A |
Purchase |
125 |
|
|
81 |
1/22/2006 |
Supplier A |
Purchase |
200 |
|
|
7 |
1/20/2006 |
Company D |
Sale |
10 |
|
|
51 |
1/20/2006 |
Company D |
Sale |
10 |
|
|
80 |
1/20/2006 |
Company D |
Sale |
10 |
|
|
34 |
1/15/2006 |
Company AA |
Sale |
100 |
|
|
80 |
1/15/2006 |
Company AA |
Sale |
30 |
So how do you solve this puzzle?
A solution is to force the query to expect the field value to be a number. That can be accomplished with the expression:
IIf(False, 0, Null)
The condition to check, False, will never be True, thus the expression will always return Null, but Access still evaluates both output options and decides the output to be numeric or Null.
Here’s how we can use this expression in our working example:
SELECT [Product ID], [Order Date], [Company Name], [Transaction], IIf(False, 0, Null) As Buy, [Quantity] As Sell
FROM [Product Orders]

UNION

SELECT [Product ID], [Creation Date], [Company Name], [Transaction], [Quantity] As Buy, Null As Sell
FROM [Product Purchases]

ORDER BY [Order Date] DESC;
Note that it is not necessary to modify the second query.
If you switch to datasheet view, you’ll now see a result that we want:
|
Product ID |
Order Date |
Company Name |
Transaction |
Buy |
Sell |
|
74 |
1/22/2006 |
Supplier B |
Purchase |
20 |
|
|
77 |
1/22/2006 |
Supplier B |
Purchase |
60 |
|
|
80 |
1/22/2006 |
Supplier D |
Purchase |
75 |
|
|
81 |
1/22/2006 |
Supplier A |
Purchase |
125 |
|
|
81 |
1/22/2006 |
Supplier A |
Purchase |
200 |
|
|
7 |
1/20/2006 |
Company D |
Sale |
10 |
|
|
51 |
1/20/2006 |
Company D |
Sale |
10 |
|
|
80 |
1/20/2006 |
Company D |
Sale |
10 |
|
|
34 |
1/15/2006 |
Company AA |
Sale |
100 |
|
|
80 |
1/15/2006 |
Company AA |
Sale |
30 |
An alternative method to achieve the same result is to prepend the queries in the union query with yet another query:
SELECT
    0 As [Product ID], Date() As [Order Date],
    "" As [Company Name], "" As [Transaction],
    0 As Buy, 0 As Sell
FROM [Product Orders]
WHERE False
For each field, Access returns fixed values of the data type you define. Of course, you don’t want the output of this query to interfere with the results so the trick to avoid that is to include a WHERE clause to False:
WHERE False
This is a little trick since this is always false and then the query doesn’t return anything. Combining this statement with the existing SQL and we arrive at a completed statement as follows:
SELECT
    0 As [Product ID], Date() As [Order Date],
    "" As [Company Name], "" As [Transaction],
    0 As Buy, 0 As Sell
FROM [Product Orders]
WHERE False

UNION

SELECT [Product ID], [Order Date], [Company Name], [Transaction], Null As Buy, [Quantity] As Sell
FROM [Product Orders]

UNION

SELECT [Product ID], [Creation Date], [Company Name], [Transaction], [Quantity] As Buy, Null As Sell
FROM [Product Purchases]

ORDER BY [Order Date] DESC;
Note: The combined query here in this example using the Northwind database returns 100 records, while the two individual queries return 58 and 43 records for a total of 101 records. The reason for this discrepancy is because two records are not unique. See the section, Working with distinct records in union queries using UNION ALL, to learn how to solve this scenario by using UNION ALL.
A special case for a union query is to combine a set of records with one record that contains the sum of one or more fields.
Here is another example that you can create in the Northwind sample database to illustrate how to get a total in a union query.
-
Create a new simple query to view the purchase of beers (Product ID=34 in the Northwind database) using the following SQL syntax:
SELECT [Purchase Order Details].[Date Received], [Purchase Order Details].Quantity
FROM [Purchase Order Details]
WHERE ((([Purchase Order Details].[Product ID])=34))

ORDER BY [Purchase Order Details].[Date Received];
-
Switch to datasheet view and you should see four purchases:
Date Received
Quantity
1/22/2006
100
1/22/2006
60
4/4/2006
50
4/5/2006
300
-
To obtain the total, create a simple aggregating query using the following SQL:
SELECT Max([Date Received]), Sum([Quantity]) AS SumOfQuantity
FROM [Purchase Order Details]
WHERE ((([Purchase Order Details].[Product ID])=34))
-
Switch to datasheet view and you should see only one record:
MaxOfDate Received
SumOfQuantity
4/5/2006
510
-
Combine these two queries into a union query to append the record with the total quantity to the purchase records:
SELECT [Purchase Order Details].[Date Received], [Purchase Order Details].Quantity
FROM [Purchase Order Details]
WHERE ((([Purchase Order Details].[Product ID])=34))

UNION

SELECT Max([Date Received]), Sum([Quantity]) AS SumOfQuantity
FROM [Purchase Order Details]
WHERE ((([Purchase Order Details].[Product ID])=34))

ORDER BY [Purchase Order Details].[Date Received];
-
Switch to datasheet view and you should see the four purchases with the sum of each followed by a record that totals the quantity:
Date Received
Quantity
1/22/2006
60
1/22/2006
100
4/4/2006
50
4/5/2006
300
4/5/2006
510
That covers the basics of adding totals into a union query. You might also want to include fixed values in both queries such as “Detail” and “Total” to visually separate the total record from the other records. You can review using fixed values in the section Combine three or more tables or queries in a union query.
Union queries in Access by default only include distinct records. But what if you want to include all records? Another example might be useful here.
In the previous section, we showed you how to create a total in a union query. Modify that union query SQL to include Product ID= 48:
SELECT [Purchase Order Details].[Date Received], [Purchase Order Details].Quantity
FROM [Purchase Order Details]
WHERE ((([Purchase Order Details].[Product ID])=48))

UNION

SELECT Max([Date Received]), Sum([Quantity]) AS SumOfQuantity
FROM [Purchase Order Details]
WHERE ((([Purchase Order Details].[Product ID])=48))

ORDER BY [Purchase Order Details].[Date Received];
Switch to datasheet view and you should see a somewhat misleading result:
|
Date Received |
Quantity |
|
1/22/2006 |
100 |
|
1/22/2006 |
200 |
One record of course doesn’t return twice the quantity in total.
The reason you see this result is because on one day the same quantity of chocolates was sold twice — as recorded in the Purchase Order Details table. Here’s a simple select query result showing both records in the Northwind sample database:
|
Purchase Order ID |
Product |
Quantity |
|
100 |
Northwind Traders Chocolate |
100 |
|
92 |
Northwind Traders Chocolate |
100 |
In the union query previously noted, you can see that the Purchase Order ID field isn’t included and that the two fields don’t make up two distinct records.
If you want to include all records, use UNION ALL instead of UNION in your SQL. This will mostly likely have an impact on the sorting of the results, so you might want to also include an ORDER BY clause to determine a sort order. Here’s the modified SQL building off the previous example:
SELECT [Purchase Order Details].[Date Received], Null As [Total], [Purchase Order Details].Quantity
FROM [Purchase Order Details]
WHERE ((([Purchase Order Details].[Product ID])=48))

UNION ALL

SELECT Max([Date Received]), "Total" As [Total], Sum([Quantity]) AS SumOfQuantity
FROM [Purchase Order Details]
WHERE ((([Purchase Order Details].[Product ID])=48))

ORDER BY [Total];
Switch to datasheet view and you should see all the details in addition to a total as the last record:
|
Date Received |
Total |
Quantity |
|
1/22/2006 |
100 |
|
|
1/22/2006 |
100 |
|
|
1/22/2006 |
Total |
200 |
A common usage for a union query is to serve as the record source for a combo box control on a form. You can use that combo box to select a value to filter the form’s records. For example, filtering the employee records by their city.
To see how this might work, here’s another example that you can create in the Northwind sample database to illustrate this scenario.
-
Create a simple select query using this SQL syntax:
SELECT Employees.City, Employees.City AS Filter
FROM Employees;
-
Switch to datasheet view and you should see the following results:
City
Filter
Seattle
Seattle
Bellevue
Bellevue
Redmond
Redmond
Kirkland
Kirkland
Seattle
Seattle
Redmond
Redmond
Seattle
Seattle
Redmond
Redmond
Seattle
Seattle
-
Looking at those results you might not see a lot of value. Expand the query though and transform it to a union query by using the following SQL:
SELECT Employees.City, Employees.City AS Filter
FROM Employees

UNION

SELECT "<All>", "*" AS Filter
FROM Employees

ORDER BY City;
-
Switch to datasheet view and you should see the following results:
City
Filter
<All>
*
Bellevue
Bellevue
Kirkland
Kirkland
Redmond
Redmond
Seattle
Seattle
Access performs a union of the nine records, previously shown, with fixed field values of <All> and «*».
Since this union clause doesn’t contain UNION ALL, Access returns only distinct records which means each city is returned only once with fixed identical values.
-
Now that you have a completed union query displaying each city name only once, along with an option that effectively selects all cities, you can use this query as the record source for a combo box on a form. Using this specific example as a model, you could create a combo box control on a form, set this query as its record source, set the Column Width property of the Filter column to 0 (zero) to hide it visually, and then set the Bound Column property to 1 to indicate the index of the second column. In the Filter property of the form itself, you can then add in code such as the following to activate a form filter using the value of what was selected in the combo box control:
Me.Filter = "[City] Like '" & Me![FilterComboBoxName].Value & "'"
Me.FilterOn = True
The user of the form can then filter the form records to a specific city name or select <All> to list all records for all cities.
Top of Page
Need more help?
03
Monday
Apr 2017
In 2013 I published a technique to create the union of two tables in Excel. This post is still very popular and so I am revisiting this topic.
Excel 2016 (and possibly Excel 2013 but I have not tested) has this capability built-in and the new method should always be preferred to the one that I published. Excel 2016 has the concept of a Workbook Query which is analogous to the output of a SQL query. These Workbook queries are normally used to import data from a database for processing in Excel but they can just as easily work on existing Excel tables.
To create the union of two or more tables follow these steps,
- Create your two tables and name them nicely. In this picture I have named my table “Table_usa_sales”
- Create a Workbook Query by clicking Data > Get and Transform > From Table
- Click in your table
- Click From Table
- Click “Close and Load” . The system will create a new sheet containing the data that is dynamically linked to your original table. Rename this sheet “Q-USA”. You will never touch this sheet so you can hide it if you wish. I prefer simply to colour the tab grey.

- Now do the same for your second table and you should have something like this,
- Now we can create a new Workbook Query that is the union of our two queries,
- Rename the resulting query and sheet “Union”
- Test your result – update a row in one of your tables and then refresh your Union


Using this technique is a good first step to learning more about Excel’s powerful ETL (Extract Transform and Load) capability and how to generate reports from its internal data model. I may post about these in a subsequent article.
This video shows you how to write basic Union queries in SQL for Excel. You’ll learn how to merge two or more tables into a single list and the difference between Union and Union All. You’ll understand the importance of selecting the same number of columns and how to map columns with different names. You’ll also learn how to sort the results of a Union query, how to add calculated columns and how to add criteria.
See our full range of VBA training resources, or
test your knowledge of VBA with one of our
VBA skills assessment tests.
This video has the following accompanying files:
| File name | Type | Description |
|---|---|---|
| Basic Union Queries.xlsm | Excel workbook with macros | The query code |
| Movies.xlsx | Excel workbook | The source data |
Click to download a zipped copy of the above files.
There are no exercises for this video.
Making a video bigger
You can increase the size of your video to make it fill the screen like this:

Play your video (the icons shown won’t appear until you do), then click on the full screen icon which appears as shown at its bottom right-hand corner.
When you’ve finished viewing a video in full screen mode, just press the Esc
key to return to normal view.
Improving the quality of a video
To improve the quality of a video, first click on the Settings
icon:

Make sure you’re playing your video so that the icons shown appear, then click on this gear icon at the bottom right-hand corner.
Choose to change the video quality:

Click on Quality as shown to bring up the submenu.
The higher the number you
choose, the better will be your video quality (but the slower the connection
speed):

Don’t choose the HD option unless you have a fast enough connection speed to support it!
Is your Wise Owl speaking too slowly (or too quickly)? You can also use
the Settings menu above to change your playback speed.
- VBA Union
VBA Union
Само по себе слово «союз» означает объединение одной или нескольких вещей. В VBA Union означает объединение двух или более диапазонов. Эта функция похожа на функцию диапазона в Excel. Это наиболее распространенная ситуация в нашей работе, когда нам нужно объединить один или несколько диапазонов друг с другом. Функция объединения в таких ситуациях очень удобна.
Функции VBA Union используются для объединения одного или нескольких диапазонов, как описано выше. Мы можем использовать эту функцию для объединения диапазонов, которые имеют какие-то общие критерии. Например, если наши данные имеют значение меньше определенного значения, мы можем использовать эту функцию, чтобы объединить эти диапазоны и выделить их.
Синтаксис VBA Union в Excel
Синтаксис для функции объединения выглядит следующим образом:

Так, например, если мы хотим объединить диапазон A1: A5 и B1: B5, мы будем использовать следующую формулу:
Союз (диапазон («A1: A5»), диапазон («B1: B5»)
С этой функцией мы можем сделать гораздо больше, и на разных примерах мы увидим, как использовать эту функцию в VBA.
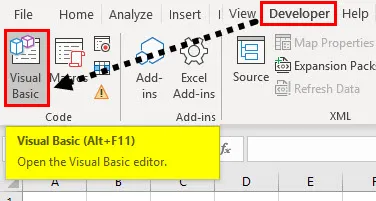
Во-первых, давайте удостоверимся, что у нас включена вкладка разработчика на вкладке файлов в разделе параметров, чтобы мы могли начать использовать VBA в Excel.
Как использовать функцию объединения VBA в Excel?
Мы научимся использовать функцию VBA Union с несколькими примерами в Excel.
Вы можете скачать этот шаблон VBA Union Excel здесь — Шаблон VBA Union Excel
Пример № 1 — VBA Union
В первом примере попробуем выбрать два диапазона вместе. Давайте выберем диапазон A1: A5 и B1: B5 вместе в этом примере.
Чтобы использовать функцию VBA Union в Excel, выполните следующие действия:
Шаг 1: Конечно, нам нужно открыть редактор VB из Visual Basic, который находится на вкладке разработчика.
Шаг 2: Теперь, как только мы окажемся в VB Editor, добавьте новый модуль из раздела вставки. Модуль, который мы вставили, дважды щелкнул по нему, чтобы мы могли начать писать код.

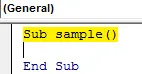
Шаг 3: Как только мы окажемся в окне кода, назовите макрос следующим образом:
Код:
Sub sample () End Sub
Шаг 4: Поскольку мы будем работать с листом 1, нам нужно сначала активировать его, чтобы использовать его свойства.
Код:
Sub sample () Worksheets ("Sheet1"). Активировать End Sub

Шаг 5: Теперь мы будем использовать функцию объединения, чтобы объединить два диапазона, которые мы обсуждали выше, со следующим кодом.
Код:
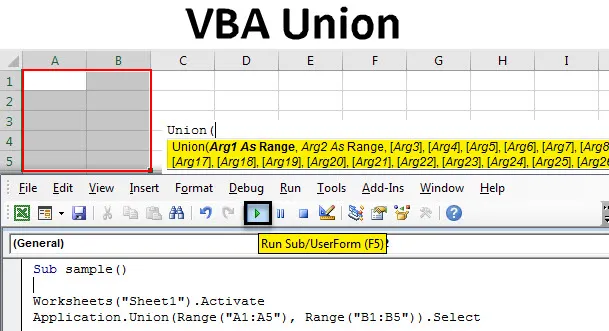
Sub sample () Worksheets ("Sheet1"). Активируйте Application.Union (Range ("A1: A5"), Range ("B1: B5")). Выберите End Sub

Шаг 6: Как только мы выполним приведенный выше код, мы увидим на листе 1, что эти два диапазона находятся в нашем выборе. Нажмите F5 или сделайте это вручную с кнопки запуска, чтобы увидеть следующий результат.

В приведенном выше примере мы выбрали только два диапазона, но мы можем сделать гораздо больше, что мы узнаем в следующих примерах.
Пример № 2 — VBA Union
Теперь в этом примере давайте выберем два диапазона, как указано выше, и изменим их цвет интерьера. Мы можем изменить формат или изменить значения, как только мы объединяем и выбираем диапазоны вместе.
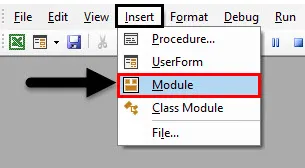
Шаг 1: Перейдите в меню «Вставка» и нажмите на модуль

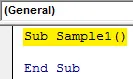
Шаг 2. Объявите имя подфункции для второго примера.
Код:
Sub Sample1 () End Sub
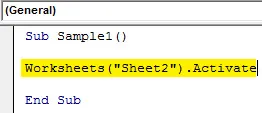
Шаг 3: Теперь давайте сначала активируем лист 2, так как мы собираемся использовать свойства листа 2 в этом примере.
Код:
Sub Sample1 () Worksheets ("Sheet2"). Активировать End Sub
Шаг 4: Объедините два диапазона A1: B5 и C1: D5 с функцией диапазона и измените цвет салона на темно-красный с помощью следующего кода.
Код:
Sub Sample1 () Worksheets ("Sheet2"). Активируйте Application.Union (Range ("A1: B5"), Range ("C1: D5")). Interior.Color = 255 End Sub
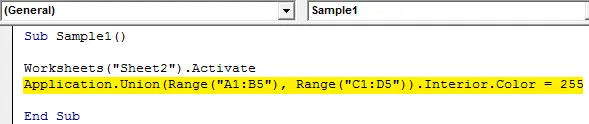
Шаг 5: Выполните вышеописанное и посмотрите результат на листе 2 следующим образом:

Мы изменили цвет диапазонов после их объединения, поскольку видим, что они все еще находятся в выделении.
Пример № 3 — VBA Union
Теперь давайте использовать функцию объединения для отображения адреса после объединения диапазонов. Мы скомбинируем диапазон A1: C4 и E1: F4 и отобразим адрес в окне Immediate. Непосредственное окно находится чуть ниже нашего окна кода, или мы можем нажать CTRL + G, чтобы вызвать его.
Шаг 1: Перейдите в меню «Вставка» и нажмите на модуль,
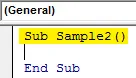
Шаг 2: Назовите имя макроса для этого третьего примера.
Код:
Sub Sample2 () End Sub
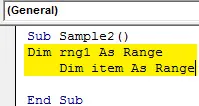
Шаг 3: Объявите две переменные в качестве диапазона на следующем шаге следующим образом.
Код:
Sub Sample2 () Dim rng1 As Range Dim item Как Sub End End
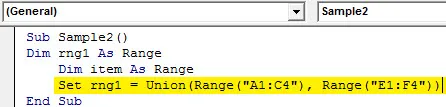
Шаг 4: Теперь установите переменную rng1 как объединение диапазона A1: C4 и E1: F4 следующим образом:
Код:
Sub Sample2 () Dim rng1 As Range Dim Item As Range Set rng1 = Объединение (Range ("A1: C4"), Range ("E1: F4")) End Sub
Шаг 5: Теперь используйте цикл for, чтобы вывести адрес этих ячеек из объединенных диапазонов с помощью следующего кода:
Код:
Sub Sample2 () Dim rng1 As Range Dim item В качестве диапазона Set rng1 = Union (Range ("A1: C4"), Range ("E1: F4")) для каждого элемента в rng1 Debug.Print item.Address Следующий элемент End Sub
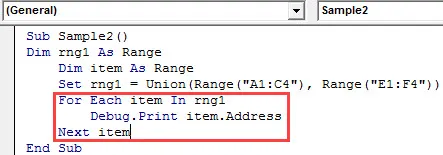
Шаг 6: Как только мы запустим приведенный выше код, мы увидим результат в ближайшем окне следующим образом:

Применение VBA Union
VBA union использует следующий синтаксис:
Expression.Union (range1, range2, … ..)
Здесь мы можем использовать столько диапазонов, сколько нам нужно.
То, что нужно запомнить
Есть несколько вещей, которые мы должны помнить о союзе в VBA:
- Объединение используется для объединения двух или более диапазонов вместе.
- Диапазоны, которые мы даем функции, должны существовать, чтобы избежать ошибки.
- Вместо приложения. Союз, мы можем просто использовать союз, так как мы работаем в самом Excel.
Рекомендуемые статьи
Это руководство к VBA Union. Здесь мы обсудим, как использовать функцию Excel VBA Union вместе с практическими примерами и загружаемым шаблоном Excel. Вы также можете просмотреть наши другие предлагаемые статьи —
- Функция копирования и вставки в VBA
- Функция подстроки Excel
- Индекс VBA вне диапазона
- Excel ISNUMBER Formula
I have an SQL query with two SELECT statements and am using a UNION statement between those two to get a unique result. I need to use this query in Excel but I believe Excel does not accept a UNION statement.
What could be used instead of UNION in the query?
![]()
pnuts
6,0623 gold badges27 silver badges41 bronze badges
asked Jan 8, 2013 at 8:12
![]()
This is an example query from a Microsoft KB article using the UNION statement.
Since that I would say: MS Query (Excel build-in tool for SQL querys) is capable to use UNION-Statements.
SELECT Color_Table.Join_Field, Color_Table.Color_Field,
   Pattern_Table.Pattern_Field
   FROM {oj `C:database`.Pattern_Table LEFT OUTER JOIN
   `C:database`.Color_Table ON Color_Table.Join_Field =
   Pattern_Table.Join_Field}
   UNION
   SELECT Color_Table.Join_Field, Color_Table.Color_Field,
   Pattern_Table.Pattern_Field
   FROM {oj `C:database`.Color_Table LEFT OUTER JOIN
   `C:database`.Pattern_Table ON Color_Table.Join_Field =
   Pattern_Table.Join_Field}
   WHERE (Color_Table.Color_Field Is Null)  or(Pattern_Table.Pattern_Field Is Null)
Source: http://support.microsoft.com/kb/136699/en-us
answered Jan 8, 2013 at 9:49
![]()
nixdanixda
26.5k17 gold badges107 silver badges155 bronze badges
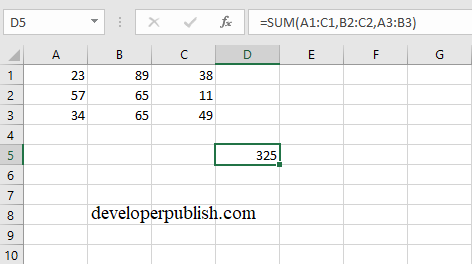
In this post,you will learn what is Union and Intersect operator in Excel and how to use them in your Excel spreadsheet.
Union operator simply adds two range of cells. Intersect Operator gives the intersection of two ranges.
The symbol , (comma) represents the union operator. So when you insert this symbol in between the function it gives you the sum of it.
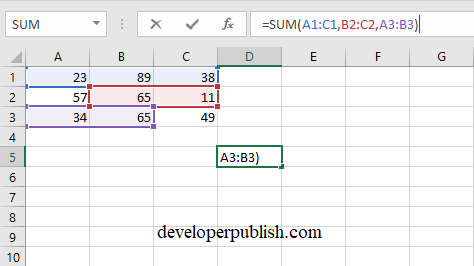
You can see the result in the below screenshot.
Intersect Operator in Excel
A white space represents this operator. For instance, when you insert a space in the function between the range. The function gets executed but only within the common range.
Let’s take a look at an example.
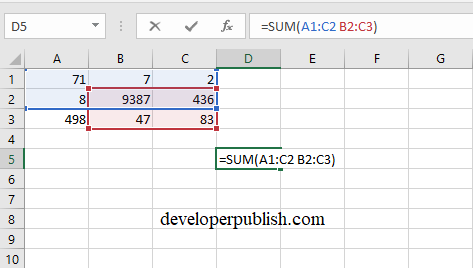
Here the intersection in the range is cell B2 and C2, so the sum is calculated from them.

So to the end, this is how you implement it.
You can use ADO with Excel.
Dim cn As Object
Dim rs As Object
Dim strFile As String
Dim strCon As String
Dim strSQL As String
Dim s As String
Dim i As Integer, j As Integer

''This is not the best way to refer to the workbook
''you want, but it is very conveient for notes
''It is probably best to use the name of the workbook.

strFile = ActiveWorkbook.FullName

''Note that if HDR=No, F1,F2 etc are used for column names,
''if HDR=Yes, the names in the first row of the range
''can be used.
''This is the Jet 4 connection string, you can get more
''here : http://www.connectionstrings.com/excel

strCon = "Provider=Microsoft.Jet.OLEDB.4.0;Data Source=" & strFile _
    & ";Extended Properties=""Excel 8.0;HDR=Yes;IMEX=1"";"

''Late binding, so no reference is needed

Set cn = CreateObject("ADODB.Connection")
Set rs = CreateObject("ADODB.Recordset")


cn.Open strCon

''A sample query
strSQL = "SELECT Distinct A, B C FROM ( " _
       & "SELECT A, B, C " _
       & "FROM [Sheet1$] " _
       & "UNION ALL " _
       & "SELECT A, B, C " _
       & "FROM [Sheet2$] ) As J "


''Open the recordset for more processing
''Cursor Type: 3, adOpenStatic
''Lock Type: 3, adLockOptimistic
''Not everything can be done with every cirsor type and
''lock type. See http://www.w3schools.com/ado/met_rs_open.asp

rs.Open strSQL, cn, 3, 3

''Write out the data to an empty sheet (no headers)
Worksheets("Sheet3").Cells(2, 1).CopyFromRecordset rss
This example illustrates how to use the union and intersect operators in Excel (borders below for illustration only).
1. The union operator (comma) adds two ranges.

Explanation: the SUM function reduces to =SUM(C4:D8) + SUM(D7:E11), 20.
2. The intersect operator (single space) returns the intersection of two ranges.

Explanation: the SUM function reduces to =SUM(D7:D8), 2.
Let’s look at a few cool examples.
3. Excel automatically adds union operators (commas). For example, type =SUM( and hold down CTRL to select the ranges below.

Note: press Enter to insert this function. Excel adds the closing parenthesis for you.
4. You can use the intersect operator (space) to return the intersection of two named ranges.

Note: the named range Feb refers to the range B3:D3 and the named range Chocolate refers to the range B2:B13.