
Hide or unhide a worksheet
Note: The screen shots in this article were taken in Excel 2016. If you have a different version your view might be slightly different, but unless otherwise noted, the functionality is the same.
-
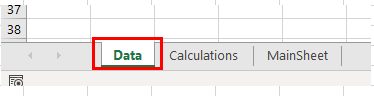
Select the worksheets that you want to hide.
How to select worksheets
To select
Do this
A single sheet
Click the sheet tab.

If you don’t see the tab that you want, click the scrolling buttons to the left of the sheet tabs to display the tab, and then click the tab.
Two or more adjacent sheets
Click the tab for the first sheet. Then hold down Shift while you click the tab for the last sheet that you want to select.
Two or more nonadjacent sheets
Click the tab for the first sheet. Then hold down Ctrl while you click the tabs of the other sheets that you want to select.
All sheets in a workbook
Right-click a sheet tab, and then click Select All Sheets on the shortcut menu.
Tip: When multiple worksheets are selected, [Group] appears in the title bar at the top of the worksheet. To cancel a selection of multiple worksheets in a workbook, click any unselected worksheet. If no unselected sheet is visible, right-click the tab of a selected sheet, and then click Ungroup Sheets on the shortcut menu.
-
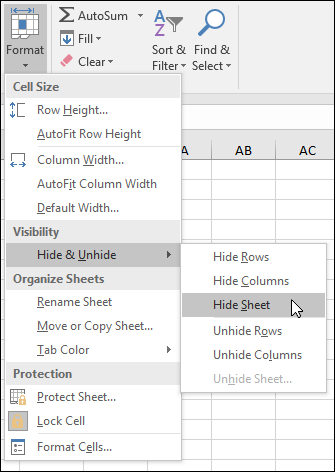
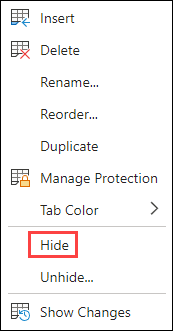
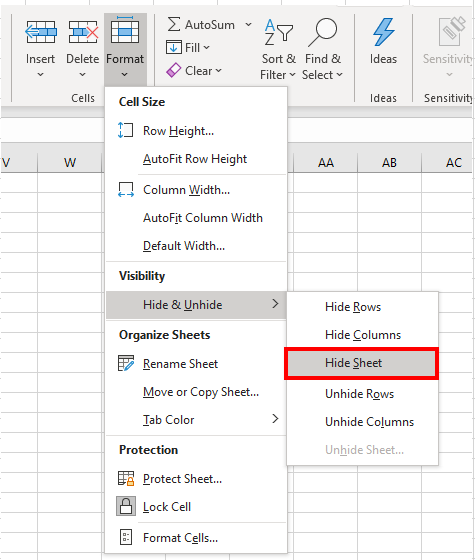
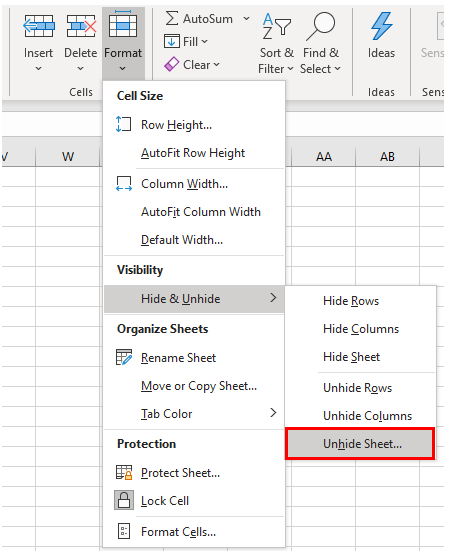
On the Home tab, in the Cells group, click Format > Visibility > Hide & Unhide > Hide Sheet.
-
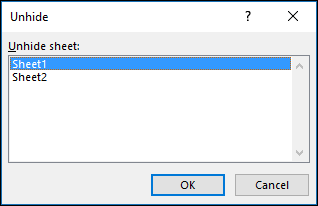
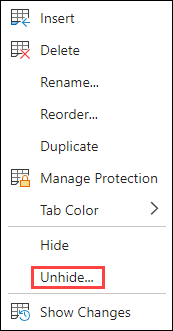
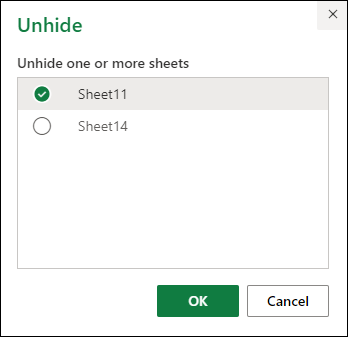
To unhide worksheets, follow the same steps, but select Unhide. You’ll be presented with a dialog box listing which sheets are hidden, so select the ones you want to unhide.
Note: Worksheets hidden by VBA code have the property xlSheetVeryHidden; the Unhide command will not display those hidden sheets. If you are using a workbook that contains VBA code and you encounter problems with hidden worksheets, contact the workbook owner for more information.

Hide or unhide a workbook window
-
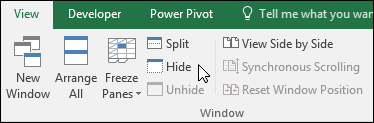
On the View tab, in the Window group, click Hide or Unhide.
On a Mac, this is under the Window menu in the file menu above the ribbon.
Notes:
-
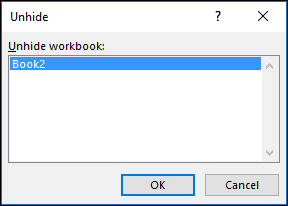
When you Unhide a workbook, select from the list in the Unhide dialog box.
-
If Unhide is unavailable, the workbook does not contain hidden workbook windows.
-
When you exit Excel, you will be asked if you want to save changes to the hidden workbook window. Click Yes if you want the workbook window to be the same as you left it (hidden or unhidden), the next time that you open the workbook.
Hide or display workbook windows on the Windows taskbar
Excel 2013 introduced the Single Document Interface, where each workbook opens in its own window.
-
Click File > Options.
For Excel 2007, click the Microsoft Office Button
, then Excel Options. -
Then click Advanced > Display > clear or select the Show all windows in the Taskbar check box.
 , then Excel Options.
Hide or unhide a worksheet
-
Select the worksheets that you want to hide.
How to select worksheets
To select
Do this
A single sheet
Click the sheet tab.
If you don’t see the tab that you want, click the scrolling buttons to the left of the sheet tabs to display the tab, and then click the tab.
Two or more adjacent sheets
Click the tab for the first sheet. Then hold down Shift while you click the tab for the last sheet that you want to select.
Two or more nonadjacent sheets
Click the tab for the first sheet. Then hold down Command while you click the tabs of the other sheets that you want to select.
All sheets in a workbook
Right-click a sheet tab, and then click Select All Sheets on the shortcut menu.
-
On the Home tab, click Format > under Visibility > Hide & Unhide > Hide Sheet.
-
To unhide worksheets, follow the same steps, but select Unhide. The Unhide dialog box displays a list of hidden sheets, so select the ones you want to unhide and then select OK.
Hide or unhide a workbook window
-
Click the Window menu, click Hide or Unhide.
Notes:
-
When you Unhide a workbook, select from the list of hidden workbooks in the Unhide dialog box.
-
If Unhide is unavailable, the workbook does not contain hidden workbook windows.
-
When you exit Excel, you will be asked if you want to save changes to the hidden workbook window. Click Yes if you want the workbook window to be the same as you left it (hidden or unhidden) the next time that you open the workbook.
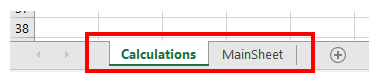
Hide a worksheet
-
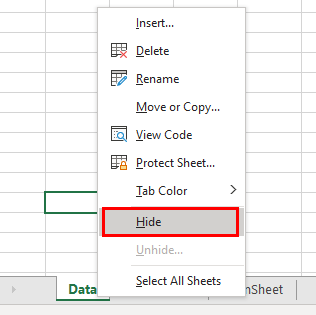
Right click on the tab you want to hide.
-
Select Hide.
Unhide a worksheet
-
Right click on any visible tab.
-
Select Unhide.
-
Mark the tabs to unhide.
-
Click OK.
Watch Video – How to Unhide All Sheets In Excel
In case you prefer reading a tutorial over watching a video, below is a detailed written tutorial on unhiding sheets in Excel.
When you work with data that is spread across multiple worksheets in Excel, you may want to hide a few worksheets. This could be to avoid the clutter or to not show some data to your client/manager by hiding some worksheets and only keeping the useful ones visible.
And in some cases, you may have a workbook that has some hidden sheets and you want to unhide some or all of these worksheets.
In this tutorial, I will show you some methods to unhide worksheets in Excel (manually as well as automatically using VBA). I will also show you how to selectively unhide worksheets based on the name or a condition.
So let’s get started!
Unhiding Sheets Manually
If you only have a few worksheets that are hidden, you can manually unhide some or all of these worksheets.
Suppose you have an Excel workbook that has 10 worksheets that are hidden.
Below are the steps to manually unhide worksheets (one at a time):
- Right-click on any of the existing worksheet tab

- Click on the Unhide option. This will open the Unhide dialog box that lists all the hidden worksheets
- In the Unhide dialog box, click on the worksheet that you to unhide (you can only select one at a time).

- Click OK.


The above steps would unhide the select worksheet.
Note: Unfortunately, there is no in-built functionality in Excel to quickly unhide all the hidden worksheets (or a way to select more than one worksheet and unhide it). As of now, you need to use the unhide dialog box where you can only select one worksheet to unhide.
You can hide worksheets in bulk, but not unhide in bulk
If you want to hide worksheets, you can select multiple worksheets at once (hold the control key and click on the worksheet tab name), right-click and click on the Hide option.
Unfortunately, there is no in-built functionality in Excel to quickly unhide all the hidden worksheets (or a way to select more than one worksheet and unhide it). As of now, you need to use the unhide dialog box where you can only select one worksheet to unhide.
While there is no-inbuilt functionality to unhide in bulk, you can easily do this with a simple VBA macro code.
Unhide All Sheets At One Go
With VBA, you can easily unhide worksheets in bulk.
For example, if you have 10 hidden worksheets, you can create a simple VBA code to unhide all the worksheets or you can unhide based on a condition (such as unhide only those where there is a specific prefix or year in the name).
Note: The methods covered in this tutorial doesn’t require you to save an Excel workbook in a macro-enabled format (.XLSM) to use the VBA code.
Using Immediate Window
VB Editor in Excel has an immediate window where you can type a line of code and instantly execute it right away.
Below are the steps to use this above line of code to unhide sheets through immediate window:
- Right-click on any of the visible sheets in the workbook
- Click on View code. This will open the VB Editor.

- Click the View option in the menu and then click on the Immediate window. This will make the Immediate window appear in the VB Editor (if not there already).

- In the Immediate window, copy and paste the following line of code: For each Sheet in Thisworkbook.Sheets: Sheet.Visible=True: Next Sheet

- Place the cursor at the end of the line
- Hit the Enter key


That’s it!
The above steps would instantly unhide all the sheets in the workbook.
Once done, you can close the VB Editor.
The best part about this is that you can do this on any workbook. You don’t need to worry about saving the workbook in a macro-enabled format. Just execute a line of code and instantly unhide all the sheets in the workbook.
Let me also quickly explain the below VBA code that we have used in the immediate window to unhide sheets:
For each Sheet in Thisworkbook.Sheets: Sheet.Visible=True: Next Sheet
The above code uses a For Next VBA loop to go through all the sheets in the workbook and set the visible property to TRUE. Once the visible property of all the sheets is changed, the code will end.
The colon (:) used in the code above is equivalent to a line break. While it looks like a single line of code, it has three parts to it which are separated by two colons.
If you’re interested in learning more about the immediate window and some awesome things you can do with it, here is a detailed tutorial about it.
By Adding Macro to QAT (with One Click)
In case you have to unhide worksheets quite often, another good way could be to have the macro code to unhide sheets in the Personal macro workbook and save the icon in the Quick Access Toolbar.
This is just a one time process and once you have it done, you can then unhide sheets in any workbook by simply clicking on a button in the QAT.
This is by far the most efficient way to unhide sheets in Excel (most useful when you get a lot of workbooks with hidden sheets and you have to unhide these).
The trick here is to save the code to unhide sheets in the Personal Macro Workbook.
A Personal Macro Workbook is something that is always open when you open any Excel file (you can’t see it though). When you save a macro code to the Personal Macro workbook, this code is now always available to you. And when you add this to the QAT and you run the macro code with a single click.
Below is the code that you need to add to the Personal Macro Workbook:
Sub UnhideAllSheets()
For Each Sheet In Sheets
    Sheet.Visible = True
Next Sheet
End Sub
Below are the steps to add this code to the Personal Macro Workbook:
- Click on the record macro button (it’s at the bottom left of the Excel workbook application)

- In the Record Macro dialog box, change the Store macro in setting to – Personal Macro Workbook.

- Click OK. This will start recording the macro
- Click on the Stop macro recording icon (at the bottom left of the workbook). This will stop the macro recording

- Right-click on any sheet tab and then click on ‘View Code’
- In the VB Editor, double-click on the Module object in the Personal.XLSB workbook

- Remove any existing code and copy and paste the above code.

- Click the Save icon in the toolbar
- Close the Vb Editor


The above steps allow you to make the Personal Macro Workbook visible in the VB Editor and place the code to unhide sheets in it.
Now all you need to do is add this code to the Quick Access Toolbar so that you can use it anytime from any workbook.
Below are the steps to add this code to the Quick Access Toolbar:
- Click on the Customize Quick Access Toolbar icon.

- Click on More Commands.

- In the Excel Options dialog box, click on the ‘Choose Commands from’ drop-down

- Click on Macros. This will show you a list of all the macros in the workbook (including the ones in PERSONAL.XLSB)

- Select the macro code to unhide sheets

- Click on the Add button

- Click OK.


The above steps would add this macro code to unhide sheets in the Quick Access Toolbar.

Now, whenever you get a workbook that has some sheets hidden, you just need to click on the code icon in the QAT and it will instantly unhide all sheets in one go.
Unhide Sheets With Specific Text in the Name
With VBA, you can also unhide sheets based on the name.
For example, suppose you have a workbook that contains sheets with years in the name and you want to unhide all the ones where the year is 2020.
You can use the below code to unhide all the sheets with the text 2020 in it:
Sub UnhideSheetsWithSpecificText()
For Each ws In ThisWorkbook.Worksheets
    If InStr(ws.Name, "2020") > 0 Then
        ws.Visible = xlSheetVisible
    End If
Next ws
End Sub
The above uses the For Next loop to go through each worksheet in the workbook. The IF Then condition then checks the name of the worksheet and if it contains the specified text (which is 2020 in this code), it will change the visible property to make it visible.
And if the name doesn’t contain the specified text, it will leave it as is.
You can also modify this code to hide sheets based on the text in the name.
For example, if you want to quickly hide all the worksheets where the name contains the text ‘2020’ in it, you can use the below code:
Sub HideSheetsWithSpecificText()
For Each ws In ThisWorkbook.Worksheets
    If InStr(ws.Name, "2020") > 0 Then
        ws.Visible = xlHidden
    End If
Next ws
End Sub
Note: You can save this code in a regular module inside VB Editor or you can save this in the Personal Macro Workbook. In case you save it in a regular module and need to use it again later, you need to save the workbook as a macro-enabled workbook (.XLSM format).
Unhide Selected Sheets (Based on User Selection)
You can also use VBA to give the user the flexibility to choose whether to unhide a sheet or not.
This can be done by showing a message box that asks the user to select whether to unhide a sheet or not. If selected, it unhides that sheet, else it moves to the next one.
Below is the code that will do this:
Sub UnhideSheetsUserSelection()
For Each sh In ThisWorkbook.Sheets
    If sh.Visible <> True Then
        Result = MsgBox("Do You Want to Unhide " & sh.Name, vbYesNo)
        If Result = vbYes Then sh.Visible = True
    End If
Next sh
End Sub
The above code goes through each sheet in the workbook and checks whether it’s already visible or not. If it’s hidden, then it shows the message box with the name of the worksheet.
As a user, you can now decide whether you want to keep this sheet hidden or unhide it.
This can work well if you have some worksheets that are hidden and you want to take a call for every sheet individually.
Note: You can save this code in a regular module inside VB Editor or you can save this in the Personal Macro Workbook. In case you save it in a regular module and need to use it again later, you need to save the workbook as a macro-enabled workbook (.XLSM format).
Here is a tutorial where I show how to save the code in the regular module in Excel (search for the ‘Where to put this code’ section in this article)
Unhide All or Selected Sheets Using Custom View
This is a less known method in case you want to quickly unhide all the worksheets (or some selected worksheets).
‘Custom View’ is functionality in Excel that allows you to create and save views that you can quickly resort to with a click of a button.
For example, suppose you have an Excel workbook with 10 worksheets. You can create a view where all these 10 sheets are visible. In the future, if you have some sheets hidden and you want o go back to the view where all the sheets were visible, you can do that by selecting the already saved custom view.
Don’t worry, you don’t lose any changes you made after creating the custom view. All custom view does is takes you back to the Excel view when you created it. So if some worksheets were visible when you created the view and are now hidden, selecting that custom view would unhide these sheets.
The intended use of Custom View is to allow users to create different views. For example, if you’re an analyst, you can create different views for different departments in your organization. So you can have a specific set of worksheets (or cells/rows/columns) visible for one department and another set for another department. Once you have these views, instead of changing this manually, you simply activate the view for a department and it will show you worksheets (or rows/columns) relevant for them only.
Below are the steps to create a custom view in Excel:
- Unhide all the worksheets to begin with
- Click the View tab
- Click on Custom Views

- In the Custom Views dialog box, click on Add. This will open the Add view dialog box

- Enter any name for this view where all the sheets (or selected sheets) are visible

- Click OK.


Once the view is created, you can anytime ask Excel to activate this view (which would make all those sheets visible that were visible when you created the view).
Below are the steps to show/activate a custom view:
- Click the View tab
- Click on Custom Views
- In the Custom Views dialog box, select the view that you want to show
- Click on Show button


This would instantly unhide sheets and show those that were visible when you created that custom view.
Unhiding Sheets that are ‘Very Hidden’
Sometimes, despite having some hidden sheets in your workbook, you would not be able to unhide it manually.
This could be because these sheets are not just hidden – these are ‘very hidden’.
When you have hidden sheets in a workbook and you right-click on any tab name, you would see the option to ‘Unhide’ sheets. But if you have sheets are ‘very hidden’ or if there are no hidden sheets, then you would not be able to use this option (it will be greyed out).
You can still unhide these ‘very hidden’ sheets by using the VBA code that we have covered above.
Just copy-paste the below code in the immediate window and hit enter and it would instantly unhide all the sheets (hidden as well as very hidden).
For each Sheet in Thisworkbook.Sheets: Sheet.Visible=True: Next Sheet
I also have a full tutorial on how to hide sheets and make these very hidden (in case you’re interested in learning)
You may also like the following Excel tutorials:
- How to Quickly Unhide COLUMNS in Excel
- How to Rename a Sheet in Excel
- Delete Rows Based on a Cell Value (or Condition) in Excel
- Hide Zero Values in Excel
- Working with Worksheets using Excel VBA
- How to Group Worksheets in Excel
- How to Delete All Hidden Rows and Columns in Excel
- Excel Tabs/Sheets Not Showing – How to Fix?
Different Methods to Unhide Excel Sheets
Unhiding a single Excel sheet is as easy as hiding them. But as a new learner, it is important to know the process. We can unhide the sheet in several ways. We will show each one of them now in this article.
Table of contents
- Different Methods to Unhide Excel Sheets
- Method #1 – Using Right Click
- Method #2
- Method #3
- Method #4 – Unhide Multiple Sheets
- Method #5 – Unhide All Worksheets Except Particular Worksheet
- Method #6 – Unhide Only Specific Excel Sheet
- Recommended Articles
You are free to use this image on your website, templates, etc, Please provide us with an attribution linkArticle Link to be Hyperlinked
For eg:
Source: Unhide Sheets in Excel (wallstreetmojo.com)
There are various ways by which you can unhide a single Excel sheet.
You can download this Unhide Sheets Excel Template here – Unhide Sheets Excel Template
Method #1 – Using Right Click
The steps to unhide sheets in Excel are as follows:
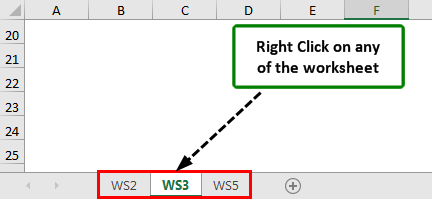
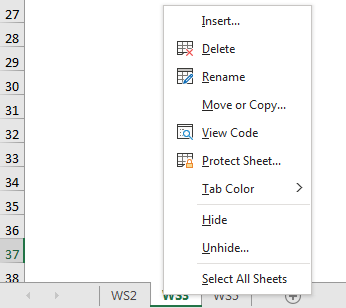
- First, we need to right-click any worksheet tabs to unhide the sheet.

- Once you right-click, you can see the options below.

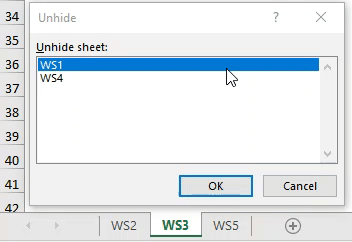
- Select the “Unhide” option in these options, and you will see a list of all hidden worksheets.

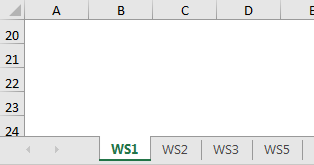
- Select the worksheet that you want to unhide and click on “OK.” It will unhide the selected sheet.

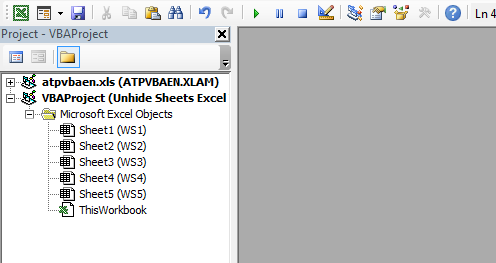
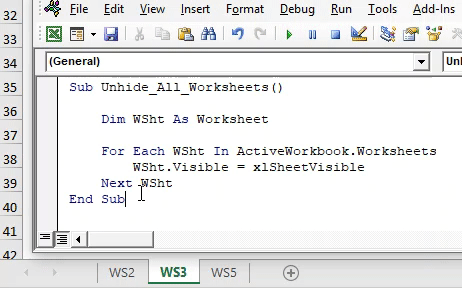
- Now, we can see the worksheet named “WS1” in the “My Sheet” tab.

Method #2
This method is more tedious than the above, but knowing different techniques is always a good option.
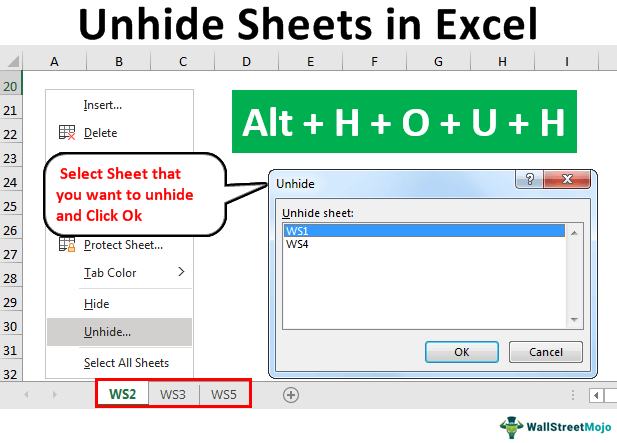
- Step 1: To unhide single Excel sheet go to Home > Format > Hide & Unhide > Unhide Sheet.
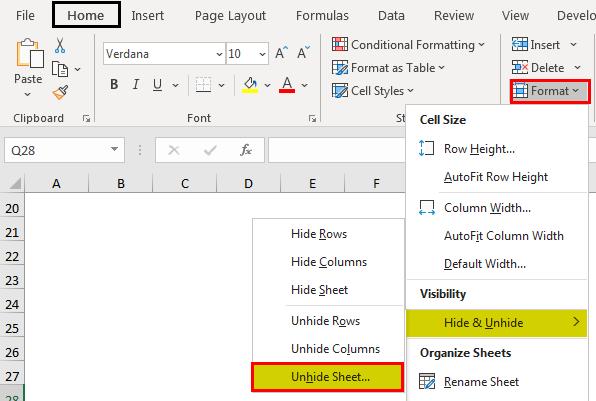
- Step 2: Upon clicking that option, as shown in the above image, we can see the below window.
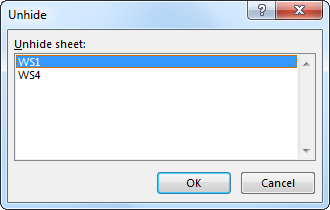
As usual, select the worksheet that you want to unhide and click on “OK.” It will unhide the selected sheet.
Method #3
A more efficient one comes, i.e., using Excel Shortcut KeyAn Excel shortcut is a technique of performing a manual task in a quicker way.read more. So, yes, we can unhide the sheet using the shortcut key.
- Step 1: Just press “ALT + H + O + U + H” to open the unhide sheet box.

- Step 2: This will open the below window.
As usual, select the worksheet that you want to unhide and click on “OK.” It will unhide the selected sheet.
Method #4 – Unhide Multiple Sheets
Unhide window can only unhide single sheets at a time, but imagine you have to unhide 10 sheets, then repeating the same set of tasks 10 times is frustrating. So, how do we unhide all the worksheets once?
We can unhide all the sheets by writing the VBA codeVBA code refers to a set of instructions written by the user in the Visual Basic Applications programming language on a Visual Basic Editor (VBE) to perform a specific task.read more in Excel. Below is the code to unhide all the hidden worksheets in the workbook.
Code:
Sub Unhide_All_Worksheets()

    Dim WSht As Worksheet

    For Each WSht In ActiveWorkbook.Worksheets
        WSht.Visible = xlSheetVisible
    Next WSht

End Sub
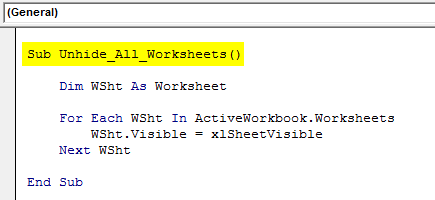
- We have used the For Each loop in VBAVBA For Each Loop helps the user to inspect and analyze the groups of objects or values individually. It even facilitates performing the specific activity for every object or value by passing a statement or group of statements in this reference.read more to unhide the worksheet. You must copy the above code, go to your worksheet, and then press ALT + F11 to open Visual Basic Editor.
- Now, insert a new module under the “INSERT” option.

- In the new module, paste the copied code.
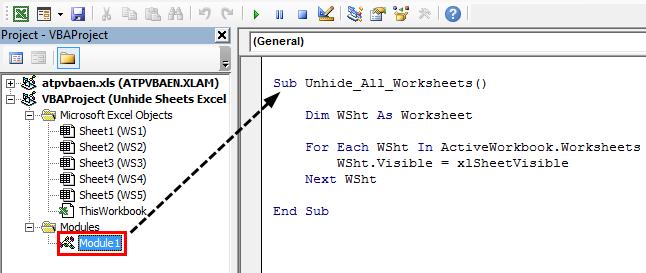
- Now, run this code. It will unhide all the hidden worksheets in the workbook.
Method #5 – Unhide All Worksheets Except Particular Worksheet
There are situations where we need to unhide all the worksheets except the specific worksheet. In such cases also, we can use VBA Coding. For example, assume you want to unhide all the worksheets except the worksheet named “Workings.”
The below code will do the same.
Code:
Sub Unhide_All_Except_One()

     Dim WSht As Worksheet

     For Each WSht In ActiveWorkbook.Worksheets
         If WSht.Name <> "Workings" Then
         WSht.Visible = xlSheetVisible
         End If
     Next WSht

End Sub
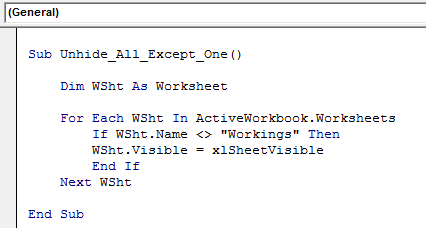
Now, run this code, and it will unhide all worksheets except the one named “Workings.”
You can change the worksheet name from “Workings” to your worksheet name.
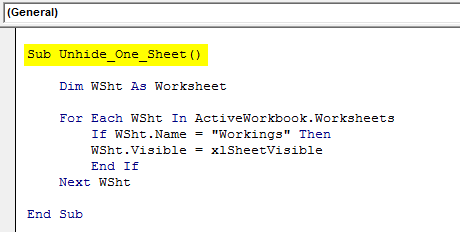
Method #6 – Unhide Only Specific Excel Sheet
Similarly, if you want to unhide only a specific Excel sheet, VBA can do this. For example, if you are going to unhide only the worksheet named “Working,” then we can use this code.
Code:
Sub Unhide_One_Sheet()

     Dim WSht As Worksheet

     For Each WSht In ActiveWorkbook.Worksheets
         If WSht.Name = "Workings" Then
         WSht.Visible = xlSheetVisible
         End If
     Next WSht

End Sub
Recommended Articles
This article has been a guide to Unhide Sheets in Excel. Here, we discuss how to unhide single and multiple worksheets using different methods in Excel with a downloadable template. You can learn more from the following articles: –
- Comparison Chart in Excel
- Auditing Tool in Excel
- Percentage Change Excel Formula
- Hide Columns in VBA
One of the first “tricks” an Excel user learns is to hide and unhide a sheet.
This is an exceptionally useful feature as it allows us to store data in a sheet, such as lists and tables, but keep the user of the workbook from seeing, manipulating, and more importantly, corrupting the information on the hidden sheet.
As with most things in Excel, there is more than one way to hide a sheet or multiple sheets. One of the easiest methods is to select a sheet (or select multiple sheets using standard Windows CTRL and Shift selection techniques), right-click the sheet tab then select “Hide”.

As an example; suppose you have twelve sheets labeled “January” through “December” and you want to hide all the monthly sheets except “December”.
- Select the “Jan” sheet
- Hold down the Shift key
- Select the “Nov” sheet
- Right-click on any selected sheet tab
- Click “Hide”

Unfortunately, unhiding multiple sheets in a single step is not as easy. If you right-click a sheet tab and select “Unhide”, the proceeding dialog box only allows a single sheet to be selected for the unhide operation.

This means you will have to perform the unhide operation eleven times to restore all the hidden sheets to a visible state.
Never fear, a solution is here (actually, three solutions)
Solution 1 – Create a Custom View
An often-overlooked feature in Excel is the ability to save a custom view.

Custom views can be used to “save” the hidden or visible states of rows and columns. This is convenient when you wish to show details of data for one printout, but a summarized version of the data in a different printout.
- Hide the desired rows and/or columns.
- Click View (tab) -> Workbook Views (group) -> Custom Views -> Add… and give the current configuration a name.

If you change the hidden/visible state of rows and/or columns but then wish to return to the saved configuration, repeat the process (View (tab) -> Workbook Views (group) -> Custom Views), select your saved view then click “Show”.

The screen will immediately return to the desired state.
Custom views also work with the visible/hidden states of worksheets. If we create a custom view prior to hiding ANY of the sheets (View (tab) -> Workbook Views (group) -> Custom Views -> Add…), we can hide as many sheets as we like. When it comes time to redisplay all the sheets, we repeat the process and select our “normal” view and click “Show”.
All the sheets have returned.
There is one negative to this process. Custom views do not work with Data Tables. The moment you add a Data Table to ANY sheet, the Custom Views feature becomes inoperable.

Because more and more people use Data Tables in their workbooks (and why wouldn’t you? They’re AMAZING!!!), we need to explore another way of unhiding all hidden worksheets.
Solution 2 – Using the VBA Immediate Window
Right up front, this does not require the use of macro-enabled workbooks. This technique can be performed in any Excel workbook.
- Open the Visual Basic Editor by pressing Alt-F11 on the keyboard or right click on any sheet tab and select View Code.

Don’t concern yourself with what you see in the ensuing window; all of that is for another day.
- Activate the Immediate Window by clicking View -> Immediate Window (or CTRL-G).

Now we will run a macro. This macro will loop through all the hidden sheets and revert their visibility states to “visible”. We will use a “For…Each” collection loop to perform this operation.
NOTE: If you are interested in learning about this command and many other useful things macros can do for you, visit the links at the end of this tutorial.
- In the Immediate window, type
for each sh in worksheets: sh.visible=true: next sh
(press Enter)
All the sheets have returned to a visible state.

What does that code mean? Let’s break down the code.
for each sh in worksheetsThis establishes a collection (list) of all worksheets and allows us to refer to each sheet individually with the alias “sh”.
sh.visible=trueWith the first sheet in the collection, set the visible property to “true”. This makes the sheet visible to the user.
next shThis selects the next sheet in the collection and returns to the first statement to repeat the process.
This process will repeat for as many sheets as are in the collection.
If this code is something you will use frequently, you can save the code in a Notepad file and then copy/paste it back into the Immediate Window whenever needed.
Solution 3 – Add a Macro to the Quick Access Toolbar (QAT)
This technique is covered in detail in the Excel VBA course (link below if you are interested in becoming a VBA Powerhouse) but will be summarized here.
If this feature is to be used often across many different workbooks, it’s worth taking the time to set this feature up on the QAT.
We will create a simple macro and store it in a special place in Excel called the Personal Macro Workbook.
Creating the Macro
- Click the “Record Macro” button on the Status Bar in the lower-left corner of Excel.
- Give the macro a name (“Unhide_All” is a good name.) Macro names cannot contain spaces.
- Change the “Store macro in:” option from “This Workbook” to “Personal Macro Workbook”.
- Click OK
- Click the “Stop Recording” button on the Status Bar in the lower-left corner of Excel.
- Open the Visual Basic Editor (Alt-F11).
- In the Project Explorer panel (upper-left), click the plus-sign next to the entry labeled “VBAProject (PERSONAL.XLSB)”.
- Click the plus-sign next to the folder labeled “Modules”.
- Double-click the module named “Module1”.
- Highlight and delete EVERYHTING in the code window (right panel).
- Enter the following code:
Sub Unhide_All()
Dim sh As Worksheet
	for each sh in worksheets: sh.visible=true: next sh
End Sub
Setting up the QAT Macro Launch Button
- Click the down arrow at the far right of the QAT and select “More Commands…” towards the bottom of the list.
- In the dropdown titled “Choose commands from:” select “Macros”.
- Select the “Unhide_All” macro on the left and click “Add>>” to move the macro to the list on the right.
- Click the “Modify” button to personalize the button icon as well as provide a tooltip. Whatever you write in the “Display name:” filed will appear on the screen when the user hover’s over the launch button on the QAT.
- Click OK.
Whenever you want to invoke the macro to unhide all the hidden sheets, click the unhide macro button on the QAT.

This feature is available for use in all open workbooks. Because we have updated the Personal Macro Workbook, don’t forget to save the changes to the Personal Macro Workbook when closing Excel.

Additional Resources
Excel VBA For…Each Loop tutorial
Excel VBA – Full Playlist
If you don’t have Office 365 and you’d like a free tool that unhides all sheets for you, then this is it!
You can add this tool to your Quick Access Toolbar or to your Excel ribbon by saving it in your Personal Macro Workbook. In this video I show you the steps to do that.

Many Thanks to Daniel Lamarche from Combo Projects for sharing this tool for free with our community members.
Please visit Daniel’s page at:
Published on: March 7, 2019
Last modified: March 2, 2023


Leila Gharani
I’m a 5x Microsoft MVP with over 15 years of experience implementing and professionals on Management Information Systems of different sizes and nature.
My background is Masters in Economics, Economist, Consultant, Oracle HFM Accounting Systems Expert, SAP BW Project Manager. My passion is teaching, experimenting and sharing. I am also addicted to learning and enjoy taking online courses on a variety of topics.

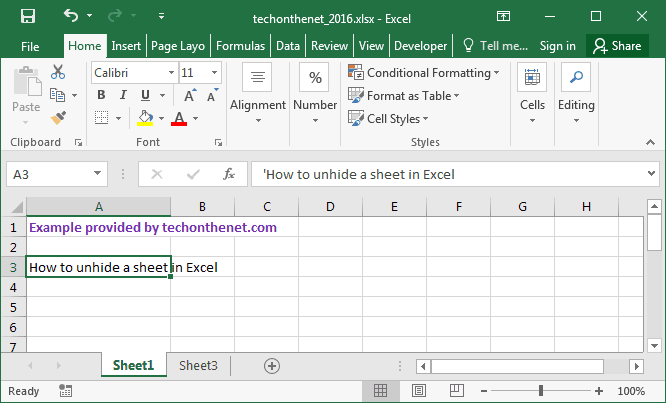
This Excel tutorial explains how to unhide a sheet in Excel 2016 (with screenshots and step-by-step instructions).
Question: In Microsoft Excel 2016, how do I unhide a sheet that has been hidden?
Answer: You can view all of the sheet names as tabs along the bottom of the document. In this example, Sheet2 is hidden. This is the sheet that we want to unhide.
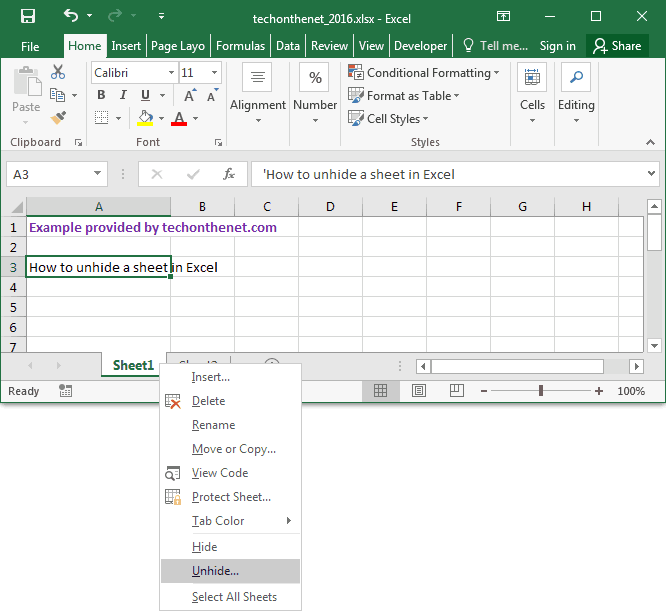
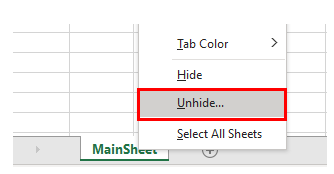
To unhide Sheet2, right-click on the name of any sheet and select Unhide from the popup menu.
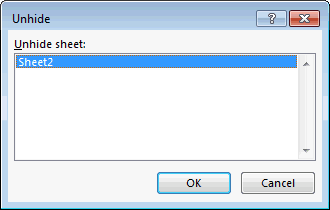
When the Unhide window appears, it will list all of the hidden sheets. Select the sheet that you wish to unhide. In this example, we’ve selected Sheet2. Click on the OK button.
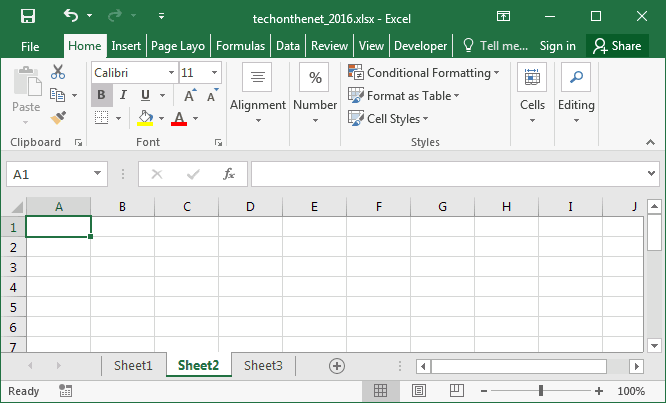
Now when you return to your spreadsheet, Sheet2 should be visible.
One of the most common issues among Excel users is finding a reference to a sheet that doesn’t seem to exist. Although you may quickly assume that the reference or formula is wrong, the solution could be as simple as unhiding the tab or sheet that is hidden.
In this article, you’ll discover the three methods to effectively unhide Excel sheets. First, you’ll learn how to unhide Excel sheets manually. Secondly, how to unhide all sheets at once using VBA. And third, how to unhide all sheets using Custom View. Finally, you’ll learn a quick way to find hidden sheets and how to hide them again using a password.
How to unhide Excel sheets?
If your worksheet contains only a few hidden sheets, then the quickest way is to unhide them by right-clicking on the tabs in Excel. Let’s see how this can be done.
- 1. Right-click on any tab and then select “Unhide…” from the drop-down menu.

How To Unhide Excel Sheets (& How To Hide) — Right-click tab
- 2. Select the sheet to unhide and click “OK”.

How To Unhide Excel Sheets (& How To Hide) — Click OK
Now that you know how to unhide a worksheet in Excel manually, let’s see quicker methods to achieve this in case you have various hidden worksheets.
How to Share an Excel File for Multiple Users?
There are different ways to share an Excel file. Here’s how to share an Excel file with multiple users for easy collaboration
READ MORE

How to unhide all sheets in Excel?
Depending on the size of data contained in Excel, it is common practice to hide the sheets that may be less important for instant viewing. However, unhiding each by right-clicking on each tab can become a little tedious. Let’s see the two ways to unhide all sheets at once in Excel using VBA and Custom View.
How to unhide sheets in Excel using VBA?
The VBA (Visual Basic for Applications) functionality lets you quickly hide unhide sheets. This is how to unhide sheets in Excel using VBA.
- 1. Right-click on any tab and select “View Code” from the pop-up menu to launch the Visual Basic Editor.

How To Unhide Excel Sheets (& How To Hide) — View Code
- 2. Go to View > Immediate Window.

How To Unhide Excel Sheets (& How To Hide) — Immediate Window
- 3. Copy the following line of code and paste into the “Immediate” window.
“for each Sheet in Thisworkbook.Sheets: Sheet.Visible=True: Next Sheet”
- 4. Then, press “Enter”.

How To Unhide Excel Sheets (& How To Hide) — Enter code
- 5. Go back to your Excel workbook, and you’ll see that all sheets are now displayed.

How To Unhide Excel Sheets (& How To Hide) — All sheets unhidden
Now, let’s see how you can quickly unhide all sheets using an alternative method.
How to unhide sheets in Excel using Custom View?
Like VBA, the “Custom View” functionality in Excel allows you to hide and unhide all sheets at once in Excel. However, to use this method to unhide sheets, you will first need to create a view with all sheets unhidden to be able to activate the unhidden view. Moreover, this functionality won’t work if your data is in table format.
How to create a Custom View for unhidden sheets in Excel?
- 1. Go to View > Custom Views.

How To Unhide Excel Sheets (& How To Hide) — Custom Views
- 2. Click on “Add…” to access the “Add view” dialog box.

How To Unhide Excel Sheets (& How To Hide) — Add…
- 3. Name this view, and click “OK” to save.

How To Unhide Excel Sheets (& How To Hide) — Name view and save
Now you’ve created the Custom View where all sheets are displayed, let’s see how to access it to quickly unhide all sheets in Excel.
How to activate a Custom View to unhide sheets in Excel?
You can activate a Custom View anytime you want to unhide all sheets in Excel. Follow these steps to activate your Custom View.
- 1. Repeat the first step from the previous section.
- 2. Select the view you created earlier and click “Show”.

How To Unhide Excel Sheets (& How To Hide) — Show Custom View
And that’s it. All your sheets should now be visible.
There are some sheets in Excel that are very hidden and harder to find, especially if the workbook contains a significant number of tabs. The best option is to use the VBA method listed above. Follow steps 1-4 from the section How to unhide sheets in Excel using VBA from this article.
Now that you’ve seen the three ways to unhide sheets in Excel, let’s see how you can quickly hide sheets in Excel using a password.
How to hide sheets in Excel with a password?
To hide a sheet in Excel with a password, you will need to protect the sheet. Follow these steps to protect an Excel Sheet with a password.
- 1. Right-click on the sheet you would like to hide with a password and select “Protect Sheet” from the pop-up menu.

How To Unhide Excel Sheets (& How To Hide) — Protect Sheet
- 2. In the “Password to unprotect sheet” field, create your password. Tick any of the option boxes below to customize user restrictions. Once finished, click “OK”.

How To Unhide Excel Sheets (& How To Hide) — Create password
- 3. Excel prompts you to enter the password again to confirm. Click “OK”.

How To Unhide Excel Sheets (& How To Hide) — Confirm Password
- 4. Right-click on any tab and you will see that the “Unhide” option is disabled.

How To Unhide Excel Sheets (& How To Hide) — Unhide is disabled
Doing this will not only require other users to enter the password to hide/unhide sheets, but it will also restrict them from making any changes to the cells contained in that sheet.
Want to Boost Your Team’s Productivity and Efficiency?
Transform the way your team collaborates with Confluence, a remote-friendly workspace designed to bring knowledge and collaboration together. Say goodbye to scattered information and disjointed communication, and embrace a platform that empowers your team to accomplish more, together.
Key Features and Benefits:
- Centralized Knowledge: Access your team’s collective wisdom with ease.
- Collaborative Workspace: Foster engagement with flexible project tools.
- Seamless Communication: Connect your entire organization effortlessly.
- Preserve Ideas: Capture insights without losing them in chats or notifications.
- Comprehensive Platform: Manage all content in one organized location.
- Open Teamwork: Empower employees to contribute, share, and grow.
- Superior Integrations: Sync with tools like Slack, Jira, Trello, and more.
Limited-Time Offer: Sign up for Confluence today and claim your forever-free plan, revolutionizing your team’s collaboration experience.
Conclusion
Learning how to hide and unhide sheets in Excel using VBA or Custom View is a great way to save time and boost productivity, no matter the size of your data.
In this article, you have learned three ways to unhide Excel sheets, which can also be helpful in case you want to hide them again later. You have seen how to unhide them individually and in bulk using VBA or Custom View. You have also learned to search for very hidden sheets using a single line of code and how to hide them with a password.
If you would like to explore further ways to collaborate in Excel without losing control of your data, check out the following articles:
- How to Use Excel Sheet View for Easy Collaboration?
- How to Password Protect an Excel File?
- How to Remove a Password from Excel? (Multiple Methods)
- How to Share an Excel File?
Hady is Content Lead at Layer.
Hady has a passion for tech, marketing, and spreadsheets. Besides his Computer Science degree, he has vast experience in developing, launching, and scaling content marketing processes at SaaS startups.
Originally published May 24 2022, Updated Mar 22 2023
See all How-To Articles
This tutorial will demonstrate how to hide and unhide worksheets in Excel and Google Sheets.

Hiding a Worksheet
You may wish to hide worksheets that contain sensitive information or calculations you don’t want other users to see or amend.
- Select the tab of sheet that needs to be hidden.
- In the Ribbon, select Home > Cells > Format > Hide & Unhide > Hide Sheet.
Alternatively, right-click on the sheet tab to obtain a shortcut menu and click Hide.
The selected sheet disappears from the sheet tabs.
- Repeat the process to hide any more sheets that need to be hidden.
Note that one sheet always has to remain visible. If you try to hide the remaining sheet, the following message appears.

Unhiding a Worksheet
- To show the worksheets once again on the screen, in the Ribbon, select Home > Cells > Format > Hide & Unhide > Unhide Sheet.
Alternatively, right-click on the sheet tab to obtain a shortcut menu and click Unhide.
- Repeat the process to hide any more sheets that need to be unhidden.
Hiding Worksheets Using VBA Code
If you want to hide multiple sheets at a time, use a loop in VBA code to loop through the sheets and hide each sheet during the loop. You need to put in an error trap, however, as the macro would try to hide all the sheets, and as shown above, you need at least one sheet visible.
Sub HideSheets()
  Dim wks As Worksheet
  On Error Resume Next
  For Each wks In ActiveWorkbook.Worksheets
  wks.Visible = False
  Next wks
End Sub
Alternatively, if you want to keep a specific sheet visible but hide the rest, test for the name property of the sheet by adding an IF statement to the macro and hide all the sheets except the one you wish to remain visible.
Sub HideSheets()
Dim wks As Worksheet
For Each wks In ActiveWorkbook.Worksheets
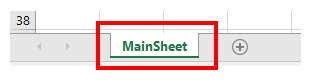
If wks.name <> "MainSheet" Then
wks.Visible = False
End If
Next wks
End SubShowing a Worksheet Using VBA Code
To unhide more than one worksheet at a time, use a loop in VBA code to loop through the sheets and unhide each sheet during the loop. You don’t need an error trap since the code loops through all sheets and unhides only the ones that are hidden.
Sub ShowSheets
  Dim wks as worksheet
  For each wks in ActiveWorkbook.Worksheets
  wks.Visible = True
  Next wks
End Sub
Hiding a Worksheet in Google Sheets
- To hide a worksheet in a Google Sheets file, right-click on the sheet tab to obtain a shortcut menu.
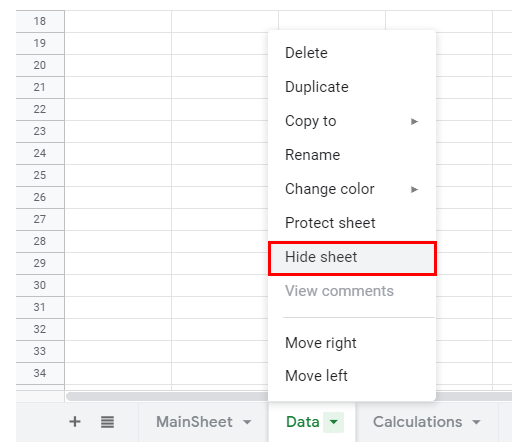
- Select Hide sheet.
- Repeat this process for each sheet you want to hide.
Unhiding a Worksheet in Google Sheets
- To unhide a worksheet in Google Sheets, in the Menu, select View > Hidden sheets. The number in parentheses indicates how many sheets are hidden.
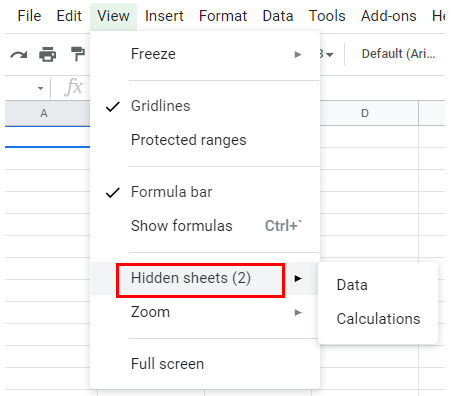
- Select the sheet that needs to be unhidden.
- Repeat the process for each sheet that needs to be made visible.
Don’t worry, hidden worksheets are not deleted
Updated on December 31, 2020
What to Know
- Easiest way to hide a worksheet: right-click the worksheet tab and select Hide.
- Easiest way to unhide: right-click any worksheet tab, select Unhide, and select worksheet to unhide.
- Alternatively, on the ribbon, go to Home > Format > Hide & Unhide > Hide Sheet or Unhide Sheet.
This article explains how to hide and unhide worksheets using the contextual menu and the ribbon in Excel for Microsoft 365, Excel 2019, 2016, 2013, and 2010.
Data Use in Hidden Worksheets
An Excel worksheet is a single spreadsheet that contains cells. Each cell can hold text, a number, or a formula, and each cell can reference a different cell on the same worksheet, the same workbook, or a different workbook.
By default, all open Excel workbooks display worksheet tabs on the taskbar at the bottom of the screen, but you can hide or display them as needed. At least one worksheet must be visible at all times.
Hiding worksheets doesn’t mean you’re deleting them, and you can still reference them in formulas and charts located on other worksheets or other workbooks.
Hide Worksheets Using the Contextual Menu
The options available in the contextual menu — the right-click menu — change depending on what is selected.
If the Hide option is inactive or grayed out, most likely, the current workbook has only one worksheet. Excel deactivates the Hide option for single-sheet workbooks because there must always be at least one visible sheet.
How to Hide a Single Worksheet
-
Click the worksheet tab to select it.
-
Right-click on the worksheet tab to open the contextual menu.
-
In the menu, click the Hide option to hide the selected worksheet.
How to Hide Multiple Worksheets
-
Click the tab of the first worksheet to be hidden to select it.
-
Press and hold down the Ctrl key on the keyboard.
-
Click the tabs of additional worksheets to select them.
-
Right-click on one worksheet tab to open the contextual menu.
-
In the menu, click on the Hide option to hide all the selected worksheets.
Hide Worksheets Using the Ribbon
Excel has no keyboard shortcut for hiding worksheets, but you can use the ribbon bar to accomplish the same task.
-
Select one or more worksheet tabs at the bottom of an Excel file.
-
Click the Home tab on the ribbon.
-
Select Format in the Cells group.
-
Click on Hide & Unhide.
-
Select Hide Sheet.
Unhide Worksheets Using the Contextual Menu
You can unhide tabs using the contextual menu, just as you can hide them.
-
Right-click a worksheet tab to open the Unhide dialog box, which displays all the currently hidden sheets.
-
Click the sheet you want to unhide.
-
Click OK to unhide the selected worksheet and to close the dialog box.
Unhide Worksheets Using the Ribbon
As with hiding worksheets, Excel has no keyboard shortcut for unhiding a sheet, but you can still use the ribbon.
-
Select one or more worksheet tabs at the bottom of the Excel file.
-
Click the Home tab on the ribbon.
-
Select Format.
-
Click Hide & Unhide.
-
Select Unhide Sheet.
-
Click the sheet you want to unhide from the list that pops up.
-
Click OK.
Thanks for letting us know!
Get the Latest Tech News Delivered Every Day
Subscribe
Unhiding sheets in Excel is easy. A workbook must contain at least one visible worksheet. To unhide sheets, execute the following steps.
Note: if your worksheet tabs are missing, please go to step 5.
1. Right click a sheet tab and then click Unhide.

The Unhide dialog box appears.
2. Hold down CTRL to select multiple sheets.

Note: in older versions of Excel, you can only unhide one sheet at a time (see step 9 for a workaround).
3. Click OK.
Result.

4. To hide sheets, hold down CTRL to select multiple sheet tabs, right click one of the sheet tabs, and then click Hide.

If your worksheet tabs are missing, execute the following steps.
5. Hover over the left edge of the scrollbar and drag the arrow to the right to show all worksheet tabs.

6. In the screenshot below, there’s not a single visible worksheet tab and there’s no arrow to show all worksheet tabs. The sheet tabs are gone.

To show the sheet tabs, execute the following steps.
7. On the File tab, click Options, Advanced, scroll down to Display options for this workbook and check ‘Show sheet tabs’.

8. Click OK.
You can also use VBA to hide worksheets. You can assign the property xlSheetHidden or xlSheetVeryHidden. You cannot use the Unhide dialog box to unhide very hidden sheets!
9. The following codes lines unhide all hidden and very hidden sheets.
Sub UnHide()
Dim sheet As Worksheet
For Each sheet In Worksheets
sheet.Visible = True
Next
End Sub
Tip: download the Excel file and try it yourself. You can learn how to run this procedure here: Run Code from a Module.