
HTTA is reader supported. When you buy through links on our site, we may earn an affiliate commission at no extra cost to you. Learn more.
Typing letters or characters in other languages, such as Russian, is now a breeze thanks to technological advances in keyboard controls.
There are a few clean tips and tricks in this article that will help you type Russian letters quickly and efficiently on any computer platform, including desktops, laptops, and even mobile devices.
Some keyboards are made in Russian and allow you to type these Russian characters more quickly and comfortably.
However, if you don’t have access to such a special Russian keyboard, the techniques in this article can be very helpful.
Without further ado, let’s get started.
There are several methods for typing or inserting Russian characters into Microsoft Word.
Because these characters are not readily available on the keyboard, the simplest way to type them on Word is to use their alt codes.
In this section, I’ll show you how to use alt codes to type Russian letters on an English keyboard.
Using the Russian Letters Alt Code
Each Russian character has an alt code that you can use to type it in Microsoft Word.
You’ll quickly learn the alt code for all the Russian characters. For the time being, let’s focus on the steps.
To type Russian letters in MS Word, follow these steps:
- First and foremost, get the alt code for the Russian letters you intend to type. These alt codes are listed just below these instructions.
- Open your Microsoft Word document and move the insertion pointer to the location where you want to type the Russian characters.
- Turn on your Num Lock. Press Fn+NmLk to turn on Num Lock on laptops without the numeric keypad.
- Hold down the Alt key on your keyboard.
- Whilst still holding on to the Alt key, press the Russian alt code.
- For example, to type ア, press and hold the Alt key, then type the alt code 12450 on the numeric keypad.
- Now release the Alt key.
You should see the Russian letter inserted as soon as you release the Alt key.
Related: How to type Japanese Characters
Below are the alt codes for the various Russian Characters.
Uppercase Russian Letters/Characters
| Character Name | Character | Alt Code |
|---|---|---|
| CYRILLIC CAPITAL LETTER A | А | Alt + 1040 |
| CYRILLIC CAPITAL LETTER BE | Б | Alt + 1041 |
| CYRILLIC CAPITAL LETTER VE | В | Alt + 1042 |
| CYRILLIC CAPITAL LETTER GHE | Г | Alt + 1043 |
| CYRILLIC CAPITAL LETTER DE | Д | Alt + 1044 |
| CYRILLIC CAPITAL LETTER IE | Е | Alt + 1045 |
| CYRILLIC CAPITAL LETTER ZHE | Ж | Alt + 1046 |
| CYRILLIC CAPITAL LETTER ZE | З | Alt + 1047 |
| CYRILLIC CAPITAL LETTER I | И | Alt + 1048 |
| CYRILLIC CAPITAL LETTER SHORT I | Й | Alt + 1049 |
| CYRILLIC CAPITAL LETTER KA | К | Alt + 1050 |
| CYRILLIC CAPITAL LETTER EL | Л | Alt + 1051 |
| CYRILLIC CAPITAL LETTER EM | М | Alt + 1052 |
| CYRILLIC CAPITAL LETTER EN | Н | Alt + 1053 |
| CYRILLIC CAPITAL LETTER O | О | Alt + 1054 |
| CYRILLIC CAPITAL LETTER PE | П | Alt + 1055 |
| CYRILLIC CAPITAL LETTER ER | Р | Alt + 1056 |
| CYRILLIC CAPITAL LETTER ES | С | Alt + 1057 |
| CYRILLIC CAPITAL LETTER TE | Т | Alt + 1058 |
| CYRILLIC CAPITAL LETTER U | У | Alt + 1059 |
| CYRILLIC CAPITAL LETTER EF | Ф | Alt + 1060 |
| CYRILLIC CAPITAL LETTER HA | Х | Alt + 1061 |
| CYRILLIC CAPITAL LETTER TSE | Ц | Alt + 1062 |
| CYRILLIC CAPITAL LETTER CHE | Ч | Alt + 1063 |
| CYRILLIC CAPITAL LETTER SHA | Ш | Alt + 1064 |
| CYRILLIC CAPITAL LETTER SHCHA | Щ | Alt + 1065 |
| CYRILLIC CAPITAL LETTER HARD SIGN | Ъ | Alt + 1066 |
| CYRILLIC CAPITAL LETTER YERU | Ы | Alt + 1067 |
| CYRILLIC CAPITAL LETTER SOFT SIGN | Ь | Alt + 1068 |
| CYRILLIC CAPITAL LETTER E | Э | Alt + 1069 |
| CYRILLIC CAPITAL LETTER YU | Ю | Alt + 1070 |
| CYRILLIC CAPITAL LETTER YA | Я | Alt + 1071 |
Lowercase Russian Letters/Characters
| Character Name | Character | Alt Code |
|---|---|---|
| CYRILLIC SMALL LETTER A | а | Alt + 1072 |
| CYRILLIC SMALL LETTER BE | б | Alt + 1073 |
| CYRILLIC SMALL LETTER VE | в | Alt + 1074 |
| CYRILLIC SMALL LETTER GHE | г | Alt + 1075 |
| CYRILLIC SMALL LETTER DE | д | Alt + 1076 |
| CYRILLIC SMALL LETTER IE | е | Alt + 1077 |
| CYRILLIC SMALL LETTER ZHE | ж | Alt + 1078 |
| CYRILLIC SMALL LETTER ZE | з | Alt + 1079 |
| CYRILLIC SMALL LETTER I | и | Alt + 1080 |
| CYRILLIC SMALL LETTER SHORT I | й | Alt + 1081 |
| CYRILLIC SMALL LETTER KA | к | Alt + 1082 |
| CYRILLIC SMALL LETTER EL | л | Alt + 1083 |
| CYRILLIC SMALL LETTER EM | м | Alt + 1084 |
| CYRILLIC SMALL LETTER EN | н | Alt + 1085 |
| CYRILLIC SMALL LETTER O | о | Alt + 1086 |
| CYRILLIC SMALL LETTER PE | п | Alt + 1087 |
| CYRILLIC SMALL LETTER ER | р | Alt + 1088 |
| CYRILLIC SMALL LETTER ES | с | Alt + 1089 |
| CYRILLIC SMALL LETTER TE | т | Alt + 1090 |
| CYRILLIC SMALL LETTER U | у | Alt + 1091 |
| CYRILLIC SMALL LETTER EF | ф | Alt + 1092 |
| CYRILLIC SMALL LETTER HA | х | Alt + 1093 |
| CYRILLIC SMALL LETTER TSE | ц | Alt + 1094 |
| CYRILLIC SMALL LETTER CHE | ч | Alt + 1095 |
| CYRILLIC SMALL LETTER SHA | ш | Alt + 1096 |
| CYRILLIC SMALL LETTER SHCHA | щ | Alt + 1097 |
| CYRILLIC SMALL LETTER HARD SIGN | ъ | Alt + 1098 |
| CYRILLIC SMALL LETTER YERU | ы | Alt + 1099 |
| CYRILLIC SMALL LETTER SOFT SIGN | ь | Alt + 1100 |
| CYRILLIC SMALL LETTER E | э | Alt + 1101 |
| CYRILLIC SMALL LETTER YU | ю | Alt + 1102 |
| CYRILLIC SMALL LETTER YA | я | Alt + 1103 |
Additional Russian Letters and Symbols
| Character Name | Character | Alt Code |
|---|---|---|
| CYRILLIC CAPITAL LETTER OMEGA | Ѡ | Alt + 1120 |
| CYRILLIC SMALL LETTER OMEGA | ѡ | Alt + 1121 |
| CYRILLIC CAPITAL LETTER YAT | Ѣ | Alt + 1122 |
| CYRILLIC SMALL LETTER YAT | ѣ | Alt + 1123 |
| CYRILLIC CAPITAL LETTER IOTIFIED E | Ѥ | Alt + 1124 |
| CYRILLIC SMALL LETTER IOTIFIED E | ѥ | Alt + 1125 |
| CYRILLIC CAPITAL LETTER LITTLE YUS | Ѧ | Alt + 1126 |
| CYRILLIC SMALL LETTER LITTLE YUS | ѧ | Alt + 1127 |
| CYRILLIC CAPITAL LETTER IOTIFIED LITTLE YUS | Ѩ | Alt + 1128 |
| CYRILLIC SMALL LETTER IOTIFIED LITTLE YUS | ѩ | Alt + 1129 |
| CYRILLIC CAPITAL LETTER BIG YUS | Ѫ | Alt + 1130 |
| CYRILLIC SMALL LETTER BIG YUS | ѫ | Alt + 1131 |
| CYRILLIC CAPITAL LETTER IOTIFIED BIG YUS | Ѭ | Alt + 1132 |
| CYRILLIC SMALL LETTER IOTIFIED BIG YUS | ѭ | Alt + 1133 |
| CYRILLIC CAPITAL LETTER KSI | Ѯ | Alt + 1134 |
| CYRILLIC SMALL LETTER KSI | ѯ | Alt + 1135 |
| CYRILLIC CAPITAL LETTER PSI | Ѱ | Alt + 1136 |
| CYRILLIC SMALL LETTER PSI | ѱ | Alt + 1137 |
| CYRILLIC CAPITAL LETTER FITA | Ѳ | Alt + 1138 |
| CYRILLIC SMALL LETTER FITA | ѳ | Alt + 1139 |
| CYRILLIC CAPITAL LETTER IZHITSA | Ѵ | Alt + 1140 |
| CYRILLIC SMALL LETTER IZHITSA | ѵ | Alt + 1141 |
| CYRILLIC CAPITAL LETTER IZHITSA WITH DOUBLE GRAVE ACCENT | Ѷ | Alt + 1142 |
| CYRILLIC SMALL LETTER IZHITSA WITH DOUBLE GRAVE ACCENT | ѷ | Alt + 1143 |
| CYRILLIC CAPITAL LETTER UK | Ѹ | Alt + 1144 |
| CYRILLIC SMALL LETTER UK | ѹ | Alt + 1145 |
| CYRILLIC CAPITAL LETTER ROUND OMEGA | Ѻ | Alt + 1146 |
| CYRILLIC SMALL LETTER ROUND OMEGA | ѻ | Alt + 1147 |
| CYRILLIC CAPITAL LETTER OMEGA WITH TITLO | Ѽ | Alt + 1148 |
| CYRILLIC SMALL LETTER OMEGA WITH TITLO | ѽ | Alt + 1149 |
| CYRILLIC CAPITAL LETTER OT | Ѿ | Alt + 1150 |
| CYRILLIC SMALL LETTER OT | ѿ | Alt + 1151 |
| CYRILLIC CAPITAL LETTER KOPPA | Ҁ | Alt + 1152 |
| CYRILLIC SMALL LETTER KOPPA | ҁ | Alt + 1153 |
| CYRILLIC THOUSANDS SIGN | ҂ | Alt + 1154 |
| COMBINING CYRILLIC TITLO | а҃ | Alt + 1155 |
| COMBINING CYRILLIC PALATALIZATION | а҄ | Alt + 1156 |
| COMBINING CYRILLIC DASIA PNEUMATA | а҅ | Alt + 1157 |
| COMBINING CYRILLIC PSILI PNEUMATA | а҆ | Alt + 1158 |
| COMBINING CYRILLIC HUNDRED THOUSANDS SIGN | ҈а | Alt + 1160 |
| COMBINING CYRILLIC MILLIONS SIGN | ҉а | Alt + 1161 |
| CYRILLIC CAPITAL LETTER SEMISOFT SIGN | Ҍ | Alt + 1164 |
| CYRILLIC SMALL LETTER SEMISOFT SIGN | ҍ | Alt + 1165 |
| CYRILLIC CAPITAL LETTER ER WITH TICK | Ҏ | Alt + 1166 |
| CYRILLIC SMALL LETTER ER WITH TICK | ҏ | Alt + 1167 |
| CYRILLIC CAPITAL LETTER GHE WITH UPTURN | Ґ | Alt + 1168 |
| CYRILLIC SMALL LETTER GHE WITH UPTURN | ґ | Alt + 1169 |
| CYRILLIC CAPITAL LETTER GHE WITH STROKE | Ғ | Alt + 1170 |
| CYRILLIC SMALL LETTER GHE WITH STROKE | ғ | Alt + 1171 |
| CYRILLIC CAPITAL LETTER GHE WITH MIDDLE HOOK | Ҕ | Alt + 1172 |
| CYRILLIC SMALL LETTER GHE WITH MIDDLE HOOK | ҕ | Alt + 1173 |
| CYRILLIC CAPITAL LETTER ZHE WITH DESCENDER | Җ | Alt + 1174 |
| CYRILLIC SMALL LETTER ZHE WITH DESCENDER | җ | Alt + 1175 |
| CYRILLIC CAPITAL LETTER ZE WITH DESCENDER | Ҙ | Alt + 1176 |
| CYRILLIC SMALL LETTER ZE WITH DESCENDER | ҙ | Alt + 1177 |
| CYRILLIC CAPITAL LETTER KA WITH DESCENDER | Қ | Alt + 1178 |
| CYRILLIC SMALL LETTER KA WITH DESCENDER | қ | Alt + 1179 |
| CYRILLIC CAPITAL LETTER KA WITH VERTICAL STROKE | Ҝ | Alt + 1180 |
| CYRILLIC SMALL LETTER KA WITH VERTICAL STROKE | ҝ | Alt + 1181 |
| CYRILLIC CAPITAL LETTER KA WITH STROKE | Ҟ | Alt + 1182 |
| CYRILLIC SMALL LETTER KA WITH STROKE | ҟ | Alt + 1183 |
| CYRILLIC CAPITAL LETTER BASHKIR KA | Ҡ | Alt + 1184 |
| CYRILLIC SMALL LETTER BASHKIR KA | ҡ | Alt + 1185 |
| CYRILLIC CAPITAL LETTER EN WITH DESCENDER | Ң | Alt + 1186 |
| CYRILLIC SMALL LETTER EN WITH DESCENDER | ң | Alt + 1187 |
| CYRILLIC CAPITAL LIGATURE EN GHE | Ҥ | Alt + 1188 |
| CYRILLIC SMALL LIGATURE EN GHE | ҥ | Alt + 1189 |
| CYRILLIC CAPITAL LETTER PE WITH MIDDLE HOOK (Abkhasian) | Ҧ | Alt + 1190 |
| CYRILLIC SMALL LETTER PE WITH MIDDLE HOOK (Abkhasian) | ҧ | Alt + 1191 |
| CYRILLIC CAPITAL LETTER ABKHASIAN HA | Ҩ | Alt + 1192 |
| CYRILLIC SMALL LETTER ABKHASIAN HA | ҩ | Alt + 1193 |
| CYRILLIC CAPITAL LETTER ES WITH DESCENDER | Ҫ | Alt + 1194 |
| CYRILLIC SMALL LETTER ES WITH DESCENDER | ҫ | Alt + 1195 |
| CYRILLIC CAPITAL LETTER TE WITH DESCENDER | Ҭ | Alt + 1196 |
| CYRILLIC SMALL LETTER TE WITH DESCENDER | ҭ | Alt + 1197 |
| CYRILLIC CAPITAL LETTER STRAIGHT U | Ү | Alt + 1198 |
| CYRILLIC SMALL LETTER STRAIGHT U | ү | Alt + 1199 |
| CYRILLIC CAPITAL LETTER STRAIGHT U WITH STROKE | Ұ | Alt + 1200 |
| CYRILLIC SMALL LETTER STRAIGHT U WITH STROKE | ұ | Alt + 1201 |
| CYRILLIC CAPITAL LETTER HA WITH DESCENDER | Ҳ | Alt + 1202 |
| CYRILLIC SMALL LETTER HA WITH DESCENDER | ҳ | Alt + 1203 |
| CYRILLIC CAPITAL LIGATURE TE TSE (Abkhasian) | Ҵ | Alt + 1204 |
| CYRILLIC SMALL LIGATURE TE TSE (Abkhasian) | ҵ | Alt + 1205 |
| CYRILLIC CAPITAL LETTER CHE WITH DESCENDER | Ҷ | Alt + 1206 |
| CYRILLIC SMALL LETTER CHE WITH DESCENDER | ҷ | Alt + 1207 |
| CYRILLIC CAPITAL LETTER CHE WITH VERTICAL STROKE | Ҹ | Alt + 1208 |
| CYRILLIC SMALL LETTER CHE WITH VERTICAL STROKE | ҹ | Alt + 1209 |
| CYRILLIC CAPITAL LETTER SHHA | Һ | Alt + 1210 |
| CYRILLIC SMALL LETTER SHHA | һ | Alt + 1211 |
| CYRILLIC CAPITAL LETTER ABKHASIAN CHE | Ҽ | Alt + 1212 |
| CYRILLIC SMALL LETTER ABKHASIAN CHE | ҽ | Alt + 1213 |
| CYRILLIC CAPITAL LETTER ABKHASIAN CHE WITH DESCENDER | Ҿ | Alt + 1214 |
| CYRILLIC SMALL LETTER ABKHASIAN CHE WITH DESCENDER | ҿ | Alt + 1215 |
| CYRILLIC LETTER PALOCHKA | Ӏ | Alt + 1216 |
| CYRILLIC CAPITAL LETTER ZHE WITH BREVE | Ӂ | Alt + 1217 |
| CYRILLIC SMALL LETTER ZHE WITH BREVE | ӂ | Alt + 1218 |
| CYRILLIC CAPITAL LETTER KA WITH HOOK | Ӄ | Alt + 1219 |
| CYRILLIC SMALL LETTER KA WITH HOOK | ӄ | Alt + 1220 |
| CYRILLIC CAPITAL LETTER EN WITH HOOK | Ӈ | Alt + 1223 |
| CYRILLIC SMALL LETTER EN WITH HOOK | ӈ | Alt + 1224 |
| CYRILLIC CAPITAL LETTER KHAKASSIAN CHE | Ӌ | Alt + 1227 |
| CYRILLIC SMALL LETTER KHAKASSIAN CHE | ӌ | Alt + 1228 |
| CYRILLIC CAPITAL LETTER A WITH BREVE | Ӑ | Alt + 1232 |
| CYRILLIC SMALL LETTER A WITH BREVE | ӑ | Alt + 1233 |
| CYRILLIC CAPITAL LETTER A WITH DIAERESIS | Ӓ | Alt + 1234 |
| CYRILLIC SMALL LETTER A WITH DIAERESIS | ӓ | Alt + 1235 |
| CYRILLIC CAPITAL LIGATURE A IE | Ӕ | Alt + 1236 |
| CYRILLIC SMALL LIGATURE A IE | ӕ | Alt + 1237 |
| CYRILLIC CAPITAL LETTER IE WITH BREVE | Ӗ | Alt + 1238 |
| CYRILLIC SMALL LETTER IE WITH BREVE | ӗ | Alt + 1239 |
| CYRILLIC CAPITAL LETTER SCHWA | Ә | Alt + 1240 |
| CYRILLIC SMALL LETTER SCHWA | ә | Alt + 1241 |
| CYRILLIC CAPITAL LETTER SCHWA WITH DIAERESIS | Ӛ | Alt + 1242 |
| CYRILLIC SMALL LETTER SCHWA WITH DIAERESIS | ӛ | Alt + 1243 |
| CYRILLIC CAPITAL LETTER ZHE WITH DIAERESIS | Ӝ | Alt + 1244 |
| CYRILLIC SMALL LETTER ZHE WITH DIAERESIS | ӝ | Alt + 1245 |
| CYRILLIC CAPITAL LETTER ZE WITH DIAERESIS | Ӟ | Alt + 1246 |
| CYRILLIC SMALL LETTER ZE WITH DIAERESIS | ӟ | Alt + 1247 |
| CYRILLIC CAPITAL LETTER ABKHASIAN DZE | Ӡ | Alt + 1248 |
| CYRILLIC SMALL LETTER ABKHASIAN DZE | ӡ | Alt + 1249 |
| CYRILLIC CAPITAL LETTER I WITH MACRON | Ӣ | Alt + 1250 |
| CYRILLIC SMALL LETTER I WITH MACRON | ӣ | Alt + 1251 |
| CYRILLIC CAPITAL LETTER I WITH DIAERESIS | Ӥ | Alt + 1252 |
| CYRILLIC SMALL LETTER I WITH DIAERESIS | ӥ | Alt + 1253 |
| CYRILLIC CAPITAL LETTER O WITH DIAERESIS | Ӧ | Alt + 1254 |
| CYRILLIC SMALL LETTER O WITH DIAERESIS | ӧ | Alt + 1255 |
| CYRILLIC CAPITAL LETTER BARRED O | Ө | Alt + 1256 |
| CYRILLIC SMALL LETTER BARRED O | ө | Alt + 1257 |
| CYRILLIC CAPITAL LETTER BARRED O WITH DIAERESIS | Ӫ | Alt + 1258 |
| CYRILLIC SMALL LETTER BARRED O WITH DIAERESIS | ӫ | Alt + 1259 |
| CYRILLIC CAPITAL LETTER E WITH DIAERESIS | Ӭ | Alt + 1260 |
| CYRILLIC SMALL LETTER E WITH DIAERESIS | ӭ | Alt + 1261 |
| CYRILLIC CAPITAL LETTER U WITH MACRON | Ӯ | Alt + 1262 |
| CYRILLIC SMALL LETTER U WITH MACRON | ӯ | Alt + 1263 |
| CYRILLIC CAPITAL LETTER U WITH DIAERESIS | Ӱ | Alt + 1264 |
| CYRILLIC SMALL LETTER U WITH DIAERESIS | ӱ | Alt + 1265 |
| CYRILLIC CAPITAL LETTER U WITH DOUBLE ACUTE | Ӳ | Alt + 1266 |
| CYRILLIC SMALL LETTER U WITH DOUBLE ACUTE | ӳ | Alt + 1267 |
| CYRILLIC CAPITAL LETTER CHE WITH DIAERESIS | Ӵ | Alt + 1268 |
| CYRILLIC SMALL LETTER CHE WITH DIAERESIS | ӵ | Alt + 1269 |
| CYRILLIC CAPITAL LETTER YERU WITH DIAERESIS | Ӹ | Alt + 1272 |
| CYRILLIC SMALL LETTER YERU WITH DIAERESIS | ӹ | Alt + 1273 |
Note: Using the alt code approach means that you have a lot to learn. And as we all know, learning these alt codes will take a lot of practice as there are many alt codes to remember. However, you can create a cheat sheet for quick reference if you happen to type Russian letters frequently.
Using Online Russian Keyboard
There are numerous free online Russian keyboards available that allow anyone to type Russian characters by simply clicking on them.
Instead of trying to type these characters with your own keyboard, you are presented with a virtual Russian keyboard that includes all of the language’s characters.
You will also be given a simple text editor in which to type the characters. After that, you can copy and paste the typed characters into Microsoft Word or wherever you want.
Listed below are some of the best free virtual Russian keyboards.
- HowToTypeAnything.Com
- VKboard.com
- Branah.com
This is another online tool that gives you a very simple and beautiful virtual keyboard with which you can type in Russian by clicking on the virtual keyboard.
These are some of the amazing tools you can use to type in Russian.
Conclusion
These are the easiest ways you can use to type Russian letters in Microsoft Word.
If you often need to type a particular Russian letter or character in Word, using the Alt code method will be a good idea.
However, if you want to type a lot of characters, then using one of the virtual keyboards will save you lots of time.
Thank you so much for reading this blog.
![]()
Download Article
![]()
Download Article
PCs and Macs enable you to type your documents in different languages. A few steps are necessary to set up your Windows or Mac programs to the preferred language; however, they are fairly simple and easy to follow. You can also set up your keyboard with a template that shows you which keys to select for the letters you want.
-
1
Go to System Preferences. Click View, then «Language & Text» and the «Input Sources» tab.
-
2
Find «Russian» and choose one (only one) of the available Russian keyboard layouts. For example, «Russian» which is a standard Russian layout for Mac.
Advertisement
-
3
Switch to Russian typing using ⌘ Cmd+Space.
Advertisement
-

1
Click on the Start button and go to the Control Panel. Click on the «Clock, Language, Region» option.
-
2
Double-click «Regional and Language Options.»
-
3
Find a tab called «Keyboard and Languages»
-
4
Click «Change Keyboard». Then select «Add».
-
5
Find «Russian» (language) in the list and then click on its ‘+’ sign to see available layouts. Click on «Russian» in that list of layouts to add it.
-
6
Click on «Apply» below right. Then Windows activates Russian keyboard layout file.
-
7
Click «OK» again. You can now use the buttons Alt+⇧ Shift to switch between Russian («RU») and English («EN»).
- Now you have standard Russian keyboard layout active and can use it for typing in Russian. Or you can install Phonetic (homophonic) layout when F-Russian F,A-A, O-O,….


Advertisement
-
1
Download the ER Bukinist KOI8 font.[1]
-
2
Download the ER Kurier KOI8-R for keyboard layout.
-
3
Click on «Start.»
-
4
Quit all programs.
-
5
Place the files in «System Folder.»
-
6
Select «Help Center» from the Help menu.
-
7
Click on «Settings.»[2]
-
8
Type «keyboards» to search.
-
9
Click on «Using different languages.»
-
10
Click on «Open...Control Panel….»
-
11
Click on «Control Panel.»
-
12
Check the box at «Russian KOI8-R.»[3]
-
13
Select the keyboard layout by clicking on «Russian-KOI8 keyboard.»
Advertisement
-
1
Click on «Start.»[4]
-
2
Click on «Settings.»
-
3
Click on «Control Panel.»
-
4
Click twice on «Regional Options.»
-
5
Click on «Cyrillic» to activate it.[5]
-
6
Click on «Apply.»


Advertisement
-
1
Click on «Start.»[6]
-
2
Click on «Settings.»
-
3
Click on «Control Panel.»
-
4
Click twice on icon for «Keyboard» to get to the properties for the keyboard.
-
5
Select the «Input Locales» tab across the top of the box.
-
6
Select the «Add» button to get to the «Add Input Language» screen.
-
7
Select «Input Language» and find and select «Russian» from the list.
-
8
Leave the «EN English» keyboard as the default.[7]
-
9
Put a check in the «Enable indicator on task bar,» bottom of screen.
-
10
Click between English and Russian by selecting either on the task bar at the bottom of your screen to the right.
-
11
Select «Apply» to ensure that all changes have been accepted and saved.


Advertisement
-
1
Click on «Start.«Activate Cyrillic Support in Windows XP[8]
-
2
Click on «Control Panel.»
-
3
Click twice on «Regional and Language Options.»
-
4
Select «Details» in the «Text services» box.
-
5
Select «Add» in «Installed services.»
-
6
Select «Russian» from the drop-down list of languages.
-
7
Click «OK.»
-
8
Click «Apply»; you will see «RU Russian» in the window.
-
9
Select «Preferences» and click the «Language Bar.»[9]
-
10
Select both «Show language…» and «Show additional language…» icons.
-
11
Click «OK.»
-
12
Select «Key Settings» for the option of switching between languages.
-
13
Click on «Switch to English.»
-
14
Select «Change Key Sequence.»
-
15
Choose either CTRL or ALT and a numbered key.
-
16
Click «OK.»
-
17
Select «Switch to Russian.»
-
18
Choose «Change Key Sequence.»[10]
-
19
Choose either CTRL or ALT and a numbered key to be used to switch to Russian.
-
20
Click «OK» twice.


Advertisement
-
1
Click on KBDRUPH.Zip to download the layout.
-
2
Unzip the file and designate a folder where the files will be placed.
-
3
Open the folder where the files were placed.[11]
-
4
Copy KBDRUPH.DLL for Windows 2000 into the WINNT folder in System32.
-
5
Copy the file into the Windows folder in System32 for Windows XP.
-
6
Open System32 and click on KBDRUPH.REG.[12]
-
7
Restart your computer.
-
8
Click on «Start.»
-
9
Click on «Programs.»
-
10
Click on «Accessories.»
-
11
Click on «Accessibility.»
-
12
Click on «On-Screen Keyboard.»
-
13
Click on «Settings» and select a font.
-
14
Select «Cyrillic» under «Script.»
-
15
Click «OK.»
-
16
Select «RU Russian» at the bottom on your screen.


Advertisement
Ask a Question
200 characters left
Include your email address to get a message when this question is answered.
Submit
Advertisement
-
You can test your settings by opening a blank file, typing some words in English, and then switching to Russian using the hot keys or the language task bar, and typing the same characters. You should see the Russian characters.
Thanks for submitting a tip for review!
Advertisement
Things You’ll Need
- Computer
- Windows or Mac operating system
- Internet access
References
About This Article
Thanks to all authors for creating a page that has been read 80,748 times.
Did this article help you?
-
#1
Hello everyone, I would like to type in Russian in my Microsoft Word documents. Most letters are supported with the exception of the following which turn into totally different letters after their key-press:
т -> m
и -> u
п -> n
д ->
![]()
(what is this letter called)
г ->
![]()
(what is this letter also)
й -> û
I realize there are other similar topics, I had read them, I’m still posting as I would like to receive more detailed instructions tailored to macOS and Version 16.52.
Advertisements
Want to reply to this thread or ask your own question?
You’ll need to choose a username for the site, which only take a couple of moments. After that, you can post your question and our members will help you out.
Ask a Question
Russian is primarily spoken in Russia and is an East Slavic language. It is a member of the Indo-European language family and is spoken as a first language by Russians.There are over 258 million native speakers of Russian worldwide. It is the most widely used Slavic language, the most common native tongue in Europe, and the language of Eurasia with the greatest geographic spread.
Russian Fonts Name
There are non-Unicode fonts and Unicode fonts. Unicode fonts are available everywhere and are supported by all operating systems. Distinctive language is considered to be text that has been typed using Unicode fonts.Non-Unicode fonts used to type unintelligible text. Unicode fonts are supported by Mac OS, Windows, and Linux.
Cyrillic
The writing system known as Cyrillic is named for St. Cyril’s missionary work during the first Bulgarian Empire. Greek capital letterforms served as the basis for the first Cyrillic writing system.
In the 10th century, Cyrillic was created for Proto-Slavic language speakers. The writing system is still in use today for many languages throughout Eurasia and beyond.
Moula
Modern sans serif Moula has a geometric feel to it. containing nine uprights and their matching italics, together with 18 typeface.
It is clear, understated, elegant, warm, and whimsical, but nevertheless intended to be adaptable and simple to read. suitable for many creative or design projects.
Support for ligatures, fractions, tabular figures, extended language (+ Cyrillic), and more. ideally suited for any display purpose and visual design. It would be suitable for editorial design as well as web, signage, and business applications.
Zona Pro Typeface
Kostas Bartsokas created the geometric sans-serif type family Zona Pro in 2013–2014, which consists of nine variants and matching italics. It is inspired by geometric faces from the 1920s, which had clear, easily readable shapes. By mixing up the heavier weights with a minor variation in the stroke widths, it gives off an almost hideous appearance. It was updated in 2019 to include Cyrillic letter support, an additional weight, and updated italics.
Zona Pro has several uses and is adaptable. It performs excellently in display sizes and headlines and has a sleek, modern style. Zona Pro is equally suitable for editorials and shorter lines of text in smaller sizes thanks to its extremely tall x-height (magazines, newspapers).
Vonique 43
Glamorous. Sleek. Definitely sexy. The third entry in the Vonique family is meant to halt onlookers in their tracks. Although many old characters return, the curvy lowercase members are what really make this font stand out. Most have very short descenders and are attractively designed after circles, matching the height of capital letters’ caps. Like its predecessors, Vonique 43 was intended for attention-grabbing logos rather than standard text. Use it for a boutique, clothing company, or premium brand. Included are punctuation, alternate spellings, kerning, Cyrillic, Greek, Basic and Extended Latin, and Cyrillic.
Wonder Garden | Latin & Cyrillic Font
The brand-new calligraphy font that supports Latin and Cyrillic is available now. The script is for Wonder Garden.
This lovely typeface is for individuals who want their designs to exude elegance and style. It works especially well for wedding invites, thank-you cards, and feminine branding.
Fibre Extended
The basic characters of Fibre are all distinct and have different noises, and it is a free handwritten typeface with a vintage feel. The kerning and font mechanics are created to provide the finest reading experience possible when using an all-caps font.
Tobi Greek Cyrillic
Introducing the playful and lovingly created Tobi Greek Cyrillic typeface.
Tobi Greek Cyrillic is an improvement of Tobi (2015) that now supports both Greek capital letters and Cyrillic as well as different ligatures. The Tobi Greek Cyrillic font is very upbeat and is great for comic books, kids’ apparel, and children’s book titles.
Braxton
the font family Braxton This site offers the brush-inspired script typeface in 5 different font weights. It goes well with other script typefaces like the script mt bold font.
Since this is the typeface that Fontfabric is showcasing, it is excellent for both web and print design applications, and it also produces beautiful calligraphic artwork.
This typeface works well for headlines of all sizes and may be used in both the maximum and smallest versions of text when combined with the Signerica font.
Capital Superfamily
A distinctive and adaptable font with modern typography inspirations is the Capital Superfamily.
True workhorse typefaces that can handle practically any typographic assignment are the Gothic and Serif families.
Soulbind
The display font Soulbind is highly distinctive. This typeface was expertly created to become a true favourite and has the ability to elevate all of your original ideas.
Souses Light and Souses Light Italic
A truly distinctive display font is soulbind. This typeface has the ability to elevate all of your original ideas because it was expertly created to become a true favourite!
Let us know what is the correct way of keeping fingers on the keyboard.
First of all, we will know what will be the position of our body and our hands. First of all, we will keep our head and body straight, keep our shoulders relaxed.Keep your fingers on the keyboard keys and don’t let your wrists touch the keyboard, always look at the screen while typing.Type without looking at the keyboard
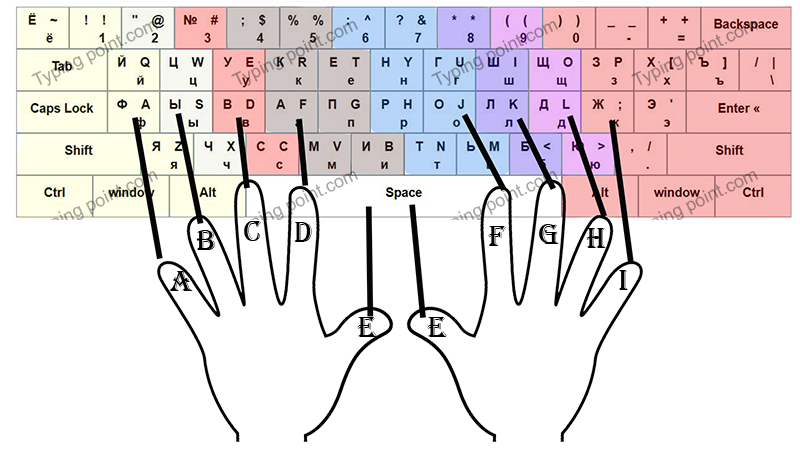
Rest your fingers on the keyboard as shown in the picture.
Let us know which finger press which key
Typing is always done with the help of all four fingers and both thumbs of both the hands.First of all, we will know which finger is called what? As shown in the picture, the finger on which «A» and «I» are written is called pinky finger.As shown in the picture, the finger on which «B» and «H» are written is called the ring finger.As shown in the picture, the finger on which «C» and «G» are written is called the middle finger.As shown in the picture, the finger on which «D» and «F» are written is called index finger.»E» figure is called thumb.
What is Unicode?
The full name of Unicode is Universal Character Encoding Standard.Unicode describes how individual characters are displayed in text files and documents, including Web pages.There are many types of Unicode, UTF-8 and UTF-16 are very common in these courts.UTF-8 encoding is used on the web and it is the default encoding in software programs. For
What is Ansi?
Ansi and UTF-8 are both encoding forms. ANSI is a standard belonging to Microsoft for the character set and is used to encode Latin characters. Whereas, UTF-8 is one of the implementations of Unicode which includes more than 128,000 characters.
How to Get russian Alt + Code in Word in Steps
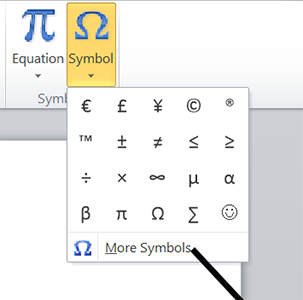
Step 1 :First open Microsoft Word and then click on Insert Tab.

Step 2 : After clicking on the Insert tab, you will get the Symbol option on the right side of the list.

Step 3: As shown in the picture, after clicking on the symbol option, click on the option of More Symbols in the thing which has come in front of you.
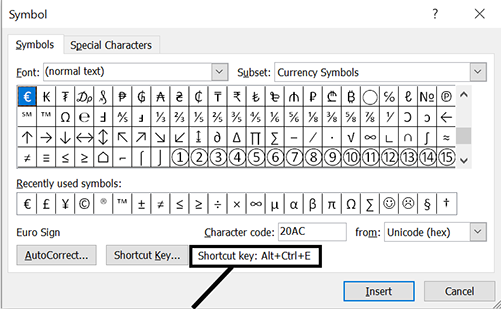
Step 4:Now click on any symbol you want to see its alt code.As soon as you click on the symbol, you will find its short alt key at the bottom.
FAQ-Frequently Asked Questions
1.How to start Russian Typing?
- Firstly open the website.
- Choose Russian language.
- Click on start typing.
- Fill your name and email address.
- Click to start.
2.What is the position of body while typing?
Firstly sit fully straight on a stool. Use your both hands and 10 fingers while typing. Set fingers on their positions and make sure your hands are on floating position. Not to touch the keyboard expect fingers.
3.How to build up the speed or accuracy in the Russian Typing point?
The first step to incline typing speed is concentration while typing just focus on the screen. As “practice makes the man perfect”. If speed does not increase at once try again and again until when your speed will be 30+ and accuracy will be 94+.
4.How to change the language of the typing point?
In the right side of the home page a significant number of languages are displayed. You can select any of them and enjoy typing. There are a lot of languages such as Russian, English, Hindi, etc.
5.How to know about different languages?
At the home page there is the brief description present about the different languages. By this, you can cane to know about particular language from which you are not familiar about. Moreover, a bit little history is also displayed on this screen.
6.How to get the certificate from typing point?
Just give an exam and get a certificate of the typing skill which can be used for different job purposes. Certificate will be in 2 languages that is Russian and English.
7.What are the benefits of using typing point?
There are ample of benefits of using this website you can enjoy a lot of languages in a particular site. Beside this, this is the only site which can provide free online certificate which can help ones to seeking different type of jobs. Along with this, which the help of this typing point you can definitely learn typing in 10-12 days by practicing continuously 1 how a day.
8.Is it safe to type any of the private information on your Typing point?
Yes, we takes care of everyone’s privacy even though we also don’t know what are you typing here, it is just in between you and your personal computer.
9.Why people need to use typingpoint.com?
It is well designed website to improve or learn your typing skills in each and every language and it provides accurate result of your speed and accuracy of spelling. Moreover, it provides a certificate of typing to the users.
Как насчет проверки скорости ваших пальцев с помощью теста? Вы можете принять меры, чтобы улучшить свою работу или экзамены, которые вы готовите, написав десятью пальцами. Приготовьтесь проверить себя с помощью теста, в котором вы будете гоняться со временем, и каждая секунда дорога!
Вы можете увеличить силу пальцев, не платя за тест на быстрые пальцы. Вы сможете заметить, что становитесь немного быстрее с каждой попыткой. Благодаря тому, что тест бесплатный, вам не придется платить какую-либо сумму, чтобы попробовать десять быстрых пальцев. Таким образом, вы увидите, что количество слов, которые вы вводите в минуту, за короткое время удвоится.
Благодаря тесту, состоящему из наиболее употребляемых слов на русском языке, вы получите возможность писать, не глядя на клавиатуру. Таким образом, вы можете продолжать писать, не беспокоясь, если я сделал ошибку при написании. Вы должны знать, что набор текста с клавиатуры не будет для вас проблемой после того, как вы пройдете тест десятью быстрыми пальцами в течение определенного периода времени. Так что начните проходить тест, не теряя времени, и более внимательно наблюдайте за изменениями в написании!
Если вы устали печатать простые слова в тесте быстрых пальцев, вы можете подготовиться к лучшему уровню, повысив уровень сложности. Определив сложность слова, вы сможете испытать себя на разных словах. Особенно если вы думаете, что на экзамене или соревновании, к которым вы готовитесь, у вас есть очень серьезные соперники, вам обязательно стоит попробовать этот метод.
Не исключено, что сложные слова заставят вас использовать разные буквы, так же как они более сложные! Однако вы можете преодолеть сложность слов, увеличив количество слов, которые вы можете написать за 1 минуту. Вы должны продолжать тест до тех пор, пока набор текста на русском языке 10 пальцами не достигнет уровня, не распознающего конкурентов. Каждый день сотни или даже тысячи пользователей используют наш тест, чтобы улучшить себя и получить отличные результаты!
Как в ворде изменить текст с английского на русский?
Как изменить текст набранный в неправильной раскладке?
Самый быстрый способ исправить или конвертировать уже набранный текст — выделить его с помощью стрелок, удерживая Ctrl и Shift, а затем нажать горячие клавиши: Break или Shift + Break либо назначенная вами комбинация клавиш переведет выделенный текст в другую раскладку (Русский ↔ Английский).
Как перевести английские буквы на русские на клавиатуре?
Для изменения регистра программе есть сочетание клавиш «Alt» + «Pause/Break». Вам нужно будет выделить текст, а затем нажать на данные клавиши клавиатуры. В результате, все прописные буквы станут ЗАГЛАВНЫМИ, а заглавные буквы, наоборот прописными.
Что делать если написал текст не на той раскладке?
Онлайн перераскладка поможет, когда сообщение случайно написано не в той раскладке. Нужно просто его скопировать в поле ввода и нажать на кнопку, результат будет через секунду.
Как перевести текст с русского на английский на компьютере?
- Откройте сайт Google Переводчика на компьютере.
- В поле слева введите слово или текст.
- Чтобы выбрать другой язык, выполните следующие действия: Экран небольшого размера. Нажмите на название языка вверху страницы. …
- Выберите, что нужно сделать: Прослушать. Чтобы узнать, как будет звучать перевод, нажмите на значок .
Как перевести на русский на клавиатуре?
Вы также можете поменять язык ввода нажатием комбинаций клавиш Ctrl, Alt и Shift. Сочетание клавиш зависит от модели Вашего компьютера и установленной на нем операционной системы, а также индивидуальных установок. Чаще всего в Windows используются Alt + Shift и Shift + Ctrl.
Как изменить раскладку клавиатуры на андроид?
Как добавить язык в Gboard через настройки Android
- Откройте настройки телефона или планшета Android.
- Нажмите Система Язык и ввод.
- В разделе «Клавиатуры» выберите Виртуальная клавиатура.
- Коснитесь Gboard. Языки.
- Нажмите на нужный вариант.
- Выберите раскладку.
- Нажмите Готово.
Как в Экселе заменить английские буквы на русские?
Теперь если выделить на листе диапазон и запустить наш макрос сочетанием клавиш Alt+F8 или на вкладке Разработчик → Макросы (Developer → Macros), то все английские буквы, найденные в выделенных ячейках, будут заменены на равноценные им русские.
Как ввести на английской раскладке?
Клавиатурная раскладка «English (International)»
- Специальные буквы и символы, обозначенные красным и оранжевым цветами, вводятся, когда прижата правая клавиша «Alt» (например: «Alt Gr»+«1» → «§» или «Alt Gr»+«a» → «æ»). …
- Синими значками поверх светло-серой буквы «а» обозначены «мёртвые клавиши», предназначенные для ввода букв с диакритическими знаками.
Как сменить раскладку клавиатуры на компьютере?
Вообще, по умолчанию, для смены раскладки используются спец. сочетания (они могут различаться в зависимости от версии ОС): ALT+SHIFT; CTRL+SHIFT.
Кто придумал русскую раскладку клавиатуры?
Ее автор, Август Дворак, профессор Университета штата Вашингтон в Сиэтле, в 1930-х годах, проанализировав частоту использования различных букв и двухбуквенных сочетаний в английском языке, а также биомеханику движения пальцев, предложил «научную» раскладку клавиатуры, которая ускоряла и облегчала набор часто …
Как поменять раскладку клавиатуры по умолчанию на Windows 10?
Чтобы изменить раскладку по умолчанию делаем следующее:
- Открываем настройки. …
- Переходим в раздел «Устройства» и слева выбираем пункт «Ввод»:
- Листаем в самый низ и выбираем «Дополнительные параметры клавиатуры»:
- Из выпадающего списка в поле «Переопределение метода ввода по умолчанию» выберем нужный нам:
Как установить автоматический переводчик на компьютер?
Выполните следующие действия:
- Запустите Chrome на компьютере.
- Нажмите на значок с тремя точками в правом верхнем углу экрана Настройки.
- Внизу выберите Дополнительные.
- В разделе «Языки» нажмите Язык.
- Включите или отключите параметр «Предлагать перевод страниц, если их язык отличается от используемого в браузере».
Как перевести текст с английского на русский в формате PDF?
Для перевода необходимо:
- Скачать и сохранить исходный документ на компьютер в формате pdf.
- Перейти на официальный сайт сервиса Google Translate.
- В левом верхнем углу ресурса выбрать вкладку «Документы».
- Нажать на кнопку «Выбрать на компьютере» и указать путь к документу, который необходимо перевести.
Как перевести таблицу Эксель на русский?
Переводите слова или фразы в Word, Excel или PowerPoint
В документе, электронной таблице или презентации выделите ячейку или текст для перевода. На вкладке Рецензирование нажмите кнопку Перевод. Выберите язык, на который нужно перевести текст.
Как перевести напечатанный текст с англ. на русский (англ. буквы на рус.)?
Как изменить английские буквы на русские?
например, если набрал vfvf вместо мама.
Для помощи вашему горю существуют онлайн переключатели раскладки уже набранного текста типа этого. Но нас же интересуют офлайновые? Есть и такие, платный TwinkiePaste, что некомильфо, и совершенно бесплатный, работающий в фоновом режиме arumswitcher.
Но не увлекайтесь. Что «пунто свитчер», что «кейборд ниндзя», что описанные мной программы, очень расслабляют. Тренируйте свое внимание.
Много-много лет назад случайно наткнулся на программу, способную оказать незаменимую помощь, когда не заметил, что печатаешь не вот раскладке, что нужно — на русском языке вместо английского или наоборот. Она мне понравилась и вот уже многие годы пользуюсь ей, практически, «безвылазно».
Punto Switcher появилась на российском рынке очень давно и даже покупка этой программы Яндексом не испортила ее — она по-прежнему бесплатна, доступна и вполне опрятно справляется со своими основными задачами, среди которых, без сомнения, одной из самых востребованных является именно переключалка раскладок. Хотя кроме простого переключения с одного шрифта на другой, программа справляется, например, и с переводом букв из прописных в строчные (если случайно нажали или забыли отключить КапсЛок), да и еще со множеством других задач.
Найти ее не сложно: она имеется в перечне программ Яндекса.
Как перевести текст в документе Word на другой язык

В данной статье показаны действия, с помощью которых можно перевести документ Word с различных языков на нужный вам язык встроенными средствами программы Microsoft Word.
Если вы работаете с разными языками, но ваши языковые навыки не слишком сильны, то можно использовать быстрый инструмент перевода. В программе Microsoft Word встроен мощный переводчик, поддерживающий множество языков, но для работы этой функции нужно постоянное интернет соединение, так как перевод содержимого документа на другой язык происходит с помощью веб-службы «Переводчик Майкрософт»
Эта инструкция написана с учетом последней версии Word. Для более старых версий Word инструкции и шаги могут незначительно отличаться, но при этом у вас также есть возможность переводить разделы текста, а также целые документы Word аналогичным образом.
- Как выбрать язык для перевода
- Как перевести документ
- Как перевести выделенный текст
- Как использовать мини-переводчик
Как выбрать язык для перевода
Чтобы выбрать с какого языка и на какой сделать перевод, откройте документ Word и перейдите на вкладку Рецензирование, в группе «Язык» нажмите кнопку Перевод и в открывшемся выпадающем списке выберите Выбрать язык для перевода…

Затем в окне «Параметры языка перевода», в выпадающих списках выберите необходимые языки для перевода документа (например с английского на русский). При необходимости выберите язык для мини-переводчика. После того как сделаете выбор, нажмите кнопку OK.

Как перевести документ
Чтобы перевести весь документ, откройте документ Word который необходимо перевести и перейдите на вкладку Рецензирование, в группе «Язык» нажмите кнопку Перевод и в открывшемся выпадающем списке выберите Перевести документ .

После этого откроется окно в котором запрашивается разрешение на отправку вашего документа на сторонний сервер, согласитесь с этим нажав кнопку Да .
Каждый раз, когда вы будете делать перевод, Word будет запрашивать разрешение на отправку вашего документа на сторонний сервер, но чтобы это сообщение больше не отображалось, установите флажок опции Больше не показывать
После этого будет переведён весь документ и перевод текста будет открыт на отдельной странице вашего браузера который используется как браузер по умолчанию.
Как перевести выделенный текст
Чтобы перевести выделенный текст, предварительно выделите часть текста, затем на вкладке Рецензирование, в группе «Язык» нажмите кнопку Перевод и в открывшемся выпадающем списке выберите Перевести выделенный текст

После этого в правой части окна появится боковая панель с переводом текста.

Вы можете использовать боковую панель для работы с переводчиком непосредственно из документа Word. Но с большими объёмами текста (больше одного абзаца), работать с ней не совсем удобно.
Как использовать мини-переводчик
Чтобы использовать мини-переводчик, откройте документ Word и перейдите на вкладку Рецензирование, в группе «Язык» нажмите кнопку Перевод и в открывшемся выпадающем списке выберите Мини-переводчик

Если включена функция мини-переводчика, то при наведении курсора на любое слово, будет появляться прозрачная панель с переводом (прозрачной она сделана для того, чтобы не отвлекать от работы, когда перевод не требуется), при наведении указателя мыши на панель, она перестанет быть прозрачной.
Используя рассмотренные выше действия, можно перевести документ Word с различных языков на нужный вам язык с помощью встроенного переводчика.

You asked, so we provided—easy-to-follow instructions on how to set up your electronic devices to write in Russian! We’ll also give you a few excellent tips on how to use this keyboard, as well as some online and app alternatives if you prefer not to set up a Russian keyboard.

Table of Contents
- Why it’s Important to Learn to Type in Russian
- Setting up Your Computer and Mobile Devices for Russian
- How to Activate an Onscreen Keyboard on Your Computer
- How to Change the Language Settings to Russian on Your Computer
- Activating the Russian Keyboard on Your Mobile Phone and Tablet
- Russian Keyboard Typing Tips
- How to Practice Typing Russian
1. Why it’s Important to Learn to Type in Russian
Learning a new language is made so much easier when you’re able to read and write/type it. This way, you will:
- Get the most out of any dictionary and Russian language apps on your devices
- Expand your ability to find Russian websites and use the various search engines
- Be able to communicate much better online with your Russian teachers and friends, and look super cool in the process!
2. Setting up Your Computer and Mobile Devices for Russian
It takes only a few steps to set up any of your devices to read and type in Russian. It’s super-easy on your mobile phone and tablet, and a simple process on your computer.
On your computer, you’ll first activate the onscreen keyboard to work with. You’ll only be using your mouse or touchpad/pointer for this keyboard. Then, you’ll need to change the language setting to Russian, so all text will appear in Russian. You could also opt to use online keyboards instead. Read on for the links!
On your mobile devices, it’s even easier—you only have to change the keyboard. We also provide a few alternatives in the form of online keyboards and downloadable apps.
3. How to Activate an Onscreen Keyboard on Your Computer
1- Mac
1. Go to System Preferences > Keyboard.
2. Check the option “Show Keyboard & Character Viewers in Menu Bar.”
3. You’ll see a new icon on the right side of the main bar; click on it and select “Show Keyboard Viewer.”

2- Windows
1. Go to Start > Settings > Easy Access > Keyboard.
2. Turn on the option for “Onscreen Keyboard.”
3- Online Keyboards
If you don’t want to activate your computer’s onscreen keyboard, you also have the option to use online keyboards. Here are some good options:
- Typeit
- Apronus
- Branah
4- Add-ons of Extensions for Browsers
Instead of an online keyboard, you could also choose to download a Google extension to your browser for a language input tool. The Google Input Tools extension allows users to use input tools in Chrome web pages, for example.
4. How to Change the Language Settings to Russian on Your Computer

Now that you’re all set to work with an onscreen keyboard on your computer, it’s time to download the Russian language pack for your operating system of choice:
- Windows 8 (and higher)
- Windows 7
- Mac (OS X and higher)
1- Windows 8 (and higher)
- Go to “Settings” > “Change PC Settings” > “Time & Language” > “Region & Language.”
- Click on “Add a Language” and select “Russian.” This will add it to your list of languages. It will appear as Русский with the note “language pack available.”
- Click on “Русский” > “Options” > “Download.” It’ll take a few minutes to download and install the language pack.
- As a keyboard layout, you’ll only need the one marked as “Russian – Русский.” You can ignore other keyboard layouts.
2- Windows 7
1. Go to Start > Control Panel > Clock, Language, and Region.
2. On the “Region and Language” option, click on “Change Keyboards or Other Input Methods.”
3. On the “Keyboards and Languages” tab, click on “Change Keyboards” > “Add” > “Russian.”
4. Expand the option of “Russian” and then expand the option “Keyboard.” Select the keyboard layout marked as “Russian.” You can ignore other keyboard layouts. Click “OK” and then “Apply.”
3- Mac (OS X and higher)
If you can’t see the language listed, please make sure to select the right option from System Preferences > Language and Region
1. From the Apple Menu (top left corner of the screen) go to System Preferences > Keyboard.
2. Click the Input Sources tab and a list of available keyboards and input methods will appear.
3. Click on the plus button, select “Russian,” and add the “Russian – Phonetic” keyboard.

5. Activating the Russian Keyboard on Your Mobile Phone and Tablet
Texting and searching in Russian will greatly help you master the language! Adding a Russian keyboard on your mobile phone and/or tablet is super-easy.
You could also opt to download an app instead of adding a keyboard. Read on for our suggestions.
Below are the instructions for both iOS and Android mobile phones and tablets.
1- iOS
1. Go to Settings > General > Keyboard.
2. Tap “Keyboards” and then “Add New Keyboard.”
3. Select “Russian” from the list.
4. When typing, you can switch between languages by tapping and holding on the icon to reveal the keyboard language menu.
2- Android
1. Go to Settings > General Management > Language and Input > On-screen Keyboard (or “Virtual Keyboard” on some devices) > Samsung Keyboard.
2. Tap “Language and Types” or “ + Select Input Languages” depending on the device and then “MANAGE INPUT LANGUAGES” if available.
3. Select “Русский” from the list.
4. When typing, you can switch between languages by swiping the space bar.
3- Applications for Mobile Phones
If you don’t want to add a keyboard on your mobile phone or tablet, these are a few good apps to consider:
- Abbott Cullen – Russian Keyboard
- Russian Keyboard 2020
- New Russian Keyboard
6. Russian Keyboard Typing Tips
Typing in Russian can be very challenging at first! Therefore, we added here a few useful tips to make it easier to use your Russian keyboard.

There are two main keyboard types:
1.) Standard (ЙЦУКЕН) is what we actually use on Russian laptops/PCs, and what is usually used on tablets/smartphones.
2.) A phonetic keyboard (say, ЯВЕРТЫ) sort of matches Russian letters to
Latin letters close in pronunciation. This may be fine if you’re moderately interested in Russian, but that’s it. Also, a phonetic keyboard has an obvious advantage if your physical keyboard doesn’t have Russian letters.
7. How to Practice Typing Russian
As you probably know by now, learning Russian is all about practice, practice, and more practice! Strengthen your Russian typing skills by writing comments on any of our lesson pages, and our teacher will answer. If you’re a RussianPod101 Premium PLUS member, you can directly text our teacher via the My Teacher app—use your Russian keyboard to do this!