
Word for Microsoft 365 Word 2021 Word 2019 Word 2016 Word 2013 Word 2010 Word 2007 More…Less
In this article
-
Add a cell
-
Add a row above or below
-
Add a column to the left or right
-
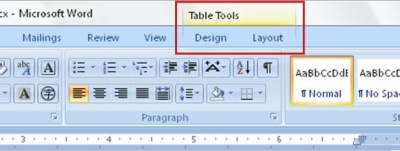
About the Table Tools contextual tabs
Add a cell
-
Click in a cell that is to the right of or above where you want to insert a cell.
-
Under Table Tools, click the Layout tab.
-
Click the arrow at the bottom, right-hand corner of the Rows & Columns section.
-
Click one of the following options.
Click
To
Shift cells right
Insert a cell and move all other cells in that row to the right.
Note: Word does not insert a new column. This may result in a row that has more cells than the other rows.
Shift cells down
Insert a cell and move the existing cells down one row. A new row is added at the bottom of the table.
Insert entire row
Insert a row above the cell that you clicked in.
Insert entire column
Insert a column to the left of the cell that you clicked in.
Top of Page
Add a row above or below
-
Click in a cell above or below where you want to add a row.
-
Under Table Tools, on the Layout tab, do one of the following:
-
To add a row above the cell, click Insert Above in the Rows and Columns group.
-
To add a row below the cell, click Insert Below in the Rows and Columns group.
-
Tip: To insert more than one row (or column) at the same time, select as many rows or columns as you want to add before you click the insert control. For example, to insert two rows above a row, first select two rows in your table and then click Insert Above.
Top of Page
Add a column to the left or right
-
Click in a cell to the left or right of where you want to add a column.
-
Under Table Tools, on the Layout tab, do one of the following:
-
To add a column to the left of the cell, click Insert Left in the Rows and Columns group.
-
To add a column to the right of the cell, click Insert Right in the Rows and Columns group.
-
Top of Page
About the Table Tools contextual tabs
You will need to know where the Design and LayoutTable Tools contextual tabs are when working on the design and structural layout of a table. The Design and Layout tabs are only visible after you have clicked inside of a table, and appear at the top of the screen on the ribbon.
Top of Page
See Also
Delete a row, column, or cell from a table
Add columns and rows to a table
Keyboard shortcuts for Microsoft Word on Windows
Need more help?
![]()
Download Article
![]()
Download Article
When working with tables in Microsoft Word, you can quickly add and remove rows by using the Table Layout tab. You can insert rows in any part of your table, not just the top and bottom. You can also copy and paste existing rows so that the exact content is duplicated.
If you want to insert a new line in your Word document, press ↵ Enter/⏎ Return.
-

1
Select the row you want to insert a new row above or below. You can insert rows so that they appear above or below the selected row. If you want to add a row at the bottom, select the bottom row. You can select any cell in the row or the entire row.
- To insert multiple rows at once, you’ll need to select as many rows as you want to create by clicking and dragging your mouse. For example, to create three rows at a time, select three existing rows.
-
2
Click the «Table Layout» tab. You’ll find this at the far right end of your Word tabs in Windows, or next to the «Table» tab in Word for Mac. It will only appear if you are currently working in a table.
Advertisement
-
3
Click «Insert Above» (Windows) or «Above» (Mac) to insert a row above the selected row. This will insert blank rows with the same row formatting directly above the row you selected.[1]
- Click «Insert Left» or «Insert Right» to insert a column to the left or right of the selected cell instead.
-
4
Click «Insert Below» (Windows) or «Below» (Mac) to insert a row below the selected row. This will insert blank rows with the same row formatting directly below the row you selected.[2]
-
5
Use the .Tab ↹ key to quickly add new rows at the end of a table. You can place your cursor in the last cell of your table and press Tab ↹ to create a new row. This will only insert rows below the last row on your table.


Advertisement
-
1
Highlight the row or rows you want to delete. You can click and drag to highlight multiple rows, or simply select a single cell in the row you want to delete.
-
2
Click the «Table Layout» tab. This appears at the end of your tab list when you are working in a table.
-
3
Click the «Delete» button and select «Delete Rows.» This will delete the row or rows that you have selected. All of the content in each of the deleted row’s cells will be deleted as well.


Advertisement
-
1
Highlight the row or rows that you want to copy. Make sure to highlight the entire row, or the new row will not have all of the cells. You can highlight one or more rows by clicking and dragging your mouse over them.
-
2
Right-click a cell in the row above where you want to insert the copy. When you paste a copied row, it will be inserted directly beneath the row you right-click on.
-
3
Select «Insert as New Rows» from the «Paste» options. This will insert the copied row as a new row in the table, directly beneath the row that you right-clicked.


Advertisement
Ask a Question
200 characters left
Include your email address to get a message when this question is answered.
Submit
Advertisement
Thanks for submitting a tip for review!
About This Article
Thanks to all authors for creating a page that has been read 208,211 times.
Is this article up to date?

on
December 12, 2011, 11:59 PM PST
How to insert multiple rows in a Word table
Adding an new row to a Word table is an easy task. Adding multiple rows is just as easy, if you know this simple trick.
We may be compensated by vendors who appear on this page through methods such as affiliate links or sponsored partnerships. This may influence how and where their products appear on our site, but vendors cannot pay to influence the content of our reviews. For more info, visit our Terms of Use page.
You probably know that you can add a row to the end of a table by pressing Tab in the last column. Doing so generates a new blank row at the bottom of the table for you to fill in. This method is probably the one that’s most familiar to you.
Once a table is complete, you may find that you need to insert new rows between existing rows. Doing so is relatively easy:
- Click anywhere inside a row above or below where you want to insert the new row.
- On the contextual Layout tab, click Insert Above or Insert Below, accordingly, in the Rows & Columns group.
Word will insert a new row! You could also right-click and choose Insert, and then select the appropriate insert command.
What you might not know is that you can add multiple rows just as easily! The trick is to select the appropriate number of existing rows before inserting. To illustrate, we’ll add three new rows above 5 in the table below:
- Select the representative rows for 5, 6, and 7. You select three rows, because you want to insert three rows. If you wanted to insert four rows, you’d select four rows, and so on.
- Click the contextual Layout tab, if necessary.
- Click Insert Above in the Rows & Columns group. As you can see, Word adds three new rows with just one insert action!
If you’re familiar with Excel, you may already know this trick, without realizing it. You can use the same process to insert multiple rows into an Excel sheet. You can also use this same technique to insert multiple columns.
-
Software
In this article, we would like to introduce you with 4 ways to quickly add multiple rows or columns to an existing Word table.
Every so often, we would find additional rows or columns are needed for an existing table. Certainly, there are a number of methods to realize it. And we here provide you 4 quick ways to do that.
Method 1: Add Multiple Rows with “Tab” Key
- Firstly, put your cursor outside the end of the last row of a table.
- Then press “Tab” key to get as many rows as you need.
Method 2: Add Multiple Rows or Columns with Contextual Menu
- At first, select a number of rows or columns.
- Next right click and choose “Insert”.
- Then choose the right command as you need. The number of rows or columns is as the same as that of the rows or columns you selected at the very first.


Besides, there are also the shortcuts for inserting columns. Press “Alt”, “J”, “L”, and “L” can insert columns to the left of the selection. And press “Alt”, “J”, “L”, and “R” can insert columns to the right of the selection.
Method 3: Add Multiple Rows with “Insert Table” Option
- To begin with, click “Layout” and check the column width in “Cell Size” group. And put cursor right at the head of the line below the last row of table.

- Secondly, click “Insert” tab.
- Then click “Table” icon.
- Next, choose “Insert Table” option on the drop-down menu.

- In “Insert Table” dialog box, enter the number of columns and rows. Remember the number of columns as the same as the existing table.
- Then input the column width you get in step 1.
- Click “OK”.


You will find 2 tables automatically merge into one.
Method 4: Add Multiple Rows or Columns with Macro
- First off, select a row then press “Alt+ F11” to trigger the VBA editor.
- Click “Normal” then “Insert”.
- Next choose “Module”.

- Double click on the new module to open the editing area.
- Then paste the following codes:

Sub AddRowsAbove()
  Dim nNumber As Long

  If Selection.Information(wdWithInTable) = True Then
    nNumber = InputBox("Input the number of rows you want to add:", "Add Rows to the selection")
    Selection.InsertRowsAbove NumRows:=nNumber
  End If
End Sub
- Hit “Run”.

- In the input box, enter the number of rows you want and click “OK”.


Now there will be 2 blank rows above the first row in the table. And if you want to add rows below a selected one, simply change the “InsertRowsAbove” to “InsertRowsbelow”.
Additionally, here is the macro to add columns:
Sub AddColumnsToLeft()
  Dim nNumber As Long

  If Selection.Information(wdWithInTable) = True Then
    Selection.InsertColumns
  End If
End Sub
You should first select a number of columns then run the macro with the steps above. You can then get new columns. The above macro adds columns to the left of the selection. To add columns to the right selection, you need to replace “InsertColumns” with “InseertColumnsRight”.
Take Care of Word Files
There can be errors or mistakes occurring in Word, result in the collapse of the software. More often than not, it’s not only our time that is wasted but also amounts of priceless data. When it gets that far, you will definitely need a tool to recover docx.
Author Introduction:
Vera Chen is a data recovery expert in DataNumen, Inc., which is the world leader in data recovery technologies, including Excel recovery and pdf repair software products. For more information visit www.datanumen.com
![]()
Written by Allen Wyatt (last updated October 17, 2022)
This tip applies to Word 2007, 2010, 2013, and 2016
Heather often works with templates that have three-row tables already present (i.e. a header row plus three empty rows). Sometimes, she needs to add 10 or 20 rows to the table. To insert the rows, Heather highlights the three existing rows and clicks ‘Insert Row Below.’ She then selects all six rows and repeats the process, until she has the number of rows she need. This is tedious, so Heather is wondering if there’s a way to simply tell Word how many rows she wants to add, rather than having to take this patchwork approach or create a whole new table.
There are actually many different ways you can add the rows you want to the table. (Flexible? Yep. Word is flexible!) One way is to rely on the trusty F4 key. Insert a single row into your table, and then repeatedly press the F4 key until you have the number of rows you want. The F4 key repeats whatever your last action was, and since the action just before you pressed it was to insert a row, that’s what each press of F4 accomplishes.
Another approach is to position the insertion point in the very last (bottom-right) cell of the table. Press the Tab key and Word adds a row to the table. The reason it does this is because the Tab key actually moves to the next cell in the table. Since there is no «next cell,» Word creates one by adding the row. As you continue to press Tab, the insertion point moves through the cells in the new row until it gets to the last cell and, pressing Tab another time again adds a new row. It is more keypresses than the F4 method, but if your table doesn’t have a lot of columns is easy to do.
An easy way that I often use to add multiple rows is to select one of the rows, press Ctrl+C (to copy the row to the Clipboard) and then immediately start pressing Ctrl+V. Each press of Ctrl+V adds another row to the table.
If you are using Word 2013 or Word 2016, you can also insert table rows easily using the mouse. Make sure the insertion point is somewhere within the table, and then move the mouse pointer just to the left of the table and between two rows. Word displays an «insert indicator.» (See Figure 1.)
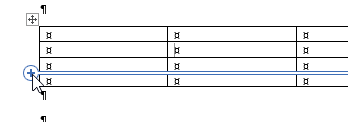
Figure 1. Inserting a table row in Word 2013 and Word 2016.
Click the plus sign on the indicator as many times as you want; each click inserts a new row.
You could also position the insertion point immediately below the existing table and use the Insert Table option (on the Insert tab of the ribbon, click the Table tool and then choose Insert Table). In the resulting dialog box, specify how many columns you want (the same as the number in your current table) and how many rows. When you click OK, Word inserts the rows and makes them a continuation of the previous table. You may need to adjust the column widths on the new rows to match the existing rows, but you’ll get exactly the number of rows you want with one action.
If you would like to use a macro to do the trick, this one is particularly helpful.
Sub AddTableRows()
    If Selection.Information(wdWithInTable) Then
        Application.Dialogs(wdDialogTableInsertRow).Show
    Else
        MsgBox "Insertion point not in a table!"
    End If
End Sub
All you need to do is to make sure the insertion point is within the table and then run the macro. (Remember you can assign it to the Quick Access Toolbar or a shortcut key.) When you do, you’ll see the Insert Rows dialog box. (See Figure 2.)
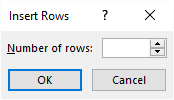
Figure 2. The Insert Rows dialog box.
Just enter the number of rows you want and when you click OK, Word inserts that number into the table.
If you would like to know how to use the macros described on this page (or on any other page on the WordTips sites), I’ve prepared a special page that includes helpful information. Click here to open that special page in a new browser tab.
WordTips is your source for cost-effective Microsoft Word training.
(Microsoft Word is the most popular word processing software in the world.)
This tip (13454) applies to Microsoft Word 2007, 2010, 2013, and 2016.
Author Bio
With more than 50 non-fiction books and numerous magazine articles to his credit, Allen Wyatt is an internationally recognized author. He is president of Sharon Parq Associates, a computer and publishing services company. Learn more about Allen…
MORE FROM ALLEN
Unwanted Numbering on Pasted Tables
When pasting text from another document or from the Web you can have unexpected characters sometimes show up. Many of …
Discover More
Limiting Who Can Delete Data
Excel allows you to protect your worksheet data in several different ways. Unfortunately, it doesn’t allow you to protect …
Discover More
Pulling Access Information into Excel
If you have a lot of data stored in Access databases, you may want to get at that information using Excel. There are a …
Discover More