

-
Select Insert > Page Number, and then choose the location and style you want.
-
If you don’t want a page number to appear on the first page, select Different First Page.
-
If you want numbering to start with 1 on the second page, go to Page Number > Format Page Numbers, and set Start at to 0.
-
When you’re done, select Close Header and Footer or press Esc.
Tip: To get back to a header or footer to make changes, double-click in the header or footer area.
-
On the Insert tab, click the Page Number icon, and then click Page Number.
-
Select a location, and then pick an alignment style. Word automatically numbers every page, except designated title pages.
-
To change the numbering style, select Format and then choose the formatting you want to use.
-
Select OK twice to close both dialog boxes.
 Please Note:
This article is written for users of the following Microsoft Word versions: 97, 2000, 2002, and 2003. If you are using a later version (Word 2007 or later), this tip may not work for you. For a version of this tip written specifically for later versions of Word, click here: Two Page Numbers per Physical Page.
![]()
Written by Allen Wyatt (last updated February 10, 2020)
This tip applies to Word 97, 2000, 2002, and 2003
It is not unusual to need to print information on half sheets of paper. For instance, you may need a page size of 5 1/2″ x 8 1/2″ for your document. This is a handy size, as you can get exactly two pages on a landscape-oriented letter-size piece of paper. You can easily use Word’s column feature to set up your document to print in two columns on the paper, and then cut the paper in half after printing.
The problem comes in when you want to print page numbers on each of your mini-pages. Word calculates page numbers based on the physical page, not on some virtual page you may want to set up. There are ways around this particular problem, however.
The first (and easiest) solution is available if you are using Word 2000 or a later version of the program. Simply follow these steps:
- Do not use columns to set up your document, unless you want columns to appear on each of your mini-pages.
- Place your page numbers in the page headers and footers as you normally would.
- Choose Page Setup from the File menu. Word displays the Page Setup dialog box.
- Make sure the Paper Size tab (Word 97 and Word 2000) or the Margins tab (Word 2002 and Word 2003) is displayed. (See Figure 1.)
- Choose the Landscape button.
- Display the Margins tab.
- Select the 2 Pages Per Sheet check box.
- Adjust page margins as desired.
- Click on OK.
- Print your document as normal.
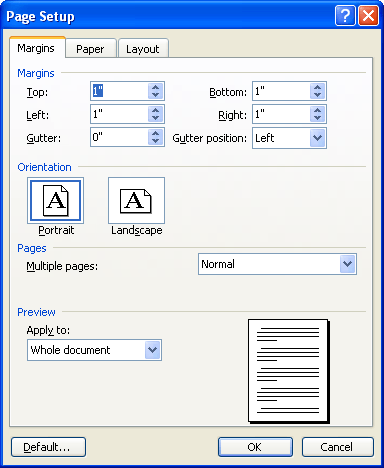
Figure 1. The Margins tab of the Page Setup dialog box.
Word takes care of placing two pages on each physical page printed.
If you are using an older version of Word, then you need to use the columns approach to set up your own virtual pages on each physical page. To place the page numbers (and have them work properly), you need to use calculations within nested fields. The following two fields show, respectively, how you would create the page number for the left virtual page and the right virtual page on each printed page:
{= {PAGE} *2-1 * MERGEFORMAT }
{= {PAGE} *2 * MERGEFORMAT }
Each pair of braces in this code is created by inserting a field using Ctrl+F9. In other words, position the insertion point where you want the first page number, press Ctrl+F9, and type the contents. To create the {PAGE} field, again press Ctrl+F9 and type the word PAGE within the resulting field braces. When you are done inserting the fields, they should look just like what is shown above.
To find out more information on the topic of multiple page numbers per page, visit the Word MVP Web site:
http://wordmvp.com/FAQs/Formatting/Print2Pages.htm
WordTips is your source for cost-effective Microsoft Word training.
(Microsoft Word is the most popular word processing software in the world.)
This tip (201) applies to Microsoft Word 97, 2000, 2002, and 2003. You can find a version of this tip for the ribbon interface of Word (Word 2007 and later) here: Two Page Numbers per Physical Page.
Author Bio
With more than 50 non-fiction books and numerous magazine articles to his credit, Allen Wyatt is an internationally recognized author. He is president of Sharon Parq Associates, a computer and publishing services company. Learn more about Allen…
MORE FROM ALLEN
Converting UTC Times to Local Times
Dates and times are often standardized on UTC time, which is analogous to GMT times. How to convert such times to your …
Discover More
Seeing a Worksheet Thumbnail in Windows
When you save a workbook, you have the opportunity to save a thumbnail image that can be displayed within Windows. Here’s …
Discover More
Using a Two-Character Day of the Week in a Date Format
Excel provides quite a bit of flexibility in how you can format dates. Even so, some dates simply cannot be formatted …
Discover More
Is it possible to have two different page numbers on the same page in Microsoft Word. I have an appendix to the document, that has its own numbering, but I want it to have also the numbers of the main document.
The document already has page numbering for the whole document? I created a new section with section break for the appendix, and removed link to previous section. Than I added another page number, and specified that the numbering should start at 1. Unfortunately, the original page numbers restarted numbering from 1, too.
Can I have one page number in the footer counting numbers from the beginning of the document, and section page number in footer counting pages for the appendix only? And I want also to have total numbers for the whole document and total page number for the appendix, so page numbers can be displayed / for the document and appendix.
asked Nov 16, 2021 at 11:26
![]()
1
You need to use bookmarks and fields to construct the extra set of page numbers.
This is set forth in Greg Maxey’s page on Page Numbering.
Dual Page Numbering
Sometimes people ask: How to display both «Page X of Y Pages» and
«Page X of Z Pages» in the header/footer of a document?Where X is the page number referenced to Y or Z. Y is the total number of pages in the document. Z is the total number of pages in an individual "content" section.Note: I use the term «content section» to differentiate
and define a document section formed with section breaks consisting of
like content (e.g., Marketing, Sales, etc.) from sections formed with
section breaks for the purpose of document layout (e.g., page
orientation, etc.)For this demonstration I have used an eight page document containing
three sections. Section 1 contains two pages, section 2 contains three
pages and section 3 contains three pages. The illustration below
depicts dual numbering in section 1:
Applying a dual numbering format in section 1 is simple. As shown in
the illustration below, the numbering depicted above results from two
field pairs. {Page} and {Numpages} fields are used for the X of Y
format on the left and {Page} and {SectionPages} fields are used for
the X of Z format on the right.
A problem arises in section 2 and subsequent sections using that simple process. As you may know, a { PAGE } field can be formatted to
«Continue from …» or «Start at …» in each new section of a
document, but not both!!Choose «Continue from previous section» in order that the left side page numbering continues throughout the document. This is also
important for proper page number display in a table of contents.However, this presents the problem depicted below:
To resolve this issue, you can retrieve the page number of the last page of the previous section and subtract that value from the {Page}
field value returned in right hand side construction of the current
section header.Add a bookmark to the last word or character in «content» section of your document. Here I havae added a bookmark «S1» to the last word in
section 1. The bookmarks you add serve as the reference mark for
PageRef fields explained below.
Each «content» section will require a unique field construction so the next step is to break the links between the «content» sections.
Now modify the right hand side field construction in the «content» section 2 and 3 headers:
The page value in the right hand construction is reset to 1 by subtracting the page number of the previous page form the page number of the current page.
Here the page number of the last page in section 2 pages is subtracted.
- Dual numbering in «content» section 2.
- Dual numbering in «content» section 3.
- Resulting numbering in table of contents.


Greg’s page has vba to help with this and variations. The above is entirely from his page.
answered Nov 19, 2021 at 16:51
![]()
Charles KenyonCharles Kenyon
4,0202 gold badges8 silver badges19 bronze badges
You have a document, that required different formats for the page numbers and can’t quite figure out how to make this work.
Microsoft Words default page number setting is to give you the same style of the page number on every page. You may want to make your content or index pages numbered i, ii, iii and then use the standard pg1, pg2, pg3 for the rest of the document. Or maybe you have reference pages at the end of the document that required separate page numbers, for whatever reason you need to use two different styles of page numbers in the same document.

Before we start, make sure you have divided your document into sections. Each new section should start on a new page to make the numbering simple, from here we will show you how to insert a specific page numbering style into each section individually.
You’ll be using as many page number styles as you need within a matter of minutes.
Heres how.
Using more than one type of page number in Word
- Open Word
- Split your document into relevant sections, with each section starting on a new page
- Place your cursor on the page you wish to start the numbering from
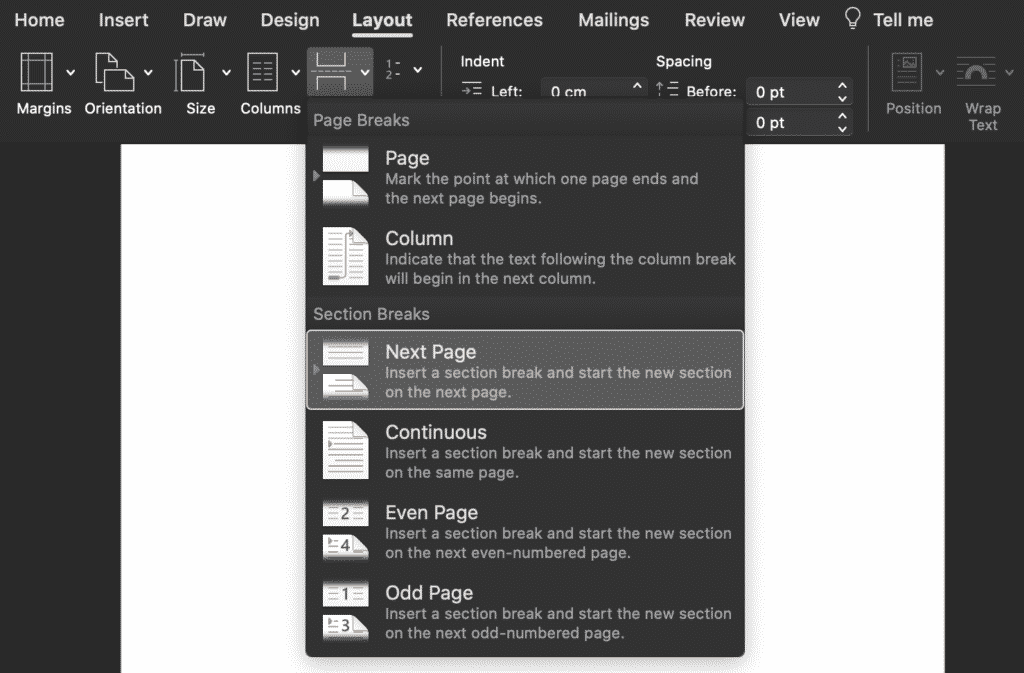
- Click Layout
- Click Page Break
- Under Page Break, press Next Page. This will create a break between the two sections
- Once you have the page break inserted, place your cursor on the page you want to start the numbering from, after the page break
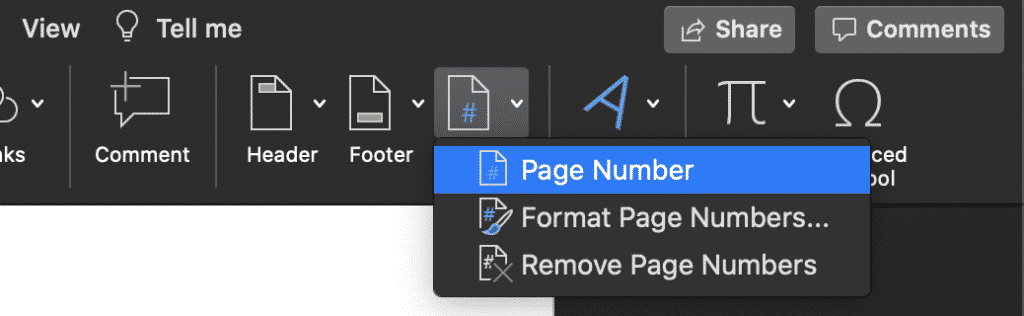
- Click Insert
- Under Insert, Click Page Number
- Press Page Number
- Click Format to select the style of page number you would like to add to this section
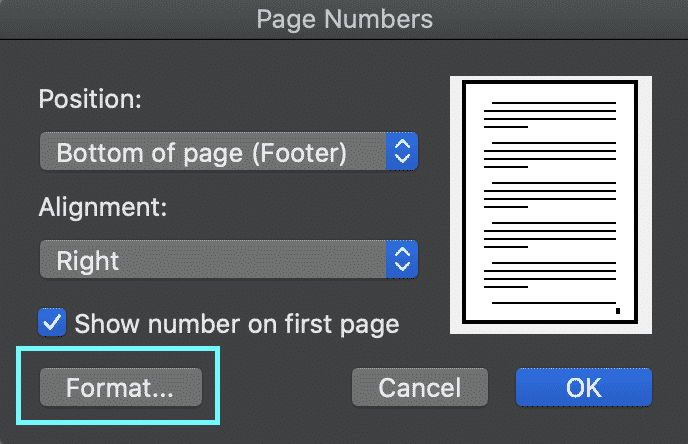
- Select Style
- Press OK
- Repeat these steps to create new page breaks before each section and then re-start or re-format the page numbers
There is no limit to how many different styles of page numbers you can use in one document, you can continue to repeat the steps above until you are satisfied with the page numbers within your Microsoft Word document.
Looking for an easier way to keep track of your Microsoft Word Documents?
Keeping track of your document can be challenging, especially when you are saving multiple versions of a file and collaborating with your team.
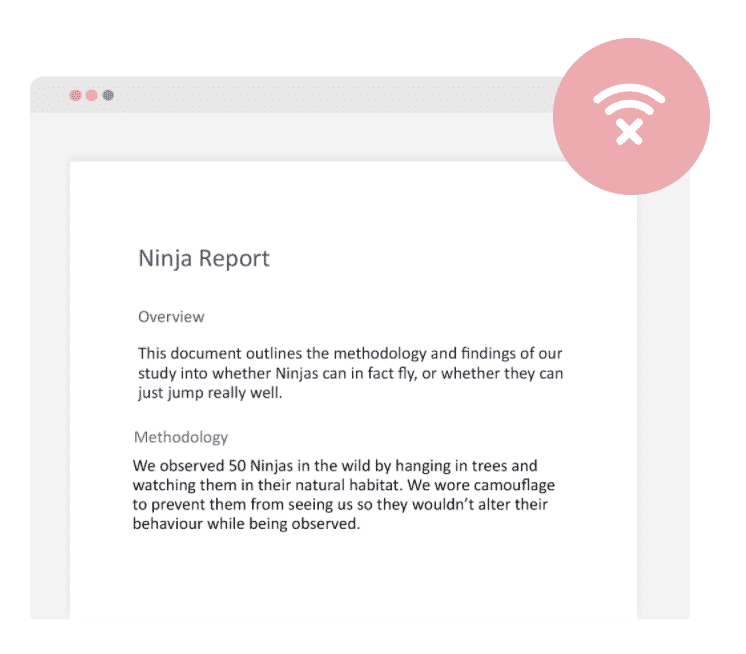
When you are working in a shared drive, without remote access your team may even pull a document out of the shared drive, save it to their desktop and work on this while they are offline.
Once back in the office, it seems simple enough to then drop the update file back into the shared drive and continue collaborating as normal.
But what if someone else had made changes to the live shared file in the time this colleague had taken a version offline, made changes and then re-saved it to the shared drive. This would leave you with two different ‘updated’ versions of the same document and no way of knowing which one is the most recent file or when the changes were made.

Your team may need to access the files offline for a number of reasons, maybe they are travelling, working from home, from an airport or an aeroplane where there is no internet connection. There are a number of reasons a team member may need to work offline leaving us open to disjointed file management more frequently than we’d like to admit.
Lucky for us, there are now some great purpose-built tools on the market such as Simul Docs that not only manage version control for you but allow you to work offline, or from anywhere without losing track of any edits, changes or updates.
Simul knows that when you are making changes to an existing document you will want it saved as a new file, and probably don’t want to have to remember to press ‘save as’ before you start editing and then ‘save’ every 30 minutes.
So Simul will automatically create a new version every time an edit is made to an existing document, saves as you go, word by word and gives you access to your documents anywhere, anytime.
You can access your documents offline on Simul, make changes and re-format knowing that the moment your computer or device is back online Simul will update the file for the rest of your team to see and save it in line with the version history.

If two team members happen to be working on the same document, offline, at the same time Simul has your back here too.
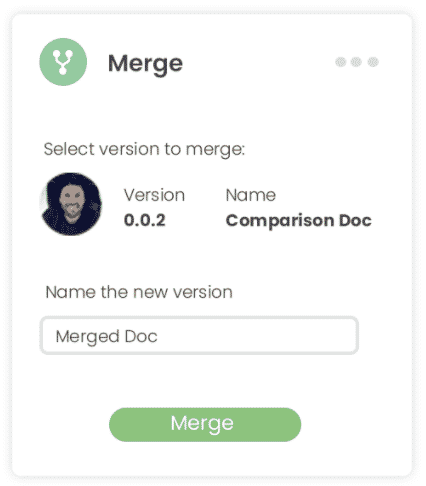
Each team members file will be saved as a new version, uploaded when they are back online, and an alert is sent to the document owner that there are two new versions available to their review.

The document owner can then review the documents and merge them together at the click of a button.
Simul allows you to collaborate from anywhere, anytime without worrying about saving your work or accidentally over-riding a colleagues file.
Its collaboration made easy and Simul knows you needed it.
So, give it a try, with Simul on your side you’ll never search for a lost document again.
In this guide, you’ll learn everything you need to know about adding page numbers in Word.
When adding page numbers into your Word document, several methods are available.
However, this guide focuses only on the best approaches that give the most ease and flexibility.
I’ll show you all the secrets.
Let’s dive right in.
Introduction.
Page numbering in Word is very easy. In fact, I know a shortcut with which you can insert page numbers in under five seconds (will be discussed soon).
At the same time, numbering pages in Word can be very complicated, depending on what document you are working on.
- Are you starting the page numbering from page one, page two or page three?
- Do you want the page numbers to be Roman numerals, alphabets or ordinary numbers?
- Where do you want to insert the page numbers? – Is it in the footer? In the Header? Or in the side margin?
All these factors count when it comes to inserting page numbers into Word.
So, in order to not confuse you, I’ll begin from the basics with examples and screenshots on every step.
Without wasting much time, let’s get started.
The quickest way to add page numbers in Word – Shortcut
This is so far the quickest way you can use to number your pages in Word.
NOTE: With this method, I assume that you just want your pages to be numbered starting from the first page to the last page.
Below are the steps you can use to perform quick page numbering in Word:
- Identify where on the page you want to insert the page numbers. Whether in the footer (bottom of page) or in the header (top of page). In this example, we’ll insert the page numbers in the footer section.

- Now, go to any page of your choice. It could be page one or page 10, it doesn’t really matter.
- Double-click on the page’s Footer area to make it editable. Alternatively, right-click in the Footer area, then click on Edit Footer. The same thing applies if you are inserting the page number into the header section.
- Whilst in the Footer editing mode, press Shift+Alt+P on your keyboard.
- Now press the Escape (Esc) key to exit the Header & Footer.
After performing the above simple steps, Word will insert page numbers on all the pages in the document.
Below is a very short video illustration of the steps outlined above:
Option 2: Using the insert page numbers button
This is yet another way you can insert page numbers into your Word document.
It involved using the Page Number commands in the Insert tab, or Header & Footer tab when active.
Following the steps below, you can also add page numbers into your Word document.
- Go to the Insert tab, in the ‘Header & Footer’ group, click on ‘Page Number’ to display the page numbering options.

You can also find the ‘Page Number’ command in the Header & Footer tab. However, the Header & Footer tab shows only when you are editing headers or footers. So you can double click either in the Footer or Header section to make it editable.
- From the ‘Page Number’ drop-down menu, choose your page numbering style to automatically insert the page numbers into your document.

Use the ‘Top of Page’ option if you want to insert page numbers on top of the pages. Or use ‘Bottom of Page’ option to add page numbers to the bottom of the pages.
This is how you can add page numbers to your word document.
The two approaches explained above are the basis for learning how to insert complex page numbers in Word.
Now let’s look at more advanced ways you can insert or tweak page numbers to suit your needs.
Numbering your pages with Roman numerals or alphabets
Word gives you the flexibility of choosing the page numbering style that works well for you.
You are not only limited to using the standard ordinary numbers when numbering your pages in Word. You can number pages with Roman numerals. You can also use alphabets.
Therefore, without further ado, below are the steps you can follow to change your page numbers to Roman numerals or other numbering styles.
- First, insert the page numbers.
To insert roman numerals as page numbers, you first have to insert the page numbers with the default ordinary numbers, and then format it to display the roman numerals.
In case you forget, to insert page numbers, go to the Insert tab, under the Header & Footer group, click Page Number and then specify the location and style you want for your page numbers.
- After successfully adding the page numbers, go to Page Number > Format Page Numbers in the Insert tab.

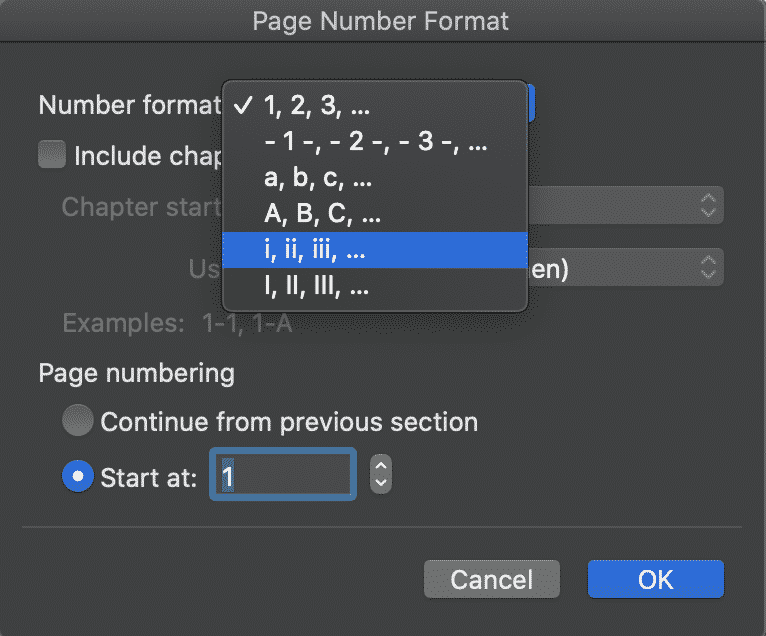
- From the ‘Page Number Format’ dialog, click the ‘Number format’ options and select the numbering style you want. You can select alphabets or roman numerals.

- Click on the OK button.
This few steps will change your page numbers to roman numerals.
NOTE: You can also include different page numbers in the same document. For instance, you can use Roman numerals for the introduction pages, and start page 1 on the main part of the content. This technique is discussed later in this article.
Removing page number from the first page
Perhaps you want to remove the first-page numbering since it serves as your cover page.
Or for any other reason, you can remove the page number from the first page of your Word document using the following editing steps:
- Double-click the Footer/Header section to activate the ‘Header & Footer’ tab. Alternatively, right-click the footer area and Click on Edit Footer.
- From the ‘Header & Footer’tab, select ‘Different First Page’.

As soon as you check the ‘Different First Page’ checkbox, the page number on the first page disappears.
NOTE: Even though there’s no page number on the first page anymore, it is still counted. This means that the second page will still display page number 2 instead of page number 1. To start numbering page 1 on the second page, keep reading below.
Numbering pages starting on page 2
After removing the page number on the first page, you realized that the second page still has page number 2 instead of 1.
This is because the first page is still counted, it’s just that the page number is not visible.
There are two ways you can number pages in Word starting on page 2:
- Start the page numbering at 0 (zero). This way, the first page will be page 0 (which is hidden anyway), and the second page will be numbered page 1.
- Use Section Breaks to separate the first page from the rest of the pages. This way, you can delete the page number on the first page and it will not affect the other page numbers on the rest of the pages.
In this section, I’ll show you how to number pages in Word starting at 0 (zero) instead of 1 (one).
- First, insert the page numbers into your document. If you don’t know how to insert page numbers, refer to the previous sections. If you already have your pages numbered, move to the next step.
- In the Insert tab, go to Page Number > Format Page Numbers.
- The ‘Page Number Format’ dialog appears. Under the page numbering section, type 0 (zero) in the Start at box.

- Click OK.
At this point, the page numbering will start with 0 (zero) on the first page which is not visible. Then the second page will be numbered N1, and so on.
TIP: Not every page needs to be on page 1. Therefore, just like starting to number at zero, you can also start your numbering at any number (except negatives) depending on the layout of your content.
As mentioned already, the second method to perform this task involve using section breaks to separate the first page from the rest of the pages. I’ll cover this approach in the next sections where you’ll learn how to insert page number in Word starting from a specific page.
Insert page number in word from specific page
Yes, it is possible to start page numbering from any page in your word document.
In the previous section, we already talked about how you can start numbering your pages from page two using the ‘Different First Page’ option.
With the ‘Different First Page’ method, you can only start numbering your pages on page 2. You cannot really insert the page numbers on other specific pages like page 3, page 4 or page 5.
To skirt this limitation, you need to use what is called Page Breaks to break your pages into sections. This way, each section can have independent headers and footers, which means that they can also be numbered independently.
To understand how this works, let’s demonstrate how to start page numbers on page 3.
Starting page numbers on page 3 or any other page
NOTE: The following steps will show you how to start numbering your pages from page 3. However, you can apply the same idea to add page numbers from any specific page you want, like page 5.
The diagram below illustrates the goal of this section:

In the diagram above, the first section (first and second pages), is the introduction – with no page numbers. And the second section (starting from the third page), is the main content – which contains page numbers, starting with number 1.
If you follow the steps below carefully, you will achieve awesome results.
Without further ado, let’s dive right into the action:
- Identify the page from where you want to start the numbering. In this example, it’s page 3.
- Place the insertion pointer at the start of the third page (main content page).

- Go to the Page Layout tab, in the page setup group, click on Breaks and then select Next Page from the extended list of commands.

At this point, the section break is inserted. It separates the document’s first two pages from the rest of the pages. Thus, starting from page 3 is a new section.
- Confirm the section break
After inserting the section break, Word doesn’t actually make the effects visible. Everything happens in the backend.
So, to be sure that the section break is really inserted, Press Ctrl+Shift+8 on PC or ⌘+8 on Mac. This will make all the paragraph marks visible including section breaks.

If you see the section break line just before the third page, it means that inserting the section break was successful. It tells Word that the next page (page 3) begins a different section which may have different header/footer.
- Unlink the header/footer for the second section from that of the previous.
To unlink these two sections:
Double-click to activate the Footer section on page three. This displays the Header & Footer tab, in the Navigation group, click on Link to Previous to deselect that command. Do the same for the Header.

When the “Link to Previous” item is selected for any given header or footer, it means that the header or footer is the same as that for the previous section. If you want to fix page numbers on specific pages, you don’t want that setting active.
Now follow the rest of the steps to insert the page numbers on page 3.
- Go to the Insert tab, in the ‘Header & Footer’ group, click on ‘Page Number’ to display the page numbering options.
- From the ‘Page Number’ drop-down menu, choose your page numbering style you want.
Use the ‘Top of Page’ option if you want to insert page numbers on top of the pages. Or use ‘Bottom of Page’ option to add page numbers to the bottom of the pages.
After adding the page numbers, you’ll notice that each section has its pages numbered separately. Section one, which has only two pages will be numbered from page 1 to 2. Then section two, which begins with page three will also be numbered starting from 1.
You can change the numbering styles of the introduction pages to say roman numerals.
We’ll talk about how to do that in the last section below.
How to insert different page numbers in word
You can use different page numbering styles within the same document.
Perhaps you want to use Roman numerals for numbering the introduction and then start over with page number 1 for the main content.
For instance, consider a document with two separate sections, as shown below:

Section 1 is the introduction which uses Roman numerals to number the pages. Section 2 contains the main content – which uses the standard ordinary numbers to number the pages, starting with page number 1.
This is entirely possible if you following the steps below very carefully.
- Open your document. If you haven’t written the content yet, you can finish writing it before you make the settings.
- Using the steps in the preceding section, insert a page break to separate the first section from the second.
- After dividing the document into sections, insert page numbers using the steps I showed you from the beginning.
- Change the page numbers in section one to Roman numerals. This is already covered in the previous sections.
- Format the page numbering in the new section too.
You can use the techniques discussed on this page to solve many page numbering problems in Word.
This is enough information to help you fix page numbers in Word.
Now it’s your turn to take action.
If you have any questions, suggestions or corrections, let me know in the comments section.