
Table of Contents
- Can you change font tracking in Word?
- How do I fix tracking in Word?
- What is tracking for fonts?
- Can I Kern in Word?
- How do I change tracked changes in Word?
- How do I figure out a font tracker?
- What’s the difference between tracking and kerning?
- Why does my Word document keep showing track changes?
- How do I get rid of tracked changes in Word?
- How do I trace a font?
- How do I change the font leading in Word?
- What does track changes do in Microsoft Word?
- How does track formatting work in Microsoft Office?
- Why do you need to trace letters in Microsoft Word?
- Where do I find kerning for fonts in word?
Select the text that you want to change. On the Home tab, click the Font Dialog Box Launcher, and then click the Advanced tab. Note: If you’re using Word 2007 the tab is called Character Spacing. Select the Kerning for fonts check box, and then enter the point size in the Points and above box.
How do I fix tracking in Word?
Changing Kerning
- Select the text whose kerning you want to adjust.
- Choose the Tools option from the Font menu.
- Make sure the Character Spacing tab is selected.
- Click on the Kerning for Fonts check box.
- Adjust the character point size to indicate when Word should start adjusting kerning.
- Click on OK.
What is tracking for fonts?
Tracking is the overall spacing between groups of letters. Leading is the vertical spacing between lines of type. It’s important to make the desired adjustments to your leading and tracking first, because doing that after kerning can undo the balance in the kerning adjustments you’ve already made.
Can I Kern in Word?
To turn on kerning in Microsoft Word on Windows, open your document and follow these simple steps. Open the Font Dialog Box by clicking the arrow on the bottom right corner of the Font section of the ribbon. Select the Advanced tab in the window. Check the box for Kerning for fonts under Character Spacing.
How do I change tracked changes in Word?
Turn tracked changes on or off
- Open the document that you want to edit.
- On the Review tab, under Tracking, select the Track Changes switch to turn on track changes. Tips: Each reviewer’s changes are displayed in a different color. If there are more than eight reviewers, Word will reuses colors.
How do I figure out a font tracker?
The Simple Answer. Divide the tracking by 1000 and use em’s. A bit of background about letter-spacing is that it is always applied to text so we should use a relative unit of length. Font size can change by the user or even by the cascade.
What’s the difference between tracking and kerning?
Kerning adjusts the spacing between any two letters while tracking affects spacing for more than two letters. Optical kerning adjusts spacing based on letter shapes and is generally a good option for large display text.
Why does my Word document keep showing track changes?
When you turn it on, any edits you make are noted in the document as “markup.” This markup is supposed to be visible on the screen, provided you are viewing the document as “Final Showing Markup.” You can either temporarily hide the markup (change the view to “Final”), or you can get rid of the markup by resolving the …
How do I get rid of tracked changes in Word?
Turn off Track Changes
- On the Review tab, go to Tracking.
- In the Track Changes drop-down list, select Off.
How do I trace a font?
How to identify fonts in an image
- Download the photo or copy the URL where the photo is hosted.
- Go to the Font Squirrel website.
- Click Upload image if you have the photo on your computer.
- Now crop the image to highlight the text on the image.
- Now click Matcherate It.
- You will see a bunch of options below the image.
How do I change the font leading in Word?
Change the line spacing in a portion of the document
- Select one or more paragraphs to update.
- Go to Home > Line and Paragraph Spacing.
- Select Line Spacing Options and choose an option in the Line spacing box.
- Adjust the Before and After settings to change spacing between paragraphs.
- Select OK.
What does track changes do in Microsoft Word?
Track Changes helps us edit documents by tracking insertions, deletions, replacements, and format changes. Word calls these edits markups. The term Track Changes is commonly used for both edits and comments, so this tutorial also includes Word’s comment tool. We will cover eleven topics:
How does track formatting work in Microsoft Office?
Track formatting This turns on or off track changes on for formatting, such as making something bold or changing font size. The default is On. Formatting Sets how the text format changes are highlighted in track changes. Choices are changing the color only, or the color and it’s formatting while in track changes.
Why do you need to trace letters in Microsoft Word?
This assists in mastering the best height and size of letters to make consistency in composing. Tracing each letter also teaches the proper spacing between characters to stop writing letters too close together or far apart that may create problems in terms of forming words and sentences later on.
Where do I find kerning for fonts in word?
Open the Font Dialog Box by clicking Format > Font in the menu bar. Select the Advanced tab in the window. Check the box for Kerning for fonts under Character Spacing. To the right, enter the minimum point value you want to use. Click OK.
In this tutorial, you will learn about how to see list of fonts used in a Word document. By default, there is no option in MS Word that can help you know which fonts are exactly used in a word document. That means if you want to know the same, then the only option you have is to open the document and then manually check the fonts. But today, I came across a free tool which can help you see which fonts are used in any Word document.
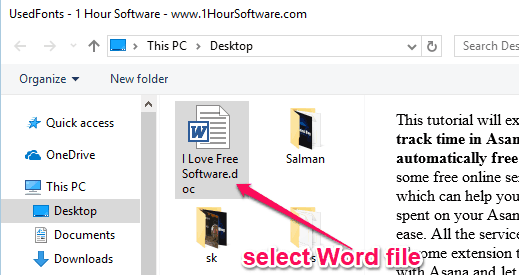
For that, you would need to simply open this software, select a Word file, and voila you get the result instantly. Do note that it supports only the “DOC” files. There are also many font identifiers available which can help you find fonts from images and webpages. But, none of them has the option to find fonts used in a Word document.
To get started, the first thing you need to do is download “UsedFonts” on your PC. The link is given at the end of this post. After that, extract the archive and then you can see a “UsedFonts.exe” file inside the extracted folder.
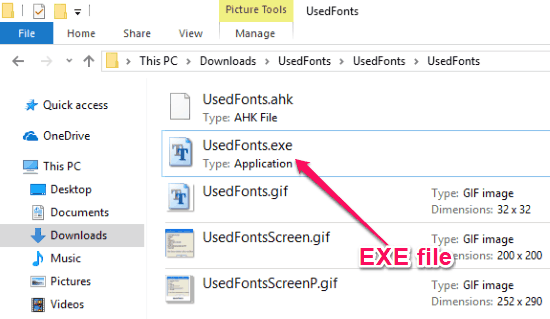
Now, to see the list of fonts used in a Word document, simply double-click on the EXE file. Then it will ask you to select the source Word document from your PC. Remember, it only supports DOC file.
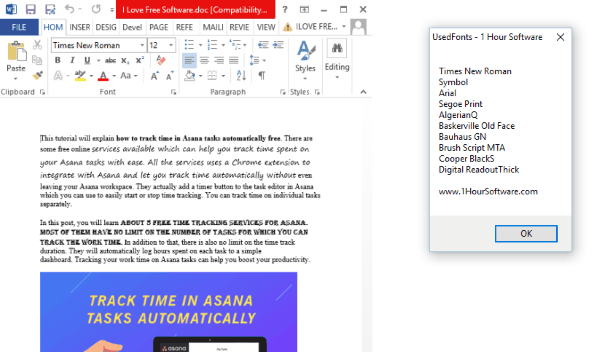
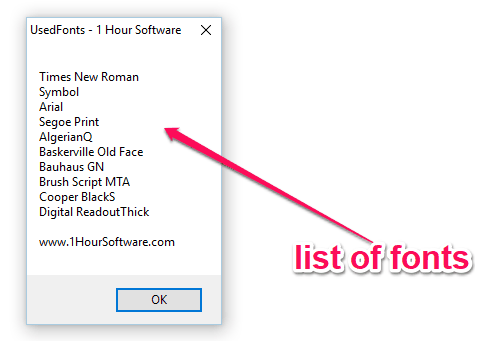
As soon as you do that, it will automatically analyze the text in the Word document and generate a list of fonts used in the document. You can see the list of fonts in a small popup window, as shown below.
Closing Words:
So, if you have been looking for a way to find out which fonts are used in a Word document, then this tutorial can be helpful for you. UsedFonts makes it super easy for you to do that. No Rocket Science required, as all you gotta do is select a Word file in this tool and the rest is done automatically. Go ahead try it out for free.
Get “UsedFonts” from here.
|
Editor Ratings: |
|
|
User Ratings: [Total: 1 Average: 4] |
|
| Home Page URL: | Click Here |
| Works With: | Windows |
| Free/Paid: | Free |
|
Tags: fonts |
22 free fonts
Related Styles
Cursive
Script
Handwriting
Sans Serif
Italic
Kids
Hand Drawn
Thin
Basic
French
Artsy
Craft
Dashed
Trace
Learning
Elementary
School
Kindergarten
Printing
Educational
Didactic
Instructional
Penmanship
Dotted
Lined
Ruled
German
Dots
Print Writing
Education
Circles
Upright
Dnealian
Adorable
Advertising
Commercial-use
Sort by
- Popular
- Trending
- Newest
- Name
Tracing Worksheets
by
Logominima
100% Free

3417 downloads
Trace
by
Kids Fonts
Personal Use Free

1.1 million downloads
Rainbow Colors
by
Misti’s Fonts
Personal Use Free

153.2k downloads
Print Clearly
by
Blue Vinyl
100% Free

Print Clearly
380.3k downloads
Cursif
by
Christophe Beaumale
100% Free

Regular
262.1k downloads
Dotline
by
Honey & Death
Personal Use Free

Regular
251.8k downloads
YBShadowTracer
by
YBFonts
Personal Use Free

57663 downloads
Penmanship Print
by
Richard Douglas
100% Free

128.9k downloads
Neal Font
by
Kids Fonts
Personal Use Free

120k downloads
LMS Spelling Bee
by
London’s Letters
Personal Use Free

91030 downloads
Jardotty
by
Christopher Jarman
Personal Use Free

98181 downloads
Ecolier Family
by
Jean Douteau
Personal Use Free

Regular
87429 downloads
National First Font Dotted
by
Roger White
100% Free

103k downloads
LA El 2
by
Schulshriften
Personal Use Free

67703 downloads
Mv Jadheedh Trace
by
Ibrahim Jadheedh Ahmed
100% Free

40266 downloads
1 to 15 of 22 Results
- 1
- 2
- Next
As a professional graphic designer, there’s one common typography error that just makes my brain go absolutely sideways. While there are plenty of design principles, understanding how to use fonts in your designs is important. In this post, I’m going to teach you how to use tracking and kerning so that your letters are always correctly spaced.
What is Tracking?
Tracking (not to be confused with Kerning, which we’ll get into later), is the the consistent increase or decrease of space between letters. Basically, it’s when you tell your designing program of choice (hopefully Photoshop or Illustrator) that you want all of your letters to have a degree of equal spacing between them.
Have you ever seen someone use a script-style font, but the letters aren’t even touching? This is the result of improper tracking. It’s an all too common error and it makes designs look terribly unpolished.
Here is an example using the script font Silver South by Set Sail Studios (which I think best represents why you need to be mindful of your tracking):
![]()
![]()
![]()
How to Adjust Tracking in Photoshop
Of course I’m not about to tell you what you’re doing wrong without explaining how to fix it. Here’s a step-by-step look at how to adjust your tracking using Photoshop.
Step 1 — Understanding the Photoshop Character Panel
The first thing you need to do is get acquainted with the Character Panel if you aren’t already. This panel has all of the settings that control anything typography related – choice of font, font size, kerning, tracking, etc. If you don’t see this setting in Photoshop, you can bring up the panel by selecting Window >> Character. It should look something like this:

-
Kerning Adjustment
-
Tracking Adjustment
Step 2 — Metrics vs Optical
Fonts are created with information already built into them – it’s how they know how to present themselves and what the spacing between the letters should look like. That’s what “Metrics” means – it’s the built in information based on what the font creator intended.
Optical is your design program’s best guess on what it thinks could look better… what it perceives would be more pleasing to the eye (like an optical illusion).


I realize that the difference is subtle, but there’s differences in spacing between these two examples. If you try it with different fonts for yourself, you’ll begin to identify those differences a bit more easily when comparing Metrics vs Optical back and forth for yourself.
Note: It’s not even that Metrics is really bad here – I’ve certainly seen much worse. Optical here ins’t perfect either – which you’ll begin to understand is you watch the video tutorial below.
Step 3 — When to use Metrics or Optical
If you’re using a handwritten/scrip font such as Silver South by Set Sail Studios, you’ll find that it was designed for certain letters to be touching, while others aren’t. We’ll want to use Metrics because the correct information is already built into the font. This is how it normally looks.

In the case of a font with a lot of flourish and touching letters, you’ll want to stick with Metrics because the spacing reasoning between those letters is already built into it. Optical is best used on Sans Serif fonts like Poppins or Open Sans.
Step 4 — Adjusting the Tracking
This is one of those situations where it’s best that I show, rather than tell. Below is a video that covers everything I just explained above + shows you the same example of bad Tracking and how you can fix your settings in Photoshop.
Taa-daa! It’s really this easy to fix your tracking and improve the quality of your Typography. It makes for a cleaner look that is more polished and professional.

Want to learn more about Typography?
Typography is at the heart of excellent graphic design, and knowing how to implement it properly will help you communicate your offers effectively to your audience and lead to more sales. Join my 7,000+ students in this course and find out how to improve your graphics.
What is Kerning?
Kerning is often confused with tracking (and truthfully, even some seasoned designers use the terminology incorrectly). Kerning is the adjustment of space between individual letters to achieve a visually pleasing result. Basically, it’s when you have a font that is otherwise proportioned, but the letters need some adjustment in order to make them look better.
There are sets of letters that are often seen together that may look strange without an adjustment to the kerning. One excellent example of this would be “VA”.
This is super common with both Serif and Sans Serif fonts, so let’s look at some examples.


I have chosen to showcase Lora and Poppins – two totally free Google fonts that you can use commercially for your business. Both are set to “Metrics”, which means we’re viewing them exactly as they were designed.
You’ll notice that the serif font Lora has a bit better of an adjustment. It’s got some minimum built-in kerning that accounts for the VA letter pairing. You can see how the top tip of the V and the bottom tip of the A overlap.
However, Poppins doesn’t have the same information built in, and you can see that there’s a wide gap between the letters. If you were to draw a box around each letter, you’d see that the spacing between the letters is actually based on where each letter begins and ends.
Unfortunately, a lot of fonts don’t include minimal built-in kerning, and some none at all. That’s why these fonts need manual adjustments.
Some premium fonts won’t have the problem that these two fonts have (you can get better fonts on Creative Market), because designers will put in more time to create Kern-pair specifications that address common issues such as “VA”, “WA”, or “Fa”.
How to Adjust Kerning in Photoshop
You may find that small adjustments need to be made, even with the best of intentions of Photoshop. You can individually adjust the kerning of the letters to create more visually appealing typography that looks intentional.
Step 1 — Set the Character Panel to Optical
You’ve already seen this panel, but let’s talk about it some more.
Depending on what type of font you’ll be working with, you’ll chose to use either Metrics to Optical. But for the purpose of this tutorial, I’m going to use a Sans Serif font in my tutorial, so I’m going to set it to Optical – it will provide me with a faster solution to my kerning problems.
I’ll still use the tracking adjustment box (I realize that’s confusing, and probably why so many people mix up the words), to adjust the kerning manually.
-
Kerning Adjustment
-
Tracking Adjustment
Step 2 — Identify problematic spacing
I’m going to use the word “AVIATOR” (yikes, you can even see the problem with it written out in a blog post!). It’s just a classic example of the need for Kerning.


I’ve blocked off the spacing between the letters to show you the immediate problem areas. Since this is set to Metrics, we know that this is what the creator intended, and to be fair… they can’t possibly account for every situation you’ll encounter when you design graphics.
We know there’s a problem with the A and V despite it seeming like in terms of measurement, that they are s tiny bit closer together than other letters in the word. That’s just a thing you have to learn, familiarize yourself with, and pay attention to when you’re looking to polish your typography.
Step 3 — Try switching the Optical settings
When you’re using a Serif or Sans Serif font, just switching to Optical can often make a big difference. It’s your design program’s way of trying to make sense of what’s there and changing the spacing to something it thinks will be more visually appealing.
It doesn’t always get it quite right, and you’ll still likely find yourself spending the time to make manual adjustments… especially if there’s an “AV” involved.
Step 4 — Manually Adjust Kerning
Again, this is best shown in video format. The video below will explain everything again, plus show you how to highlight letters and adjust the kerning manually in Photoshop.
“But Kimi, I use Canva…”
Wherever you are, you probably just heard my long, drawn-out sigh.
I get it. Canva seems a lot less scary than Photoshop or Illustrator. There’s less buttons and there’s a bunch of boxes and other design elements already made for you. Even as a professional, I understand the appeal of tools that seem easier to use.
Having said that, it’s features like manual kerning in Adobe programs that make it a more professional tool. Canva has a built in metric tracking system, but doesn’t offer the ability to kern. And while that may not be a big deal in a lot of situations, it never fails that I see someone using a script/handwritten/brush font in Canva to create graphics – with glaringly incorrect letter-spacing.
It’s my solemn duty as a professional graphic designer to encourage you to try Photoshop for yourself. In addition to being cheaper than Canva (seriously… it’s only $10/mo and you get Lightroom with it too!), as a whole, the usability isn’t all that different. It just seems kind of scary because there’s a lot more buttons to play with.
Did you know? Free elements in Canva may not be used commercially. So all of your Pinterest graphics, business cards, and logos that utilize Canva’s elements are prohibited by its terms of use.

Get the right tools for design
Adobe Creative Cloud is the industry standard for design, and it’s what you should be using if you want to create professional graphics. Whether you stick with Photoshop or subscribe to the entire creative suite, you can’t go wrong with Adobe.
Are you using correct tracking and kerning?
Not everyone has the designer eye for it, but it’s an important element of design. What graphics will you improve thanks to this tutorial?

Don’t forget to Pin it!
If you enjoyed the content of this blog post and found it valuable, please save it to Pinterest so that other people can read and learn too!
Как сделать track changes в word?
- Откройте документ, который нужно отредактировать.
Для этого дважды щелкните по документу Microsoft Word или откройте программу Microsoft Word, а затем выберите документ на странице «Последние документы».
- Прежде чем вносить изменения в документ, сделайте его копию и редактируйте ее, а не исходный документ (на случай, если что-то пойдет не так).
-
Перейдите на вкладку Рецензирование. Она находится на синей ленте в верхней части документа. Откроется панель инструментов, которые помогут отредактировать документ.
-
Нажмите Исправления. Эта опция находится посередине верхней панели инструментов. Так вы включите функцию «Исправления» в Microsoft Word.
-
Откройте выпадающий список рядом с Исправления.
В списке находятся следующие опции:
- Исправления: добавленный или удаленный текст будет обозначен красными линиями на полях; другие изменения не отображаются.
- Все исправления: все изменения, внесенные в документ, будут обозначены красным шрифтом и комментариями на полях.
- Без исправлений: обозначения исправлений будут скрыты, а документ отобразится в финальном виде (после внесения всех изменений).
- Оригинал: отобразится исходный документ без изменений.
-
Нажмите Все изменения. Будут обозначены все изменения (красным шрифтом), которые были внесены в исходный текст (черный шрифт).
- Удалите текст.
Если удалить один символ или целый абзац, они исчезнут из документа. На полях справа появится красное поле с примечанием « Удалено: ».
- Если вы измените формат всего документа (например, поменяете шрифт), это также будет обозначено на полях справа.
- Введите новый текст.
Любой текст, который вы добавите в документ, будет отображаться красным шрифтом.
- Если вы перейдете на новую строку (для этого нажмите ↵ Enter или ⏎ Return), на полях слева появится серая вертикальная черта, обозначающая новую строку.
- Нажмите Создать примечание, чтобы добавить примечание к выделенному тексту.
Значок этой опции выглядит как текстовое облачко со знаком «плюс» и находится в верхней части окна. На полях справа откроется поле, в которое можно ввести примечание.
- Щелкните по любой точке документа вне поля для примечания, чтобы сохранить примечание.
- Примите или отклоните исправления.
Для этого нажмите «Принять» или «Отклонить», чтобы согласиться или не согласиться с обозначенными исправлениями; также можно нажать «▼» под опцией «Принять» или «Отклонить», а затем нажать «Все исправления», чтобы согласиться или не согласиться со всеми изменениями, внесенными в документ. При этом будут удалены все обозначения исправлений, такие как красный шрифт и поля с примечаниями.
- Также документ можно сохранить с обозначениями исправлений; в этом случае пропустите этот шаг.
-
Сохраните документ. Для этого зажмите Ctrl (или ⌘ Command в Mac OS X), а затем нажмите S. Документ будет сохранен с внесенными изменениями.
- В некоторых почтовых клиентах удаленный текст отображается черным шрифтом с перечеркивающей красной линией.
- Если перед редактированием документа вы не сделаете его копию, это может привести к потере содержимого исходного документа.
Информация о статье
Эту страницу просматривали 13 979 раза.
Была ли эта статья полезной?
Текстовый редактор Microsoft Word — это не только отличный инструмент для набора и форматирования текста, но и удобнейшее средство его дальнейшего исправления и правки. Об этой истинно «редакторской» функции знают немногие, поэтому мы решили раскрыть вам этот секрет.
Проще всего править текст на бумаге — возразят мне многие читатели. Действительно, взяв красную ручку всегда можно зачеркнуть несуразную фразу, а сверху написать что-то получше. Можно оставить злорадные комментарии, показав автору текста его неправоту. А самое главное: при такой правке исходный текст не меняется, и автору самому решать, принимать исправления или нет. Но такие исправления не отправишь по электронной почте, и существуют они в единственном виде.
Воспользовавшись инструментами рецензирования текстового редактора Word, вы сможете точно так же вставлять комментарии практически красной ручкой на полях и исправлять то, что написал автор, зачеркивая исходный текст. Но при этом документ со всеми исправлениями и пометками будет существовать в электронном виде, а значит, будет доступен для пересылки по электронной почте. А автор документа, изучив исправления, буквально одним нажатием кнопки может их принять, а не исправлять каждую пометку вручную, или же, наоборот, отклонить, оставшись при своем мнении.
Инструменты для вставки пометок и исправлений размещены на панели инструментов «Рецензирование». Отобразить ее можно, выбрав «Вид (View) -> Панели инструментов (Toolbars) -> Рецензирование (Reviewing)».
Если вдруг, читая текст, у вас возникло желание прокомментировать особо понравившийся или наоборот, неудачный момент, вы можете воспользоваться инструментом «Примечание». Для этого выделите нужный фрагмент текста и нажмите кнопку «Добавить примечание» (Insert Comment) на панели инструментов. В поле справа от основного текста появится окно для ввода примечания. После того, как вы набрали текст, нажмите мышкой в стороне от окна для ввода примечания.
Поле для ввода примечания отобразиться справа от текста документа.
После сохранения и повторного открытия текста, на экране фрагмент, у которого есть примечание, будет выделен другим цветом. А если навести на него мышку, можно увидеть текст примечания, его автора и время его добавления. Перемещаться между добавленными примечаниями удобно с помощью специальных кнопок, размещенных на панели инструментов «Рецензирование».
Просмотр текста примечания
Следующим инструментом, доступным для редактирования, является режим исправления.
При включении этого режима записываются все изменения, вносимые в документ. Причем, как изменения, касающиеся его содержимого (будет записано удаление и добавление текста), так и изменения формата документа (изменение шрифтов, параметров страниц и т. д.). Перейти в режим записи исправлений очень просто — достаточно дважды щелкнуть мышкой по кнопке с надписью «ИСПР», которая размещена в строке состояния текстового редактора. Второй способ: нажать на кнопку «Исправления» (Track Changes) на панели инструментов «Рецензирование».
В зависимости от настроек Word, исправления будут либо отображаться другим цветом, либо не отображаться вовсе, но обязательно рядом с каждым исправлением будет размещено примечание, в котором и будет указано, какие именно изменения были внесены в документ.
Все исправления и примечания наглядно отображаются на правом поле документа
Для просмотра всех исправлений следует отобразить на экране окно просмотра изменений. Для этого необходимо нажать кнопку «Окно просмотра» на панели инструментов «Рецензирование». В нижней части экрана отобразятся все внесенные в документ исправления и примечания. Используя это окно можно по очереди выделять в тексте документа добавленные примечания и исправления. Для этого надо дважды щелкнуть мышкой на линии, отделяющей одно примечание от другого.
Следующим шагом после просмотра внесенных изменений будет принятие решения относительно их сохранения. Для этого предназначены списки «Принять выделенное исправление» и «Отклонить выделенное исправление». Нажав соответствующую кнопку можно раскрыть список и выбрать нужный пункт, с помощью которого можно принять или отклонить это конкретное исправление. А выбрав пункт «Отклонить все изменения» или «Применить все изменения» можно принять решение относительно правки всего документа.

Инструмент «Исправления» в Word нужен для отслеживания изменений, сделанных в документе. Он особенно полезен при совместной работе над документом с другими пользователями. Иногда необходимо скопировать текст в другой документ, сохранив историю исправлений. Эта задача кажется простой, но на деле она сложнее, чем просто скопировать и вставить текст.
Сперва выделите текст с изменениями.
Первый секрет копирования исправлений вместе с текстом: нужно обязательно отключить опцию Track Changes (Исправления). Для этого откройте вкладку Review (Рецензирование). Если в разделе Tracking (Запись исправлений) кнопка Track Changes (Исправления) подсвечена синим, это значит, что опция включена. Нажмите нижнюю часть этой кнопки и выберите из выпадающего меню пункт Track Changes (Исправления). Теперь, когда опция отключена, у кнопки нет подсветки.
Примечание: Если не отключить функцию Track Changes (Исправления), Word решит, что Вы хотите скопировать текст в таком виде, как если бы все изменения были приняты, и исправления применятся.
Нажмите Ctrl+C, чтобы скопировать текст. Создайте новый документ, в него мы вставим скопированный текст.
Примечание: Текст можно вставить в любой существующий документ Word.
Откройте вкладку File (Файл).

В левой части окна нажмите New (Создать).
В разделе New (Создать) кликните по Blank document (Новый документ).

Второй секрет успешного сохранения исправлений в скопированном тексте: отключите опцию Track Changes (Исправления) в том документе, куда собираетесь вставить скопированный текст. Затем нажмите Ctrl+V, и скопированный текст вставится вместе с исправлениями.

Для копирования текста можно воспользоваться инструментом «Копилка», что особенно удобно, если Вы копируете несколько несмежных блоков текста и/или изображения.
Урок подготовлен для Вас командой сайта office-guru.ru Источник: /> Перевела: Ольга Гелих
Правила перепечаткиЕще больше уроков по Microsoft Word
Оцените качество статьи. Нам важно ваше мнение:
Track changes in Word
Word for Office 365 Word 2019 Word 2016 Word 2013 Word 2010 Word 2007 More… Less
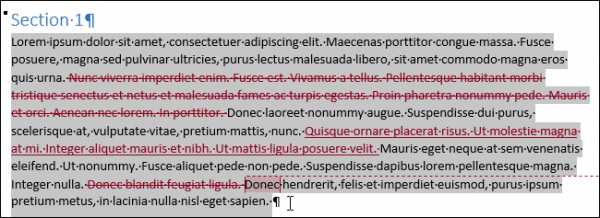
Turning on Track Changes gives you and your coworkers a way to make changes that are easy to spot. The changes are like suggestions that you can review, and then remove them or make them permanent.
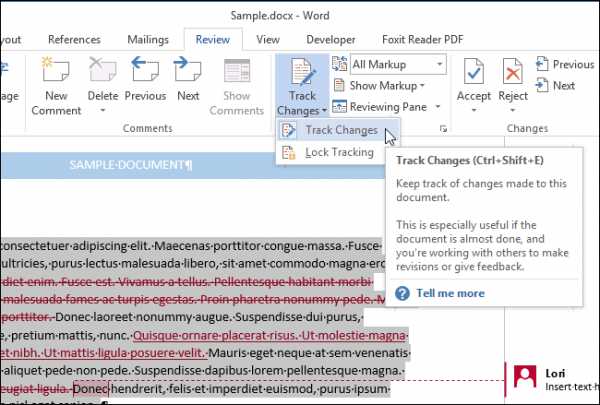
Turn Track Changes on and off by going to Review > Track Changes.
-
When it’s turned on, deletions are marked with a strikethrough, and additions are marked with an underline. Different authors’ changes are indicated with different colors.
-
When it’s turned off, Word stops marking changes, but the colored underlines and strikethrough are still in the document.
To review the changes in your document, go to Review > Tracking > Display for Review.
-
To review the changes, indicated by a red line in the margin, choose Simple Markup.
-
For a detailed view of the changes, choose All Markup.
-
For a preview of how the document will look if you make all the suggested changes permanent, choose No Markup.
-
To view the original document as if all the suggested changes were removed, choose Original.
-
On the Review tab, in the Tracking group, choose Track Changes.
The Track Changes is highlighted, as shown in the following image.
Note: If the Track Changes feature is unavailable, you might have to turn off document protection. On the Review tab, in the Protect group, click Restrict Editing, and then click Stop Protection at the bottom of the Protect Document task pane. (You might need to know the document password.)
You also can add a track changes indicator to the status bar.
-
Right-click the status bar and choose Track Changes.
Note: You now can use the Track Changes indicator on the status bar to turn on or turn off Track Changes.
When you turn off Track Changes, you can revise the document without marking what has changed. Turning off the feature, however, doesn’t remove any changes that have already been tracked.
-
On the Review tab, in the Tracking group, choose Track Changes button.
The Track Changes button no longer is highlighted as shown in the following image.
Important: To remove tracked changes, use the Accept and Reject commands on the Review tab in the Changes group.
What would you like to do?
Display all changes inline
The default in Word is to display deletions and comments in balloons in the margins of the document. However, you can change the display to show comments inline and all deletions with strikethroughs instead of inside balloons.
-
On the Review tab, in the Tracking group, click Show Markup.
-
Point to Balloons, and then click Show All Revisions Inline to show deletions with strikethroughs and comments inline.
Display comments in ScreenTips instead of balloons
The default in Word is to display deletions and comments in balloons in the margins of the document. However, you can change the display to show comments inline. Inline comments can be viewed when you rest your pointer on the comment indicator.
-
On the Review tab, in the Tracking group, click Show Markup.
-
Point to Balloons, and then click Show All Revisions Inline to show deletions with strikethroughs and comments inline.
-
Rest the pointer on a comment in the document. The comment appears in a ScreenTip.
Display changes by type of edit or by reviewer
-
On the Review tab, in the Tracking group, click Show Markup.
-
Do one of the following:
-
Click to select the type of change that you want to display. For example, click Comments or Insertions and Deletions. The check mark next to the item indicates that the item is selected.
-
Important: Even if you hide a type of markup by clearing it on the Show Markup menu, the markup automatically appears each time the document is opened by you or a reviewer.
Point to Reviewers, and then click to clear all check boxes except the ones next to the names of the reviewers whose changes and comments you want to show.
Note: To select or clear all check boxes for all reviewers in the list, click All Reviewers.
Display changes and comments for specific reviewers
An editor or reviewer usually wants to view a document as it will appear after their changes are incorporated. This procedure gives an editor or reviewer the opportunity to see how the document will look with the changes.
-
On the Review tab, in the Tracking group, click the arrow in the Display for Review box, and then choose the option that you want.
-
Final Showing Markup This view displays the final document with all tracked changes and comments showing. This is the default view for all documents opened in Word.
-
Final This view displays the document with all changes incorporated into the text and without tracked changes showing. However, any tracked changes or comments that have not been accepted, rejected, or deleted remain in the document.
-
Original Showing Markup This view displays the original text with tracked changes and comments.
-
Original This view displays the original document without tracked changes and comments showing. However, any tracked changes or comments in the document that have not been accepted, rejected, or deleted remain in the document.
-
Note: If you want to see comments and tracked changes in balloons, you must be in Print Layout view or Web Layout view.
Hide tracked changes and comments when printing
Hiding changes does not remove changes from the document. You must use the Accept and Reject commands in the Changes group to remove markup from your document.
-
Click the File tab.
-
Click Print.
-
Under Settings, click the arrow next to Print All Pages.
-
Click Print Markup to clear the check mark.
What would you like to do?
Review a summary of tracked changes
The Reviewing Pane is a handy tool for making sure that all tracked changes have been removed from your document and won’t show up to others who might view your document. The summary section at the top of the Reviewing Pane displays the exact number of visible tracked changes and comments that remain in your document.
The Reviewing Pane also allows you to read long comments that don’t fit within a comment bubble.
Note: The Reviewing Pane, unlike the document or the comment bubbles, is not the best tool for making changes to your document. Instead of deleting text or comments or making other changes in the Reviewing Pane, make all editorial changes in the document. The changes will then be visible in the Reviewing Pane.
-
On the Review tab, in the Tracking group, choose one of the following:
-
To view the summary at the side of your screen, choose Reviewing Pane.
-
To view the summary across the bottom of your screen, in the Reviewing Pane list, choose Reviewing Pane Horizontal.
-
-
Choose Show Detailed Summary to view the number of each type of change.
Review each tracked change and comment in sequence
-
On the Review tab, in the Changes group, click Next or Previous.
-
Do one of the following:
-
In the Changes group, choose Accept.
-
In the Changes group, choose Reject.
-
In the Comments group, choose Delete.
-
-
Accept or reject changes and delete comments until there are no more tracked changes or comments in your document, and then confirm all tracked changes are accepted or rejected and that all comments are deleted.
-
On the Review tab, in the Tracking group, choose Reviewing Pane.
Note: The summary section at the top of the Reviewing Pane displays the exact number of tracked changes and comments that remain in your document.
Review changes by type of edit or by a specific reviewer
-
On the Review tab, in the Tracking group, do one of the following:
-
In the Show Markup list, clear all check boxes except for those next to the types of changes that you want to review.
-
In the Show Markup list, choose Reviewers, and then clear all check boxes except those next to the names of the reviewers whose changes you want to see.
-
In the Show Markup list, choose All Reviewers to select or clear the check boxes for all reviewers in the list
-
-
On the Review tab, in the Changes group, choose Next or Previous.
-
Do one of the following:
-
In the Changes group, choose Accept.
-
In the Changes group, choose Reject.
-
Accept all changes at the same time
-
On the Review tab, in the Changes group, choose Next or Previous.
-
In the Accept list, choose Accept All Changes in Document.
Reject all changes at the same time
-
On the Review tab, in the Changes group, choose Next or Previous.
-
In the Reject list, choose Reject All Changes in Document.
Delete comments
-
Click the comment.
-
On the Review tab, in the Comments group, click Delete.
To delete all comments at once, click the arrow below Delete, and then click Delete All Comments in Document.
What would you like to do?
You can easily make and view tracked changes and comments while you work in a document. By default, Microsoft Office Word 2007 uses balloons to display deletions, comments, formatting changes, and content that has moved. If you want to see all your changes inline, you can change settings so that tracked changes and comments display the way you want.
Balloons (1) show formatting changes, comments, and deletions.
Note: To prevent you from inadvertently distributing documents that contain tracked changes and comments, Word displays tracked changes and comments by default. Final Showing Markup is the default option in the Display for Review box.
-
Open the document that you want to revise.
-
On the Review tab, in the Tracking group, click the Track Changes button. The Track changes button becomes highlighted, as shown in the following figure.
-
Optional. Add a track changes indicator to the status bar. Right-click the status bar, and click Track Changes. Click the Track Changes indicator on the status bar to turn on or turn off track changes.
-
Make the changes that you want by inserting, deleting, moving, or formatting text or graphics. You can also add comments.
Note: If you use change tracking and then save your document as a Web page (.htm or .html), tracked changes will appear on your Web page.
To turn Track changes off:
-
On the Review tab, in the Tracking group, click the Track Changes button.
The Track Changes button is no longer highlighted, as shown in the following image.
If you customized the status bar to include a track changes indicator, clicking Track Changes in the Tracking group will also turn off the indicator in the status bar.
Note: Turning off change tracking does not eliminate the tracked changes in your document. To ensure that there are no more tracked changes in your document, be sure that all changes are showing, and then use the Accept or Reject commands for each change in the document.
Be aware that there are various ways to hide tracked changes or comments, but all the changes that were made while the Track Changes feature was turned on and all the comments that were inserted remain part of the document until they are accepted or rejected (or, in the case of comments, deleted).
Hiding tracked changes—for example, under Show Markup, clearing the check mark for Insertions and Deletions—doesn’t delete existing tracked changes or comments from the document. Instead, hiding tracked changes enables you to view the document without having to wade through crossed-out text, underlining, and balloons.
There are several ways to hide tracked changes and comments, which may lead you to think that they are not in the document. For example:
-
Display for Review box On the Review tab, in the Tracking group, the Display for Review box shows you what viewing mode you are in. It also provides additional options for viewing your document. If you click Final or Original, tracked changes and comments are hidden. To display them, select Final Showing Markup or Original Showing Markup.
-
Show Markup On the Review tab, in the Tracking group, you can use the Show Markup list to hide comments and tracked changes. Items that are marked with a check mark under Show Markup are displayed; items without a check mark are hidden. To display an item, such as Insertions and Deletions, click it on the Show Markup menu.
The default in Word is to display deletions and comments in balloons in the margins of the document. However, you can change the display to show comments inline and all deletions as crossed out instead of inside balloons.
-
On the Review tab, in the Tracking group, click Balloons.
-
Click Show All Revisions Inline to show deletions as crossed out and comments inline.
There are several options available for changing how tracked changes (markup) is displayed.
-
You can change the color and other formatting that Word uses to mark changed text and graphics by clicking the arrow next to Track Changes and then clicking Change Tracking Options.
Note: While you can’t assign specific colors for changes made by different reviewers, each reviewer’s changes appear as a different color in the document so that you can track multiple reviewers.
-
You can view all changes, including deletions, inline instead of inside balloons that appear in the margins of your document. To show changes inline, in the Tracking group, click Balloons, and then click Show all revisions inline.
When you click Show all revisions inline, all the revisions and comments in the document appear inline.
-
To highlight the margin area where all balloons appear, under Show Markup, click Markup Area Highlight.
-
On the Review tab, in the Tracking group, click the arrow next to Show Markup.
-
Do one of the following:
-
Select the type of change that you want to display.
Note: Even if you hide a type of markup by clearing it on the Show Markup menu, the markup automatically appears each time the document is opened by you or a reviewer.
-
Point to Reviewers, and then click to clear all check boxes except the ones next to the names of the reviewers whose changes and comments you want to show.
Note: To select or clear all check boxes for all reviewers in the list, click All Reviewers.
-
You can use the Display for Review list, in the Tracking group, to view a document at various stages of the edit process. Each of the four options in the list provides a different view of the document. Final Showing Markup is the default when you open any document.
-
Final Showing Markup This view displays the final document with all tracked changes and comments showing. This is the default view for all documents opened in Word.
-
Final This view displays the document with all changes incorporated into the text and without tracked changes showing. However, any tracked changes or comments that have not been accepted, rejected, or deleted remain in the document.
-
Original Showing Markup This view displays the original text with tracked changes and comments.
-
Original This view displays the original document without tracked changes and comments showing. However, any tracked changes or comments in the document that have not been accepted, rejected, or deleted remain in the document.
The default in Word is to display deletions and comments in balloons in the margins of the document. However, you can change the display to show comments inline. Inline comments can be viewed when you rest your pointer on the comment indicator.
-
On the Review tab, in the Tracking group, click Balloons.
-
Click Show All Revisions Inline to show deletions as crossed out and comments inline.
-
Rest the pointer on a comment in the document. The comment appears in a ScreenTip.
To learn more about comments, see Insert and delete comments.
-
On the Review tab, in the Changes group, click Next or Previous.
-
Do one of the following:
-
In the Changes group, choose Accept.
-
In the Changes group, choose Reject.
-
In the Comments group, choose Delete.
-
-
Accept or reject changes and delete comments until there are no more tracked changes or comments in your document, and then confirm all tracked changes are accepted or rejected and that all comments are deleted.
-
On the Review tab, in the Tracking group, choose Reviewing Pane.
Note: The summary section at the top of the Reviewing Pane displays the exact number of tracked changes and comments that remain in your document.
-
On the Review tab, in the Changes group, choose Next or Previous.
-
Do one of the following:
In the Accept list, choose Accept All Changes in Document.
In the Reject list, choose Reject All Changes in Document.
Office Word 2007 provides a feature called Document Inspector that allows you to check any document for tracked changes, comments, hidden text, and other personal information. To check a document:
-
Open the document you want to inspect for tracked changes and comments.
-
Click the Microsoft Office Button , point to Prepare, and then click Inspect Document.
-
In the Document Inspector dialog box, click Inspect.
-
Review the inspection results. If Document Inspector finds comments and tracked changes, you are prompted to click Remove All next to Comments, Revisions, Versions, and Annotations.
-
Click Reinspect or Close.
Before you print the document, switch to Print Layout view and display the tracked changes and comments the way that you want them to appear in the printed document. You have several options.
-
Print showing all markup On the Review tab, in the Tracking group, click Show Markup.
Note: Clicking Show Markup displays or hides all markup in the document for selected reviewers. When you display all markup, all types of markup are selected on the Show Markup menu.
-
Print showing changes and comments by type or reviewer On the Review tab, in the Tracking group, click Show Markup, and then select the type of change that you want to display.
-
Print changes and comments for an editor or other reviewer On the Review tab, in the Tracking group, in the Display for Review box, click Final Showing Markup.
When the markup appears the way that you want it to, you are ready to print the document.
-
Click the Microsoft Office Button , and then click Print.
-
In the Print dialog box, in the Print what box, click Document showing markup, and then click OK.
Notes:
-
By default, Microsoft Word chooses the zoom level and page orientation to best display the tracked changes in your printed document.
-
If balloons are turned on, the document will shrink to fit the balloons on the printed page. To make your printed page readable, you can turn off balloons by clicking Balloons in the Tracking group and then clicking Show all revisions inline. You can also set the page layout to landscape to print the balloons and the text in a more readable format. On the Page Layout tab, under Page Setup, click Orientation, and then click Landscape.
-
Change the layout for printing tracked changes
-
On the Review tab, in the Tracking group, click the arrow next to Track Changes, and then click Change Tracking Options.
-
Under Balloons, in the Paper orientation in printing list, click one of the following:
-
Auto When you select this option, Word decides the orientation that will provide the best layout for your document.
-
Preserve When you select this option, Word prints the document with the orientation that is specified in the Page Setup dialog box.
-
Force Landscape When you select this option, the orientation is landscape and the most room is allowed for balloons.
-
Print a list of changes made to a document
-
Click the Microsoft Office Button , and then click Print.
-
In the Print what box, click List of markup.
Hiding changes does not remove changes from the document. You must use the Accept and Reject commands in the Changes group to remove markup from your document.
-
Click the Microsoft Office Button , and then click Print.
-
In the Print what box, click Document (instead of Document showing markup).
Insert or delete a comment
Expand your Office skills Explore training
Track changes in Word
Word for Office 365 Word 2019 Word 2016 Word 2013 Word 2010 Word 2007 More… Less
Turning on Track Changes gives you and your coworkers a way to make changes that are easy to spot. The changes are like suggestions that you can review, and then remove them or make them permanent.
Turn Track Changes on and off by going to Review > Track Changes.
-
When it’s turned on, deletions are marked with a strikethrough, and additions are marked with an underline. Different authors’ changes are indicated with different colors.
-
When it’s turned off, Word stops marking changes, but the colored underlines and strikethrough are still in the document.
To review the changes in your document, go to Review > Tracking > Display for Review.
-
To review the changes, indicated by a red line in the margin, choose Simple Markup.
-
For a detailed view of the changes, choose All Markup.
-
For a preview of how the document will look if you make all the suggested changes permanent, choose No Markup.
-
To view the original document as if all the suggested changes were removed, choose Original.
-
On the Review tab, in the Tracking group, choose Track Changes.
The Track Changes is highlighted, as shown in the following image.
Note: If the Track Changes feature is unavailable, you might have to turn off document protection. On the Review tab, in the Protect group, click Restrict Editing, and then click Stop Protection at the bottom of the Protect Document task pane. (You might need to know the document password.)
You also can add a track changes indicator to the status bar.
-
Right-click the status bar and choose Track Changes.
Note: You now can use the Track Changes indicator on the status bar to turn on or turn off Track Changes.
When you turn off Track Changes, you can revise the document without marking what has changed. Turning off the feature, however, doesn’t remove any changes that have already been tracked.
-
On the Review tab, in the Tracking group, choose Track Changes button.
The Track Changes button no longer is highlighted as shown in the following image.
Important: To remove tracked changes, use the Accept and Reject commands on the Review tab in the Changes group.
What would you like to do?
Display all changes inline
The default in Word is to display deletions and comments in balloons in the margins of the document. However, you can change the display to show comments inline and all deletions with strikethroughs instead of inside balloons.
-
On the Review tab, in the Tracking group, click Show Markup.
-
Point to Balloons, and then click Show All Revisions Inline to show deletions with strikethroughs and comments inline.
Display comments in ScreenTips instead of balloons
The default in Word is to display deletions and comments in balloons in the margins of the document. However, you can change the display to show comments inline. Inline comments can be viewed when you rest your pointer on the comment indicator.
-
On the Review tab, in the Tracking group, click Show Markup.
-
Point to Balloons, and then click Show All Revisions Inline to show deletions with strikethroughs and comments inline.
-
Rest the pointer on a comment in the document. The comment appears in a ScreenTip.
Display changes by type of edit or by reviewer
-
On the Review tab, in the Tracking group, click Show Markup.
-
Do one of the following:
-
Click to select the type of change that you want to display. For example, click Comments or Insertions and Deletions. The check mark next to the item indicates that the item is selected.
-
Important: Even if you hide a type of markup by clearing it on the Show Markup menu, the markup automatically appears each time the document is opened by you or a reviewer.
Point to Reviewers, and then click to clear all check boxes except the ones next to the names of the reviewers whose changes and comments you want to show.
Note: To select or clear all check boxes for all reviewers in the list, click All Reviewers.
Display changes and comments for specific reviewers
An editor or reviewer usually wants to view a document as it will appear after their changes are incorporated. This procedure gives an editor or reviewer the opportunity to see how the document will look with the changes.
-
On the Review tab, in the Tracking group, click the arrow in the Display for Review box, and then choose the option that you want.
-
Final Showing Markup This view displays the final document with all tracked changes and comments showing. This is the default view for all documents opened in Word.
-
Final This view displays the document with all changes incorporated into the text and without tracked changes showing. However, any tracked changes or comments that have not been accepted, rejected, or deleted remain in the document.
-
Original Showing Markup This view displays the original text with tracked changes and comments.
-
Original This view displays the original document without tracked changes and comments showing. However, any tracked changes or comments in the document that have not been accepted, rejected, or deleted remain in the document.
-
Note: If you want to see comments and tracked changes in balloons, you must be in Print Layout view or Web Layout view.
Hide tracked changes and comments when printing
Hiding changes does not remove changes from the document. You must use the Accept and Reject commands in the Changes group to remove markup from your document.
-
Click the File tab.
-
Click Print.
-
Under Settings, click the arrow next to Print All Pages.
-
Click Print Markup to clear the check mark.
What would you like to do?
Review a summary of tracked changes
The Reviewing Pane is a handy tool for making sure that all tracked changes have been removed from your document and won’t show up to others who might view your document. The summary section at the top of the Reviewing Pane displays the exact number of visible tracked changes and comments that remain in your document.
The Reviewing Pane also allows you to read long comments that don’t fit within a comment bubble.
Note: The Reviewing Pane, unlike the document or the comment bubbles, is not the best tool for making changes to your document. Instead of deleting text or comments or making other changes in the Reviewing Pane, make all editorial changes in the document. The changes will then be visible in the Reviewing Pane.
-
On the Review tab, in the Tracking group, choose one of the following:
-
To view the summary at the side of your screen, choose Reviewing Pane.
-
To view the summary across the bottom of your screen, in the Reviewing Pane list, choose Reviewing Pane Horizontal.
-
-
Choose Show Detailed Summary to view the number of each type of change.
Review each tracked change and comment in sequence
-
On the Review tab, in the Changes group, click Next or Previous.
-
Do one of the following:
-
In the Changes group, choose Accept.
-
In the Changes group, choose Reject.
-
In the Comments group, choose Delete.
-
-
Accept or reject changes and delete comments until there are no more tracked changes or comments in your document, and then confirm all tracked changes are accepted or rejected and that all comments are deleted.
-
On the Review tab, in the Tracking group, choose Reviewing Pane.
Note: The summary section at the top of the Reviewing Pane displays the exact number of tracked changes and comments that remain in your document.
Review changes by type of edit or by a specific reviewer
-
On the Review tab, in the Tracking group, do one of the following:
-
In the Show Markup list, clear all check boxes except for those next to the types of changes that you want to review.
-
In the Show Markup list, choose Reviewers, and then clear all check boxes except those next to the names of the reviewers whose changes you want to see.
-
In the Show Markup list, choose All Reviewers to select or clear the check boxes for all reviewers in the list
-
-
On the Review tab, in the Changes group, choose Next or Previous.
-
Do one of the following:
-
In the Changes group, choose Accept.
-
In the Changes group, choose Reject.
-
Accept all changes at the same time
-
On the Review tab, in the Changes group, choose Next or Previous.
-
In the Accept list, choose Accept All Changes in Document.
Reject all changes at the same time
-
On the Review tab, in the Changes group, choose Next or Previous.
-
In the Reject list, choose Reject All Changes in Document.
Delete comments
-
Click the comment.
-
On the Review tab, in the Comments group, click Delete.
To delete all comments at once, click the arrow below Delete, and then click Delete All Comments in Document.
What would you like to do?
You can easily make and view tracked changes and comments while you work in a document. By default, Microsoft Office Word 2007 uses balloons to display deletions, comments, formatting changes, and content that has moved. If you want to see all your changes inline, you can change settings so that tracked changes and comments display the way you want.
Balloons (1) show formatting changes, comments, and deletions.
Note: To prevent you from inadvertently distributing documents that contain tracked changes and comments, Word displays tracked changes and comments by default. Final Showing Markup is the default option in the Display for Review box.
-
Open the document that you want to revise.
-
On the Review tab, in the Tracking group, click the Track Changes button. The Track changes button becomes highlighted, as shown in the following figure.
-
Optional. Add a track changes indicator to the status bar. Right-click the status bar, and click Track Changes. Click the Track Changes indicator on the status bar to turn on or turn off track changes.
-
Make the changes that you want by inserting, deleting, moving, or formatting text or graphics. You can also add comments.
Note: If you use change tracking and then save your document as a Web page (.htm or .html), tracked changes will appear on your Web page.
To turn Track changes off:
-
On the Review tab, in the Tracking group, click the Track Changes button.
The Track Changes button is no longer highlighted, as shown in the following image.
If you customized the status bar to include a track changes indicator, clicking Track Changes in the Tracking group will also turn off the indicator in the status bar.
Note: Turning off change tracking does not eliminate the tracked changes in your document. To ensure that there are no more tracked changes in your document, be sure that all changes are showing, and then use the Accept or Reject commands for each change in the document.
Be aware that there are various ways to hide tracked changes or comments, but all the changes that were made while the Track Changes feature was turned on and all the comments that were inserted remain part of the document until they are accepted or rejected (or, in the case of comments, deleted).
Hiding tracked changes—for example, under Show Markup, clearing the check mark for Insertions and Deletions—doesn’t delete existing tracked changes or comments from the document. Instead, hiding tracked changes enables you to view the document without having to wade through crossed-out text, underlining, and balloons.
There are several ways to hide tracked changes and comments, which may lead you to think that they are not in the document. For example:
-
Display for Review box On the Review tab, in the Tracking group, the Display for Review box shows you what viewing mode you are in. It also provides additional options for viewing your document. If you click Final or Original, tracked changes and comments are hidden. To display them, select Final Showing Markup or Original Showing Markup.
-
Show Markup On the Review tab, in the Tracking group, you can use the Show Markup list to hide comments and tracked changes. Items that are marked with a check mark under Show Markup are displayed; items without a check mark are hidden. To display an item, such as Insertions and Deletions, click it on the Show Markup menu.
The default in Word is to display deletions and comments in balloons in the margins of the document. However, you can change the display to show comments inline and all deletions as crossed out instead of inside balloons.
-
On the Review tab, in the Tracking group, click Balloons.
-
Click Show All Revisions Inline to show deletions as crossed out and comments inline.
There are several options available for changing how tracked changes (markup) is displayed.
-
You can change the color and other formatting that Word uses to mark changed text and graphics by clicking the arrow next to Track Changes and then clicking Change Tracking Options.
Note: While you can’t assign specific colors for changes made by different reviewers, each reviewer’s changes appear as a different color in the document so that you can track multiple reviewers.
-
You can view all changes, including deletions, inline instead of inside balloons that appear in the margins of your document. To show changes inline, in the Tracking group, click Balloons, and then click Show all revisions inline.
When you click Show all revisions inline, all the revisions and comments in the document appear inline.
-
To highlight the margin area where all balloons appear, under Show Markup, click Markup Area Highlight.
-
On the Review tab, in the Tracking group, click the arrow next to Show Markup.
-
Do one of the following:
-
Select the type of change that you want to display.
Note: Even if you hide a type of markup by clearing it on the Show Markup menu, the markup automatically appears each time the document is opened by you or a reviewer.
-
Point to Reviewers, and then click to clear all check boxes except the ones next to the names of the reviewers whose changes and comments you want to show.
Note: To select or clear all check boxes for all reviewers in the list, click All Reviewers.
-
You can use the Display for Review list, in the Tracking group, to view a document at various stages of the edit process. Each of the four options in the list provides a different view of the document. Final Showing Markup is the default when you open any document.
-
Final Showing Markup This view displays the final document with all tracked changes and comments showing. This is the default view for all documents opened in Word.
-
Final This view displays the document with all changes incorporated into the text and without tracked changes showing. However, any tracked changes or comments that have not been accepted, rejected, or deleted remain in the document.
-
Original Showing Markup This view displays the original text with tracked changes and comments.
-
Original This view displays the original document without tracked changes and comments showing. However, any tracked changes or comments in the document that have not been accepted, rejected, or deleted remain in the document.
The default in Word is to display deletions and comments in balloons in the margins of the document. However, you can change the display to show comments inline. Inline comments can be viewed when you rest your pointer on the comment indicator.
-
On the Review tab, in the Tracking group, click Balloons.
-
Click Show All Revisions Inline to show deletions as crossed out and comments inline.
-
Rest the pointer on a comment in the document. The comment appears in a ScreenTip.
To learn more about comments, see Insert and delete comments.
-
On the Review tab, in the Changes group, click Next or Previous.
-
Do one of the following:
-
In the Changes group, choose Accept.
-
In the Changes group, choose Reject.
-
In the Comments group, choose Delete.
-
-
Accept or reject changes and delete comments until there are no more tracked changes or comments in your document, and then confirm all tracked changes are accepted or rejected and that all comments are deleted.
-
On the Review tab, in the Tracking group, choose Reviewing Pane.
Note: The summary section at the top of the Reviewing Pane displays the exact number of tracked changes and comments that remain in your document.
-
On the Review tab, in the Changes group, choose Next or Previous.
-
Do one of the following:
In the Accept list, choose Accept All Changes in Document.
In the Reject list, choose Reject All Changes in Document.
Office Word 2007 provides a feature called Document Inspector that allows you to check any document for tracked changes, comments, hidden text, and other personal information. To check a document:
-
Open the document you want to inspect for tracked changes and comments.
-
Click the Microsoft Office Button , point to Prepare, and then click Inspect Document.
-
In the Document Inspector dialog box, click Inspect.
-
Review the inspection results. If Document Inspector finds comments and tracked changes, you are prompted to click Remove All next to Comments, Revisions, Versions, and Annotations.
-
Click Reinspect or Close.
Before you print the document, switch to Print Layout view and display the tracked changes and comments the way that you want them to appear in the printed document. You have several options.
-
Print showing all markup On the Review tab, in the Tracking group, click Show Markup.
Note: Clicking Show Markup displays or hides all markup in the document for selected reviewers. When you display all markup, all types of markup are selected on the Show Markup menu.
-
Print showing changes and comments by type or reviewer On the Review tab, in the Tracking group, click Show Markup, and then select the type of change that you want to display.
-
Print changes and comments for an editor or other reviewer On the Review tab, in the Tracking group, in the Display for Review box, click Final Showing Markup.
When the markup appears the way that you want it to, you are ready to print the document.
-
Click the Microsoft Office Button , and then click Print.
-
In the Print dialog box, in the Print what box, click Document showing markup, and then click OK.
Notes:
-
By default, Microsoft Word chooses the zoom level and page orientation to best display the tracked changes in your printed document.
-
If balloons are turned on, the document will shrink to fit the balloons on the printed page. To make your printed page readable, you can turn off balloons by clicking Balloons in the Tracking group and then clicking Show all revisions inline. You can also set the page layout to landscape to print the balloons and the text in a more readable format. On the Page Layout tab, under Page Setup, click Orientation, and then click Landscape.
-
Change the layout for printing tracked changes
-
On the Review tab, in the Tracking group, click the arrow next to Track Changes, and then click Change Tracking Options.
-
Under Balloons, in the Paper orientation in printing list, click one of the following:
-
Auto When you select this option, Word decides the orientation that will provide the best layout for your document.
-
Preserve When you select this option, Word prints the document with the orientation that is specified in the Page Setup dialog box.
-
Force Landscape When you select this option, the orientation is landscape and the most room is allowed for balloons.
-
Print a list of changes made to a document
-
Click the Microsoft Office Button , and then click Print.
-
In the Print what box, click List of markup.
Hiding changes does not remove changes from the document. You must use the Accept and Reject commands in the Changes group to remove markup from your document.
-
Click the Microsoft Office Button , and then click Print.
-
In the Print what box, click Document (instead of Document showing markup).
Insert or delete a comment
Как в Word 2013 копировать и вставлять текст с исправлениями — Microsoft Excel для начинающих
Инструмент «Исправления» в Word нужен для отслеживания изменений, сделанных в документе. Он особенно полезен при совместной работе над документом с другими пользователями. Иногда необходимо скопировать текст в другой документ, сохранив историю исправлений. Эта задача кажется простой, но на деле она сложнее, чем просто скопировать и вставить текст.
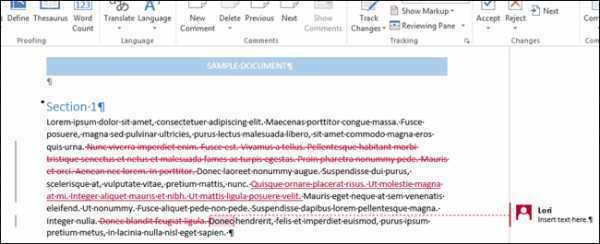
Сперва выделите текст с изменениями.

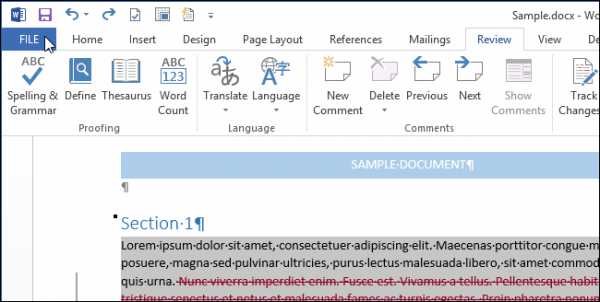
Первый секрет копирования исправлений вместе с текстом: нужно обязательно отключить опцию Track Changes (Исправления). Для этого откройте вкладку Review (Рецензирование). Если в разделе Tracking (Запись исправлений) кнопка Track Changes (Исправления) подсвечена синим, это значит, что опция включена. Нажмите нижнюю часть этой кнопки и выберите из выпадающего меню пункт Track Changes (Исправления). Теперь, когда опция отключена, у кнопки нет подсветки.
Примечание: Если не отключить функцию Track Changes (Исправления), Word решит, что Вы хотите скопировать текст в таком виде, как если бы все изменения были приняты, и исправления применятся.

Нажмите Ctrl+C, чтобы скопировать текст. Создайте новый документ, в него мы вставим скопированный текст.
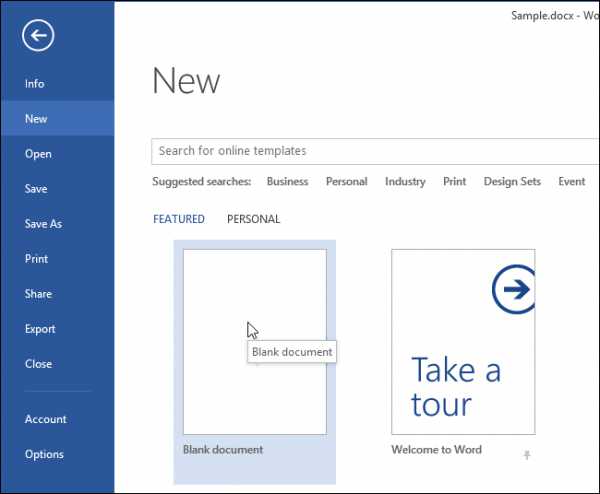
Примечание: Текст можно вставить в любой существующий документ Word.
Откройте вкладку File (Файл).
В левой части окна нажмите New (Создать).

В разделе New (Создать) кликните по Blank document (Новый документ).
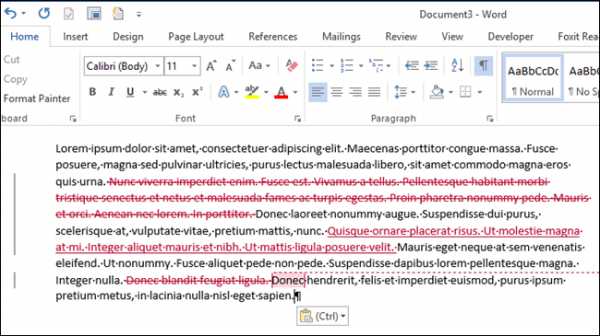
Второй секрет успешного сохранения исправлений в скопированном тексте: отключите опцию Track Changes (Исправления) в том документе, куда собираетесь вставить скопированный текст. Затем нажмите Ctrl+V, и скопированный текст вставится вместе с исправлениями.
Для копирования текста можно воспользоваться инструментом «Копилка», что особенно удобно, если Вы копируете несколько несмежных блоков текста и/или изображения.
Оцените качество статьи. Нам важно ваше мнение: