
83
83 people found this article helpful
A great feature for spreadsheet collaboration
Before you ask your team members to review your Excel worksheets, turn on Excel revision tracking for your shared workbook. When you use the legacy track changes feature in Excel, you’ll see who made changes to the worksheet or workbook, and the changes they made. After your team finishes the review, compare your original data with the reviewers’ changed data. Then, accept or reject their changes, and turn off Track Changes to finalize the document.
Instructions in this article apply to Excel for Microsoft 365, Excel 2019, and Excel 2016.
Can You Track Changes in Excel?
When you want your team to review and edit your Excel workbook, you have two options. If everyone on your team uses Excel for Microsoft 365, the co-authoring feature is a straightforward and quick way to review a document. If you want more information about the revisions made or if your team members work with older versions of Excel, use the legacy Track Changes feature.
You won’t find the option to track changes in Excel for Microsoft 365 and Excel 2019 on the Excel Ribbon. You’ll only see the track changes commands in the Review tab of Excel 2016 and older versions. The option is available in newer versions of Excel, but you’ll need to add the associated track changes commands to a new group in the Review tab.
Microsoft recommends that you use the co-authoring feature of Excel, which replaces Shared Workbooks. With co-authoring, you’ll see the changes others make in real time, and each person’s changes may be in a different color. However, co-authoring doesn’t track the changes, and you can’t reject changes to revert to your original data. Co-authoring is only available with a Microsoft 365 subscription.
Enable Track Changes in Newer Versions of Excel
To enable the legacy Track Changes feature in Windows:
-
Go to the File tab and select Options.
-
In the Excel Options dialog box, select Customize Ribbon.
-
Select the Choose command from drop-down arrow and choose All commands.
-
Select the Customize the Ribbon drop-down arrow and choose Main Tabs.
-
Expand and highlight the Review category.
-
Select New Group.
-
Make sure the New Group entry is highlighted, then select Rename.
-
In the Rename dialog box, enter a display name for the group. For example, enter Track Changes.
-
Select OK to apply the change and close the Rename dialog box.
-
In the Excel Options dialog box, go to the All Commands list, then choose each of the following:
- Compare and Merge Workbooks (Legacy)
- Protect Sharing (Legacy)
- Share Workbook (Legacy)
- Track Changes (Legacy)
After you select each command, select Add to add that command to the Review tab.
-
Select OK to apply your changes and close the Excel Options dialog box.
-
The four track changes commands appear on the Review tab in the new group that you created.
How to Turn On Track Changes in Excel
After you’ve entered all the information in the worksheet, turn on the Track Changes feature before making the Excel workbook available for review.
-
Go to the Review tab and select Track Changes > Highlight Changes.
-
In the Highlight Changes dialog box, select the Track changes while editing check box.
-
Select the When check box and set it to All.
-
Select the Who check box and set it to Everyone.
-
Select the Highlight changes on screen check box.
-
Select OK.
-
On the Review tab, select Share Workbook.
-
In the Share Workbook dialog box, go to the Editing tab and select the Use the old shared workbooks feature instead of the new co-authoring experience check box.
-
Select OK.
-
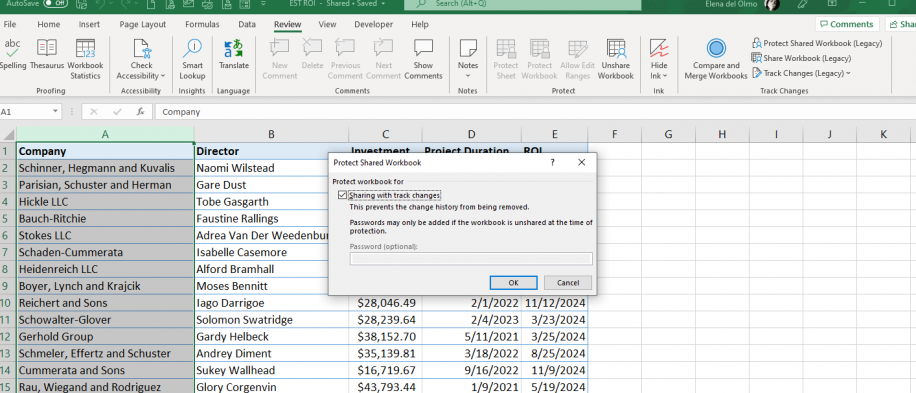
On the Review tab, select Protect Shared Workbook.
-
In the Protect Shared Workbook dialog box, select the Sharing with track changes check box.
-
Select OK.
Share the Workbook
When your shared workbook is ready to be reviewed, upload the file to a location that your team members can access. For example, upload the workbook to a SharePoint site, a OneDrive folder, or Dropbox.
The Track Changes feature doesn’t work with workbooks that contain tables. Tables must be converted to a range.
After the workbook is uploaded, inform your team members that the file is ready for their review. One way to do this is to use the Share feature in Excel.
If you don’t have a space set up that is accessible to all the reviewers, email the workbook file to each reviewer.
How to View and Accept Changes
After all your reviewers have had a chance to review and edit the workbook, it’s time to accept or reject those changes.
-
Go to the Review tab and select Track Changes > Accept or Reject Changes.
-
In the Select Changes to Accept or Reject dialog box, clear the Where checkbox to accept or reject changes to the entire workbook.
-
Select OK.
-
For each change, select either Accept or Reject.
How to Turn Off Track Changes
When you’re finished with the review and don’t want to continue to track changes made to the workbook, turn off the Track Changes feature.
-
Go to the Review tab and select Track Changes > Highlight Changes.
-
In the Highlight Changes dialog box, clear all the check boxes.
-
Select OK.
Thanks for letting us know!
Get the Latest Tech News Delivered Every Day
Subscribe
Important: This article explains an older method of tracking changes using a «Shared Workbook.» The Shared Workbook feature has many limitations and has been replaced by co-authoring. Co-authoring doesn’t provide the ability to track changes. However, if you and others have the file open at the same time, you can see each other’s selections and changes as they happen. Also, if the file is stored on the cloud, it’s possible to view past versions so you can see each person’s changes. Learn more about co-authoring.
-
Be certain that you want to use this method before continuing. Shared Workbooks have limitations, and one in particular is the inability to edit using Excel for the web. Therefore we highly recommend co-authoring, which is the replacement for Shared Workbooks.
-
Click Review > Share Workbook.
Note that in newer versions of Excel, the Share Workbook button has been hidden. Here’s how to unhide it.
-
In the Share Workbook dialog box, on the Editing tab, select the Allow changes by more than one user at the same time check box.
-
Click the Advanced tab.
-
Under Track changes, click Keep change history for and, in the days box, type the number of days of change history that you want to keep. By default, Excel keeps the change history for 30 days and permanently erases any change history that is older than this number of days. To keep change history for a longer than 30 days, enter a number that is larger than 30.
-
Click OK and, if you are prompted to save the workbook, click OK to save the workbook.
-
Click Review > Track Changes, and then click Accept or Reject Changes.
Note that in newer versions of Excel, the Track Changes button has been hidden. Here’s how to unhide it.
-
If prompted to save the workbook, click OK.
-
In the Select Changes to Accept or Reject dialog box, do the following:
-
To accept or reject changes that are made after a particular date, select the When check box, click Since date in the When list, and then type the earliest date for which you want to review the changes.
-
To accept or reject changes that are made by another user, select the Who check box and then, in the Who list, click the user whose changes you want to review.
-
To accept or reject changes that are made by all users, clear the Who check box.
-
To accept or reject changes that are made to a specific area, select the Where check box, and then type the cell reference of the worksheet range.
-
To accept or reject changes to the entire workbook, clear the Where check box.
-
-
Click OK, and then review the information about each change in the Accept or Reject Changes dialog box.
-
To accept or reject each change, click Accept or Reject.
-
If prompted to select a value for a cell, click the value that you want, and then click Accept.
Notes:
-
You must accept or reject a change before you can advance to the next change.
-
You can accept or reject all remaining changes at once by clicking Accept All or Reject All.
-
Click Review > Track Changes, and then click Highlight Changes.
Note that in newer versions of Excel, the Track Changes button has been hidden. Here’s how to unhide it.
-
To select the changes that you want to see, do the following:
-
To view all changes that have been tracked, select the When check box, click All in the When list, and then clear the Who and Where check boxes.
-
To view changes that were made after a particular date, select the When check box, click Since date in the When list, and then type the earliest date for which you want to view changes.
-
To view changes that were made by a specific user, select the Who check box and then, in the Who list, click the user whose changes you want to view.
-
To view changes to a specific range of cells, select the Where check box, and then type the cell reference of the worksheet range.
-
-
To specify how you want to view the changes, do the following:
-
To highlight changes on the worksheet, select the Highlight changes on screen check box.
-
To create a list of changes on a separate worksheet, select the List changes on a new sheet check box to display the history worksheet.
Note: This check box is available only after you turn on change tracking and save the file with at least one trackable change.
-
Turning off change tracking deletes the change history. To keep a copy of this information, do the following to print the history worksheet or copy it to another workbook:
-
Click Review > Track Changes > Highlight Changes.
Note that in newer versions of Excel, the Track Changes button has been hidden. Here’s how to unhide it.
-
Under Highlight which changes, select the When check box, and then in the When list, click All.
-
Clear the Who and Where check boxes.
-
Select the List changes on a new sheet check box.
-
Click OK.
-
You can now print, or copy the history to another workbook.
When you highlight changes as you work, Excel marks any revisions (such as changes, insertions, and deletions) with a highlighting color.
-
Click Review > Track Changes, and then click Highlight Changes.
Note that in newer versions of Excel, the Track Changes button has been hidden. Here’s how to unhide it.
-
In the Highlight Changes dialog box, select the Track changes while editing check box. Selecting this check box shares the workbook and highlights changes that you or other users make.
-
Under Highlight which changes, select the When check box and then, in the When list, click the option that you want.
-
To specify the users for whom you want to highlight changes, select the Who check box and then, in the Who list, click the option that you want.
-
To specify the worksheet area where you want changes to be highlighted, select the Where check box and then, in the Where box, type the cell reference of the worksheet range.
-
Make sure that the Highlight changes on screen check box is selected.
-
Click OK. If prompted, save the workbook.
-
On the worksheet, make the changes that you want. Please note that some changes, such as formatting, are not tracked and therefore are not marked with a highlighting color.
When you no longer want changes to be highlighted, you can turn off change highlighting.
-
Click Review > Track Changes, and then click Highlight Changes.
Note that in newer versions of Excel, the Track Changes button has been hidden. Here’s how to unhide it.
-
In the Highlight Changes dialog box, clear the Track changes while editing check box.
-
Click Review > Track Changes > Highlight Changes.
Note that in newer versions of Excel, the Track Changes button has been hidden. Here’s how to unhide it.
-
Under Highlight which changes, select the When check box and then, in the When list, click All.
-
Clear the Who and Where check boxes.
-
Select the List changes on a new sheet check box.
-
Click OK.
-
In the history worksheet, click the filter arrows next to the column labels to find the information that you want.
Note: Saving the workbook hides the history worksheet. To view the history worksheet after saving, you must display it again by selecting the List changes on a new sheet check box in the Highlight Changes dialog box.
By using the Track Changes feature in Excel for Mac, you can track, maintain, and display information about the changes that are made to a shared workbook.
Important:
-
The Track Changes button is no longer available in the ribbon in the newer versions of Excel for Mac. In order to use this feature, you will need to add Track Changes back to the ribbon first. For more information, see Add the Track Changes button to the ribbon.
-
Change tracking is available only in shared workbooks. In fact, when you turn on change tracking, the workbook automatically becomes a shared workbook. Although a shared workbook is typically stored in a location where other users can access it, you can also track changes in a local copy of a shared workbook.
Add the Track Changes button to the ribbon
To add the Track Changes button in the ribbon, you will need to create a custom group and then add the button to the group.
-
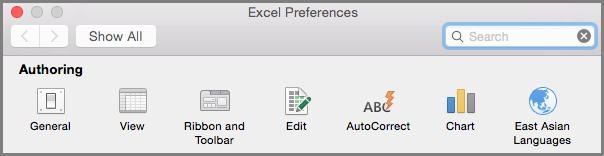
Click Excel > Preferences > Ribbon & Toolbar.

-
Under Customize the Ribbon, under Main tabs, select Review.
-
Below the Main Tabs list, click
, and select New group. -
You can now rename this custom group. Just select New Group (Custom), click
> Rename > and type a name in the Display name box, and click Save. -
Under Choose commands from, select Main Tabs, and then in the list select Review > Changes > Track Changes (Legacy), and then click > (Add arrow) to move the item under the custom group you created.
-
Click Save and close the Excel Preferences dialog box.
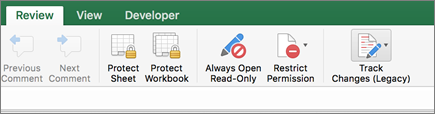
You should see the Track Changes (Legacy) option in the Review tab on the ribbon.
 , and select New group.
 > Rename > and type a name in the Display name box, and click Save.
-
On the Review tab, click Track Changes, and then click Highlight Changes.
-
Select or clear the Track changes while editing. This also shares your workbook check box.
Selecting this check box shares the workbook and highlights changes that you or other users make. If you clear the check box, you will receive a message indicating that this action will remove the workbook from shared use.
When you highlight changes as you work, Excel outlines any revisions (such as changes, insertions, and deletions) with a highlighting color.
-
On the Review tab, click Track Changes, and then click Highlight Changes.
-
Select the Track changes while editing. This also shares your workbook check box.
-
Under Highlight which changes, select the When check box, and then in the dropdown list, click the option that you want.
-
Do any of the following:
To specify
Do this
The users for whom you want to highlight changes
Select the Who check box, and then in the Who menu, click the option that you want.
The sheet area where you want changes to be highlighted
Select the Where check box, and then in the Where box, type the cell reference of the sheet range.
Tip: You can also click the Collapse Dialog icon at the right end of the Where box and then select the range that you want to use on the sheet. After you finish, click Collapse Dialog again to display the entire dialog box.
-
Make sure that the Highlight changes on-screen check box is selected.
-
Click OK.
If you are prompted to save the workbook, click OK.
-
On the sheet, make the changes that you want.
Note: Some changes, such as formatting, are not tracked and therefore are not marked with a highlighting color.
When you no longer want changes to be highlighted, you can stop highlighting them.
-
On the Review tab, click Track Changes, and then click Highlight Changes.
-
Clear the Highlight changes on-screen check box.
-
On the Review tab, click Track Changes, and then click Highlight Changes.
Note: If the Track changes while editing. This also shares your workbook is not selected, Excel has not recorded any change history for the workbook.
-
To select the changes that you want to see, do any of the following:
To view
Do this
All changes that have been tracked
Select the When check box, select All from the When pop-up menu, and then clear the Who and Where check boxes.
Changes that were made after a particular date
Select the When check box, click Since date in the When list, and then type the earliest date for which you want to view changes.
Changes that were made by a specific user
Select the Who check box and then, in the Who list, click the user whose changes you want to view.
Changes to a specific range of cells
Select the Where check box, and then type the cell reference of the sheet range.
-
You can also click Collapse Dialog at the right end of the Where box and then select the range that you want to use on the sheet. After you finish, click Collapse Dialog again to display the entire dialog box.
-
To specify how you want to view the changes, do any of the following:
To
Do this
Highlight changes on the sheet
Select the Highlight changes on screen check box.
This enables you to view the details about a change by resting the pointer over a highlighted cell.
Create a list of changes on a separate sheet
Select the List changes on a new sheet check box to display the history sheet.
This check box is available only after you turn on change tracking and save the file with at least one trackable change.
-
On the Review tab, click Track Changes, and then click Accept or Reject Changes. .
If you are prompted to save the workbook, click OK.
-
In the Select Changes to Accept or Reject dialog box, do any of the following:
To accept or reject
Do this
Changes that are made after a particular date
Select the When check box, click Since date in the When list, and then type the earliest date after which you want to review the changes.
Changes that are made by another user
Select the Who check box and then, in the Who list, click the user whose changes you want to review.
Changes that are made by all users
Clear the Who check box.
Changes that are made to a specific area
Select the Where check box, and then type the cell reference of the sheet range.
You can also click Collapse Dialog at the right end of the Where box and then select the range that you want to use on the sheet. After you finish, click Collapse Dialog again to display the entire dialog box.
Changes to the entire workbook
Clear the Where check box.
-
Click OK, and then review the information about each change in the Accept or Reject Changes dialog box.
The information includes other changes that are affected by the changes you make. You can scroll to see all the information as needed.
-
For each change, click Accept or Reject.
Notes:
-
If you are prompted to select a value for a cell, click the value that you want, and then click Accept.
-
You must accept or reject a change before you can advance to the next change.
-
You can accept or reject all remaining changes at once by clicking Accept All or Reject All.
-
All changes must be saved before they can be listed on the history sheet.
-
When you reject a change, the history sheet records the rejection with «Undo» or «Result of rejected action» in the Action Type column. To view the history sheet, see View the history sheet for more information.
-
-
On the Review tab, click Track Changes, and then click Highlight Changes.
Note: If the Track changes while editing. This also shares your workbook check box is not selected, Excel has not recorded any change history for the workbook.
-
Under Highlight which changes, select the When check box, and then in the When pop-up menu, click All.
-
Clear the Who and Where check boxes.
-
Select the List changes on a new sheet check box, and then click OK.
-
Click OK.
The history sheet appears.
-
In the history sheet, click the filter arrows next to the column labels to find the information that you want.
Note: Saving the workbook hides the history sheet. To view the history sheet after saving, you must display it again by selecting the List changes on a new sheet check box in the Highlight Changes dialog box.
Because the change history is deleted when you turn off change tracking, you may want to save a copy of the history. You can print the history sheet or copy it to another workbook.
-
On the Review tab, click Track Changes, and then click Highlight Changes.
-
Under Highlight which changes, select the When check box, and then, in the When list, click All.
-
Clear the Who and Where check boxes.
-
Select the List changes on a new sheet check box.
-
Click OK.
Tips:
-
To print the history sheet, click Print on the File menu, select the print options you want, and then click Print.
-
To copy the history sheet to another workbook, follow these steps:
-
Hold down CONTROL and click the History tab at the bottom of the history sheet, and then click Move or Copy.
-
In the To book area, click the name of the workbook you want to move the sheet to, or click (new book).
-
Select the Create a copy check box, and then click OK.
-
Save the workbook that contains the copied history sheet.
-
You can use change tracking to log details about workbook changes every time that you save a workbook. This change history can help you identify any changes that were made to the data in the workbook, and you can then accept or reject those changes.
Change tracking is especially useful when several users edit a workbook. It is also useful when you submit a workbook to reviewers for comments and then want to merge the input that you receive into one copy of that workbook, incorporating the changes and comments that you want to keep.
When changes are made in the shared workbook, you can view the change history directly on the sheet or on a separate history sheet. Either way, you can instantly review the details of each change. For example, you can see who made the change, what type of change was made, when it was made, what cells were affected, and what data was added or deleted.
When you use change tracking, consider the following:
-
Change tracking differs from the undo operation and does not create a backup copy
You might expect that change tracking creates a backup copy of the workbook before changes are made, or that you can undo any of those changes. Unfortunately, you cannot use the change history to revert changes by undoing them or by restoring an earlier version of the workbook. However, the history sheet includes a record of all deleted data so that you can copy that data back to the original cells in the shared workbook.
Because change tracking is not designed to help you return to earlier versions of a workbook, you should continue to back up workbooks that have change tracking in effect.
-
Some types of changes are not tracked
Changes that you make to cell contents are tracked, but other changes, such as formatting changes, are not tracked. Some Excel features are unavailable in shared workbooks and therefore cannot be tracked.
-
The change history is kept only for a specific interval
By default, when you turn on change tracking, the change history is kept for 30 days to keep the size of the workbook manageable. However, you can increase or decrease the number of days of the change history that you want to keep. To keep the change history indefinitely, you can specify a large number of days. You can also make periodic copies of the history information.
-
The oldest part of the change history is periodically deleted
Excel determines the change history that is kept by counting back from the current date. Each time that you close the workbook, Excel deletes any part of the change history that is older than the number of days that were in effect the last time the workbook was saved.
For example, if you are keeping 30 days of change history, and you open a workbook for the first time in two months, you will be able to view the history from two months ago. However, when you close this workbook, the history from the previous 30 days (31 to 60 days ago) is deleted.
Important: When you turn off change tracking or stop sharing the workbook, all change history is permanently deleted.
Excel provides the following ways to access and use the stored change history.
-
Onscreen highlighting
Excel can outline changed areas in a different color for each user and display the basic details as a comment when you rest the pointer over each changed cell. Onscreen highlighting is useful when a workbook does not have many changes or when you want to see at a glance what has changed.
-
History tracking
Excel can display a separate history sheet that provides a printable list of change details on which you can filter to find the changes that you are interested in. The history sheet is useful when a workbook has many changes or when you want to investigate what occurred in a series of changes.
-
Change reviewing
Excel can step you through the changes in sequence so that you can decide whether to accept or reject each change. This method is useful when you are evaluating comments from other users.
Need more help?
You can always ask an expert in the Excel Tech Community or get support in the Answers community.
На чтение 3 мин Опубликовано 26.04.2020
Excel содержит очень полезный инструмент, который позволяет отслеживать исправления, вносимые в рабочую книгу. Например, Вы можете отдать свою работу другому пользователю на рецензирование, а затем забрав ее обратно, посмотреть какие изменения были внесены. В этом уроке мы научимся отслеживать исправления в рабочей книге Excel, а также создавать Журнал изменений.
Предположим, Вас попросили откорректировать или выполнить совместно с коллегами работу над одной рабочей книгой Excel. Если есть распечатанный экземпляр, можно взять красную ручку и исправить недочеты, отметить орфографические ошибки или добавить комментарии на полях. Microsoft Excel позволяет осуществлять все это в электронном виде при помощи режима Отслеживания исправлений.
Содержание
- Общие сведения об отслеживании исправлений в Excel
- Как включить режим отслеживания исправлений
- Вынесение всех исправлений на отдельный лист
Общие сведения об отслеживании исправлений в Excel
Когда режим отслеживания исправлений включен, каждая ячейка, в которой произошли изменения, будет выделена особыми границами и указателем. При наведении курсора на отмеченную ячейку Вы увидите детали исправления. Это позволяет Вам и другим рецензентам следить за тем, чтобы все было исправлено, прежде чем утверждать окончательную версию книги.
Существует ряд исправлений, которые Excel не может отслеживать. Перед использованием данной опции советуем Вам ознакомиться на сайте компании Microsoft со списком изменений, которые не отслеживаются и не выделяются.
Вы не сможете использовать режим отслеживания исправлений, если рабочая книга включает в себя таблицы. Чтобы удалить таблицу: выделите её, перейдите на вкладку Конструктор, а затем выберите команду Преобразовать в диапазон.
Как включить режим отслеживания исправлений
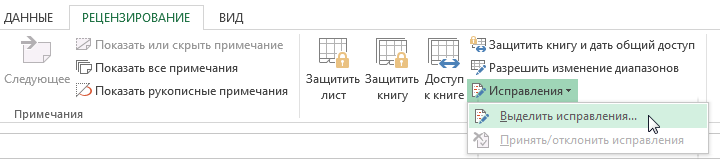
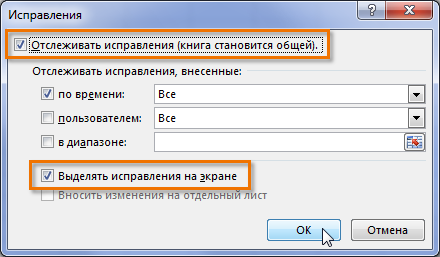
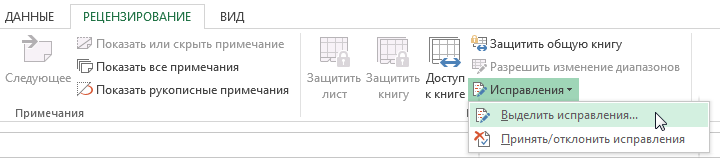
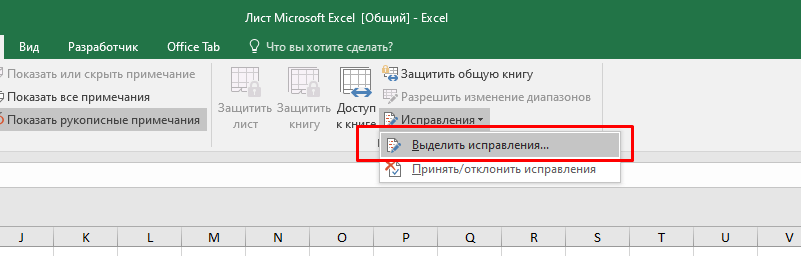
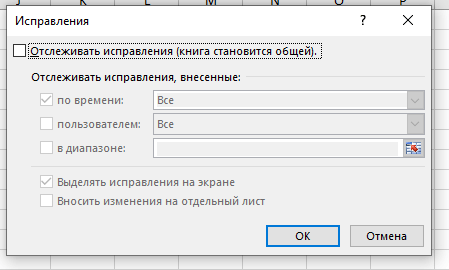
- На вкладке Рецензирование нажмите команду Исправления, а затем в выпадающем меню выберите пункт Выделить исправления.
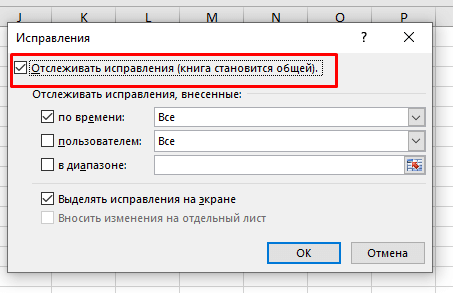
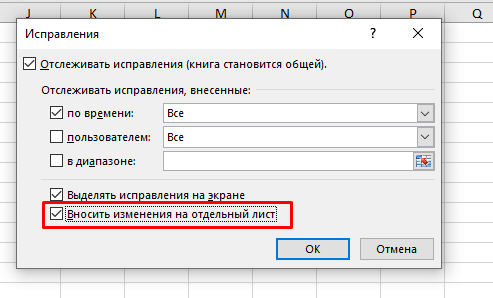
- В появившемся диалоговом окне Исправления установите флажок Отслеживать исправления. Убедитесь, что выбран пункт Выделять исправления на экране, а затем нажмите OK.
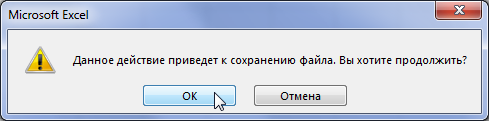
- Если появится запрос для подтверждения сохранения книги, нажмите ОК.
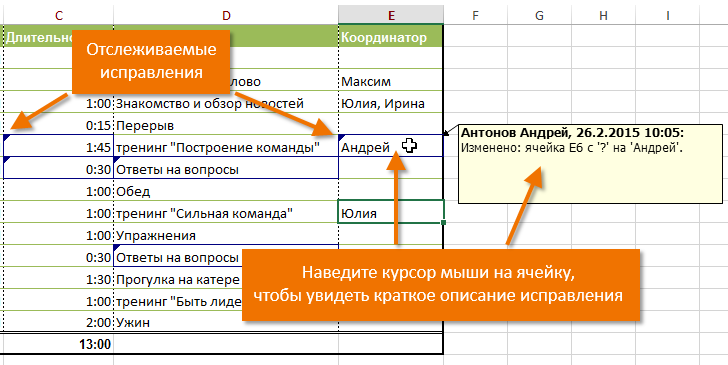
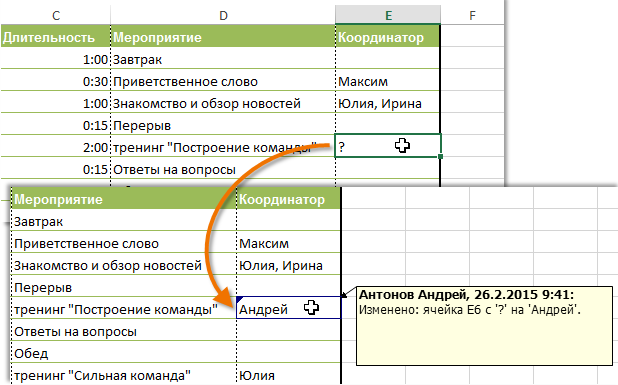
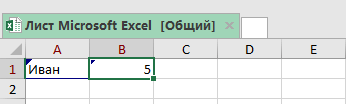
- Режим отслеживания исправлений будет включен. Теперь любая отредактированная ячейка будет помечаться цветной границей и треугольником в верхнем левом углу. Если рецензентов несколько, каждому из них будет присвоен свой цвет.
- Выберите любую отредактированную ячейку, чтобы увидеть перечень внесенных изменений. В следующем примере мы изменили содержимое ячейки E6 с «?» на «Андрей».
При включении режима отслеживания исправлений книга автоматически становится общей. Сутью общего доступа к рабочим книгам является возможность их хранения там, где сразу несколько пользователей смогут одновременно открывать и редактировать ее. Кроме этого, Вы можете отслеживать исправления как в локальной, так и в личной копии книги.
Вынесение всех исправлений на отдельный лист
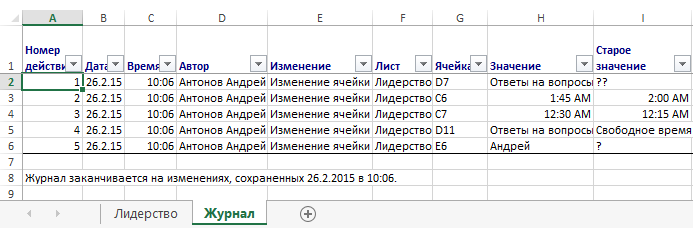
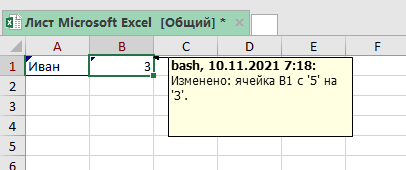
В Excel есть возможность просматривать изменения на отдельном листе, который называется Журнал изменений. В данном журнале приводится список всех изменений в книге, включая Старое значение (прежнее содержимое ячейки) и Значение (текущее содержимое ячейки).
- Сохраните рабочую книгу.
- На вкладке Рецензирование выберите команду Исправления, а затем в выпадающем меню нажмите Выделять исправления.
- В появившемся диалоговом окне Исправления установите флажок Вносить изменения на отдельный лист, затем нажмите OK.
- Исправления будут приводиться на отдельном листе с названием Журнал.
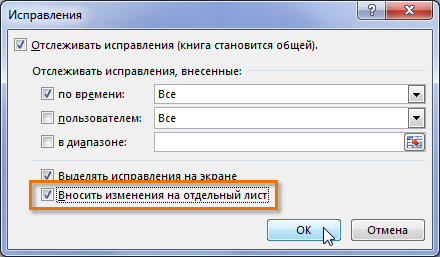
Чтобы удалить Журнал изменений из рабочей книги Excel, можно либо сохранить книгу, либо снять флажок Вносить изменения на отдельный лист в диалоговом окне Исправления.
Оцените качество статьи. Нам важно ваше мнение:
Watch Video – How to Track Changes in Excel
If you work with an Excel file that needs to be updated or reviewed by other people, the option to track changes can come in handy.
You can also use it when you’re updating a file and need to keep a track of all the changes you do yourself. This can be helpful when you revisit it sometime later.
In this tutorial, I will show you how to track changes in Excel.
Enabling the Track Changes in Excel Feature
By default, this feature is disabled in Excel.
Here are the steps to enable track changes in Excel:
The above steps would enable ‘Track Changes’ in Excel and now it will highlight any change done to the workbook.
Note: For this option to work, you need to have the workbook saved on your system or a network drive. If the file has not been saved, it will first ask you to save it before enabling the ‘Track Changes’ option. If the file is already saved, it will still save it before enabling the tracking.
How do ‘Track Changes’ work in Excel?
Once you have enabled the tracking, whenever you or anybody who accesses the workbook makes any changes to it, it will get highlighted with a blue border and get a small blue triangle in the top left of the cell. This is similar to the red triangle you see when you insert a comment in a cell.
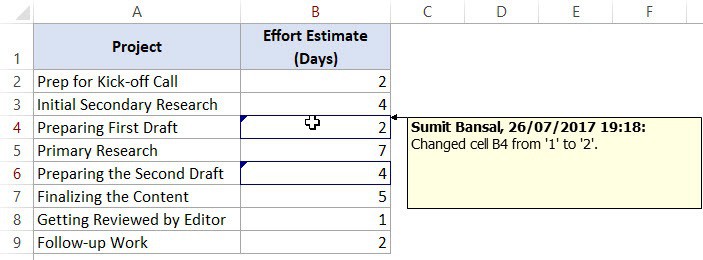
For example, below I have a dummy project plan and I have made changes in column B (cell B4 and B6).
![]()
When you hover the cursor over the cell that has a change, it will show a message that specifies what the change is, who made the change, and when it was done.
Note that when ‘track changes’ option is enabled in Excel, the workbook is shared and some of the features are automatically disabled. For example, you will not be able to protect a sheet when ‘track changes’ are ON. You will notice that some of the options in the ribbon are grayed out.
Getting a List of All the Changes
If you have a workbook that has a lot of changes made to it, you may want to get a list of all the changes separately as a list.
Here are the steps to get a list of all the changes in a new worksheet:
This will instantly create a new worksheet that will list all the changes that you have made.
Accepting/Rejecting Changes
When the changes are made, these are not final until you review these changes. This can be useful when you have the reviewed file from your colleague/boss/client, and you have to decide on what changes are to be kept and which ones are to be rejected.
Here are the steps to accept/reject changes in Excel:
If you reject a change, it will revert back to the original value.
Note that when you accept a change, you can not undo it.
Disabling Track Changes in Excel
Once your work is finalized, you can disable the track changes feature in Excel. That will remove any existing blue box in the cells and will stop tracking any further changes.
Here are the steps to disable ‘track changes’ in Excel:
Difference Between Comments and Track Changes
A lot of people prefer adding comments while reviewing other people’s work in Excel.
Here are the major differences in ‘comments’ and the ‘track changes’ functionality:
- You don’t need to edit a cell’s content in order to leave a comment. Track changes, on the other hand, would insert a note whenever there is any change in the cell.
- Adding comment is a manual process, while track changes, when enabled, would automatically record everything that happens in the worksheet.
- You can not get a list of all the comments separately in a worksheet (unless you use VBA as shown here) while you can get it with the tracking functionality with a simple click.
- When you enable track changes in Excel, some of the functionalities are disabled. This is not the case with comments.
You May Also Like the Following Tutorials:
- How to Use Spell Check in Excel.
- Using Input Message in Excel to Display Message when a Cell is Selected.
Содержание
- Show changes that were made in a workbook
- Как включить и использовать отслеживание изменений в Excel
- Включение функции отслеживания изменений в Excel
- Как работает функция «Отслеживание изменений» в Excel?
- Получение списка всех изменений
- Принятие / отклонение изменений
- Отключение отслеживания изменений в Excel
- Разница между комментариями и отслеживанием изменений
- How to Track Changes in Excel (Easy Step-by-Step)
- What is Track Changes Feature in Excel
- How Does The Track Changes Feature Work?
- How to Turn Track Changes On In Excel
- Latest Versions
- Step 1 – Adding Track Changes to the Review tab by customizing the ribbon:
- Step 2 – Turning Track Changes On:
- Older Versions
- Getting a List of All the Changes
- Accepting/Rejecting Changes
- How to Turn Track Changes Off
- Comments Vs Track Changes
- Subscribe and be a part of our 15,000+ member family!
Show changes that were made in a workbook
Show Changes in Excel lets you see exactly what edits were made to your workbooks, so you can confidently allow others to collaborate on your work. You can see details of who changed what, where, and when, along with the previous value of the cell for quick reversion. You can narrow down the list of changes by selecting any sheet, range, or individual cell, to see all changes that were made, including bulk edits. You can see past changes for up to 60 days. If you’re having trouble, Get help on showing changes.
View changes for the entire workbook
In the Review tab, select Show Changes.
Changes are shown in the pane with the most recent changes on top, in the order the changes were made.
You can see who made edits, exactly where in the workbook, when, and what they changed.
You can also see Changes made at once by clicking on See changes in a bulk card.
Note: Show Changes tracks changes made from Windows Desktop, Excel on the Mac, iPad, iOS and Android phones. You can see past changes for up to 60 days.
Filter and see changes for a subset or range
1. Select any sheet, range or single cell.
2. Right click to open the context menu and select Show Changes.
Note: If you or others edit the workbook while this pane is open, select the See New Changes button to update the changes. The notification lets you stay in control when you want to refresh the list and not be distracted when reviewing changes.
Filter changes from the Changes pane
At the top of the pane, select the  Filter icon.
Select Range or Sheet to filter the changes shown, and then do the following:
To show a range or cell’s changes, select Range and enter the range or cell in the text box.
Select the arrow icon next to the text box to confirm.
Источник
Как включить и использовать отслеживание изменений в Excel
Посмотреть видео — Как отслеживать изменения в Excel
Если вы работаете с файлом Excel, который необходимо обновить или просмотреть другими людьми, вам может пригодиться возможность отслеживать изменения.
Вы также можете использовать его, когда обновляете файл и вам нужно отслеживать все изменения, которые вы делаете сами. Это может быть полезно, когда вы вернетесь к нему позже.
В этом уроке я покажу вам, как отслеживать изменения в Excel.
Включение функции отслеживания изменений в Excel
По умолчанию эта функция отключена в Excel.
Вот шаги, чтобы включить отслеживание изменений в Excel:
Вышеупомянутые шаги позволят «отслеживать изменения» в Excel, и теперь он будет выделять любые изменения, внесенные в книгу.
Примечание. Чтобы эта опция работала, вам необходимо сохранить книгу в вашей системе или на сетевом диске. Если файл не был сохранен, он сначала попросит вас сохранить его перед включением опции «Отслеживать изменения». Если файл уже сохранен, он все равно сохранит его перед включением отслеживания.
Как работает функция «Отслеживание изменений» в Excel?
После того, как вы включили отслеживание, всякий раз, когда вы или любой, кто обращается к книге, вносите в нее какие-либо изменения, она будет выделена синей рамкой и получит маленький синий треугольник в верхнем левом углу ячейки. Это похоже на красный треугольник, который вы видите, когда вставляете комментарий в ячейку.
Например, ниже у меня есть фиктивный план проекта, и я внес изменения в столбец B (ячейки B4 и B6).

Когда вы наводите курсор на ячейку, в которой есть изменение, отображается сообщение, в котором указывается, что это за изменение, кто внес изменение и когда это было сделано.

Обратите внимание, что когда в Excel включен параметр «отслеживать изменения», книга является общедоступной, и некоторые функции автоматически отключаются. Например, вы не сможете защитить лист, когда включен параметр «отслеживать изменения». Вы заметите, что некоторые параметры на ленте неактивны.
Получение списка всех изменений
Если у вас есть книга, в которую внесено много изменений, вы можете получить список всех изменений отдельно в виде списка.
Вот шаги, чтобы получить список всех изменений на новом листе:
Это мгновенно создаст новый рабочий лист, в котором будут перечислены все внесенные вами изменения.
Принятие / отклонение изменений
После внесения изменений они не являются окончательными, пока вы не ознакомитесь с ними. Это может быть полезно, когда у вас есть проверенный файл от вашего коллеги / начальника / клиента, и вам нужно решить, какие изменения следует сохранить, а какие отклонить.
Вот шаги, чтобы принять / отклонить изменения в Excel:
Если вы отклоните изменение, оно вернется к исходному значению.
Обратите внимание: приняв изменение, вы не сможете его отменить.
Отключение отслеживания изменений в Excel
Как только ваша работа будет завершена, вы можете отключить функцию отслеживания изменений в Excel. Это приведет к удалению любого существующего синего поля в ячейках и остановит отслеживание любых дальнейших изменений.
Вот шаги, чтобы отключить функцию «отслеживать изменения» в Excel:
Разница между комментариями и отслеживанием изменений
Многие люди предпочитают добавлять комментарии при просмотре чужих работ в Excel.
Вот основные различия в функциях «комментариев» и «отслеживания изменений»:
- Вам не нужно редактировать содержимое ячейки, чтобы оставить комментарий. С другой стороны, отслеживание изменений будет вставлять примечание всякий раз, когда в ячейке происходят какие-либо изменения.
- Добавление комментария — это ручной процесс, в то время как отслеживание изменений, если оно включено, автоматически записывает все, что происходит на листе.
- Вы не можете получить список всех комментариев отдельно на листе (если вы не используете VBA, как показано здесь), хотя вы можете получить его с помощью функции отслеживания простым щелчком.
- Когда вы включаете отслеживание изменений в Excel, некоторые функции отключаются. С комментариями дело обстоит иначе.
Вам также могут понравиться следующие уроки:
- Как использовать проверку орфографии в Excel.
- Использование сообщения ввода в Excel для отображения сообщения при выборе ячейки.
Источник
How to Track Changes in Excel (Easy Step-by-Step)
This tutorial will give you the ins and outs of Track Changes Feature in Excel. Everything from what Track Changes is and what it does, how to turn it on and off and everything that you can do with the tracked changes is right here. We also clear up the confusion between comments and Track Changes.
If your spreadsheet has multiple users, changes in the file may be inevitable. You can protect the sheet and lock the cells but your sheet needs constant updates. You are fine with those updates but it won’t hurt if the other users had your approval, right? Well, Track Changes is the feature with proof of change and electronic approval. All changes made to the data will be highlighted and left up to you to take up or turn down. Ready to learn how it’s all done?
Let’s get tracking!

Table of Contents
What is Track Changes Feature in Excel
Track Changes in Excel allows users to review changes made to the worksheet. These changes can be viewed as highlighted on the worksheet and also enlisted in a separate sheet. The changes can be accepted or rejected, switching the rejected changes back to the original values.
Learn how Track Changes works and what it does right ahead.
How Does The Track Changes Feature Work?
Once Track Changes has been enabled, any changes made to the cells are tracked. If you have turned on Track Changes with the settings mentioned above, this is how a change made to a cell value will appear:
Note the current value of cell G13:

After changing the date from the 7 th to 8 th , the change is marked by surrounding the cell with a dark blue border with a small blue arrow on the top-left corner:

Hover the cursor over this cell to see the infotip related to the change made to the cell:

The infotip displays the author, date and time of the change, the location of the changed cell, and the value of the cell before and after the change.
The color of the column header of the changed cell goes from black to purple:

- All changes are denoted by the same blue border and the change in color of the column header. Changes made by other users are denoted by different color borders.

- Only manual changes will be tracked. Automatic changes in cell values as a result of formulas will not be marked.

- Track Changes only applies to shared workbooks. When Track Changes are enabled, note that the previously grayed-out Unshare Workbook button is now also enabled. This is because Tracked Changes is only applicable to shared workbooks with multiple simultaneous users.
The disadvantage of shared workbooks and henceforth of Tracked Changes is that many other features would be grayed out and unavailable. If you attempt to use Unshare Workbook, Track Changes will also be disabled.

How to Turn Track Changes On In Excel
This depends on the version of Excel you are using. For the older versions, you should find the Track Changes button in the Review tab. And in the later versions, you will have to add Track Changes to your Quick Access Toolbar or the Review tab. We will make the addition to the Review tab. The details on turning Track Changes on for both older and later versions are below.
Note that the Track Changes button will be grayed out if the worksheet contains Excel Tables. If you want to use Track Changes, the tables will need to be converted to ranges.
Latest Versions
In the later versions of Excel after Excel 2016, the Track Changes feature is not directly accessible. That is because the features under Shared Workbook have been replaced with co-authoring due to several limitations. Co-authoring, however, does not include the Track Changes feature.
So if you’re looking to recreate the features under Shared Workbook from the older Excel versions, we will show you how to add them to the Review tab by customizing the ribbon. Track Changes can then be turned on from the Review tab. Let’s start with the steps for customizing the Review tab:
Step 1 – Adding Track Changes to the Review tab by customizing the ribbon:
- In the Review tab, right-click anywhere on the ribbon and select the Customize the Ribbon

The Excel Options window will open:

- Click on the drop arrow under Choose commands from: and select All Commands.

- Select the New Group button from the bottom-right of the window.

- Then select the Rename button to open a small Rename

- In the Display name: field, enter a name for the group such as Track Changes.
- Click on the OK button to close the Rename

- Now from the list of commands on the left, select the following commands and click on the Add > > button after selecting each command to add them to the new group one by one. Read note below.
- Track Changes (Legacy)
- Share Workbook (Legacy)
- Protect Sharing (Legacy)

- If needed, adjust the commands in the new group by clicking and dragging the commands up or down.
- When done, click on the OK command to close the Excel Options

The new group will appear on the ribbon with the added commands:

Note: The other two commands are added only for recreating the Changes group from the older versions. Only add the Track Changes command if that is all you need to use.
Step 2 – Turning Track Changes On:
Click on the Track Changes button in the Track Changes


- In the Highlight Changes window, check the Track changes while editing checkbox. The rest are the default settings which you can change as per preference.

- Click on the OK button when done. Confirm the prompt window by clicking on OK.

Now any changes made will be tracked:

Older Versions
The older versions, up to Excel 2016, have the Track Changes feature accessible in the Review tab. Enabling Track Changes is the same for the older versions as it is for the newer versions. Here’s how to turn on Track Changes for Excel versions up to Excel 2016:
The Track Changes button is already available in the Review tab:
- Select the Review tab >Changes group >Track Changes button >Highlight Changes.

- Check the first checkbox in the Highlight Changes window to turn on Track Changes.
- Click on OK.

Track Changes will have been enabled.
Getting a List of All the Changes
If all the changes are marked on the sheet and there are a lot of them, your worksheet might look like badly done homework checked by a teacher. If it’s becoming difficult separating what are changes and what aren’t, you can get a list of all the changes in a new temporary sheet with all the details of the change infotip also mentioned.
These are the steps to get all the changes enlisted in a new sheet:
- Make sure Track Changes is on before making any changes to the data.
- Save the workbook for any changes made to the data.
- From the Review tab, select the Track Changes button and select Highlight Changes to go to the Highlight Changes

- Select the last checkbox reading List changes on a new sheet.

Only saved changes can be enlisted so make sure you have saved the file before attempting to enlist the changes otherwise at this point, you will receive a prompt encouraging to save the file and you will have to do the steps again. The changes will not enlist until the file is saved.
If the file was saved, the changes will be enlisted and you will be redirected to a new tab named History:

Notes:
Bear in mind that the History tab is not dynamic and will not be updated with changes made to the sheet. For enlisting any new changes, the steps will have to be repeated.
The History list is a temporary tab that disappears when the workbook is saved or closed or when Track Changes are disabled. If you wish to keep the history, you can copy-paste the contents of the History sheet to another worksheet and save the workbook.
The History list will only enlist changes made after turning on Track Changes.
Accepting/Rejecting Changes
Tracked changes can be accepted or rejected. The rejected changes are restored and the accepted changes are kept. Here we have the steps to accept or reject changes made under Track Changes:
- Go to the Review tab, open the Track Changes menu and select the Accept/Reject Changes

- Below are the default settings in the Select Changes to Accept or Reject dialog box. You can change these as required.
- Click on the OK command button.

- Accept or reject changes individually or all together using the command buttons in the Accept or Reject Changes dialog box.

If a cell has been changed multiple times, you will also have a choice of which change you want to keep:

Accepted changes keep their changed cell values and values of rejected changes revert to the original value.
We have highlighted a rejected and accepted change each below:

How to Turn Track Changes Off
Turning off Track Changes is as simple as turning it on. The changes borders and History sheet will disappear and changes made to the data won’t be marked anymore. Follow these steps to turn off Track Changes:
- Go to the Review tab and select the Track Changes button and then the Highlight Changes

- Uncheck the Track changes while editing checkbox to disable Track Changes.


As you can see, the highlighted borders have gone. Any changes made to the data won’t be highlighted anymore.
A comment is a note added by the user to a cell. A Track Changes infotip is added automatically to a cell changed while Track Changes is enabled.
Right off, let’s see the obvious visual differences between comments and Track Changes:

When a comment is inserted, the username is added automatically but the note of the comment itself is manually added by the user:

With Track Changes on, when a cell is changed, an infotip is automatically added, displaying the user, the date, time, and location of the altered cell, and the altered and former value of the cell:

A Track Changes infotip comes from the result of changing a cell with the feature on. A comment has no prerequisites for adding.
To enlist all comments in a separate sheet, you need a VBA Macro code. To enlist a complete tracked history of changes, you can use the preset option provided with the Track Changes feature.
Enabling Track Changes disables some features while inserting comments has no indirect impact.
Comments can be added, edited, or deleted easily. An accepted tracked change cannot be reverted.
That was everything on Track Changes. Next, when you’re having trouble with anything on Track Changes, come back here for some guidance. We are certain that with our Excel tricks, you’ll become quite the Excel wizards. We’ll be back with more sprinklings of Excel stardust. Remember your magic words!
Subscribe and be a part of our 15,000+ member family!
Now subscribe to Excel Trick and get a free copy of our ebook «200+ Excel Shortcuts» (printable format) to catapult your productivity.
Источник
Содержание
- Включение функции отслеживания изменений в Excel
- Как работает функция «Отслеживание изменений» в Excel?
- Получение списка всех изменений
- Принятие / отклонение изменений
- Отключение отслеживания изменений в Excel
- Разница между комментариями и отслеживанием изменений
Посмотреть видео — Как отслеживать изменения в Excel
Если вы работаете с файлом Excel, который необходимо обновить или просмотреть другими людьми, вам может пригодиться возможность отслеживать изменения.
Вы также можете использовать его, когда обновляете файл и вам нужно отслеживать все изменения, которые вы делаете сами. Это может быть полезно, когда вы вернетесь к нему позже.
В этом уроке я покажу вам, как отслеживать изменения в Excel.
По умолчанию эта функция отключена в Excel.
Вот шаги, чтобы включить отслеживание изменений в Excel:
Вышеупомянутые шаги позволят «отслеживать изменения» в Excel, и теперь он будет выделять любые изменения, внесенные в книгу.
Примечание. Чтобы эта опция работала, вам необходимо сохранить книгу в вашей системе или на сетевом диске. Если файл не был сохранен, он сначала попросит вас сохранить его перед включением опции «Отслеживать изменения». Если файл уже сохранен, он все равно сохранит его перед включением отслеживания.
Как работает функция «Отслеживание изменений» в Excel?
После того, как вы включили отслеживание, всякий раз, когда вы или любой, кто обращается к книге, вносите в нее какие-либо изменения, она будет выделена синей рамкой и получит маленький синий треугольник в верхнем левом углу ячейки. Это похоже на красный треугольник, который вы видите, когда вставляете комментарий в ячейку.
Например, ниже у меня есть фиктивный план проекта, и я внес изменения в столбец B (ячейки B4 и B6).
Когда вы наводите курсор на ячейку, в которой есть изменение, отображается сообщение, в котором указывается, что это за изменение, кто внес изменение и когда это было сделано.
Обратите внимание, что когда в Excel включен параметр «отслеживать изменения», книга является общедоступной, и некоторые функции автоматически отключаются. Например, вы не сможете защитить лист, когда включен параметр «отслеживать изменения». Вы заметите, что некоторые параметры на ленте неактивны.
Получение списка всех изменений
Если у вас есть книга, в которую внесено много изменений, вы можете получить список всех изменений отдельно в виде списка.
Вот шаги, чтобы получить список всех изменений на новом листе:
Это мгновенно создаст новый рабочий лист, в котором будут перечислены все внесенные вами изменения.
Принятие / отклонение изменений
После внесения изменений они не являются окончательными, пока вы не ознакомитесь с ними. Это может быть полезно, когда у вас есть проверенный файл от вашего коллеги / начальника / клиента, и вам нужно решить, какие изменения следует сохранить, а какие отклонить.
Вот шаги, чтобы принять / отклонить изменения в Excel:
Если вы отклоните изменение, оно вернется к исходному значению.
Обратите внимание: приняв изменение, вы не сможете его отменить.
Отключение отслеживания изменений в Excel
Как только ваша работа будет завершена, вы можете отключить функцию отслеживания изменений в Excel. Это приведет к удалению любого существующего синего поля в ячейках и остановит отслеживание любых дальнейших изменений.
Вот шаги, чтобы отключить функцию «отслеживать изменения» в Excel:
Разница между комментариями и отслеживанием изменений
Многие люди предпочитают добавлять комментарии при просмотре чужих работ в Excel.
Вот основные различия в функциях «комментариев» и «отслеживания изменений»:
- Вам не нужно редактировать содержимое ячейки, чтобы оставить комментарий. С другой стороны, отслеживание изменений будет вставлять примечание всякий раз, когда в ячейке происходят какие-либо изменения.
- Добавление комментария — это ручной процесс, в то время как отслеживание изменений, если оно включено, автоматически записывает все, что происходит на листе.
- Вы не можете получить список всех комментариев отдельно на листе (если вы не используете VBA, как показано здесь), хотя вы можете получить его с помощью функции отслеживания простым щелчком.
- Когда вы включаете отслеживание изменений в Excel, некоторые функции отключаются. С комментариями дело обстоит иначе.
Вам также могут понравиться следующие уроки:
- Как использовать проверку орфографии в Excel.
- Использование сообщения ввода в Excel для отображения сообщения при выборе ячейки.
Вы поможете развитию сайта, поделившись страницей с друзьями
На чтение 4 мин Просмотров 3.8к. Опубликовано 16.03.2022
Функция «Исправления» — одна из самых лучших функций в Excel. Она позволяет вам не запутаться при работе с большими объемами данных и файлами, которые редактируют сразу несколько человек.
С помощью этой функции, вы можете отдельно отслеживать каждое изменение или сразу все. В общем, настроек в ней много.
Итак, начнем!
Содержание
- Как начать следить за изменениями в Excel
- Как работает эта опция в Excel
- Как просмотреть все изменения списком
- Принимаем или отклоняем изменения
- Отключаем опцию
- Различия между комментариями и отслеживанием изменений
Как начать следить за изменениями в Excel
Изначально эта опция не активирована в Excel. Вы можете сделать это самостоятельно.
Пошаговая инструкция:
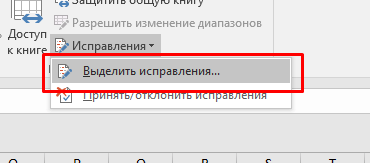
- Щелкните на «Рецензирование»;

- Щелкните на «Выделить изменения…» в функции «Исправления»;

- В открывшемся окошке поставьте галочку на опции «Отслеживать исправления». Также вы можете задать дополнительные настройки (видно на картинке), но это уже по вашему усмотрению;
- Подтвердите.
Итак, мы включили функцию.

Как работает эта опция в Excel
Итак, теперь при каждом изменении ячейки она будет выделена синей рамкой. Если вы нажмете на неё, вы увидите кто, когда и что конкретно изменил в ячейке. Это очень удобно когда файл редактируют несколько людей. Например, если вы нашли ошибку, то можете увидеть кто её допустил.
На картинке ниже, я поменял значение ячейки B1, она выделилась синим цветом и в ней появился синий треугольник (слева вверху).
Если мы поместим курсор мышки на ячейку, то увидим небольшое окошко с примечанием, в нем будет указана вся информация про изменение.
Важная информация: когда вы включаете эту функцию, ваш файл Excel становится «Общим». Вы не сможете использовать его защиту (с паролем, как мы рассматривали в статьях ранее) и так далее. Имейте это в виду.
Как просмотреть все изменения списком
Это может понадобиться, когда вы работаете с большими объемами данных. Вы можете просмотреть сразу все изменения, которые вносились в файл списком.
Пошаговая инструкция:
- Щелкните на «Рецензирование»;
- Щелкните на «Выделить изменения…» в функции «Исправления»;
- В открывшемся окошке, кроме уже поставленной галочки на «Отслеживать исправления», поставьте галочку на опции «Вносить изменения на отдельный лист»;
- Подтвердите.

В результате, Excel откроет новую страничку и поместит все изменения туда списком.
Принимаем или отклоняем изменения
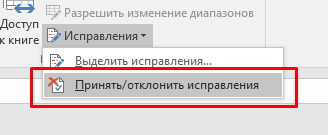
В случае если у вас активирована наша функция, изменения, которые вносятся в ячейки не являются окончательными. Чтобы они стали окончательными, вы должны принять их в специальном разделе «Принять/отклонить исправления». Это относится и к изменениям, которые вносили другие люди в ваш файл, если такие, разумеется, есть.
Пошаговая инструкция:
- Щелкните на «Принять/отклонить исправления» в функции «Исправления»;
- В открывшемся окне «Просмотр исправлений» можно выбрать:
- Когда были внесены изменения
- Какой пользователь вносил изменения
- И в каком диапазоне вносились изменения
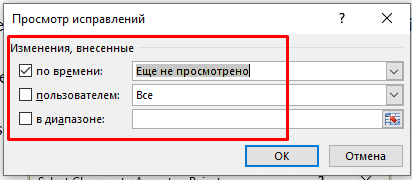
- Когда укажете нужные вам параметры, подтвердите;
- В следующем окне Excel покажет вам все изменения, которые вносились в ячейках, которые удовлетворяют всем указанным параметрам в прошлом шаге.
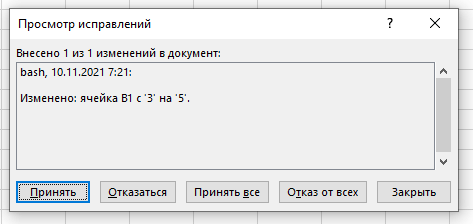
Вот и все, в этом окошке вы выбираете, принять или отклонить изменения (например, если вы увидели ошибку, вы можете отклонить).
Отключаем опцию
Когда вы закончите работу над файлом, вы можете отключить эту опцию, чтобы она не мешала.
Пошаговая инструкция:
- Щелкните на «Выделить исправления…» в функции «Исправления»;
- И просто снимите галочку, которую мы поставили ранее («Отслеживать исправления»);
- Подтвердите;
- Откроется окошко, указанное на картинке ниже. Просто щелкните «Да».

Различия между комментариями и отслеживанием изменений
Некоторым нравится добавлять комментарии к ячейкам.
В чем разница между комментарием и отслеживанием изменения:
- Функция «Отслеживание изменений» пишет примечание для каждой ячейки только тогда, когда она была изменена. В случае комментария, изменения необязательны. Комментарий можно оставить и без изменения ячейки.
- Преимущество функции, рассмотренной в статье, заключается в том, что она автоматизирована. То есть она автоматически помечает все ячейки, где было изменение.
- Также нельзя вывести все комментарии для файла, в отдельный лист и после, например, распечатать их.
- Минус нашей функции в том, что, например, мы не можем защитить файл Excel, когда используем функцию. А если мы используем комментарии, то можем.
When collaborating on a spreadsheet with others simultaneously, it’s important to get an instant view of the changes that have been made. Moreover, if you’re responsible for filtering the data, then you’ll definitely benefit from a quick system that allows you to accept or reject changes. Although it’s possible to track changes in all Excel versions, it’s easier to find in Excel 2016 and older versions. To be able to review changes to a shared workbook in Excel 365 or 2019, you’ll need to add this command to your Ribbon.
In this article, you’ll find a step-by-step illustration of how to track changes in Excel 365. First, you’ll learn how to enable the feature to track changes in your Ribbon. Then, you’ll learn how to accept and reject the changes and, finally, how to turn off this feature to finalize the document.
Can you track changes in Excel?
Excel’s co-authoring feature has replaced the former Shared Workbooks function from previous versions. Although co-authoring allows you to highlight the changes other users make to the spreadsheet in real time, it’s not the same as tracking changes. For example, co-authoring won’t let you accept or reject the changes to the original data.
It’s important to check the Excel version you’re working on, as this will determine whether you need to add the feature yourself to the Ribbon. Whereas in Excel 2016 and older versions, the Track Changes command appears in the “Review” tab by default, in Excel 365 and 2019, you’ll have to add it manually.
How to turn on track changes in Excel?
If you work in Excel 365 or 2019, you can still enjoy the full potential of collaboration features. However, before turning on the track changes feature, you need to add it to your Ribbon. This is how to enable the Track Changes command in your Excel “Review” tab.
How to add the Track Changes command to the Review tab?
- 1. Open your Excel spreadsheets and go to File > Options.

How to Track Changes in Excel (Step-by-Step) — Options
- 2. Select “Customize Ribbon” on the left-side menu.

How to Track Changes in Excel (Step-by-Step) — Customize Ribbon
- 3. In the “Choose command from” drop-down menu, select “All commands”.

How to Track Changes in Excel (Step-by-Step) — All commands
- 4. In the “Customize the Ribbon” drop-down menu, select “Main Tabs”.

How to Track Changes in Excel (Step-by-Step) — Main Tabs
- 5. Click on the “+” button to expand the “Review” category. Then, select the “New Group” button below.

How to Track Changes in Excel (Step-by-Step) — Expand Review
- 6. Click on “New Group (Custom)” and then “Rename”.

How to Track Changes in Excel (Step-by-Step) — Rename
- 7. Enter “Track Changes” as the new name for the group. Click “OK” to save the changes and close the Rename dialog box.

How to Track Changes in Excel (Step-by-Step) — Rename Track Changes
- 8. Go to the “All Commands” list and click on the following options: Compare and Merge Workbooks (Legacy), Protect Sharing (Legacy), Share Workbook (Legacy), Track Changes (Legacy). Click on “Add” after clicking on each option. These would now appear under the “Track Changes” group in the “Main Tabs” list to the right.

How to Track Changes in Excel (Step-by-Step) — Add commands
- 9. Click “OK” to save and apply all changes. Close the window and head over to your “Review” tab. All of these commands should now appear to the far right.

How to Track Changes in Excel (Step-by-Step) — Track Changes in Review tab
And that’s done! Now, you’re ready to start using Track Changes.
The Beginner’s Guide to Excel Version Control
Discover what Excel version control is, the version control features Excel has to offer, and how to use them to share, merge, and review Excel changes
READ MORE

How to customize the Track Changes feature?
Once you’re ready to share your workbook to allow other users to edit, you can turn on the Track Changes option and customize how these are highlighted for later review.
- 1. Go to Review > Track Changes > Highlight Changes.

How to Track Changes in Excel (Step-by-Step) — Highlight Changes
- 2. Check the box for “Track changes while editing”.

How to Track Changes in Excel (Step-by-Step) — Track changes while editing
- 3. Choose the following options to make sure all changes are highlighted. In “When”, select “All”, and in “Who”, select “Everyone”. Make sure that the box for “Highlight changes on screen” is ticked and click “OK” to save.

How to Track Changes in Excel (Step-by-Step) — Highlight with changes options
For this command to function properly, you need to share the workbook using the command you just created.
- 1. Go to Review > Share Workbook.

How to Track Changes in Excel (Step-by-Step) — Share Workbook
- 2. In the “Editing” tab, make sure the option “Use the old shared workbooks feature instead of the new co-authoring experience” is checked. Click “OK” and close the window.

How to Track Changes in Excel (Step-by-Step) — Editing tab
- 3. The “Advanced” tab allows you to customize how the changes are tracked to give you a more in-depth tracking history. Once you finish, click “OK” and close.

How to Track Changes in Excel (Step-by-Step) — Advanced tab
- 4. Go to Review > Protect Shared Workbook. Select “Sharing with track changes” to prevent other users to remove the change history. Click “OK” to finish.
How to Track Changes in Excel (Step-by-Step) — Protect Shared Workbook
How to view, accept, and reject changes?
Once your team has modified the data, you can review all edits and accept or reject those changes. This is how you can view, accept, and reject changes to your spreadsheet.
- 1. Go to Review > Track Changes > Accept or Reject Changes.

How to Track Changes in Excel (Step-by-Step) — Accept or Reject Changes
- 2. Make sure the “Where” checkbox is not ticked so that Excel shows the changes from the entire workbook.

How to Track Changes in Excel (Step-by-Step) — Accept or Reject Changes
- 3. For each change, you can “Accept” or “Reject”. If you select “Accept All” or “Reject All” Excel will automatically apply all changes. Once you finish, select “Close”.

How to Track Changes in Excel (Step-by-Step) — Accept or Reject
The “Accept or Reject Changes” dialog box is essentially Excel’s. Unlike tracking changes in Google Sheets or accessing its edit history feature, the steps to follow to see the history log or edit history in Excel are a bit more complex. However, once you’ve added the Track Changes command to your Ribbon, accessing it will be quicker.
How to turn off track changes in Excel?
Once you’ve finished reviewing your workbook and don’t want any further changes to be saved or reflected, you can turn off Track Changes. This is how you can turn off Track Changes in Excel.
- 1. Go to the Review > Track Changes > Highlight Changes.

How to Track Changes in Excel (Step-by-Step) — Highlight Changes
- 2. Clear all the options in the “Highlight Changes” window, and click “OK” to save changes.

How to Track Changes in Excel (Step-by-Step) — Clear all options
Want to Boost Your Team’s Productivity and Efficiency?
Transform the way your team collaborates with Confluence, a remote-friendly workspace designed to bring knowledge and collaboration together. Say goodbye to scattered information and disjointed communication, and embrace a platform that empowers your team to accomplish more, together.
Key Features and Benefits:
- Centralized Knowledge: Access your team’s collective wisdom with ease.
- Collaborative Workspace: Foster engagement with flexible project tools.
- Seamless Communication: Connect your entire organization effortlessly.
- Preserve Ideas: Capture insights without losing them in chats or notifications.
- Comprehensive Platform: Manage all content in one organized location.
- Open Teamwork: Empower employees to contribute, share, and grow.
- Superior Integrations: Sync with tools like Slack, Jira, Trello, and more.
Limited-Time Offer: Sign up for Confluence today and claim your forever-free plan, revolutionizing your team’s collaboration experience.
Conclusion
If there is one feature that stands out in Excel for not being readily accessible, it’s “Track Changes”. In Word, for example, this feature is more accessible to users, and it’s widely used. Whether you are responsible for editing the data or reviewing later, knowing that all edits are registered will definitely help you work with less pressure.
If you’re working on Excel 365 or 2019 you should now be able to use the track changes command without issues. As you’ve seen, creating a group for the “Track Changes” and “Share Workbook” commands might require more steps than in other spreadsheet apps; however, you will only have to do it once, and you can then turn on and off in a quick and easy way.
If you want to learn more about Excel and how to use its version control features, you’ll find the following articles very useful:
- AutoRecover an Excel File (& AutoRecover Location)
- How To Restore A Previous Version Of An Excel File?