
Align text horizontally
-
In the text box, select the text that you want to change the horizontal alignment for.
-
On the Home tab, click the alignment option that you want
 .
.
 .
.Align text vertically
You can align all the text in a text box with the top, middle, or bottom of the text box.
-
Click the outer edge of the text box to select it.
-
On the Shape Format tab, click Format Pane.
-
Click the Shape Options tab if it isn’t already selected.
-
Click the text box icon
, and then click Text Box. -
Choose Top, Middle, or Bottom from the Vertical alignment drop-down list.
 , and then click Text Box.
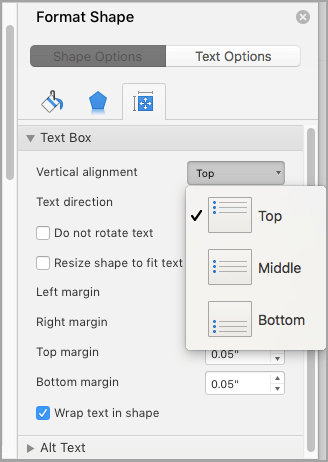
Adjust the text box margins
-
Click the outer edge of the text box to select it.
-
On the Shape Format tab, click Format Pane.
-
Click the Shape Options tab if it isn’t already selected.
-
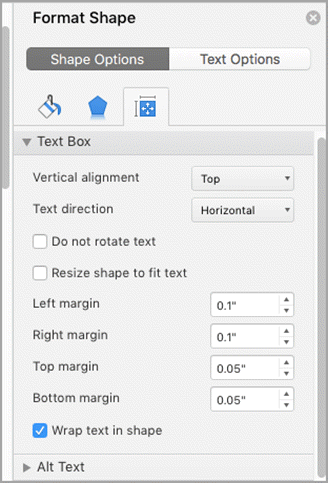
Click the text box icon
, and then click Text Box. -
You can adjust the left, right, top, and bottom margins.
Important:
Office for Mac 2011 is no longer supported. Upgrade to Microsoft 365 to work anywhere from any device and continue to receive support.
Upgrade now
Align text horizontally
-
In the text box, select the text that you want to change the horizontal alignment for.
-
On the Home tab, under Paragraph, click the alignment option that you want
.
Align text vertically
You can align all the text in a text box with the top, middle, or bottom of the text box.
-
Click the outer edge of the text box to select it.
-
Click the Format tab (the purple contextual tab that appears next to the Home tab), and then under Text Box, click Change text alignment within the text box
. -
Click the alignment option that you want.
 .
.Adjust the text box margins
-
Click the outer edge of the text box to select it.
-
On the Format menu, click Shape.
-
In the left pane of the Format Shape dialog box, click Text Box.
-
Under Internal Margin, adjust the measurements to increase or decrease the distance between the text and the outer border of the text box.
I know how to vertically align text with Word 2007. However, I would like to vertically align some text at the top and some text at the bottom, all on the same page. I tried doing this by adding a continuous section break (one that does not go to the next page), and having different vertical alignment settings on each side of the section break. However, the vertical alignment on the other side of the section break remains the same, i.e. aligned to the top. Does anyone know of another way to make this work?
asked Apr 23, 2014 at 13:56
![]()
2
You’re on the right track. Eliminate your Section Break and split your text into two paragraphs. Then in Page Layout settings select Justified for your vertical alignment. Anything in your top paragraph should orient to the top, anything in the second paragraph to the bottom. If you need new lines in these paragraphs, use a carriage return shift enter instead of just enter.
Note, this solution doesn’t allow for very complex formatting on the page, so if you need a complex layout, you should consider options like Text Boxes or filling the between paragraph gap with «empty» paragraphs as placeholders.
answered Apr 23, 2014 at 14:06
![]()
davdav
9,8365 gold badges29 silver badges50 bronze badges
3
![]()
Download Article
An easy-to-follow guide on changing the direction of text in Microsoft Word
![]()
Download Article
- Rotating Text
- Making Text Vertical
- Mirroring Text
- Changing Paper Orientation
|
|
|
Do you want to type vertically in word? You can create vertical text by creating a textbox and adjusting its settings to set the position. You can change the text’s direction, rotate it, and mirror it. You could also change the document’s orientation from portrait to landscape mode. This wikiHow will show you how to write vertically in word on your Windows or Mac computer.
Things You Should Know
- Create a textbox with your text. Click «Shape Format» → «Text Direction» → «Rotate all text 90°».
- To make text vertical, drag the right-center circle of your textbox towards the left.
- To mirror text, right-click the textbox, then «Format Shape». Click «Effects», then input «180» into the X or Y Rotation field.
-
1
-
2
Create a textbox. To do this, click the Insert tab in the top toolbar, then click the Text Box icon in the Text section. You can select Simple Text Box from the presets.
Advertisement
-
3
Insert your text. Input the text you want to edit. You can copy and paste from another program into Microsoft Word.
- Make sure the textbox is still selected.
-
4
Click Shape Format. You can find this at the top toolbar, next to Help. Alternatively, double-click the edge of the textbox to be quickly redirected.
-
5
Click Text Direction. This will be in the Text section.
- A drop-down menu will open.
-
6
Select Rotate all text 90°. You can also select Rotate all text 270° if you want the top of the words to face the left side.
- Your text will be rotated.
- You can continue to edit your text in the textbox. The words will type in the direction set.


Advertisement
-
1
Open a project in Microsoft Word. This looks like a W on top of a blue square. Microsoft Word is available to install for Windows and Mac.
- You must have a subscription to use Office 365.
-
2
Create a textbox. To do this, click the Insert tab in the top toolbar, then click the Text Box icon in the Text section. You can select Simple Text Box from the presets.
-
3
Insert your text. Input the text you want to edit. You can copy and paste from another program into Microsoft Word.
- Make sure the textbox is still selected.
-
4
Click and drag the center circle on the right towards the left. With the textbox selected, you’ll see four circles at each point of the text box and one circle between each corner. Use the middle circle on the left side.
- As you drag the text box towards the left, it will become smaller. The text inside will adjust to fit the size of the box in vertical format.
- Make sure not to drag past the point of the left line. This could result in the words returning to their normal positions.
-
5
Remove the textbox lines (optional). If you want to remove the lines around the text, double-click the textbox to return to the Shape Format tab.
- Click Shape Outline, then select No Outline from the drop-down menu.
- The textbox lines will be hidden. Be sure to save your document if you need to return to it later.


Advertisement
-
1
Open a project in Microsoft Word. This looks like a W on top of a blue square. Microsoft Word is available to install for Windows and Mac.
- You must have a subscription to use Office 365.
-
2
Create a text box. To do this, click the Insert tab in the top toolbar, then click the Text Box icon in the Text section. You can select Simple Text Box from the presets.
-
3
Insert your text. Input the text you want to edit. You can copy and paste from another program into Microsoft Word.
- Make sure the textbox is still selected.
-
4
Right-click the textbox. A drop-down menu will open.
-
5
Click Format Shape…. This will be at the very bottom of the menu.
- A panel will open on the right side.
- If you don’t see this option, make sure the textbox is selected, not the text.
-
6
Click the «Effects» icon. This looks like a pentagon, next to the paint bucket icon.
-
7
Enter 180 in the X or Y field. If you want your text to be mirrored left-right, enter 180 into the X Rotation field. If you want your text to be mirrored up-down, enter 180 into the Y Rotation field.
- The changes will take effect immediately.
-
8
Remove the textbox lines (optional). If you want to remove the lines around the text, double-click the textbox to return to the Shape Format tab.
- Click Shape Outline, then select No Outline from the drop-down menu.
- The textbox lines will be hidden. You can print your document if needed.


Advertisement
-
1
Open a project in Microsoft Word. This looks like a W on top of a blue square. Microsoft Word is available to install for Windows and Mac.
- You must have a subscription to use Office 365.
- Use this method if you want to change your paper orientation from portrait to landscape.
-
2
Click Layout. This will be in the top toolbar, between Design and References.
-
3
Click Orientation. You can find this at the top, next to Margins.
- A drop-down menu will open.
-
4
Click Landscape. Your Microsoft Word document will change to landscape orientation.
- If you change back to portrait mode after inputting text, the text will follow the portrait mode orientation. It will not save in its landscape position.


Advertisement
Ask a Question
200 characters left
Include your email address to get a message when this question is answered.
Submit
Advertisement
Thanks for submitting a tip for review!
About This Article
Article SummaryX
1. Click Insert.
2. Click Text.
3. Click Text Box.
4. Click Draw Text Box.
5. Click and drag a text box.
6. Type text into the box.
7. Hover the mouse over the box outline.
8. Click the rotation icon and drag in any direction.
Did this summary help you?
Thanks to all authors for creating a page that has been read 1,279,262 times.
Is this article up to date?
Donatella Versace, Vice-President of the Versace Group, once noted that, «Creativity comes from a conflict of ideas.» Whether you are designing a building or creating a document, you can do it more creatively by incorporating elements that appear to conflict with their surroundings. For example, many people expect a Word document’s text to flow horizontally. Using a simple trick, you can disrupt that flow and introduce text that moves up and down the page vertically. Used sparingly, this effect can help a document stand out and capture the attention of people who read it.
-
Open a Word document.and click «Insert» followed by «Text Box.» The built-In window opens and displays different types of text boxes.
-
Click «Draw Vertical Text Box» and note that your cursor changes into a crosshair.
-
Click the location within the document where you want to insert vertical text, hold down your left mouse button and draw a vertical rectangle.
-
Release the mouse button to place a vertical text box on the document. Type any text in the text box, and Word makes the text flow from top to bottom.
-
Click the small handle that displays in the midpoint of the text box’s right side, hold down your left mouse button and drag the handle to the left to make the text box narrower. This eliminates the excess space that may surround your text.
How to Rotate Text in Word
Change the text direction in Word
Updated on November 29, 2022
What to Know
- Rotate a text box: Go to Insert > Text Box to create a text box. Select the box and drag the rotation handle to the right or left to rotate.
- Rotate text within a text box: Select Drawing Tools Format > Text Direction and choose either Rotate all text 90° or Rotate all text 270°.
- Change the direction of a table: Go to Insert > Table to create a table. Select a cell, then select Table Tools Layout > Text Direction.
You can use a text box or table in Microsoft Word to orient text in any direction you like. In this guide, we show you how to rotate a text box, how to rotate text within a text box, and how to change the direction of a table in the desktop versions of Microsoft Word for PC or Mac. (This task cannot be done in Word Online or the Word mobile apps.)
How to Rotate a Text Box in Word
Text boxes make it easy to change the direction of text in word. All you do is create the text box, add some text, and decide how to rotate the text box.
To create a text box, select Insert > Text Box and choose one of the built-in designs. To add text, select the text box and begin typing.
Drag the rotation handle on a text box to rotate the text.
To rotate the text with the rotation handle, select the text box and drag the rotation handle to the right or to the left. Release it when the text is in the direction you want.
To rotate the text box by 15-degree increments, hold Shift while dragging the rotation handle.
To rotate the text box 90 degrees:
- In Word for PC: Select the text box, select Layout > Rotate, and choose either Rotate Right 90° or Rotate Left 90°.
- In Word for Mac: Click the text box, click Shape Format > Arrange > Rotate > Rotate, and choose either Rotate Right 90° or Rotate Left 90°.
Choose a custom rotation angle.
To set a custom rotation angle:
- In Word for PC: Select the text box, select Layout > Rotate, and select More Rotation Options. From the Size tab, change the rotation angle to the angle you need.
- In Word for Mac: Click the text box, click Shape Format > Arrange > Rotate > Rotate, and click More Rotation Options. From the Size tab, change the rotation angle so the text points in the direction you need.
How to Rotate Text in a Text Box
Instead of rotating the text box, you can opt to rotate the text inside the box instead.
You can also rotate text inside a shape.
Choose how to rotate text inside a text box.
To rotate text in a text box, select Drawing Tools Format > Text Direction and choose either Rotate all text 90° or Rotate all text 270°. The text will appear vertically on the page.
To align the text inside a text box, select Drawing Tools Format > Align Text, and align the text with the right side of the text box, the left side, or the center.
How to Change Text Direction in a Table
You can also rotate text inside a table. Rotating text makes it possible to have narrow rows in a table.
To create a table, select Insert > Table and choose a table size.
Change text direction in a Word table.
To change text direction in a table:
-
Select the cell containing the text you want to change direction.
-
To change the text direction, select Table Tools Layout > Text Direction. The text will rotate to the right. Select Text Direction again to rotate the text another 90 degrees.
-
To change the text alignment, choose an Alignment option to change how the text appears in the cell. You can align the text to the center, to the left, to the right, to the bottom, or to the top.
FAQ
-
How do I rotate a picture in Word?
Select the picture you want to rotate, then select and hold the rotation handle that appears just above the picture. While still holding, drag the handle to the left or right to rotate. Note that if you have multiple pictures selected at once, they will all rotate individually.
-
How do I rotate a document in Word?
To rotate a document in Word, select Layout > Orientation, and then choose the page orientation you prefer: Landscape (horizontal) or Portrait (vertical).
-
How do I rotate a single page in Word?
Select the page you want to reorient, then select Page Layout > Page Setup and choose either Portrait or Landscape under Orientation. Then select Apply to > Selected text.
Thanks for letting us know!
Get the Latest Tech News Delivered Every Day
Subscribe