
![]()
Download Article
![]()
Download Article
Do you want to add, hide, show, or personalize the toolbars at the top of Microsoft Word so you can access stuff quickly? The ribbon toolbar at the top of the screen, which contains icons, tabs, and menus, is highly customizable—you can add or remove tabs, group icons, and more. You can also personalize the Quick Access toolbar, which is just below the ribbon above your document, so the buttons you use the most are only one click away. This wikiHow article covers how to customize the Quick Access and ribbon toolbars in any modern version Microsoft Word, from Office 2010 to Microsoft 365.
Things You Should Know
- Customize the Quick Access Toolbar by clicking the downwards-pointing arrow and selecting «More Commands».
- To customize the ribbon on a Mac, go to Word > Preferences > Ribbon and Toolbar.
- To customize the ribbon on Windows, right-click a blank area of the toolbar and select «Customize the Ribbon.
-

1
Show or hide the ribbon. The «ribbon» is another name for the main toolbar at the top of Microsoft Word. If you’re using a PC, you can show or hide the ribbon as needed.
- If the toolbar at the top of Word is missing and you want to get it back, just press Ctrl + F1 to bring it back.[1]
On some keyboards, you’ll need to press Ctrl + Fn + F1 to activate the function key.- If you still can’t see the ribbon, you might be in full-screen mode. Click the three dots at the top-right corner to bring the ribbon back, click the down-arrow at the bottom-right corner of the ribbon, and choose Always show Ribbon.
- If you want to hide the ribbon to give yourself more space to work with in your document, right-click any of the tabs on the ribbon and select Collapse the ribbon.
- If the toolbar at the top of Word is missing and you want to get it back, just press Ctrl + F1 to bring it back.[1]
-
2
Open the Customize the Ribbon menu. If you want to add tabs or customize the options on your toolbar, right-click an empty area on the toolbar and select Customize the Ribbon…
Advertisement
-
3
Change the order of the tabs. If you want to reorder the Home, Insert, Draw, Layout, and other tabs, it’s easy:
- Select a tab on the right panel under «Customize the Ribbon.»
- Click the up arrow button to move that tab ahead in the list, or the down arrow to move it further down.
- Click OK to save your changes.
-
4
Choose which tabs appear. Each tab at the top of the ribbon (except for the File tab) has a corresponding checkbox under «Customize the ribbon.» You can remove a checkmark to hide that tab from the ribbon, or add a checkmark if it’s missing.
- If you want to rename a tab, you can just select the tab in the right panel and click Rename. Some tabs cannot be renamed.
-
5
Add a new tab to the toolbar. Want to make your own custom tab at the top of Word? Just click New tab below the «Customize the ribbon» column on the right side and enter a name for your tab. Once you have a new tab, you can add any functions and icons to it from the left panel.
-
6
Add or remove commands and icons on a tab. You can choose which commands and icons appear on each tab.
- Click the + next to any of the tab names under «Customize the ribbon» to display all functions and groups on that tab.
- Click + next to a group to see which functions and icons are in that group.
- To see available commands and icons you can add to any tab, use the drop-down menu above the left column «Choose commands from.»
- To add a new function to a group, select the group. Then, click a command on the left panel and select Add.
- To remove a command from a toolbar, click the command, then click Remove.
- To create a new group on a tab, select a tab, then click New Group. You can then add commands to this group.


Advertisement
-
1
Open your Ribbon and Toolbar preferences. If you want to add new items to your Word toolbar, you can do so from the preferences panel. To get there, click the Word menu, select Preferences, then click Ribbon and Toolbar.[2]
-
2
Change the order of the tabs. If you want to reorder the Home, Insert, Draw, Layout, and other tabs, it’s easy. Just click and drag any of the tabs in the right panel up or down the list until you’ve created the desired order.
-
3
Choose which tabs appear. Each tab at the top of the ribbon (except for the File tab) has a corresponding checkbox under «Customize the ribbon.» You can remove a checkmark to hide that tab from the ribbon, or add a checkmark if it’s missing.
- If you want to rename a tab, you can just select the tab in the right panel, click the gear icon, and then click Rename.
-
4
Add a new tab to the toolbar. Want to make your own custom tab at the top of Word? Just click + under the «Customize the ribbon» panel on the right side, select New tab, and enter a name for your tab.
-
5
Add, remove, or group commands on a tab. You can choose which commands and icons appear on each tab.
- Click the arrow next to any of the tab names under «Customize the ribbon» to display all functions and groups on that tab.
- Click the arrow next to a group to see which functions and icons are in that group.
- To see available commands and icons you can add to any tab, use the drop-down menu above the left column «Choose commands from.»
- To add a new command to a group, select the group in the right panel. Then, click a command on the left panel and click the right-arrow to move it over.
- To remove a command from a toolbar, click the command, then click the left arrow.
- To create a new group on a tab, select a tab, click +, and select New Group.


Advertisement
-
1
Show or hide the Quick Access Toolbar. If you don’t see the Quick Access Toolbar on Windows, you may have hidden it.
- To show it, right-click a blank area of the ribbon and select Show Quick Access Toolbar.
- To hide the toolbar, right-click it and select Hide Quick Access Toolbar.
-
2
Open the Customize Quick Access Toolbar menu. Just click the line with a down-arrow on the left side of the toolbar to view a list of commands.
- On a Mac, you can also go to the Word menu, select Preferences, and click Quick Access Toolbar.
- By default, this toolbar displays the «Save», «Undo», and «Redo» icons. You can add more icons to the Quick Access Toolbar or move it to a new location.
-
3
Click More Commands. This opens your Quick Access Toolbar settings, where you can add and remove commands.
- You can opt to add a command that’s already listed but does not have a checkmark in front of it («Save» has a checkmark in front of it because that icon is already displayed in the toolbar).
-
4
Find the command you want to add to the Quick Access Toolbar. You can use the drop-down menu above the left column («Choose commands from») to browse available commands.
-
5
Select a command and click Add or >. This adds the selected command to Quick Access.
- You can also click and drag commands to re-order them. The list is shown vertically but the Quick Access Toolbar is horizontal with the topmost command in the list showing as the leftmost icon in the toolbar.
- Add as many buttons as you’d like. Since the buttons are pretty small, you can add the <separator> command to add a line or empty space.
- You won’t see any changes in your toolbar until you’ve clicked Ok.
-
6
Click OK or Save when you’re done. You’ll be able to see the changes you’ve made to the Quick Access Toolbar.
- Click the «Customize» button again and select «Show Below the Ribbon» to have the Quick Access Toolbar below the editing ribbon. To put it back, click «Show Above the Ribbon.»[3]
- To reset the toolbar to default, click the drop-down next to «Customizations» and select Reset only Quick Access Toolbar.[4]
- Click the «Customize» button again and select «Show Below the Ribbon» to have the Quick Access Toolbar below the editing ribbon. To put it back, click «Show Above the Ribbon.»[3]
-
7
Move the Quick Access Toolbar. By default, the Quick Access Toolbar appears below the ribbon. If you want to move the toolbar above the ribbon, just click the icon with a line and a down-arrow on the Quick Access Toolbar and select Show Above Ribbon. easy icons can appear above or below the ribbon.


Advertisement
Ask a Question
200 characters left
Include your email address to get a message when this question is answered.
Submit
Advertisement
Video
Thanks for submitting a tip for review!
About This Article
Thanks to all authors for creating a page that has been read 162,931 times.
Is this article up to date?
This article is for people with visual or cognitive impairments who use a screen reader program such as Microsoft’s Narrator, JAWS, or NVDA with the Microsoft 365 products. This article is part of the Microsoft 365 screen reader support content set where you can find more accessibility information on our apps. For general help, visit Microsoft Support home or Fixes or workarounds for recent office issues.
Use Word with your keyboard and a screen reader to explore and navigate the different views and move between them. We’ve tested it with Narrator, JAWS, and NVDA, but it might work with other screen readers as long as they follow common accessibility standards and techniques.
 Need instructions on how to get started with Word, but not using a screen reader? See Word help & learning.
Notes:
-
New Microsoft 365 features are released gradually to Microsoft 365 subscribers, so your app might not have these features yet. To learn how you can get new features faster, join the Office Insider program.
-
To learn more about screen readers, go to How screen readers work with Microsoft 365.
In this topic
-
Navigate the main view
-
Navigate between views
-
Explore a document
-
Use Search
Navigate the main view
When you open a Word document for editing, you land on the main view. To cycle between the elements in the main view, press the F6 (forward) or Shift+F6 (backward). The main elements are, in order:
-
The main content area, which shows the document content. You hear the name of the document, followed by «Editing,» when the focus is on the document content.
-
The status bar at the bottom of the screen where you can find document statistics such as page count, word count, text language, and zoom level. You hear the current page number when the focus is on the status bar, for example, «Page two of three.»
-
To navigate the status bar, use the Right and Left arrow keys.
-
-
The row of ribbon tabs, which includes tabs such as File, Home, Insert, Review, View, and the Share and Comments buttons. The ribbon containing the options specific to the currently selected tab is located below the row of ribbon tabs.
-
When the focus moves to the ribbon tabs, you hear «Ribbon tabs,» followed by the currently selected tab. To navigate the row of ribbon tabs, press the Left or Right arrow key until you hear the name of the tab or control you want, and press Enter to select it.
-
To navigate from the row of ribbon tabs to the ribbon, press the Tab key or the Down arrow key once. You hear the name of the first option on the ribbon. To navigate between options on the ribbon, press the Tab key, Shift+Tab, or the Right or Left arrow key. You can also use keyboard shortcuts to select options directly. For the ribbon keyboard shortcuts, refer to Use the keyboard to work with the ribbon in Word.
-
Navigate between views
In addition to the main view, Word has the following commonly used views and areas:
The File menu
The File menu contains commands such as New, Open, and Save a Copy. You can also access your accounts and the app settings from the File menu. The File menu consists of a tab pane on the left and the contents of a selected tab on the right.
-
To open the File menu, press Alt+F. You hear: «File, home.» The focus is on the Home tab in the tab pane.
-
To navigate between the tabs in the tab pane, press the Up or Down arrow key until you hear the tab you want to open, for example, «New.» Press Enter to open the tab. The content pane of the selected tab opens to the right of the tab pane. To move the focus to the content pane, press the Tab key once.
-
To navigate within a tab content pane, press the Tab key, Shift+Tab, or the arrow keys.
-
To exit the File menu and return to the main view, press Esc.
For the File menu keyboard shortcuts, refer to Keyboard shortcuts for the File menu in Microsoft 365 for Windows.
The Quick Access Toolbar
The Quick Access Toolbar and title bar at the top of the screen contain the document name, buttons for AutoSave, ribbon display options, and your account, and buttons for minimizing, restoring the size, and closing the active window.
-
To navigate to the Quick Access Toolbar and title bar, press Alt once. You hear: «Ribbon tabs.» Then press Shift+Tab once. The focus is now on the Quick Access Toolbar.
-
To browse the available options, press Shift+Tab repeatedly. You can add and remove Quick Access Toolbar buttons and change their order on the toolbar. For instructions, refer to Use a keyboard to customize the Quick Access Toolbar.
The Options window
The Options window contains Word settings, such as personalization, proofreading, and language preferences. The Options window consists of an options category pane on the left and the content pane of the selected category on the right.
-
To open the Options window, press Alt+F, T. You hear: «Word options.»
-
To navigate the options categories, press the Down arrow key until you hear the name of the category you want, then press the Tab key to move the focus to the content pane.
-
To navigate the content pane, press the Tab key, Shift+Tab, or the Up and Down arrow keys.
-
To exit the Options window and return to the main view, press the Tab key until you hear «OK,» and press Enter. To return to the main view without making changes, press Esc.
Explore a document
Use the Narrator scan mode
To navigate the content of your document by elements, you can use the Narrator scan mode. To turn on the scan mode, press the SR key+Spacebar.
With the scan mode enabled, you can use the Up and Down arrow keys and keyboard shortcuts to navigate your document and cycle between paragraphs, other elements, areas, and landmarks. For detailed information on how to use the Narrator scan mode, refer to Chapter 3: Using scan mode.
To find the JAWS cursor that suits your needs, refer to So Many Cursors, So Little Time, Understanding Cursors in JAWS. To learn how to use the NVDA Browse mode which is also optionally available for Word, refer to 6. Browse Mode.
Use the Navigation pane
You can use the Navigation pane to quickly navigate between parts of the document such as headings or graphics.
-
To turn on the Navigation pane, press Alt+W, K. You hear: «Navigation, search document, edit box.»
-
Do one of the following:
-
To navigate the headings in the document, press the Tab key until you hear «Heading tab item,» press the Tab key until you hear the heading you want, and then press Enter. The focus moves to the beginning of the heading row in the document body.
-
To navigate by certain elements in your document, such as graphics, press the Tab key until you hear «Search, split button,» and then press Alt+Down arrow key to expand the menu. Press the Down arrow key until you hear the element you want, for example, «Graphic,» and then press Enter to select. The focus moves to the next result button. Press Enter repeatedly to move through the results.
-
-
To close the Navigation pane, press Alt+W, K.
Use Read Mode
Read Mode is designed to make reading text easier and includes reading tools such as Read Aloud.
-
To enable Read Mode, press Alt+W, F.
-
Do one or more of the following:
-
To access the Read Mode toolbar, press Alt, and then press the Tab key until you hear the name of the menu you want, and then press Enter to select it. Press the Down arrow key to move down on the list of available options, and press Enter to select an option.
-
To use Read Aloud, press Alt+W, R. To access the reading controls, press the Tab key until you reach the option you want, and then press Enter to select it.
Tip: For the best results, it might be helpful to turn off your screen reader when you use Read Aloud.
-
-
To exit Read Mode, press Esc.
Use the Immersive Reader view
With Immersive Reader, you can improve focus, declutter the text you’re reading, read scanned texts more easily, and decode complex texts.
-
To turn on Immersive Reader, press Alt+W, L, 2.
-
To access the Immersive Reader ribbon and options, press Alt. You hear: «Immersive, Immersive Reader, tab.» Press the Tab key to move between the options on the ribbon and press Enter to select an option.
-
To turn off Immersive Reader, press Alt+W, L, 2.
Use the Focus mode
The Focus mode can help you minimize distractions and concentrate on writing, creating, and collaborating in Word. The Focus mode hides the ribbon and status bar, showing just the Word document itself.
-
To turn on the Focus mode, press Alt+W, O.
-
To turn off the Focus mode, press Esc.
Navigate between floating shapes
-
To quickly move the focus to the first floating shape such as a text box or a chart, press Ctrl+Alt+5.
-
To cycle between the floating shapes, press the Tab key or Shift+Tab.
-
To return to the normal navigation, press Esc.
Zoom in or out
Zoom in to get a close-up of your document or zoom out to get an overview of the page at a reduced size.
-
Press Alt+W, Q. You hear “Zoom dialog” or “Zoom window.”
-
Press the Tab key until you reach the Percent spinner, and then type a percentage or use the Up or Down arrow key to change the percentage.
-
Press the Tab key until you reach the OK button and press Enter.
Use Search
To find an option or perform an action quickly, use the Search text field. To learn more about the Search feature, go to Find what you need with Microsoft Search.
Note: Depending on the version of Microsoft 365 you are using, the Search text field at the top of the app window might be called Tell Me instead. Both offer a largely similar experience, but some options and search results can vary.
-
Select the item or place in your document, presentation, or spreadsheet where you want to perform an action.
-
To go to the Search text field, press Alt+Q.
-
Type the search words for the action that you want to perform. For example, if you want to add a bulleted list, type bullets.
-
Press the Down arrow key to browse through the search results.
-
Once you’ve found the result that you want, press Enter to select it and to perform the action.
See also
Use a screen reader to insert and change text in Word
Use a screen reader to insert a picture or image in Word
Keyboard shortcuts in Word
Basic tasks using a screen reader with Word
Set up your device to work with accessibility in Microsoft 365
Make your Word documents accessible to people with disabilities
What’s new in Microsoft 365: Release notes for Current Channel
Use Word for Mac with your keyboard and VoiceOver, the built-in MacOS screen reader, to explore and navigate the different views and move between them.
Need instructions on how to get started with Word, but not using a screen reader? See Word help & learning.
Notes:
-
New Microsoft 365 features are released gradually to Microsoft 365 subscribers, so your app might not have these features yet. To learn how you can get new features faster, join the Office Insider program.
-
This topic assumes that you are using the built-in macOS screen reader, VoiceOver. To learn more about using VoiceOver, go to VoiceOver Getting Started Guide.
In this topic
-
Navigate the main view
-
Navigate between views
-
Explore a document
Navigate the main view
When you open a Word document for editing, you land on the main view. To navigate the main view, press F6 (forward) and Shift+F6 (backward). The focus moves through the following elements in the main view, in order:
-
The main content area, which shows the document content. This is where you edit the document. When the focus is on the content area, you hear the page you’re on, followed by the location of the text insertion point.
-
The status bar at the bottom of the screen, which contains document statistics such as page count, word count, text language, and the zoom level. When the focus moves to the status bar, you hear the current page number, followed by the total number of pages, for example, «Page six of fourteen.» To browse the options on the status bar, press Control+Option+Right or Left arrow key.
-
The quick access toolbar at the top of the screen, which contains, for example, the AutoSave, Print, and Undo buttons and the name of the document. You hear «Autosave» when the focus moves to the quick access toolbar. To move between the options on the toolbar, press Control+Option+Right or Left arrow key.
-
The row of ribbon tabs, which includes tabs such as Home, Insert, Review, View, and the Share and Comments buttons. When the focus moves to the ribbon tabs, you hear the currently selected tab, for example, «Home, selected tab.»
-
To navigate the row of ribbon tabs, press Control+Option+Right or Left arrow key until you hear the name of the tab or control you want, and press Control+Option+Spacebar to select it and display the ribbon.
-
The ribbon containing the options specific to the currently selected tab is located below the row of ribbon tabs. To navigate from the row of ribbon tabs to the ribbon, press the Tab key until you hear the ribbon you’re entering and the first option on the ribbon. For example, with the View tab selected, you hear: «Entering View tab commands scroll area.» To navigate between the options on the ribbon, press Control+Option+Right or Left arrow key.
-
Navigate between views
In addition to the main view, Word has the following commonly used views and areas:
Word start page
When you open the Word app, you land on the start page. On the start page, you can create a new document, browse templates, open an existing document, and access your account info. The start page consists of a tab pane on the left and the contents of a selected tab on the right.
-
To navigate the tab pane, press the Tab key. To display the tab contents, press Control+Option+Spacebar.
-
To navigate from the tab pane to the content pane of the selected tab, press the Tab key until you hear: «Entering scroll area.» To browse the available sections in the content pane, press Control+Option+Right arrow key. To interact with a section, press Control+Option+Shift+Down arrow key. To stop interacting with a section, press Control+Option+Shift+Up arrow key.
-
To navigate to the start page from the main view, press Shift+Command+P.
The app menu bar
The app menu bar contains additional options and controls, for example, for editing text and formatting tables. You can also access the File menu with options to start a new document or open an existing one.
-
To move the focus to the app menu bar, press Control+Option+M.
-
To browse the options on the menu bar, press Control+Option+Right arrow key.
-
To exit the menu bar, press Esc.
The Word Preferences window
In the Word Preferences window, you can access Word settings such as AutoCorrect and ribbon options.
-
To open the Word Preferences window, press Command+Comma (,).
-
To navigate the window, press the Tab key. To select a setting, press Spacebar. The setting dialog box opens. To navigate within a setting dialog box, press the Tab key or the arrow keys.
-
To close the Word Preferences window and return to your document, press Esc.
Explore a document
To navigate around a Word document, you can use the keyboard shortcuts, the VoiceOver features such as rotor, or the Navigation Pane.
Use the keyboard shortcuts
One of the quickest ways to move around in a document is to use the keyboard shortcuts. For a full list of keyboard shortcuts for navigating a document, refer to the «Navigate the document» section in Keyboard shortcuts in Word.
Use the VoiceOver rotor, Quick Nav, or Item Chooser
You can use the VoiceOver features such as rotor, Quick Nav, or Item Chooser to navigate directly to an item, for example, a section heading or link.
-
To open the rotor, press Control+Option+U. For more info, refer to Use the VoiceOver rotor on Mac.
-
To open the Item Chooser, press Control+Option+I. For more info, refer to Use the VoiceOver Item Chooser to navigate on Mac.
-
To activate Quick Nav, press the Left and Right arrow keys at the same time. For more info, refer to Use VoiceOver Quick Nav in apps and webpages on Mac.
Use the Navigation Pane
Use the Navigation Pane to quickly navigate between parts of the document such as headings.
-
To turn on the Navigation Pane, press Command+F6 until you hear the name of the current ribbon tab. Press Control+Option+Right arrow key until you hear «View, tab,» and press Control+Option+Spacebar. Press the Tab key until you hear «Navigation pane, toggle button,» and press Control+Option+Spacebar.
-
To move the focus to the navigation pane, press Command+F6 until you hear: «Thumbnails pane, selected.»
-
Press Control+Option+Right arrow key until you hear «Document map, tab,» and then press Control+Option+Spacebar.
-
Press Control+Option+Right arrow key until you hear «Table,» and then press Control+Option+Shift+Down arrow key to open the headings table.
-
To move between the headings, press the Down or Up arrow key until you find the heading you want, and then press Control+Option+Spacebar to move the focus to the beginning of the heading in the document body.
See also
Use a screen reader to insert and change text in Word
Use a screen reader to insert a picture or image in Word
Keyboard shortcuts in Word
Basic tasks using a screen reader with Word
Set up your device to work with accessibility in Microsoft 365
Make your Word documents accessible to people with disabilities
What’s new in Microsoft 365: Release notes for Current Channel
Use Word for iOS with VoiceOver, the built-in iOS screen reader, to explore and navigate the different views and move between them.
Need instructions on how to get started with Word, but not using a screen reader? See Word help & learning.
Notes:
-
New Microsoft 365 features are released gradually to Microsoft 365 subscribers, so your app might not have these features yet. To learn how you can get new features faster, join the Office Insider program.
-
This topic assumes that you are using the built-in iOS screen reader, VoiceOver. To learn more about using VoiceOver, visit Apple accessibility.
In this topic
-
Navigate the main view
-
Navigate between views
-
Explore a document
-
Use VoiceOver with an external keyboard
Navigate the main view
When you open a Word document for editing, you land on the main view. It contains the following main elements:
-
The top menu bar, which contains options such as Close file, Share, and File.
-
To move the focus to the top menu bar, tap near the top of the screen with four fingers. You hear the name of the document. Then swipe right once. The focus is now on the top menu bar. To browse the available options, swipe right repeatedly.
-
-
The document content area, which appears under the top menu and takes up the majority of the screen.
-
To move the focus to the content area, swipe right or left until you hear the name of the document, followed by the file extension, for example «Docx» and the current page. VoiceOver starts to read the page content.
-
-
The quick toolbar, which appears at the bottom of the screen when you’ve selected an editable element in the content area. It contains document formatting options for the selected element.
-
To go to and navigate the quick toolbar, select an editable element in the document, and swipe right until you reach the toolbar buttons.
-
-
The ribbon menu, which pops up from the bottom of the screen and contains tabs with different sets of tools and options. The ribbon options specific to the selected tab are displayed below the tab name.
-
To go to the ribbon menu, tap near the top of the screen with four fingers, swipe right until you hear «Show ribbon,» and double-tap the screen. You hear the currently selected tab.
-
To switch to another tab, double-tap the screen, swipe left or right until you hear the name of the tab you want, and then double-tab the screen.
-
To navigate the ribbon options, swipe left or right.
-
Navigate between views
In addition to the main view, Word has the following commonly used views:
The Home, New, and Open tabs
When you open the Word app, you land on the Home tab. This tab lists the documents that you’ve recently worked on and documents that others have shared with you. At the top of the Home tab, you can find the Search text field to search for a document.
The New tab is where you can start a new document. Here you can also find the available templates.
On the Open tab, you can access the document storage locations that are available to you, such as OneDrive, SharePoint, and your iPhone. You can browse for a file in each location and open it for editing.
-
To navigate the contents of each tab, swipe left or right. To select a file, folder, or storage location, double-tap the screen.
-
To switch between the Home, New, and Open tabs, tap near the bottom of the screen with four fingers, swipe left or right until you hear the tab you want, and then double-tap the screen.
-
To navigate to a tab when you’re editing a document in the main view, tap near the top of the screen with four fingers, swipe right until you hear «Close file,» and double-tap the screen. The focus moves to the tab from where you opened the document you just closed.
The File menu
The File menu contains options such as Save a Copy, Export, and Print.
-
To open the File menu, tap near the top of the screen with four fingers, swipe right until you hear «File,» and double-tap the screen.
-
To navigate the menu, swipe left or right.
-
To exit the menu, swipe left until you hear «Done,» and double-tap the screen.
The Search view
In the Search view, you search the currently open document and browse search results.
-
To navigate to the Search view when you’re editing a document, swipe left until you hear «Find,» and double-tap the screen. Use the on-screen keyboard to type the search words.
-
To browse the search results, tap near the top of the screen with four fingers, swipe left until you hear «Next search result» or «Previous search result,» and double-tap the screen.
-
To exit the Search view, swipe right until VoiceOver starts to read the document content, and then double-tap the screen.
Explore a document
-
To explore the text of a document, swipe right or left until you hear VoiceOver announce the currently open page, followed by «Content.» Swipe up or down to change the screen reader navigation mode, for example, to headings, paragraphs, lines, or words, and then swipe right or left to navigate.
-
Use the VoiceOver rotor to choose how you want to move through a document when you swipe up or down. For example, if you choose «Words,» the focus moves through the document word by word with each swipe.
-
To use the rotor, rotate two fingers on your phone screen as if you’re turning a dial. You hear the first rotor option. Keep rotating your fingers until you hear the option you want, and lift your fingers to select the option. To navigate by the selected element, swipe up or down.
-
-
To scroll through a document, swipe up or down with three fingers. When you lift your fingers off the screen, VoiceOver announces the page you’re on.
-
Use the Mobile view to simplify the page layout, which could make it easier to read and edit text on your phone’s screen. Swipe left or right until you reach the Mobile view button, and then double-tap the screen. To return to the Print view, swipe left until you hear «Print view,» and double-tap the screen.
Use VoiceOver with an external keyboard
If you use VoiceOver with an external keyboard and you want to use keyboard shortcuts to navigate and edit your document, make sure Quick Nav is turned off. To turn Quick Nav off, on your external keyboard, press the Left and Right arrow keys simultaneously. To turn Quick Nav back on, press the Left and Right arrow keys again.
For the keyboard shortcuts, refer to Keyboard shortcuts in Word.
See also
Use a screen reader to insert and change text in Word
Use a screen reader to insert a picture or image in Word
Basic tasks using a screen reader with Word
Set up your device to work with accessibility in Microsoft 365
Make your Word documents accessible to people with disabilities
What’s new in Microsoft 365: Release notes for Current Channel
Use Word for Android with TalkBack, the built-in Android screen reader, to explore and navigate the different views and move between them.
Need instructions on how to get started with Word, but not using a screen reader? See Word help & learning.
Notes:
-
New Microsoft 365 features are released gradually to Microsoft 365 subscribers, so your app might not have these features yet. To learn how you can get new features faster, join the Office Insider program.
-
This topic assumes that you are using the built-in Android screen reader, TalkBack. To learn more about using TalkBack, go to Android accessibility.
In this topic
-
Navigate the main view
-
Navigate between views
-
Explore a document
-
Use the TalkBack menu
Navigate the main view
When you open a Word document for editing, you land on the main view. It contains the following main elements:
-
The top menu bar, which contains buttons such as More options to open the ribbon, Search, Undo, and Menu to open options for saving and sharing, for example.
-
To go to the top menu bar from the document content, swipe left until you hear «Menu.»
-
To navigate the top menu, swipe left and right.
-
-
The main content area, which appears under the top menu and takes up the majority of the screen. To move the focus to the content area, swipe right until you hear the name of the document and its file extension, for example, «Docx.»
-
The quick toolbar, which appears at the bottom of the screen when you’ve selected an editable element in the content area. It contains document formatting options for the selected element.
-
To go to and navigate the quick toolbar, select an editable element in the document, and swipe right until you reach the toolbar buttons.
-
-
The ribbon, which pops up from the bottom of the screen and contains tabs with different editing tools and options.
-
To go to the ribbon, slide one finger near the top of the screen until you hear «More options, button,» and double-tap the screen. You hear the currently selected ribbon tab. The ribbon options specific to the selected tab are displayed below the tab name.
-
To switch to another tab, double-tap the screen, swipe left or right until you hear the name of the tab you want, and double-tab the screen.
-
To navigate the ribbon options, swipe left or right.
-
Navigate between views
In addition to the main editing view, Word has the following commonly used views and areas:
The Recent, Shared, and Open views
When you open the Word app, you land on the Recent view. It lists the documents that you’ve recently worked on. To browse the list, swipe right or left. To select a document, double-tap the screen. The document opens in the editing view.
In the Shared view, you can find the documents that others have shared with you. To browse the list, swipe right or left. To select a document, double-tap the screen. The document opens in the editing view.
In the Open view, you can browse the available file storage locations or navigate to a document you want to open.
-
To switch between the Recent, Shared, and Open views, slide one finger near the bottom of the screen until you hear the view you want, and double-tap the screen.
-
At the top of each view, you can find buttons for accessing your account info, and creating a new document. Slide one finger at the top of the screen until you hear «New button,» or «Signed in as,» followed by your username. In the Recent and Shared views, you can also find a button to search for a document. Swipe right or left until you hear «Search, button,» and double-tap the screen.
-
To navigate to the Recent view when you’re editing your document in the main view, swipe left or slide one finger near the upper-left corner of the screen until you hear «Back button,» and double-tap the screen.
The Word menu
The Word menu contains options for saving, sharing, and printing your document. From here you can also access the Word for Android settings.
-
To open the Word menu, swipe left until you hear «Menu,» and then double-tap the screen.
-
To navigate the Word menu, swipe left or right until you hear the option you want, and then double-tap the screen.
-
To exit the menu, swipe down-then-left.
The Find bar
Use the Find bar to search the currently open document and browse the search results.
-
To navigate to the Find bar when you’re editing a document, swipe left until you hear «Find,» and then double-tap the screen. Use the on-screen keyboard to type your search words.
-
To browse the search results, swipe left until you hear «Find previous» or «Find next,» and double-tap the screen.
-
To close the Find bar, swipe right you hear «Close Find bar,» and then double-tap the screen.
Explore a document
To explore the text of a document, swipe right or left until you hear the screen reader announce the currently open page, followed by «Content.» You can change the screen reader navigation mode, also known as the reading control, for example, to headings, paragraphs, lines, or words. The gestures to change the mode depend on the Android version of your phone. For more information, refer to Use TalkBack gestures.
See also
Use a screen reader to insert and change text in Word
Use a screen reader to insert a picture or image in Word
Keyboard shortcuts in Word
Basic tasks using a screen reader with Word
Set up your device to work with accessibility in Microsoft 365
Make your Word documents accessible to people with disabilities
What’s new in Microsoft 365: Release notes for Current Channel
Use Word for the web with your keyboard and a screen reader to explore and navigate the different views and move between them. We have tested it with Narrator in Microsoft Edge and JAWS and NVDA in Chrome, but it might work with other screen readers and web browsers as long as they follow common accessibility standards and techniques.
Need instructions on how to get started with Word, but not using a screen reader? See Word help & learning.
Notes:
-
New Microsoft 365 features are released gradually to Microsoft 365 subscribers, so your app might not have these features yet. To learn how you can get new features faster, join the Office Insider program.
-
To learn more about screen readers, go to How screen readers work with Microsoft 365.
-
When you use Word for the web with a screen reader, switch to the full screen mode. Press F11 to toggle the full screen mode on and off.
-
When you use Word for the web, we recommend that you use Microsoft Edge as your web browser. Because Word for the web runs in your web browser, the keyboard shortcuts are different from those in the desktop program. For example, you’ll use Ctrl+F6 instead of F6 for jumping in and out of the commands. Also, common shortcuts like F1 (Help) and Ctrl+O (Open) apply to the web browser – not Word for the web.
In this topic
-
Navigate the main view
-
Navigate between views
-
Explore a document
-
Use Search
Navigate the main view
When you open a Word for the web document, you land on the main view. To cycle between the elements in the Word for the web main view, press the Ctrl+F6 (forward) or Shift+Ctrl+F6 (backward). The main elements are, in order:
-
The main content area, which contains the document content. This is where you edit the document. You hear «Document contents, editing» when the focus is on the main content area.
-
The status bar at the bottom of the screen, which contains document statistics such as page count, word count, text language, and the zoom level. When the focus is on the status bar, you hear the number of the page you’re currently on and the total number of pages in the document, for example, «Page one of three, button.» To navigate within the status bar, press the Tab key or Shift+Tab.
-
The title banner at the top of the screen, which contains the App Launcher button for launching other applications, the name and file path of the currently open file, the Search text field, and buttons for accessing the settings and your account info. You hear «Banner, App launcher» when the focus is on the title banner. To navigate the title banner, press the Tab key or Shift+Tab.
-
The row of ribbon tabs, which includes tabs such as File, Home, Insert, View, and Help. When the focus moves to the row of ribbon tabs, you hear «Ribbon tabs,» followed by the currently selected tab. To navigate the row of ribbon tabs, use the Right and Left arrow keys.
-
The ribbon containing buttons specific to the currently selected tab is located immediately below the row of ribbon tabs. To navigate from a ribbon tab to the ribbon, press the Tab key once. You hear the name of the first button in the ribbon. To navigate between buttons on the ribbon, use the Right and Left arrow keys.
-
The row of ribbon tabs also contains controls for additional actions such as switching between modes, sharing the document, displaying the Comments pane, and more. To access the additional controls, press Ctrl+F6 until you hear «Ribbon tabs, and then press the Tab key until you hear «Additional controls, Mode menu,» followed by the currently selected mode, for example, «Editing, selected.» To browse the additional controls, press the Right arrow key.
-
Navigate between views
In addition to the main view, Word for the web has the following commonly used views and areas:
The File menu
The File menu contains options such as New, Open, and Save a Copy. You can also access your account info and the app settings. The File menu consists of a tab pane on the left and the contents of a selected tab on the right.
-
To open the File menu, press Alt+Windows logo key+F. You hear: «Close.» The Home tab is selected and its contents are displayed in the content pane.
-
To navigate between the tabs in the tab pane, press the Up or Down arrow key until you hear the tab you want to open, for example, «New.» Press Enter to open the tab. The content pane of the selected tab opens to the right of the tab pane. The focus moves to the first item in the content pane.
-
To navigate within a content pane, press the Tab key, Shift+Tab, or the arrow keys.
-
To exit the File menu and return to the main view, press Esc.
Reading View
Reading View is designed to make reading text easier for everyone. In Reading View, Word for the web also offers Accessibility Mode, which can make reading a document easier for people who use screen reader. In Accessibility Mode, Word for the web presents a Portable Document Format (PDF) version of the file with tagging in your browser. Your screen reader reads the text and its formatting from the PDF version in the browser.
-
To turn on Reading View, press Alt+Windows logo key, W, F.
-
To navigate to the Reading View toolbar, press Ctrl+F6 until you hear «Accessibility Mode,» press the Tab key to explore the options on the toolbar.
-
In Reading View, to turn Accessibility Mode on or off, press Ctrl+F6 until you hear «Accessibility Mode,» and press Enter.
-
To exit Reading View, press Ctrl+F6 until you hear «Accessibility Mode,» press the Tab key until you hear «Edit document,» and press Enter. You hear: «Edit document, Make quick changes right here in Word.» Then do one of the following:
-
To continue editing and reading the document in Word for the web, press Enter.
-
To open the document in the full desktop version of Word, press the Down arrow key until you hear «Open in desktop app,» and press Enter.
-
Explore a document
Use the Navigation Pane
You can use the Navigation Pane to quickly navigate between headings in a document.
-
To turn on the Navigation Pane, press Alt+Windows logo key, W, K. You hear: «Navigation, search for.»
-
Press the Tab key or Shift+Tab until you hear «Headings,» and press Enter. Press the Tab key until you hear the currently selected tab, for example, «Find tab item,» and then press the Right arrow key until you hear: «Heading tab item.»
-
Press the Tab key until you hear the heading you want, and press Enter. The focus moves to the beginning of the heading row in the document body.
Use zoom
-
Press Ctrl+F6 until you hear the current page number followed by the total number of pages in the document, for example, «Page one of three.»
-
To zoom in, press the Tab key until you hear «Zoom in,» and press Enter. You hear the new zoom percentage, for example, «90 percent.» To zoom out, press the Tab key or Shift+Tab until you hear «Zoom out,» and press Enter.
Use Search
To find an option or perform an action quickly, use the Search text field. To learn more about the Search feature, go to Find what you need with Microsoft Search.
Note: Depending on the Microsoft 365 version of you are using, the Search text field at the top of the app window might be called Tell Me instead. Both offer a largely similar experience, but some options and search results can vary.
-
Select the item or place in your document, presentation, or spreadsheet where you want to perform an action. For example, in an Excel spreadsheet, select a range of cells.
-
To go to the Search text field, press Alt+Q.
-
Type the search words for the action that you want to perform. For example, if you want to add a bulleted list, type bullets.
-
Press the Down arrow key to browse through the search results.
-
When you’ve found the result that you want, press Enter to select it and to perform the action.
See also
Use a screen reader to insert and change text in Word
Use a screen reader to insert a picture or image in Word
Keyboard shortcuts in Word
Basic tasks using a screen reader with Word
Make your Word documents accessible to people with disabilities
What’s new in Microsoft 365: Release notes for Current Channel
Technical support for customers with disabilities
Microsoft wants to provide the best possible experience for all our customers. If you have a disability or questions related to accessibility, please contact the Microsoft Disability Answer Desk for technical assistance. The Disability Answer Desk support team is trained in using many popular assistive technologies and can offer assistance in English, Spanish, French, and American Sign Language. Please go to the Microsoft Disability Answer Desk site to find out the contact details for your region.
If you are a government, commercial, or enterprise user, please contact the enterprise Disability Answer Desk.
| The ToolbarA toolbar is a bar containing buttons and options that you use to carry out commands. With toolbars, commands become just handy and easily accessible to users. The buttons contained in them are used to access commands more quickly than by opening the menus and the respective dialog boxes.
ScreenTips So, any time you are at a loss as to the name or use of a toolbar button, simply rest the mouse pointer over such button and immediately, you’ll see a little text pop-up below the pointer, saying something. This is a ScreenTip or ToolTip. In case the ScreenTips don’t appear when you move the pointer over a button, it is possible the feature has been disabled/turned off. You can turn it on by doing the following:
That’s all. Those are the steps you’ll also take to deactivate the feature, for one reason or another, though not advisable. HOW TO DISPLAY/INVOKE A (MISSING) TOOLBAR |
Displaying A Toolbar Using the View Menu
- On the Menu bar, click View. This displays the View menu.
- Then, on the View menu, point to Toolbars item.
- Select and click the name of the desired toolbar from the Toolbars sub-menu.The toolbar you selected will then appear on screen.
This now displays the Toolbars sub-menu, in which the names of certain toolbars are shown. Here, you’ll find that some of the toolbar names have a check mark to the left of them, while some have none. The check mark indicates the toolbar bearing it is already displayed on screen.
 |
| Fig: Showing or hiding a toolbar using the View menu |
Those are the steps you’ll also follow to hide a toolbar you no longer want on screen at a particular moment.
NOTE:
If you can’t find the particular toolbar you are really looking for on the Toolbars sub-menu, click Customize, and then click the Toolbars tab in the Customize dialog box that appears. In the Toolbars list, click the checkbox next to the name of the toolbar you want and then click Close. See figure below.
 |
| Fig: Showing or hiding a toolbar using the Customize dialog box |
To Display a Desired Toolbar Using a Shortcut
Simply right-click an empty space on any toolbar, and then click the name of toolbar you want.
TIP: If you do not see the toolbar you’re looking for on the shortcut menu, click the Toolbar Options arrow, point to Add or Remove Buttons, click Customize, click the Toolbars tab in the Customize dialog box, and then, in the toolbars list, click the checkbox next to the toolbar you want and click Close when you are through.
 |
| Fig: Displaying the Customize dialog box via the Toolbar Options button |
At this juncture, I’m quite confident to a reasonable extent that how to determine the name of any toolbar button/icon should never be a problem to you, since the ScreenTips are there to «tell-tale». Right now, your problem, I guess, should be: «What exactly is the function of each of these toolbar buttons/icons?» Well, if you have asked that question, it simply shows you are bright and ready to learn. The good news is, you are not helpless: I have dedicated the following sections to expatiate a little on the Standard toolbar, Formatting toolbar, and the Drawing toolbar, since you will be using them constantly.
Standard Toolbar
You have learned that the Standard toolbar is, by default, docked directly below the Menu bar, and that it contains buttons used for performing tasks similar to the commands available in the Menu bar. Let’s now take a moment to identify the name and purpose/use of each of the buttons on the Standard toolbar.
|
NAME |
ICON |
USE |
| New |
|
Creates a new blank document based on the default or current template. |
| Open |
|
Opens a document previously created and saved in Word. |
| Save |
|
Saves new changes to the current document or file, with its filename, location and document format. |
|
|
Sends the content of the current document as the body of an E-mail message. |
|
| Search |
|
Finds files, Web pages and Outlook items based on the search criteria you enter. |
|
|
Prints the active document or selection. | |
| Print Preview |
|
Shows how a document or file will look when you print it. |
| Spelling |
|
Checks spelling in the active document, file or item. |
| Cut |
|
Removes the selected item from the active document and places it in the Clipboard. |
| Copy |
|
Copies selected text or object to the Clipboard. |
| Paste |
|
Pastes the item you cut or copied into (the position of the insertion point) the document from the Clipboard. |
| Format Painter |
|
Copies the format from a selected text or object and applies it to the text or object you click. |
| Undo |
|
Reverses the last action or deletes the last entry you typed. Click the arrow next to this icon to select and reverse multiple actions at a time. |
| Redo |
|
Reverses the action of the last Undo command. Click the arrow next to this icon to select and reverse multiple Undo command actions. |
| Insert Hyperlink |
|
Inserts a new hyperlink or edits the selected hyperlink. |
| Tables and Borders |
|
Displays Tables and Borders toolbar, which offers tools for editing/formatting a table and its content. |
| Insert Table |
|
Inserts a table in the document. Click and drag to specify the number of rows and columns. |
| Insert Microsoft Excel Worksheet |
|
Inserts a new Microsoft Excel worksheet at the insertion point. Click and drag to specify the number of rows and columns. Use the Excel tools on the toolbar to edit the table. |
| Columns |
|
Changes the number of columns in a document or a section of a document. |
| Drawing |
|
Shows or hides the Drawing toolbar. |
| Document Map |
|
Used to turn on or off the Document Map. Document Map shows the outline structure of a document so that you can quickly navigate through the document and keep track of your location in it. |
| Zoom |
|
Used to «zoom in» to get a close-up view of a document or «zoom out» to see more of the page at a reduced size. |
| Show/Hide |
|
Shows or hides non-printing characters, such as tab characters, paragraph marks and hidden text. |
| Office Assistant (Microsoft Office Help) |
|
Opens Help or invokes the Office Assistant to provide help topics and tips to help you accomplish your task. |


Formatting Toolbar
The Formatting toolbar offers shortcut buttons to help format a document quickly. From the Formatting toolbar, you can quickly apply formatting attributes such as Font; Font Color; Alignment; Line Spacing; Bullets and Numbering, etc, document text, to save time.
The following table provides a list of Formatting toolbar buttons and a brief description of each.
|
NAME |
ICON |
USE |
| Style |
|
Opens a Style drop-down list from which you can select one. |
| Font |
|
Changes the font of the selected text or number. Click the drop-down arrow beside the box and select a font from the list. |
| Font Size |
|
Changes the size of the selected text or number. Enter a size value in the box, or select an appropriate size from the drop-down list. |
| Bold |
|
Applies or removes bold formatting to or from a selected text or number. |
| Italic |
|
Makes selected text or number italic, but removes italic from selected text or number if it’s already italic. |
| Underline |
|
Underlines (rules a line) or removes underline formatting from selected text or number. |
| Align Left |
|
Aligns the selected text, number or inline object to the left with a jagged edge. |
| Center |
|
Aligns selected text, numbers or inline objects to the center. |
| Align Right |
|
Aligns the selected text, number or inline objects to the right, with a jagged edge. |
| Justify |
|
Aligns the selected paragraphs to both the left and right margins or indents. |
| Numbering |
|
Adds numbers to or removes numbers numbers from selected paragraphs. |
| Bullets |
|
Adds bullets to or removes bullets from the selected paragraphs. |
| Decrease Indent |
|
Indents the selected paragraph to the previous tab stop or indents the content of the selected item to the left by one character width of the standard font. |
| Increase Indent |
|
Indents the selected paragraph to the next tab stop or indents the content of the selected item to the right by one character width of the standard font. |
| Outside Border |
|
Adds or removes a border around the selected text, paragraphs, cells, pictures or other objects. |
| Highlight |
|
Marks text so that it is highlighted and stands out from the surrounding text. |
| Font Color |
|
Formats the selected text with the color you click |


Drawing Toolbar
The Drawing toolbar is located at the bottom of the window, between the Horizontal Scroll bar and the Status bar. Like every other toolbar, this also contains smart icons representing shortcuts to Main menu commands in Word.
It holds buttons/tools used in creating drwaings, such as rectangles, ovals, lines, arrows, WordArt text, etc. It also offers tools for inserting organizational charts and ready-made pictures and Clip Arts from their different locations.
Also included in this toolbar are tools for formatting inserted objects and for adding special effects such as shadow or 3-D to lines, rectangles, ovals, etc. Like every other toolbar also, the Drawing toolbar can be displayed or hidden.
The following table shows a list of tools offered on the Drawing toolbar, and their functions:
|
NAME |
ICON |
USE |
| Draw |
|
Offers a number of options for defining the relative positions, arrangements, rotation, etc, of drawings in a document. It also offers tools for changing the shape of AutoShapes. |
| Select Objects |
|
Changes the pointer to a selection arrow so you can click to select objects in the active window. |
| AutoShapes |
|
Offers a group of ready-made shapes that include basic shapes, such as rectangles and circles, including a variety of lines and connectors, block arrows, flowchart symbols, stars and banners, and callouts. |
| Line |
|
Allows you to draw a straight line where you click or drag in the active window. |
| Arrow |
|
Draws or inserts a line with an arrow head where you click or drag in the active window. |
| Rectangle |
|
Draws a rectangle where you click and drag on the active window. You can also draw a square using this tool by holding SHIFT while you drag. |
| Oval |
|
Draws an oval where you click and drag in the active document. To draw a (perfect) circle, hold down SHIFT while you drag. |
| Text Box |
|
Draws a text box with horizontal direction where you click and drag in the active document. |
| Insert WordArt |
|
Creates decorative text by inserting a Microsoft Office drawing objects. |
| Insert Diagram |
|
Creates an organizational chart or a circle, radial, pyramid, or Venn or target diagram in your document. |
| Clip Art |
|
Opens the Clip Gallery where you can select the clip art image you want to insert in your document or update your clip art collection. |
| Insert Picture |
|
Inserts an existing picture in your active document at the insertion point. |
| Fill Color |
|
Adds, modifies, or removes the fill color or effects from the selected object. |
| Line Color |
|
Adds, modifies, or removes the line color from the selected object. |
| Font Color |
|
Allows you to add, modify, or remove the text color of the selected text. |
| Line Style |
|
Used to select a thickness for the selected line. |
| Dash Style |
|
Allows you to control the appearance of the selected line. |
| Arrow Style |
|
Allows you to select the style of arrowhead. |
| Shadow Style |
|
Allows you to select the shadow appearance of the selected drawing object. |
| 3-D Style |
|
Allows you to add depth to drawing objects such as lines, AutoShapes, and freeform objects. |


Thank you for taking your time to read this tutorial. Please visit this blog again for future updates and helpful tips. Your visits will surely be worth it. I sincerely appreciate your visits and presence here. If you are finding these tutorials and tips informative and helpful, please kindly recommend this blog to your friends. If, on the other hand, there is any area you feel improvement is needed, please kindly forward a piece of advice. These will be highly welcomed and appreciated. Feel free to drop comments or ask questions using the comment box below. Your comments will be promptly reviewed and published and your questions speedily looked into and answered in the best possible manner. Thanks.
The Standard toolbar
This entire toolbar could become a floating window by
double-clicking on the control bar at the far left end of this
toolbar. That gives the following window, which can be placed
anywhere on the screen:
This toolbar can be restored to its original position by
clicking in the gray bar at the top and dragging it back to the
top of the screen. Push the top of the window up to the bottom
of the menu bar.
Function of commonly used buttons

Creates a new blank document based on the
default template

Opens or finds a file

Saves the active file with its current
file name, location and file format

Prints the active file — for more print
options go to the File menu and select Print

Print preview — Shows how the document
will look when you print it.

Spelling, grammar and writing style
checker
Cut — Removes the selection from the
document and places it on the clipboard
Copy — Copies the selected item(s) to the
clipboard
Paste — Places the content of the
clipboard at the insertion point

Format painter — Copies the format from a
selected object or text and applies to other objects or
text

Undo — Reverses the last command, use
pull-down menu to undo several steps
Redo — Reverses the action of the Undo
button, use the pull-down menu to redo several
steps

Displays the Tables and Borders
toolbar

Insert a table into the document, or make
a table of selected text

Insert an Excel spreadsheet into the Word
document
Columns — Changes the number of columns
in a document

Displays or hides the Drawing
toolbar
Zoom — Enlarge or reduce the display of
the active document
The Formatting toolbar
This entire toolbar could become a floating window by
double-clicking on the control bar at the far left end of this
toolbar. That gives the following window, which can be placed
anywhere on the screen:
This toolbar can be restored to its original position by
clicking in the gray bar at the top and dragging it back to the
top of the screen. Push the top of the window up to the bottom
of the menu bar.
Function of commonly used buttons

Select the style to apply to
paragraphs

Changes the font of the selected
text

Changes the size of selected text and
numbers
Makes selected text and numbers
bold
Makes selected text and numbers
italic

Underlines selected text and
numbers
Aligns to the left with a ragged right
margin

Centers the selected text

Aligns to the right with a ragged left
margin
Aligns the selected text to both the left
and right margins
Makes a numbered list or reverts back to
normal

Add, or remove, bullets in a selected
paragraph
Decreases the indent to the previous tab
stop
Indents the selected paragraph to the
next tab stop

Adds or removes a border around selected
text or objects

Marks text so that it is highlighted and
stands out

Formats the selected text with the color
you click
The Drawing toolbar
This entire toolbar could become a floating window by
double-clicking on the control bar at the far left end of this
toolbar. That gives the following window, which can be placed
anywhere on the screen:
This toolbar can be restored to its original position by
clicking in the gray bar at the top and dragging it back to the
top of the screen. Push the top of the window up to the bottom
of the menu bar.
Function of commonly used buttons

A pull down menu with several
drawing options

Changes the pointer to a selection
arrow

Rotates the selected object to any
degree

A pull down menu with several libraries of
shapes

Draws a line where you click and drag.
Hold the Shift key down to make the line straight
Inserts a line with an arrowhead where
you click and drag
Draws a rectangle where you click and
drag. Hold down Shift to draw a square
Draws an oval where you click and drag.
Hold down Shift to draw a circle
Draws a text box where you click and

Create text effects with
Word Art

Add, modify, or remove fill color from a
selected object

Add, modify, or remove line
color
Formats the selected text with the color

Changes the thickness of lines

Selects dash style for dashed
lines
Select arrow style; placement and shape
of arrowhead

A pull down menu offers shadow
choices

Add 3-d effects to rectangles or
ovalsCustomize the toolbars
Removing items
from active toolbarsIf any item on the toolbar is not useful to you it can be
removed. I am going to use a floating copy of the Standard
toolbar as an example:
In the above toolbar I plan to remove the Insert Hyperlink
button
- From the
View
menu select
Toolbar- From the
Toolbar
submenu select
Customize- Click on the button you want to remove
- Click and drag the button until you see an x attached to
the pointer- Let go of the button and it is removed from the
toolbar� The same procedure can be used
to move a toolbar button to a new location on any toolbarRestoring items to an active toolbar
To restore any buttons that you removed from a toolbar
follow this procedure:
- From the
View
menu select
Toolbar- From the
Toolbar
submenu select
Customize- Choose the
Toolbars
tab- Click on the name of the toolbar
- Select the
Reset
button- Click
OK
in the
Reset
Toolbar
windowAdding buttons to a toolbar
A large number of toolbars can be added to the window from
the View/Toolbar window. However, you may wish to add only a
button or two to the open toolbars. There are some actions that
I used regularly in Microsoft Works which are not listed on the
commonly used toolbars in Word, such as:
- Insert date
- 1.5 space and double space
If you browse in the Customize window you may find other
examples. In the example below I add the
Date
button
from the
Insert
menu. The following steps will allow you
to add any buttons to any menu:
- From the
View
menu select
Toolbar- From the
Toolbar
submenu select
Customize- Choose the
Commands
tab- Select the name of the menu (I used
Insert
)- Scroll in the right window to find the button
- Click and drag the button to the space on the toolbar
where you want the button- Release the mouse and the button is placed.
Changing the size of the window displaying the selected font
If I am using the font Arial there is more than enough room
to display the font name on the Formatting toolbar. If more
room is needed, the size of that window can be decreased. On
the other hand, if I am using the font Times New Roman MT Extra
Bold the size of the window will be too small to display the
entire font name. Using the Customize menu, the window can be
re-sized using the following steps:
- From the
View
menu select
Toolbar- From the
Toolbar
submenu select
Customize- When the Customize window appears click on the font name
window- When the black box outlines the window put your cursor
on the right edge of the window- When your cursor changes to a double-headed arrow click
and dragUsing the Symbol toolbar button
I often use symbol characters in documents I produce. On my
Macintosh I use Keycaps to find the symbols, and on my IBM I
use the Character Map. However, Word has a toolbar button which
is easier to use than either of those two applications.Using the steps outlined above I added the symbol button
(Greek letter Omega) from the Insert menu. One click on this
button brings up a window with all available characters in a
given font. Click once on a character to see an enlarged view.
Double-click a character to insert it into the document
If you perform any task repetitively in Word, there is
probably a button to use for the task. Search the
Customize/Commands window to find what you are looking for.
Internet4classrooms is a collaborative effort by
Susan Brooks and Bill Byles.
![]()
Learn how to create, navigate, and format a document in Microsoft Word.
What to Know
- To create a Word document, choose a pre-built template or begin with a blank document.
- Open, save, and start documents using the File tab, and insert images, symbols, or other media using the Insert tab.
- In the “Home” tab, highlight your text and experiment with formatting options. You can alter the font, italicize/bold/underline your text, and experiment with font size.

If you’re new to MS Word or have just typed the occasional letter or short paper, you may be surprised at how much more it can do.
Word has hundreds of settings and tools to help you make professional-looking documents and use them for personal purposes.
Learning Microsoft Word like a pro will help you save time, increase productivity, and make your work and life easier, like comparing Word documents to know the differences.
You can download and use Microsoft Word for free if you only need to use basic features. There is also a version of Word for free on Mac.
RELATED: How To Get Microsoft Word For Free On Mac
How to Use Microsoft Word Step-by-Step
Here’s how to use Microsoft Word step by step.
Note: Instructions in this article apply to Microsoft Office Word 2007, Word 2010, Word 2013, Word 2016, Word 2019, Word 2021, Word for Microsoft 365, and Word for Mac. In this article, we are using Word 365 as an example.
Part 1: Creating a Basic Document

1. Open the Microsoft Word application: Double-click the Microsoft Word icon to open it.

2. Review the available templates: You’ll notice several templates of interest at the top of the screen:
- Blank document – A blank Word document with the standard formatting.
- Welcome to Word – Take a tour of Word using this template to learn and do the basics.
- Creative Resume/Cover Letter – A neat, pre-formatted resume (and cover letter) document.
- Student Report with Cover Photo – A document format aimed at an academic audience.
- Fax Cover Sheet – A document used to preface fax reports.
- Cards – Premade templates to create postcards.
- You can also use the search bar on the Home screen to look for specific templates online from within Word.

3. Choose a template: It will open the template in Word with whatever pre-determined formatting it has. Now that your document is open, you can review your Toolbar options.
- When in doubt, start with a blank document.
RELATED: How to Download and use Microsoft Word for Free
Part 2: Navigating the Microsoft Word Toolbar

1. Click the File tab: It’s in the upper left corner of the screen (or in the menu bar for Mac users). On the left side of your screen, you have several valuable options:
- New – Click this to open the “New Document” page, which contains a list of all the pre-formatted templates. When you open a new document, it will prompt you to save your previous one.
- Open – See a list of recently opened or pinned documents. You can also search in a specific directory (for example, “This PC“).
- Info (PC only) – Click this to review the document’s statistics, such as when it was last modified or created and any potential issues like Spelling errors, etc.
- Save – To save your document, click Save. If you’ve saved this document the first time, you’ll see a prompt to enter a name, save location, and preferred file format.
- Save As – Click this option to save your document “as” something (e.g., save under a different name or file format). You can also use this option to save a Word document to a pdf file.
- Print – Click this option to access your printer settings to print a Word document.
- Share – Click this tab to see the document’s sharing options, including email and cloud options.
- Export – Click this to create a PDF, create a PDF/XPS document, or change the file type quickly.
- Transform – Click this to transform your document to a Microsoft Sway web page.
- Close – Click this option to close your document (you’ll see a prompt asking to Save or Don’t Save your document’s content).
RELATED: How to Save or Export a Word Document As a PDF

2. Click ← in the top left corner of your screen. You won’t have this option on a Mac; click your document to exit the “File” menu.

3. Review the Home tab to see your formatting options. At the top of your document screen–from left to right–you’ll see six sub-sections of this tab:
- Clipboard – Text is saved on your clipboard whenever you copy it. By selecting the Clipboard option, you can view copied text.
- Font – You can change text case, font style, size, color, formatting (e.g., bold or italic), effects, and highlighting from this section.
- Paragraph – This section allows you to change aspects of your paragraph formatting, such as line spacing, alignment, indentation, and bullet formatting.
- Styles – This section discusses various text types for different situations (e.g., headings, titles, and subtitles). You’ll also notice the famous “No Spacing” option, which eliminates extra spaces between lines of text.
- Editing – Here, you’ll find frequently used tools, such as “Find and Replace,” which quickly allows you to replace all appearances of one Word with another. You can also use the Select option to select objects or text in your document.
- Dictate (Voice) – This Office Dictation option allows you to use speech-to-text to create drafts or outlines, capture notes, and get your thoughts out. Click the Dictate button and wait for it to turn on. Start speaking to see text appear on the Word document.

4. Click the Insert tab to review the media types you can place in your document. It is to the right of the Home tab. Use the Insert tab to add graphics, pictures, comments, and page numbers to your documents. Among the notable options, from left to right, are the following:
- Table – By selecting this option, you can create an Excel-style table directly within your document.
- Pictures – Insert an image into your document using this feature.
- Shapes – Insert readymade Shapes using this feature.
- Comment – Add a note in your document using this feature.
- Header, Footer, and Page Number – These options are required when writing in MLA or APA format. The Header adds a space at the top of the document for comments, while the Footer adds at the bottom—you can customize page numbers.
- Equation/Symbol – These options use special formatting to display simple equations correctly. You can choose these equations or symbols from the relevant drop-down menu.
- Link – Add clickable hyperlinks to take readers or users to webpages or files within or outside your document.

5. Click the Draw tab to create your drawings. It’s to the right of the Insert tab.
- The drawing features in Word can help you add notes, create shapes, edit text, and more. The Draw tab is also available in Excel and PowerPoint.
- The Draw tab provides three drawing textures: pen, pencil, and highlighter, each with a unique look. Click one to select it, and you’re ready to begin drawing.
- If you want to change the color or thickness of the pen, click the drop-down arrow next to it and choose your preference. Click away from the menu to return to your drawing when you’ve finished.
- You can use the Ink to Shape feature to convert your ink drawings to various shapes.

6. Click the Design tab to create your template. It’s to the right of the Draw tab.
- The Design tab displays pre-designed themes and document formatting options at the top of the page.

7. Select the Layout tab to change the formatting of your page. This tab includes options for modifying the following aspects of your document:
- Margins – Set the margin sizes for the entire document using this feature.
- Orientation – Change your page orientation to landscape or portrait.
- Page size – Choose a document size for your page using this option.
- Columns – Number of columns on the page (defaults to one). You can also Add or Remove Columns.
- Breaks – Insert a section break to your page and select where the section starts using this option.
- Hyphenation – Hyphenate a word using this feature.
- Indentation (left or right)
- Spacing (before or after)
- Selection Pane – Select the object to change its order or visibility using this option.

8. Click the References tab to manage your citations. You can also manage your bibliography page from here.
- Click the Bibliography drop-down menu and choose a template for quick bibliography formatting.
- You can change the bibliography formatting from APA to MLA in the “Citations & Bibliography” group of options (or other citation styles).
- You can insert a table of figures from the “Captions” group. It is helpful in scientific review papers or other documents where statistical data is more critical than quotations.
- You can insert Authorities from the “Table of Authorities” group. It allows you to add statutes and other citations to your document.
- You can create a table of contents from the “Table of Contents” group. It allows you to give an overview of your document.

9. Click the Mailings tab to review your document-sharing options. You can check your email settings, start mail merge, select recipients, and share documents from within this section.
- You can also create and print an envelope or label template by selecting it from the “Create” group in the upper left corner of your screen.
- The Start Mail Merge drop-down menu allows sending a document to multiple people. You can also insert different fields, such as Name and Address.
- The Select Recipients drop-down menu lets you choose between Outlook contacts and an existing contact list in Word. Or you can type a new list of recipients.

10. Click the Review tab. Since you can use the Review section for editing, it includes document marking and proofreading options. Among the essential options are:
- Spelling & Grammar (Editor): Select this option (far left corner) to highlight spelling or grammatical mistakes and writing suggestions.
- The “Proofing” section is on the far left side of the Word toolbar. Use the Word Count feature to count the number of characters, Pages, Words, Paragraphs, and Lines in your document.
- The “Changes” section: This section is on the far right side of the toolbar. You can enable the “Track Changes” feature from here, which automatically formats any additions or deletions you make in a document in red print. You can also jump from the Previous to the Next tracked change.
- The “Protect” section: Use Restrict Editing option to prevent formatting changes, track changes, or allow only commenting on the document.
Tip: In the newer versions of Microsoft Word, you’ll see the “Editor” option in the “Proofing group” instead of Spelling & Grammar.

11. Click the Focus Mode to eliminate distractions. It’s in the status bar of your document. Or you can select the View tab at the top to find this feature. It’s to the right of the Review tab.
- It’s for eliminating distractions from your document to improve productivity.
- Press the Esc key on your keyboard to exit focus mode.

12. Decide on the options that best apply to your work. For example, if you’re a student, you’ll almost certainly use the Insert and References tabs. You can format your first Word document now that you’re familiar with the toolbar options.
Part 3: Formatting Your Writing

1. Open a new Blank Document in Word. If you already have a document, you can open it instead.

2. Enter text. Click on the blank section of the document and start typing.
- If you opened an existing document, make a backup before reformatting.

3. Highlight a section of text. Click and drag your cursor across your writing and let go of the cursor when you’ve highlighted the area you wish to edit.

4. Consider what you want to do to the writing. Some potential options include:
- Format your writing quickly. Right-click (or two-finger click) on your highlighted text and choose an option from the right-click menu.
- Change the font of your choice. You can select a new font from the drop-down bar at the top of the “Font” section (Home tab).
- Make your highlighted section bold, italicized, or underlined. Click the B, I, or U in the “Font” section of the Home tab.
- Change the color of your text. You can click the drop-down bar next to Font Color in the Font group of the Home tab and then choose a color.
- Change your document’s spacing. It is easiest to do by right-clicking your selected text, selecting Paragraph, and adjusting the “Line Spacing” value in the bottom right corner of this window.

5. Continue working with Word. Your preferred options for your documents will vary depending on the purpose of creating them. So the more you work within your format, the more experienced you’ll become.
RELATED: How to Update Microsoft Word on Windows PC and Mac
Tips
- A red line under a word indicates a misspelling, a green line indicates a grammatical error and a blue line indicates formatting.
- If you right-click (or two-finger click) on an underlined word, a replacement suggestion will appear at the top of the right-click menu.
- Hold down the Control (or ⌘ Command key on a Mac) and tap S to save your document quickly.
Warning
- Don’t forget to save your work before exiting Word.
Is Microsoft Word free?
Yes absolutely! Microsoft Word is free to download and use from the Apple App Store or Google Play Store. You can also use the free web version of Word online in your browser.
How can I install Word for free?
Go to the free Office website and sign up for free. Then log in to your Microsoft account and start using Word for free. You can also save your work in the cloud with OneDrive.
How to use Microsoft Word for free?
To start using Office apps for free. open your browser, go to www.office.com, and sign up for free. Select the Word app to use it for free. You can choose from free online versions of Excel, PowerPoint, Outlook, OneNote, and OneDrive online storage.
Reference:
- https://support.microsoft.com/en-us/office/basic-tasks-in-word-87b3243c-b0bf-4a29-82aa-09a681999fdc
24
24 people found this article helpful
Explore the Ribbon and learn how to use it
The Ribbon is the toolbar that runs across the top of Microsoft Word, PowerPoint, Excel, and other Microsoft 365/Office applications. The Ribbon consists of tabs that keep related tools organized and accessible no matter what kind of project or device you’re working on. The Ribbon can be hidden completely, shown in various capacities, or customized to meet your needs.
Instructions in this article apply to Word for Microsoft 365, Word 2019, Word 2016, Word 2013, and Word 2010.
Explore View Options for the Ribbon
Depending on your current settings, the Ribbon will be in one of three forms:
- The Show Tabs setting displays the tabs (File, Home, Insert, Draw, Design, Layout, References, Mailings, Review, and View).
- The Show Tabs and Commands setting displays the tabs and the command icons.
- The Auto-Hide Ribbon setting hides the tabs and commands.
If the Ribbon is currently hidden, a three-dot icon displays in the upper-right corner of the Word window.
-
Select the Ribbon Display Options icon (which is located in the upper-right corner and is a small box with an upward-pointing arrow inside).
-
Select Auto-Hide Ribbon to hide the ribbon. Select the bar located at the top of the window to display the ribbon.
-
Select Show Tabs to display ribbon tabs only. Choose a tab to display the related commands.
-
Select Show Tabs and Ribbon to display ribbon tabs and commands at all times.
To collapse the Ribbon to see more of a document, double-click any ribbon tab or press CTRL+F1. To expand the Ribbon, double-click any ribbon tab or press CTRL+F1.
Using the Ribbon
Each tab on the Word Ribbon has commands and tools underneath it. Change the view to Show Tabs and Commands to see these commands. If the Ribbon is set to Show Tabs, select a tab to see the related commands.
To use a command, find the command you want, then select it. If you aren’t sure what an icon on the Ribbon stands for, hover the mouse over it to see a description of the command.
Here are a few examples:
- To insert a picture into a Word document, select the Insert tab and choose Pictures. Browse to the picture you want to insert, then select Open.
- To start a bulleted list, select the Home tab and choose the Bullets icon.
- To start a numbered list, select the Home tab and choose the Numbering icon.
- To choose a design for the entire document, select the Design tab and choose the design you want to use.
- To check spelling and grammar, select the Review tab and choose Spelling & Grammar.
Many tools work differently when text or an object is selected. To select text, drag the mouse over it. When text is selected, any text-related tool (such as Bold, Italic, Underline, or Font Color) is applied only to the selected text. If no text is selected, those attributes are applied to the subsequent text you type.
Customize the Quick Access Toolbar
The Quick Access Toolbar is located above the Ribbon. By default, it contains shortcuts to the Save, Undo, and Redo commands. Save time and become more productive by adding shortcuts to the commands you use most. For example, make it easier to work with documents by adding shortcuts to the New, Print, and Email commands.
To add items to the Quick Access Toolbar:
-
On the Quick Access Toolbar, select Customize Quick Access Toolbar (the down arrow icon located to the right of the last item).
-
To add a command, choose any command that does not have a checkmark.
-
To remove a command, choose any command that does have a checkmark beside it.
-
To see more commands and add items, select More Commands to open the Word Options dialog box.
-
In the left pane, choose the command you want to add to the Quick Access Toolbar.
-
Select Add.
-
Repeat these steps to add as many commands as you want, then choose OK.
Customize the Ribbon
Add or remove tabs from the Ribbon and add or remove items on those tabs to customize the Ribbon to meet your needs. As a precaution, don’t make too many changes until you are familiar with how the Ribbon is set up by default.
Advanced users might want to add the Developer tab and other tabs to streamline Word so that it only shows exactly what they use and need.
To access the options to customize the Ribbon:
-
Select File, then choose Options to display the Word Options dialog box.
-
Choose Customize Ribbon.
-
To remove a tab, go to the Main Tabs list and clear the checkbox next to the tab.
To add a tab, select the check box next to the tab to put a checkmark in it.
-
To remove a command from a tab, go to the Main Tabs list and select the plus sign to expand the tab.
-
Select the command.
You might have to expand a section again to find the command.
-
Select Remove.
To add a command, go to the left pane, choose the command, then select Add.
-
Select OK to save the changes.
Thanks for letting us know!
Get the Latest Tech News Delivered Every Day
Subscribe
Quick Access Toolbar lies next to the Microsoft Office Button. It is a customizable toolbar that comes with a set of independent commands. It gives you quick access to commonly used commands such as Save, Undo, Redo, etc.
See the image:
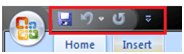
When you click the drop-down arrow next to toolbar it offers more commands. With a left click you can add any of these commands to Quick Access Toolbar. You can also remove the commands added to the tool bar. The indent, spacing values, individual styles and other features that appear on the ribbon cannot be added to quick access toolbar. The following image is showing the menu of quick access toolbar.
See the image:

For Videos Join Our Youtube Channel: Join Now
Feedback
- Send your Feedback to [email protected]
Help Others, Please Share


