
![]()
Download Article
![]()
Download Article
Do you need to view or edit a protected Excel worksheet? If the sheet is locked with a password and you’re not sure what it is, you can easily use Google Sheets or a VBA script (in earlier versions of Excel) to remove the password. This wikiHow article will show you how to unlock a protected Excel spreadsheet with or without the password. If your entire Excel workbook is password-protected and you can’t open it, you’ll need to unlock the file first.
-

1
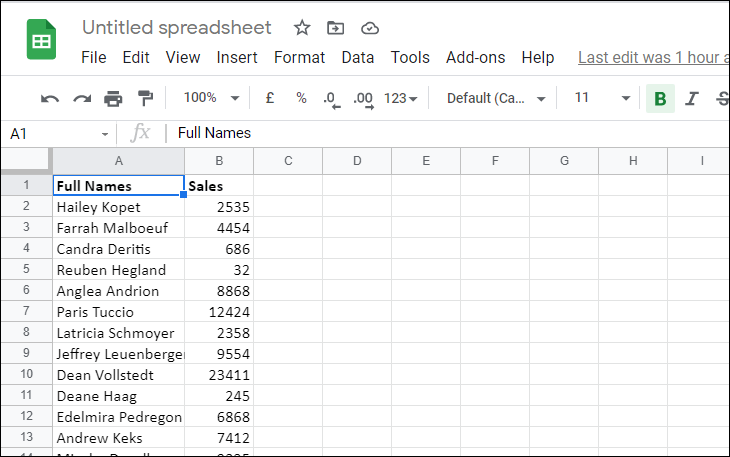
Open the workbook with a protected sheet in Microsoft Excel. You can usually do this by double-clicking the file’s name on your computer.
-
2
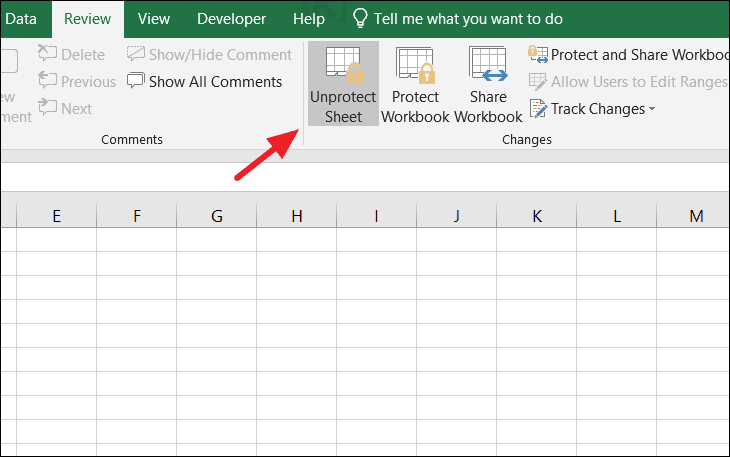
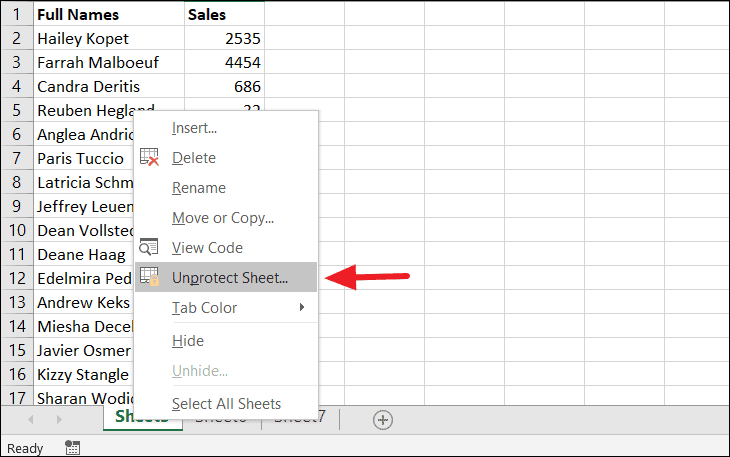
Right-click the tab for the protected sheet. Each sheet’s tab appears along the bottom of Excel. The protected sheet often has a padlock icon in some versions of Excel. Right-click the tab (or the lock icon) to open the context menu.[1]
- If multiple sheets are protected, you’ll need to remove protection on each sheet separately.
Advertisement
-
3
Click Unprotect Sheet. If the sheet is not password-protected, it will unlock immediately. If not, you’ll be prompted to enter a password into a pop-up window.
-
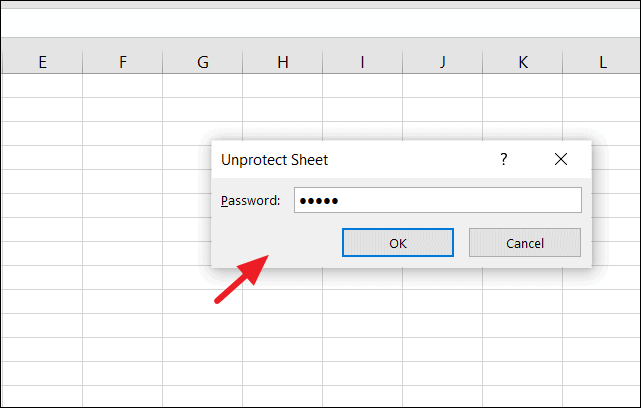
4
Enter the password and click OK. If the password is correct, the sheet will become unprotected.
- If you don’t know the password, see the Using Google Sheets method. This method lets you upload the file to Google Sheets, which removes all protections added in Excel.
- If you’re using Excel 2010 or earlier and prefer not to upload to Google Sheets, see the Using VBA Code in Excel 2010 and Earlier method.


Advertisement
-
1
Go to https://drive.google.com in a web browser. If you have a Google account, you can use Google Sheets (a free online app that’s similar to Excel) to remove protection from all sheets in a workbook—even if you don’t know the password.
- If you’re not already signed into your Google account, follow the on-screen instructions to sign in now.
- If you don’t have a Google account, see How to Make a Google Account.
-
2
Click + New. It’s at the top-left corner of the page.
-
3
Click File Upload. This opens your computer’s Open panel.
-
4
Select the Excel file you want to edit and click Open. This uploads the file to your Google Drive.
-
5
Double-click the Excel file in your Google Drive. You’ll probably have to scroll down to find it. This opens a preview of the file.
-
6
Click the Open with menu. It’s at the top of the preview. A menu will expand.
-
7
Click Google Sheets. Now that the file is open for editing in Google Sheets, any sheet protections added in Excel have been removed.
-
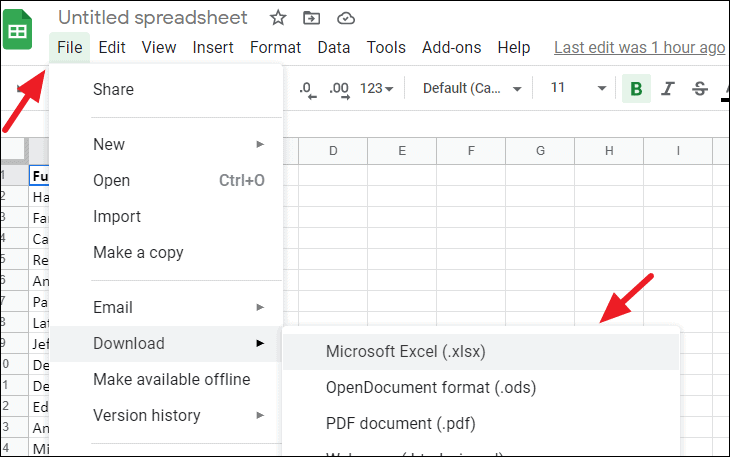
8
Re-download the file to your computer. If you want to keep working on the file in Microsoft Excel rather than Google Sheets, you can download this newly-unprotected version of your workbook using the following steps:
- Click the File menu at the top-left corner of your sheet.
- Click Download As.
- Click Microsoft Excel (.xlsx) .
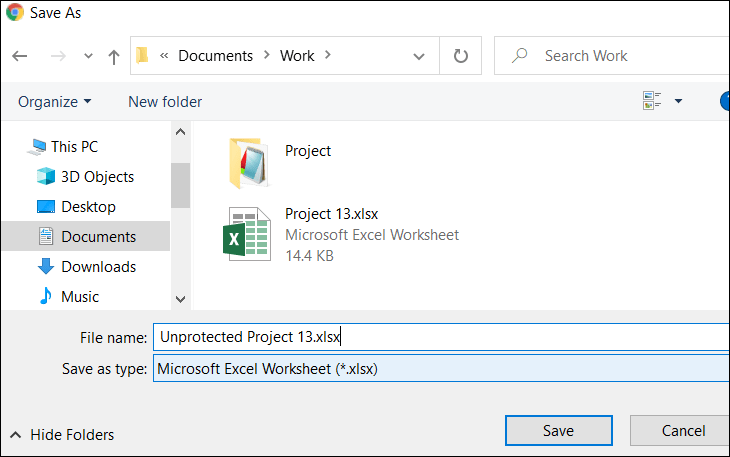
- Select a folder to save the file. If you want to keep the original version of the file (the one with a protected sheet) intact, type a new name for the file as well.
- Click Save to download the file.


Advertisement
-
1
Search «password find online» and find an online password removal service.
-
2
Click «Unprotect your file».
-
3
Click «Browse» and choose the protected file.
-
4
Choose «Remove password» radio button.
-
5
Wait while the service removes your password.
-
6
Download the unprotected file, if your file is small.
-
7
Download a demo-file if your file is big. To get the whole file, you’ll need to enter a license key.


Advertisement
-
1
Open the workbook that has a protected sheet in Excel. You can usually do this by double-clicking the file’s name on your computer. Excel files usually end with the file extension .xls or .xlsx.
- Use this method if you have already tried unlocking a sheet but found that it’s password-protected (and you don’t know the password).
- This method will not work in Excel 2013 or later.
-
2
Re-save the file in the xls format. If the file you’re working on has the «.xlsx» extension (common if it was created or edited in newer versions of Excel), you’ll only be able to use this method if you first convert it to the Excel 97-2003 (.xls) format. Here’s how to do this:[2]
- Click the File menu at the top-right corner.
- Click Save As.
- Go to the folder in which you want to save the file.
- Select Excel 97-2003 (.xls) from the «Save as type» or «File Format» menu.
- Click Save.
Follow the on-screen prompts to make any necessary conversions.
-
3
Press Alt+F11 to open the Visual Basic Editor.
-
4
Right-click the workbook’s file name in the «Project — VBAProject» panel. It’s at the top of the left panel. Make sure you right-click the option that contains the file’s name (ends with «.xls»), which should be at the top. A menu will expand.[3]
-
5
Click Insert on the menu. Another menu will expand.
-
6
Click Module. This inserts a new module in which you’ll paste some code.
-
7
Copy the code. Highlight the code that follows this text, then press Ctrl+C (PC) or ⌘ Command+C to copy it:
Sub PasswordBreaker()
'Breaks worksheet password protection.
    Dim i As Integer, j As Integer, k As Integer
    Dim l As Integer, m As Integer, n As Integer
    Dim i1 As Integer, i2 As Integer, i3 As Integer
    Dim i4 As Integer, i5 As Integer, i6 As Integer

    On Error Resume Next
    For i = 65 To 66: For j = 65 To 66: For k = 65 To 66
    For l = 65 To 66: For m = 65 To 66: For i1 = 65 To 66
    For i2 = 65 To 66: For i3 = 65 To 66: For i4 = 65 To 66
    For i5 = 65 To 66: For i6 = 65 To 66: For n = 32 To 126
         ActiveSheet.Unprotect Chr(i) & Chr(j) & Chr(k) & _
            Chr(l) & Chr(m) & Chr(i1) & Chr(i2) & Chr(i3) & _
            Chr(i4) & Chr(i5) & Chr(i6) & Chr(n)
         If ActiveSheet.ProtectContents = False Then
            MsgBox "Password is " & Chr(i) & Chr(j) & _
                Chr(k) & Chr(l) & Chr(m) & Chr(i1) & Chr(i2) & _
                Chr(i3) & Chr(i4) & Chr(i5) & Chr(i6) & Chr(n)
         	Exit Sub
         End If
    Next: Next: Next: Next: Next: Next
    Next: Next: Next: Next: Next: Next
End Sub
-
8
Right-click the new module and select Paste. The copied code now appears in the module window.
-
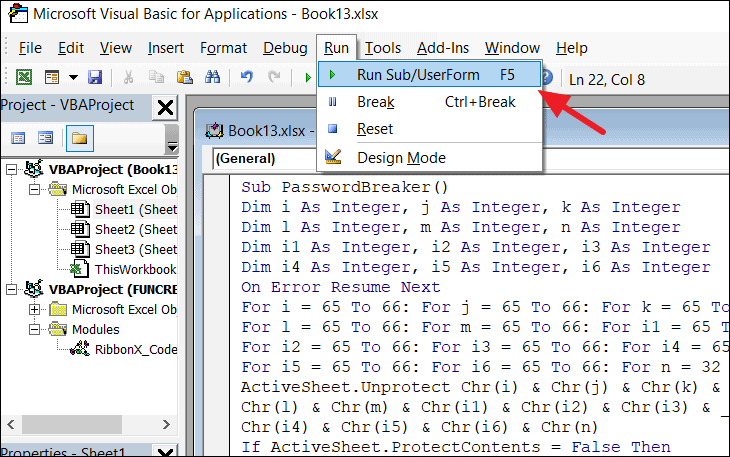
9
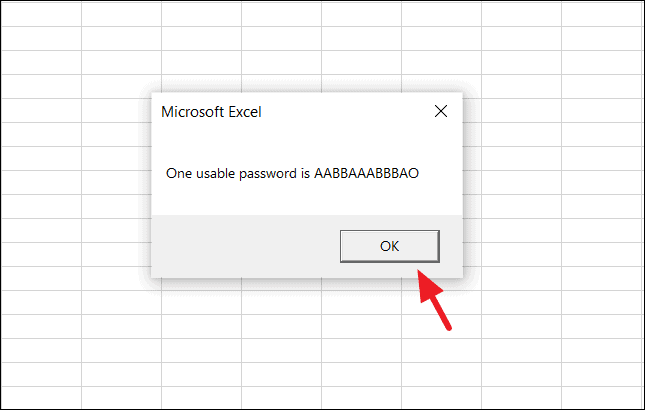
Press F5 to run the code. Excel will now run the code, which can take several minutes. Once the code is finished running, a new password will appear on a pop-up window.
- The new password will be a random number of «As» rather than the original password.
-
10
Click OK on the Password pop-up. A new password will appear but you won’t need to write it down. Clicking OK will remove sheet protection automatically.[4]
- If you had to convert the file to an earlier format, you can now save the workbook again as an .xlsx file.


Advertisement
Add New Question
-
Question
What if I forgot the password to the document?

Try to use method 2 above (Uploading to Google Sheets). The downloaded Excel sheet from Google Sheets will be unprotected, so no password is needed.
-
Question
The Google sheet method is not working.
Margot Fontenaut
Community Answer
It won’t work for a password to open the document, but it works fine for passwords restricting shared access. If you can open your file, but can’t edit it, this method will work. If you can’t open you file without entering password, it won’t work. In such case you will need to use password cracking tools like Password-find, Rixler password cracker, Password recovery lastic to remove protection from your file. It’s impossible to restore or bypass a password to open the document without special software.
-
Question
I received Compile error Syntax error.
Margot Fontenaut
Community Answer
You need to delete the phrase Breaks worksheet password protection. Compiler don’t understand it and there you have the compile error cause of the syntax error. If VBA code is not your thing, you can use password removal apps like Password-find or Password Lastic to remove the password from your sheet.

Ask a Question
200 characters left
Include your email address to get a message when this question is answered.
Submit
Advertisement
Video
Thanks for submitting a tip for review!
References
About This Article
Article SummaryX
To unlock a sheet in an Excel workbook, right-click the sheet’s tab and click Unprotect sheet. Enter the password, if prompted.
If you don’t know the password, upload the sheet to your Google Drive, open it in Google Sheets, then re-download it to your computer.
Did this summary help you?
Thanks to all authors for creating a page that has been read 563,248 times.
Reader Success Stories
-

«I had to save the Excel sheet as a Google sheet and then download it again as Microsoft Excel, that is unless I…» more
Is this article up to date?
Many people use Excel password protection in workplaces where data storage and analysis are done with Microsoft Excel. However, there is a chance that you may forget the password. In this case, the post will introduce 3 ways to recover your Excel password, and then unprotect Excel workbook which you forgot the password. Here we go, keep reading and select one of the sutiable ways for yourself.
How to Unprotect Excel Workbook [Change and Remove]
We search the info and test how to unprotect Excel file with password. For different versions, the steps are a little bit different. Now, check how to perform it.
Change and Remove Excel Workbook Password
If you are using Excel version above 2016:
- Open the Excel Workbook and go to the Review tab, click on Protect Workbook.
- A window pops up to require password, enter the password to unprotect workbook.
- With the last step, you can work on workbook.
- Now, click on Protect Workbook again. It asks you to enter password to protect workbook, meaning that the password has already changed and removed with the above steps.
- Now, now you can set a new password if you still want to protect the file.

How to Unprotect an Excel Workbook without Password
The following methods are suitable for how to unlock a password protected Excel file.
Unprotect Exel Document with PassFab for Excel
No matter how complex your password is, you can rely on PassFab for Excel.
PassFab for Excel can help you:
- Recover your Excel workbook password to unprotect your Excel file nearly 99%
- Remove the Excel editing restriction password nearly 100%
- Support recovering the length of password up to 100
- Fail to recover by yourself? Customer Support help you recover quickly.
-
Download it.
-
Open PassFab for Excel and click on Recover Excel Open Password
-
Now, import the locked Excel file.
-
The time to recover the Excel workbook file is not sure, it’s up to the password length. it’s up to the password length.
-
Now, you can copy the password to open the locked Excel workbook and work on it normally.
Unprotect an Excel Workbook with ZIP Tool
Here recommends a free method to you, that is to use ZIP software to unprotect XLS. It’s tricky but not difficult. Just go step by step:
-
If your files extensions are not enabled you have to enable them by navigating to Control Panel > Folder option >View and disable «Hide Extensions for known file types».
-
Now look for your protected excel file and change its extension from .xlsx to .zip by renaming the file.
-
Now open your zip file using related software such as WinRAR. And navigate to xl > worksheets and extract sheet.XML file(s). These sheet represents your excel files sheets.
-
Now open the extracted XML file with notepad or wordpad and find the following tag: «sheetProtection password=… /».
- Now select the whole tag and remove it.
- Now save the XML file and put it back in the same zip folder and replace the old one.
- Close the zip file and change the extension back to .xlsx from .zip.
Tips:
This method only applies to Excel password protected workbooks. If the file is secured with the «Encrypt with Password» feature, it will not work.
Unprotecting an Excel Workbook with VBA Code
Another way to unprotect excel file is by using VBA code. It is one of the simple method but it has to be done step by step. But firstly you have to keep in mind the following points:
- If Excel file contain 2 or more protected sheets, run this code for each sheet.
- If your Excel document version is later than 2010 then first save the document as Excel 97-2003 workbook (*.xls), run the macro, and then save it back to the original version.
-
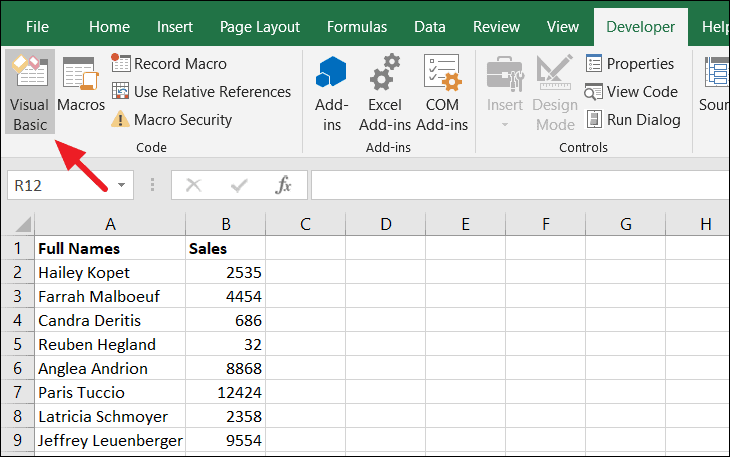
Open your Excel file and press Alt + F11 to open the Microsoft Visual Basic for Applications.
-
Now Right click on the workbook name and select Insert > Module.
-
A dialogue box will appear in the right pane. Copy the following code and paste it.
-
Now click on Run button and let the computer do the rest.
- When the code is cracked, macro will notify. The password will not be the same instead it will be combination of A’s and B’s. Click OK and the Excel document is unprotected.
Conlcusion
With the help of above solutions now you can protect you excel file without fear of losing password. If your boss asked you to get an old protected excel file fixed, you just need to go through one of the solutions mentioned above. You don’t need to be an IT expert, just install a PassFab for Excel to regain access to any Excel file, which also suits on how to unprotect a sheet in Excel.
COMMENT
Unprotect as an owner under the Review tab or without a password using the Visual Basic code editor
Updated on December 4, 2022
What to Know
- Unprotect as owner: Select Review > Unprotect Sheet and enter the password.
- Unprotect without password: Open Visual Basic code editor by selecting Developer > View code.
- Then, enter the code supplied in this article and select Run. In a few minutes, a password is revealed. Choose OK.
This article explains how to unprotect Excel workbooks. The information applies to Excel workbooks in Microsoft Excel 365, Microsoft Excel 2019, 2016, and 2013.
How to Unlock an Excel Workbook as the Owner
Microsoft Excel is packed with features. One such feature is the ability to protect your Excel files at the cell, spreadsheet, or workbook level. Sometimes it’s necessary to unprotect Excel workbooks to ensure data changes apply correctly.
This method assumes that as the owner of the file, you remember the password used to protect the spreadsheet.
-
Open the protected spreadsheet, and select Review > Unprotect Sheet. You could also right-click the protected spreadsheet, then select Unprotect Sheet.
You can identify a protected spreadsheet under the Changes section of the Review tab on the ribbon. If the spreadsheet is protected, you see the Unprotect Sheet option.
-
Enter the password used to protect the spreadsheet, then select OK.
-
Your spreadsheet will now be unprotected and it can be modified.
How to Unprotect an Excel Workbook Without Knowing the Password
You may have protected your Excel workbook or spreadsheet and haven’t had to modify it in some time, even years. Now that you need to make changes, you no longer remember the password you used to protect this spreadsheet.
Fortunately, these steps will allow you to unprotect your workbook using a Virtual Basic script as a macro to identify the password.
-
Open the protected spreadsheet.
-
Access the Visual Basic code editor by either pressing ALT+F11 or select Developer > View Code.
-
In the Code window of the protected sheet, enter the following code:
Sub PasswordBreaker()
Dim i As Integer, j As Integer, k As Integer
Dim l As Integer, m As Integer, n As Integer
Dim i1 As Integer, i2 As Integer, i3 As Integer
Dim i4 As Integer, i5 As Integer, i6 As Integer
On Error Resume Next
For i = 65 To 66: For j = 65 To 66: For k = 65 To 66
For l = 65 To 66: For m = 65 To 66: For i1 = 65 To 66
For i2 = 65 To 66: For i3 = 65 To 66: For i4 = 65 To 66
For i5 = 65 To 66: For i6 = 65 To 66: For n = 32 To 126
ActiveSheet.Unprotect Chr(i) & Chr(j) & Chr(k) & _
Chr(l) & Chr(m) & Chr(i1) & Chr(i2) & Chr(i3) & _
Chr(i4) & Chr(i5) & Chr(i6) & Chr(n)
If ActiveSheet.ProtectContents = False Then
MsgBox "One usable password is " & Chr(i) & Chr(j) & _
Chr(k) & Chr(l) & Chr(m) & Chr(i1) & Chr(i2) & _
Chr(i3) & Chr(i4) & Chr(i5) & Chr(i6) & Chr(n)
Exit Sub
End If
Next: Next: Next: Next: Next: Next
Next: Next: Next: Next: Next: Next
End Sub
-
Select Run or press F5 to execute the code.
-
The code will take several minutes to run. Once finished, you’ll receive a pop-up with a password. Select OK and your spreadsheet will be unprotected.
This is not the original password and you don’t need to remember it.
FAQ
-
How do I protect workbooks in Excel?
To password-protect Excel workbooks, open the workbook and select File > Info > Protect Password > Protect Workbook > Encrypt with Password.
-
How do I protect cells in Excel?
Thanks for letting us know!
Get the Latest Tech News Delivered Every Day
Subscribe
Excel for Microsoft 365 for Mac Excel 2021 for Mac Excel 2019 for Mac Excel 2016 for Mac Excel for Mac 2011 More…Less
Workbook passwords can be changed or removed by anyone who knows the current password.
Caution: Passwords in Excel for Mac and Word for Mac have a 15-character limit. You cannot open a workbook or document that has been password protected in the Windows-based version of Excel or Word if the password is longer than fifteen characters. If you want to open the file in Office for Mac, ask the Windows-based author to adjust the password length.
-
Open the workbook that you want to change or remove the password for.
-
On the Review tab, click Protect Sheet or Protect Workbook.
-
Click Unprotect Sheet or Protect Workbook and enter the password.
Clicking Unprotect Sheet automatically removes the password from the sheet.
-
To add a new password, click Protect Sheet or Protect Workbook, type and confirm the new password, and then click OK.
To remove a password from the workbook, click Protect Workbook, and then click OK without entering a new password.
Change a workbook password
-
Open the workbook that you want to change the password for.
-
On the Review tab, under Protection, click Passwords.
-
In the Password to open box or Password to modify box, select all contents.
-
Type the new password, and then click OK.
-
In the Confirm Password dialog box, type the password again, and then click OK.
-
Click Save
.
 .
.Remove a workbook password
-
Open the workbook that you want to remove the password from.
-
On the Review tab, under Protection, click Passwords.
-
Select all contents in the Password to open box or the Password to modify box, and then press DELETE.
-
Click Save
.
See also
Require a password to open or modify a workbook
Need more help?
Want more options?
Explore subscription benefits, browse training courses, learn how to secure your device, and more.
Communities help you ask and answer questions, give feedback, and hear from experts with rich knowledge.
Password protection in Microsoft Excel is often used in workplaces to protect important data. Microsoft Excel allows users to protect the worksheets and prevents others from making changes to the original data.
There are two ways a spreadsheet can be secured. One of the ways is using no password, which can be unprotected by anyone. In the other case, the worksheet or workbook is password protected, which means you’ll need to have the password to unlock it. In this article, we will show you how to unprotect worksheets or workbooks with or without a password in Excel.
Unprotect Worksheets/Workbook in Excel. One of the best features of Excel is that it can protect your Excel files at the cell, spreadsheet, and/or workbook level. After locking and protecting worksheets or workbooks, if you want to allow others to edit data, you need to unprotect them.
If you know the password it’s really easy to unprotect a worksheet. Though unlocking an Excel spreadsheet without a password is not simple but you can still do it by using the following tricks.
How to Unprotect Excel Sheet with Password/No Password
It’s very easy to unprotect an Excel sheet and allow users to edit and modify the spreadsheets. If you already know the password of the protected sheet, you can easily remove protection. Just follow any of these steps:
Open the protected spreadsheet, and switch to the ‘Review’ tab and click the ‘Unprotect Sheet’ icon in the Changes group.
You can access the same above option by right-clicking the protected spreadsheet tab, then select the ‘Unprotect Sheet’ option from the context menu.
If your sheet is a password-protected worksheet, Excel will prompt you to enter the password. Type the password in the Unprotect Sheet dialog box and click ‘OK’.
If your worksheet was not protected with a password, clicking the ‘Unprotect Sheet’ option is enough to unlock your sheet.
How to Unprotect Excel Workbook with Password/No Password
When your password-protect your Excel workbook, you can’t change the structure of the workbook, such as add, move, rename, or delete worksheets, and view hidden sheets. But you still are able to edit the data on the worksheets even if your workbook is password-protected. If you wish to change the Excel workbook structure like adding or removing worksheets, you must unprotect the Excel Workbook structure first.
To remove the workbook protection, open the protected workbook, and click the ‘Protect Workbook’ button (option would be highlighted in gray color) under the Review tab.
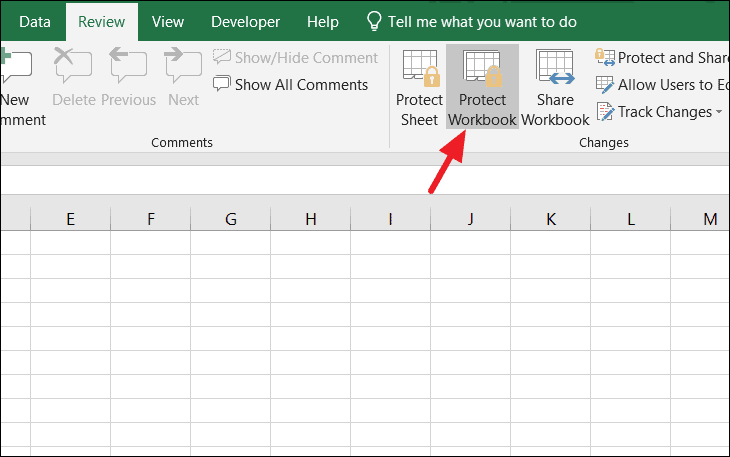
Type the password in the Unprotect Workbook prompt box and save the workbook.
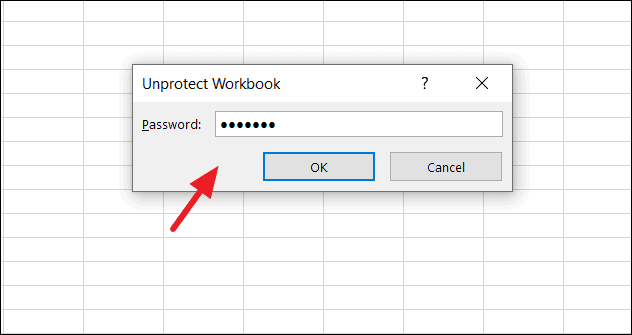
Now your workbook is unlocked, you are free to edit the Excel Workbook structure.
How to Unprotect Excel Worksheet Without Password
If you have a password secured worksheet and you have no idea what the password is or you haven’t unlocked it for a long time and you forgot it, there are few ways to unprotect that excel sheet.
Unprotect Excel Worksheet with VBA Code
Excel’s worksheet protection is based on a simple encryption algorithm. Even when you protect your Excel worksheet with a password, anyone with the below VBA code can crack it in minutes.
You can unlock a password-protected sheet by using a VBA code as a macro to identify the password. Here’s How:
Open the password-protected sheet and go to the ‘Developer’ tab and click the ‘View Code’ button on the ribbon. This will open up the code editor window in Microsoft Visual Basic for Applications.
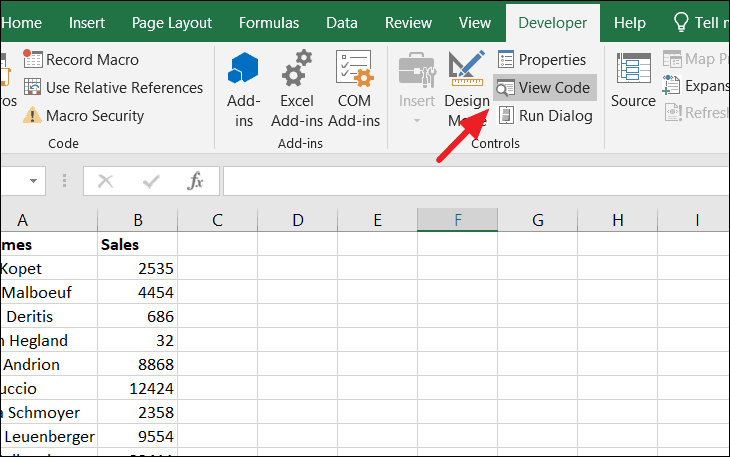
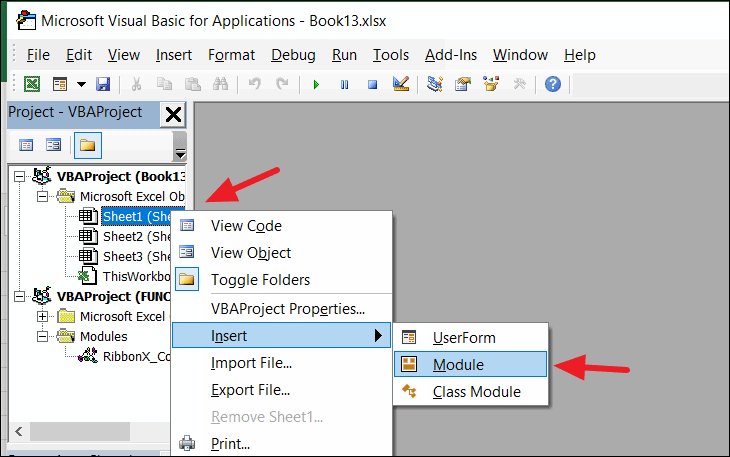
Or you can go to the ‘Developer’ tab and click the ‘Visual Basic’ button. In the Visual Basic code editor, expand the ‘Microsoft Excel Objects’ option on the left pane, right-click the worksheet that is password-protected, and select Insert –> Module from the context menu.
In the Code window of the protected sheet, copy and paste the following VBA code:
Sub PasswordBreaker()
Dim i As Integer, j As Integer, k As Integer
Dim l As Integer, m As Integer, n As Integer
Dim i1 As Integer, i2 As Integer, i3 As Integer
Dim i4 As Integer, i5 As Integer, i6 As Integer
On Error Resume Next
For i = 65 To 66: For j = 65 To 66: For k = 65 To 66
For l = 65 To 66: For m = 65 To 66: For i1 = 65 To 66
For i2 = 65 To 66: For i3 = 65 To 66: For i4 = 65 To 66
For i5 = 65 To 66: For i6 = 65 To 66: For n = 32 To 126
ActiveSheet.Unprotect Chr(i) & Chr(j) & Chr(k) & _
Chr(l) & Chr(m) & Chr(i1) & Chr(i2) & Chr(i3) & _
Chr(i4) & Chr(i5) & Chr(i6) & Chr(n)
If ActiveSheet.ProtectContents = False Then
MsgBox "One usable password is " & Chr(i) & Chr(j) & _
Chr(k) & Chr(l) & Chr(m) & Chr(i1) & Chr(i2) & _
Chr(i3) & Chr(i4) & Chr(i5) & Chr(i6) & Chr(n)
Exit Sub
End If
Next: Next: Next: Next: Next: Next
Next: Next: Next: Next: Next: Next
End Sub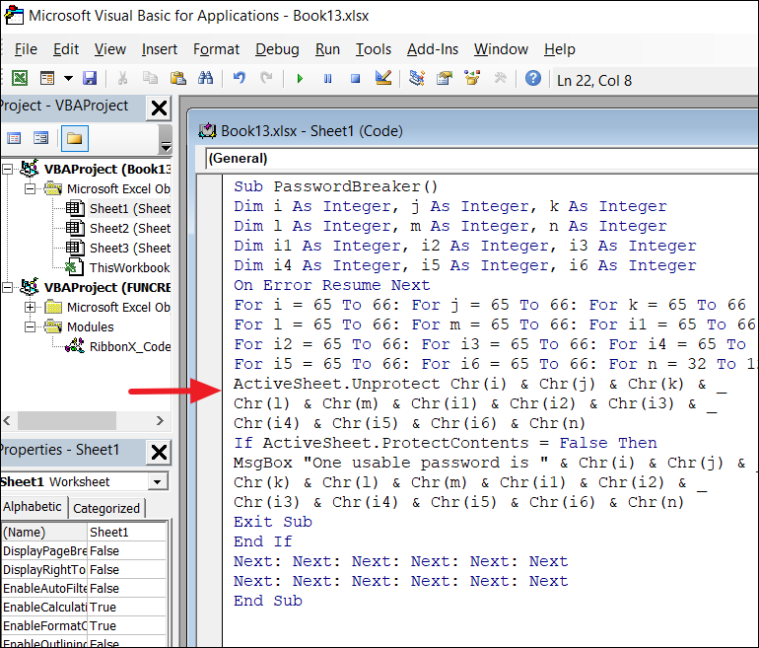
Click the ‘Run’ button on the toolbar and select the ‘Run Sub/UserForm’ option or press ‘F5’ to execute the code.
The code will take a couple of minutes to crack the password. Once it’s done, you’ll receive a pop-up with a cracked password, which is not the original one (it’s usually some combination of A’s and B’s), but still, it works. Click ‘OK’ and the sheet will be unprotected.
You need to save the Excel file before closing (as Macro-Enabled Workbook) after pasting the code to the module.
Unprotect Excel Sheet Without Password Using Zip
There’s another trick you can use to Unprotect a worksheet. Just follow theses steps:
First, navigate to Control Panel and open ‘File Explorer options’.
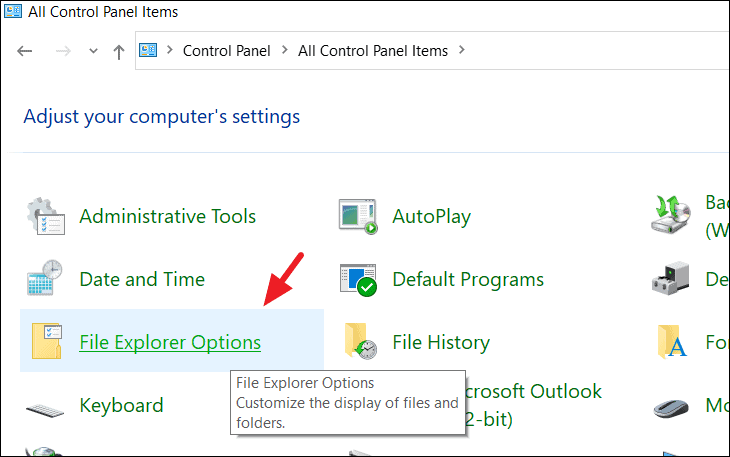
In the File Explorer Options window, uncheck the ‘Hide Extensions for known file types’ to enable your file extensions. Then, click ‘Apply’ to apply the changes and click ‘OK’ to close the window. Now your file extensions of files will be visible.

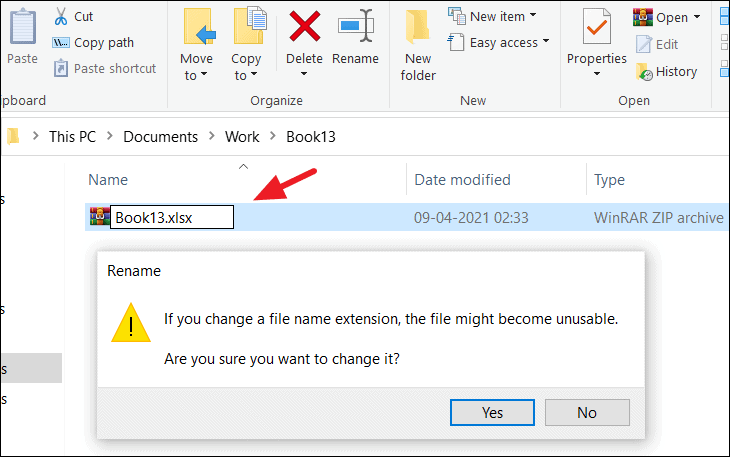
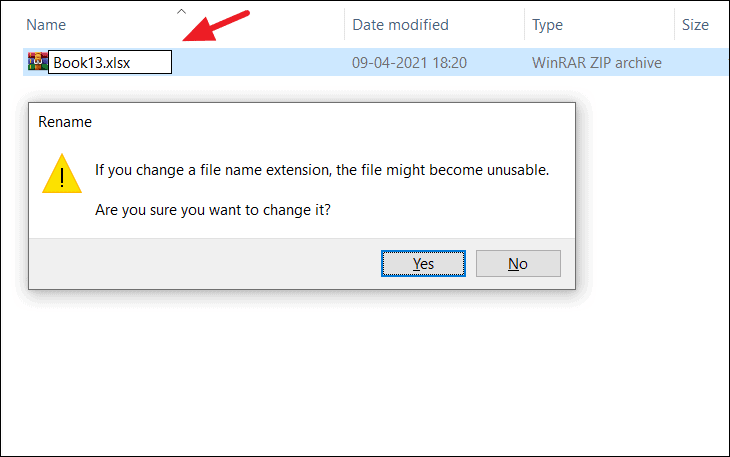
Now located your protected excel file in your drive and rename and change its extension from .xlsx to .zip.
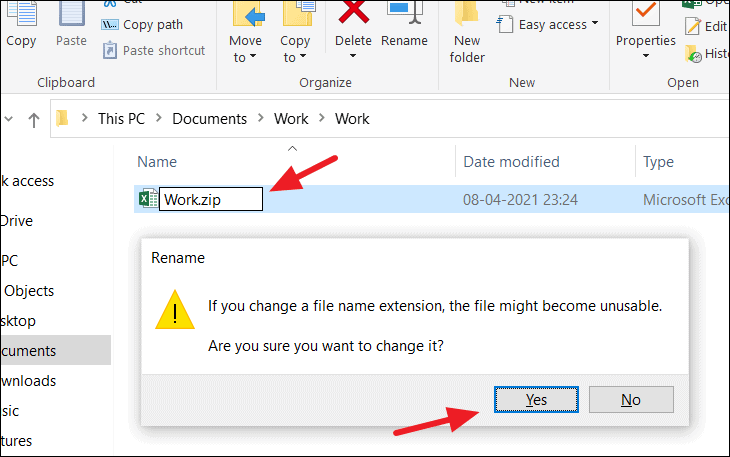
To change extension, right-click on the file, select ‘Rename’ option and replace ‘.xlsx’ with ‘.zip’. Then hit ‘Enter’ and click ‘Yes’ in Rename prompt box.
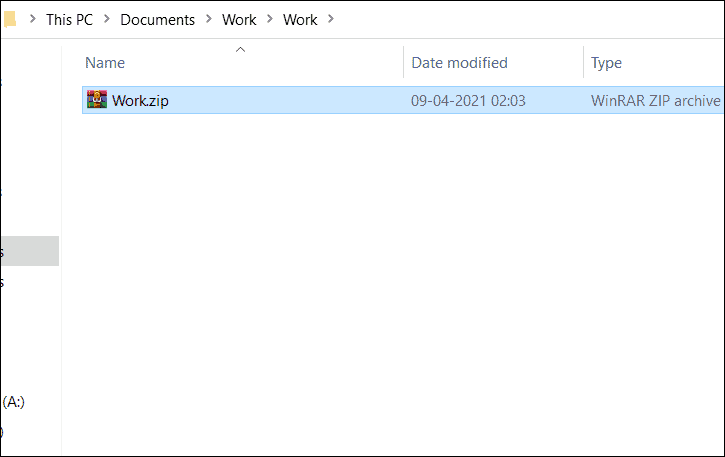
Now, your Excel file is a Zip file.
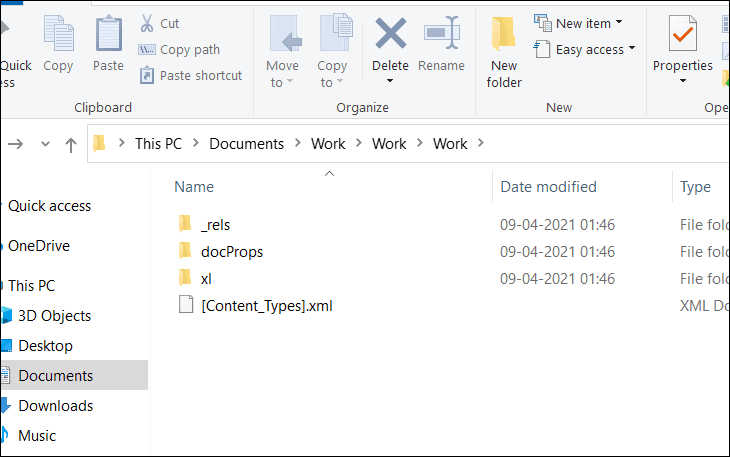
Next, extract the Zip file as shown below. In our case, the most important files to open are located in the /xl/ folder, where we have basically all that has been included in our Excel workbook. Now we can see it as separate .xml files.
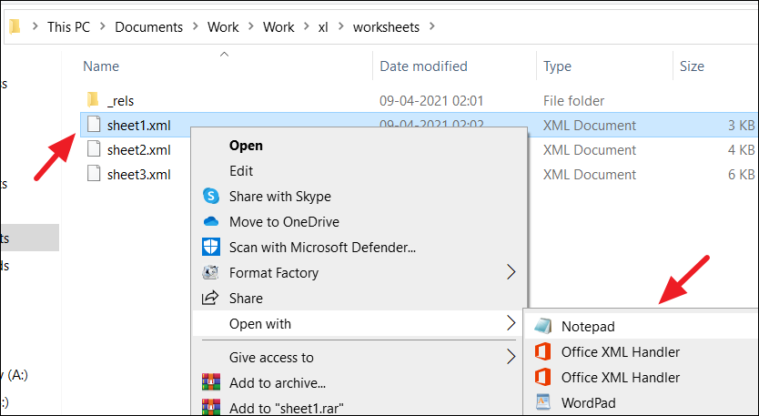
Now navigate to ‘xl –>worksheets –> sheet 1.xml’ (which is the protected sheet). When you open the ‘/xl/worksheets/’ directory, you will see the list of all sheets (in XML format) available in your workbook. Then, open the sheet 1.xml file with Notepad or WordPad (right-click on the file and select a text editor from the ‘Open with’ context menu).
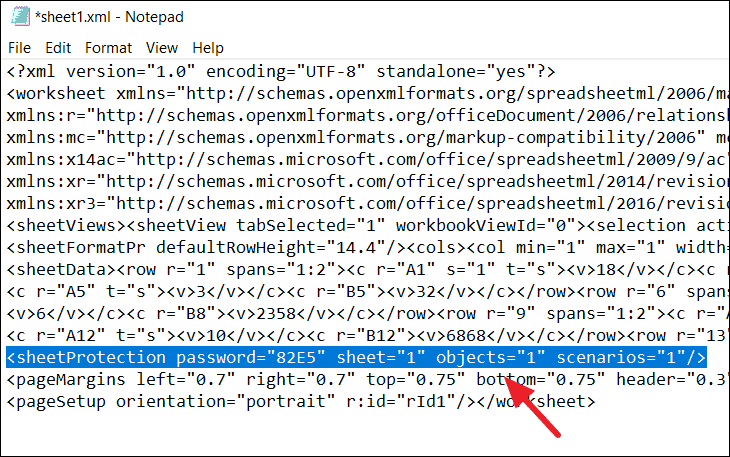
Find the following tag and delete it:
<sheetProtection password=… />
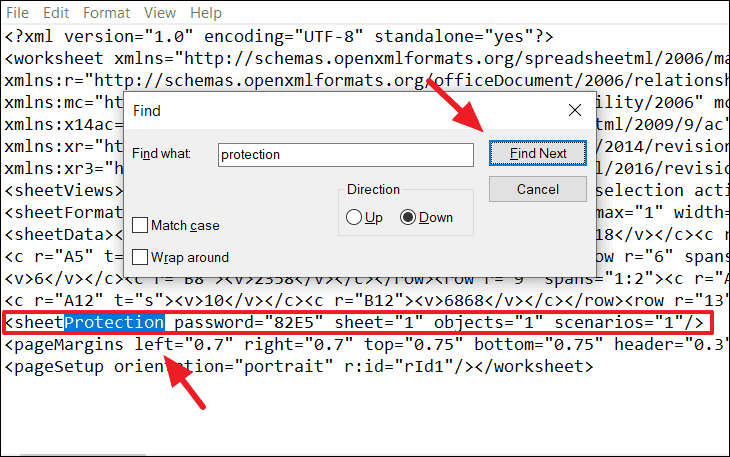
If you have a large amount of information in the worksheet, it will be hard to locate the ‘sheetProtection’ tag. So press Ctrl + F to open the Find feature, type ‘protection’ in ‘Find what’, and click ‘Find Next’. It will find the word ‘Protection’ and highlight it. Now, you can select the ‘sheetProtection’ and delete it.
After that, save the XML file and re-zip all the extracted files into a zip file again. Then, change the extension back from .zip to .xlsx.
Now, open and check your spreadsheet. It will be unprotected.
This method only works in password-protected workbooks. If the file is protected with the ‘Encrypt with Password’ feature, this method won’t work.
Unprotect an Excel Sheet with a Google Sheets
Yet another workaround that allows you to unprotect an Excel worksheet without a password. You’ll need a Google Drive account to do this.
Open your Google Drive account and click the ‘New’ button at the top left corner.
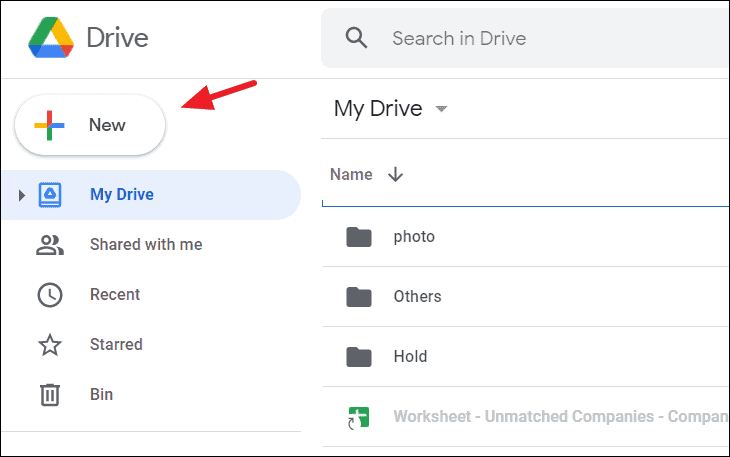
From the New menu, select ‘Google Sheets’ and click ‘Blank spreadsheet’.

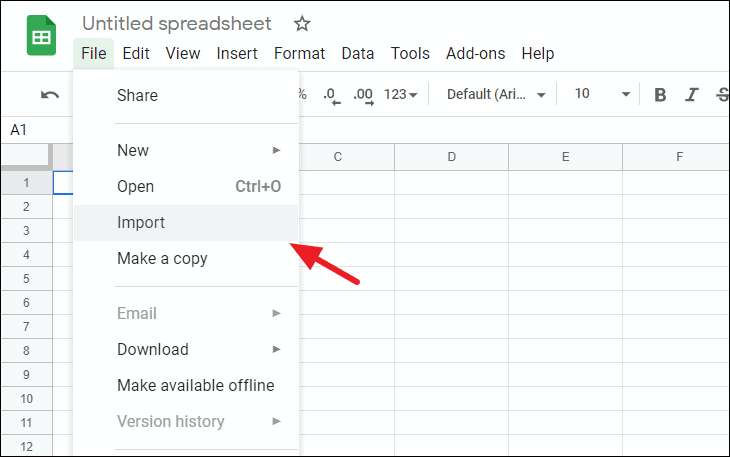
In the blank spreadsheet, click ‘File’ in the toolbar and select ‘Import’.
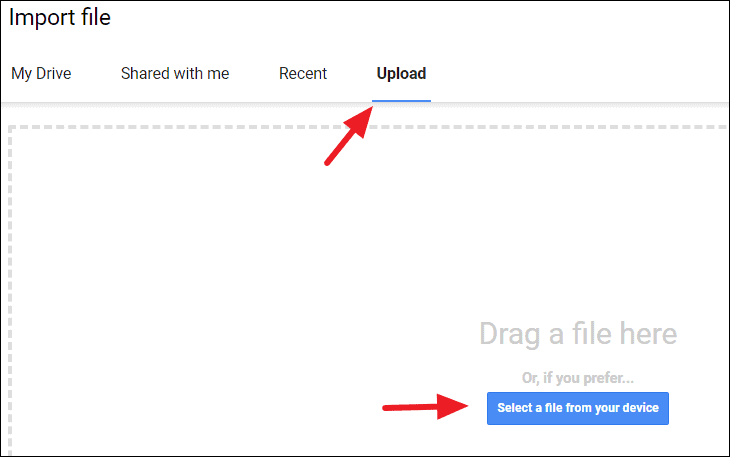
In the Import file dialogue box, select the ‘Upload’ tab from the menu and click the ‘Select a file from your device’ button.
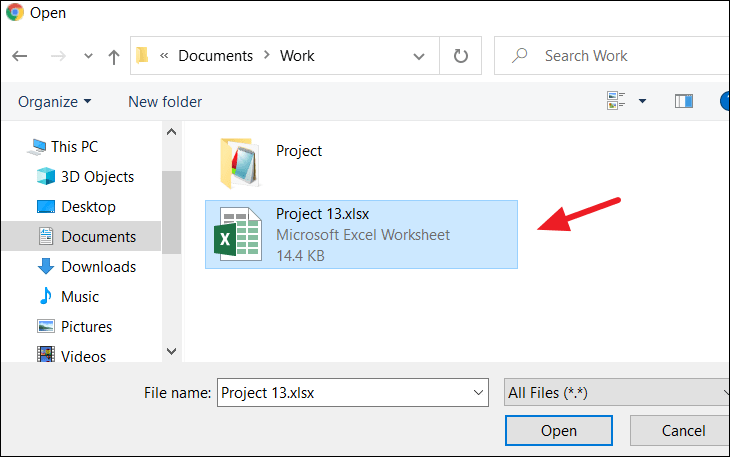
Browse and find the Excel workbook on your local drive, select it, and click ‘Open’ to upload. Or you can simply drag and drop the excel file into the Import file box.
In the Import file window, select the ‘Replace spreadsheet’ option and click the ‘Import Data’ button.
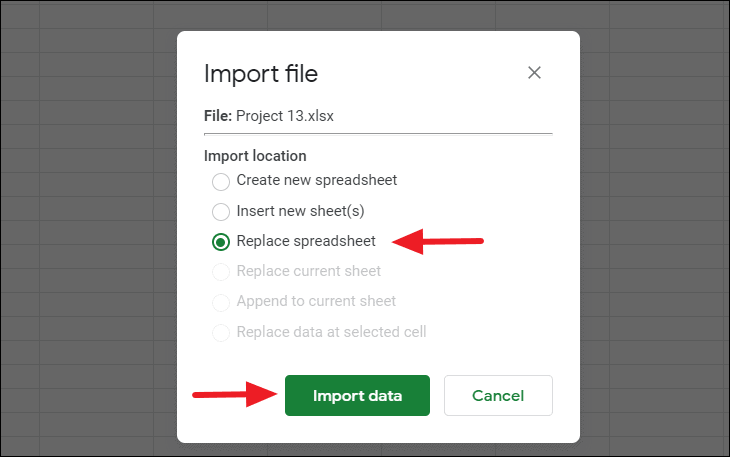
This will import your protected Excel worksheet into your Google Sheets with all the data. Now, you’ll notice that the worksheet is no longer protected and you are free to edit the data.
You can now export the worksheet back to Excel format again.
In the now unprotected Google sheet, click the ‘File’ menu from the toolbar and select the ‘Download’ option. Then choose ‘Microsoft Excel (.xlsx)’ from the context menu.
Then give the file a new name and click ‘Save’.
Now you have the same exact Excel sheet, but it is no longer password-protected.
How to Unprotect an Excel Workbook Without Password
If you have a password protected workbook for which you can’t remember the password, then use the VBA Code and ZIP methods to unprotect the workbook as discussed below.
Unprotect Excel Workbook Without Password Using VBA Code
You can also unprotect workbook structure in Excel using Microsoft Visual Basic for Application (VBA) feature. Here’s How:
Open the Excel file with the protected workbook structure and then go to the ‘Developer’ tab and click the ‘Visual Basic’ button.
In the Visual Basic code editor, click the ‘Insert’ tab and select ‘Module’ option.
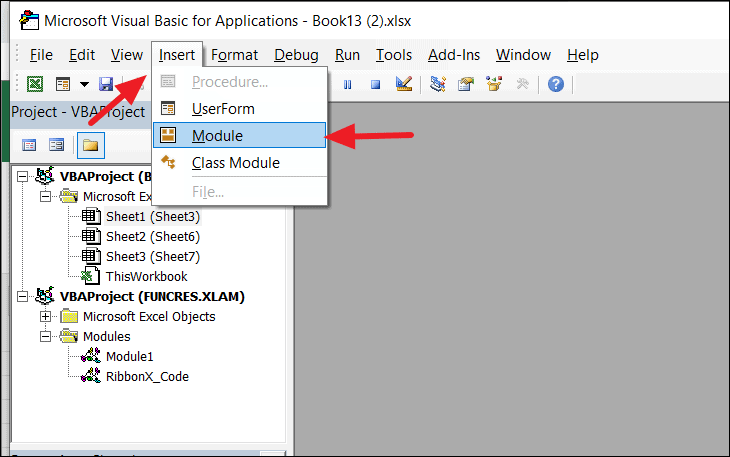
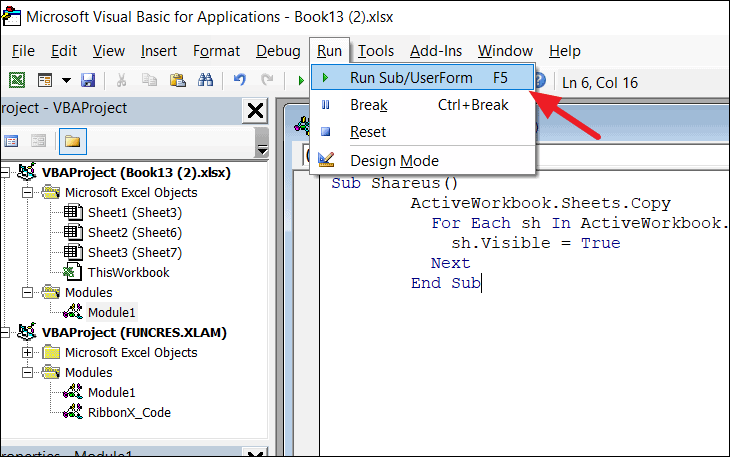
On the popup module (code) window, copy and paste the following code to unlock the workbook structure.
Sub Shareus()
        ActiveWorkbook.Sheets.Copy
          For Each sh In ActiveWorkbook.Sheets
            sh.Visible = True
          Next
        End Sub
Hit the ‘F5’ button or click the ‘Run’ button on the toolbar and select the ‘Run Sub/UserForm’ option to run the macro.
Then a new workbook opens up with a different name. It is the same as the original workbook but without workbook structure protection. Now you unprotected the workbook structure in Excel without knowing the password.
Unprotect Excel Workbook Without Password Using Zip
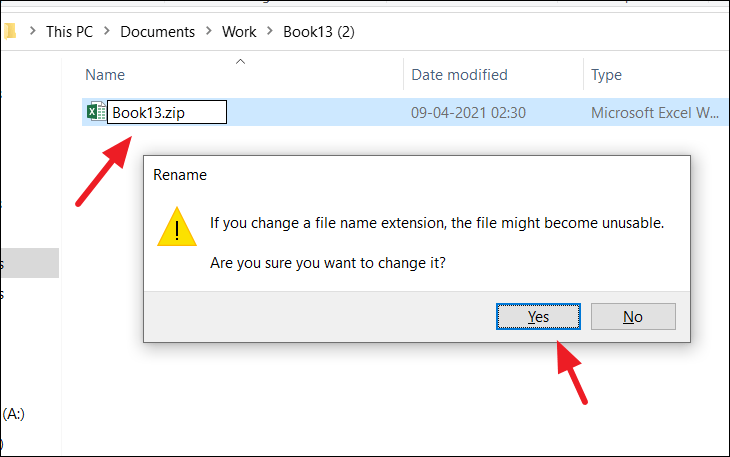
You can unprotect the Excel workbook safely without a password by changing the file extension and manipulating its constituents.
Get the excel file with the protected workbook structure, rename and change its extension from .xlsx to .zip as we did earlier for the protected worksheet. Before you do that make a copy of it for backup.
Then extract the zip file using some file archiver software like WinRAR or 7zip and you’ll get some folders and files as shown below.
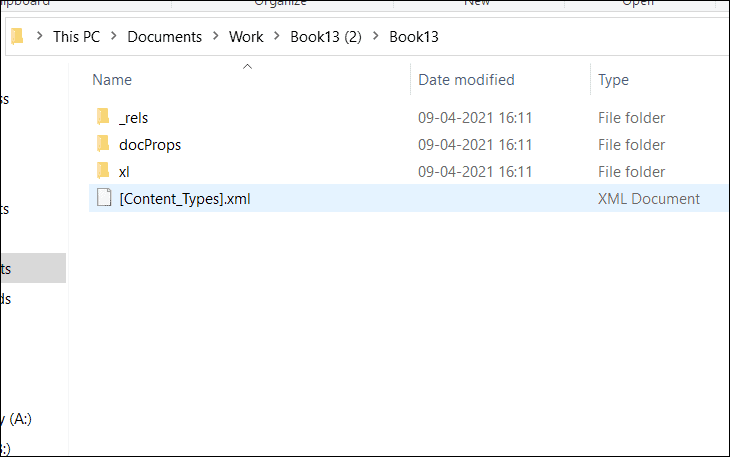
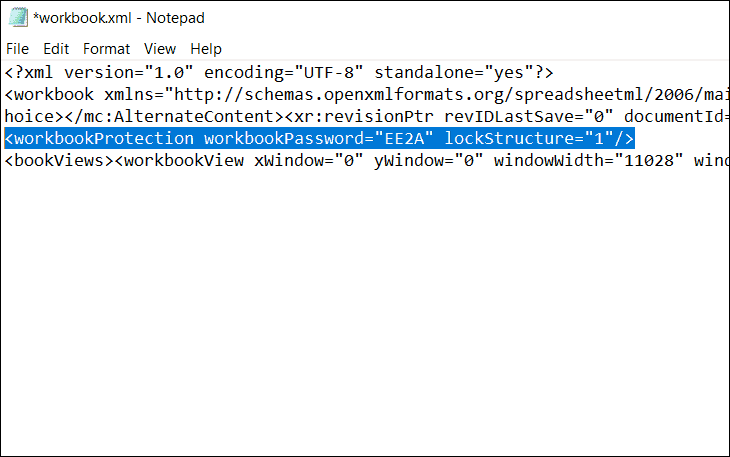
Then open the ‘xl’ folder and open the ‘workbook.xml’ file with Notepad (which contains protection tag)
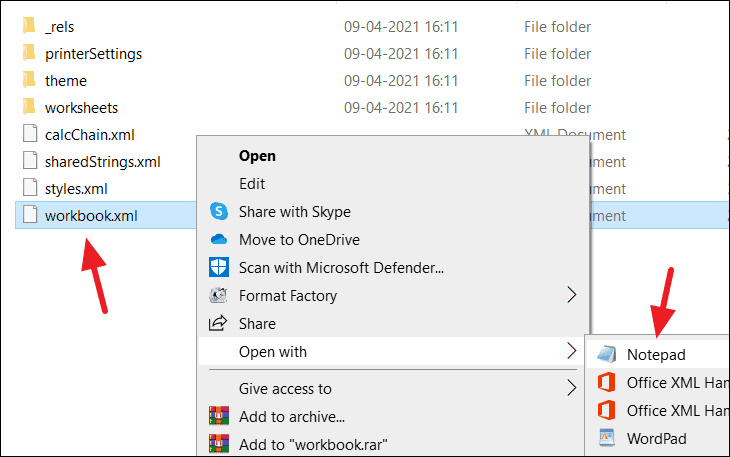
Now find and select this whole protection tag and delete it:
<workbookProtection workbookPassword= …/>
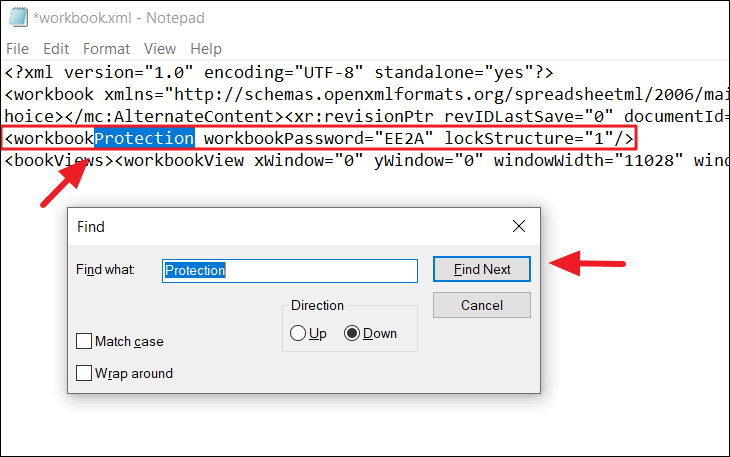
If you are having a hard time finding this tag, just press Ctrl + F to open the Find dialog, type ‘protection’ in ‘Find what’, and click ‘Find Next’. It will find the word ‘Protection’ and highlight it for you. Now, you can highlight the ‘workbookProtection’ tag and delete it.
After removing the protection tag, save the ‘workbook.xml’ file. Then, zip (compress) all the extracted files back into a zip file.
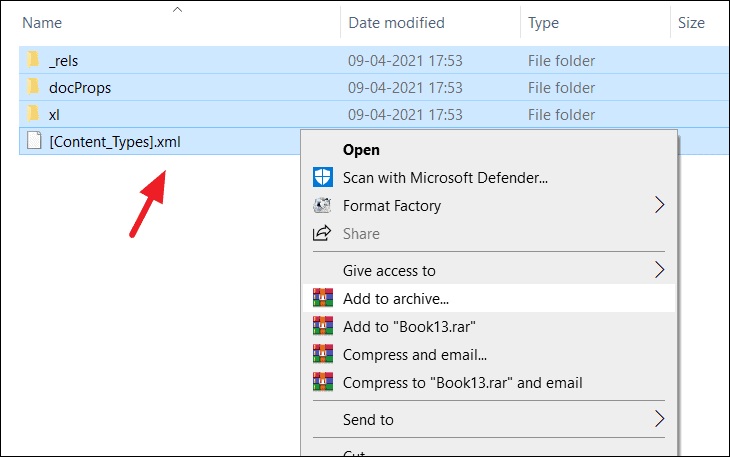
Now all you have to do is change the extension of the file from ‘.zip’ to ‘.xlsx’.
Now the zip file will be converted back to the Excel file and you will find the protected password has been removed from the workbook.
That’s how you unprotect Excel worksheet/workbook.