Watch video – Convert Date to Text in Excel
Date and Time in Excel are stored as numbers. This enables a user to use these dates and time in calculations. For example, you can add a specific number of days or hours to a given date.
However, sometimes you may want these dates to behave like text. In such cases, you need to know how to convert the date to text.
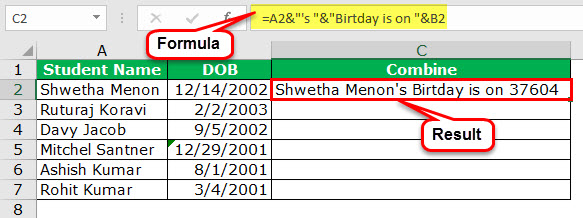
Below is an example where dates are combined with text. You can see that the dates don’t retain their format and show up as numbers in the combined text.
In such situations, it’s required to convert a date into text.
Convert Date to Text in Excel
In this tutorial, you’ll learn three ways to convert the date to text in Excel:
- Using the Text Function
- Using the Text to Column feature
- Using the Copy-Paste method
Convert Date to Text using Text Function
TEXT function is best used when you want to display a value in a specific format. In this case, it would be to display the date (which is a number) in the date format.
Let’s first see how the text function works.
Here is the syntax:
=TEXT(value, format_text)
It takes two arguments:
- value – the number that you want to convert into text. This can be a number, a cell reference that contains a number, or a formula result that returns a number.
- format_text – the format in which you want to display the number. The format needs to be specified within double quotes.
Using the Text function requires a basic understanding of the formats that you can use in it.
In the case of dates, there are four parts to the format:
- day format
- month format
- year format
- separator
Here are the formats you can use for each part:
- Day Format:
- d – it shows the day number without a leading zero. So 2 will be shown as 2 and 12 will be shown as 12.
- dd – it shows the day number with a leading zero. So 2 will be shown as 02, and 12 will be shown as 12
- ddd – it shows the day name as a three letter abbreviation of the day. For example, if the day is a Monday, it will show Mon.
- dddd – it shows the full name of the day. For example, if it’s Monday, it will be shown as Monday.
- Month Format:
- m – it shows the month number without a leading zero. So 2 will be shown as 2 and 12 will be shown as 12.
- mm – it shows the month number with a leading zero. So 2 will be shown as 02, and 12 will be shown as 12
- mmm – it shows the month name as a three letter abbreviation of the day. For example, if the month is August, it will show Aug.
- mmmm – it shows the full name of the month. For example, if the month is August, it will show August.
- Year Format:
- yy – it shows the two digit year number. For example, if it is 2016, it will show 16.
- yyyy – it shows the four digit year number. For example, if it is 2016, it will show 2016.
- Separator:
- / (forward slash): A forward slash can be used to separate the day, month, and year part of a date. For example, if you specify “dd/mmm/yyyy” as the format, it would return a date with the following format: 31/12/2016.
- – (dash): A dash can be used to separate the day, month, and year part of a date. For example, if you specify “dd-mmm-yyyy” as the format, it would return a date with the following format: 31-12-2016.
- Space and comma: You can also combine space and comma to create a format such as “dd mmm, yyyy”. This would show the date in the following format: 31 Mar, 2016.
Let’s see a few examples of how to use the TEXT function to convert date to text in Excel.
Example 1: Converting a Specified Date to Text
Let’s again take the example of the date of joining:
Here’s the formula that will give you the right result:
=A2&"'s joining date is "&TEXT(B2,"dd-mm-yyyy")
Note that instead of using the cell reference that has the date, we have used the TEXT function to convert it into text using the specified format.
Below are some variations of different formats that you can use:
You can experiment with other formats as well and create your own combinations.
Also read: How to Convert Text to Date in Excel (8 Easy Ways)
Example 2: Converting Current Date to Text
To convert the current date into text, you can use the TODAY function along with the TEXT function.
Here is a formula that will do it:
="Today is "&TEXT(TODAY(),"dd/mm/yyyy")
This could be useful in dashboards/reports, where as soon as the file is opened (or any changes are made), the date refreshes to show the current date.
Convert Date to Text using Text to Column
If you’re not a fan of Excel formulas, there is another cool way to quickly convert date to text in Excel – the Text to Column feature.
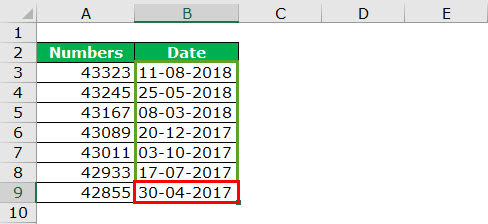
Suppose you have a dataset as shown below and you want to convert these dates into text format:
Here are the steps to do this:
- Select all the cells that contain dates that you want to convert to text.
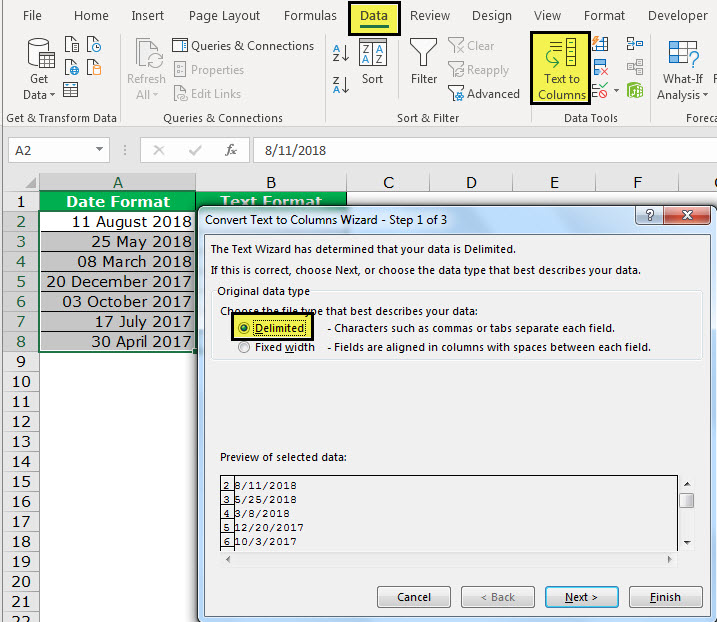
- Go to Data –> Data Tools –> Text to Column.
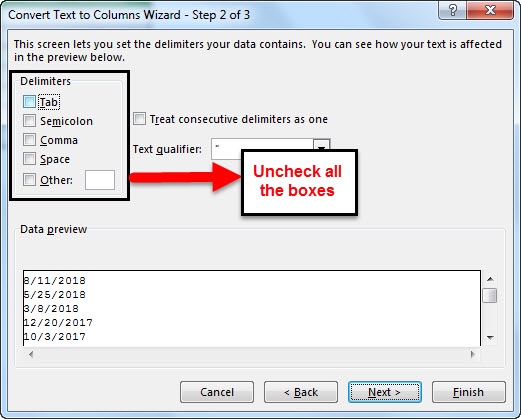
- In the Text to Column Wizard, make the following selections:
This would instantly convert the dates into text format.
Note: There is a difference in the format of the dates in the two columns. While the original format had dd mmm, yyyy format, the result is dd-mm-yyyy. Remember that the Text to Column feature will always convert dates to the default short date format (which is dd-mm-yyyy as per my systems regional settings. It could be different for yours).
Also read: How to Convert Serial Numbers to Dates in Excel (2 Easy Ways)
If you want the date in other formats, use the formula method, or the copy-paste method shown below.
Convert Date to Text using the Copy-Paste Method
This is the fastest way to convert date to text.
Here are the steps:
You May Also Like the Following Excel Tutorials:
- Convert Text to Numbers in Excel – A Step By Step Tutorial.
- How to Convert Formulas to Values in Excel.
- How to Quickly Transpose Data in Excel.
- [Quick Tip] How to Split Cells in Excel.
- Excel Timesheet Calculator Template.
- How to Insert Date and Timestamp in Excel.
- Excel Calendar Template.
- How to Remove Time from Date in Excel
- Convert Time to Decimal Number in Excel (Hours, Minutes, Seconds)
- How To Convert Date To Serial Number In Excel?
When we work in Excel often, we deal with numbers, text, and date format. Excel completely works on numbers. It will reflect the values based on the formatting you give. For example, the date and Time in excelTime is a time worksheet function in Excel that is used to calculate time based on the inputs provided by the user. The arguments can take the following formats: hours, minutes, and seconds.read more are stored as numbers and converted to readable values based on the formatting.
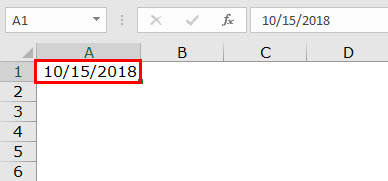
Look at the below example; the value in cell A1 is 43388. But, if we format it to date, it will show us the value as 15-10-2018.
You can download this Convert Date to Text Excel Template here – Convert Date to Text Excel Template
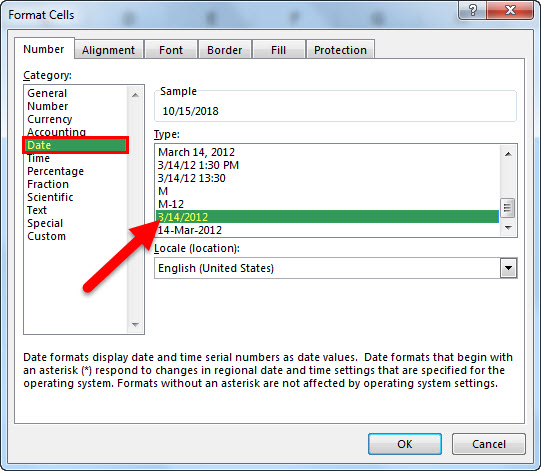
First, we must right-click on the cell and select the “Format Cells” option.
Then, we need to select the date option as shown below.
Now, the result will be as below.
So, Excel will reflect the numbers based on the formatting we apply.
Table of contents
- How to Convert Date to Text in Excel?
- Where can you Convert Date to Text in Excel?
- Example #1 – Convert Date to Text in Excel using “TEXT” Function
- Example #2 – Convert Date to Text in Excel using “TEXT” Function
- Example #3 – Convert Date to Text Using Text to Column Option
- Example #4 – Convert Date to Text in Excel using Formula
- Recommended Articles
Where can you Convert Date to Text in Excel?
Now, let us see some examples of converting dates to text in Excel.
When we need to convert Date to Text in ExcelYou can convert Date to Text in Excel through the most commonly used method, i.e., the text function or by using: Text-to-Column option, Copy Paste Method and VBA.
read more, we need to use the TEXT function in Excel. As mentioned, time and date in Excel are stored as numbers. However, sometimes we may require showing it as the text string. In such cases, we can use the TEXT function
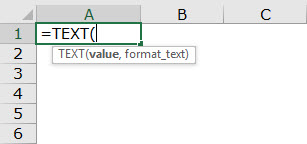
- TEXT function consists of VALUE & FORMAT_TEXT.
- VALUE: It is the value we need to convert. It is simply the targeted cell. That could be a number, a reference cell that contains a number.
- FORMAT_TEXT: The format we need to provide to the cell, i.e., the targeted cell.
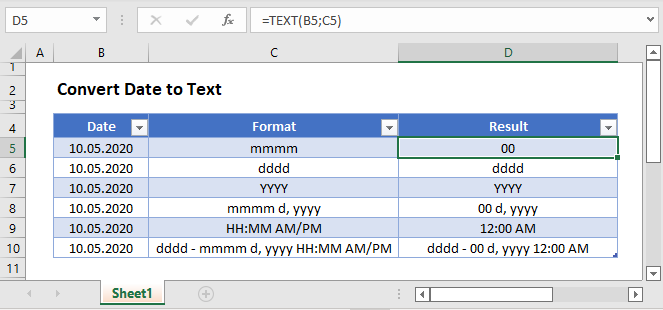
There are multiple date formats available in Excel. The below table will provide a better idea about the different formats and results.
Example #1 – Convert Date to Text in Excel using “TEXT” Function
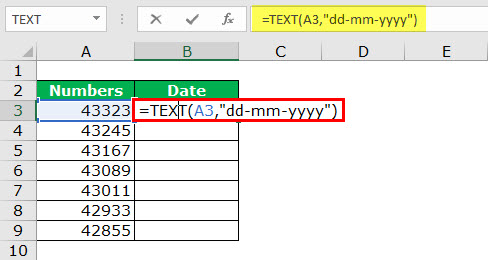
We have the below values from cell A2 to A10 and convert them to the Date from B2 to B10.
To convert them to date format, in cell B2 write the below formula.
=TEXT(A3,”dd-mm-yyyy”)
Press enter and drag the formula
Example #2 – Convert Date to Text in Excel using “TEXT” Function
Take the below data and join the two columns (A2 & B2) together. For example, get the result as Shwetha Menon’s Birthdate is 14 Dec 2002.
Step 1:
- We must go to cell C2 and apply the below concatenate code.
First, it will show the value as “Shwetha Menon’s Birthday is 37604.” It does not make sense to read it because the formula shows the date as numbers only. Therefore, we need to format the number and apply a date format.
- Then, we must apply the TEXT function to get the correct format. In cell C2, we must use the below formula.
Result:
Note: We can apply different format styles shown in the early table to understand and get different results.
Example #3 – Convert Date to Text Using Text to Column Option
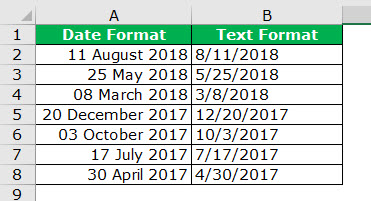
If we do not like formulas in Excel to convert the date to text format, we can use the TEXT TO COLUMN OPTION. Assume we have data from cells A2 to A8.
Now, we need to convert it into text format.
Step 1: We must first select the whole column that we want to convert.
Step 2: Then, we must go to Data > Convert Text to Columns Wizard in Excel.
Step 3: We must ensure that the delimiter is selected and click the “Next” button.
Step 4: Now, the pop-up below will open and uncheck all the boxes and click the “Next” button.
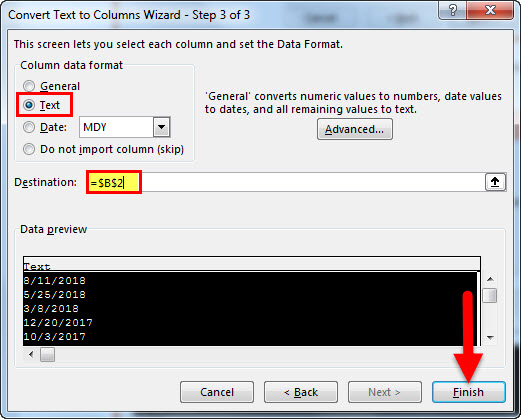
Step 5: We must select the “TEXT” option from the next dialog box. Then, we need to mention the destination cell as =$B$2 and click “Finish.”
Step 6: As a result, it will instantly convert into text format..
Example #4 – Convert Date to Text in Excel using Formula
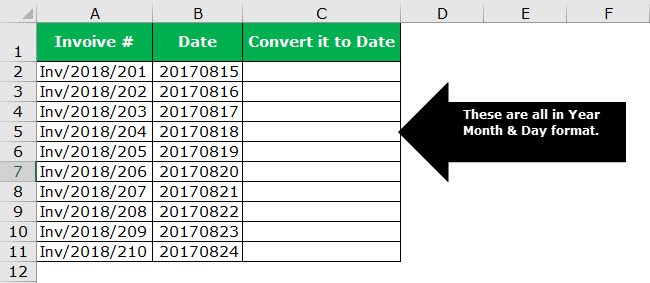
We must use the formula method to convert the number to a date format. Assume we have the below data in our Excel file.
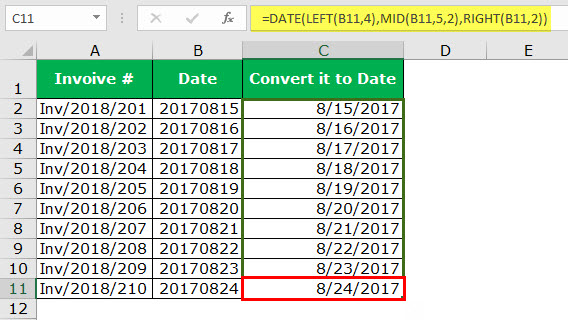
Formulas you need to know to convert them to YYYY-MM-DD are DATE, LEFT, RIGHT & MID functions. Moreover, the formula is.
Date: Date Function in ExcelThe date function in excel is a date and time function representing the number provided as arguments in a date and time code. The result displayed is in date format, but the arguments are supplied as integers.read more formats it into Year-Month-Day format.
Left: LEFT Function in ExcelThe left function returns the number of characters from the start of the string. For example, if we use this function as =LEFT ( «ANAND»,2), the result will be AN.read more will take the first portion for year format. It takes 4 first 4 characters in year format.
Mid: MID Function will take the middle part of the data for month format. It takes the middle 2 characters for a month format.
Right: RIGHT Function in ExcelRight function is a text function which gives the number of characters from the end from the string which is from right to left. For example, if we use this function as =RIGHT ( “ANAND”,2) this will give us ND as the result.read more will take the last part for Day format. Takes the last 2 characters for Day format.
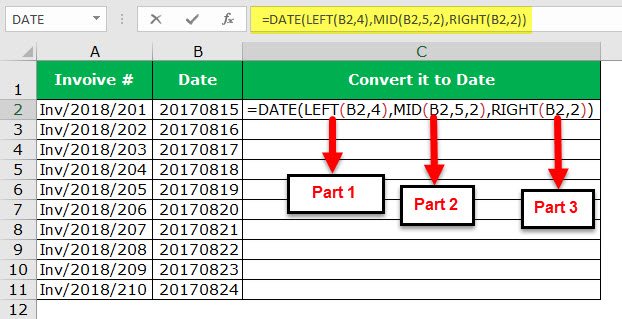
Now, we must go ahead and apply the formula to get the date format.
Now, let us elaborate on each part.
Part 1: LEFT (B2, 4) this means, in cell B2, take the first four characters. i.e., 2017
Part 2: MID (B2, 5, 2) this means, in cell B2, starting from 5th character, select two characters. i.e., 08.
Part 3: RIGHT (B2, 2) this means, in cell B2 from the right side, select two characters. i.e., 15
The Date function will combine all these and give you the value below. Next, drag and drop the formula for the remaining cells.
Recommended Articles
This article is a guide to Convert Date to Text in Excel. Here, we discuss converting date to text in Excel using three methods – 1) Text Function and 2) Text to Column Option 3) Formula Method, along with Excel examples and downloadable Excel templates. You may also look at these useful functions in Excel: –
- Excel Separate Text
- Add Text in Excel FormulaText in Excel Formula allows us to add text values to using the CONCATENATE function or the ampersand (&) symbol.read more
- Text to Columns in ExcelText to columns in excel is used to separate text in different columns based on some delimited or fixed width. This is done either by using a delimiter such as a comma, space or hyphen, or using fixed defined width to separate a text in the adjacent columns.read more
- MONTH Excel Function
Return to Excel Formulas List
Download Example Workbook
Download the example workbook
This tutorial will teach you how to convert dates to text in Excel & Google Sheets.
Convert Dates to Text
Excel stores dates as serial numbers, where each whole number represents a unique date.
This is extremely useful as it allows you to perform calculations on the dates, but in some cases you may wish to convert that date to text.
Text Function
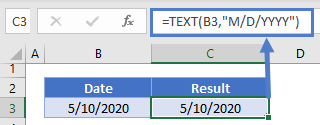
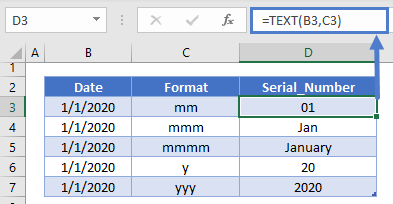
To convert dates to text, you can use the TEXT Function:
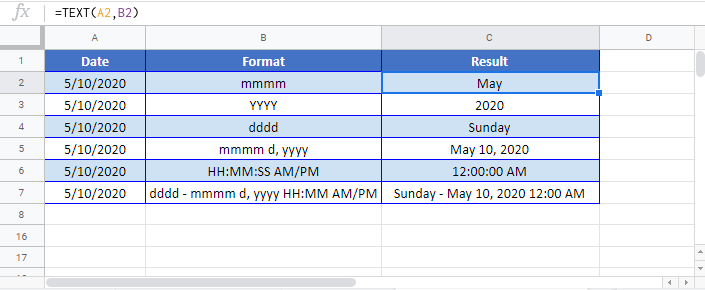
=TEXT(B3,"M/D/YYYY")The most important input in the TEXT Function is the display format. Notice in the previous example we used the “m/d/yyyy” format. Here are other common date display formats:
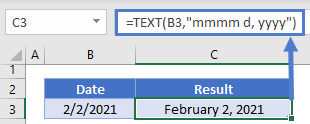
Notice that you can use the TEXT Function to write out a full date
=TEXT(B3,"mmmm d, yyyy")You can also display only the month name or year:
or you can use any of those format types to build your desired date format.
Date Formatting
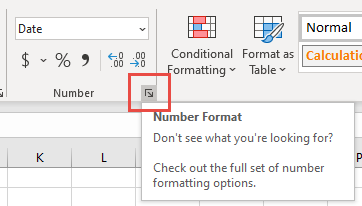
The easiest way to test your date formatting is by opening up the Format Cells Menu and selecting Custom. To open the menu, press CTRL + 1 or click this button:
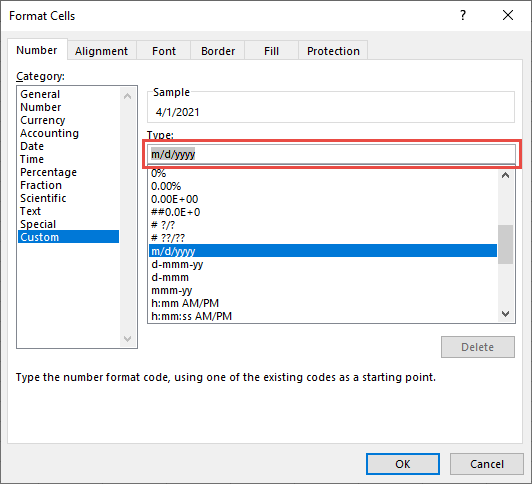
Navigate to the Custom Form and edit the custom formatting:
Here you can see the result of your formatting in real-time. Once you have the formatting you need, simply copy and paste it into the TEXT Function.
Type Date as Text
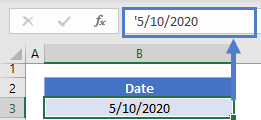
If you’re entering a new date into a cell, simply start the date with an apostrophe (‘). By starting a cell with an apostrophe you tell Excel to trade that cell as text.
This keeps the date exactly as entered and prevents it from being converted to a date stored as a serial number.
Convert Date to Text in Google Sheets
All of the above examples work exactly the same in Google Sheets as in Excel.
I have an Excel file which has a column formatted as date in the format dd-mm-YYYY.
I need to convert that field to text. If I change the field type excel converts it to a strange value (like 40603).
I tried the text function but it gives me Error 508.
Any help?
Lance Roberts
22.2k32 gold badges112 silver badges129 bronze badges
asked Apr 3, 2012 at 12:04
2
You don’t need to convert the original entry — you can use TEXT function in the concatenation formula, e.g. with date in A1 use a formula like this
="Today is "&TEXT(A1,"dd-mm-yyyy")
You can change the «dd-mm-yyyy» part as required
answered Apr 3, 2012 at 12:20
barry houdinibarry houdini
45.5k8 gold badges63 silver badges80 bronze badges
2
You can use TEXT like this as part of a concatenation
=TEXT(A1,"dd-mmm-yy") & " other string"
answered Apr 3, 2012 at 12:23
brettdjbrettdj
54.6k16 gold badges113 silver badges176 bronze badges
If that is one table and have nothing to do with this — the simplest solution can be copy&paste to notepad then copy&paste back to excel 
answered Apr 3, 2012 at 12:10
AlexHalkinAlexHalkin
1,08814 silver badges33 bronze badges
2
Dates and times in Excel are stored as serial numbers and converted to human readable values on the fly using number formats. When you enter a date in Excel, you can apply a number format to display that date as you like. In a similar way, the TEXT function allows you to convert a date or time into text in a preferred format. For example, if the date January 9, 2000 is entered in cell A1, you can use TEXT to convert this date into the following text strings as follows:
=TEXT(A1,"mmm")            // "Jan"
=TEXT(A1,"dd/mm/yyyy")     // "09/01/2012"
=TEXT(A1,"dd-mmm-yy")      // "09-Jan-12"
Date format codes
Assuming a date of January 9, 2012, here is a more complete set of formatting codes for date, along with sample output.
| Format code | Output |
| d | 9 |
| dd | 09 |
| ddd | Mon |
| dddd | Monday |
| m | 1 |
| mm | 01 |
| mmm | Jan |
| mmmm | January |
| mmmmm | J |
| yy | 12 |
| yyyy | 2012 |
| mm/dd/yyyy | 01/09/2012 |
| m/d/y | 1/9/12 |
| ddd, mmm d | Mon, Jan 9 |
| mm/dd/yyyy h:mm AM/PM | 01/09/2012 5:15 PM |
| dd/mm/yyyy hh:mm:ss | 09/01/2012 17:15:00 |
You can use the TEXT function to convert dates or any numeric value to a fixed text format. You can explore available formats by navigating to Format Cells (Win: Ctrl + 1, Mac: Cmd + 1) and selecting various format categories in the list to the left. Also see: Excel custom number formats.
На чтение 5 мин Просмотров 4.4к. Опубликовано 19.02.2022
Excel сохраняет даты в виде порядковых номеров. Человеку невозможно их читать и понимать, но, таким образом, можно использовать их в функциях расчета, к примеру добавить к дате или времени какое-то количество времени (день, год и так далее).
Но, довольно часто, вам может быть нужно использовать даты в одних ячейках с текстом, так сказать, объединять.
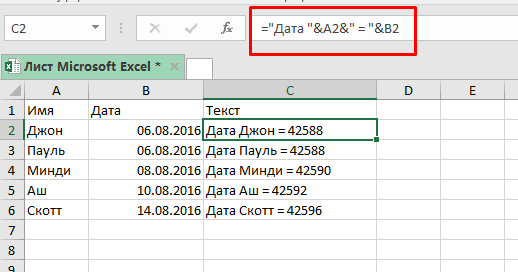
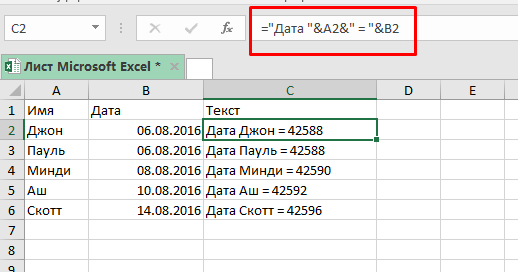
На картинке пример объединения даты с текстом в одной ячейке. Видите как выглядит наша дата? Это формат порядкового номера Excel.
Именно в таких ситуациях вам может понадобиться привести дату в «читаемый» формат.
Содержание
- Переводим дату в текстовый формат
- Как привести указанную дату в текстовый формат
- Как привести текущую дату в текстовый формат
- Переводим дату в текстовый формат с помощью функции «Текст по столбцам»
- Переводим дату в текстовый формат с помощью копирования и вставки
Переводим дату в текстовый формат
Когда нам нужно привести дату в определенный формат (к примеру, 16-08-2016), мы можем вызвать функцию ТЕКСТ.
Итак, как она работает.
Синтаксис:
=ТЕКСТ(значение; формат_текста)Она принимает два аргумента:
- Значение — в нашем случае это дата, которую вы хотите преобразовать в текст нужного формата. Это может быть просто дата, ссылка на ячейку с датой, или результат формулы.
- Формат_текста — формат, в котором нужно показать нашу дату. Формат должен быть указан в двойных кавычках.
Какие есть форматы и разделители?
Формат дат состоит из 4 составляющих:
- день
- месяц
- год
- разделитель
Ниже приведены форматы, которые можно использовать для каждой части:
Формат дня:
- Д — день будет отображаться без нуля, т.е. 1 будет отображаться как 1, а 12 как 12.
- ДД — день будет отображаться с нулем, т.е. 1 будет 01, а 12 как 12.
- ДДД — будет отображаться день недели(сокращенно), т.е. «Пятница» будет «Пят».
- ДДДД — будет отображаться день недели(полностью), т.е. «Пятница» будет «Пятница».
Формат месяца:
- М — месяц будет отображаться без нуля, т.е. 1 будет отображаться как 1, а 12 как 12.
- ММ — месяц будет отображаться с нулем, т.е. 1 будет 01, а 12 как 12.
- МММ — месяц будет отображаться с сокращенным названием, т.е. «Сентябрь» будет «Сен».
М — месяц будет отображаться без нуля, т.е. 1 будет отображаться как 1, а 12 как 12.
ММ — месяц будет отображаться с нулем, т.е. 1 будет 01, а 12 как 12.
МММ — месяц будет отображаться с сокращенным названием, т.е. «Сентябрь» будет «Сен».
ММММ — месяц будет отображаться с полным названием, т.е. «Сентябрь» будет «Сентябрь».
Формат года:
- ГГ — год будет отображаться как 2 цифры, т.е. 2019 будет 19.
- ГГГГ — год будет отображаться полностью, т.е. 2019 будет 2019.
Разделитель:
- «/» : это просто разделитель между цифрами в дате, т.е. отображаться будет как 01/01/2019.
- «-»: такой же разделитель между цифрами, т.е. отображаться будет как 01-01-2019.
- Пробелы и запятые: тут немного посложней, вы можете комбинировать и создавать свои форматы отображения, например, 01 января, 2019 года.
Итак, разберем примеры.
Как привести указанную дату в текстовый формат
Пример:
Итак, мы получили дату вместе с текстом, но дата сейчас в формате порядкового номера Excel.
Формула:
="Дата"&A2&"="&B2 Теперь, нам нужно получить дату в «привычном» для нас виде.
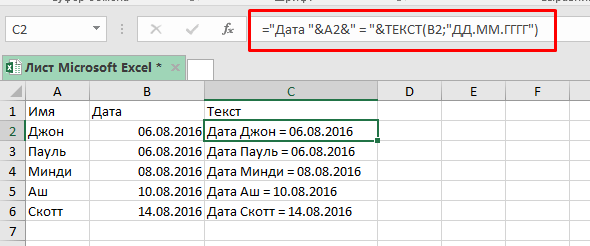
Формула будет:
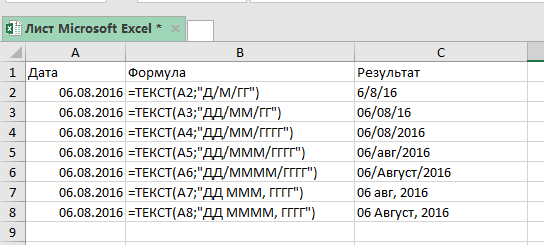
="Дата "&A2&" = "&ТЕКСТ(B2;"ДД.ММ.ГГГГ")Итак, мы вызвали функцию ТЕКСТ, указали ссылку на ячейку и определили формат, результат вы видите на картинке выше.
Какие еще есть форматы и как они выглядят на «выходе»:
Как привести текущую дату в текстовый формат
Для того чтобы получить текущую дату мы можем использовать функцию СЕГОДНЯ.
Формула:
="Сегодня "&ТЕКСТ(СЕГОДНЯ();"ДД/ММ/ГГГГ")Эта функция может пригодиться вам в случае, если вы формируете отчеты, где важна, например, дата изменения файла.
Переводим дату в текстовый формат с помощью функции «Текст по столбцам»
Если формулы и вызов функций вам не по душе, есть вариант и для вас.
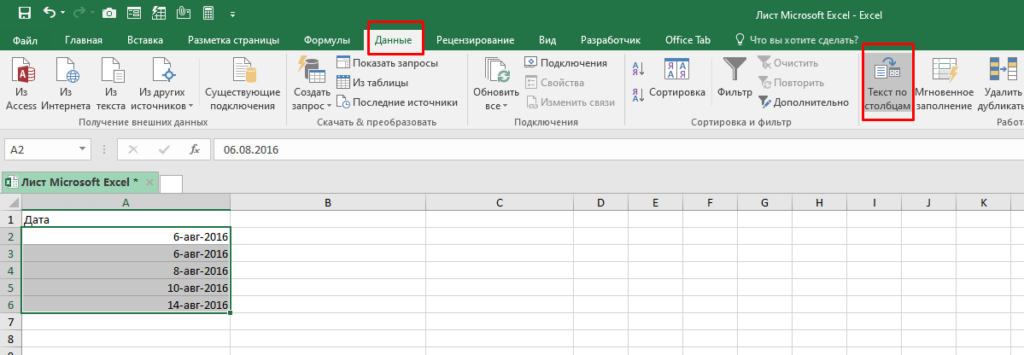
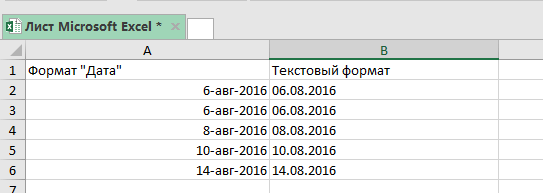
Допустим, у нас есть следующие данные и нам нужно преобразовать их в текстовый формат:
Пошаговая инструкция:
- Выделите ячейки, которые необходимо преобразовать в текст;
- Перейдите в раздел «Данные» -> «Текст по столбцам»;
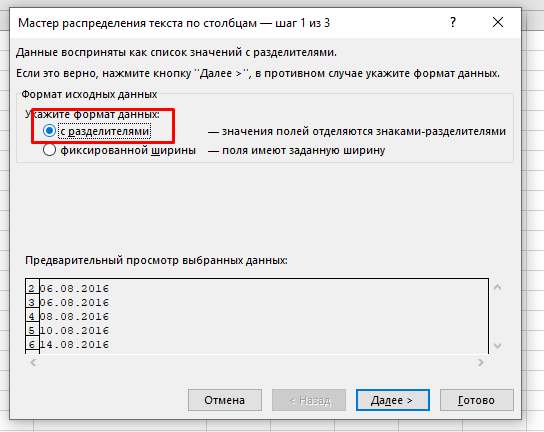
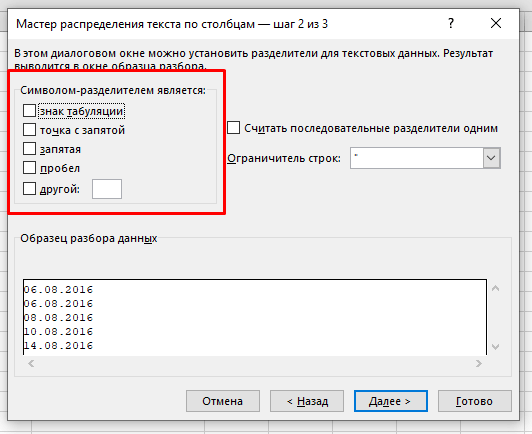
- В открывшемся окне:
- Выберите опцию «с разделителями»;
- Снимите все галочки и нажмите «Далее»;
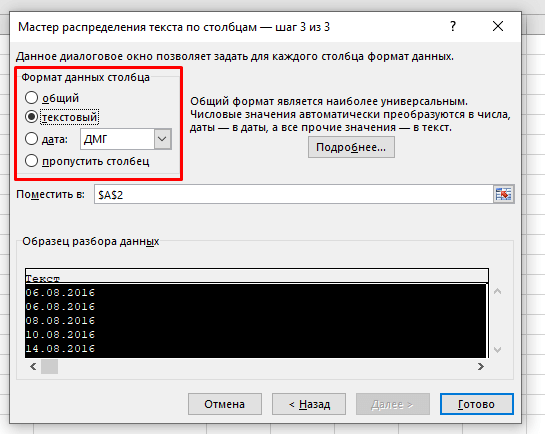
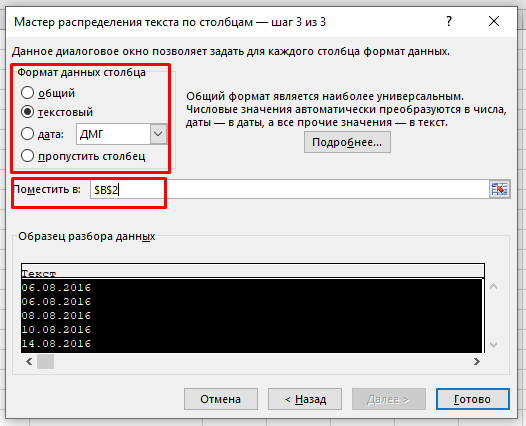
- Выберите формат «текстовый» укажите куда поместить наши, уже текстовые, значения и нажмите «Готово».
Функция сразу же переводит даты в текстовый формат.
Важная информация: эта функция устанавливает формат для дат по умолчанию для настроек вашей системы. То есть если вы хотите записать даты в определенном формате вам нужно использовать способы рассмотренные ранее, но для начала дочитайте нашу статью, возможно следующий вариант подойдет вам.
Переводим дату в текстовый формат с помощью копирования и вставки
Пошаговая инструкция:
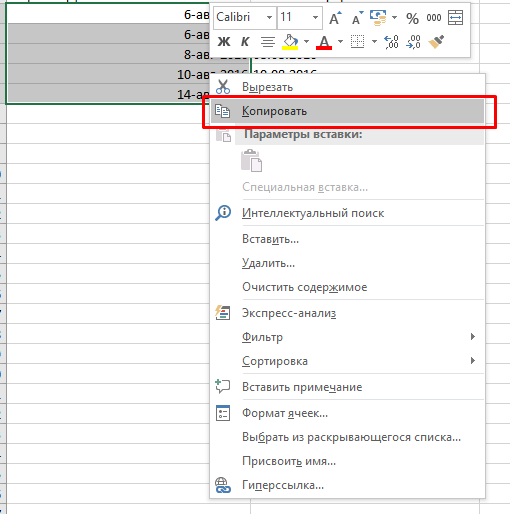
- Выделите ячейки с датами, которые нужно преобразовать, и скопируйте их;
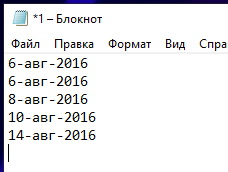
- Откройте обычный блокнот и вставьте наши данные туда, как только вы это сделаете, данные сразу же потеряют формат, т.е. станут обычным текстом (потому что в блокноте нет никаких форматов данных, кроме текста);
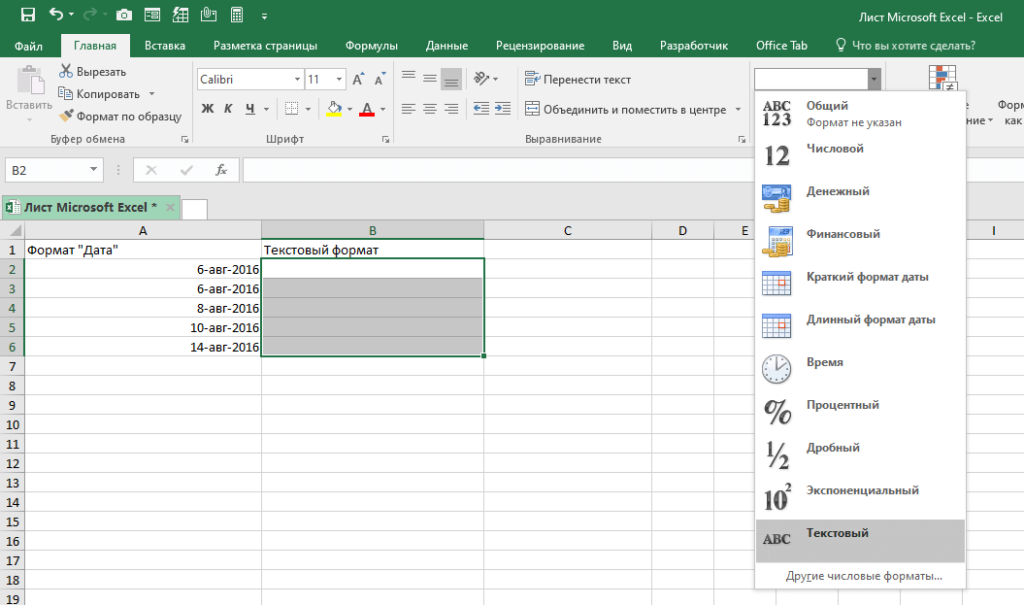
- Выделите ячейки, куда вы будете вставлять даты и поменяйте их формат на «Текстовый»;
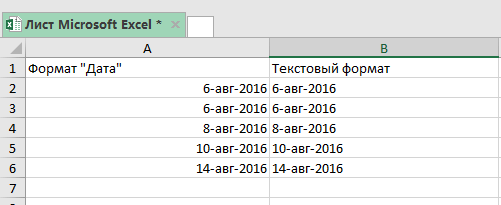
- А теперь, заново скопируйте даты из блокнота, а затем вставьте их в Excel.
Excel сохраняет даты в виде порядковых номеров. Человеку невозможно их читать и понимать, но, таким образом, можно использовать их в функциях расчета, к примеру добавить к дате или времени какое-то количество времени (день, год и так далее).
Но, довольно часто, вам может быть нужно использовать даты в одних ячейках с текстом, так сказать, объединять.
На картинке пример объединения даты с текстом в одной ячейке. Видите как выглядит наша дата? Это формат порядкового номера Excel.

If we want to convert a calendar date in its number format, to text format, we are going to utilize the Excel TEXT Function.
Generic Formula
=TEXT(date,format)
- date is the number value we want to convert.
- format is the pattern in which we want the resulting text string to appear.
Time and dates are originally stored as serial numbers in Excel before they are transformed into values that can be read by us.
How to use the Excel TEXT Function.
We will now demonstrate how we can use the Excel TEXT Function to convert a date in number format into text. .

In the example illustrated above, our purpose is to convert the date in cell A2 to a text string format.
We entered the formula for the TEXT Function into cell B2.
The Excel TEXT Function returned the text string date format in cell B2.
The TEXT Function can be used for converting numeric values or dates in a fixed format.

Instant Connection to an Expert through our Excelchat Service:
Our live Excelchat Service is here for you. We have Excel Experts available 24/7 to answer any Excel questions you may have. Guaranteed connection within 30 seconds and a customized solution for you within 20 minutes
Содержание
- Convert Date to Text in Excel – Explained with Examples
- Convert Date to Text in Excel
- Convert Date to Text using Text Function
- Example 1: Converting a Specified Date to Text
- Example 2: Converting Current Date to Text
- Convert Date to Text using Text to Column
- Convert Date to Text using the Copy-Paste Method
- Convert a Date to Text in Excel
- Convert a Date to Text By Adding an Apostrophe
- Convert a Date to Text Using Excel Text to Columns
- Convert a Date to Text Using the Excel Text Function
- How to convert text to date and number to date in Excel
- How to distinguish normal Excel dates from «text dates»
- How to convert number to date in Excel
- How to convert 8-digit number to date in Excel
- How to convert text to date in Excel
- Excel DATEVALUE function — change text to date
- Excel DATEVALUE function — things to remember
- Excel VALUE function — convert a text string to date
- Mathematical operations to convert text to dates
- How to convert text strings with custom delimiters to dates
- Text to Columns wizard — formula-free way to covert text to date
- Example 1. Converting simple text strings to dates
- Example 2. Converting complex text strings to dates
- Quick conversion of text dates using Paste Special
- Fixing text dates with two-digit years
- How to turn on Error Checking in Excel
- How to change text to date in Excel an easy way
Convert Date to Text in Excel – Explained with Examples
Watch video – Convert Date to Text in Excel
Date and Time in Excel are stored as numbers. This enables a user to use these dates and time in calculations. For example, you can add a specific number of days or hours to a given date.
However, sometimes you may want these dates to behave like text. In such cases, you need to know how to convert the date to text.
Below is an example where dates are combined with text. You can see that the dates don’t retain their format and show up as numbers in the combined text.
In such situations, it’s required to convert a date into text.
This Tutorial Covers:
Convert Date to Text in Excel
In this tutorial, you’ll learn three ways to convert the date to text in Excel:
- Using the Text Function
- Using the Text to Column feature
- Using the Copy-Paste method
Convert Date to Text using Text Function
TEXT function is best used when you want to display a value in a specific format. In this case, it would be to display the date (which is a number) in the date format.
Let’s first see how the text function works.
Here is the syntax:
It takes two arguments:
- value – the number that you want to convert into text. This can be a number, a cell reference that contains a number, or a formula result that returns a number.
- format_text – the format in which you want to display the number. The format needs to be specified within double quotes.
Using the Text function requires a basic understanding of the formats that you can use in it.
In the case of dates, there are four parts to the format:
- day format
- month format
- year format
- separator
Here are the formats you can use for each part:
- Day Format:
- d – it shows the day number without a leading zero. So 2 will be shown as 2 and 12 will be shown as 12.
- dd – it shows the day number with a leading zero. So 2 will be shown as 02, and 12 will be shown as 12
- ddd – it shows the day name as a three letter abbreviation of the day. For example, if the day is a Monday, it will show Mon.
- dddd – it shows the full name of the day. For example, if it’s Monday, it will be shown as Monday.
- Month Format:
- m – it shows the month number without a leading zero. So 2 will be shown as 2 and 12 will be shown as 12.
- mm – it shows the month number with a leading zero. So 2 will be shown as 02, and 12 will be shown as 12
- mmm – it shows the month name as a three letter abbreviation of the day. For example, if the month is August, it will show Aug.
- mmmm – it shows the full name of the month. For example, if the month is August, it will show August.
- Year Format:
- yy – it shows the two digit year number. For example, if it is 2016, it will show 16.
- yyyy – it shows the four digit year number. For example, if it is 2016, it will show 2016.
- Separator:
- / (forward slash): A forward slash can be used to separate the day, month, and year part of a date. For example, if you specify “dd/mmm/yyyy” as the format, it would return a date with the following format: 31/12/2016.
- – (dash): A dash can be used to separate the day, month, and year part of a date. For example, if you specify “dd-mmm-yyyy” as the format, it would return a date with the following format: 31-12-2016.
- Space and comma: You can also combine space and comma to create a format such as “dd mmm, yyyy”. This would show the date in the following format: 31 Mar, 2016.
Let’s see a few examples of how to use the TEXT function to convert date to text in Excel.
Example 1: Converting a Specified Date to Text
Let’s again take the example of the date of joining:
Here’s the formula that will give you the right result:
Note that instead of using the cell reference that has the date, we have used the TEXT function to convert it into text using the specified format.
Below are some variations of different formats that you can use:
You can experiment with other formats as well and create your own combinations.
Example 2: Converting Current Date to Text
To convert the current date into text, you can use the TODAY function along with the TEXT function.
Here is a formula that will do it:
This could be useful in dashboards/reports, where as soon as the file is opened (or any changes are made), the date refreshes to show the current date.
Convert Date to Text using Text to Column
If you’re not a fan of Excel formulas, there is another cool way to quickly convert date to text in Excel – the Text to Column feature.
Suppose you have a dataset as shown below and you want to convert these dates into text format:
Here are the steps to do this:
- Select all the cells that contain dates that you want to convert to text.
- Go to Data –> Data Tools –> Text to Column.
- In the Text to Column Wizard, make the following selections:
This would instantly convert the dates into text format.
If you want the date in other formats, use the formula method, or the copy-paste method shown below.
Convert Date to Text using the Copy-Paste Method
This is the fastest way to convert date to text.
Here are the steps:
You May Also Like the Following Excel Tutorials:
Источник
Convert a Date to Text in Excel
This page describes the following three different methods, that can be used to convert a date to text in Excel.
| Excel Convert Date to Text Index: |
| Date to Text By Adding an Apostrophe |
| Date to Text Using Text to Columns |
| Date to Text Using Excel Functions |
Convert a Date to Text By Adding an Apostrophe
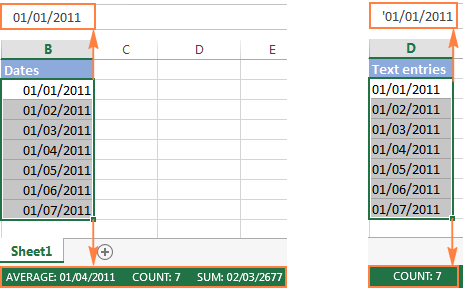
The quickest way to convert an Excel date to text is to insert an apostrophe in front of the date (see right above ).
The apostrophe will not be displayed in the cell, but it will tell Excel to treat the contents of the cell as text.
Convert a Date to Text Using Excel Text to Columns
If you want to convert an entire column of Excel dates to text, you might prefer to use the Excel Text to Columns command.
However, note that the Text to Columns command only works on one column of data at a time.
To use the Excel Text to Columns command to convert dates to text:
- Select the range of cell(s) that you want to convert (these must not span more than one column).
From the Data tab on the Excel ribbon, select the Text to Columns option (see right above ).
This will cause the Convert Text to Columns wizard to open up. Within this:
- Make sure the Delimited option is selected and click Next >;
- Make sure that none of the Delimiters are selected and then click Next > again;
You should now be offered a selection of Column Data Formats. Select Text and click the Finish button.
Convert a Date to Text Using the Excel Text Function
The Excel Text Function converts a supplied numeric value (including an Excel date or time) to text, using a user-specified format.
The syntax of the function is:
- value is the numeric value to be converted to text;
- format_text is a text string that defines the formatting to be applied to the supplied value .
The spreadsheet below shows examples of the Excel Text Function used to convert the date 01/01/2016 into text strings with various date formats:
Источник
How to convert text to date and number to date in Excel

The tutorial explains how to use Excel functions to convert text to date and number to date, and how to turn text strings into dates in a non-formula way. You will also learn how to quickly change a number to date format.
Since Excel is not the only application you work with, sometimes you’ll find yourself working with dates imported in an Excel worksheet from a .csv file or another external source. When that happens, chances are the dates will export as text entries. Even though they look like dates, Excel won’t not recognize them as such.
There are many ways to convert text to date in Excel and this tutorial aims to cover them all, so that you can choose a text-to-date conversion technique most suitable for your data format and your preference for a formula or non-formula way.
How to distinguish normal Excel dates from «text dates»
When importing data into Excel, there is often a problem with date formatting. The imported entries may look like normal Excel dates to you, but they don’t behave like dates. Microsoft Excel treats such entries as text, meaning you cannot sort your table by date properly, nor can you use those «text dates» in formulas, PivotTables, charts or any other Excel tool that recognizes dates.
There are a few signs that can help you determine whether a given entry is a date or a text value.
| Dates | Text values |
|
|
How to convert number to date in Excel
Since all Excel functions that change text to date return a number as a result, let’s have a closer look at converting numbers to dates first.
As you probably know, Excel stores dates and times as serial numbers and it is only a cell’s formatting that forces a number to be displayed as a date. For example, 1-Jan-1900 is stored as number 1, 2-Jan-1900 is stored as 2, and 1-Jan-2015 is stored as 42005. For more information on how Excel stores dates and times, please see Excel date format.
When calculating dates in Excel, the result returned by different date functions is often a serial number representing a date. For example, if =TODAY()+7 returns a number like 44286 instead of the date that is 7 days after today, that does not mean the formula is wrong. Simply, the cell format is set to General or Text while it should be Date.
To convert such serial number to date, all you have to do is change the cell number format. For this, simply pick Date in the Number Format box on the Home tab.
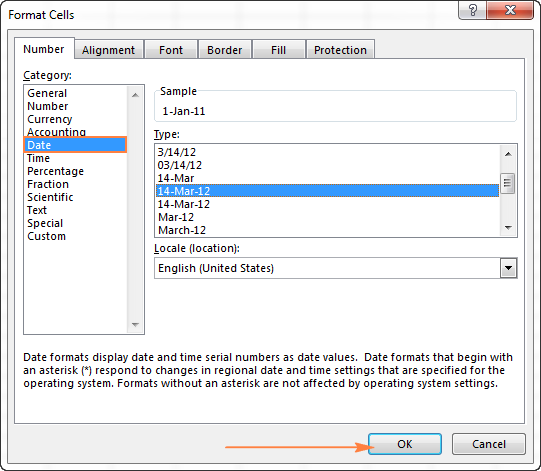
To apply a format other than default, then select the cells with serial numbers and press Ctrl+1 to open the Format Cells dialog. On the Number tab, choose Date, select the desired date format under Type and click OK.
Yep, it’s that easy! If you want something more sophisticated than predefined Excel date formats, please see how to create a custom date format in Excel.
If some stubborn number refuses to change to a date, check out Excel date format not working — troubleshooting tips.
How to convert 8-digit number to date in Excel
It’s a very common situation when a date is input as an 8-digit number like 10032016, and you need to convert it into a date value that Excel can recognize (10/03/2016). In this case, simply changing the cell format to Date won’t work — you will get ########## as the result.
To convert such a number to date, you will have to use the DATE function in combination with RIGHT, LEFT and MID functions. Unfortunately, it is not possible to make a universal formula that will work in all scenarios because the original number can be input in a variety of different formats. For example:
| Number | Format | Date |
| 10032016 | ddmmyyyy | 10-Mar-2016 |
| 20160310 | yyyymmdd | |
| 20161003 | yyyyddmm |
Anyway, I will try to explain the general approach to converting such numbers to dates and provide a few formula examples.
For starters, remember the order of the Excel Date function arguments:
So, what you need to do is extract a year, month and date from the original number and supply them as the corresponding arguments to the Date function.
For example, let’s see how you can convert number 10032016 (stored in cell A1) to date 3/10/2016.
- Extract the year. It’s the last 4 digits, so we use the RIGHT function to pick the last 4 characters: RIGHT(A1, 4).
- Extract the month. It’s the 3 rd and 4 th digits, so we employ the MID function to get them MID(A1, 3, 2). Where 3 (second argument) is the start number, and 2 (third argument) is the number of characters to extract.
- Extract the day. It’s the first 2 digits, so we have the LEFT function to return the first 2 characters: LEFT(A2,2).
Finally, embed the above ingredients into the Date function, and you get a formula to convert number to date in Excel:
=DATE(RIGHT(A1,4), MID(A1,3,2), LEFT(A1,2))
The following screenshot demonstrates this and a couple more formulas in action:
Please pay attention to the last formula in the above screenshot (row 6). The original number-date (161003) contains only 2 chars representing a year (16). So, to get the year of 2016, we concatenate 20 and 16 using the following formula: 20&LEFT(A6,2). If you don’t do this, the Date function will return 1916 by default, which is a bit weird as if Microsoft still lived in the 20 th century 🙂
Note. The formulas demonstrated in this example work correctly as long as all numbers you want to convert to dates follow the same pattern.
How to convert text to date in Excel
When you spot text dates in your Excel file, most likely you would want to convert those text strings to normal Excel dates so that you can refer to them in your formulas to perform various calculations. And as is often the case in Excel, there are a few ways to tackle the task.
Excel DATEVALUE function — change text to date
The DATEVALUE function in Excel converts a date in the text format to a serial number that Excel recognizes as a date.
The syntax of Excel’s DATEVALUE is very straightforward:
So, the formula to convert a text value to date is as simple as =DATEVALUE(A1) , where A1 is a cell with a date stored as a text string.
Because the Excel DATEVALUE function converts a text date to a serial number, you will have to make that number look like a date by applying the Date format to it, as we discussed a moment ago.
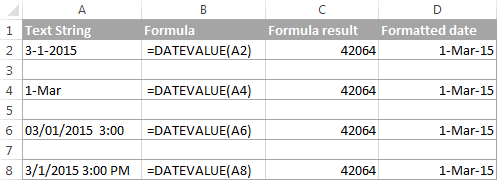
The following screenshots demonstrates a few Excel DATEVALUE formulas in action:
Excel DATEVALUE function — things to remember
When converting a text string to a date using the DATEVALUE function, please keep in mind that:
- Time information in text strings is ignored, as you can see in rows 6 and 8 above. To convert text values containing both dates and times, use the VALUE function.
- If the year is omitted in a text date, Excel’s DATEVALUE will pick the current year from your computer’s system clock, as demonstrated in row 4 above.
- Since Microsoft Excel stores dates since January 1, 1900 , the use of the Excel DATEVALUE function on earlier dates will result in the #VALUE! error.
- The DATEVALUE function cannot convert a numeric value to date, nor can it process a text string that looks like a number, for that you will need to use the Excel VALUE function, and this is exactly what we are going to discuss next.
Excel VALUE function — convert a text string to date
Compared to DATEVALUE, the Excel VALUE function is more versatile. It can convert any text string that looks like a date or number into a number, which you can easily change to a date format of your choosing.
The syntax of the VALUE function is as follows:
Where text is a text string or reference to a cell containing the text you want to convert to number.
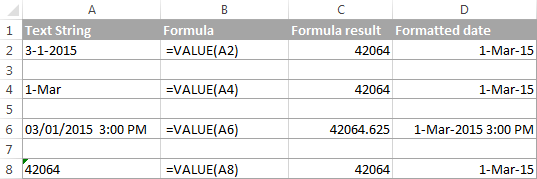
The Excel VALUE function can process both date and time, the latter is converted to a decimal portion, as you can see in row 6 in the following screenshot:
Mathematical operations to convert text to dates
Apart from using specific Excel functions such as VALUE and DATEVALUE, you can perform a simple mathematical operation to force Excel to do a text-to-date conversion for you. The required condition is that an operation should not change the date’s value (serial number). Sounds a bit tricky? The following examples will make things easy!
Assuming that your text date is in cell A1, you can use any of the following formulas, and then apply the Date format to the cell:
- Addition: =A1 + 0
- Multiplication: =A1 * 1
- Division: =A1 / 1
- Double negation: =—A1
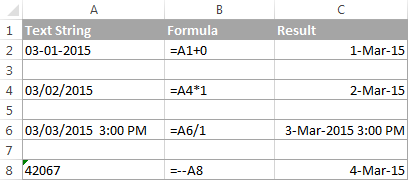
As you can see in the above screenshot, mathematical operations can convert dates (rows 2 and 4), times (row 6) as well as numbers formatted as text (row 8). Sometimes the result is even displayed as a date automatically, and you don’t have to bother about changing the cell format.
How to convert text strings with custom delimiters to dates
If your text dates contain some delimiter other than a forward slash (/) or dash (-), Excel functions won’t be able to recognize them as dates and return the #VALUE! error.
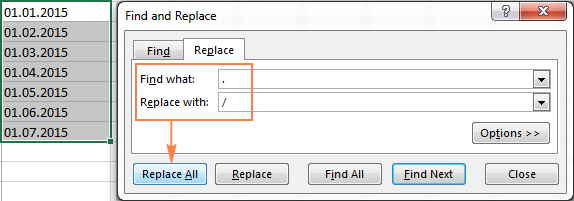
To fix this, you can run Excel’s Find and Replace tool to replace your delimiter with a slash (/), all in one go:
- Select all the text strings you want to convert to dates.
- Press Ctrl+H to open the Find and Replace dialog box.
- Enter your custom separator (a dot in this example) in the Find what field, and a slash in the Replace with
- Click the Replace All
Now, the DATEVALUE or VALUE function should have no problem with converting the text strings to dates. In the same manner, you can fix dates containing any other delimiter, e.g. a space or a backward slash.
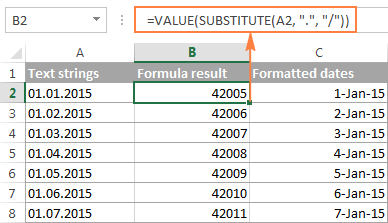
If you prefer a formula solution, you can use Excel’s SUBSTITUTE function instead of Replace All to switch your delimiters to slashes.
Assuming the text strings are in column A, a SUBSTITUTE formula may look as follows:
Where A1 is a text date and «.» is the delimiter your strings are separated with.
Now, let’s embed this SUBSTITUTE function into the VALUE formula:
And have the text strings converted to dates, all with a single formula.
As you see, the Excel DATEVALUE and VALUE functions are quite powerful, but both have their limits. For example, if you are trying to convert complex text strings like Thursday, January 01, 2015, neither function could help. Luckily, there is a non-formula solution that can handle this task and the next section explains the detailed steps.
Text to Columns wizard — formula-free way to covert text to date
If you are a non-formula user type, a long-standing Excel feature called Text To Columns will come in handy. It can cope with simple text dates demonstrated in Example 1 as well as multi-part text strings shown in Example 2.
Example 1. Converting simple text strings to dates
If the text strings you want to convert to dates look like any of the following:
You don’t really need formulas, nor exporting or importing anything. All it takes is 5 quick steps.
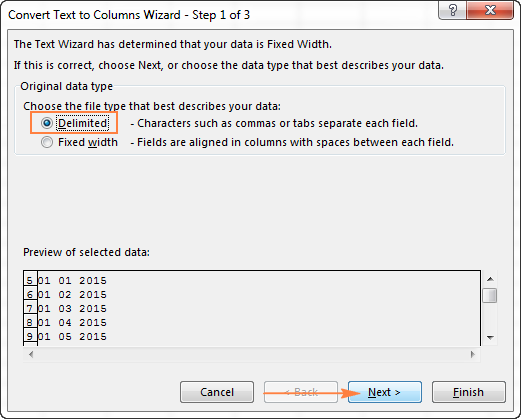
In this example, we will be converting text strings like 01 01 2015 (day, month and year are separated with spaces) to dates.
- In your Excel worksheet, select a column of text entries you want to convert to dates.
- Switch to the Data tab, Data Tools group, and click Text to Columns.
- In step 1 of the Convert Text to Columns Wizard, select Delimited and click Next.
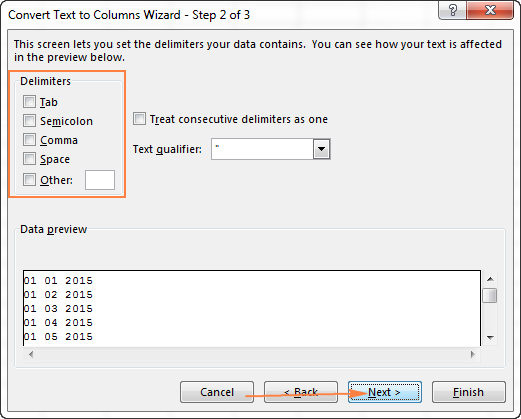
- In step 2 of the wizard, uncheck all delimiter boxes and click Next.
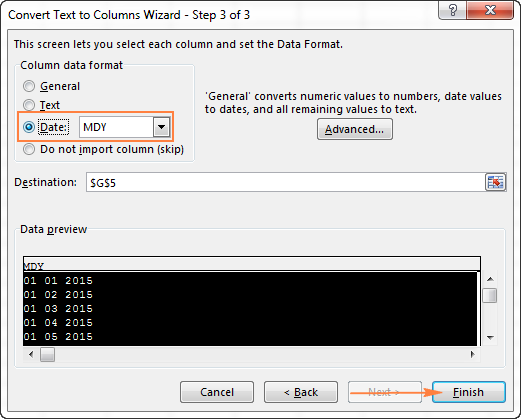
- In the final step, select Date under Column data format, choose the format corresponding to your dates, and click Finish.
In this example, we are converting the text dates formatted as «01 02 2015» (month day year), so we select MDY from the drop down box.
Now, Excel recognizes your text strings as dates, automatically converts them to your default date format and displays right-aligned in the cells. You can change the date format in the usual way via the Format Cells dialog.
Note. For the Text to Column wizard to work correctly, all of your text strings should be formatted identically. For example, if some of your entries are formatted like day/month/year format while others are month/day/year, you would get incorrect results.
Example 2. Converting complex text strings to dates
If your dates are represented by multi-part text strings, such as:
- Thursday, January 01, 2015
- January 01, 2015 3 PM
You will have to put a bit more effort and use both the Text to Columns wizard and Excel DATE function.
- Select all text strings to be converted to dates.
- Click the Text to Columns button on the Data tab, Data Tools group.
- On step 1 of the Convert Text to Columns Wizard, select Delimited and click Next.
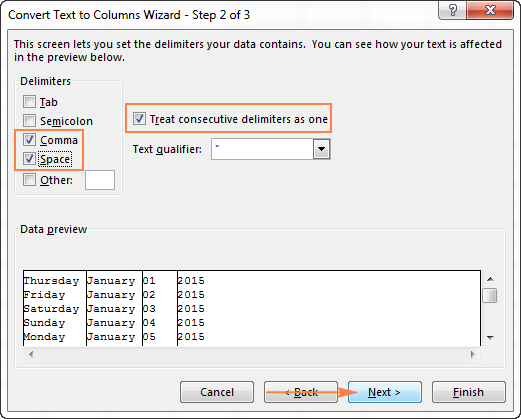
- On step 2 of the wizard, select the delimiters your text strings contain.
For example, if you are converting strings separated by commas and spaces, like «Thursday, January 01, 2015″, you should choose both delimiters — Comma and Space.
It also makes sense to select the «Treat consecutive delimiters as one» option to ignore extra spaces, if your data has any.
And finally, have a look at the Data preview window and verify if the text strings are split to columns correctly, then click Next.
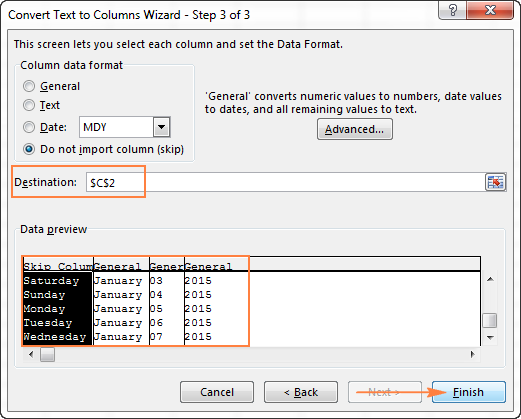
On step 3 of the wizard, make sure all columns in the Data Preview section have the General format. If they don’t, click on a column and select General under the Column data format options.
Note. Do not choose the Date format for any column because each column contains only one component, so Excel won’t be able to understand this is a date.
If you don’t need some column, click on it and select Do not import column (skip).
If you don’t want to overwrite the original data, specify where the columns should be inserted — enter the address for the top left cell in the Destination field.
When done, click the Finish button.
As you see in the screenshot above, we are skipping the first column with the days of the week, splitting the other data into 3 columns (in the General format) and inserting these columns beginning from cell C2.
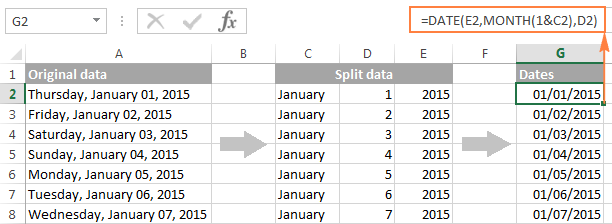
The following screenshot shows the result, with the original data in column A and the split data in columns C, D and E.
Finally, you have to combine the date parts together by using a DATE formula. The syntax of the Excel DATE function is self-explanatory:
In our case, year is in column E and day is in column D, no problem with these.
It’s not so easy with month because it is text while the DATE function needs a number. Luckily, Microsoft Excel provides a special MONTH function that can change a month’s name to a month’s number:
For the MONTH function to understand it deals with a date, we put it like this:
Where C2 contains the name of the month, January in our case. «1&» is added to concatenate a date (1 January) so that the MONTH function can convert it to the corresponding month number.
And now, let’s embed the MONTH function into the month ; argument of our DATE formula:
And voila, our complex text strings are successfully converted to dates:
Quick conversion of text dates using Paste Special
To quickly convert a range of simple text strings to dates, you can use the following trick.
- Copy any empty cell (select it and press Ctrl + C ).
- Select the range with text values you want to convert to dates.
- Right-click the selection, click Paste Special, and select Add in the Paste Special dialog box:
- Click OK to complete the conversion and close the dialog.
What you have just done is tell Excel to add a zero (empty cell) to your text dates. To be able to do this, Excel converts a text string to a number, and since adding a zero does not change the value, you get exactly what you wanted — the date’s serial number. As usual, you change a number to the date format by using the Format Cells dialog.
To learn more about the Paste Special feature, please see How to use Paste Special in Excel.
Fixing text dates with two-digit years
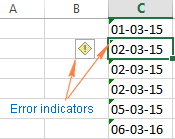
The modern versions of Microsoft Excel are smart enough to spot some obvious errors in your data, or better say, what Excel considers an error. When this happens, you will see an error indicator (a small green triangle) in the upper-left corner of the cell and when you select the cell, an exclamation mark appears:
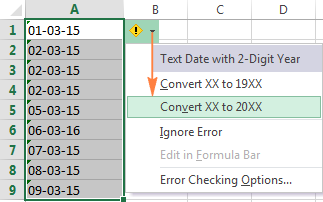
Clicking the exclamation mark will display a few options relevant to your data. In case of a 2-digit year, Excel will ask if you want to convert it to 19XX or 20XX.
If you have multiple entries of this type, you can fix them all in one fell swoop — select all the cells with errors, then click on the exclamation mark and select the appropriate option.
How to turn on Error Checking in Excel
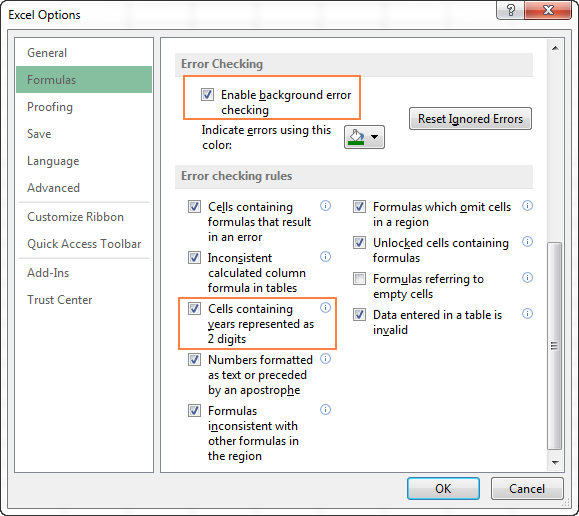
Usually, Error Checking is enabled in Excel by default. To make sure, click File > Options > Formulas, scroll down to the Error Checking section and verify if the following options are checked:
- Enable background error checking under Error Checking;
- Cells containing years represented as 2 digits under Error checking rules.
How to change text to date in Excel an easy way
As you see, converting text to date in Excel is far from being a trivial one-click operation. If you are confused by all different use cases and formulas, let me show you a quick and straightforward way.
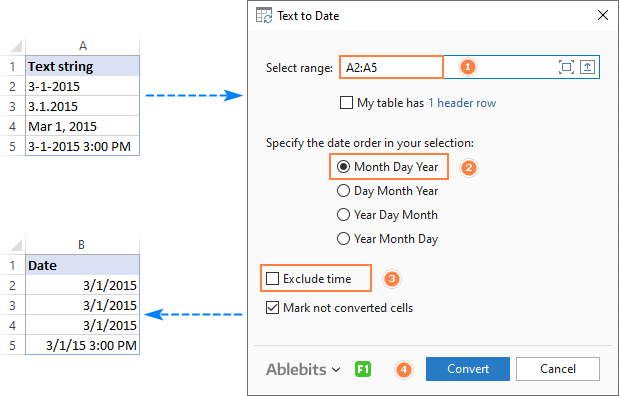
Install our Ultimate Suite (a free trial version can be downloaded here), switch to the Ablebits Tools tab (2 new tabs containing 70+ awesome tools will be added to your Excel!) and find the Text to Date button:
To convert text-dates to normal dates, here’s what you do:
- Select the cells with text strings and click the Text to Date button.
- Specify the date order (days, months and years) in the selected cells.
- Choose whether to include or not include time in the converted dates.
- Click Convert.
That’s it! The results of conversion will appear in the adjacent column, your source data will be preserved. If something goes wrong, you can simply delete the results and try again with a different date order.
Tip. If you chose to convert times as well as dates, but the time units are missing in the results, be sure to apply a number format that shows both the date and time values. For more info, please see How to create custom date and time formats.
If you are curious to learn more about this wonderful tool, please check out its home page: Text to Date for Excel.
This is how you convert text to date in Excel and change dates to text. Hopefully, you have been able to find a technique to your liking. In the next article, we will tackle the opposite task and explore different ways of converting Excel dates to text strings. I thank you for reading and hope to see you next week.
Источник


