
Here’s a quick way to format a title line for your report/document in WORD:
- Type your title line at the top of the page
- Triple Left click the title line you typed (to select it)
- Choose Format
- Borders and Shading
- Choose Box
- Ensure «Paragraph» is selected in the «Apply to» section
- Choose OK
Now you can center it and bold if you like so it looks something like this:
This is my Sample Title Line
This tutorial shows how to insert figure captions and table titles in Microsoft Word.
We will also look at how to create two-line table titles and figure captions that will appear as one line in the list of tables or figures.
Table of Contents
- How to Insert Figure Captions and Table Titles
- How to Create Two-Line Figure Captions and Table Titles
Watch all the steps shown here in real time!
Explore more than 200 writing-related software tutorials on my YouTube channel.
The images below are from Word for Microsoft 365. The steps also apply to Word for Microsoft 365 for Mac (a.k.a., Word for Mac), Word 2021, Word 2019, Word 2016, and Word 2013.
- (Tables only) Hover your pointer over the table and then select the handle that appears on the top, left corner to select the entire table.

- Right-click (PC) or Control-click (Mac) the table or figure and then select Insert Caption from the shortcut menu.

Alternative: Select the figure or table and then select Insert Caption from the References tab in the ribbon.

- Select Figure or Table from the Label menu in the Caption dialog box.
The Figure label is appropriate for visuals such as graphs, charts, photos, illustrations, and maps.

Important Note: Each label type maintains its own number sequence. For example, if you have a Figure 1 and then insert a table, it will be Table 1.
- Select Above selected item or Below selection item from the Position menu.

The default option for Figure is Below selected item. The default option for Table is Above selected item. These defaults will be appropriate for most situations. However, APA style places both the table title and figure title above the item.[i]
Optional Step: Change the Figure or Table Label
- Select the New Label button.

- Enter your new label in the Label text box in the New Label dialog box. (For example, you may want to change Figure to Fig.)

- Select the OK button.

Optional Step: Change Figure or Table Numbering
- Select the Numbering button (PC) or Format button (Mac) to change how your figures or tables are numbered.


- Select numerals, letters, or Roman numerals from the Format menu in the Caption Numbering dialog box.

- If you have already added heading numbers, select Include chapter number to start with the chapter or section number. (This option won’t work if you don’t have established heading numbers.)
For more information, please see “How to Add Heading Numbers to Table Titles and Figure Captions in Microsoft Word (PC & Mac).”

- Select the OK button.

- Type your caption or title after the label and number in the Caption text box.
Pro Tip: Most of our primary style guides recommend placing a period after the figure or table number. However, Word doesn’t provide a way to add that period automatically, so remember to add it manually as you type each caption.

See “How to Write Figure Captions” and “How to Write Table Titles” for information on writing captions and titles according to Chicago style (including Turabian), APA style, and MLA style.
- Select the OK button.

Your caption or title will now appear with your figure or table.

How to Create Two-Line Figure Captions and Table Titles
The following steps show how to place the label (e.g., Table 1) and the title or caption on two separate lines, but format them in such a way that they will still appear on one line in the list of tables or figures.
- Insert your figure caption or table title shown in the previous section.
- Place your cursor at the start of the title or caption and then press the Backspace key on a PC or Delete key on a Mac to remove any extra spaces between the number and the title or caption.

- Press Shift + Enter (PC) or Shift + Return (Mac) to create a soft return instead of a regular hard return.
The label and title or caption should now appear on two different lines.

However, when you create or update your list of tables or figures, it should appear on one line.

Important Note: Caption and title numbers won’t automatically update if you move or delete figures or tables in your document. Visit “How to Update Table and Figure Numbers in Microsoft Word” for information about manually updating table and figure numbers.
[i] Publication Manual of the American Psychological Association, 7th ed. (Washington, DC: American Psychological Association, 2020), 7.23–7.25.
Related Resources
How to Add Background Images to Tables in Microsoft Word (PC & Mac)
How to Add Background Images to Charts in Microsoft Word (PC & Mac)
How to Save Tables and Figures as Images in Microsoft Word (PC & Mac)
Updated March 05, 2023
Tables are visual displays of data arranged in rows and columns. Table cells contain numbers, text, or a combination of numbers and text. Some cells can include images, symbols, links, and other objects. See how to create and modify tables in Word.
Each table should be referenced in the document content. Typically, tables have a number and a title, which are referenced. Microsoft Word offers functionality to create automatically updated numbers for figures, tables, and equations. The numbers and titles, created using the Captions functionality, are used to cross-reference tables in a document and create a List of Tables.
The word Table and a number identify a table then follows the caption. A caption is a short block of text that explain table contents without referring to the document content:

See more about creating numbers and captions for figures: images, pictures, charts, etc., creating captions for equations, and creating captions for photographs.
Attention! We highly recommend checking the formatting requirements, accepted by your college, university, company, or established on the project, etc.
Insert a caption for tables
To add automatically updated numbers and a title (caption) for a table, select it by:
- Selecting all rows or columns of the table one by one, or
- Moving the mouse over the table until you see the table selection icons in the upper-left corner of the table and clicking it:

Note: You can also click on the table selection icon in the bottom-right corner for the same effect. See how to select table elements for more details.

After selecting a table, do one of the following:
- On the References tab, in the Captions group, click the Insert Caption button:

- Right-click on the selection and select the Insert Caption… in the popup menu:


In the Caption dialog box:

Select the label and its position
- Under Options:
- From the Label dropdown list, select the item type you need:

- Table,
- Equation – see how to create captions for equations,
- Figure (selected by default) — see how to create captions for figures,
- Another label (in this example, My Caption) was created using the New Label… button (see how to create a new label below).
Note: Remember that each type of object you labeled will be numbered sequentially within its group.
- From the Position dropdown list, select one of the options:
- Above selected item (selected by default for the Table label), or
- Below selected item (selected by default for the Figure label).
Note: The captions for tables are usually located above the tables.
- From the Label dropdown list, select the item type you need:


Exclude label from caption
- Select the Exclude label from caption check box if you don’t need to add the label to the caption:
Some requirements recommend using the lowercase word table instead of the automatically added Table in Word cross-references.
The option Exclude label from caption hides the label from being displayed in cross-references or a List of Tables.
For example:
- When you insert a cross-reference with the selected option Entire captions or Only label and number (see more details how to use cross-references in Word), Word adds the capitalized label and number, as you see in the Caption field of the Caption dialog box. E.g., “are listed in Table 3” or “are listed in Table 3 Number of articles by statuses and products”.
- All captions, created with selected option Exclude label from caption, Word adds in cross-references as their numbers without the labels. Type the word table (as required) and insert a reference to a caption (e.g., “are listed in table 3”).

Add a new label
- Click the New Label… button to create a new label:
In the New Label dialog box, type a new label name:


Note: See also how to delete a custom label.
Modify caption numbering
- Click the Numbering… button if you want to change any of the numbering options:
In the Caption Numbering dialog box:

- In the Format dropdown list, select the numbering format you need (some requirements recommend using Latin capital letters instead of numbers for tables):
- Select the Include chapter number check box to include the chapter number in the caption number. After selecting this option, two more options will be unlocked:
- From the Chapter starts with style dropdown list, select the heading level you need to include in the caption:
- In the Use separator dropdown list, select the punctuation you need to insert between the chapter number and the table number:
- At the bottom of the dialog box, see how your choices will look in the Examples section. E.g., Table 2.3” means the third table in chapter 2.
- Click the OK button.
- From the Chapter starts with style dropdown list, select the heading level you need to include in the caption:


Add a title
- To add the text of your caption, click after the table number and enter the text. E.g.:

Notes:
- There are several standard requirements for table titles:
- Chicago style recommends using the table title in line with the label and number. E.g.:

- In opposite, APA (American Psychological Association) and MLA (Modern Language Association) styles recommend using the table title with one double-spaced line below the table number (see how to adjust line spacing). E.g.:

To create such a title, don’t type any text in the Caption field, leave it, then do the following:
- Create a caption without a title.
- Position cursor after a caption number and add a new line (by pressing Shift+Enter) in which type of title you need.
Note: You can press Enter and create a new paragraph instead of a new line. See how to create a List of Tables (Table of Figures) for more details.
- Format the caption to adjust line spacing (see how to change caption line spacing).
- In addition, MLA style recommends using a hanging indent to the second line of long titles. E.g.:

- Chicago style recommends using the table title in line with the label and number. E.g.:
- Word offers very helpful functionality to create a text that can be displayed in a List of Tables instead of a caption text. See how to create a Table of Contents Entry.
- For most requirements, the number and the title should be without an ending period. If you need a period after a number, type it in the Caption field.
- If a table spans more than one page, the first page of that table should have a complete caption; the subsequent pages should have an abbreviated caption consisting of a label, a number, and the word Continued. E.g., “Table 3. Continued”.


Using an AutoCaption
See Adding captions with AutoCaption.
Group a table and its caption
According to all requirements, a table (or its part) with its caption should appear on the same page. Word adds captions for tables as a regular paragraph with selected Keep with next option. See how to keep lines and paragraphs together for more details.
See also how to keep a table row on one page and keep a table on one page of a Word document.
Edit or modify a caption
Microsoft Word adds numbers in captions as fields.
![]()
You can show all fields in a document with a gray background, see how to turn on or turn off highlighting of fields in a Word document.
- Labels:
If needed, you can change the label. Word for Microsoft 365 will update the reference if available. In this case, Word will not create a new label and a separate numbering. Be careful!
- Numbers:
DO NOT edit caption numbers! If you change a number:
- In some cases, Word will update it, and you will lose your changes,
- Otherwise, the caption number may stop updating automatically.
- Text:
To add or modify a caption text, click on it and change what you need, like in a regular paragraph.
Do not forget to format a caption according to the requirements you use!
Delete a caption and an unnecessary label
If you need to remove some caption, select the caption paragraph (full line or several lines) and press Delete. Do not forget to update fields in the document!
To remove the unnecessary label, do the following:
1. Open the Caption dialog box.
2. In the Label dropdown list, select the label you want to remove.
3. Click the Delete Label to remove a custom label:

Note: You can’t delete predefined labels: Equation, Figure, and Table.
Update caption numbering
Word automatically updates references and numbering if you insert a new text. However, copying, deleting, or moving context often leads to confusion in the document. After such operations, you have to update all dependencies manually.
To update fields in the document, select the entire document by clicking Ctrl+A, and do one of the following:
- Press F9,
- Right-click on any of the fields and select Update Field in the popup menu:


Word will update all fields. You can be sure that the numbering and references are correct.
We strongly recommend checking a document at least visually after changes!
Ce microsoft program stands out today for being one of the best software in text editing , and it is that all users have the possibility of having all the necessary tools that allow them to achieve writing from very high level. .
One of the most important aspects of this app is that it not only allows you to work with text, but also offers the possibility of including pictures, shapes, charts, tables and many other items that will be available there. However, when you work with data tables, the process is not that simple.
The control of these data tables in Word sheet is not always an easy task, because in many cases very long tables are created and occupy two or more sheets , so that the title of this one is lost . This is why we are going to explain here how you can repeat the header row in your document and so keep the title in each of your text sheets .
What is a header row and what is it used for?
Whenever a table is created in a document, whether in Word, Excel or any other program, it has an in- head, where the title of the table will go , that’s what it will be referring to. In addition, these headers allow you to add un logo, title, numbering, author’s name or any other information the user needs en top of document .
This means that he are two ways to apply header in Word , or for each of the spreadsheets, or simply to add it to each of the data tables created there. In accordance with this, in the next section we will explain the steps to perform these procedures.
Steps to repeat one line header on all pages of a Word document
Currently you can repeat the header of the first row of a Word table or simply create a header in the first row of the sheet de calculation in general and that it appears throughout the document .
This is why below we teach you how to perform this procedure step by step in each of the cases, to do so, follow these instructions:
Repeat the header in the first row of your data table
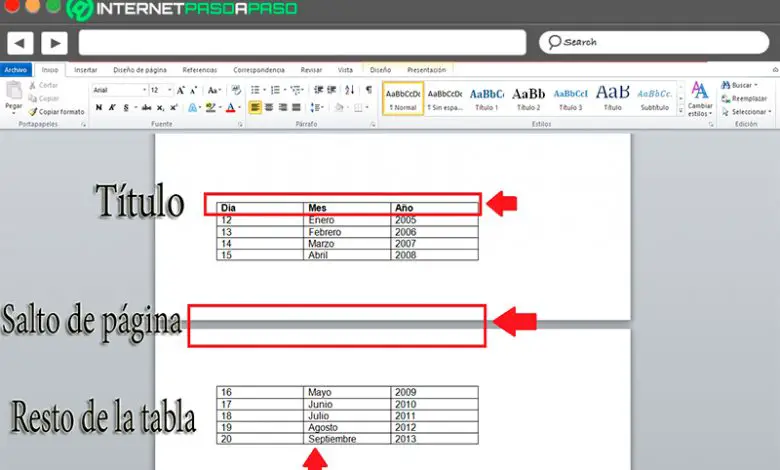
When creation of a data table repeatedly there are several problems, one of the more frequent is when these tables are very long and take up one or two sheets of Word, the title will therefore be lost each time a page jump is made.
Si the title is lost, drives will have issues while viewing said data box, because they can easily be confused by not knowing to which description belongs each of the data that appears in it .
Therefore, the best that can be done is to repeat the first row of the table in each of the worksheets it occupies, to do this, follow each of these steps:
- The first thing to do is to insert your data table . To do this, you need to go to the ribbon and click on the tab there. «Insertion», then click on «Board» and select the measures from the table you want to insert.
- Once inserted and filled in, it may happen that it is separated into one or more worksheets so that the header of the first line be lost after the page break as can be seen on the screen.
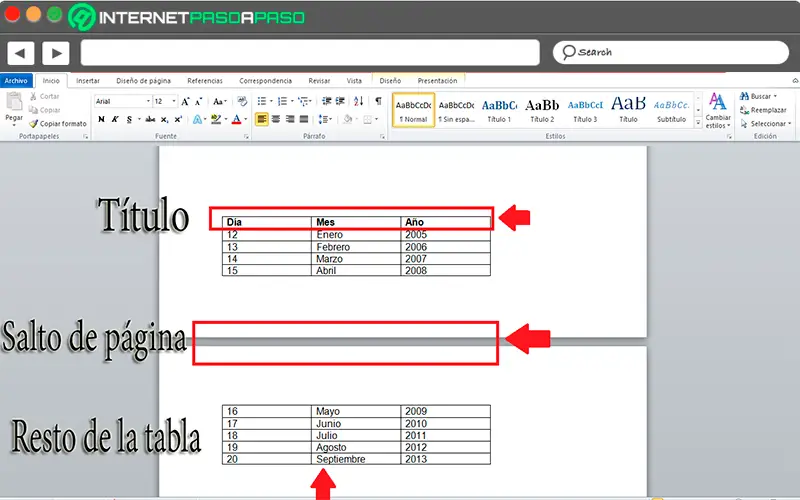
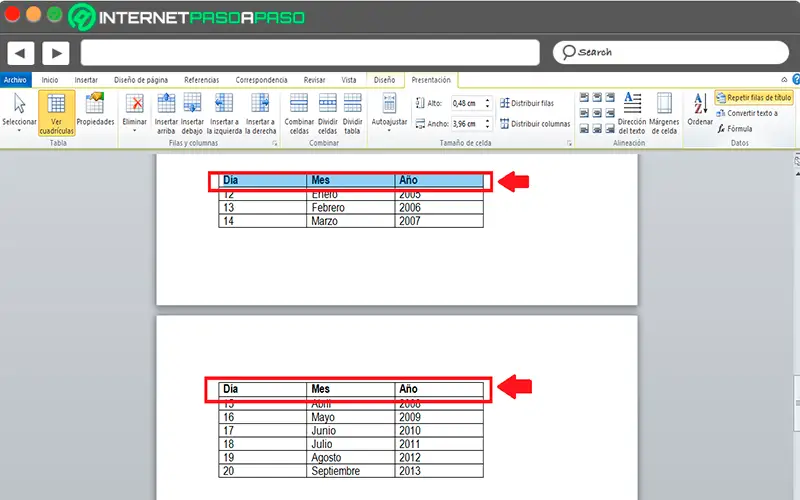
- As you can see in this case, the table is divided between two sheets of Word . In this case, what you want is that the title «Day, Month and Year» appears in the first line of the second sheet, for that you must select the said title.
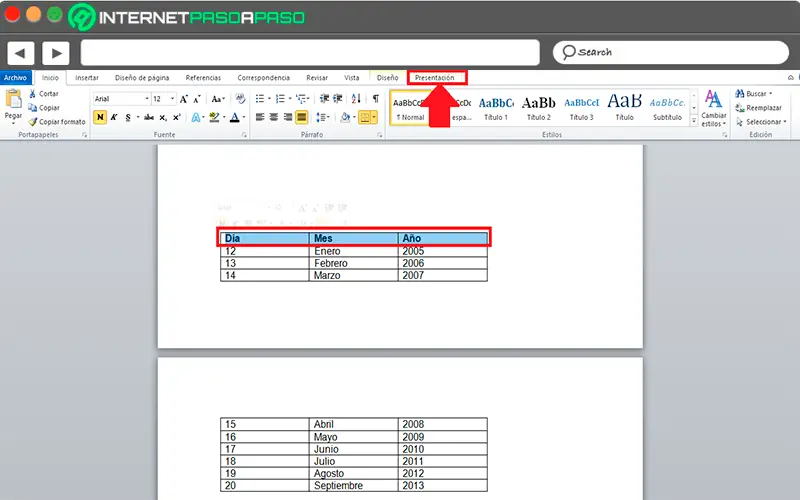
- Once selected, you will notice that a new tab called «Presentation» will appear on the ribbon , that you will select.
- When you have selected this option, several options will appear, on the right side of your screen you will find the option «Repeat title lines» that you will select.
«UPDATE ✅ Want to learn more about how to repeat row title in Microsoft Word document? ⭐ ENTER HERE ⭐ and learn how to do it FROM SCRATCH! ”
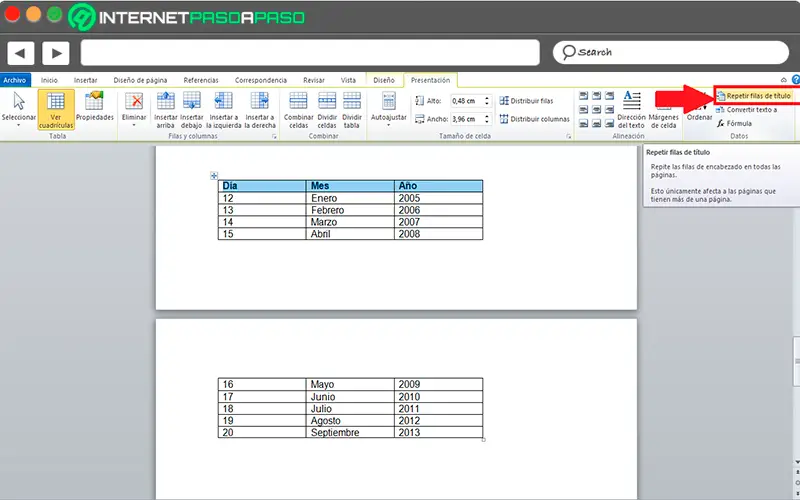
- Then you will see how the title is repeated again in the first row of the table on the next page , this way you can continue to maintain the header allowing reading the table much easier for readers .
Apply header to all Word pages
On many occasions, during the writing an essay, it is necessary that each of the pages have the same title , this may be the company logo, a specific description or the same title for all pages. This allows you to identify each part of your document, thus avoiding its taken by third parties .
In accordance with this, here we show you how to perform this simple and fast procedure:
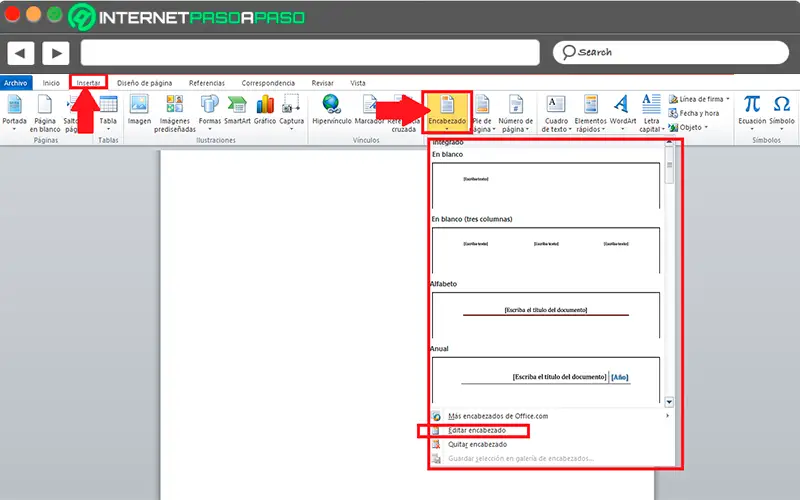
- To perform this process, you can do it by two ways, the first is through the ribbon by selecting the tab «Insertion».
- There you will find several functions available, in this case you must select «On your mind» situated in «Header and footer».
- When you have selected it, several available header options will appear, in this case you need to select the one that best suits your needs. In case you want to create your own title, you must select the item «Edit header».
- Once some of them have been selected, they will appear as follows:
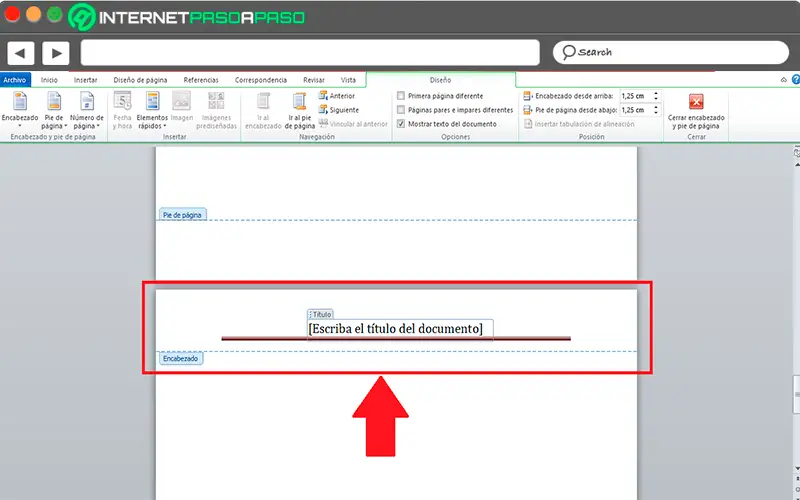
- The next thing will be to place the title you want and click on any other page site this way you will have the same title for each of the Word sheets you use .
The other way to do it is simpler, but in this case you will not have any models but you will place the title you want to repeat on each of your pages.
To do so, follow these steps:
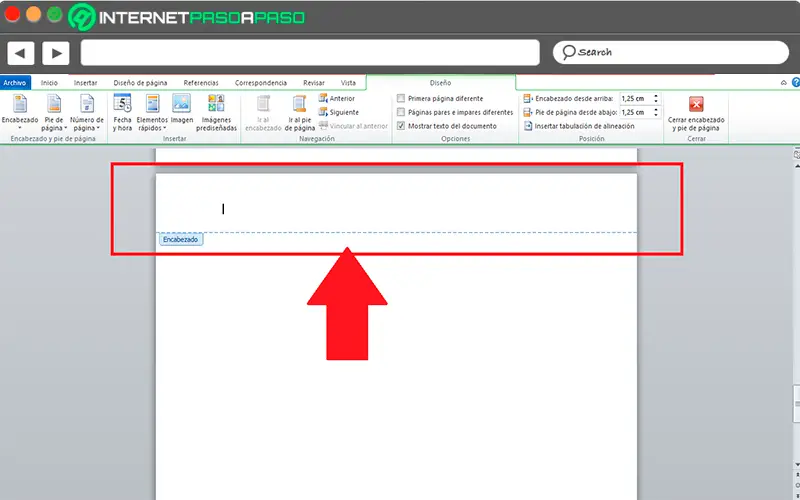
- This procedure is very simple, the only thing you will have to do is locate yourself at the top of the spreadsheet and double click on it.
- Then you will see how the header area appears activated . This is where you will need to write the title that you want to appear on all your Word sheets .
If you have any questions, please leave them in the comments, we will get back to you as soon as possible, and it will be a great help for more community members as well. Thank you!

Word for Microsoft 365 Outlook for Microsoft 365 Word 2021 Outlook 2021 Word 2019 Outlook 2019 Word 2016 Outlook 2016 Word 2013 Outlook 2013 Word 2010 Outlook 2010 Word 2007 Outlook 2007 More…Less
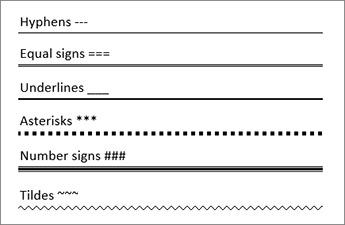
You can add horizontal lines, sometimes called horizontal rules, to a document or email message to help separate sections of text and add visual appeal.
By default, Word and Outlook have a three-character shortcuts that inserts a full-width horizontal rule in your document or message. The appearance of that rule—thinner, thicker, double-line, dotted, wavy—depends on which shortcut you use, as illustrated in the image below.
If this automatic line feature doesn’t suit you, you can turn off this feature in Word or turn it off in Outlook.
If you want to draw a line for illustration purposes, see Draw a line in Word or Outlook instead.
Insert a horizontal line by typing a few characters
The fastest way to add a horizontal line or rule is to use the AutoFormat feature. When you type certain characters three times in their own paragraph and then press Enter, those characters instantly become a full-width horizontal line.
-
Place the cursor where you want to insert the horizontal line.
-
Type three of the characters illustrated below, and then press Enter.

The line is inserted for the full width of the page. When inserted into a column, the line is inserted to match the width of the column. To add text above the line, put your cursor where you want the text and begin typing.
Format the horizontal line after you create it
The shortcut described above creates an empty paragraph with a bottom border. You can change the look of that border line by using the Borders options:
-
In Word, on the Home tab of the ribbon, select the down arrow next to
Borders.In Outlook, on the Format Text tab of the ribbon, select the down arrow next to
Borders. -
At the bottom of the menu, select Borders and Shading.
-
In the dialog, you can change the line’s style (solid, dotted, wavy, double, and so on), color, or width as you see fit.
-
When you’re done formatting the line, select OK. Then, on the ribbon, select the
Borders button to apply your changes.
 Borders.
 Borders button to apply your changes.
 Word: Turn off the automatic line feature
To prevent Word or Outlook from automatically inserting a horizontal line when you type the three shortcut characters, do the following:
-
On the ribbon, select File > Options.
-
In the dialog box, select Proofing > AutoCorrect Options > AutoFormat As You Type.
-
Clear the Border Lines option.
-
Select OK.
Outlook: Turn off the automatic line feature
-
On the ribbon, select File > Options.
-
In the dialog box, select the Mail tab, then select Editor Options.
-
On the Proofing tab, select AutoCorrect Options > AutoFormat As You Type.
-
Under Apply as you type, clear the Border Lines option.
-
Select OK.
Want to draw a line?
See Draw a line in Word or Outlook.
See Also
Add a border to some text
Draw shapes
Need more help?
Want more options?
Explore subscription benefits, browse training courses, learn how to secure your device, and more.
Communities help you ask and answer questions, give feedback, and hear from experts with rich knowledge.