
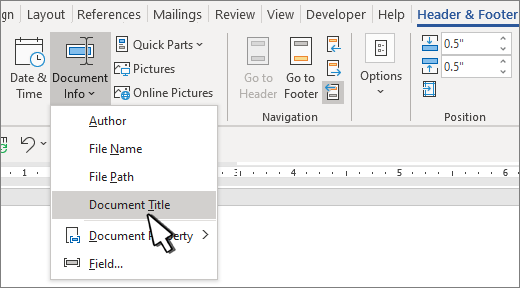
Using document info
For common information, such as Author name, File name, date, or file path, follow these steps:
-
Double-click the header or footer .
-
Select Document Info, and choose the information you want.

Note: Select Document Property to select additional information, such as Title, Company, or Subject.
-
Select Close Header and Footer or press Esc to exit.
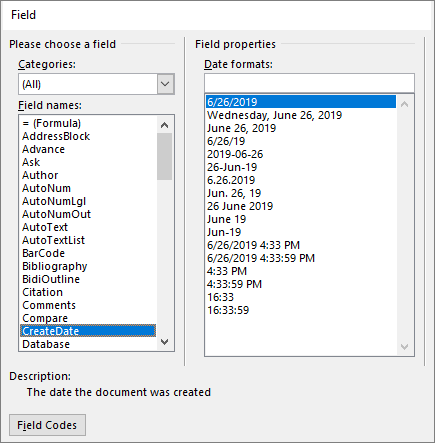
Using field codes
If you don’t find the info you want, such as file size or who it was last saved by, you can use field codes to add a variety of document properties.
Note: If you already added a header or footer from the gallery, this procedure may replace or change the formatting of the current header or footer.
-
Go to Insert > Header or Footer.
-
Select Edit Header or Edit Footer.
-
Select Quick Parts, and select Field.
-
In the Field names list, choose the field you want (such as FileName, Date, Author, or Title), choose the format you want in the Field properties section.
-
If a field property has addition options, choose any you like in the Field options section.
-
Select OK.
-
Select Close Header and Footer or press Esc to exit.

Word for the web doesn’t support adding file names and other document properties to a header or footer.
Select Open in Word to open your document in the desktop version of Word if you have it and follow the steps here on the Windows tab.

Tables are visual displays of data arranged in rows and columns. Table cells contain numbers, text, or a combination of numbers and text. Some cells can include images, symbols, links, and other objects. See how to create and modify tables in Word.
Each table should be referenced in the document content. Typically, tables have a number and a title, which are referenced. Microsoft Word offers functionality to create automatically updated numbers for figures, tables, and equations. The numbers and titles, created using the Captions functionality, are used to cross-reference tables in a document and create a List of Tables.
The word Table and a number identify a table then follows the caption. A caption is a short block of text that explain table contents without referring to the document content:

See more about creating numbers and captions for figures: images, pictures, charts, etc., creating captions for equations, and creating captions for photographs.
Attention! We highly recommend checking the formatting requirements, accepted by your college, university, company, or established on the project, etc.
Insert a caption for tables
To add automatically updated numbers and a title (caption) for a table, select it by:
- Selecting all rows or columns of the table one by one, or
- Moving the mouse over the table until you see the table selection icons in the upper-left corner of the table and clicking it:

Note: You can also click on the table selection icon in the bottom-right corner for the same effect. See how to select table elements for more details.

After selecting a table, do one of the following:
- On the References tab, in the Captions group, click the Insert Caption button:

- Right-click on the selection and select the Insert Caption… in the popup menu:


In the Caption dialog box:

Select the label and its position
- Under Options:
- From the Label dropdown list, select the item type you need:

- Table,
- Equation – see how to create captions for equations,
- Figure (selected by default) — see how to create captions for figures,
- Another label (in this example, My Caption) was created using the New Label… button (see how to create a new label below).
Note: Remember that each type of object you labeled will be numbered sequentially within its group.
- From the Position dropdown list, select one of the options:
- Above selected item (selected by default for the Table label), or
- Below selected item (selected by default for the Figure label).
Note: The captions for tables are usually located above the tables.
- From the Label dropdown list, select the item type you need:


Exclude label from caption
- Select the Exclude label from caption check box if you don’t need to add the label to the caption:
Some requirements recommend using the lowercase word table instead of the automatically added Table in Word cross-references.
The option Exclude label from caption hides the label from being displayed in cross-references or a List of Tables.
For example:
- When you insert a cross-reference with the selected option Entire captions or Only label and number (see more details how to use cross-references in Word), Word adds the capitalized label and number, as you see in the Caption field of the Caption dialog box. E.g., “are listed in Table 3” or “are listed in Table 3 Number of articles by statuses and products”.
- All captions, created with selected option Exclude label from caption, Word adds in cross-references as their numbers without the labels. Type the word table (as required) and insert a reference to a caption (e.g., “are listed in table 3”).

Add a new label
- Click the New Label… button to create a new label:
In the New Label dialog box, type a new label name:


Note: See also how to delete a custom label.
Modify caption numbering
- Click the Numbering… button if you want to change any of the numbering options:
In the Caption Numbering dialog box:

- In the Format dropdown list, select the numbering format you need (some requirements recommend using Latin capital letters instead of numbers for tables):
- Select the Include chapter number check box to include the chapter number in the caption number. After selecting this option, two more options will be unlocked:
- From the Chapter starts with style dropdown list, select the heading level you need to include in the caption:
- In the Use separator dropdown list, select the punctuation you need to insert between the chapter number and the table number:
- At the bottom of the dialog box, see how your choices will look in the Examples section. E.g., Table 2.3” means the third table in chapter 2.
- Click the OK button.
- From the Chapter starts with style dropdown list, select the heading level you need to include in the caption:


Add a title
- To add the text of your caption, click after the table number and enter the text. E.g.:

Notes:
- There are several standard requirements for table titles:
- Chicago style recommends using the table title in line with the label and number. E.g.:

- In opposite, APA (American Psychological Association) and MLA (Modern Language Association) styles recommend using the table title with one double-spaced line below the table number (see how to adjust line spacing). E.g.:

To create such a title, don’t type any text in the Caption field, leave it, then do the following:
- Create a caption without a title.
- Position cursor after a caption number and add a new line (by pressing Shift+Enter) in which type of title you need.
Note: You can press Enter and create a new paragraph instead of a new line. See how to create a List of Tables (Table of Figures) for more details.
- Format the caption to adjust line spacing (see how to change caption line spacing).
- In addition, MLA style recommends using a hanging indent to the second line of long titles. E.g.:

- Chicago style recommends using the table title in line with the label and number. E.g.:
- Word offers very helpful functionality to create a text that can be displayed in a List of Tables instead of a caption text. See how to create a Table of Contents Entry.
- For most requirements, the number and the title should be without an ending period. If you need a period after a number, type it in the Caption field.
- If a table spans more than one page, the first page of that table should have a complete caption; the subsequent pages should have an abbreviated caption consisting of a label, a number, and the word Continued. E.g., “Table 3. Continued”.


Using an AutoCaption
See Adding captions with AutoCaption.
Group a table and its caption
According to all requirements, a table (or its part) with its caption should appear on the same page. Word adds captions for tables as a regular paragraph with selected Keep with next option. See how to keep lines and paragraphs together for more details.
See also how to keep a table row on one page and keep a table on one page of a Word document.
Edit or modify a caption
Microsoft Word adds numbers in captions as fields.
![]()
You can show all fields in a document with a gray background, see how to turn on or turn off highlighting of fields in a Word document.
- Labels:
If needed, you can change the label. Word for Microsoft 365 will update the reference if available. In this case, Word will not create a new label and a separate numbering. Be careful!
- Numbers:
DO NOT edit caption numbers! If you change a number:
- In some cases, Word will update it, and you will lose your changes,
- Otherwise, the caption number may stop updating automatically.
- Text:
To add or modify a caption text, click on it and change what you need, like in a regular paragraph.
Do not forget to format a caption according to the requirements you use!
Delete a caption and an unnecessary label
If you need to remove some caption, select the caption paragraph (full line or several lines) and press Delete. Do not forget to update fields in the document!
To remove the unnecessary label, do the following:
1. Open the Caption dialog box.
2. In the Label dropdown list, select the label you want to remove.
3. Click the Delete Label to remove a custom label:

Note: You can’t delete predefined labels: Equation, Figure, and Table.
Update caption numbering
Word automatically updates references and numbering if you insert a new text. However, copying, deleting, or moving context often leads to confusion in the document. After such operations, you have to update all dependencies manually.
To update fields in the document, select the entire document by clicking Ctrl+A, and do one of the following:
- Press F9,
- Right-click on any of the fields and select Update Field in the popup menu:


Word will update all fields. You can be sure that the numbering and references are correct.
We strongly recommend checking a document at least visually after changes!
Click the “Title” button in the “Styles” group under the “Home” tab on the main menu ribbon to automatically apply a title style to your title text. Click the “Subtitle” button in the “Styles” group to automatically apply the recommended subtitle style to the selected text.
Contents
- 1 How do you create a title in Word?
- 2 How do I make a fancy title in Word?
- 3 Where is the title bar in Microsoft Word?
- 4 How do I add a title to a table of contents in Word?
- 5 How do you shade text in Word?
- 6 Where is the title bar in Windows 10?
- 7 What is the title bar in Word 2016?
- 8 What does title bar look like?
- 9 How do I insert a title style in a table of contents?
- 10 How do you make titles appear in table of contents?
- 11 Do you include title page in table of contents?
- 12 How do I use dictation in Word?
- 13 Is there a note taking template in Word?
- 14 How do I get rid of widow orphan control?
- 15 Where is the widow orphan control in Word?
- 16 How do you put a box around a border in Word?
- 17 How do I add a title bar?
- 18 Which toolbar is on the title bar?
- 19 How do I change my Windows title?
- 20 What is title bar in Word document?
How do you create a title in Word?
Inserting the Document Title in Your Document
- Position the insertion point where you want the title to appear.
- Display the Insert tab of the ribbon.
- Click the Quick Parts tool in the Text group and then choose Field.
- In the Categories list, choose Document Information.
- In the Field Names list choose Title.
How do I make a fancy title in Word?
Create a title style in Word to save time and mouse clicks
- Open a blank document and type Title.
- Select Title and click the Bold and Center buttons on the Formatting toolbar or Home tab.
- Change the font to 22 points.
- Click anywhere in your title text.
Where is the title bar in Microsoft Word?
We will start with the Title bar, which is located at the very top of the screen. On the Title bar, Microsoft Word displays the name of the document you are currently using.
How do I add a title to a table of contents in Word?
(3) To add a Heading to the Table of Contents, highlight the added heading on the document, and click on the correct “Heading” button ( e.i. Heading 1, or Heading 2, etc.) at the “Styles” Section from the “Home” Tab.
How do you shade text in Word?
Apply shading to words or paragraphs
- Select the word or paragraph that you want to apply shading to.
- On the Home tab, in the Paragraph group, click the arrow next to Shading.
- Under Theme Colors, click the color that you want to use to shade your selection.
Where is the title bar in Windows 10?
The title bar is at the top of every window in Windows 10. This includes three buttons at the top right corner of the window and a title for each open window. There are a number of ways you can customize the title bar with a few extra software packages and the options included in Windows 10.
What is the title bar in Word 2016?
name of current document
Title Bar: The title bar displays the name of current document. For the first time it is document when you saved your document the will display on the title bar. C. Sign in: Here you can use most of Microsoft word functionality.
What does title bar look like?
A title bar is a small strip that extends across the top of a window. It displays the title of the window and typically includes the close, minimize, and maximize buttons. In macOS, these buttons are on the left side of the title bar, while in Windows, they are on the right.
How do I insert a title style in a table of contents?
To verify that the Title style will now be added to the Table of Contents:
- Choose the References tab.
- Click Table of Contents.
- Choose Insert Table of Contents…
- Click the Options… button.
- Scroll through the Available styles: list to make sure that the Title style now shows up and that it has the desired TOC level.
How do you make titles appear in table of contents?
To customize your existing table of contents:
- Go to References > Table of Contents.
- Select Custom table of contents.
- Use the settings to show, hide, and align page numbers, add or change the tab leader, set formats, and specify how many levels of headings to show.
Do you include title page in table of contents?
The Table of Contents should appear after the title page in the document. To create the Table of Contents manually, start a new page right after the title page.The Table of Contents should be on its own page. Do not include the introduction or a dedication on the same page as the Table of Contents.
How do I use dictation in Word?
Dictate in Word For the Web
Open a document and click the Dictate icon on the Home Ribbon and dictate your text. When finished, click the icon again to turn off Dictation. To see other languages available for dictation, click the Down arrow next to the Dictate icon and choose the language you’d like to use.
Is there a note taking template in Word?
Organize your notetaking with this notes template in Word. With place for a title and bullet points, a Microsoft Word note taking template is perfect for lectures, important meetings or teleconferences, sales pitches, and more.
How do I get rid of widow orphan control?
How to Turn the Widow Orphan Control Setting On or Off in Microsoft Word
- Open a document in Word.
- Select everything with Ctrl + A.
- Click the Home tab.
- Click the Paragraph button.
- Select the Line and Page Breaks tab.
- Click Widow/orphan control to remove the checkmark.
- Click OK.
Where is the widow orphan control in Word?
Control widow and orphan lines
On the Format menu, click Paragraph, and then click the Line and Page Breaks tab. Select the Widow/Orphan control check box.
How do you put a box around a border in Word?
Boxing text or paragraphs
Select the text you want to box in. Choose the Borders and Shading command from the bottom of the Border menu. The Borders and Shading dialog box appears. If you want to apply the border to only text (words) and not to the entire paragraph, choose Text from the Apply To drop-down list.
How do I add a title bar?
There are two ways to change title bar for your activity:
- Design time (that is, change title in AndroidManifest. xml file).
- By coding (that is, you can code to change the activity title).
Which toolbar is on the title bar?
The toolbar that is present on the left of the title bar is most frequently used commands in the application. Toolbars are mostly present in the word, office suite, web browsers and other such computing languages. Mostly, the toolbar hides the menu bar by default.
How do I change my Windows title?
Right-click on one of the selected windows commands and click Change Window Title. You can also use the Actions button to select the Change Window Title option. Set a common Window title for the selected windows that your want to change and click OK. The windows titles are changed to the new title that you’ve assigned.
What is title bar in Word document?
• Title Bar: A horizontal bar at the top of an active document. This bar displays the. name of the document and application. At the right end of the Title Bar is the Minimize, Maximize and Close buttons. •
![]()
Written by Allen Wyatt (last updated August 13, 2022)
This tip applies to Word 2007, 2010, 2013, 2016, 2019, Word in Microsoft 365, and 2021
Word keeps track of many pieces of information about your document. You can see the information maintained by Word in this manner:
- If you are using Word 2007, click the Office button and then click Word Options. In the resulting Word Options dialog box, you click Prepare and then Properties.
- If you are using Word 2010 or a later version of the program, display the File tab of the ribbon and then click Info | Properties | Advanced Properties.
If you search around through the information that Word maintains about a document, you’ll find that Word provides the opportunity to specify a title for your document. Once you set the title, Word allows you to insert this information into your document and have it updated automatically. This means you can set the title once in the document properties and then have it inserted in the header, footer, or heading for your document. That way, you only have to update it in one place and it will automatically be updated everywhere in the document.
To insert the document title into your document (after you have added it to the document’s properties, as described above), follow these steps:
- Position the insertion point where you want the title to appear.
- Display the Insert tab of the ribbon.
- Click the Quick Parts tool in the Text group and then choose Field. Word displays the Field dialog box.
- In the Categories list, choose Document Information. Word updates the choices in the Field Names list (right side of the dialog box). (See Figure 1.)
- In the Field Names list choose Title.
- Click on OK to close the dialog box and insert your field.
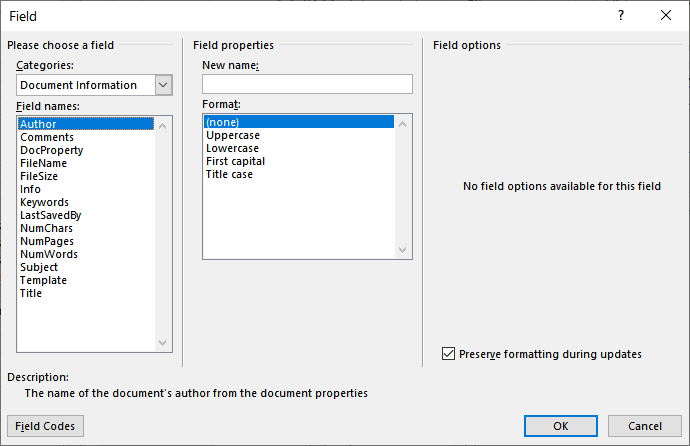
Figure 1. The Field dialog box.
WordTips is your source for cost-effective Microsoft Word training.
(Microsoft Word is the most popular word processing software in the world.)
This tip (6028) applies to Microsoft Word 2007, 2010, 2013, 2016, 2019, Word in Microsoft 365, and 2021.
Author Bio
With more than 50 non-fiction books and numerous magazine articles to his credit, Allen Wyatt is an internationally recognized author. He is president of Sharon Parq Associates, a computer and publishing services company. Learn more about Allen…
MORE FROM ALLEN
Conditionally Highlighting Cells Containing Formulas
Excel’s conditional formatting feature allows you to create formats that are based on a wide variety of criteria. If you …
Discover More
Understanding the Start Menu
When you want to start using Windows for real, you’ll typically need to go through the Start menu to do it. This tip …
Discover More
Understanding Style Sets
When you display the Home tab of the ribbon, Word shows a variety of styles in the Styles group. These are Style Sets, as …
Discover More
More WordTips (ribbon)
Printing Field Codes
Field codes allow dynamic information to be included in documents and can be a great boon. At some point you may want to …
Discover More
Updating Fields Automatically
You can place dynamic fields into many parts of your document. If your document contains a lot of fields, you might …
Discover More
Calculating Dates with Fields
Can you calculate dates using fields? Yes, but you probably don’t want to except as a learning experience. An easier way …
Discover More
I am making a template and it has a field named Title. I want that when the user writes the title it automatically changes the document title so I can have a constant updated title in the header. I cannot use VBA.
asked Dec 5, 2013 at 14:12
![]()
Yes you can use a mapped content control to insert a field into a document that will update the title document property when changed. You can read up on mapped content controls here.
To insert a content control mapped to the title document property in Microsoft Word 2007 and up, navigate to Insert on the ribbon, Click Quick Parts followed by Document Properties and choose Title.
answered Dec 5, 2013 at 22:52
![]()
AdamAdam
7,3032 gold badges25 silver badges41 bronze badges
2
Click wherever you want eventually want to manually type the title.
-
Click Developer tab
(If you don’t have the Developer Tab, click File > Options > Customize Ribbon, then under Main Tabs select the Developer check box.)
-
Click XML Mapping Pane
- From the drop-down, select the Custom XML Part that ends in /core-properties.
- Right-click Title, then click Insert Content Control from the popup menu, then Plain Text (or whatever).
It will auto-populate with whatever the Document Title currently is, but it’s now a «two-way street» — if you type in there, it updates the actual Document Title.
To have that property echoed elsewhere,
- Click the cursor wherever you want it to go
- Select Insert > Quick Parts > Document Property > Title
answered Apr 26, 2018 at 15:45
![]()
Jo-JoJo-Jo
111 bronze badge