
Word for Microsoft 365 Word for Microsoft 365 for Mac Word 2021 Word 2021 for Mac Word 2019 Word 2019 for Mac Word 2016 Word 2016 for Mac Word 2013 Word 2010 Word 2013 Developer Word Starter 2010 More…Less
Sometimes, putting a border around text will work better in your document than inserting a text box or a one-cell table, to achieve a similar look.
-
Select a word, line, or paragraph.
-
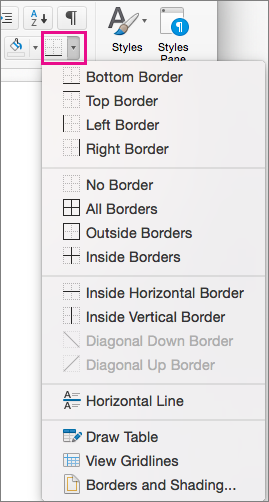
Go to Home > Borders, and then open the menu of border choices.

-
Choose the type of border you want:
Customize the border
-
After you’ve selected your text and found the basic type of border you’d like, open the Borders menu again, and choose Borders and Shading.
-
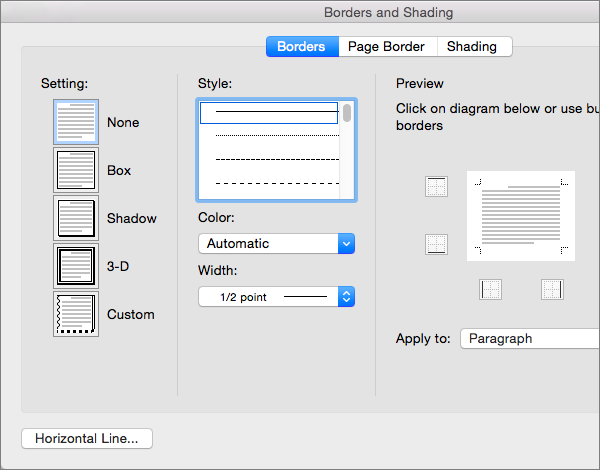
Make your choices for style, color, and width, and then apply the choice with the buttons in the Preview section of the dialog box. When the preview is the way you want it, click OK.
Note: Make sure that the Apply to box has the correct setting: Text or Paragraph.
See Also
Add, change, or delete borders from documents or pictures
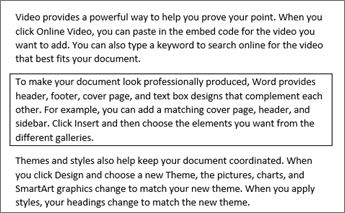
You can add a border to an individual word, a line of text, or an entire paragraph. You can make borders as plain or fancy as you want.
You can also add a border to a picture, put a border around a table, add a border to an individual page.
Add a border to selected text
-
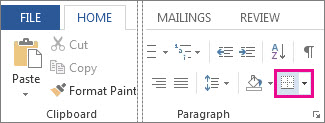
Select a word, line, or paragraph.
-
On the Home tab, click the arrow next to the Borders button.
-
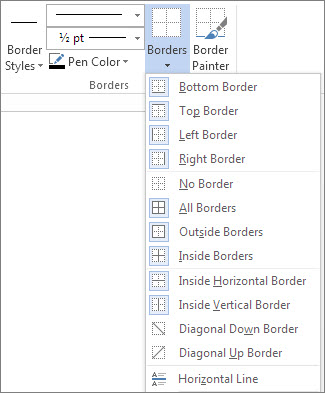
In the Borders gallery, click the border style that you want to apply.
Customize the text border
-
After you’ve selected your text and found the basic type of border you’d like, click the arrow next to the Borders button again, and then click Borders and Shading.
-
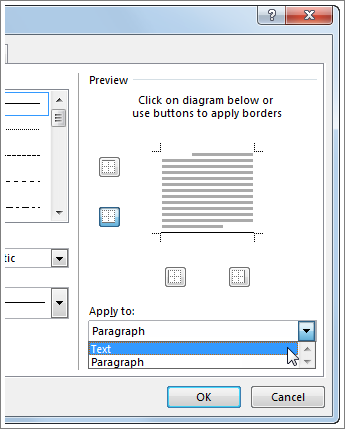
In the Borders and Shading dialog box, change Setting, Style, Color, and Width to create the border style that you want.
Note: To make sure the border style is correctly applied, set Apply to to Text or Paragraph. If you haven’t selected any text, you can only set Apply to to Paragraph.
-
Click OK to apply your selected border styles.
Tip: You can also fill the area of your selected text with color. In the Borders and Shading dialog box, click Shading to select a color and patterns. The color you pick in the Fill list fills the rectangular area; the color you select from the Color menu is applied to the rectangular area in a pattern you select from the Style list.
See Also
Add, change, or delete borders from documents or pictures
Add a border to a table
Need more help?

by Carol Bratt on March, 27 2008 at 08:03AM EDT
MS Word’s Borders and Shading feature allows you to control exactly where to place a border in a document. For example, let’s say you want only your title page to have a border along the left and right margins.
Follow the steps below to make it happen:
- Select the title page.
- Go to Format | Borders and Shading.
- On the Page Border tab, select a setting.
- Decide on your formatting by making selections from the Line Style, Art, Width, and Color drop-down lists.
- In the Preview section, click the buttons to turn off the border at the top and bottom margins.
- Select This Section — First Page Only from the Apply To drop-down list.
- Click the Options button.
- Select Text from the Measure From drop-down list.
You can also add a border to a page in the middle of the document by making that page a new section and selecting This Section from the Apply To drop down list.
Come visit at http://www.carolscorneroffice.com to learn more!
When you become a member at CarolsCornerOffice.com, you have access to this and many, many more articles that include screenshots. Don’t delay: visit us today!
Click the “Title” button in the “Styles” group under the “Home” tab on the main menu ribbon to automatically apply a title style to your title text. Click the “Subtitle” button in the “Styles” group to automatically apply the recommended subtitle style to the selected text.
Contents
- 1 How do you create a title in Word?
- 2 How do I make a fancy title in Word?
- 3 Where is the title bar in Microsoft Word?
- 4 How do I add a title to a table of contents in Word?
- 5 How do you shade text in Word?
- 6 Where is the title bar in Windows 10?
- 7 What is the title bar in Word 2016?
- 8 What does title bar look like?
- 9 How do I insert a title style in a table of contents?
- 10 How do you make titles appear in table of contents?
- 11 Do you include title page in table of contents?
- 12 How do I use dictation in Word?
- 13 Is there a note taking template in Word?
- 14 How do I get rid of widow orphan control?
- 15 Where is the widow orphan control in Word?
- 16 How do you put a box around a border in Word?
- 17 How do I add a title bar?
- 18 Which toolbar is on the title bar?
- 19 How do I change my Windows title?
- 20 What is title bar in Word document?
How do you create a title in Word?
Inserting the Document Title in Your Document
- Position the insertion point where you want the title to appear.
- Display the Insert tab of the ribbon.
- Click the Quick Parts tool in the Text group and then choose Field.
- In the Categories list, choose Document Information.
- In the Field Names list choose Title.
How do I make a fancy title in Word?
Create a title style in Word to save time and mouse clicks
- Open a blank document and type Title.
- Select Title and click the Bold and Center buttons on the Formatting toolbar or Home tab.
- Change the font to 22 points.
- Click anywhere in your title text.
Where is the title bar in Microsoft Word?
We will start with the Title bar, which is located at the very top of the screen. On the Title bar, Microsoft Word displays the name of the document you are currently using.
How do I add a title to a table of contents in Word?
(3) To add a Heading to the Table of Contents, highlight the added heading on the document, and click on the correct “Heading” button ( e.i. Heading 1, or Heading 2, etc.) at the “Styles” Section from the “Home” Tab.
How do you shade text in Word?
Apply shading to words or paragraphs
- Select the word or paragraph that you want to apply shading to.
- On the Home tab, in the Paragraph group, click the arrow next to Shading.
- Under Theme Colors, click the color that you want to use to shade your selection.
Where is the title bar in Windows 10?
The title bar is at the top of every window in Windows 10. This includes three buttons at the top right corner of the window and a title for each open window. There are a number of ways you can customize the title bar with a few extra software packages and the options included in Windows 10.
What is the title bar in Word 2016?
name of current document
Title Bar: The title bar displays the name of current document. For the first time it is document when you saved your document the will display on the title bar. C. Sign in: Here you can use most of Microsoft word functionality.
What does title bar look like?
A title bar is a small strip that extends across the top of a window. It displays the title of the window and typically includes the close, minimize, and maximize buttons. In macOS, these buttons are on the left side of the title bar, while in Windows, they are on the right.
How do I insert a title style in a table of contents?
To verify that the Title style will now be added to the Table of Contents:
- Choose the References tab.
- Click Table of Contents.
- Choose Insert Table of Contents…
- Click the Options… button.
- Scroll through the Available styles: list to make sure that the Title style now shows up and that it has the desired TOC level.
How do you make titles appear in table of contents?
To customize your existing table of contents:
- Go to References > Table of Contents.
- Select Custom table of contents.
- Use the settings to show, hide, and align page numbers, add or change the tab leader, set formats, and specify how many levels of headings to show.
Do you include title page in table of contents?
The Table of Contents should appear after the title page in the document. To create the Table of Contents manually, start a new page right after the title page.The Table of Contents should be on its own page. Do not include the introduction or a dedication on the same page as the Table of Contents.
How do I use dictation in Word?
Dictate in Word For the Web
Open a document and click the Dictate icon on the Home Ribbon and dictate your text. When finished, click the icon again to turn off Dictation. To see other languages available for dictation, click the Down arrow next to the Dictate icon and choose the language you’d like to use.
Is there a note taking template in Word?
Organize your notetaking with this notes template in Word. With place for a title and bullet points, a Microsoft Word note taking template is perfect for lectures, important meetings or teleconferences, sales pitches, and more.
How do I get rid of widow orphan control?
How to Turn the Widow Orphan Control Setting On or Off in Microsoft Word
- Open a document in Word.
- Select everything with Ctrl + A.
- Click the Home tab.
- Click the Paragraph button.
- Select the Line and Page Breaks tab.
- Click Widow/orphan control to remove the checkmark.
- Click OK.
Where is the widow orphan control in Word?
Control widow and orphan lines
On the Format menu, click Paragraph, and then click the Line and Page Breaks tab. Select the Widow/Orphan control check box.
How do you put a box around a border in Word?
Boxing text or paragraphs
Select the text you want to box in. Choose the Borders and Shading command from the bottom of the Border menu. The Borders and Shading dialog box appears. If you want to apply the border to only text (words) and not to the entire paragraph, choose Text from the Apply To drop-down list.
How do I add a title bar?
There are two ways to change title bar for your activity:
- Design time (that is, change title in AndroidManifest. xml file).
- By coding (that is, you can code to change the activity title).
Which toolbar is on the title bar?
The toolbar that is present on the left of the title bar is most frequently used commands in the application. Toolbars are mostly present in the word, office suite, web browsers and other such computing languages. Mostly, the toolbar hides the menu bar by default.
How do I change my Windows title?
Right-click on one of the selected windows commands and click Change Window Title. You can also use the Actions button to select the Change Window Title option. Set a common Window title for the selected windows that your want to change and click OK. The windows titles are changed to the new title that you’ve assigned.
What is title bar in Word document?
• Title Bar: A horizontal bar at the top of an active document. This bar displays the. name of the document and application. At the right end of the Title Bar is the Minimize, Maximize and Close buttons. •
![]()
Download Article
Learn how to insert a lined or art border in Microsoft Word documents on desktop
![]()
Download Article
- Adding a Page Border (Windows)
- Adding a Page Border (Mac)
- Adding a Text Border
- Q&A
|
|
|
Do you want to make an outside border in your Microsoft Word documents? You can easily add a solid or dotted border to an entire page or selected content. You can also use Microsoft Word’s included designs to create an artistic border for themed event flyers. This wikiHow will show you how to create a border around text, images, or pages in Microsoft Word using your Windows or Mac computer.
Things You Should Know
- To add a page border, click «Design» → «Page Borders». Select a border setting, style, and page application. Click «OK».
- To add a border around text or images, select the content. Click the «Home» tab and click the arrow next to the border icon. Click «Borders and Shading…»
- Select a border setting, style, and page application. Click «OK».
-
1
Open a project in Microsoft Word. This looks like a W on top of a blue square. Microsoft Word is available to install for Windows.[1]
- You must have a subscription to use Office 365.
- Use this method to add a lined border around a Microsoft Word document. This is different from changing the margins.
-
2
Click Design. This will be in the top toolbar, between Draw and Layout.
Advertisement
-
3
Click Page Borders. You can find this at the left side of the Design section, next to Page Color. It will have an icon of a page with a yellow border.
- A new window will open.
-
4
Click Page Border. This is the middle tab on the Borders and Shading window. You may already be on this tab.
-
5
Select a border setting. In the left-most column, click the border option that you want to use. Select from: None, Box, Shadow, 3-D, and Custom.
- If you want a simple border to go all the way around your page, select Box.
- To add a border with fun images, click the Art drop-down menu and select from Word’s art gallery. This border can be used for themed flyers for holidays and events.
-
6
Select a border style. In the «Style» column, scroll down until you find the border style you want to use, then click the style. Select from the various solid and dotted line styles.
- If needed, you can also change the border’s color and width from the Color and Width drop-down menus, respectively.
-
7
Select pages to use. If you created a new section earlier in this method, click the «Apply to» drop-down box, then click the section to which you want to apply the border in the resulting drop-down menu.
- To apply the border to the first page of your section, click This section — first page only in the drop-down menu.
-
8
Click OK. It’s at the bottom of the page. This will apply the border to your document’s specified page(s).

Advertisement
-
1
Open a project in Microsoft Word. This looks like a W on top of a blue square. Microsoft Word is available to install for Mac.[2]
- You must have a subscription to use Office 365.
-
2
Click Design. This will be in the top toolbar, between Draw and Layout.
-
3
Click Page Borders. You can find this at the left side of the Design section, next to Page Color. It will have an icon of a page with a yellow border.
- The Borders and Shading window will open, set to the Page Border tab. If it isn’t already on the Page Border tab, click it now.
-
4
Select a border setting. In the left-most column, click the border option that you want to use. Select from: None, Box, Shadow, 3-D, and Custom.
- If you want a simple border to go all the way around your page, select Box.
- To add a border with fun images, click the Art drop-down menu and select from Word’s art gallery. This border can be used for themed flyers for holidays and events.
-
5
Select a border style. In the «Style» column, scroll down until you find the border style you want to use, then click the style. Select from the various solid and dotted line styles.
- If needed, you can also change the border’s color and width from the Color and Width drop-down menus, respectively.
-
6
Select pages to use. If you created a new section earlier in this method, click the «Apply to» drop-down box, then click the section to which you want to apply the border in the resulting drop-down menu.
- To apply the border to the first page of your section, click This section — first page only in the drop-down menu.
-
7
Click OK. This is the blue button. This will apply the border to your document’s specified page(s).
Advertisement
-
1
Open a project in Microsoft Word. This looks like a W on top of a blue square.
-
2
Click Home. This is in the top toolbar, between File and Insert.
-
3
Select content. Click and drag your mouse across the text or image(s) around which you want to place a border.
- This method will place a border around an entire selection of images and text together.
- If you want to place a border around a single image, double-click the image. Select a preset style from the Picture Styles section, or click Picture Border to set the color, weight, and design of the border.[3]
-
4
Click
next to the «Borders» button. The Borders button resembles a square divided into four smaller squares; you’ll find it in the «Paragraph» section of options in the toolbar, just right of the paint bucket icon. A drop-down menu will open.
- On a Mac, click the Format menu item at the top of the screen instead.
-
5
Click Borders and Shading…. It’s at the bottom of the drop-down menu. A new window will open.
- On a Mac, you’ll find this option in the middle of the Format drop-down menu.
-
6
Select a border setting. In the left-most column, click the border option that you want to use. Select from: None, Box, Shadow, 3-D, and Custom.
- If you want a simple border to go all the way around your text, select Box.
-
7
Select a border style. In the «Style» column, scroll down until you find the border style you want to use, then click the style. Select from the various solid and dotted line styles.
- If needed, you can also change the border’s color and width from the Color and Width drop-down menus, respectively.
- To add a border with images, click the Art drop-down menu and select a design.
-
8
Select pages to use. If you created a new section earlier in this method, click the «Apply to» drop-down box, then click the section to which you want to apply the border in the resulting drop-down menu.
- To apply the border to the first page of your section, click This section — first page only in the drop-down menu.
-
9
Click OK. This will apply the border to your document’s specified page(s).
- Be sure to save your document when you’re finished.
- You can also use Microsoft Word to create a booklet or another handout flyer.


Advertisement
Add New Question
-
Question
How can I place a border around a picture I’ve inserted into a document?

You do what is shown above, but instead, you click on the picture before you go through the steps.
-
Question
How do I put a border around a table in Microsoft Word?
Go into Format —> Borders and Shading. There you’ll find options for borders you can apply to the table.
-
Question
What three options can I set regarding a picture border?
The three option you can set are: small, medium and large.
Ask a Question
200 characters left
Include your email address to get a message when this question is answered.
Submit
Advertisement
Thanks for submitting a tip for review!
About This Article
Thanks to all authors for creating a page that has been read 971,538 times.
Is this article up to date?
Text boxes in an MS Word document are a very useful feature. Text within a box acts as a highlight for the reader. Here, we will show you how to:
- Add a Text Box
- Remove a Text Box
- Customize a Text Box Border
- Change Border Color
- Create Dashed Border
- Change Border Thickness
Let us begin.
Step #1: Open the Word document.
Open the Word document where you want to add the text box.
Step #2: Add the Text Box
Position the cursor where you want the text box to appear.
In the top menu bar, click on the Insert tab to change the ribbon.

In the section Text, click on the Text Box icon to open a dialog box for Built-In text boxes.

Click on the text box you find suitable. We select the Simple Text Box.

Word adds the text box in the document.

Remove a Text Box
Step #1: Open the Word document.
Open the Word document that has at least one text box.
Step #2: Remove the text box
Click on the text box boundary to select it.

Press the Delete button on your keyboard.
Word will delete the text box from your document.
Customize a Text Box Border
Step #1: Open the Word document.
Open the Word document that has at least one text box.
Step #2: Customize the text box border
Click on the text box boundary to select it.

Right-click on the text box boundary to open a menu.
Click on Format AutoShape/Picture.

This opens a dialog box for Format Text Box.
Click on the Colors and Lines tab.

Change Border Color
Under Line, click on the down arrow on the right-hand side of Color:.

This opens a dialog box for Theme Colors and Standard Colors.
Click on the color of your choice.

The chosen color will appear against the Color: tab under Line.

Note: At this point, you can click on OK at the bottom of the dialog box to exit. Word will change the color of the box to your chosen color. Else, move to the next step to make more changes.
Create Dashed Border
In the Format Text Box dialog box, under Line, click on the down arrow on the right side of Dashed:.

This opens a choice for different dashed lines.
Select the most suitable dashed line.

The chosen dashed line will appear against the Dashed: tab under Line.

Note: At this point, you can click on OK at the bottom of the dialog box to exit. Word will make the changes to the text box as per your choices above. Else, move to the next step to make more changes.
Change Border Thickness
In the Format Text Box dialog box, under Line, click on the down arrow on the right side of Style:.

This opens a choice for lines of a different style.
Each line style has its weight in points on its left.
Select the line most suitable to you.

The chosen line style will appear against the Style: tab.
The weight of the chosen line style will appear against the Weight: tab under Style:.

The choice of line styles offers only a few discrete weights.
To change the line weight, select the number next to Weight:.
Change the number as you like.

Click on OK at the bottom of the Format Text Box dialog box to exit.
Word will make the changes to the text box according to all your choices.

Conclusion
Follow our step-by-step instructions to add or delete text boxes in your Word document. Beautify your text boxes with our instructions. We have shown you how to change the border color, style of the border line, and the thickness of the border.