
I am struggling to get an accurate answer on this questions on whether TinyMCE supports pasting from Microsoft word. I guess there may be a lot of out of date information on the web on this topic as I have seen answers such as:
- There is a plugin you can install to get it to work
- You have to use a separate «paste from word» button as opposed to pasting in the editor
- it should work fine out of the box
- it doesn’t work at all (no matter what you do)
I have tested this and it doesn’t seem like it works out of the box (answer #3) but I am not sure if this is due to a configuration / initialization issue on my side or there is some other external thing needed.
Any help would be appreciated.
![]()
informatik01
15.9k10 gold badges74 silver badges103 bronze badges
asked Aug 10, 2009 at 15:59
![]()
It does indeed work (as well as it can). You will need to use the «paste from Word» button, though, so TinyMCE can filter any of the extraneous markup that Word adds to its content. You’ll also have to make sure the paste plugin (which is part of the the default install) is loaded.
I believe that you’ll need to explicitly add the button in your theme, though. Take a look at this example from the TinyMCE wiki.
plugins : "paste",
theme_advanced_buttons3_add : "pastetext,pasteword,selectall",
will add the plugin and button (to whichever row you’d like). The TinyMCE wiki claims paste does Word filtering by default, but I’ve never seen it work in the wild without explicitly using the «paste from Word» button.
![]()
Trajan
3392 silver badges15 bronze badges
answered Aug 10, 2009 at 16:10
![]()
ajmajm
19.7k3 gold badges32 silver badges37 bronze badges
2
For me it works without «paste from word» button by directly pasting the content from word. I am using 3.3.9.3
answered Sep 16, 2011 at 4:35
![]()
ppantppant
7529 silver badges19 bronze badges
| layout | title | description | keywords |
|---|---|---|---|
|
default |
Paste from Word |
Upgrade the Microsoft Word copy-and-paste capabilities of TinyMCE. |
enterprise powerpaste power paste powerpaste_word_import powerpaste_html_import powerpaste_block_drop powerpaste_allow_local_images microsoft word excel |
Improve your productivity & writing experience
TinyMCE PowerPaste automatically cleans up content from Microsoft Word and other HTML sources to ensure clean, compliant content that matches the look and feel of your site or app.
TinyMCE PowerPaste is a Premium Plugin from TinyMCE. We have flexible purchase options: as a stand-alone plugin, to OEM and custom enterprise pricing.
Customers: we have full documentation explaining how to install and configure TinyMCE PowerPaste. [Go to the docs.]({{ site.baseurl }}/plugins/powerpaste/)
Example use cases
Content from Microsoft Word
If you paste content from Microsoft Word into your app, you probably know the published page usually doesn’t match the site’s style. Fonts can be different, images missing and formatting not the same as their original document.
This can be time consuming for users to fix, and usually involves manually editing HTML. It can also increase support requests.
TinyMCE PowerPaste automatically “cleans” pasted content, fixing these issues. It can also automatically upload images to a server, helping you spend time on more productive tasks.
Content from Microsoft Excel
TinyMCE PowerPaste also makes light work of pasting Excel content into your app, automatically creating HTML compliant tables in the process.
While developers are very familiar writing HTML tables, most content creators literally don’t know where to start. And then there’s the issue of manually entering their Excel data into the table. This isn’t a fun experience either.
For users of both Word and Excel, PowerPaste will dramatically improve the content production experience you deliver to your clients.
Content from the internet
If you cut and paste content from the internet into your app – which includes almost everyone – PowerPaste also works its auto-magic.
Just as it cleans up rogue formatting from sources like Word, it does the same for internet content. Need to grab a quote from a website for your blog post? PowerPaste removes classes, minimizing the chance of unwanted CSS overriding your stylesheets.
It also does the same for images, automatically linking to the source image URL. Perfect content, every time.
Buy TinyMCE PowerPaste
Start with our dedicated product page to see our flexible pricing options. OEM and enterprise customers should contact sales directly. Still not sure? Check out the demo below.
PowerPaste demo
{% include codepen.html id=»Jbaeyr» %}
Naturally, one of the most important tasks of a web page is to deliver necessary information to the users. Information, or content, displayed on each page should be structured in a way that would attract people, appear to be useful and easily perceived by both mind and our eyes. The last criterion, visual characteristics, however poorly important it might seem, actually accounts for both ease of perception and attractive look of the web page. Usually the information you want to display is preliminary prepared by the experts in the sphere and very often these people do not have a single clue about the complex procedure of adding content to the web page. Quite often the information is prepared in Microsoft Office Word or other Writers (also open source-based), and then the IT-specialists have to break their necks over solving the problems of copying the information onto a web page. Plone suggests a few solutions to copying desirable content (in text format) from Microsoft Office Word to your web page.
This tutorial is therefore aimed at observing the main problems that might appear and the ways to successfully cope with them.
NB! The tutorial is based on Plone 4.0 and the default TinyMCE text editor (type of WYSIWYG — What You See Is What You Get).
Problems and Solutions
Of course, the whole process of adding content starts from simply adding a new Page in the Add new drop-down menu of your default Plone website. Then you must fill in the Title field for your future web page, the Summary field can be either filled in or left blank as you wish. Then goes the Body text containing most of the information and, simultaneously, most of the problems with text formatting.
First of all, there are several ways of inserting content — you may either write directly in the Body text field (this is in case you are the main source of information) or copy text from a document (most frequently used secondary source). And it is the latter case that presupposes problematic issues. The amateur Plone user would simply copy the text from Word. BUT, let us have a closer look at what might happen in this case. So, we have the following Microsoft Word Document:

When simply copied to Plone Body text field, this is what happens:

Result: desirable text formatting (italics, bold type) is partially preserved, though additional paragraphs appear, so editing is required. When dealing with a small portion of text, this pasting mode is possible and could be easily enhanced. However, when dealing with a lot of content, you should take into consideration that this type of pasting might presuppose additions and omissions that could be later neglected during the editing stage. The editor (or content manager who inserts content to the Plone website) is a human being and could miss on some important points relying solely on the ‘intelligence’ of Plone configurations. You should therefore always REMEMBER that whichever parting mode you choose, editing stage is CRUCIAL and cannot be neglected.
Solution: there are two ways out that could improve the process of pasting-editing.
You may either edit the text by clicking the HTML button on the toolbar (in case you are well-versed in HTML code) or use the functions of the TinyMCE text editor applied in Plone 4.0 (type of multi-functional and user-friendly WYSIWYG editor — What You See Is What You Get).
There are two buttons specifically designed for copying text — Paste as Plain Text and Paste from Word. However, they do not appear on the default TinyMCE toolbar. You should go to Site Setup configurations in the upper right corner under the user name drop-down menu. There under Plone Configuration title you will find TinyMCE Visual Editor option. By clicking on this active header, you will see several tags, among which Toolbar is what you actually need. You will see there the list of available icons appearing on your toolbar, and you have to activate Paste as Plain Text and Paste from Word buttons by ticking the boxes near them:

On activating these icons, your toolbar will have the following options:

Paste as Plain Text
If you wish to try pasting your text as plain text, you should click the Paste as Plain Text button on your toolbar (after you have successfully activated it). The following window appears:

You paste the text into the window and click Insert button under it. When pasted as plain text, the content appears with no styles assigned to it. The only exception is line break. You can preserve this formatting by ticking option ‘Keep linebreaks’ before inserting text. Then content can be edited with the buttons similar to those applicable in Microsoft Word Documents (or any other type of writer):

Result: all you get is a plain text with no styles assigned to it as you can observe on the following screenshot. This procedure is considered to be quite a reliable one, since the editor can control the formatting situation him/herself and assign all desirable styles to the plain text with the help of TinyMCE tools.

The editing stage after plain text is inserted is the easiest and the least time-consuming one. You can now add corresponding types and styles (italics, bold, ordered/unordered lists, links, images, etc.) to your page using the options available in the TinyMCE editor toolbar. In our case, we needed to have some text in italics, some — in bold, and we also needed unordered list. Our WYSIWYG editor does not demand highlighting certain portions of the text to make them italics, bold, etc., you can simply put the cursor on any area that needs formatting and then click the option you need. After the editing stage we received the following result:

Paste from Word
If you wish to try pasting your text from word, you should click the Paste from Word button on your toolbar (after you have successfully activated it). The following window appears:

When pasted from Word, the procedure is the following. You paste your text into the window and click Insert button under it.

Result: the pasted text preserves some of the original formatting styles (like header, italics type, unordered list), but adds new paragraphs and does not preserve underline style (as observed on our sample).

The outcome is, of course, far from perfect and requires additional editing to reach originally assigned formatting, but it could be easily edited with the tools available in the TinyMCE editor. It demands less formatting than with Paste as Plain Text option, because it preserves at least something, but you have to be very attentive in tracing the differences between original and received formatting.
Other
However, there’s one more solution to the problem with text pasting. You can also first copy the text into a simple notepad as the simplest text editor with no formatting, you will get a plain text and then you will be able to copy it to your Plone Body text window.
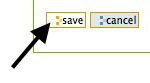
Irrespective of the pasting mode you choose, whenever you have finally achieved desirable visual display of your web page, do not forget to click Save button at the bottom of the page.
The web page with the content in our case looks the following way:

Hopefully, now you will have less problems pasting content from Microsoft Word to Plone. Good luck!
When copying and pasting text from a Microsoft Word document into the WebCMS, extra care should be taken to remove any Microsoft Word formatting, as this could cause your CMS website to not display properly.
How to do this depends on which text editor you’re using.
- I’m using TinyMCE.
- I’m using Kupu.
- I don’t know which text editor I’m using.
Copying and Pasting Text from Microsoft Word into a TinyMCE Text Editor
TinyMCE has a great built-in tool that allows you to easily copy and paste text from Microsoft Word into a page in your subsite.
- Start by navigating to the page you’d like to edit and accessing the Edit Page screen. (Need help with this step?)
- Click inside the Body Text area where you’d like to insert your text.
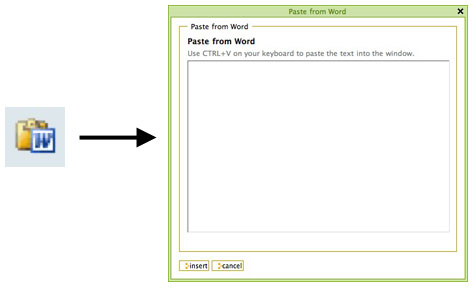
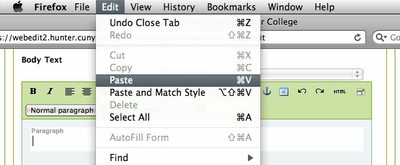
- Click on the Paste from Word icon in the formatting toolbar. A box titled Paste From Word should appear.

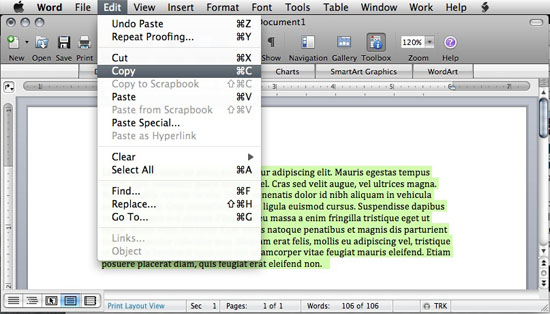
- Switch to your Microsoft Word document, highlight the text you want to copy, and choose Edit > Copy from the menu bar.
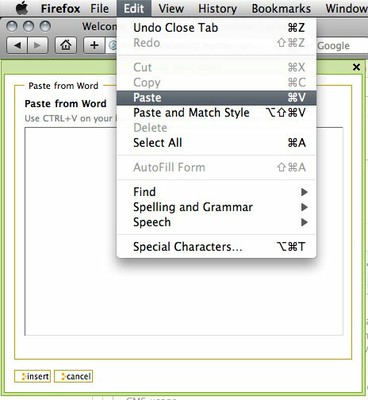
- Switch back to your web browser, where you should still see the Paste From Word box.
- Click in this box, then choose Edit > Paste from the menu bar.
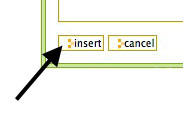
- Click on Insert to finish pasting the text into your page.
- You may now continue to edit your page. When you’re done, remember to click Save.
Copying and Pasting Text from Microsoft Word into a Kupu Text Editor
Unlike TinyMCE, Kupu does not have a built-in tool to accommodate text copied and pasted from a Microsoft Word document. Therefore, an extra program is required when using the Kupu editor. If you regularly need to copy and paste from Microsoft Word documents when working in the WebCMS, we strongly suggest you switch to the TinyMCE editor.
Step-by-step instructions for copying and pasting using the Kupu editor are below:
- Start by navigating to the page you’d like to edit and accessing the Edit Page screen. (Need help with this step?)
- Switch to your Microsoft Word document, highlight the text you want to copy, and choose Edit > Copy from the menu bar.
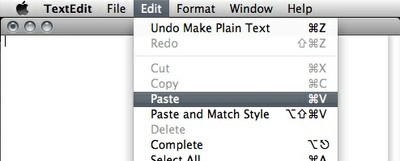
- Open a separate plain text editor program (e.g. Notepad on Windows or TextEdit on Mac).
- Paste your text from the Microsoft Word document into your plain text editor.
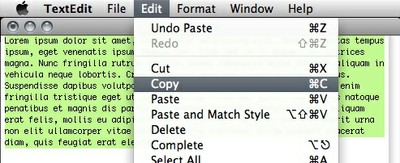
- While you’re still in the plain text editor, highlight all of the text you just pasted. Copy this text by choosing Edit > Copy from the menu bar.
- Return to the Edit Page screen in your web browser. Click inside the Body Text area where you’d like to insert your text.
- Paste your text by choosing Edit > Paste from the menu bar.
- You may now continue to edit your page. When you’re done, remember to click Save.
I don’t know which text editor I’m using.
Short Answer:
If your formatting toolbar is blue, you’re using TinyMCE.
If your formatting toolbar is green, you’re using Kupu.
Long Answer:
There are many differences between the Kupu and TinyMCE text editors. We strongly recommend using TinyMCE, especially for copying and pasting text from Microsoft Word. If you would like to change your text editor from one to the other, click here to learn how.