
Содержание
- 3 Ways To Create A Project Timeline In Excel (+ free template)
- How to create a timeline in Excel using SmartArt? (and for what purpose)
- SmartArt Graphics Timeline In Excel: for what purpose?
- Create your SmartArt timeline
- How to Create an Excel Timeline Using a Scatter Chart? (and for what purpose)
- Scatter chart timelines in Excel: for what purpose?
- Create your scatter chart timeline in Excel
- How to Create a timeline in Excel using Timeline Templates?
- Create your timelines with Excel Templates
- Pros & Cons Of Excel Timelines
- What makes Excel an interesting project timeline maker…
- … and why you might need something that’s built for project planning and work management
- So, what then? What’s the alternative?
- Meet Toggl Plan. The best way to create visual project timelines.
- Create beautiful timelines for complex projects
- Don’t overwork yourself, or your team.
- Collaborate with your teammates
- Drag and drop your projects
- Временная шкала проекта (Project Timeline)
- Шаг 1. Исходные данные
- Шаг 2. Строим основу
- Шаг 3. Добавляем названия этапов
- Шаг 4. Прячем линии и наводим блеск
3 Ways To Create A Project Timeline In Excel (+ free template)
Last Updated: 20 August 2021 02 September 2022
We, humans, are visual animals.
In other words, the human brain will find it a lot easier to digest information that’s clearly communicated and displayed. For this reason, the visual component is essential when planning complex projects with many moving pieces.
Well, you’re in the right place to learn precisely how to do just that.
In this blog post, you’ll get a step-by-step process to create a timeline in Excel in three different ways to visually communicate your project’s schedule and create a powerful visual timeline to plan without getting a headache.
How to create a timeline in Excel using SmartArt? (and for what purpose)
For starters, what are SmartArt graphics?
SmartArt Graphics Timeline In Excel: for what purpose?
Microsoft Excel’s Smart Art feature makes it reasonably straightforward to create a project timeline.
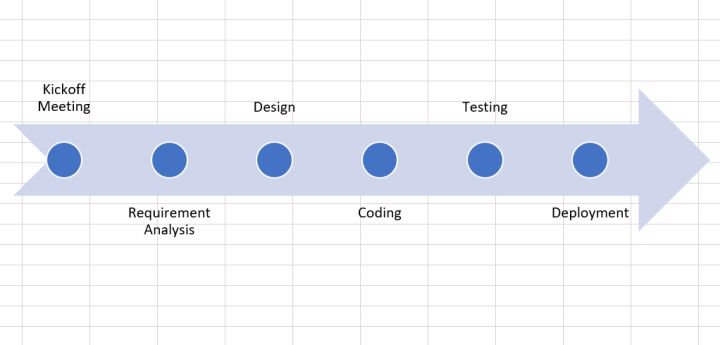
Now, while SmartArt timelines can be a valuable tool to communicate a project’s roadmap to stakeholders, they are also limited; you can only create simplistic timelines to visualize the milestones of a project.
In short: SmartArt timelines are okay for simple reporting purposes, not to work with.
Create your SmartArt timeline
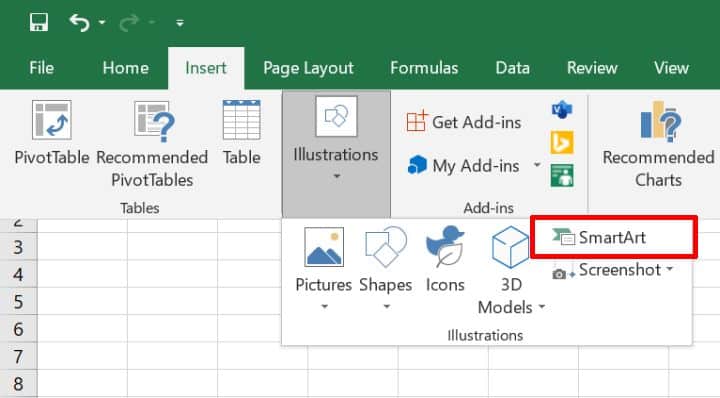
- Open a blank Excel document. Click Insert > SmartArt > Process.
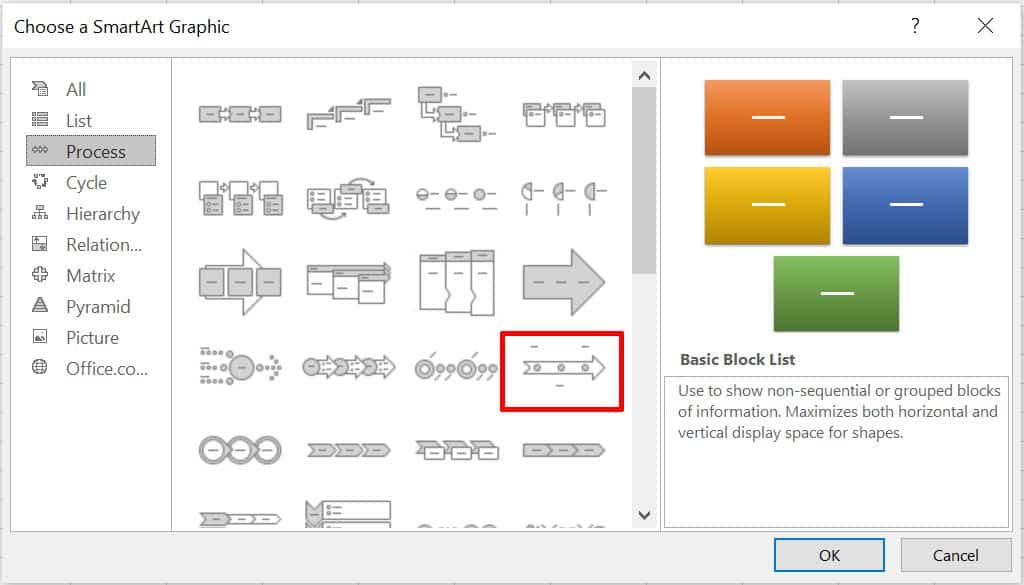
- Then select Basic Timeline from the Graphic options. You may also choose other graphics templates that suit your needs.
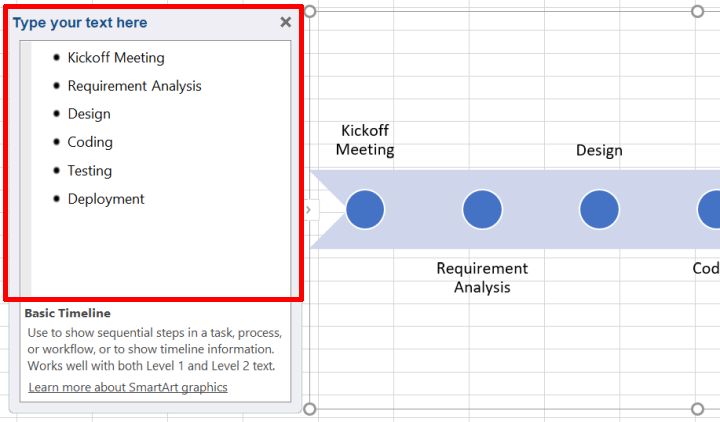
- Enter Timeline data either in the provided text box or directly on the timeline.
- Excel also allows you to change the style of a timeline. To do so, simply right-click to change the theme style, fill color, and outline styles.
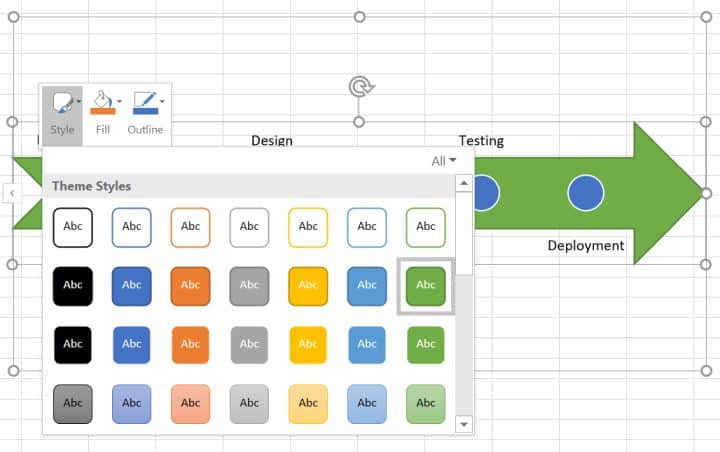
And you’re all set. Your simplistic Excel SmartArt timeline should be ready!
If you’re after something more usable than SmartArt, you may be interested in building a scatter chart.
How to Create an Excel Timeline Using a Scatter Chart? (and for what purpose)
Scatter chart timelines in Excel: for what purpose?
Scatter charts provide a simple way to visualize various data entries over a specific period.
For instance, you could use a scatter chart to visualize the due date for all milestones of a project along with the necessary resources to complete them.
This is something that a basic SmartArt timeline couldn’t deliver.
Here again, you can choose from and edit the many charts available in Microsoft Excel to represent a simple project timeline that will suit your needs.
In short: Scatter chart timelines are a viable option to plan elementary projects that don’t require much resourcing.
Create your scatter chart timeline in Excel
This guide is a bit longer, but stick to our steps, and you’ll be fine! — alternatively, feel free to leave a comment below if you’re stuck!
- First, open a blank Excel document.
- Then, prepare your chart data.
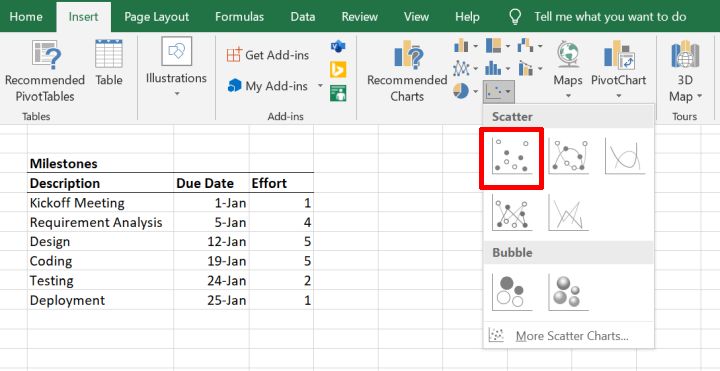
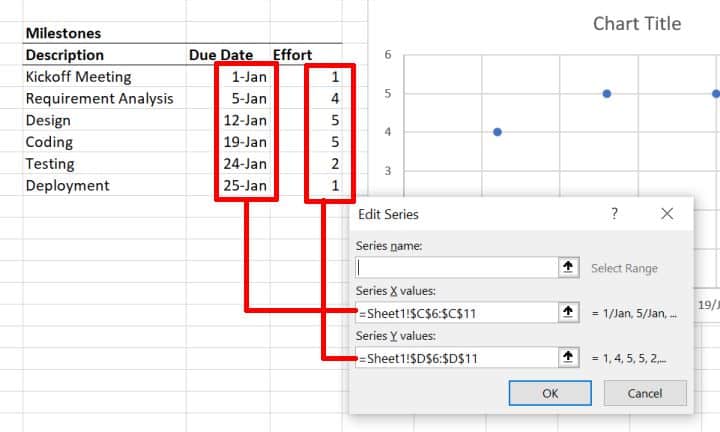
For this chart, we’ll create milestones for a website design project and attribute a due date and an estimated effort for each.

- Next, insert a scatter chart from Insert > Charts. Then select the Scatter option.
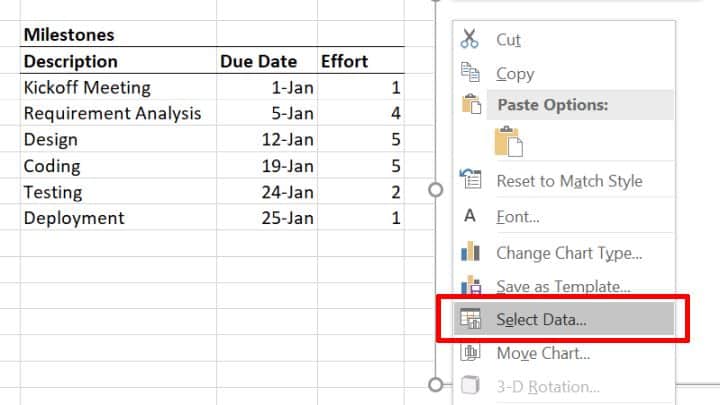
Now, we need to map our prepared data to the chart.
- Right-click on the scatter chart. Then click the Select Data option.
- In the dialog that pops up, click on the Add button in the Legend Entries section.
- Set the Due Dates range as Series X values, and the Efforts range as the Series Y values.
- Next, make our chart look like a timeline, disable the Primary Vertical Axis, Chart Title, and Gridlines chart elements.
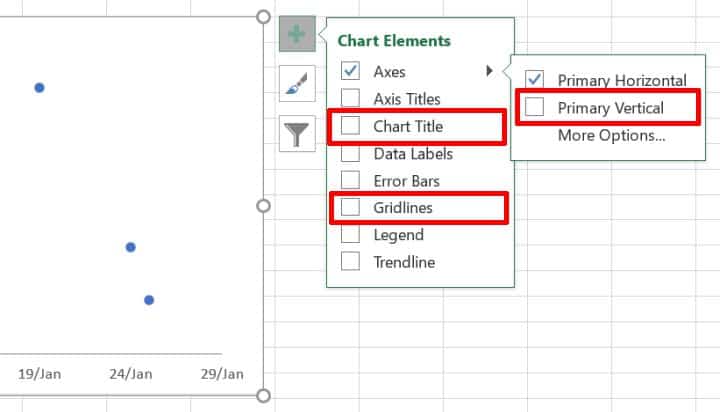
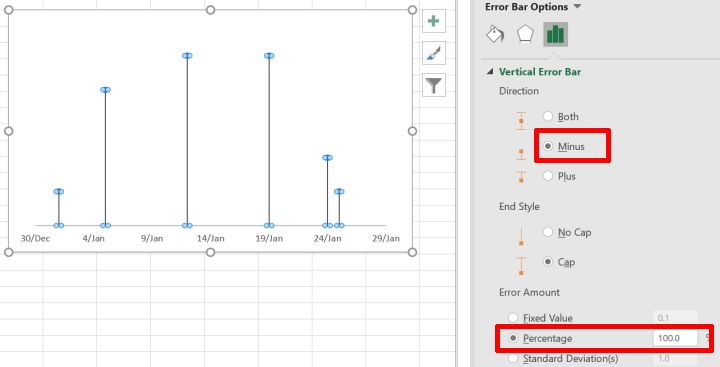
- To display the timeline markers, check the Error Bars option in Chart Elements.
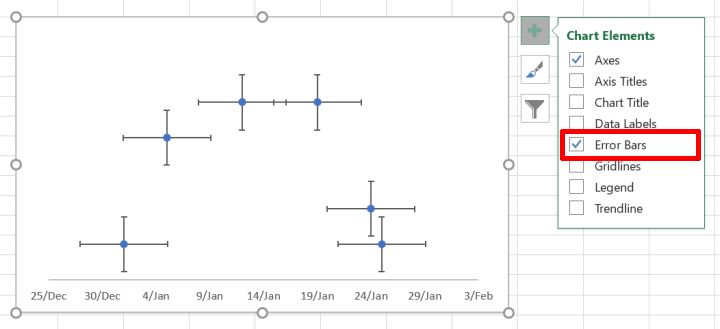
- Then to format the error bars, click on Chart Elements > Error bars > More Options.
- For horizontal error bars, set the End Style to No Cap and the Error Amount > Percentage to 0%.
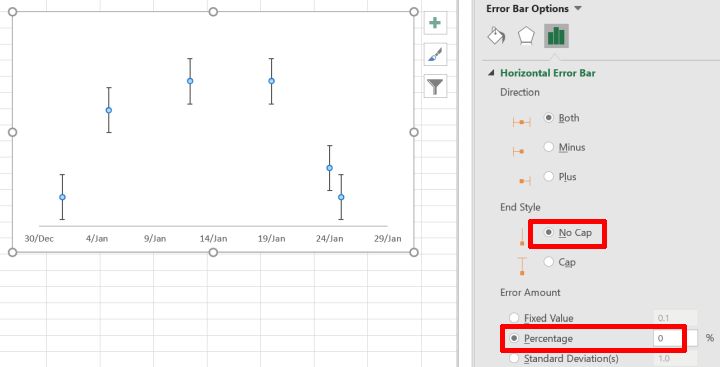
- For vertical error bars, set the Direction to Minus and the Error Amount > Percentage to 100%.
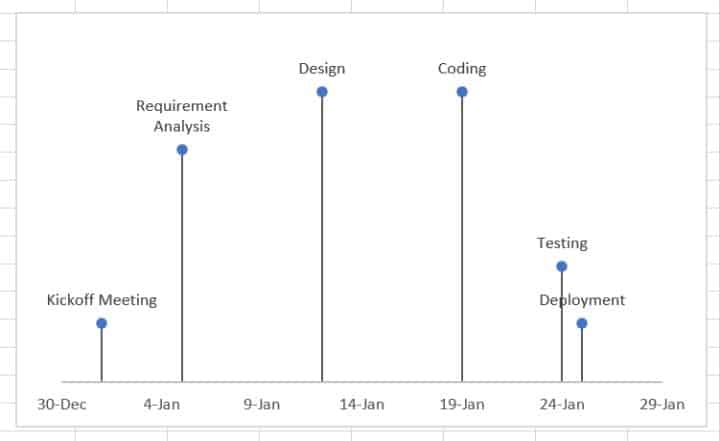
- To display the milestone labels, enable Data Labels from Chart Elements > Data Labels. Then click on Data Labels > More Options.
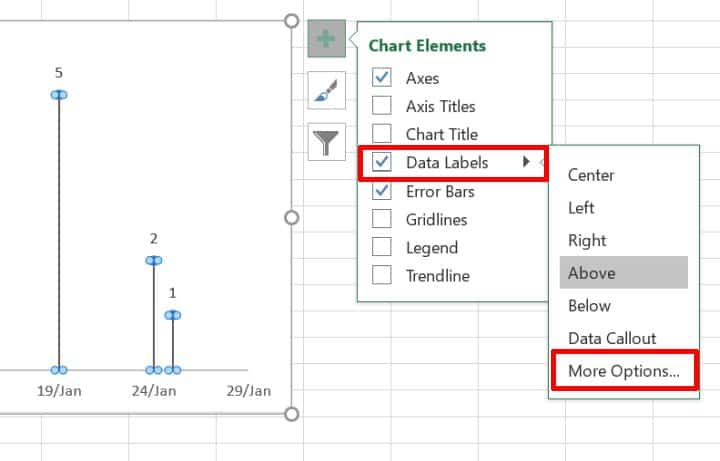
- Enable the Value From Cells option and select the range of milestones names from our prepared data. Uncheck the Y Value option.
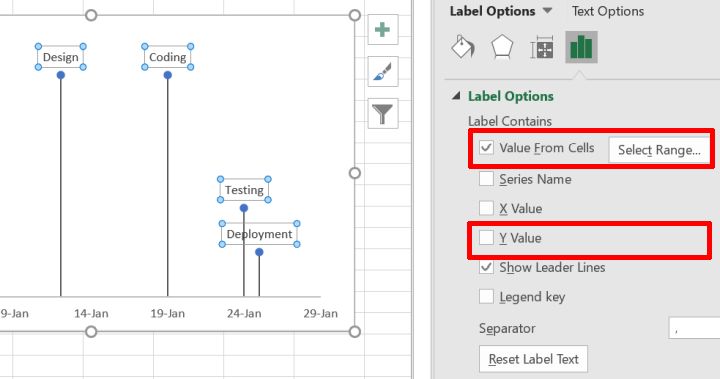
Hats off to you! You made it! Your Excel timeline using a scatter chart is ready.
Now, if you don’t want to bother creating your own Excel timeline charts from scratch (I can’t blame you there), an alternative is to make your timelines using Excel templates.
How to Create a timeline in Excel using Timeline Templates?
Excel timeline templates are readily available in Microsoft Office’s Template Library.
Note that some of these templates will only be available once you purchase a Microsoft Office 365 subscription. However, the vast majority is available free of charge.
In short: use ready Excel templates to create simple project plans to avoid building them yourself.
Let’s look at how to create a timeline in Excel using a template.
Create your timelines with Excel Templates
- Download the free “Project timeline with milestones” template from the Office template library.
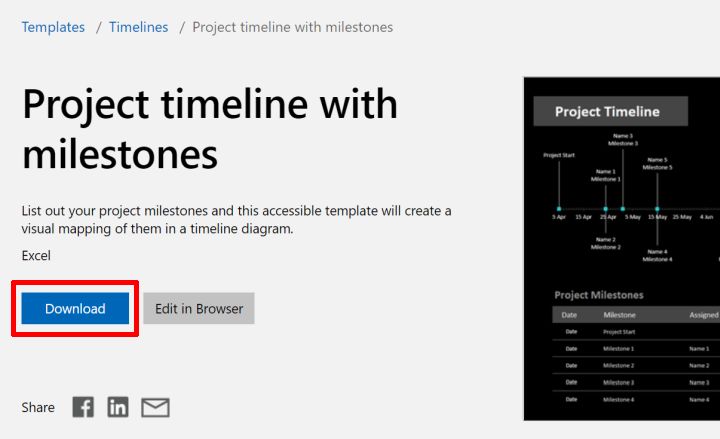
- Open the downloaded template in Excel and update your milestone data in the Project Milestones section. Set the milestone due date, milestone description, the person responsible, and the milestone label position.
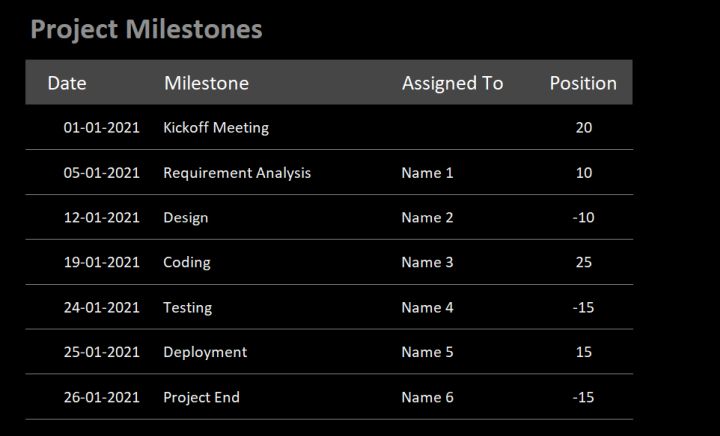
As you update your project milestone data, the milestone chart above automatically gets updated.
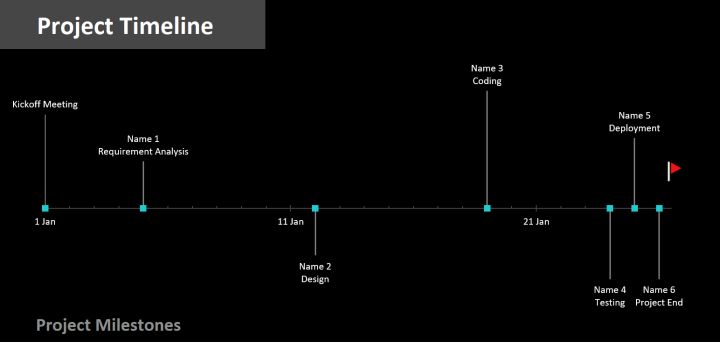
This is most likely the fastest way to build a decent timeline on Excel, especially if you don’t want to bother creating one from scratch on your own.
Now, you’ve probably noticed that while Excel makes it possible to create project timelines, it’s not cut for it.
Pros & Cons Of Excel Timelines
As mentioned earlier, a timeline is a powerful visual tool for project managers.
In the early stages of a project, it helps to communicate a project’s roadmap. And in the later stages, it allows project managers to plan and track project schedules and allocate resources.
What makes Excel an interesting project timeline maker…
The most significant advantage of using Microsoft Excel to create a timeline is that it’s easily available:
- Anyone with a computer, a smartphone, or a tablet can use Excel. It’s relatively affordable and doesn’t require a beast of a computer to run properly.
- You probably already have access to it. If you already have access to the MS Office Suite, you won’t need to spend anything extra.
- Your team is most likely Excel literate (up to a certain degree). If your team members are already comfortable using Excel, you won’t need to spend time training and onboarding them on the tool.
- You can find a ton of free Excel templates online. Using these templates, it’s reasonably easy to create a timeline in Excel.
… and why you might need something that’s built for project planning and work management
Don’t get me wrong; I love Excel (there’s a reason why I’ve decided to write this step-by-step blog post). And if you are seriously considering using Excel as your project timeline maker, know that I’ve been in your position, and I’d rather tell you why it might drive you crazy.
- Excel lacks collaborative features. You cannot work with another team member on a project’s schedule unless you both sit right next to each other. As a result, it is tough for distributed teams to plan together.
- You can’t ensure data integrity. It’s (way too) easy for anyone to wrongly update or delete data from an Excel document, making it hard to keep track of who did what, where, and when.
- Version soup: “Oh shoot, I thought we were working from the Team Planning V12_new.xls?” Team members will eventually work on different versions of Excel spreadsheets. From experience, I know that combining data from these versions can quickly become chaotic.
To sum up, Excel is OK for small and simple projects. You will need something else for anything bigger because Excel timeline templates are too basic and aren’t really teamwork-friendly.
So, what then? What’s the alternative?
To create project timelines for larger projects, you may want to consider using a project planning tool like Toggl Plan.
Meet Toggl Plan. The best way to create visual project timelines.
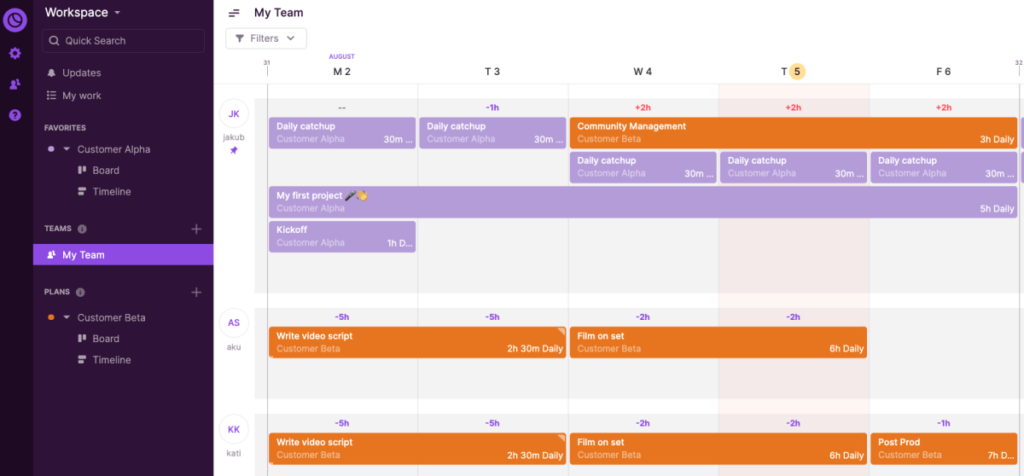
Toggl Plan is an easy-to-use SaaS with a drag-and-drop interface that helps those in charge of delivering projects to be on top of their work and capacity planning by providing a clear overview of who’s doing what and when, well ahead of time.
Consequently, teams can work at capacity and deliver projects on time, without stressing about it.
Create beautiful timelines for complex projects
Excel’s timelines can be helpful – But they are too simplistic and can be darn hard to read. We built Toggl Plan’s timeline to become the only tool you need to plan and visualize your projects.
Don’t overwork yourself, or your team.
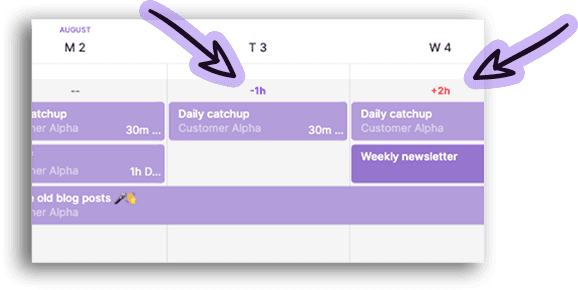
One of the advantages of planning well ahead of time is to anticipate how much work you and your team can take.
In Toggl Plan, you’ll be able to see how busy everyone is in the blink of an eye, thus making it more convenient to move tasks around and make sure that no one in your team works silly hours.
Collaborate with your teammates
While you can benefit from it as a single user, we actually built Toggl Plan for teams. When working together, you can leave comments, create and assign tasks, move tasks around, adjust how long it took to complete a project, etc.
In other words, Toggl Plan enables teamwork.
Drag and drop your projects
While Excel is most likely the most comprehensive software out there, it’s not user-friendly. One of the things that I dislike the most about it is the impossibility to drag-and-drop items.
In Toggl Plan, you can simply drag and drop your tasks.
Painless. Fast. Easy.
Long story short, Toggl Plan makes project planning and work management bliss. Now, hold your horse because the best is yet to come. If you’re an individual user, Toggl Plan is free forever. And if you work with a team, you can sign up for a 14-day free trial.
Jitesh is an SEO and Content Specialist at Toggl. On this blog, he shares actionable tips for professional service teams to deliver projects profitably.
Источник
Временная шкала проекта (Project Timeline)
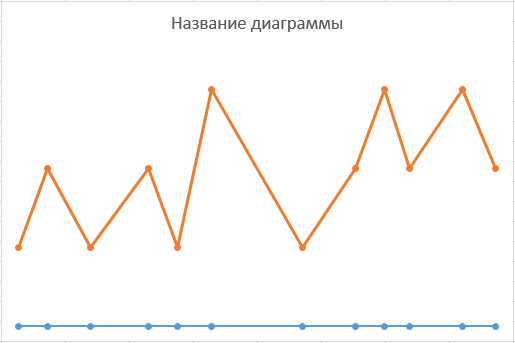
Предположим, мы работаем над долгим и сложным проектом, состоящим из нескольких этапов. Задача — наглядно показать всю хронологию работ по проекту, расположив ключевые моменты проекта (вехи, milestones) на оси времени. Примерно вот так:
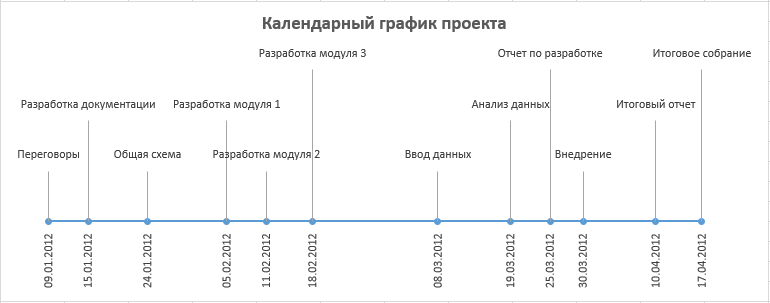
В теории управления проектами подобный график обычно называют календарем или временной шкалой проекта (project timeline), хотя я также встречал еще один русскоязычный аналог -«лента времени». В любом случае, главное — не как назвать, а как построить. Поехали.
Шаг 1. Исходные данные
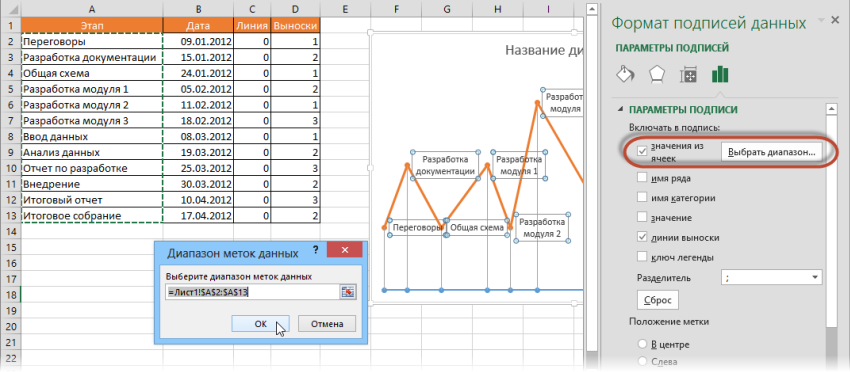
Для построения нам потребуется оформить исходную информацию по вехам проекта в виде следующей таблицы:

Обратите внимание на два дополнительных служебных столбца:
- Линия — столбец с одинаковой константой около нуля по всем ячейкам. Даст на графике горизонтальную линию, параллельную оси Х, на которой будут видны узлы — вехи проекта. В принципе, можно было бы использовать и полный ноль, но тогда график совпадает с осью X, что дает проблемы потом с настройкой внешнего вида диаграммы в Excel 2007-2010. Новый Excel 2013 нули воспринимает спокойно.
- Выноски — невидимые столбцы для поднятия подписей к вехам на заданную (разную) величину, чтобы подписи не накладывались. Значения 1,2,3 и т.д. задают уровень поднятия подписей над осью времени и выбираются произвольно.
Шаг 2. Строим основу
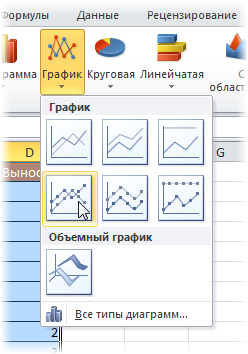
Теперь выделяем в таблице все, кроме первого столбца (т.е. диапазон B1:D13 в нашем примере) и строим обычный плоский график с маркерами на вкладке Вставка — График — График с маркерами (Insert — Chart — Line with markers) :
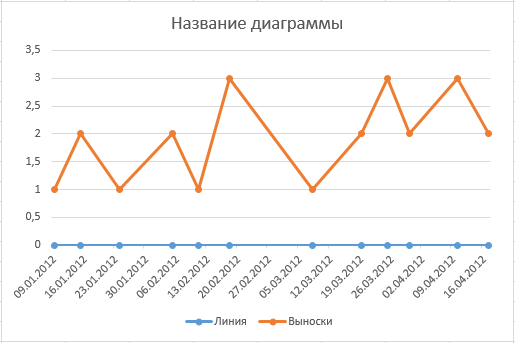
Убираем линии сетки, вертикальную и горизонтальную шкалы и легенду. Сделать это можно вручную (выделение мышью и клавиша Delete) или отключив ненужные элементы на вкладке Макет (Layout) . В итоге должно получиться следующее:
Теперь выделите ряд Выноски (т.е. ломаную оранжевую линию) и на вкладке Макет выберите команду Линии — Линии проекции (Layout — Lines — Projection Lines) :
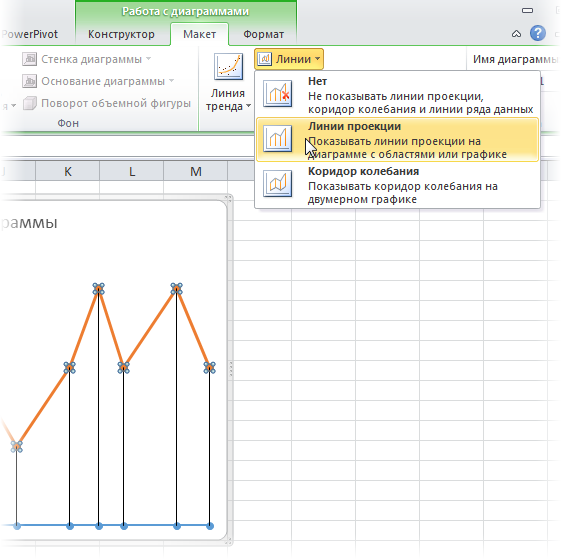
От каждой точки верхнего графика будет опущен перпендикуляр на нижний. В новом Excel 2013 эта опция находится на вкладке Конструктор — Добавить элемент диаграммы (Design — Add Chart Element) .
Шаг 3. Добавляем названия этапов
Эта часть будет простой у тех, кто уже осмелился на установку нового Excel 2013 и более сложной у тех, кто еще работает со старыми версиями.
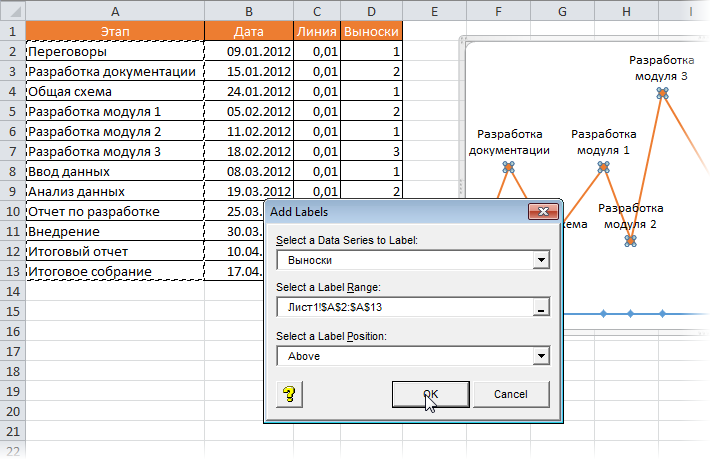
В Excel 2013 все просто. Как я уже писал здесь, он умеет делать подписи к точкам данных просто беря текст из любого заданного пользователем диапазона. Для этого нужно выделить ряд с данными (оранжевый) и на вкладке Конструктор выбрать Добавить элемент диаграммы — Подписи — Дополнительные параметры (Design — Add Chart Element — Data Labels) , а затем в появившейся справа панели установить флажок Значения из ячеек (Values from cells) и выделить диапазон A2:A13:
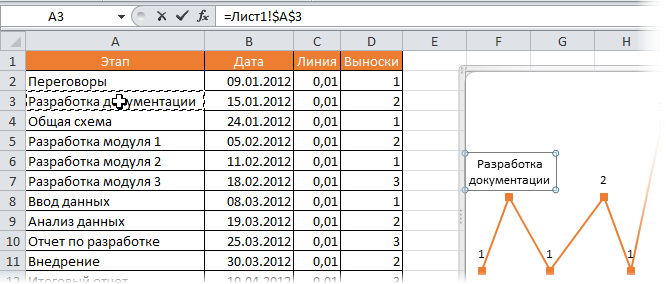
В версиях Excel 2007-2010 и старше такой возможности нет, но у вас есть два альтернативных варианта:
- Добавьте любые подписи к оранжевому графику (значения, например). Затем выделяйте по очереди каждую подпись, ставьте в строке формул знак «равно» и щелкайте по ячейке с названием этапа из столбца А. Текст выделенной подписи будет автоматически браться из выделенной ячейки:
При большом количестве этапов первый вариант, конечно, не радует своей «рукопашностью». Поэтому для оптовой вставки подписей из ячеек можно использовать дополнительные надстройки на VBA. В частности, надстройку XYChartLabeler (автор — Rob Bovey, Excel MVP). Скачиваете надстройку, устанавливаете и получаете на вкладке Надстройки (Add-ins) кнопку XY Chart Labeler — Add Chart Labels. После нажатия на нее появляется диалоговое окно, где и можно задать диапазон с данными для подписей на диаграмме:
Шаг 4. Прячем линии и наводим блеск
Внесем последние правки, чтобы довести нашу уже почти готовую диаграмму до полного и окончательного шедевра:
- Выделяем ряд Выноски (оранжевую линию), щелкаем по ней правой кнопкой мыши и выбираем Формат ряда данных (Format Data Series) . В открывшемся окне убираем заливку и цвет линий. Оранжевый график, фактически, исчезает из диаграммы — остаются только подписи. Что и требуется.
- Добавляем подписи-даты к синей оси времени на вкладке Макет — Подписи данных — Дополнительные параметры подписей данных — Имена категорий (Layout — Data Labels — More options — Category names) . В этом же диалоговом окне подписи можно расположить под графиком и развернуть на 90 градусов, при желании.
Источник
Smartsheet Contributor
Kate Eby
April 26, 2016
Whether you’re a college student, business owner, or busy parent, balancing all your responsibilities can be tricky. Creating a simple weekly schedule makes it easier to stay organized and plan ahead, and using a pre-formatted template makes this even easier. There are many potential uses for a weekly schedule template.
We’ve compiled templates for both Microsoft Excel and Word that are easy to use, customize and print, and they are free to download. These templates are compatible with older versions of Excel and Word, including Excel 2003 and 2007 and can also be saved in PDF format. Some of the templates are formatted like weekly calendars, but if you’re looking for monthly, yearly or other calendars, we have a variety of Excel calendar templates available.
We’ve also included weekly schedule templates in Smartsheet, a real-time work execution platform that makes tracking and planning weekly tasks more collaborative than Excel.
Smartsheet has been recognized as a leader in G2’s 2023 Best Software Awards, ranking #5 for Best Enterprise Products.
Excel Weekly Schedule Template, Sun-Sat with 30-minute Intervals
Download Weekly Schedule Sun-Sat 30-min Intervals Excel Template
Excel | Smartsheet
Plan each hour of your day with this weekly template showing 30-minute intervals. Organize your work day, create a personal planner, schedule family activities, or print the template to use as a simple weekly calendar.
Bi-Weekly Work Schedule Excel Template
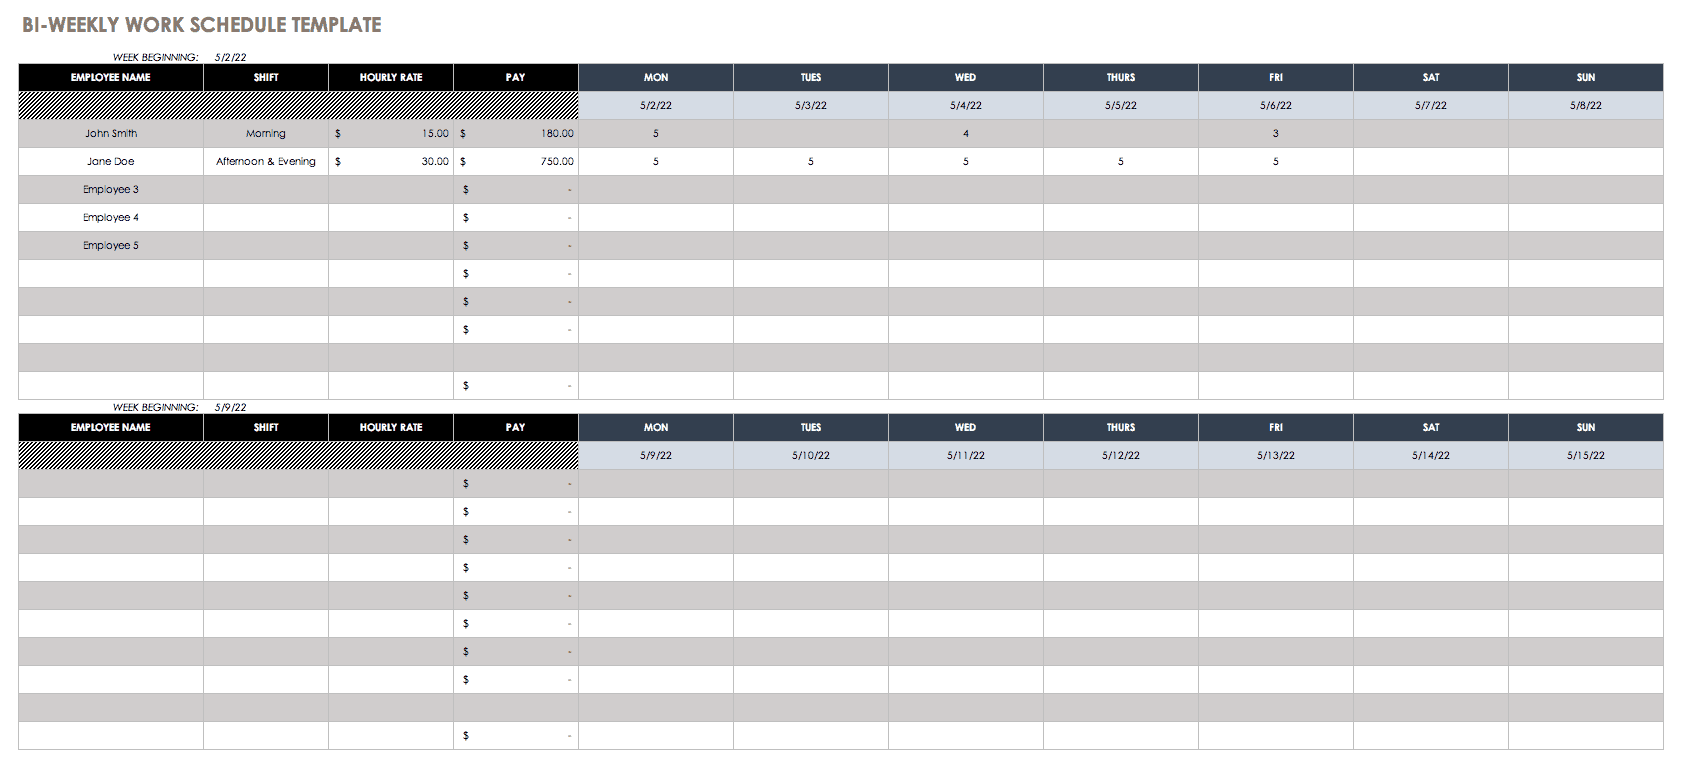
Download Bi-Weekly Work Schedule Template
Excel | Smartsheet
Adjust the date and starting time on this bi-weekly work schedule template to create a custom calendar. Keep track of your own work schedule, or use this template to plan employee shifts.
Excel Weekly Schedule Template, Mon-Sun
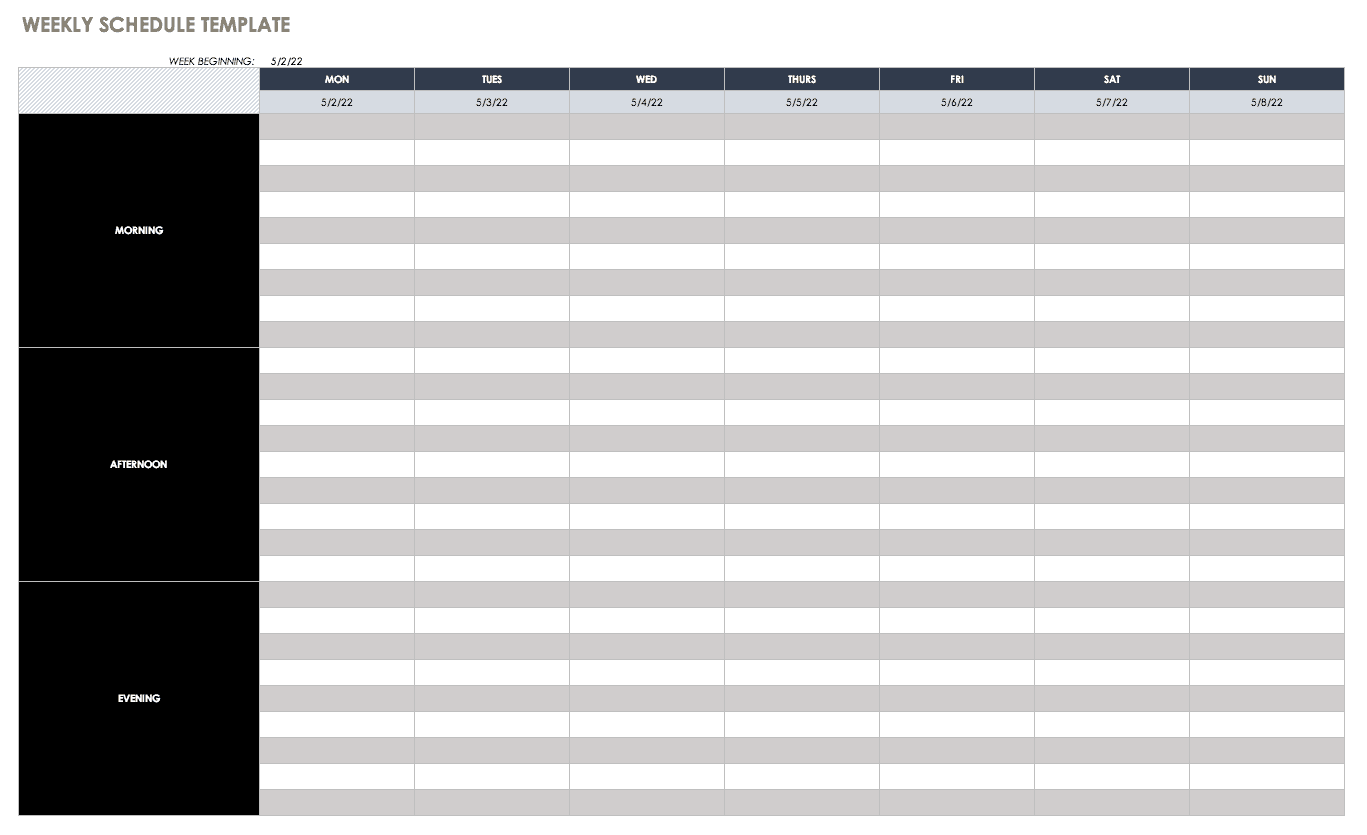
Download Weekly Schedule Excel Template, Mon-Sun
Excel | Smartsheet
This blank weekly schedule template provides morning, afternoon and evening time periods for a full week, starting with Monday. Stay organized with this basic weekly calendar template.
Weekly Task Schedule Template
Download Weekly Task Schedule Excel Template
Excel | Smartsheet
Keep track of your weekly tasks with this free template. Whether you’re scheduling errands, appointments, chores or other tasks, this template shows which items have been completed and which are still pending. Think of this as an Excel version of a weekly to-do list.
Employee Schedule Excel Template
Download Employee Schedule Excel Template
Excel | Smartsheet
In addition to scheduling shifts for employees, this free template allows you to track work hours and labor costs. Create a simple yet functional weekly employee schedule to streamline your business organization.
Weekly Report Excel Template
Download Weekly Report Excel Template
Document progress and concerns for ongoing projects with this weekly report template. Get status updates from employees, create weekly reports for your boss, evaluate activities in process, and get feedback from team members. This simple template can be an important and effective communication tool.
Loan Amortization Schedule Template
Download Loan Amortization Schedule Excel Template
Track payments for a business loan, mortgage or other type of loan with this amortization schedule template. You can see how payments are applied to interest and principal, as well as the remaining balance on the loan.
Bill Payment Schedule Template
Download Bill Payment Schedule Excel Template
This bill payment schedule shows when each bill is due and the monthly total spent on bills. Keep track of where your money is going each month, and make sure your bills get paid on time.
Weekly Planner Template
Download Weekly Planner Excel Template
This weekly planner template makes it easy to see your week at a glance, with room for notes and priority tasks. This is a simple choice if you’re looking for a free, printable planner. Keep track of birthdays and events, create a to-do list, and plan for each day of the week.
Weekly Assignment Schedule Template
Download Weekly Assignment Schedule Excel Template
Stay on top of multiple assignments with this weekly assignment schedule template. The simple layout makes it easy to plan your week or create a weekly project calendar for your team.
Student Schedule Template
Download Student Schedule Excel Template
School days just got a little easier. Students can plan their weekly schedules with this simple template, keeping track of class times, extracurricular activities, a work schedule, or any of the important aspects of a busy student life.
Weekly College Schedule Template
Download Weekly College Schedule Excel Template
If you’re a college student with a busy weekly schedule, use this template to stay organized and keep track of classes, study groups, events and other activities. Organize your college schedule by time, day and priority.
Class Schedule Template
Download Class Schedule Excel Template
All students can benefit from a weekly class schedule template. It’s easy to plan for the week and create a daily routine based on a class schedule. Create time for studying, schedule meal times, and add any other important weekly obligations.
Weekly Homework Schedule Excel Template
Download Weekly Homework Schedule Excel Template
This homework schedule template may not keep you from procrastinating, but it will help you stay organized throughout the week. Track your homework assignments for each class, and record which items have been completed.
Sports Schedule Template
Download Sports Schedule Excel Template
This sports schedule template is a roster and schedule in one. Coaches can easily access contact information for team members, schedule game days, and keep track of league teams.
Weekly Chore Schedule Template
Download Weekly Chore Schedule Excel Template
Assign household chores to family members or housemates for each day of the week. This weekly chore schedule template shows morning and evening chores in a basic format that’s easy to read. Doing chores may not always be fun, but using a template can help ensure they get done.
Weekly Schedule Template for Word
Download Weekly Schedule Template, Sun-Sat for Word (landscape)
Download Weekly Schedule, Sun-Sat for Word Template (portrait)
Download Weekly Schedule, Mon-Sun for Word Template
Download Weekly Schedule, Mon-Sat for Word Template
Weekly Schedule Template, Sun-Sat for Word (landscape): If you need a full 24-hour schedule, this weekly template shows every hour for each day of the week. This template is printable in landscape format and can be easily adjusted to accommodate your schedule.
Weekly Schedule Template, Sun-Sat for Word (portrait): This weekly schedule template also shows a full 24-hour cycle for each day of the week, and is printable in portrait format.
Weekly Schedule Template, Mon-Sun for Word: Plan your days from 8:00 a.m. to 6:00 p.m. with this free weekly schedule template in Word format. This template shows a full week, starting with Monday.
Weekly Schedule Template, Mon-Sat for Word: This blank weekly schedule template offers simplicity and flexibility. Plan your week from Monday to Saturday using whatever time intervals suit your needs.
Weekly Agenda Template for Word
Download Weekly Agenda Word Template
Review project schedules and goals, track ongoing action items, address new agenda items, and plan for future meetings with this weekly agenda template. If you have a recurring weekly meeting, this free template is an easy way to organize your weekly agenda and provide meeting notes to team members.
Improve Weekly Scheduling Efforts with Real-Time Task Management in Smartsheet
The ability to view and access schedules and task lists from anywhere, on any device, is key to balance workloads and ensure no task is missed. That’s why it’s essential to find a tool that makes it easy to view, track, and manage the details of your schedules, to-do lists, and agendas no matter if you’re in the office or on the go.
Smartsheet is an enterprise work execution platform that is fundamentally changing the way businesses and teams work. Over 74,000 brands and millions of information workers trust Smartsheet to help them accelerate business execution and address the volume and velocity of today’s collaborative work.
The familiar Smartsheet interface that is designed for how people actually work leads to rapid and broad adoption across your organization. Use Smartsheet to gain real-time visibility into task lists and schedules, and then access and manage them from anywhere, at any time. Share schedules with internal and external team members, to improve collaboration and ensure that deadlines are met.
Try Smartsheet and discover how you can maximize your task management efforts, today.
Additional Resources
168
168 people found this article helpful
Plan days, weeks, or months in a worksheet
Updated on August 30, 2022
What to Know
- Easiest: Download a pre-made template from Microsoft Excel.
- Create template: Select A1:E2 > Merge & Center > type WEEKLY SCHEDULE > select Middle Align.
- Add borders and headings. In A3, type TIME. In A4 and A5, enter time > fill cells > add days > save template.
This article explains how to create a schedule in Microsoft Excel, either by using a pre-made template or creating one from scratch. Instructions apply to Excel 2019, Excel 2016, Excel for Microsoft 365, and Excel 2013.
How to Create a Schedule in Excel
Microsoft Excel provides templates for a weekly chore schedule, a student schedule, a daily work schedule, and many more. You can download the one you want and customize it with your own data, or you can learn how to create a schedule from scratch.
Follow these steps to create a seven-day schedule with hourly blocks for a single user.
-
Start Excel and open a new, blank workbook.
-
Select the cell range A1:E2, then select Merge & Center in the Alignment group of the Home tab.
-
Type «WEEKLY SCHEDULE« into A1:E2, change the font size to 18, and select Middle Align in the Alignment group.
-
Select cells F1:H2, select the Borders drop-down in the Font group of the Home tab, then select All Borders.
-
Enter «Daily Start Time« into F1; «Time Interval» into G1; and «Starting Date» into H1. Choose the Select All icon (between 1 and A on the worksheet), then double-click the line separating any two columns to resize all cells to fit the contents.
-
Select cell A3 and enter «TIME.»
-
Select cell A4 and enter the time you want your schedule to begin. To follow this example, enter «7:00.»
-
In cell A5, enter the next interval you want to list in the schedule. To follow this example, enter «7:30.» Select A4:A5 and drag the fill handle down to fill the time increments for the rest of the day.
If you want to change the time format, select the column, right-click, then select Format Cells. Select Time in the Category list of the Number tab and choose the time format you wish to use.
-
In cell B3, enter the day of the week with which you want your schedule to begin. To follow this example, enter «SUNDAY.»
-
Drag the fill handle to the right to automatically fill the remaining days of the week on the schedule.
-
Select Row 3. Make the font Bold and change the font size to 14.
-
Change the font size of the times in Column A to 12.
If necessary, select the Select All icon (between 1 and A on the worksheet) and double-click the line separating any two columns to resize all cells to fit the contents once more.
-
Select the Select All icon or press Ctrl+A and select Center in the Alignment group of the Home tab.
-
Select cells A1:H2. Select the Fill Color drop-down from the Font group of the Home tab and choose a fill color for the selected cells.
-
Choose a unique fill color for each of the following cells or ranges:
- A3
- B3:H3
- A4:A28 (or the range of cells containing times on your worksheet)
- B4:H28 (or the range of cells making up the remainder of your schedule)
Skip this step if you prefer a black and white schedule.
-
Select the body of the schedule. Select the Borders drop-down in the Font group and select All Borders.
-
Save the schedule.
Save the Schedule as a Template
Saving the schedule as a template allows you to reuse it without making a new one each time or clearing the contents of your existing schedule.
-
Select File > Export > Change File Type.
-
Select Template > Save As. The Save As dialog box will open.
-
Open the Custom Office Templates folder.
-
Enter a name for the template and select Save.
-
To use the template in the future, select the Personal tab on the New screen and select the schedule template. It will open as a new workbook.
FAQ
-
How do I export a Revit schedule into Excel?
In Revit, select File > Export > Reports > Schedule, then choose a save location and select Save. Choose appearance export options and how exported data will display, then select OK. In Excel, select Data > Get & Transform Data > From Text/CSV. Then choose the exported Revit schedule and select Import.
-
How can I make a amortization schedule in Excel?
First, create a new spreadsheet or open an existing one and enter the necessary loan, interest, and payment data. In cell B4 (assuming the other relevant information is in the B columns above it), use the equation =ROUND(PMT($B$2/12,$B$3,-$B$1,0), 2). This will automatically calculate your monthly payments.
-
How do I change the date format in my Excel schedule?
Right-click the cell you want to change and select Format Cells. From there, select the Number tab, select Date under Category, choose the date format you want to use, then confirm with OK.
-
How do I export an Excel schedule on a single page?
Select Page Layout > Dialog Box Launcher > Page tab, then select Fit under Scaling. Choose one page wide by one page tall, then confirm with OK. After that, export the schedule like you would with other Excel spreadsheets.
-
How do I merge an Excel schedule into my Google Calendar?
Either export or save the Excel schedule as either a CSV or ICS so it will be compatible with Google Calendar. In the calendar, select Settings > Import & Export > choose a compatible file to import. Next, choose which calendar to import the file to, and confirm by selecting Import.
Thanks for letting us know!
Get the Latest Tech News Delivered Every Day
Subscribe
We have a number of schedule templates and calendars that you can download and edit using Microsoft Excel or OpenOffice. A spreadsheet is a great tool for creating a daily schedule or weekly schedule. It’s not too difficult to create your own schedule from scratch, but like most people, you probably value your time and money, so hopefully our free schedule templates will be just what you need.
Advertisement
Schedule Templates
Class Schedule
This class schedule is essential for any college student. Use it to help you plan your weekly class schedule for a new semester to ensure that you don’t accidentally overlap your work, classes, training times, etc.
Work Schedule
This work schedule template is designed to let you print two weeks at a time. Easily modify the template for night shifts or other shifts. Includes mini monthly calendars for convenience in planning.
Lesson Schedule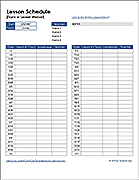
Create a yearly lesson schedule for a class with multiple teachers.
Weekly Reward Chart
Download a weekly reward chart for tracking progress on chores, practice, or other tasks.
Weekly Schedule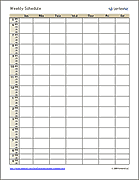
This weekly schedule is a generic version of the class schedule template listed above, but not as complicated as the weekly calendar.
Shift Schedules
Shift Schedule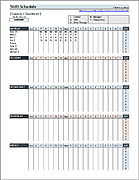
This shift schedule template is great for job scheduling, shift scheduling, etc.
Shift Calendar
Create a yearly shift calendar for rotating 24-hour shifts. Designed specifically for firefighters.
Employee Schedule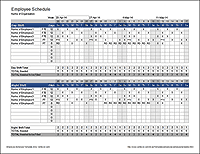
Create a shift schedule for any number of employees. Simple design for easy customization. Set up for a day and night shift.
Meal Planner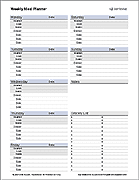
These meal planners are great for creating and printing weekly or monthly meal plans. Customize your own list of meals to populate the drop down lists in the planners.
Daily Planner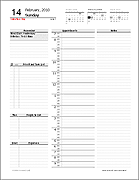
A printable daily schedule template that lets you create your own daily planner using standard letter-size paper that can be included in your 3-ring binder.
Weekly Planner
A printable weekly planner page for people who don’t need the detail of the daily planner.
Monthly Planner
A printable monthly planner page with notes, to-do list, and goals section (not just a calendar).
Yearly Planner Calendar
This planning calendar can be used to print a 2-page, 12-month calendar with space below each day to write brief notes.
Family Planner
A printable weekly family planner template for appointments and meals with lists for to dos, chores, and shopping.
Homework Planner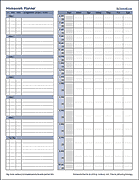
Get organized. List your assignments and plan your week to get your homework done.
Weekly Student Planner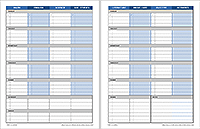
Keep up with your assignments and other activities using this 2-page student planner with columns for each subject and rows for each week day.
Appointment Book
Print a full year of weekly appointment calendar pages (double-sided) that you can assemble into a book or 3-ring binder.
Bullet Journal Pages
Use this template to update calendars and dates then print bullet journal pages in a variety of formats.
What is the Timeline in Excel?
Timeline in Excel is a kind of SmartArt created to display the different timings of a particular process. It is mainly used for filtering the underlying datasets by date. Such datasets are in the form of pivot tables containing the date field.
The timeline was first introduced in the 2013 version of Excel.
Table of contents
- What is the Timeline in Excel?
- How to Create Timelines in Excel? (With Example)
- Step #1 – Create table object
- Step #2 – Create a pivot table
- Step #3 – Create a pivot chart
- Step #4 – Insert a timeline in Excel
- How Does the Timeline Filter the Pivot Table?
- Top Timeline Tools in Excel
- #1 – Timeline slicer
- #2 – Scroll bar
- #3 – Time level
- #4 – Filter
- #5 – Timeline header
- #6 – Selection label
- #7 – Timeline window size
- #8 – Timeline caption
- #9 – Timeline style
- Frequently Asked Questions
- Recommended Articles
- How to Create Timelines in Excel? (With Example)
How to Create Timelines in Excel? (With Example)
You can download this Timeline Excel Template here – Timeline Excel Template
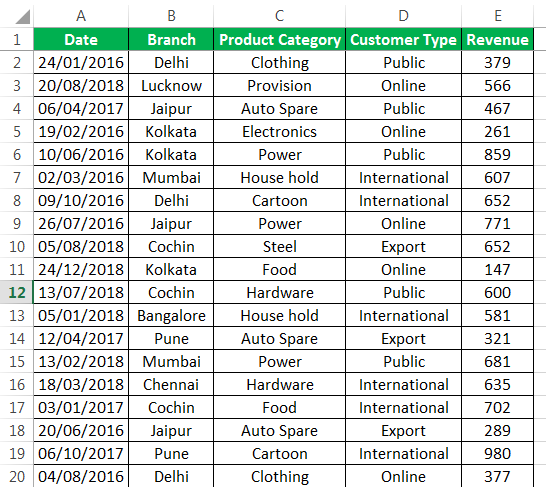
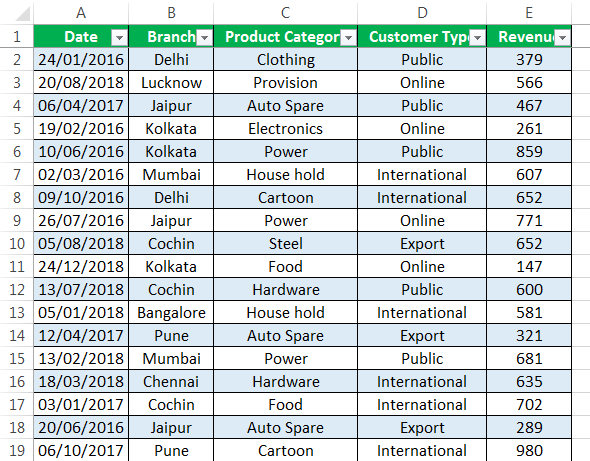
In the following table, there are five columns, namely–Date, Branch, Product Category, Customer Type, and RevenueRevenue is the amount of money that a business can earn in its normal course of business by selling its goods and services. In the case of the federal government, it refers to the total amount of income generated from taxes, which remains unfiltered from any deductions.read more.
With the help of a pivot table A Pivot Table is an Excel tool that allows you to extract data in a preferred format (dashboard/reports) from large data sets contained within a worksheet. It can summarize, sort, group, and reorganize data, as well as execute other complex calculations on it.read moreand a pivot chart, let us create a timeline in Excel. The pivot table and pivot chartIn Excel, a pivot chart is a built-in feature that allows you to summarize selected rows and columns of data in a spreadsheet. It is a visual representation of a pivot table that helps in the summarization and analysis of datasets, patterns, and trends.read more help summarize and analyze data.
Step #1 – Create table object
Initially, let us convert the data set into a table object with the help of the following steps:
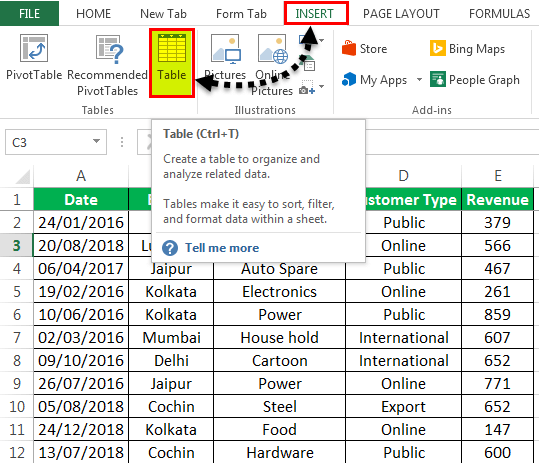
- Click inside the data set, go to the Insert tab, and select “table”.

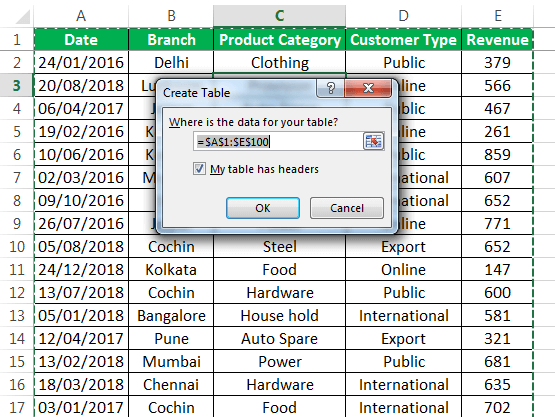
- The “create table” popup appears which displays the data range and a checkbox for table headers. Click “Ok.”

- Once the table object is created, the data appears in a tabulated form, as shown in the succeeding image.

Step #2 – Create a pivot table
Since we want to summarize the revenue data across different categories of the timeline, we create a pivot table.
The steps to create a pivot table are listed as follows:
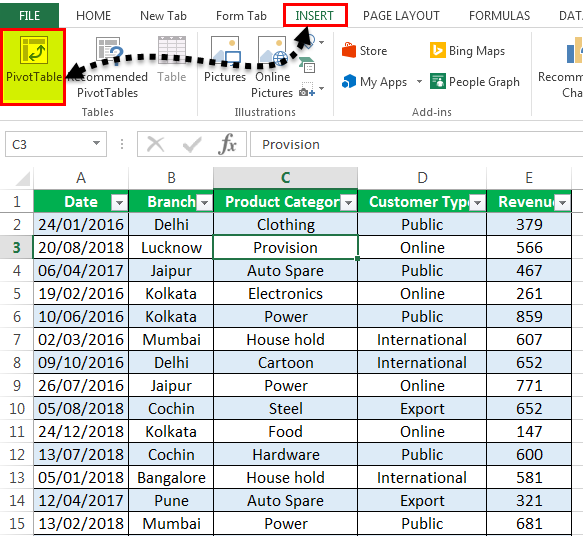
- Click on the data set within the table.
- Go to the Insert tab, select “PivotTable,” and click “Ok.”
- The “PivotTable Fields” pane appears in another sheet. Name this sheet as “PivotTable_Timeline.”
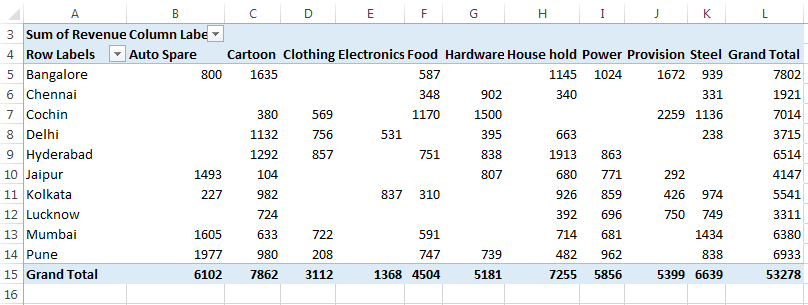
- In the “PivotTable Fields” pane, drag “branch” to the “rows” section, “product category” to the “columns” section, and “revenue” to the “values” section.
Step #3 – Create a pivot chart
We need to base a pivot chart on the pivot table that we have created. The steps to create a pivot chart are stated as follows:
- Copy the previous sheet as “PivotChart_Timeline” or create another sheet with this name.
- Click inside the pivot table on the sheet “PivotChart_Timeline.”
- In the Home tab, go to “Analyze” and select “PivotChart.”
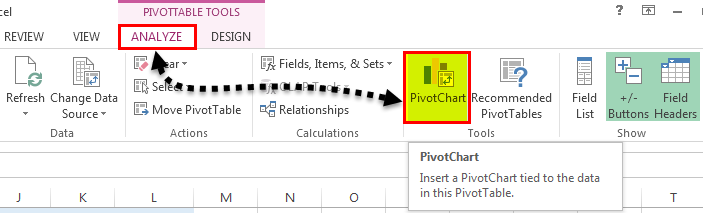
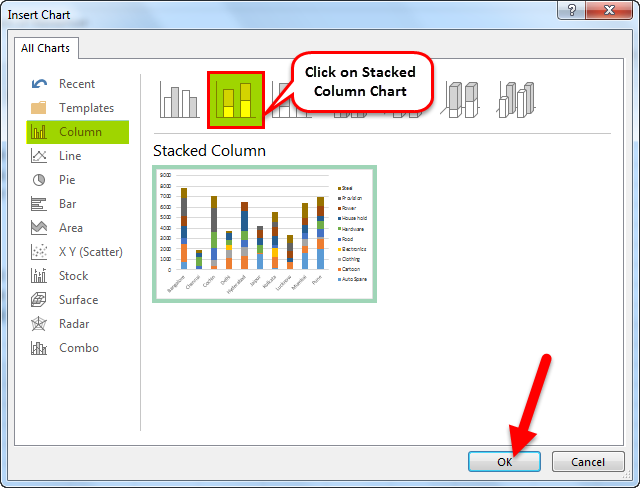
- The “insert chart” popup window appears.
- Select “stacked column chart” and click “Ok.”
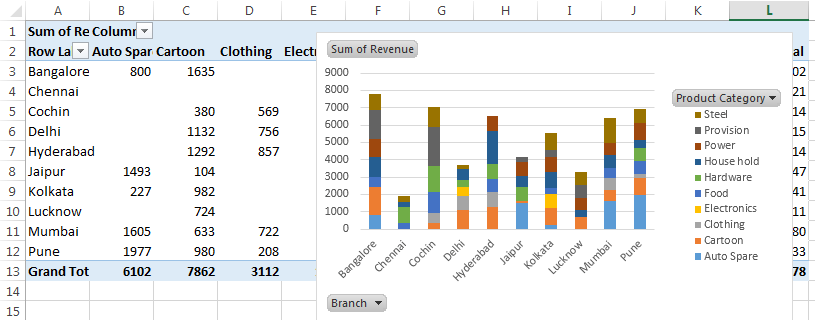
- The pivot chart appears as shown in the following image.
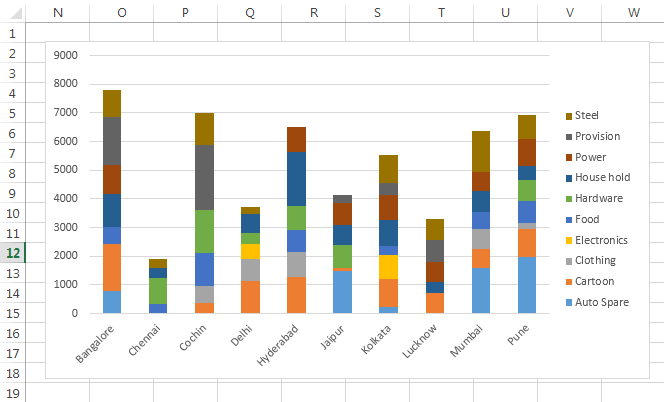
- In the pivot chart, you can hide the “product category,” “branch,” and “sum of revenue.” To do this, right-click and select “hide legend field buttons on chart,” as shown in the succeeding screenshot.

- The pivot chart appears without the legend buttons, as shown in the following image.
Step #4 – Insert a timeline in Excel
The steps to insert a timeline are mentioned as follows:
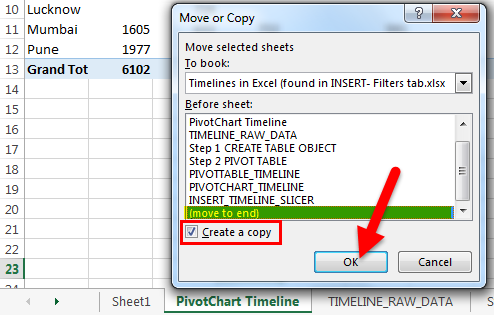
- Copy the “PivotChart_Timeline” to other sheets with the “create a copy” option. The popup window shown in the succeeding image appears.
- Right-click on the sheet name “PivotChart_Timeline” and name the sheet as “Insert_Timeline.”
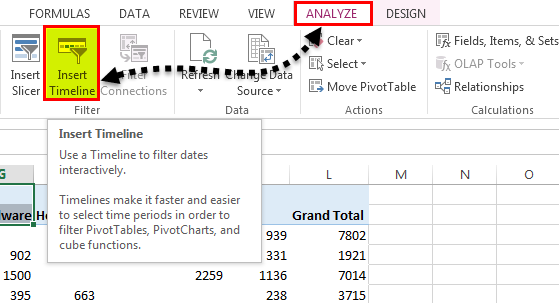
- Click anywhere on the data set of the pivot table. Select the Analyze tab on the Excel ribbonThe ribbon is an element of the UI (User Interface) which is seen as a strip that consists of buttons or tabs; it is available at the top of the excel sheet. This option was first introduced in the Microsoft Excel 2007.read more and click on the “Insert Timeline” button in the Filter group.
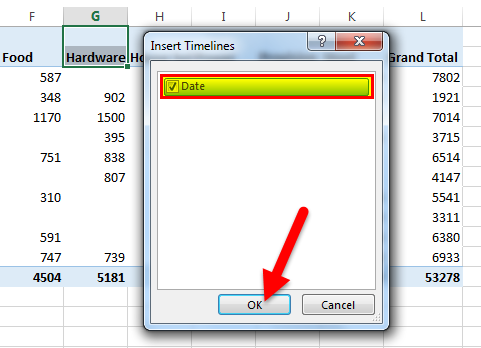
- The “insert timelines” pop-up window appears. It shows a checkbox with the date field. This is the filter of the timeline. Select the checkbox and click “Ok.”
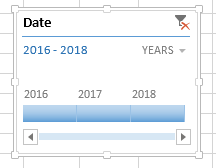
- Now, the timeline appears.
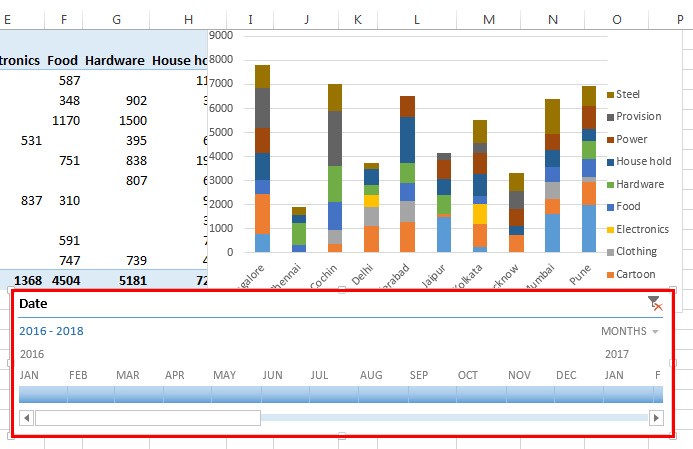
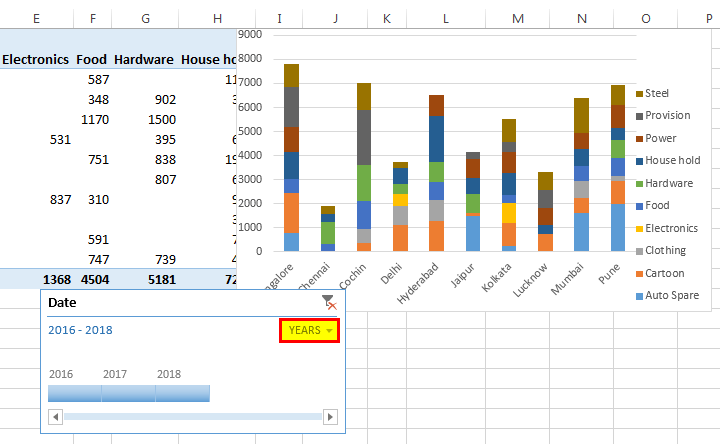
- For the timeline, you can configure or select group dates by years, quarters, months or days with the help of the drop-down list.
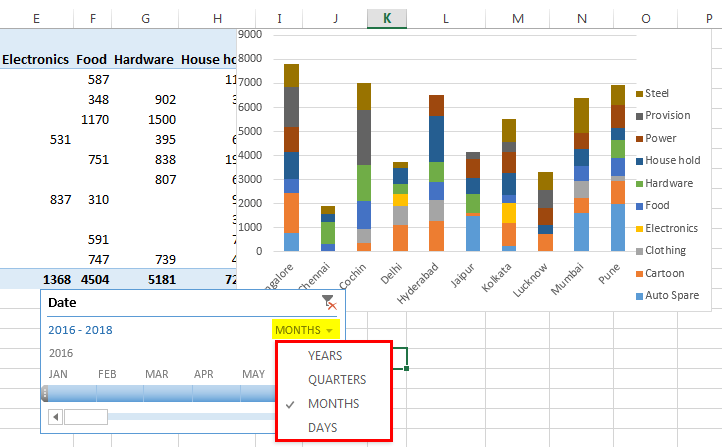
- We have selected “years” as shown in the following image.
How Does the Timeline Filter the Pivot Table?
Let us consider the previous example again.
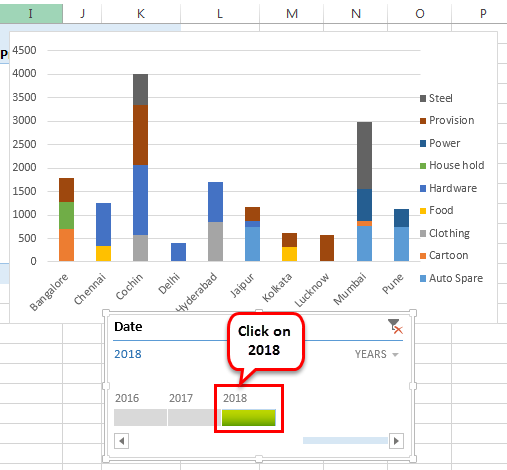
We want the timeline to filter the pivot table with results of the year 2018. To do this, click on “2018” in the timeline slicer.
The revenue for the year 2018 with reference to the branch and product category appears.
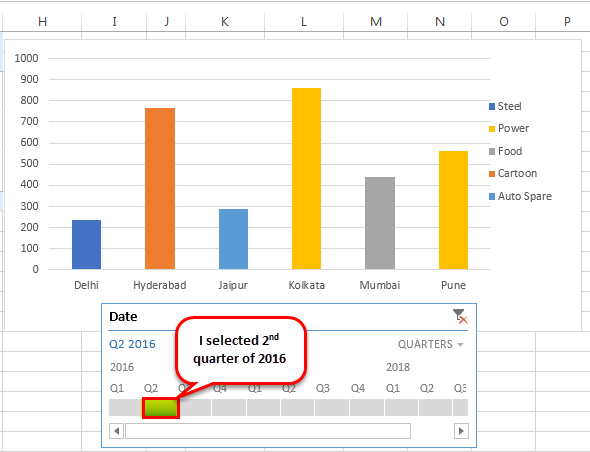
Now, let us select “quarters” from the dropdown list. If quarterly data in the timeline is not visible, drag the blue-colored box towards the end.
Let us select the 2nd quarter of 2016 to observe revenue across the different branches and product categories.
Top Timeline Tools in Excel
Timelines in Excel help filter the dates of the pivot tables. This is done with the help of various tools that assist in the working of the timeline.
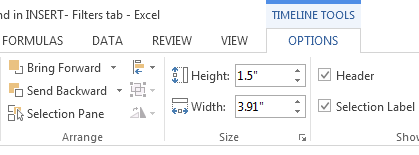
The timeline tools appear to the right and the left of the Options tab, as shown in the following two images.
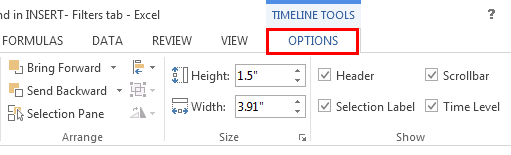

The major timeline tools are listed as follows:
#1 – Timeline slicer
The timeline slicer allows toggling between years, quarters, months, and days. In the dashboard, there is an option of combining the timeline with the slicer.
In comparison to the normal date filter, the timeline slicer is a more effective visual tool. This is because the latter provides a graphical representation that helps track critical milestones.

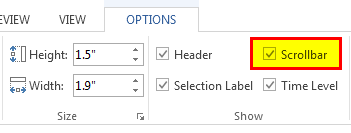
#2 – Scroll bar
It appears in the Options tab and helps select periods. It also allows scrolling through the years, quarters, months, and days.
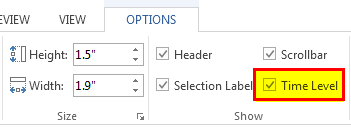
#3 – Time level
This tool allows selecting from four different time levels based on choice. The four-time levels are, namely–years, quarters, months, and days.

#4 – Filter
This button helps clear all the “time” options like years, quarters, months or days.
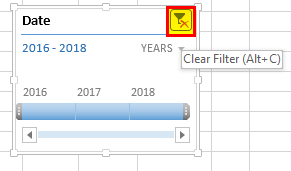
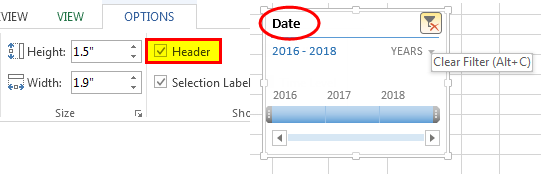
It displays the heading or the title of the timeline, as shown in the following image.
#6 – Selection label
It displays the date rangeTo create a data range in Excel, click anywhere in the table and then go to table tools>design on the ribbon>convert to range. To do so, right-click the table and select table>convert to range.read more that is included in the filter.

#7 – Timeline window size
The height and width of the PivotTable timeline can be adjusted according to the requirement. It is also possible to resize the timeline window by dragging it from its borders.

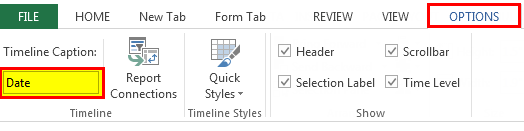
#8 – Timeline caption
By default, the caption box shows the column name as the caption. This is the column that was selected while inserting the timeline.
#9 – Timeline style
There are various style options in Excel for the PivotTable timeline. The following screenshot shows 12 types of theme styles.
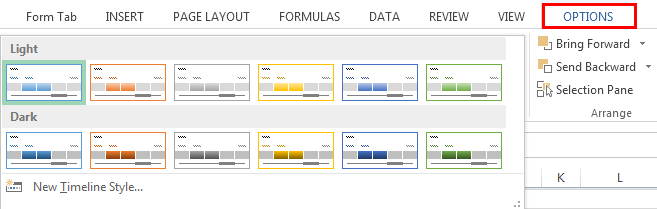
The style of the timeline can also be customized according to choice.
Frequently Asked Questions
#1 – What are slicer and timeline in Excel?
A slicer is an object that allows quick filtering of data. The slicer shows all the possible values of the column that are selected by the user. Each value appears as a button that can be used for toggling.
The slicer also displays the current filtering state, which lets the user know the exact values that are being displayed currently. A slicer can be used with a table and a pivot table.
A timeline allows the filtering of data specifically with date fields. The user can filter data by years, quarters, months, and days. The dates are displayed horizontally, beginning from the oldest to the newest, as one moves from left to right on a timeline.
A timeline can only be used with a pivot table having date fields.
#2 – How to use a timeline in Excel?
The timeline can be used with the help of the following features:
1) Timeline period–The timeline can use either a single period or multiple adjacent periods. To select a period, click on the first period and drag the cursor to the last period. Release the click to see the selected date range.
2) Date grouping–The “time level” feature allows grouping of dates in data. The dates can be grouped into years, quarters, months, and days.
3) Timeline handle or scroll bar–The scroll bar can be used to either increase or decrease the selected range of dates. This is done by dragging the scroll bar to the left or the right of the timeline range.
4) Timeline filters–Filters can be used to reset the timeline. For this, either select the filter icon or press Alt+C on the keyboard (with the timeline selected).
#3 – How to present a timeline in Excel?
The steps to present a timeline in Excel are listed as follows:
– Adjust the height and width of the timeline as per the requirement. To do this, select the timeline and go to “timeline tools,” click “options,” and select “size.”
– Enter an appropriate caption name in the “timeline caption” button.
Apply a theme to the timeline from the various “timeline styles” available.
– Link the timeline with more than one pivot table, in case of multiple PivotTables. To do this, select the timeline, right-click and select “report connections.” In the popup window, the pivot tables to be linked can be selected.
- A timeline in excel is a kind of SmartArt that displays the different timings of a particular process.
- The timeline was first introduced in Excel 2013.
- The pivot table and the pivot chart help summarize and analyze data.
- The user can select dates by years, quarters, months, or days with the help of the drop-down list of the timeline in excel.
- The timeline excel tools like scroll bar, time level, filter, selection label, window size, etc., appear on the right and the left side of the Options tab.
- The timeline slicer allows toggling between years, quarters, months, and days.
- Since the timeline slicer helps track milestones, it is a more effective visual tool than the normal date filter.
Recommended Articles
This has been a guide to Timeline in Excel. Here we discuss how to use timeline tools in Excel to create a Timeline in Excel along with practical examples and a downloadable Excel template. You may learn more about Excel from the following articles –
- Add a Border in ExcelIn Excel, a border is used to separate data tables or a specific range of cells from the rest of the text. As a result, it makes it easier to find specific information quickread more
- Add Filter in ExcelThe filter in excel helps display relevant data by eliminating the irrelevant entries temporarily from the view. The data is filtered as per the given criteria. The purpose of filtering is to focus on the crucial areas of a dataset. For example, the city-wise sales data of an organization can be filtered by the location. Hence, the user can view the sales of selected cities at a given time.
read more - Editing Drop-Down List in ExcelDropdowns in Excel assist a user in manually entering data in a cell with some specific values to choose from.read more
- VLOOKUP FalseIn excel we use the VLOOKUP false function to look for an exact match. In the vlookup function, we can use «1» as the criteria for TRUE and use «0» as the criteria for FALSE. The need for using TRUE may not arise so always stick to FALSE as the criteria for [Range Lookup].read more