
Home / Excel Basics / How to Insert a Timestamp in Excel [Formula + VBA + Shortcut]
A few years back when I was working for a tech company I was one of those people who were an Excel help point for all. And that’s the real reason I’m fascinated to learn more. One day the lady who was working as a reception coordinator came to me and asked:
Puneet, I’m managing a list of tasks and I want to add date and time in the corresponding cell on completion of each task. Which is the best way?
And quickly I realized that she was talking about a timestamp. I’m sure you also use it while working in Excel. In general, it contains the current date and time, and we use it to capture the completion time of a task. Now the thing is: Which is the best way to insert a timestamp in Excel?
In this post, you’ll learn how to create a timestamp in Excel using 5 different ways and we will try to figure out which is the best out of all. So let’s get started.
1. Using a Keyboard Shortcut to Insert a Timestamp
There are two different shortcuts to insert a date and a time. And, here we need to use both of them subsequently. Here are the steps:
- First of all, select the cell where you need to insert a timestamp.
- After that, use the shortcut key Control + : (Press and hold control and then press colon). Once you press this, it will insert the current date (according to your system) in the cell.
- At this time, your cell is in edit mode.
- Now, press Control + Shift + : (Press and hold the control and shift key and then press the colon).
- Your cell is still in edit mode, now press the enter key to complete the entry.
In short, you need to press two shortcuts in sequence to insert this. And, if you want to add only one thing of date and time, just skip the shortcut key.
| PROs | Cons |
|---|---|
| If you want to save time and have fewer cells, this method is perfect. | This is not a dynamic method, you have a static timestamp. And if you want to update the time stamp you need to enter it again. |
| When you enter both the date and time, Excel automatically picks the right format to display it. | You need to press two different shortcut keys to enter it. |
2. Insert a Timestamp with NOW Function
A simple dynamic method. If you want to use a formula to insert a timestamp, the perfect way is to use the NOW function. When you enter this function in a cell it returns the current date and time according to your system’s settings.
The default format of date and time return by NOW is mm/dd/yyyy hh:mm. But for some reason, if you want a custom format, you change its format using the custom format option. Select the cell ➜ Press shortcut key control + 1 ➜ Select “Custom” ➜ Enter “mm/dd/yyyy hh:mm” in the input box ➜ Click OK.

And if you want to enter the only date then you can use TODAY instead of NOW, it only returns the current date according to the system’s settings.

Pros
- It’s a dynamic method.
- You can use both of the functions with an IF function to create a condition to enter a timestamp if another cell has a value.
Cons
- Even though it’s a dynamic method but as both of the functions are volatile they will get updated whenever you make changes to your worksheet.
- And if you just want values instead of formulas you need to convert them into values manually.
3. Using Circular Reference for Creating a Timestamp
If you want to get into an advanced method and don’t want to use methods #1 and #2 then you can use a circular reference to insert a timestamp.
But before you learn this method let’s understand what circular reference is all about. Let’s say you have a value of 5 in cell A1 and a value of 10 in cell B1. Now if you enter a formula =A1+B1+C1 in cell C1, it will return a message circular reference error.

This is because you are using cell C1 as a reference in cell C1. When a circular reference error happens, there is a non-ending loop in the cell. Reference the cell A3 is dependent on the value of cell A3 and the value of A3 is dependent on reference to cell A3.

But when a circular reference is entered, Excel doesn’t calculate it and the non-ending loop never starts.
Here’s the deal:
You can enable the “iterative calculation option” to force Excel to perform the calculation at least one time and use the now function in the calculation. This way Excel will update the cell formula only one time instead of every time. Steps to enable iterative calculation option:
- Go to File ➜ Options.
- In the Excel options, select Formulas.
- In the Calculated options, check the Enable iterative calculation option.
- Click OK.

After that in cell B2, enter the below formula in the formula bar.
=IF(A2<>"",IF(B2<>"",B2,NOW()),"")
Now when you enter any value in cell A2 the formula in cell B2 will return a timestamp.

If you are a VBA freak then I’m sure you’ll find this VBA code useful. With this, you don’t need to enter a formula or even not use any shortcut key. Just select the cell where you need to enter a timestamp and run the macro.
Sub timeStamp()

Dim ts As Date

With Selection

.Value = Now
.NumberFormat = "m/d/yyyy h:mm:ss AM/PM"

End With

End Sub
How to use this code
To use this code you can add it on QAT (quick access toolbar) and run it every time whenever you need to add a timestamp.
Here are the steps:
Now you have an icon on QAT and whenever you need a timestamp you can select the cell and click this button to insert it.
4.1 Using UDF for Timestamp
Yes, you can also create a custom Excel function for inserting a timestamp in Excel. Below is the code for this UDF.
Function Timestamp(Reference As Range)
If Reference.Value <> "" Then
Timestamp = Format(Now, "dd-mm-yyyy hh:mm:ss")
Else
Timestamp = ""
End If
End Function
By using this user-defined function you can get a timestamp in a cell if another has a value in it. Please follow the below steps:
- Go to Developer tab and open VBA editor.
- In VBA editor, insert a new module and paste this code into it.
- Now, close VBA editor and come back to your worksheet.
- In the cell B2, enter below formula.

- Now, when you enter any value in cell A1, cell B1 will get a timestamp.

Conclusion
Adding a timestamp is something we often do while working in Excel. And, you have 5 different methods to insert it. If you ask me I love to use the VBA button on QAT for this. The best way is to add this code in a personal.xlsb so that you can use it in all the workbooks. This is the whole story about timestamps and I’m sure you found it useful but now tell me one thing.
Do you know any other method for this?
Please share with me in the comment section, I’d love to hear from you, and please don’t forget to share this tip with your friends.
If you want to sharpen your existing Excel Skills, check out these Excel Tips and Tricks.
I am using DateTime.Now in my Excel Macro to show the current timestamp.
It shows timestamp in «dd-MM-yyyy hh:mm:ss» format.
Instead, how can I get the timestamp in «yyyy-MM-dd hh:mm:ss» format?
![]()
asked Mar 28, 2011 at 9:32
![]()
Parth BhattParth Bhatt
19.3k28 gold badges133 silver badges216 bronze badges
Try with: format(now(), "yyyy-MM-dd hh:mm:ss")
answered Mar 28, 2011 at 9:37
![]()
Mohamed SalighMohamed Saligh
11.9k19 gold badges65 silver badges84 bronze badges
0
DateTime.Now returns a value of data type Date. Date variables display dates according to the short date format and time format set on your computer.
They may be formatted as a string for display in any valid date format by the Format function as mentioned in aother answers
Format(DateTime.Now, "yyyy-MM-dd hh:mm:ss")
answered Mar 28, 2011 at 9:49
![]()
chris neilsenchris neilsen
52.2k10 gold badges84 silver badges122 bronze badges
0
Format(Now(), "yyyy-MM-dd hh:mm:ss")
answered Mar 28, 2011 at 9:39
![]()
Mitch WheatMitch Wheat
294k43 gold badges465 silver badges540 bronze badges
If some users of the code have different language settings format might not work. Thus I use the following code that gives the time stamp in format «yyymmdd hhMMss» regardless of language.
Function TimeStamp()
Dim iNow
Dim d(1 To 6)
Dim i As Integer


iNow = Now
d(1) = Year(iNow)
d(2) = Month(iNow)
d(3) = Day(iNow)
d(4) = Hour(iNow)
d(5) = Minute(iNow)
d(6) = Second(iNow)

For i = 1 To 6
    If d(i) < 10 Then TimeStamp = TimeStamp & "0"
    TimeStamp = TimeStamp & d(i)
    If i = 3 Then TimeStamp = TimeStamp & " "
Next i

End Function
answered Sep 23, 2015 at 7:19
![]()
this worked best for me:
        Cells(partcount + 5, "N").Value = Date + Time
        Cells(partcount + 5, "N").NumberFormat = "mm/dd/yy hh:mm:ss AM/PM"
answered May 6, 2016 at 12:39
![]()
Copy and paste this format yyyy-mm-dd hh:MM:ss in format cells by clicking customs category under Type
answered Nov 14, 2013 at 16:17
![]()
RafiqRafiq
191 bronze badge
Timestamp in saving workbook path, the «:» needs to be changed. I used «:» -> «.» which implies that I need to add the extension back «xlsx«.
wb(x).SaveAs ThisWorkbook.Path & "" & unique(x) & " - " & Format(Now(), "mm-dd-yy, hh.mm.ss") & ".xlsx"
answered Oct 27, 2018 at 12:14
![]()
WizhiWizhi
6,3684 gold badges24 silver badges47 bronze badges
It can work as easy as this, choose the location you want, in this case I choose D3
Sheets("Put your Sheet's name here").Range("D3") = Now
Example, my sheet is called Sources
Sheets("Sources").Range("D3") = Now
![]()
pushkin
9,30515 gold badges54 silver badges93 bronze badges
answered Sep 28, 2018 at 15:39
![]()
Use the Format function.
Format(Date, "yyyy-mm-dd hh:MM:ss")
answered Mar 28, 2011 at 9:38
![]()
Arnoud KooiArnoud Kooi
1,5584 gold badges17 silver badges25 bronze badges
1
Do you ever need to put a timestamp in an Excel spreadsheet? Maybe you are tracking time for billing purposes or maybe you just want to keep track of what happens when. If so, this post is for you! In the following steps, I will show how to create a timestamp with VBA code.
Create A Timestamp Using Excel Formulas.
There are other ways that you could accomplish creating timestamps in Excel. One of the most frequent questions and one of my most popular and visited blog posts is Create A Timestamp In Excel with Formulas.
The formula solution, whilst very useful does not suit everyone and has some restrictions in itself. If you are brave enough to take on a small bit of VBA code, we can create and event handler macro which is a good alternative solution to using the formula method which I find is slightly more robust and flexible.
This was a an alternative solution for a subscriber rather than the formula date and time stamp method. He wanted the timestamp to update if he decided to overwrite the contents of the target cells again and again. This I believe gives that solution.
There is no need to insert a module in, or use a module in this piece of code, it is written directly to the worksheet you want the timestamp to appear on. That makes sense right?
So, here is a step by guide to inserting a timestamp into Excel with VBA. You can download a sample workbook here to work through this example.
We are assuming that the date time stamp will be entered into Column B when an entry is made into Column A.
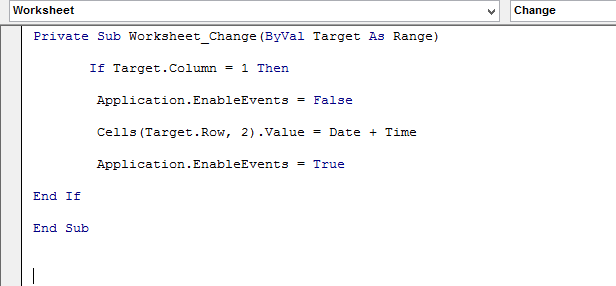
- Open up your Excel worksheet and hit ALT +F11 to open the Visual Basic Editor. ( if you need to enable the Developer Tab you can find out more here)
- Double Click on the Excel worksheet where your timestamp is to appear- in this example it is Sheet 1.
- In the left hand drop down box select Worksheet and in the right select Change. (This will create a macro that runs when the worksheet changes), and the Value Target As Range means any cell we choose to apply this to.

- We want to then type the following code underneath the First Line that Excel generated for us.
If Target.Column = 1 Then
Application.EnableEvents = False
Cells(Target.Row, 2).Value = Date + Time
Application.EnableEvents = True
End If
Walk Through Of Excel Timestamp Code.
Let’s talk through the code. It is an If Then Statement with the following meaning.
If The Target Column 1 changes Then we want the cells in the Target Row in the Second Column to change to the value of Date and Time. Easy huh?. Now we have a couple of extra lines of code in there, the Application.EnableEvents. By adding these in we ensure that the macro does not run on and on, by turning off the macro then turning it on as required.
This solution allow overwriting of previous entries, and will update with the latest date time stamp. So if you find the Formula way of inserting a timestamp into an Excel worksheet then these few little lines of code may just be your solution.
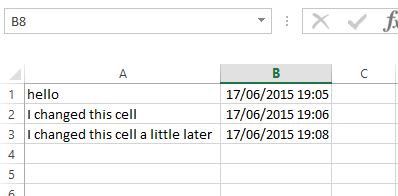
So, the result of this piece of code looks like this.
Let me know if you find this piece of code more useful than the formula solution in the comments below.
We’ve covered the basics of setting up a timestamp in Excel, and we hope that these tips will help you to create your own timestamps. If this post has been helpful to you, please share it with others who may be interested! Feel free to ask any questions below or at our website for more information. Finally, I would love know if this was useful for you so we can make future blog posts even better – thank you!
Other Suggested Excel Tips.

The Date and Timestamp is a type of data type that determines the date and time of a particular region. It contains some characters along with some encoded data. This format may vary from language to language. Keeping track of date and time helps in managing records of our work as well as segregate the information day-wise. In this article, we will be going to learn how we can automatically insert Date and Timestamp in Excel.
There are multiple ways to insert Date and Timestamp in Excel. These methods include both static and dynamic methods.
1. Inserting Date And Timestamp using keyboard shortcuts (Static method)
The static method is helpful when there are only a few cells where you need to insert the Date and Timestamp. You can quickly use the keyboard shortcut to manually insert the Date and Timestamp.
Follow the below steps to implement the same:
- Select the cell into which the current date or time needs to be inserted.
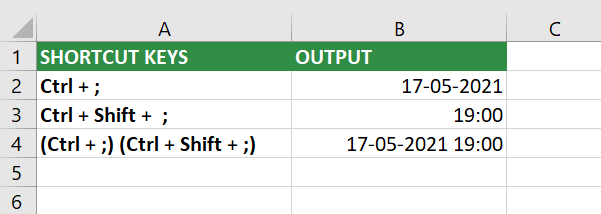
- Use this shortcut – Ctrl + ; (Control + semicolon) to insert the current date.
- Use this shortcut – Ctrl + Shift + ; (Control + Shift + semicolon) to insert the current time.
- Use this shortcut – Press the combination (Ctrl + ;) and (Ctrl + Shift + ;) to insert the current time and time.
2. Inserting Date And Timestamp using Formulas:
The NOW() and TODAY() functions can be used to insert the current date and time that will update automatically. This method dynamically updates the date-time whenever a change is made in the worksheet.
- NOW(): To insert current date and time.
- TODAY(): To insert the current date.
Follow the below steps to implement the same:
- Select the cell into which the current date or time needs to be inserted.
- Enter the function NOW() or TODAY().
- Press the Enter key.
- The current date-time or date will be inserted into the selected cell.

3. Insert Timestamp Automatically While Entering Data In Different Column
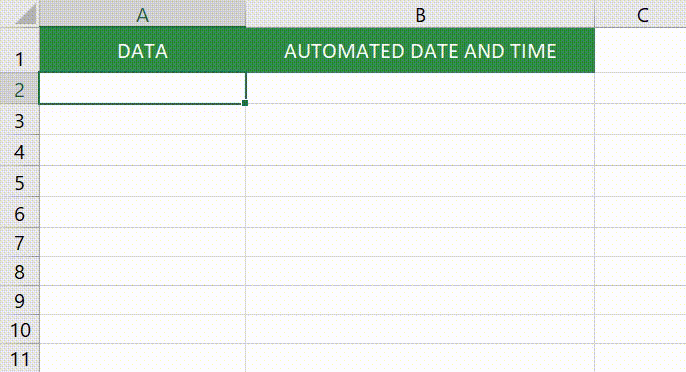
This method will enable the insertion of the timestamp in a column while entering data into another column. For example, consider two columns A and B in your worksheet. While you enter data in a cell of column A, the current date and time in the corresponding cell in Column B will get updated automatically.
Follow the below steps to implement the same:
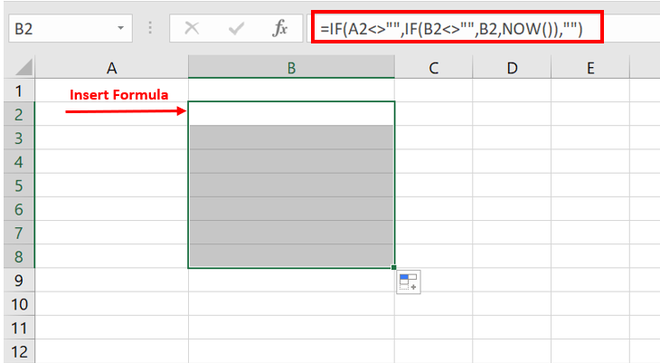
- Click File -> Options and the Excel Options dialogue box will appear. Now from the left pane, select the Formulas option. You will see Enable interactive calculation in the right pane below Calculation options. Check this option and select OK.

- In this next adjoining column (say column B), enter this formula:
=IF(A1<>"",IF(B1<>"",B1,NOW()),"")
- Drag and select cells to auto-fill the formula.
- You can also customize the format of the date and time. To do this, right-click on the selected formula cells, go to the context menu, and select Format Cells. You will see the Format cells dialogue box. Go to the bottom and select Custom. In the right pane select the suitable format for your cells.


- Now when you enter the data in a column, you will get the date and time in your chosen format in the adjoining cell.
4. Using VBA To Insert Timestamp Automatically While Entering Data In a Different Column
If you are familiar with working on VBA, then there is another method for you to automatically insert the timestamp in your excel sheet using VBA.
Follow the below steps to implement the same:
- To open Microsoft Visual Basic for Applications, press Alt + F11. The VBA window will open. Now go to Insert and select the Module to open a blank module.

- Now, add the code given below to your blank module and save the code.
Function MyTimestamp(Reference As Range)

If Reference.Value <> "" Then

MyTimestamp = Format(Now, "dd-mm-yyyy hh:mm:ss")

Else

MyTimestamp = ""

End If

End Function

- Go back to your worksheet and type the below formula in your cell in which you want to insert timestamp.
A is the column for inserting entries of data.
B is corresponding column, into which the date and timestamp will be updated.

Type the below formula into B1 cell:
=MyTimestamp(A1)

- Now, if you insert the entry in a column, you will get the date and time in the adjoining cell automatically.

Inserting date time in Excel using VBA is as simple as writing a formula in a Cell.
The VBA timestamp code is:
Range(“A1”).value = Format(Now, «mm/dd/yyyy HH:mm:ss»)
This code will show the current date and time in cell A1. And yeah, that is it. it’s done.
The “Now” function returns current date and time, and “Format” function formats the output into «mm/dd/yyyy HH:mm:ss» format.
Show date and time whenever a change is made using VBA.
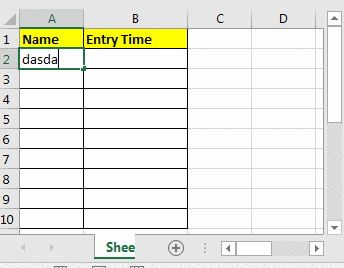
Let’s say you have prepared a sheet. In this sheet, you want time to be shown in column B whenever someone does an entry Column A.
Now we need a VBA timestamp code that runs every time when change is made in column A.
The below code gets the work done easily.
Run Macro When A Change is Made (Worksheet Change Event Handler)
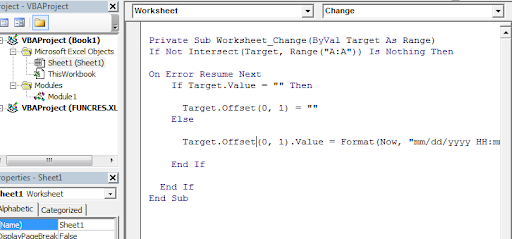
Private Sub Worksheet_Change(ByVal Target As Range)

If Not Intersect(Target, Range("A:A")) Is Nothing ThenOn Error Resume Next

If Target.Value = "" ThenTarget.Offset(0, 1) = ""

Else

Target.Offset(0, 1).Value = Format(Now, "mm/dd/yyyy HH:mm:ss")

End If

End If End Sub
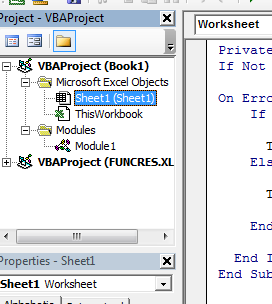
To run this code, open VBA and double click on the sheet in the project window on which you want to show timestamp.
Now we have to use VBA event handler since we want to run our code to run every time when a change is made.
From the drop-down above your code, select Worksheet.

Now adjacent to worksheet drop down, you see another drop down. It contains a lot of event handlers. For now, select “change”.

Now copy the above code here.
And it is done. Get back to your sheet and check it.
Code Explanation:
- The code is written on sheet1 by double-clicking on it. It means your code belongs to only this sheet.
- We used “Change” event handler of “Worksheet” to trigger our VBA Code.
-
Private Sub Worksheet_Change(ByVal Target As Range)
This is the fixed and default subroutine name of a change event handler.
- We want our code to run change is made only in column A.
-
If Not Intersect(Target, Range("A:A")) Is Nothing ThenThis line checks if the changed cell is in column A or not.
- Now, if the above line returns True, then these lines are executed
On Error Resume Next
If Target.Value = "" ThenTarget.Offset(0, 1) = ""
ElseTarget.Offset(0, 1).Value = Format(Now, "mm/dd/yyyy HH:mm:ss")
The first line ignores error pop and runs these two lines. If you omit On Error Resume Next you will see error popping up when you delete a value in column A.
If Target.Value = "" Then
:- This line checks if a cell in column A is blank. If yes then
Target.Offset(0, 1) = ""
:- This line deletes adjacent cell value.
And if False
Else
 Target.Offset(0, 1).Value = Format(Now, "mm/dd/yyyy HH:mm:ss")
:- This line enters the current time and date in adjacent of A column.
- And the last three lines just close their respective block. And it’s done. Now you have a sheet that gives an exact time of change made in a cell of column A.
You may have noticed that there are several event handlers in the drop-down list. Play around them. Try to figure out what each event handler works. And if have any difficulty, write it down in the comments section.