
Creating numbered tickets in Word can seem difficult or even impossible if you are not familiar with all the capabilities of the Word program. If you have tried going to the Word template section and have been unsuccessful or frustrated with all the options and questions, there is an easier way. The simplest resolution for creating numbered tickets is to find existing templates that can be edited and adjusted to fit your needs.
Click on the Help menu from an open Word document. The Help menu is usually listed in the very top toolbar and is the listing farthest to the right. When you left click on the Help icon, a drop-down menu will ask you to choose the type of help you are looking for.
- Creating numbered tickets in Word can seem difficult or even impossible if you are not familiar with all the capabilities of the Word program.
- When you left click on the Help icon, a drop-down menu will ask you to choose the type of help you are looking for.
Choose the option «Microsoft Office Word Help.» An assistance box will populate to the right of your document window. In the box labelled «Search for» type «Create numbered tickets» and click the green arrow. The Help function will search and provide a list of options within that area.
Choose the template titled «Raffle tickets 6 per page.» Word will provide a preview of the template and then ask if you would like to download the template. By choosing download, Word will replace your existing document with the raffle ticket template for you to edit.
- Choose the template titled «Raffle tickets 6 per page.»
- By choosing download, Word will replace your existing document with the raffle ticket template for you to edit.
Place your cursor over «your organisation name» on the template and begin to type the name of the organisation or fundraiser the tickets are intended for.
Change all other existing text to reflect the correct date and prizes by highlighting the words and either editing or deleting the existing text. Font size and style can be adjusted using the font toolbar above the document. Images can be added by using the Insert menu in the toolbar and following the same process as inserting images to a Word document.
Create multiple tickets. Copy and paste the entire page as many times as needed to create multiple tickets once all information has been updated.
Update the sequence of numbers of copied tickets by highlighting the number and clicking on the right button of your mouse. A drop-down menu will give you the option to update the field and the system will automatically update the number in sequence. Each ticket must be individually updated before printing.
Save your document for future editing or printings.
Creating a ticket template in Microsoft Word is a relatively straightforward process. To make your own tickets, follow these steps:
1.Launch your word processing program and create a new document.
2. Once the document is open, enable the “Ticket” design style. You can enable this style by selecting the “Design” tab and then selecting the “Gallery” option. From here, scroll down to “Tickets” and select a suitable ticket style.
3. Once the “Ticket” design style has been selected, make changes to its markdowns and margins. To do this, select your ticket style and select the “Format” option. From here, select “Margins” and “Indents and Spacing”.
Adjust the margins and markdowns to your desired settings.
4. Copy and paste this ticket style to every page in your document. To do this, select the “Page Layout” tab and then select “Multiple Pages”. From here, select the “Mirror Margins” option and then select “Apply”.
5. Once the margins of each ticket have been properly mirrored, add text and images where necessary. To do this, select your ticket and select the “Insert” option. From here you can add text boxes, pictures, shapes and other elements.
6. Once your ticket has been properly formatted with images, text and other elements, save and print it. To save the document, select the “File” option and then select the “Save As” option. From here, you can select a suitable save location and file name.
To print, select the “File” option and then select the “Print” option. From here, adjust the print settings to your preferences and then select the “Print” button.
Following these steps, you should now have a ticket template in Microsoft Word.
How do I print tickets from word?
Printing tickets from Microsoft Word can be done in several ways. The simplest way to print tickets from Word is to use a template. Microsoft Word comes with several ticket templates that can be customized to fit your needs.
To use a ticket template, open Word and head to the “File” menu. Then select “New”, followed by “Templates on Office. com”. Scroll through the list of available templates until you find one that looks suitable for your tickets.
Select your template and edit the design in Word. You can also add images, logos, text, and colors to suit your taste.
Once you’re done with editing, go to “File” and click on “Print”. Select the number of copies you want to print and adjust other printing preferences such as the paper size. When the printing is completed, your tickets will be ready.
In addition to using templates, you can create and print tickets using Word’s design and text tools. Start by creating ticket-sized rectangles around the text “Ticket” and some placeholder information (e.
g. event name, date, venue, etc. ). You can then find suitable fonts and colors from Word’s Font and Color menus. Finally, adjust the layout and text sizes as well as the spacing between different sections of your ticket.
When you are satisfied with the design, go to the “File” menu and click “Print”.
You can also create and print tickets from Word by downloading a ticket template from the internet. Just search for “ticket templates for Word” in your favorite search engine and you’ll be presented with several websites that offer free and paid ticket templates for Microsoft Word.
After downloading a template to your computer, open it in Word and customize it to fit your needs. Finally, click “Print” and you’ll have your tickets ready.
What is ticket template?
A ticket template is a type of document used to issue tickets for an event or a service such as a theatre or concert performance. A ticket template will generally include information such as the name of the event, the venue, seating area, and ticket price.
Many ticket templates will also include the logo or artwork of the event. Some ticket templates may require the purchaser to sign or provide other identifying information to complete the purchase. Ticket templates can be printed and customized with additional features such as barcoding and ticket numbering.
They can also be used to create tickets with unique designs, allowing event venues to customize them to their needs. With the aid of software and technology, event organizers can quickly produce a large number of tickets.
Ticket templates are also helpful when it comes to handling the ticket sales process for an event, including bookings and payment. The use of ticket templates enables event organizers to more easily account for tickets and prevent fraudulent activities.
Ultimately, the use of ticket templates helps to improve the efficiency of the ticket sales process, which helps both event organizers and customers.
How do I make numbered tickets in Word?
Creating numbered tickets in Microsoft Word is quite straightforward. Here is a step-by-step guide to help you create your own numbered tickets:
1. Open up a new document in Microsoft Word.
2. Click on the ‘Insert’ tab and then in the ‘Text’ section click on ‘Text Box’.
3. Select the ‘Draw Text Box’ option and then draw a text box on your document.
4. In the ‘Home’ tab, click on the ‘Numbering’ icon.
5. Choose the numbered list option and select the format of the numbering style you want to use.
6. Enter the starting number for your ticket numbering and choose whether you’d like each ticket to increment by one or by another number.
7. Once you’re happy with the format and the starting number of your tickets, click ‘OK’.
8. Copy the text box and then paste it as many times as you need to create the desired number of tickets.
9. You can then add any additional content or text to each ticket, such as a name, guest name, or a special message.
10. Finally, save the document and then print it out to create your tickets.
Does Word have a citation generator?
Yes, Word does have a citation generator. In Word 2016 and Word 2019, Microsoft introduced an integrated citation generator that makes it simple to create citations in MLA style. It’s only available in Word Online; if you’re using the desktop version, you’ll need to resort to a third-party software or website.
To use the built-in generator, open your Word document and click on the References tab. You can then choose from several different citation styles, including APA, Chicago, Harvard, and MLA. When you select a style, a box will appear where you can enter your source information.
After entering this information, you can then insert the citation into your document.
Does Microsoft Word have a draw function?
Yes, Microsoft Word does have a draw function. This function is found in the “Insert” tab of the main toolbar and then “Shapes”. Upon clicking, a selection of shapes will appear, including line, rectangle, oval, and more.
The draw function also has a “Freeform” option, which allows you to draw in your own shapes using your mouse or track pad. Furthermore, other options enable you to choose from objects such as arrows, equations, and flowchart symbols.
You can also modify the look of your shapes by changing the fill color, line color, line width style and effects, and more. Text can be added to a shape, and rotating them is easy. To add more to the draw function, dropping a picture into a shape is possible, as well as 3D shapes.
You can also group shapes together and break them apart. This gives you the ability to draw and make diagrams to help visualize your work.
How do you make tickets on Google Docs?
Creating tickets on Google Docs is a relatively straightforward process. First, you will need to open a new document and click on the “File” menu. From there, select “Page Setup” and set the page type to “Tickets.
” In the ticket layout options, you can choose to use the predefined ticket size, or you can enter custom measurements. Once you have done that, you will need to add the elements of the ticket. This can include text, shapes, images, and lines.
Text: You can add text within the ticket area by clicking on the “Text” icon in the menu on the right. From there, you can start typing in the text field.
Images: To add images to the ticket, you must click the “Insert” option in the toolbar and select “Image” to select an image from your files.
Lines: By clicking the “Insert” option, you will also be able to insert vertical and horizontal lines, which will be useful for creating boxed out sections on the ticket.
Once you have added all of the necessary elements, you can adjust the size and formatting of the ticket by clicking on the “Format” menu. You can also add or delete elements as needed.
Finally, when you have completed the ticket layout, you can choose to duplicate it for multiple tickets by going to the “File” menu and clicking “Duplicate.”
Creating tickets on Google Docs is a straightforward and simple process. With the relatively easy layout tools, anyone can make custom tickets quickly and easily.
How does a dummy ticket work?
A dummy ticket is a type of ticket that can be used as a placeholder in a system or within an application. It acts as a “key” for a particular part of the system and it contains the minimum information necessary to identify that part or task.
It can also be used in processes where it is necessary to have a certain sequence of steps in order to get to a certain result. For example, a dummy ticket can be used to reserve a seat on a plane or book a hotel room when the actual process of booking the ticket doesn’t require entering any credentials.
In that case the dummy ticket acts as a placeholder in the system until the credentials are given. Another example is when a system allows users to select a given task, but there are multiple ways it can be achieved.
In this case the dummy ticket can be used as a placeholder until the user decides which process to follow. Dummy tickets have no actual value and can be discarded once the desired result has been achieved.
Therefore, they are helpful in scenarios where a certain order needs to be followed in order to achieve a result.
Can you print directly off of Canva?
Yes, you can print directly off of Canva. To do this, you first need to create your design in Canva. Once inside Canva, you can select the ‘Download’ option in either the top-right corner or the left-side menu.
You will then have the choice to download your design as an image, PDF, and PowerPoint, among other formats. Select the option which suits your needs and when prompted, choose the ‘Print’ option. This will open the design in your computer or laptops’ print dialog and settings.
Once your settings are correctly adjusted, you can then click on ‘OK’ to print off your design.
What is the way to print from Canva?
The easiest way to print from Canva is to use the print options that are available directly in the Canva editor. From the Canva editor, click on the “File” tab, then select “Print” from the drop-down menu.
This will open a pop-up window where you can select the paper size, orientation, and printing options for your design. You can also preview your design before printing by clicking on the “Preview” button.
Once you are ready to print, just click on the “Print” button and your design will be sent to your printer. If you have access to a professional printer, you can also use the Canva Print Service to have your design professionally printed.
To use this service, simply go to the “File” tab in the Canva editor and select either “Canva Print” or “Canva Print (Premium). ” From there, you can choose your paper size, orientation, and quantity of prints and then place your order.
Your design will be professionally printed and delivered to your doorstep.
Struggling to get Word to put numbers on raffle tickets? I’ve got your back. Follow these 7 simple steps to raffle ticket awesomeness.
How do I create numbered raffle tickets in Word?
First, create your ticket layout in Word. Then use Excel to make a list of ticket numbers. Use the Mail Merge function to pull these numbers into your Word ticket template. The clever bit: use the <<NextRecord>> tag to get a different number on each ticket. Then run your merge and print.
Read on for more detail!
Note: this takes quite a while. If you want a shorter way to do this, I recommend Raffle Ticket Creator. This website lets you design a ticket online and then download a PDF with all your numbered raffle tickets, ready to print at home. Try it now: https://app.raffleticketcreator.com
Step 1 — Create one basic ticket template
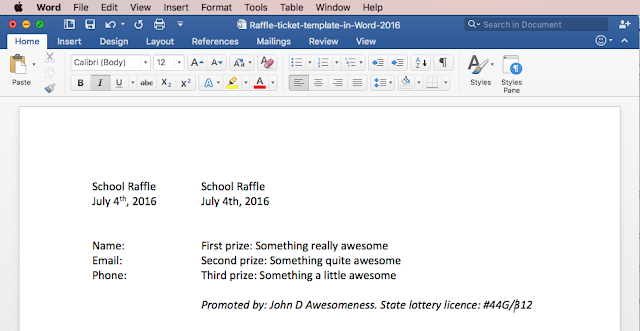
Create a new document in Word and type in the basic information that you need on your raffle tickets. The event you are raising money for, the price of the ticket, the date of the draw and the prizes that are on offer. Depending on your local laws, you might also need to include a licence number and contact name on each ticket.
Just use tabs and spaces to lay everything out, rather than tables. This will make it easier later on.
You might end up with something like this:
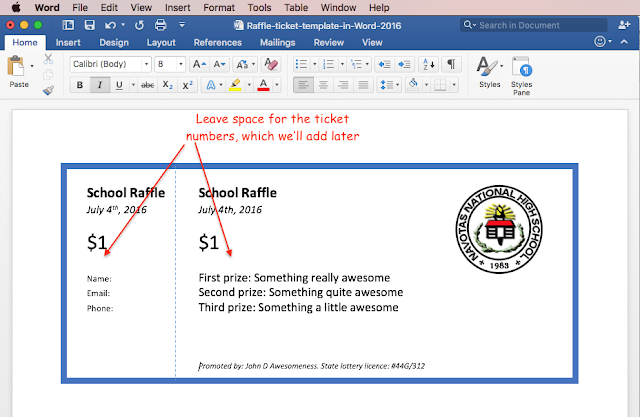
Step 2: Make your template prettier
Next, maybe add a logo and a border to brighten it up a bit. Remember to leave some space for the ticket numbers to go (we’ll add them in a moment).
Step 3: Create four tickets per page
Next, copy and paste the whole ticket so you have four tickets on a page. You might need to tinker with your layout a bit to get them all to fit neatly:
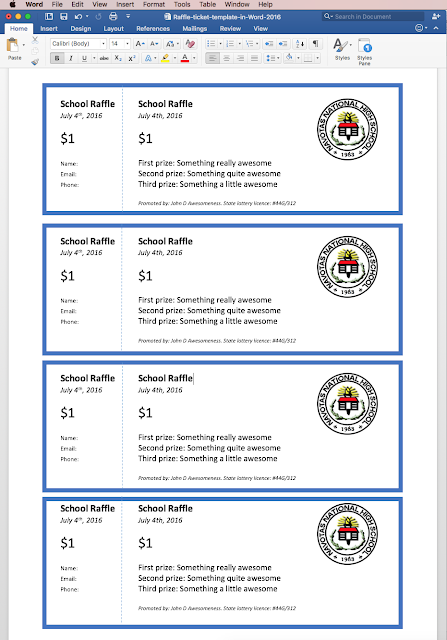
So, now you have a template ready with four raffle tickets per page. You just need to add numbers to each one.
Need help getting started? Here is the template I used in the screenshots above, feel free to download it and use it yourself:
Download Raffle Ticket Template for Word 2016 (A4 Paper)
Download Raffle Ticket Template for Word 2016 (US Letter Paper)
Step 4: Use Excel to generate your ticket numbers
Use Excel to generate your list of numbers, which you will then automagically pull into your Word raffle ticket template.
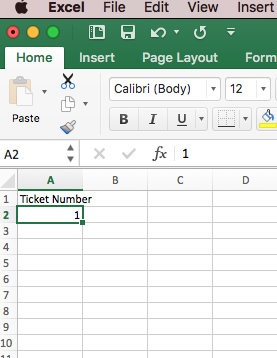
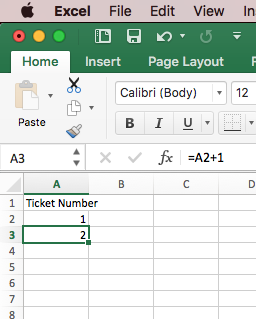
Open Excel and create a new workbook. In the top left cell (cell A1), type «Ticket Number» (without quotes), and in the cell below that type «1» (again, without quotes). Your sheet should look like this:
In the next row down, type «=A2+1» (without quotes) and hit enter / return:

That will put a «2» in that cell, like this:
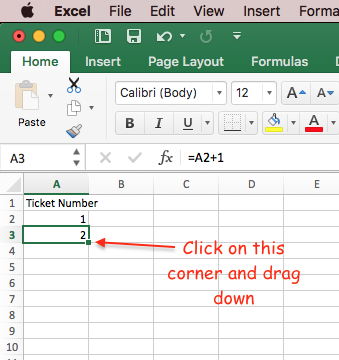
Now, pay attention to this bit if you are not a regular Excel user. Select the cell with the 2 in it, then carefully click the tiny square at the bottom right of that cell. Click that square and drag the mouse down the screen:
Keep dragging down and let the sheet scroll up until you get to, say, row 501. That will give you consecutive numbers up to 500. Go as far as you need for the number of raffle tickets you need, like this:
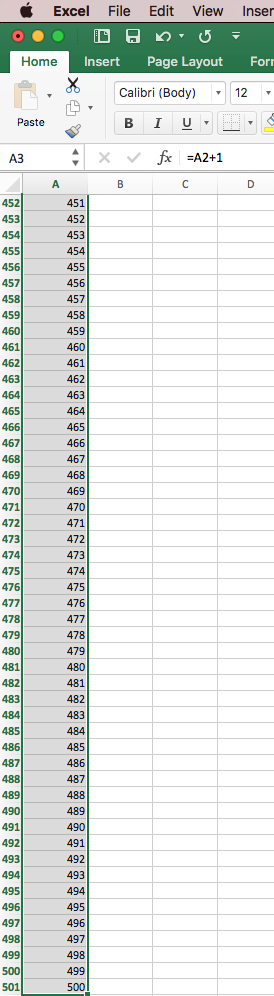
(If you prefer using the keyboard, rather than the mouse, then do this instead of dragging down: select cell A3, hit CTRL+C (or cmd+C on a Mac) to copy, then select cell A4 and use SHIFT+fn+down arrow to select all the way down to row 501. Then hit CTRL+V (or cmd+V on a Mac) to paste.)
Now save your spreadsheet somewhere that you can find it again, and close Excel.
Step 5: Pull your ticket numbers into your Word template
Go back to your raffle ticket template in Word 2016 and go to Mailings > Select Recipients > Use Existing List:

Navigate to the Excel spreadsheet which you created earlier with your raffle ticket numbers. Click ‘OK’ to the next two questions (and «Allow» if you also get some security questions):


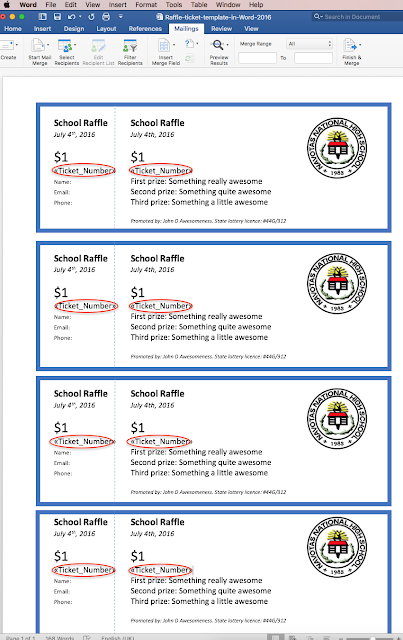
Now place your cursor where you want the ticket number to appear. Then in the menu ribbon, go to Mailings and click «Insert Merge Field». Select «Ticket_Number» (which should be the only option which appears):

That will insert a placeholder where your ticket number will appear:

(If that’s not in the correct place, just delete the placeholder, put your cursor in the correct spot, then hit «Insert Merge Field» again.)
Repeat this for each place where you need the ticket number to appear on your raffle ticket template. Most likely, you’ll need it on each counterfoil and each main ticket, so eight in total, like this:
Step 6: Tell Word to put a new number on each ticket
Now for the tricky bit. Pay attention, Bond. A Mail Merge normally has just one «recipient» per page. So Word won’t move on to the next number in your list until it gets on to the next page. But you need a new number for each ticket.
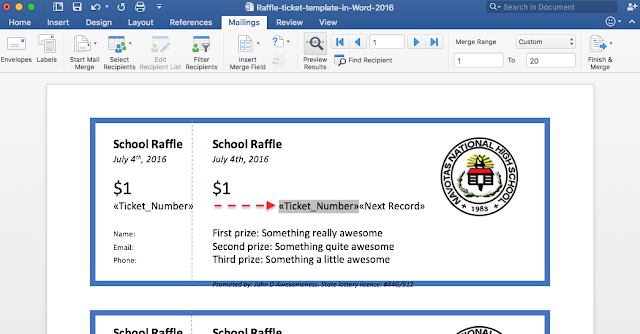
To tell Word to change the number for each ticket in your template, you need to insert a special «Next Record» marker on each ticket.
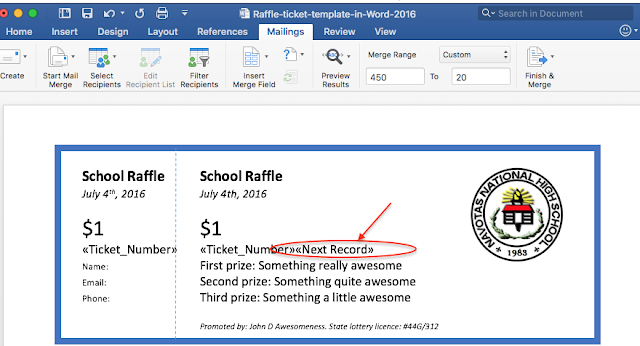
Put your cursor just after the second Ticket Number placeholder on the first ticket:

Then in the Mailings section of the ribbon click the little question mark button and select «Next Record»:
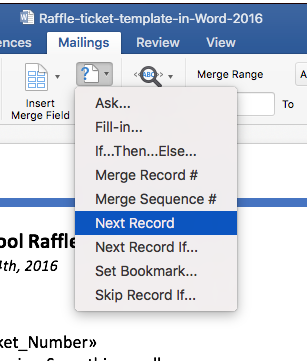
That will insert another placeholder called «Next Record». You’ll see it like this:
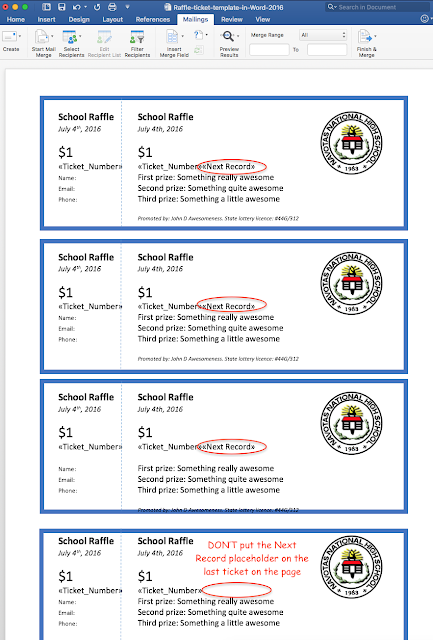
Repeat this for the second and third tickets on your template, but not for the last ticket on the page (because Word will move to the next number at the start of the next page anyway):
Nearly there now!
Step 7: Run the merge to create one printable document with all your raffle tickets
Now you can run your mail merge to generate one big document of tickets and every ticket will have a unique number.
Click on ‘Finish & Merge’:
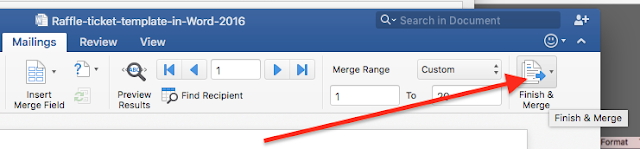
Then click ‘Edit individual documents’:
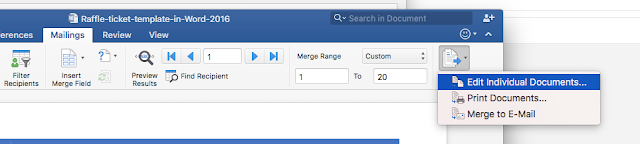
Word will whirr away and create a new document, with all your raffle tickets in it and each one will have a unique number:

That’s it! Print this document and you are done. Give yourself a big pat on the back!
Numbers not in the right place? Fear not.
You might find your numbers don’t quite appear in the correct place in your finished document:
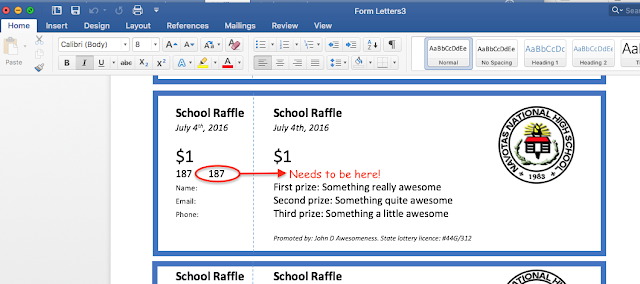
Easy to fix. Close the new document which Word just created (don’t bother to save it). Go back to your main template document and just move the placeholder further to the right. It’ll look odd, because the placeholders take up more space than the real numbers, so the layout looks messed up. Something like this:
Then click «Preview Results» in the Mailings Ribbon and check where your number is now. Adjust the spacing again if necessary until your number appears in the right place:
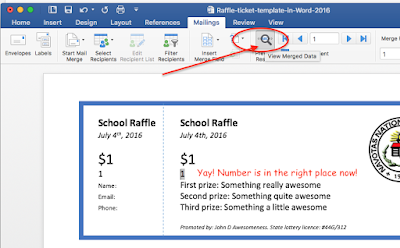
Then complete your merge as before (Finish & Merge > Edit Individual Documents) and print it out.
**************
Not got half a day to spend fiddling around with Word 2016 to print raffle tickets? Try Raffle Ticket Creator instead: just enter the details of your event into a web page and Raffle Ticket Creator will generate a PDF for you with all your tickets in it ready to print!
INTELLIGENT WORK FORUMS
FOR COMPUTER PROFESSIONALS
Contact US
Thanks. We have received your request and will respond promptly.
Log In
Come Join Us!
Are you a
Computer / IT professional?
Join Tek-Tips Forums!
- Talk With Other Members
- Be Notified Of Responses
To Your Posts - Keyword Search
- One-Click Access To Your
Favorite Forums - Automated Signatures
On Your Posts - Best Of All, It’s Free!
*Tek-Tips’s functionality depends on members receiving e-mail. By joining you are opting in to receive e-mail.
Posting Guidelines
Promoting, selling, recruiting, coursework and thesis posting is forbidden.
Students Click Here
Numbered tickets in WordNumbered tickets in Word(OP) 9 Sep 03 11:14 I am trying to use Word to create a repeating block of text, which recurs three times on each page — they’re actually tickets to a concert. However, I want to number each ticket individually. I’ve thought of using the Envelopes and Labels wizard to create the repeated text, but I can’t find a way of numbering labels. I also wondered about using a 1 x 3 table and numbering the cells somehow. Any ideas? Duncan Red Flag SubmittedThank you for helping keep Tek-Tips Forums free from inappropriate posts. |
Join Tek-Tips® Today!
Join your peers on the Internet’s largest technical computer professional community.
It’s easy to join and it’s free.
Here’s Why Members Love Tek-Tips Forums:
 Talk To Other Members
- Notification Of Responses To Questions
- Favorite Forums One Click Access
- Keyword Search Of All Posts, And More…
 Talk To Other Members
Register now while it’s still free!
Already a member? Close this window and log in.
Join Us Close
Similarly, How do I create a ticket in Word?
How to Make Tickets on Microsoft Word
- Step 1: Launch Microsoft Word and Search for Tickets. Launch Microsoft Word, and in the search bar, type in ‘Tickets. …
- Step 2: Change the Placeholder Text. You will see that there are some placeholder text boxes on the ticket. …
- Step 3: Add an Image. …
- Step 4: Copy Ticket Over to Others.
Hence, Do raffle tickets need to be numbered? The tickets must be numbered so that they are easy to keep track of. Although it costs more for the printer to number the tickets, it is worth it. Many organizations try to save money by not having numbered tickets or by numbering the tickets themselves.
How do I create a numbered ticket in Excel?
Beside above, How do you get numbered tickets in Canva?
How to make an event ticket
- Open Canva. Open up Canva and search for the “Event Ticket” design type. …
- Select a template. Find event ticket templates for every industry and theme, from music to theatre to raffle. …
- Experiment with features. …
- Customize your ticket. …
- Download and print.
How do I make tickets on my computer?
How do you make a ticket on Google Docs?
How to Create a Ticket System With Google Docs
- Visit the Google Docs website at docs.google.com, and sign in with your Google username and password. …
- Click the “Create new” button on the left side of the screen, then click “Form.”
- Enter a name for your form in the “Untitled form” field. …
- Create your support ticket fields.
How do you make a ticket on Powerpoint?
How do I create an online raffle?
If you want to do a raffle online, you can host a giveaway on social media or a raffle website. Pick a site to host your raffle, and choose your prizes and ticketing system. Then, make a post or a website detailing your raffle information. At the end of your set raffle time, pick a winner fairly and honestly.
Can you hold a raffle on Facebook?
You can run a raffle on your Page’s Timeline, in a Facebook Page Tab, and on a Facebook App page. But, You aren’t allowed to run a raffle on your personal Profile Timeline. Make sure that you only use your business account.
How do you set up a raffle?
How To Organize A Raffle in 7 Easy Steps.
- Check Local Laws and Regulation. Always do some due diligence and check local or regional laws regarding raffles. …
- Set Goals. You have to determine if the raffle is for charity or for profit. …
- Raffle Prizes. …
- Print Raffle Tickets. …
- Promote Your raffle. …
- Sell Tickets. …
- Hold The Draw.
How do you make a raffle ticket in Publisher?
Click inside the small field with the magnifying glass in the middle of the Available Templates page, then type “tickets” and click the magnifying glass icon. Review the Publisher ticket options, then double-click a template, such as “Raffle Ticket,” to open the design in the Publisher window.
What is a raffle drawing?
A raffle is a type of contest in which you buy a ticket for a chance to win a prize. After the tickets are sold, a drawing determines which ticket holds the winning number. People raffle off everything from fruit baskets to cars. You might enter a raffle at a school gathering, a fair, or another event.
How do I print my ticket from Canva?
Print designs using personal printer
- Create or open the existing design that you want to print.
- Add margins and bleed. Adjust some elements, if needed. …
- Click the ⤓ button on the toolbar above the editor. …
- On the file type dropdown, select PDF Print. …
- Click Download.
How do I print a PDF ticket?
To save a PDF version of your ticket, go to the three dots at the top right-hand corner of a ticket. Select Print Ticket and from the print options on your left, select Save as PDF under the Destination drop-down. From here you can choose where you’d like to save it on your computer.
How do I create a ticket in Excel?
How do you get virtual raffle tickets?
If you want to do a raffle online, you can host a giveaway on social media or a raffle website. Pick a site to host your raffle, and choose your prizes and ticketing system. Then, make a post or a website detailing your raffle information. At the end of your set raffle time, pick a winner fairly and honestly.
Does Google have a ticket system?
Unfortunately, there is no ticketing tool in the Google Workspace. Google does not have its own Google apps support ticket system for companies that are using Gmail to manage customer support requests. In fact, Google suggests using other Google apps to provide customer support.
How do I increase my ticket on Gmail?
Connecting to your Gmail account
In the Support addresses section, click Add address, then select Connect external address. If requested, sign in to your Gmail account. If you don’t want to import any pre-existing emails as tickets, then deselect Create tickets from last 50 emails.
How do I make tickets on publisher?
Create the ticket in Publisher
- In Publisher, choose New from the File menu.
- In the Search control, enter tickets.
- Double-click one of the ticket templates (Figure A). Figure A.
- Save the file.
How do I give a gift ticket?
You can disguise your tickets as a different gift by putting them in a box or wrapping them in something like tissue paper. If you are getting tickets for a concert or show, you can wrap the tickets in a band t-shirt to throw them off.
How do you make slide invitations?
3 Easy Steps for Creating Invitations in PowerPoint
- Step 1: Find the Right Template. Download It. This is easily the most important phase. …
- Step 2: Fill out your personal information. Customize the template. …
- Step 3: Save the Presentation. Print It.
- Reference 1
- Reference 2
- Reference 3
- Reference 4
- Reference 5