
07 Aug 3 Ways to Perform an Excel SQL Query
Posted at 12:08h
in Excel VBA
0 Comments
Howdee! Excel is a great tool for performing data analysis. However, sometimes getting the data we need into Excel can be cumbersome and take a lot of time when going through other systems. You’re also at the mercy of how a disparate system exports data, and may need an additional step between exporting and getting the data into the format you need. If you have access to the database where the data is housed, you can circumvent these steps and create your own custom Excel SQL query.
To follow along with my below demos, you’ll need to have an instance of SQL server installed on your desktop. If you don’t, you can download the trial version, developer version, or free express version here. I’ll be working with the free developer version in this article. I’m also using a sample database that you can download here. The easiest way to install this is using SQL Server Management Studio (SSMS). That download is available here. Once you open SSMS, it should automatically detect your local server instance. You must ensure your SQL Server User is running as the “Local Client” and then you can create a blank database, and restore that database from the backup file. If you have issues accomplishing this, let me know in the comments and I’ll elaborate on how this is done.
If you are familiar enough with SQL and have access to your own data, you can skip these steps and use your data. Otherwise, I recommend downloading these tools before getting started. If you’re new to SQL, I highly recommend the SQL Essential Training courses on Lynda.com. Now, on to why you’re all here…
Excel SQL Query Using Get Data
This option is the most straight forward approach to creating an Excel SQL query. However, it is important to note that this approach is only available in Excel 2013 and later and will not currently work on Mac OSX. To get started, select “Get Data” à “From Database” à “From SQL Server Database” as shown in the screen grab. At this point it will pop-up a prompt to enter your server name and the target database you’re wanting to query (you can get this information from SSMS). You can enter this information and then select “OK”. This will allow you to browse available tables from that database to import. You can remove columns and filter tables before importing. If you do not know how to write SQL queries yet, this is one approach you can take.
However, if you select the “Advanced” dropdown arrow, you can create your own custom Excel SQL query. I usually create my query in SSMS or Visual Studio and then just paste the final query in this window. That is because there is no intellisense in this window and it can be difficult to spot errors in your query. Once you select OK, it will ask you to confirm credentials and you may get an error about encryption. This is common when connecting to databases in this manner and nothing to worry about. The next screen will provide an example of your data and you can select “Load” to import it.

This will create a table on a new tab and you’ll also notice a new pane on the right titled “Connections & Queries”. It will display the name of your query (defaults to “Query1”, “Query2”, etc.) and you can rename the query by right-clicking and selecting “Rename”. You can also edit the query from this location as well. It will open up an interface with a sample of your data and you can add/remove columns, filter your data, or edit your source query from here.
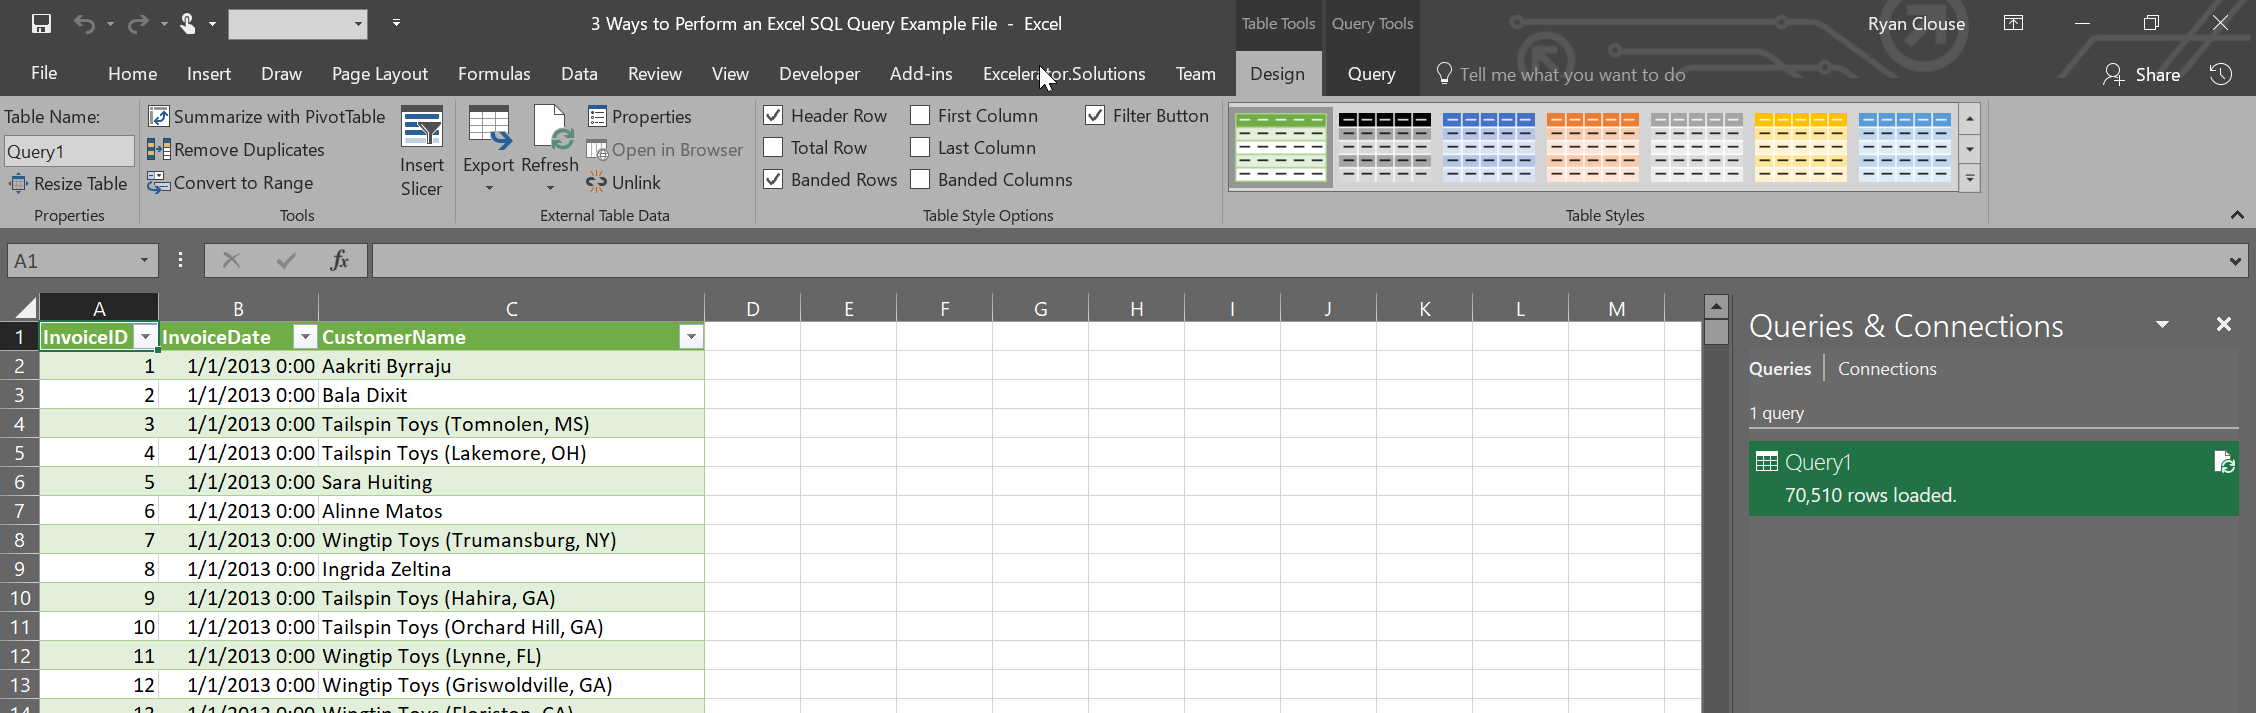
Now that you’ve set up this Excel SQL query, you can simply refresh the data set with fresh data anytime by clicking “Refresh All” on the “Data” ribbon. A quick side note here. If you pivot this data, “Refresh All” will refresh pivot tables first and then the query. To update your pivot table, you’ll need to refresh all twice or update your pivot table manually. To me, one of the downsides of this approach is the results are always returned in a table. I personally do not like working with tables in Excel. That’s where using VBA for your SQL query can come in handy.
Excel SQL Query Using VBA
Using VBA to create your Excel SQL query is not as straight forward as the previous approach, but can still be an extremely useful method depending on your situation. I particularly like that the data is not returned to a table unless you designate it to be so. This technique will work on older versions of Microsoft Excel but will not work on Mac OSX versions of Excel since it uses and ADO connection.
To get started, open up the VBA editor by pressing alt+F11. Before beginning to write your code, you’ll need to ensure that the “Microsoft ActiveX Data Objects 2.0 Library” is referenced from the VBA Project. To do this, click on “Tools” in the ribbon menu at the top of the VBA editor. In the popup, ensure the library is checked as shown below. This allows the project to use the ADO connectors to create the connection to your database. Next, let’s dimension a few variables.

Dim Conn As New ADODB.Connection
Dim recset As New ADODB.Recordset
Dim sqlQry As String, sConnect As String
The Conn variable is will be used to represent the connection between our VBA project and the SQL database. The receset variable will represent a new record set through which we will give the command to perform our Excel SQL query using the connection we’ve established. Finally, the sqlQry variable will represent a string variable that is our SQL query command, and the sConnect variable will be a string representing the connection string the database requires. Let’s look at how to use these variables to perform a SQL query.
sqlQry = "select top 1000 si.InvoiceID, si.InvoiceDate, sc.CustomerName from Sales.Invoices si" & _
             " left join sales.Customers sc on sc.CustomerID = si.CustomerID"

sConnect = "Driver={SQL Server};Server=[Your Server Name Here]; Database=[Your Database Here];Trusted_Connection=yes;"

Conn.Open sConnect

Set recset = New ADODB.Recordset

    recset.Open sqlQry, Conn
    Sheet2.Cells(2, 1).CopyFromRecordset recset
    recset.Close

Conn.Close

Set recset = Nothing
While this may look complex, each step is relatively simple. Firstly, we set our sqlQry variable equal to a string that represents the syntax of our SQL query. We then create a connection string we can use in our next command to connect to the database. So, “Conn.Open” is the command to open the connection and “sConnect” is the string it uses to do so. “Trusted_Connection=yes” means that the connection will attempt to be established using your Microsoft credentials for the account you’re logged in as.
Now that the connection is open, we can open a new record set and pass it the sql command using the sqlQry variable, and tell it which connection to use by passing it the Conn variable. We can then use the VBA command “CopyFromRecordset” to paste the recordset anywhere in our workbook. It’s important to close both the record set and connection at this point. You also want to set your recset variable equal to nothing so it does not eat up valuable resources.
One of the downsides to using this method is that you must explicitly tell Excel some things that the previous approach did automatically. For example, this SQL query will not return any column headers. Therefore, you must explicitly tell Excel what to label your columns. Secondly, the data is not automatically cleared and the new query imported. You must also explicitly tell Excel to do this as well. Here is the final code with those commands added.
Sub SQL_Example()
Dim Conn As New ADODB.Connection
Dim recset As New ADODB.Recordset
Dim sqlQry As String, sConnect As String

Sheet2.Cells.ClearContents

sqlQry = "select top 1000 si.InvoiceID, si.InvoiceDate, sc.CustomerName from Sales.Invoices si" & _
            " left join sales.Customers sc on sc.CustomerID = si.CustomerID"

sConnect = "Driver={SQL Server};Server=[Your Server Name Here]; Database=[Your Database Name Here];Trusted_Connection=yes;"

Conn.Open sConnect
Set recset = New ADODB.Recordset

    recset.Open sqlQry, Conn
    Sheet2.Cells(2, 1).CopyFromRecordset recset
    recset.Close

Conn.Close
Set recset = Nothing

Sheet2.Cells(1, 1) = "Invoice ID"
Sheet2.Cells(1, 2) = "Invoice Date"
Sheet2.Cells(1, 3) = "Customer Name"

End Sub
My preference for using this approach is when I want the user to be able to pass parameters to my Excel SQL query. For example, I might have a dropdown of customer names the user could select. By using this tactic, I can easily add a dropdown of customer names the user can select, and pass that value to my SQL query in a where clause.
As you can see, both the built in Excel SQL query and the VBA method have pros and cons. I employ both in my everyday work depending on what situation I find myself in.
Excel SQL Query Using Microsoft Query
This option is likely the most complex option, but it has the added advantage of being compatible with some versions of Mac OSX. I won’t pretend to be an expert at creating Mac OSX compatible tools for Excel, but I have successfully used this implementation to create an embedded Excel SQL query for Macs in the past.
I also like this method because you can create popup style parameters. For example, you can prompt the user to input date range parameters at the time the SQL query is ran. Like the first example, running this query is as easy as clicking “Refresh All” on the Data ribbon. Let’s dive in to the details.
To get started here, click “Get Data” on the Data ribbon. In the menu that dropdowns select “From Other Sources” and, finally “From Microsoft Query”.

This will open a wizard for you to choose your data source. Double click “<New Data Source>” and you’ll be prompted to enter some information about your data source. Option 1 can be anything you wish that describes your data source. Option 2 should be “SQL Server”. Click “Connect” and it will pop up a third window where you can enter information about the server and login information. Be sure you select the “Options>>” dropdown so you can select the database you’re wanting to connect to.

You’ll now have a new data source in the original window. Double click the data source to bring up a table import wizard. If you want to import an entire table, you can do so here and even filter and sort the data using the import wizard. However, if you want to use your own custom query as we have been, just select any field and go through the wizard and import the data. When you come to screen that asks you if you want to return the data to Excel or edit in a query, return the data to Excel. It will then prompt you to select where you want the data returned in your workbook.
The query will return the data in a table format. To change it to your own custom SQL query, let’s follow these steps:
- Click anywhere in the data table.
- On the Excel Data Ribbon, in the “Queries & Connections” group, properties will no longer be grayed out like it normally is. Click this.
- In the popup – you’ll see another properties icon. Click this.
- In this popup, select the “Definition” tab and paste your SQL query in the “Command Text” input box.
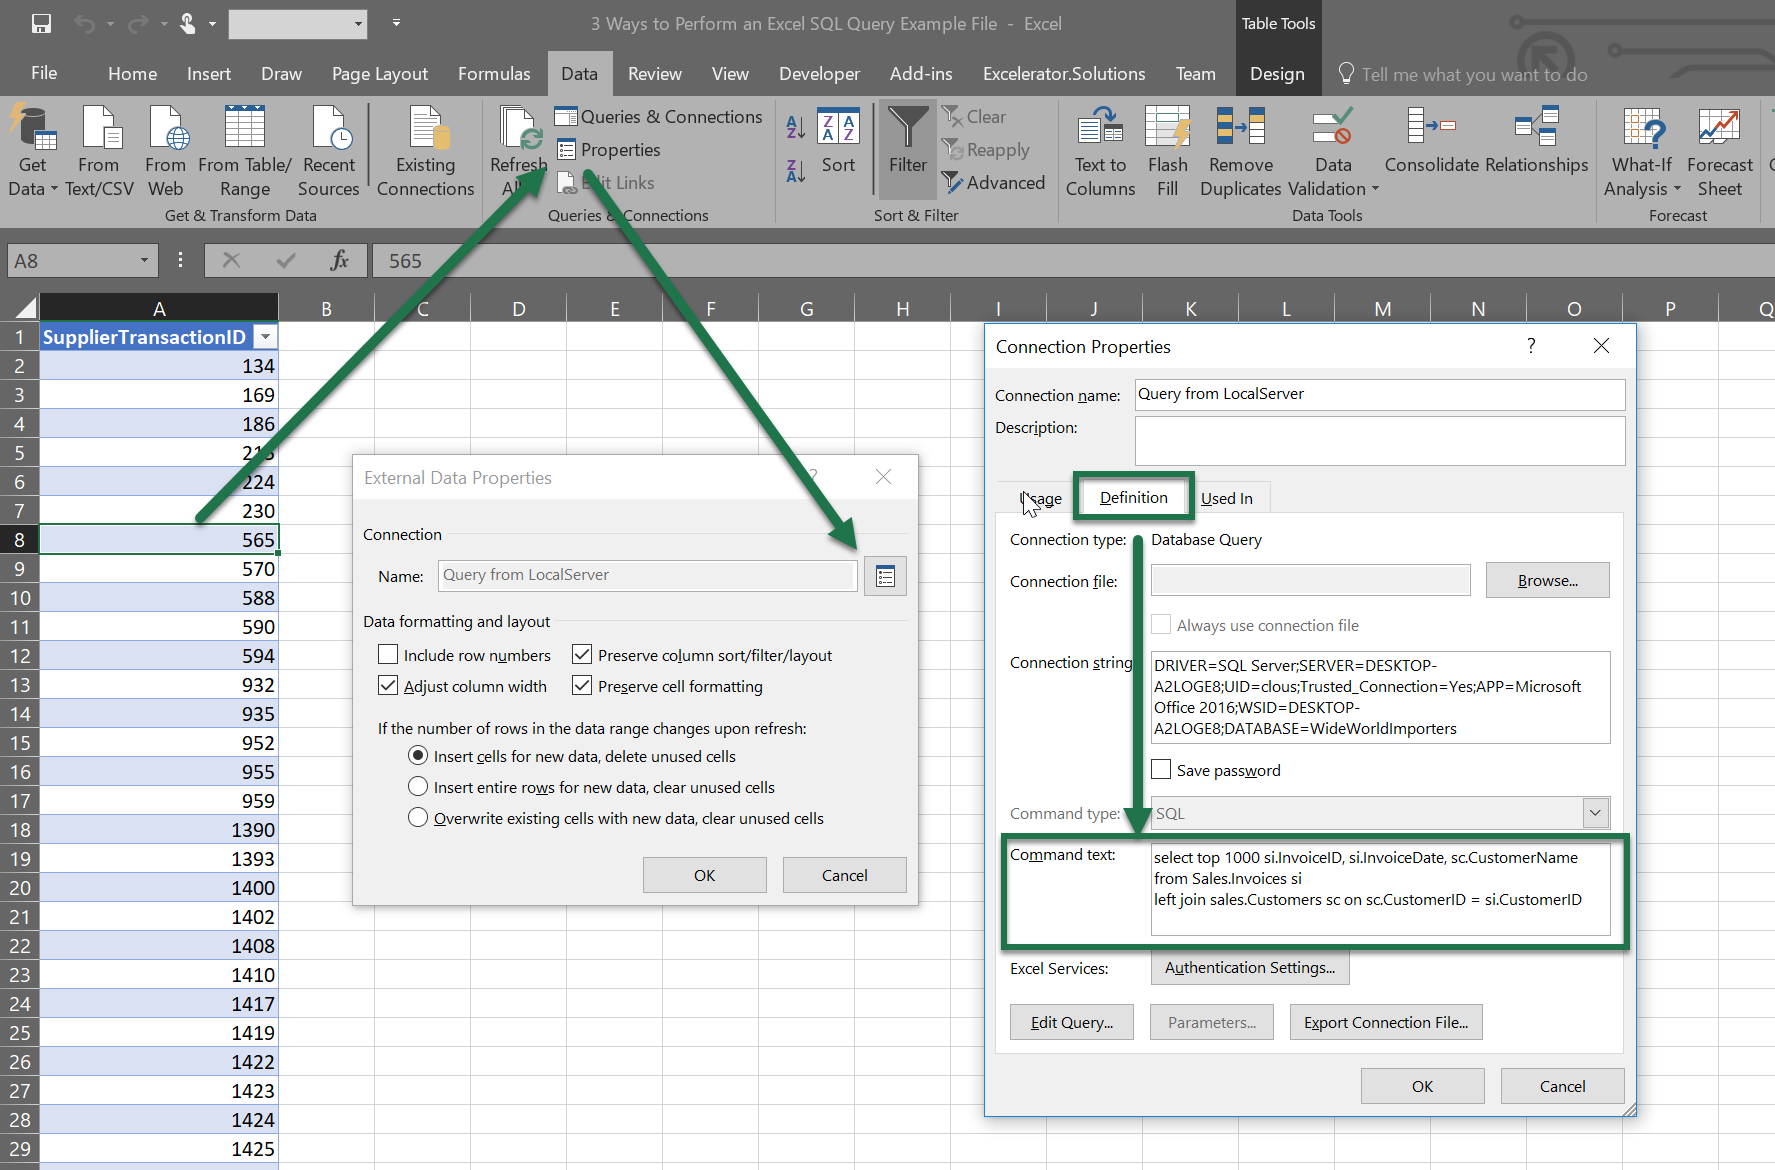
Now you’ve built an Excel SQL Query that can be refreshed anytime the workbook is refreshed. In my screengrab, the “Parameters” button is greyed out. If you want to add parameters to your query, you do so by adding “?” in your command text. That looks like this.
This creates a parameter the end user can interact with. You can have the user be prompted to enter an input when the workbook is refreshed, select a default value, or have it linked to a cell in the workbook. Even though this option is cumbersome to set up, I really enjoy using it. It allows me a lot of flexibility to have the user interact with the data. As I touched on in the beginning, I’ve had success using this option on Microsoft Office for Mac OSX. I don’t want to say this will work 100% of the time on a Mac because I’ve also had it fail. If anyone has any input on this, I’d love to hear from you.
Let me know your thoughts on these approaches in the comments! What other ways do you creatively get data into Excel from SQL data sources?
Cheers!
R
Export SQL Data to Excel from Microsoft SQL Server
Let’s go over three ways to export an SQL Query to an Excel File Using MSSQL
Despite the pushback from Database aficionados, sometimes it makes sense to export data from SQL to an Excel file. It really depends on who is the audience of the information. Not everyone is great with SQL Analysis. Few people require access to the database.
And lots of times the boss just needs to see the information in Excel.
So, if Excel is the Output required this article is here to help you Export SQL Queries to Excel.
Here are three ways to Export a SQL query to Excel format. The last one can be kind of tricky. I’ll provide a condensed version followed by a detailed version with screenshots.
Three quick ways to Export SQL Data to Excel:
Choose the Summarized Version and then scroll to further down to use the SQL Export Version to Excel that works best for you.
Method Number 1 – Copy Grid results and Paste into Excel
Under Query, Make sure results to Grid are selected.
After Running your query, right-click the top right corner of the grid.
Copy With Headers.
Paste into an Excel File
Possible Issues:
I’ve seen formatting issues with this strategy. For Example, there are situations where the spreadsheet drops preceding zeroes after the copy-paste.
I’ve also noticed lengthy fields, (think of a really long free text field) end up running into the next line.
For the reasons above, I prefer this next method for a clean Excel file.
Method Number 2: Export the Query Results as a Task
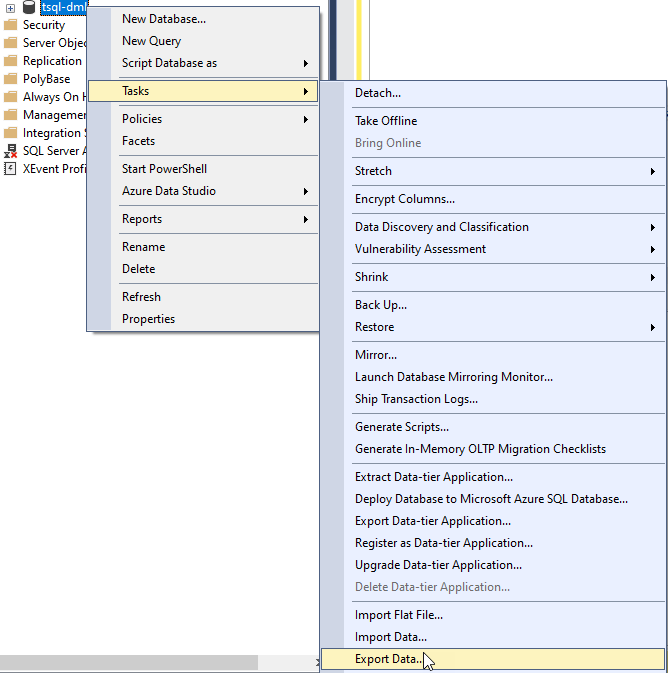
In the object explorer window, find the database you want to export from.
Right Click the Database, Click Tasks, and Export Data
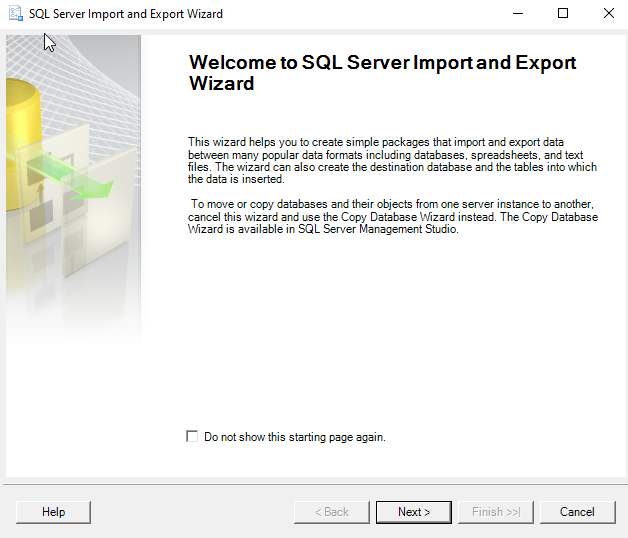
The Wizard walks you through the rest of the steps but I have included screenshots below.
Method Number 3 – Use Good Old fashioned TSQL to send the data to an excel file
For those who value speed above all use the following script format.
INSERT INTO OPENROWSET(‘Microsoft.ACE.OLEDB.12.0′,’Excel 12.0; Database=C:SQL2019ReportsUsernames.xlsx;’,’SELECT * FROM [Sheet1$]’) SELECT DisplayName FROM dbo.Users Where Reputation > 2000
Possible Issues – Configuring this might not be your type of fun and getting this straight deserves its own article.
Step by Step instructions with screenshots
Method Number 1 – Copy Grid results and paste into Excel
After ensuring results to grid turned on, Execute your query, right-click the top left-hand corner of the results grid.
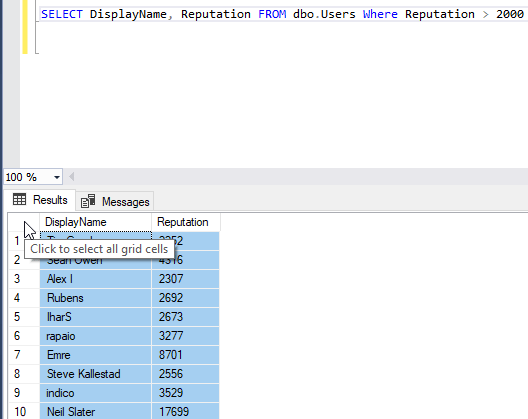
Choose Copy with Headers and then you are ready to paste in Excel with Ctrl + C
Method 2 – Export Via the Export Wizard
Right-click on the database you want to export from. Then Select tasks and “Export Data”.
The SQL Server Wizard will startup. Click Next through the prompts.
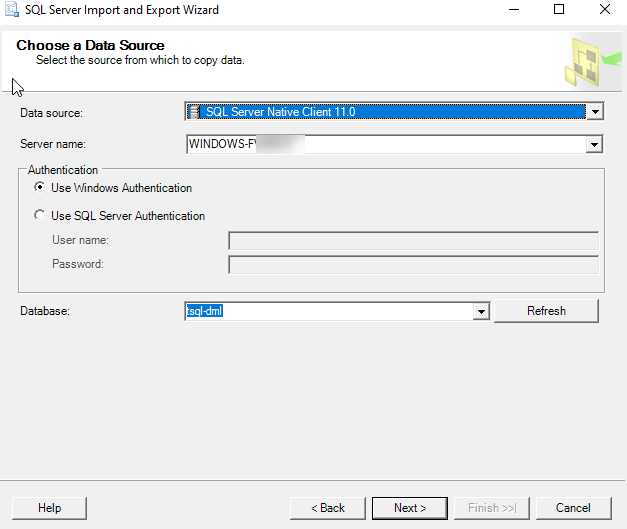
Select the appropriate Native client, your server name, and database and choose “Next”.
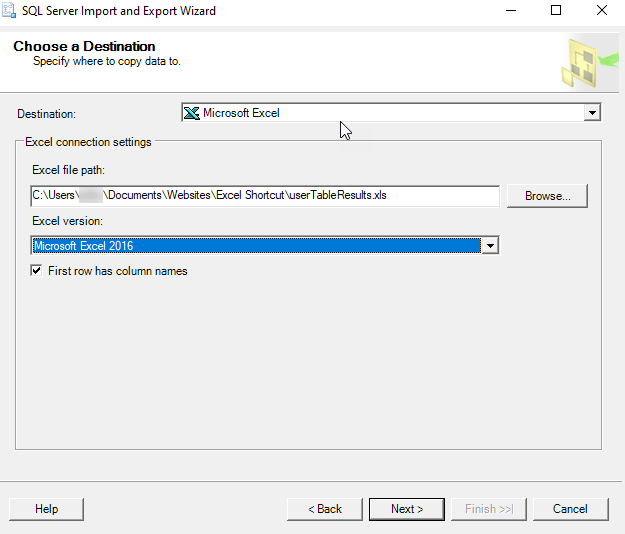
Next, Select Microsoft Excel and the file path where you want to import the data. The .xls file that you name will be created by this process.
Now you can choose to export a whole table or a query. For the purpose of this exercise, we are creating a query.
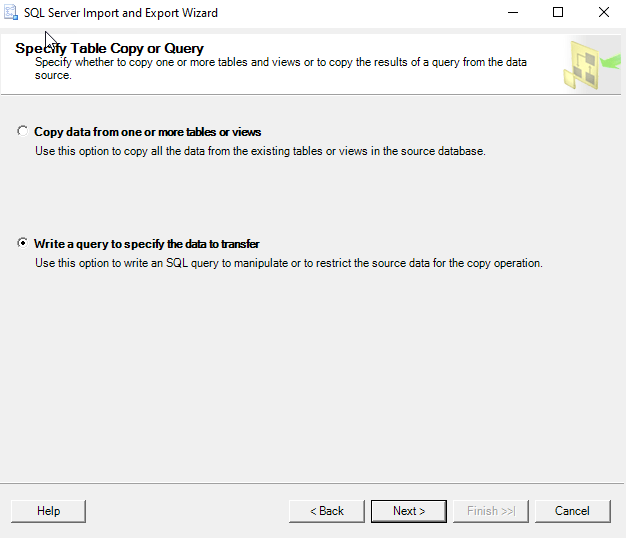
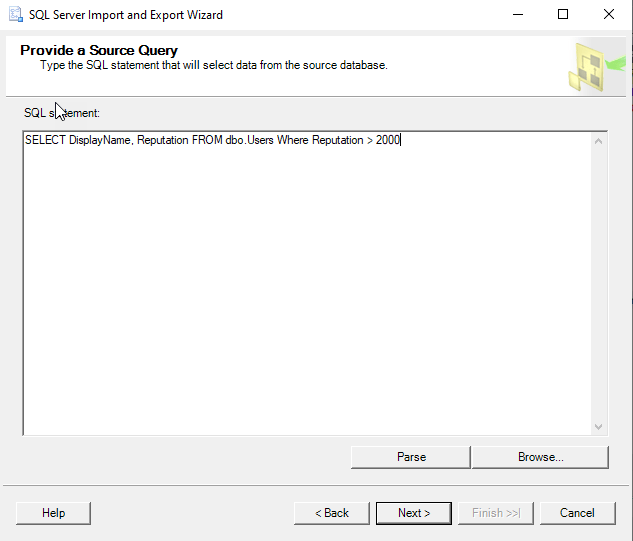
Paste the query into the SQL Statement field. Make sure every output field has a unique name.
Click Next on the “Select Source Tables and Views” screen.

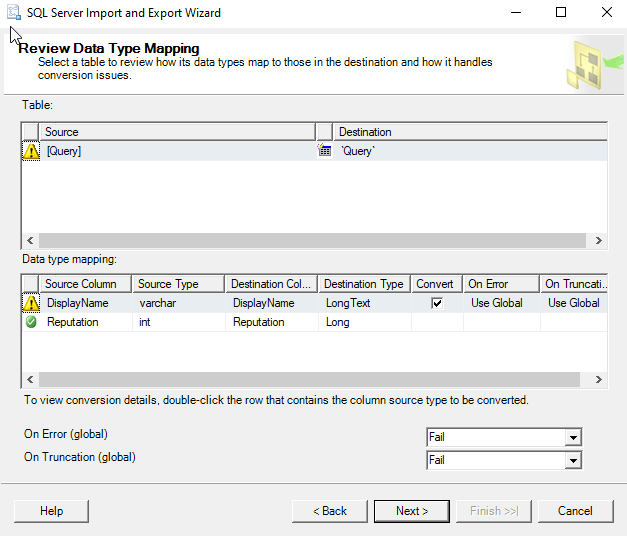
I use the default settings on the “conversion issues and data type mapping screen”
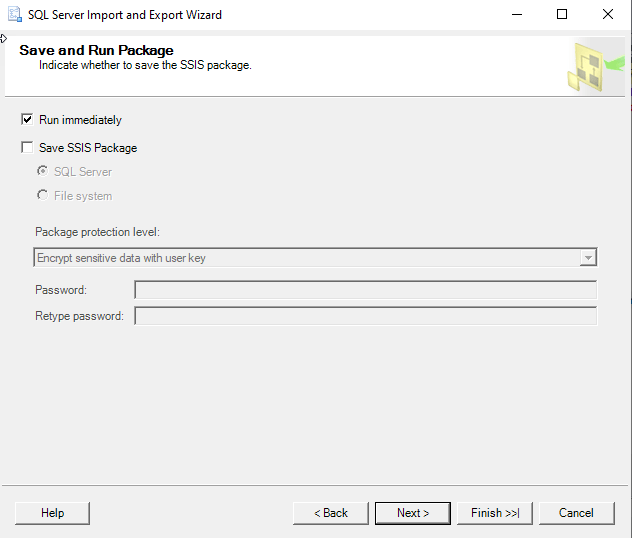
Now you can choose to Run immediately or Save an SSIS Package for later reuse.
Double Check your settings and click finish.
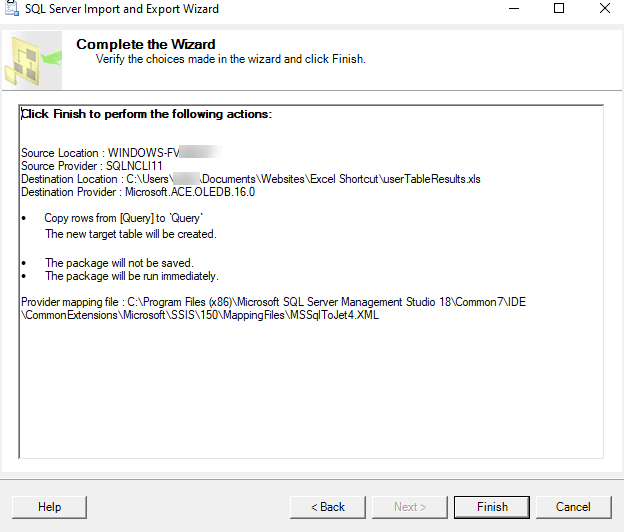
Make sure there were no errors in the Export.
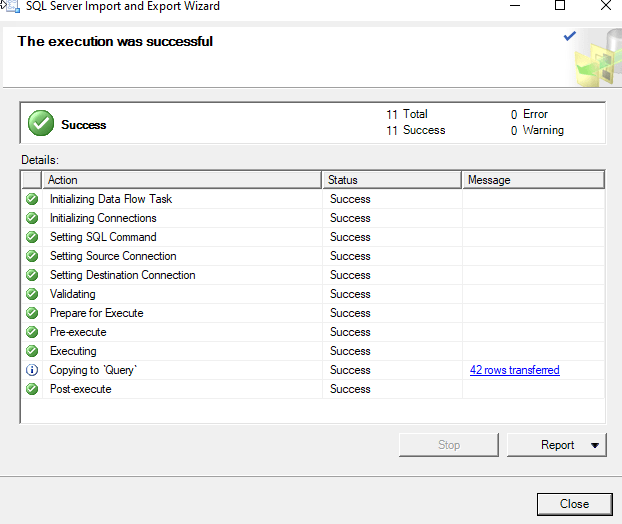
Now Go to the directory you choose earlier and make sure you have a sweet-looking Excel File at that location!
Method Number 3 – Use TSQL to send the data to an excel file
This method is the quickest once you get it set up but the configuration is the tricky part. Permissions can be a limiting factor.
Also with the script below, you have to make sure the file exists before you run the query for it to import properly.
First, create a blank excel file at the directory of your choosing.
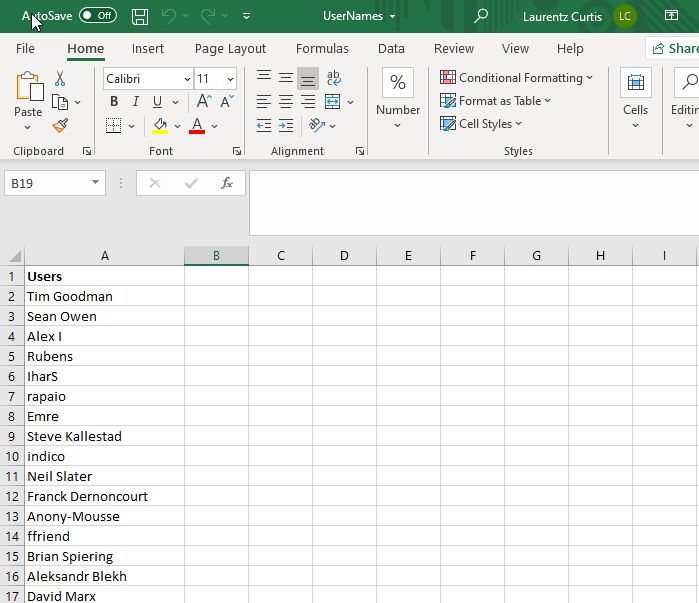
C:SQL2019ReportsUsernames.xlsx
Then run this script below.
INSERT INTO OPENROWSET(‘Microsoft.ACE.OLEDB.12.0’,’Excel 12.0;
Database=C:SQL2019ReportsUsernames.xlsx;’,’SELECT * FROM [Sheet1$]’)
SELECT DisplayName FROM dbo.Users Where Reputation > 2000

Configuring this can be tricky and dependent on your level of permissions. Make sure you have the correct Linked Server/Provider installed (‘Microsoft.ACE.OLEDB.12.0’) And check your Database user settings to this server .

There are many fine ways to get this done, which others have already suggestioned. Following along the «get Excel data via SQL track», here are some pointers.
-
Excel has the «Data Connection Wizard» which allows you to import or link from another data source or even within the very same Excel file.
-
As part of Microsoft Office (and OS’s) are two providers of interest: the old «Microsoft.Jet.OLEDB», and the latest «Microsoft.ACE.OLEDB». Look for them when setting up a connection (such as with the Data Connection Wizard).
-
Once connected to an Excel workbook, a worksheet or range is the equivalent of a table or view. The table name of a worksheet is the name of the worksheet with a dollar sign («$») appended to it, and surrounded with square brackets («[» and «]»); of a range, it is simply the name of the range. To specify an unnamed range of cells as your recordsource, append standard Excel row/column notation to the end of the sheet name in the square brackets.
-
The native SQL will (more or less be) the SQL of Microsoft Access. (In the past, it was called JET SQL; however Access SQL has evolved, and I believe JET is deprecated old tech.)
-
Example, reading a worksheet:
SELECT * FROM [Sheet1$] -
Example, reading a range:
SELECT * FROM MyRange -
Example, reading an unnamed range of cells:
SELECT * FROM [Sheet1$A1:B10] -
There are many many many books and web sites available to help you work through the particulars.
Further notes
By default, it is assumed that the first row of your Excel data source contains column headings that can be used as field names. If this is not the case, you must turn this setting off, or your first row of data «disappears» to be used as field names. This is done by adding the optional HDR= setting to the Extended Properties of the connection string. The default, which does not need to be specified, is HDR=Yes. If you do not have column headings, you need to specify HDR=No; the provider names your fields F1, F2, etc.
A caution about specifying worksheets: The provider assumes that your table of data begins with the upper-most, left-most, non-blank cell on the specified worksheet. In other words, your table of data can begin in Row 3, Column C without a problem. However, you cannot, for example, type a worksheet title above and to the left of the data in cell A1.
A caution about specifying ranges: When you specify a worksheet as your recordsource, the provider adds new records below existing records in the worksheet as space allows. When you specify a range (named or unnamed), Jet also adds new records below the existing records in the range as space allows. However, if you requery on the original range, the resulting recordset does not include the newly added records outside the range.
Data types (worth trying) for CREATE TABLE: Short, Long, Single, Double, Currency, DateTime, Bit, Byte, GUID, BigBinary, LongBinary, VarBinary, LongText, VarChar, Decimal.
Connecting to «old tech» Excel (files with the xls extention): Provider=Microsoft.Jet.OLEDB.4.0;Data Source=C:MyFolderMyWorkbook.xls;Extended Properties=Excel 8.0;. Use the Excel 5.0 source database type for Microsoft Excel 5.0 and 7.0 (95) workbooks and use the Excel 8.0 source database type for Microsoft Excel 8.0 (97), 9.0 (2000) and 10.0 (2002) workbooks.
Connecting to «latest» Excel (files with the xlsx file extension): Provider=Microsoft.ACE.OLEDB.12.0;Data Source=Excel2007file.xlsx;Extended Properties="Excel 12.0 Xml;HDR=YES;"
Treating data as text: IMEX setting treats all data as text. Provider=Microsoft.ACE.OLEDB.12.0;Data Source=Excel2007file.xlsx;Extended Properties="Excel 12.0 Xml;HDR=YES;IMEX=1";
(More details at http://www.connectionstrings.com/excel)
More information at http://msdn.microsoft.com/en-US/library/ms141683(v=sql.90).aspx, and at http://support.microsoft.com/kb/316934
Connecting to Excel via ADODB via VBA detailed at http://support.microsoft.com/kb/257819
Microsoft JET 4 details at http://support.microsoft.com/kb/275561
Introduction
There are two ways to import SQL Server data into Microsoft Excel using VBA:
- To create a QueryTable connected to a database table using Excel or VBA.
- To insert database data to a range using ADO Recordset or Excel add-ins.
The QueryTable object has a native Excel feature to refresh data.
To refresh data inserted using ADO, just insert the data again.
There are two ways to export Excel data to SQL Server using VBA:
- To use ADO.
- To use Excel add-ins that allow saving data and support VBA integration.
You can download the example and continue reading when you try the code.
Download Example
The attached VBA code example works in Microsoft Excel 2003-2016.
The example works with data in Microsoft Azure SQL Database. So, you can test the solution right after download.
Before to continue
This article was written in June 2011. It contains the tested code that you can use. I have a lot of thanks.
I would like to recommend you to take a look at my e-book «Excel Applications. 10 Steps for VBA Developers.»
You can also download the workbook examples and the SaveToDB add-in used as a free VBA library.
With the SaveToDB add-in, you can create more functional VBA applications with fewer efforts.
For example, you can save data changes from Excel to a database using a single call like GetAddIn().Save.
E-book
E-book Examples
SaveToDB Add-In
Table of Contents
- Introduction
- SQL Server Data Import to Excel using QueryTable
- SQL Server Data Import to Excel using ADO
- SQL Server Data Import to Excel using SaveToDB Add-In
- Excel Data Export to SQL Server using ADO
- Excel Data Export to SQL Server using SaveToDB Add-In
- Connection String Functions
- Conclusion
- See Also
- Download
SQL Server Data Import to Excel using QueryTable
Function ImportSQLtoQueryTable
The function creates a native Excel QueryTable connected to the OLE DB data source specified by the conString parameter.
The result is nearly the same as using the standard Excel connection dialog box.
Function ImportSQLtoQueryTable(conString As String, query As String, target As Range) As Integer

    On Error Resume Next

    Dim ws As Worksheet
    Set ws = target.Worksheet

    Dim address As String
    address = target.Cells(1, 1).address

    ' Procedure recreates ListObject or QueryTable

    If Not target.ListObject Is Nothing Then     ' Created in Excel 2007 or higher
        target.ListObject.Delete
    ElseIf Not target.QueryTable Is Nothing Then ' Created in Excel 2003
        target.QueryTable.ResultRange.Clear
        target.QueryTable.Delete
    End If

    If Application.Version >= "12.0" Then        ' Excel 2007 or higher
        With ws.ListObjects.Add(SourceType:=0, Source:=Array("OLEDB;" & conString), _
            Destination:=Range(address))

            With .QueryTable
                .CommandType = xlCmdSql
                .CommandText = StringToArray(query)
                .BackgroundQuery = True
                .SavePassword = True
                .Refresh BackgroundQuery:=False
            End With
        End With
    Else                                          ' Excel 2003
        With ws.QueryTables.Add(Connection:=Array("OLEDB;" & conString), _
            Destination:=Range(address))

            .CommandType = xlCmdSql
            .CommandText = StringToArray(query)
            .BackgroundQuery = True
            .SavePassword = True
            .Refresh BackgroundQuery:=False
        End With
    End If

    ImportSQLtoQueryTable = 0

End Function

' Source: http://support.microsoft.com/kb/816562

Function StringToArray(Str As String) As Variant

    Const StrLen = 127
    Dim NumElems As Integer
    Dim Temp() As String
    Dim i As Integer

    NumElems = (Len(Str) / StrLen) + 1
    ReDim Temp(1 To NumElems) As String

    For i = 1 To NumElems
       Temp(i) = Mid(Str, ((i - 1) * StrLen) + 1, StrLen)
    Next i

    StringToArray = Temp
End Function
Code comments:
- The query parameter can contain a SELECT or EXECUTE query.
- The resulting data will be inserted starting from the top left cell of the target range.
- If the target range contains a ListObject or QueryTable object, it will be deleted, and a new object will be created instead.
If you need to change the query only, just change the QueryTable.CommandText property. - Pay attention to the .SavePassword = True line.
Microsoft Excel stores passwords without encryption.
If possible, use the trusted connection. However, it is not supported by Microsoft Azure SQL Database yet.
Test Code of SQL Server Data Import to Excel using QueryTable
Sub TestImportUsingQueryTable()

    Dim conString As String
    conString = GetTestConnectionString()

    Dim query As String
    query = GetTestQuery()

    Dim target As Range
    Set target = ThisWorkbook.Sheets(1).Cells(3, 2)

    Select Case ImportSQLtoQueryTable(conString, query, target)
        Case Else
    End Select

End Sub
SQL Server Data Import to Excel using ADO
Function ImportSQLtoRange
The function inserts SQL Server data to the target Excel range using ADO.
Function ImportSQLtoRange(conString As String, query As String, target As Range) As Integer

    On Error Resume Next

    ' Object type and CreateObject function are used instead of ADODB.Connection,
    ' ADODB.Command for late binding without reference to
    ' Microsoft ActiveX Data Objects 2.x Library

    ' ADO API Reference
    ' https://docs.microsoft.com/en-us/sql/ado/reference/ado-api/ado-api-reference?view=sql-server-ver16

    ' Dim con As ADODB.Connection
    Dim con As Object
    Set con = CreateObject("ADODB.Connection")

    con.ConnectionString = conString

    ' Dim cmd As ADODB.Command
    Dim cmd As Object
    Set cmd = CreateObject("ADODB.Command")

    cmd.CommandText = query
    cmd.CommandType = 1         ' adCmdText

    ' The Open method doesn't actually establish a connection to the server
    ' until a Recordset is opened on the Connection object
    con.Open
    cmd.ActiveConnection = con

    ' Dim rst As ADODB.Recordset
    Dim rst As Object
    Set rst = cmd.Execute

    If rst Is Nothing Then
        con.Close
        Set con = Nothing

        ImportSQLtoRange = 1
        Exit Function
    End If

    Dim ws As Worksheet
    Dim col As Integer

    Set ws = target.Worksheet

    ' Column Names
    For col = 0 To rst.Fields.Count - 1
        ws.Cells(target.row, target.Column + col).Value = rst.Fields(col).Name
    Next
    ws.Range(ws.Cells(target.row, target.Column), _
        ws.Cells(target.row, target.Column + rst.Fields.Count)).Font.Bold = True

    ' Data from Recordset
    ws.Cells(target.row + 1, target.Column).CopyFromRecordset rst

    rst.Close
    con.Close

    Set rst = Nothing
    Set cmd = Nothing
    Set con = Nothing

    ImportSQLtoRange = 0

End Function
Code comments:
- The query parameter can contain a SELECT or EXECUTE query.
- The resulting data will be inserted starting from the top left cell of the target range.
- Using Object types and the CreateObject function instead of direct use of ADO types
lets to avoid setting ActiveX Data Objects 2.x Library references on user computers.
This code works in Microsoft Excel 2003-2016. - Always use Set Nothing statements for ADODB.Connection and ADODB.Recordset objects to free resources.
Test Code of SQL Server Data Import to Excel using ADO
Sub TestImportUsingADO()

    Dim conString As String
    conString = GetTestConnectionString()

    Dim query As String
    query = GetTestQuery()

    Dim target As Range
    Set target = ThisWorkbook.Sheets(2).Cells(3, 2)

    target.CurrentRegion.Clear

    Select Case ImportSQLtoRange(conString, query, target)
        Case 1
            MsgBox "Import database data error", vbCritical
        Case Else
    End Select

End Sub
SQL Server Data Import to Excel using SaveToDB Add-In
The SaveToDB add-in allows connecting to databases, to text files, and the web using Data Connection Wizard, and supports OLE DB, ODBC, .NET and internal providers.
You can reload data using the Reload button at the ribbon or in the Context menu, or from VBA macros.
However, the add-in does not support connecting to new data sources from macros.
The add-in can save a lot of developer time when you need to implement changing query parameters.
You can modify the parameters by setting new values to named cells like Range(«Company») = «ABC».
You can learn about this feature in the attached SaveToDB examples for VBA developers.
Procedure TestImportUsingSaveToDB
The procedure reloads active table data.
The table is a native Excel ListObject connected using the Data Connection Wizard.
Sub TestImportUsingSaveToDB()

    Dim addIn As COMAddIn
    Dim addInObj As Object

    Set addIn = Application.COMAddIns("SaveToDB")
    Set addInObj = addIn.Object

    addInObj.Load

End Sub
Code comments:
If the table is an Excel ListObject connected to a database using OLE DB or ODBC, then the action is the same as ListObject.QueryTable.Refresh BackgroundQuery:=False.
In other cases (the web and file connections or databases through .NET providers), the add-in refreshes data using internal procedures. Moreover, the macro remains the same.
Excel Data Export to SQL Server using ADO
Function ExportRangeToSQL
The function exports the sourceRange data to a specified database table.
The optional beforeSQL code is executed before exporting, and the optional afterSQL code is executed after exporting.
The following logic of the export process is used in the example:
- Delete all data from a temporary import table.
- Export Excel data to the empty temporary import table.
- Update desired tables from the temporary import table data.
Specially developed stored procedures are used in the first and third steps.
You can adapt them to your task.
Moreover, a universal code is used to transfer Excel data to a destination table.
Function ExportRangeToSQL(sourceRange As Range, conString As String, table As String, _
    Optional beforeSQL = "", Optional afterSQL As String) As Integer

    On Error Resume Next

    ' Object type and CreateObject function are used instead of ADODB.Connection,
    ' ADODB.Command for late binding without reference to
    ' Microsoft ActiveX Data Objects 2.x Library
    ' ADO API Reference
    ' https://docs.microsoft.com/en-us/sql/ado/reference/ado-api/ado-api-reference?view=sql-server-ver16
    ' Dim con As ADODB.Connection
    Dim con As Object
    Set con = CreateObject("ADODB.Connection")

    con.ConnectionString = conString
    con.Open

    ' Dim cmd As ADODB.Command
    Dim cmd As Object
    Set cmd = CreateObject("ADODB.Command")

    ' BeginTrans, CommitTrans, and RollbackTrans Methods (ADO)
    ' http://msdn.microsoft.com/en-us/library/ms680895(v=vs.85).aspx

    Dim level As Long
    level = con.BeginTrans

    cmd.CommandType = 1             ' adCmdText
    If beforeSQL > "" Then
        cmd.CommandText = beforeSQL
        cmd.ActiveConnection = con
        cmd.Execute
    End If

    ' Dim rst As ADODB.Recordset
    Dim rst As Object
    Set rst = CreateObject("ADODB.Recordset")

    With rst
        Set .ActiveConnection = con
        .Source = "SELECT * FROM " & table
        .CursorLocation = 3         ' adUseClient
        .LockType = 4               ' adLockBatchOptimistic
        .CursorType = 0             ' adOpenForwardOnly
        .Open

        ' Column mappings

        Dim tableFields(100) As Integer
        Dim rangeFields(100) As Integer

        Dim exportFieldsCount As Integer
        exportFieldsCount = 0

        Dim col As Integer
        Dim index As Integer

        For col = 0 To .Fields.Count - 1
            index = 0
            index = Application.Match(.Fields(col).Name, sourceRange.Rows(1), 0)
            If index > 0 Then
                exportFieldsCount = exportFieldsCount + 1
                tableFields(exportFieldsCount) = col
                rangeFields(exportFieldsCount) = index
            End If
        Next

        If exportFieldsCount = 0 Then
            ExportRangeToSQL = 1
            Goto ConnectionEnd
        End If

        ' Fast read of Excel range values to an array
        ' for further fast work with the array

        Dim arr As Variant
        arr = sourceRange.Value

        ' The range data transfer to the Recordset

        Dim row As Long
        Dim rowCount As Long
        rowCount = UBound(arr, 1)

        Dim val As Variant

        For row = 2 To rowCount
            .AddNew
            For col = 1 To exportFieldsCount
                val = arr(row, rangeFields(col))
                If IsEmpty(val) Then
                Else
                    .Fields(tableFields(col)) = val
                End If
            Next
        Next

        .UpdateBatch
    End With

    rst.Close
    Set rst = Nothing

    If afterSQL > "" Then
        cmd.CommandText = afterSQL
        cmd.ActiveConnection = con
        cmd.Execute
    End If

    ExportRangeToSQL = 0

ConnectionEnd:

    con.CommitTrans

    con.Close
    Set cmd = Nothing
    Set con = Nothing

End Function
Code comments:
- The preliminary column mappings are used for fast transferring Excel range column data to a Recordset column.
- Excel data types are not verified.
- Using Object types and the CreateObject function instead of direct use of ADO types
lets to avoid setting ActiveX Data Objects 2.x Library references on user computers.
This code works in Microsoft Excel 2003-2016. - Always use Set Nothing statements for ADODB.Connection and ADODB.Recordset objects to free resources.
Test Code of Excel Data Export to SQL Server
The temporary dbo04.ExcelTestImport table is used for inserting Excel data.
This table is cleared before exporting by the dbo04.uspImportExcel_Before stored procedure.
The dbo04.uspImportExcel_After stored procedure updates the source dbo04.ExcelTest table with values from dbo04.ExcelTestImport.
This technique simplifies the Excel part of an application but requires additional database objects and server side coding.
Sub TestExportUsingADO()

    Dim conString As String
    conString = GetTestConnectionString()

    Dim table As String
    table = "dbo04.ExcelTestImport"

    Dim beforeSQL As String
    Dim afterSQL As String

    beforeSQL = "EXEC dbo04.uspImportExcel_Before"
    afterSQL = "EXEC dbo04.uspImportExcel_After"

    Dim ws As Worksheet
    Set ws = ThisWorkbook.ActiveSheet

    Dim qt As QueryTable
    Set qt = GetTopQueryTable(ws)

    Dim sourceRange As Range

    If Not qt Is Nothing Then
        Set sourceRange = qt.ResultRange
    Else
        Set sourceRange = ws.Cells(3, 2).CurrentRegion
    End If

    Select Case ExportRangeToSQL(sourceRange, conString, table, beforeSQL, afterSQL)
        Case 1
            MsgBox "The source range does not contain required headers", vbCritical
        Case Else
    End Select

    ' Refresh the data
    If Not qt Is Nothing Then
        Call RefreshWorksheetQueryTables(ws)
    ElseIf ws.Name = ws.Parent.Worksheets(1).Name Then
    Else
        Call TestImportUsingADO
    End If

End Sub
The called RefreshWorksheetQueryTables procedure updates all worksheet QueryTables and ListObjects.
Sub RefreshWorksheetQueryTables(ws As Worksheet)

    On Error Resume Next

    Dim qt As QueryTable

    For Each qt In ws.QueryTables
        qt.Refresh BackgroundQuery:=True
    Next

    Dim lo As ListObject

    For Each lo In ws.ListObjects
        lo.QueryTable.Refresh BackgroundQuery:=True
    Next

End Sub
The called GetTopQueryTable function returns the most top QueryTable object connected to a database.
Function GetTopQueryTable(ws As Worksheet) As QueryTable

    On Error Resume Next

    Set GetTopQueryTable = Nothing

    Dim lastRow As Long
    lastRow = 0

    Dim qt As QueryTable
    For Each qt In ws.QueryTables
        If qt.ResultRange.row > lastRow Then
            lastRow = qt.ResultRange.row
            Set GetTopQueryTable = qt
        End If
    Next

    Dim lo As ListObject

    For Each lo In ws.ListObjects
        If lo.SourceType = xlSrcQuery Then
            If lo.QueryTable.ResultRange.row > lastRow Then
                lastRow = lo.QueryTable.ResultRange.row
                Set GetTopQueryTable = lo.QueryTable
            End If
        End If
    Next

End Function
Excel Data Export to SQL Server using SaveToDB Add-In
The SaveToDB add-in allows saving data changes from Excel to databases.
You can save data using the Save button at the ribbon or from VBA macros.
The simplest scenario is saving changes to a single target table. It works without coding.
Moreover, you can load data from tables, views, or stored procedures.
If you need to save the data to multiple normalized tables, you have to use stored procedures
for INSERT, UPDATE, and DELETE operations. It is not so hard.
Procedure TestExportUsingSaveToDB
The macro saves data changes of the active table to a database and reloads the data.
Sub TestExportUsingSaveToDB()

    Dim addIn As COMAddIn
    Dim addInObj As Object

    Set addIn = Application.COMAddIns("SaveToDB")
    Set addInObj = addIn.Object

    addInObj.Save

End Sub
Code comments:
The SaveToDB add-in makes a lot of work behind the scene.
It saves table metadata, a copy of loaded data, and data changes on hidden sheets.
You can even close the workbook. When the Save action is called, it builds and sends
INSERT, UPDATE and DELETE statements (or specified stored procedures) to a database.
You can learn hidden sheets using the SaveToDB, Options, Developer Options tab,
and generated SQL commands using the SaveToDB, Save, View Save Changes SQL menu item.
Connection String Functions
The example contains several useful functions for working with connection strings.
Function OleDbConnectionString
If the Username parameter is empty, the function returns an OLE DB connection string for trusted connection.
Function OleDbConnectionString(Server As String, Database As String, _
    Username As String, Password As String) As String

    If Username = "" Then
        OleDbConnectionString = "Provider=SQLOLEDB.1;Data Source=" & Server _
            & ";Initial Catalog=" & Database _
            & ";Integrated Security=SSPI;Persist Security Info=False;"
    Else
        OleDbConnectionString = "Provider=SQLOLEDB.1;Data Source=" & Server _
            & ";Initial Catalog=" & Database _
            & ";User ID=" & Username & ";Password=" & Password & ";"
    End If

End Function
Function OdbcConnectionString
If the Username parameter is empty, the function returns an ODBC connection string for trusted connection.
Function OdbcConnectionString(Server As String, Database As String, _
    Username As String, Password As String) As String

    If Username = "" Then
        OdbcConnectionString = "Driver={SQL Server};Server=" & Server _
            & ";Trusted_Connection=Yes;Database=" & Database
    Else
        OdbcConnectionString = "Driver={SQL Server};Server=" & Server _
            & ";UID=" & Username & ";PWD=" & Password & ";Database=" & Database
    End If

End Function
Conclusion
You can use the attached example code to import-export data between Microsoft Excel and SQL Server.
The code works fine with Microsoft SQL Server 2005-2016 and Microsoft Azure SQL Database, and in Microsoft Excel 2003-2016.
You can adapt it to another database platforms like MySQL, Oracle, or DB2 as the code uses OLE DB and ODBC connections.
You can also use the SaveToDB add-in as a database layer starting Excel 2007.
SaveToDB allows implementing projects with fewer efforts as it solves database layer tasks from the box.
See Also
- Microsoft Office Development
- ADO API Reference
- How to import data from Microsoft SQL Server into Microsoft Excel
- Using SaveToDB Add-In as VBA Library
Download
![]()
Загрузить PDF
![]()
Загрузить PDF
Эта статья поможет пользователям вставить SQL-запрос в Excel 2010 и создать в Excel динамическую связь.
Шаги
-

1
Перейдите на вкладку «Данные» и выберите «Из других источников», как показано ниже.
-
2
В выпадающем меню выберите “Из мастера подключения данных”.
-
3
Откроется Мастер подключения данных. Из доступных вариантов выберите “ODBC DSN” и нажмите “Далее”.
-
4
Появится окно «Подключение к источнику данных ODBC». Там будет показан список баз данных, доступных в вашей организации. Выберите соответствующую базу данных и нажмите “Далее”.
-
5
Появится окно выбора базы данных и таблицы.
-
6
Мы можем выбрать базу данных и таблицу, откуда хотим получать данные. Соответственно, выберите нужную базу данных и таблицу.
-
7
В окне “Сохранить файл подключения к данным и завершить” выберите «Завершить». Это окно выберет имя файла на основе вашего выбора на предыдущих экранах.
-
8
Появится окно импортирования данных, где мы можем выбрать нужные варианты и нажать OK.
-
9
В выпадающем меню выберите “Из мастера подключения данных”.
-
10
Перейдите на вкладку «Данные» и нажмите на «Соединения». В следующем окне нажмите на «Свойства».
-
11
В следующем окне перейдите на вкладку «Определения».
-
12
В поле “Текст команды” введите SQL-запрос и нажмите OK. Excel отобразит результат согласно запроса.
-
13
Теперь перейдите в Microsoft Excel и проверьте, что результаты соответствуют указанному SQL-запросу.
Реклама


Об этой статье
Эту страницу просматривали 29 231 раз.