
Содержание
- Пишем игру «Жизнь» (Life) на VBA в Excel
- Шаг 1. Готовим игровое пространство
- Шаг 2. Пишем макрос
- How can you make Game of life in Excel? [closed]
- 7 Answers 7
- Gliders, Hasslers, and the Toadsucker: Writing and Explaining a Structured Excel Life Game
- Introduction
- Contents
- John Horton Conway’s game of Life
- Life simulators
- Running the Life spreadsheet
- Predefined patterns
- Blinker, clock, toad
- Toadsucker
- Figure 8, pulsar
- Glider, lightweight spaceship
- Glider gun, reflector, relay
- Writing spreadsheets in Excelsior
- Literate Spreadsheet Programming
- Iterative calculations in Excel
- The program
- Compiling Life
- Compiling a foxes-eat-rabbits model
- Compiling a science-fiction generator
- Life links and references
Пишем игру «Жизнь» (Life) на VBA в Excel
Если вы уже имели какой-то опыт программирования в прошлой жизни (привет, Basic, Pascal и т.д.), то, скорее всего, уже прошли этап «игрописательства». Однако, тряхнуть стариной и размять мозги вполне можно. Если же вы никогда не программировали игр, то никогда не поздно начать этот весьма увлекательный процесс. Всё, что нам потребуется — это Excel (любой версии) и 15-20 минут времени для начала.
Тренироваться будем на известной в узких кругах программистов игре «Жизнь» (Life). Её придумал британский математик Джон Конвей еще в 1970 году на основе работ легендарного Джона фон Неймана — прадедушки всех современных компьютеров. Если вы не сталкивались с ней раньше — не проблема, правила можно объяснить за полминуты:
Игра идет на большом (иногда даже бесконечном) поле в клеточку («вселенной»). Как вы понимаете, Excel для такого подходит идеально 🙂
В один момент времени каждая клетка может быть в двух состояниях — живой (обозначим её каким-нибудь значком или просто единичкой) или же мертвой (пустой). Начальное состояние всех клеток в игре называют первым поколением.
Если брать блок клеток 3х3 с текущей клеткой в середине, то вокруг неё оказывается 8 клеток-соседей. Дальнейшая судьба клетки зависит от того, сколько именно живых клеток (N) окажется в этой окружающей области. Вариантов несколько:
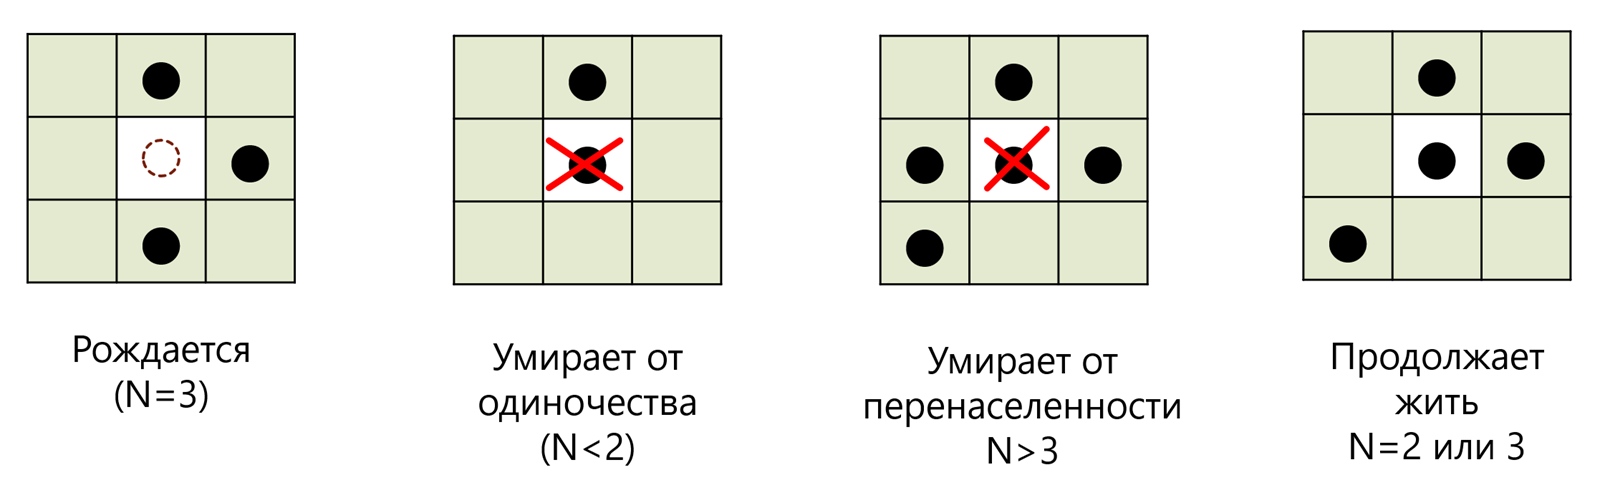
- Если клетка была пустая (мертвая), но у нее есть ровно 3 живых соседа, то в ней зарождается жизнь.
- Если клетка живая, но у неё меньше 2 соседей, то она умирает от одиночества.
- Если клетка живая, но у неё больше 3 соседей, то она умирает от перенаселения.
- Если клетка живая и у нее 2-3 соседа, то клетка продолжает жить.
Вот, собственно, и все правила. Можно даже сказать, что всё это неправильно называть игрой, т.к. здесь нет соперников в привычном понимании. Вы расставляете первое поколение, запускаете процесс и затем просто наблюдаете за развитием вашей «колонии» на протяжении нескольких поколений.
Однако, не стоит недооценивать обманчивую простоту этой логики — количество комбинаций, сценариев игры и многообразие фигур в такой игровой вселенной поражает своим разнообразием и поистине бесконечно. В математике подобные модели называют клеточными автоматами. А самое интересное, что реализовать подобную модель можно в любой версии Excel буквально на 20 строчках кода.
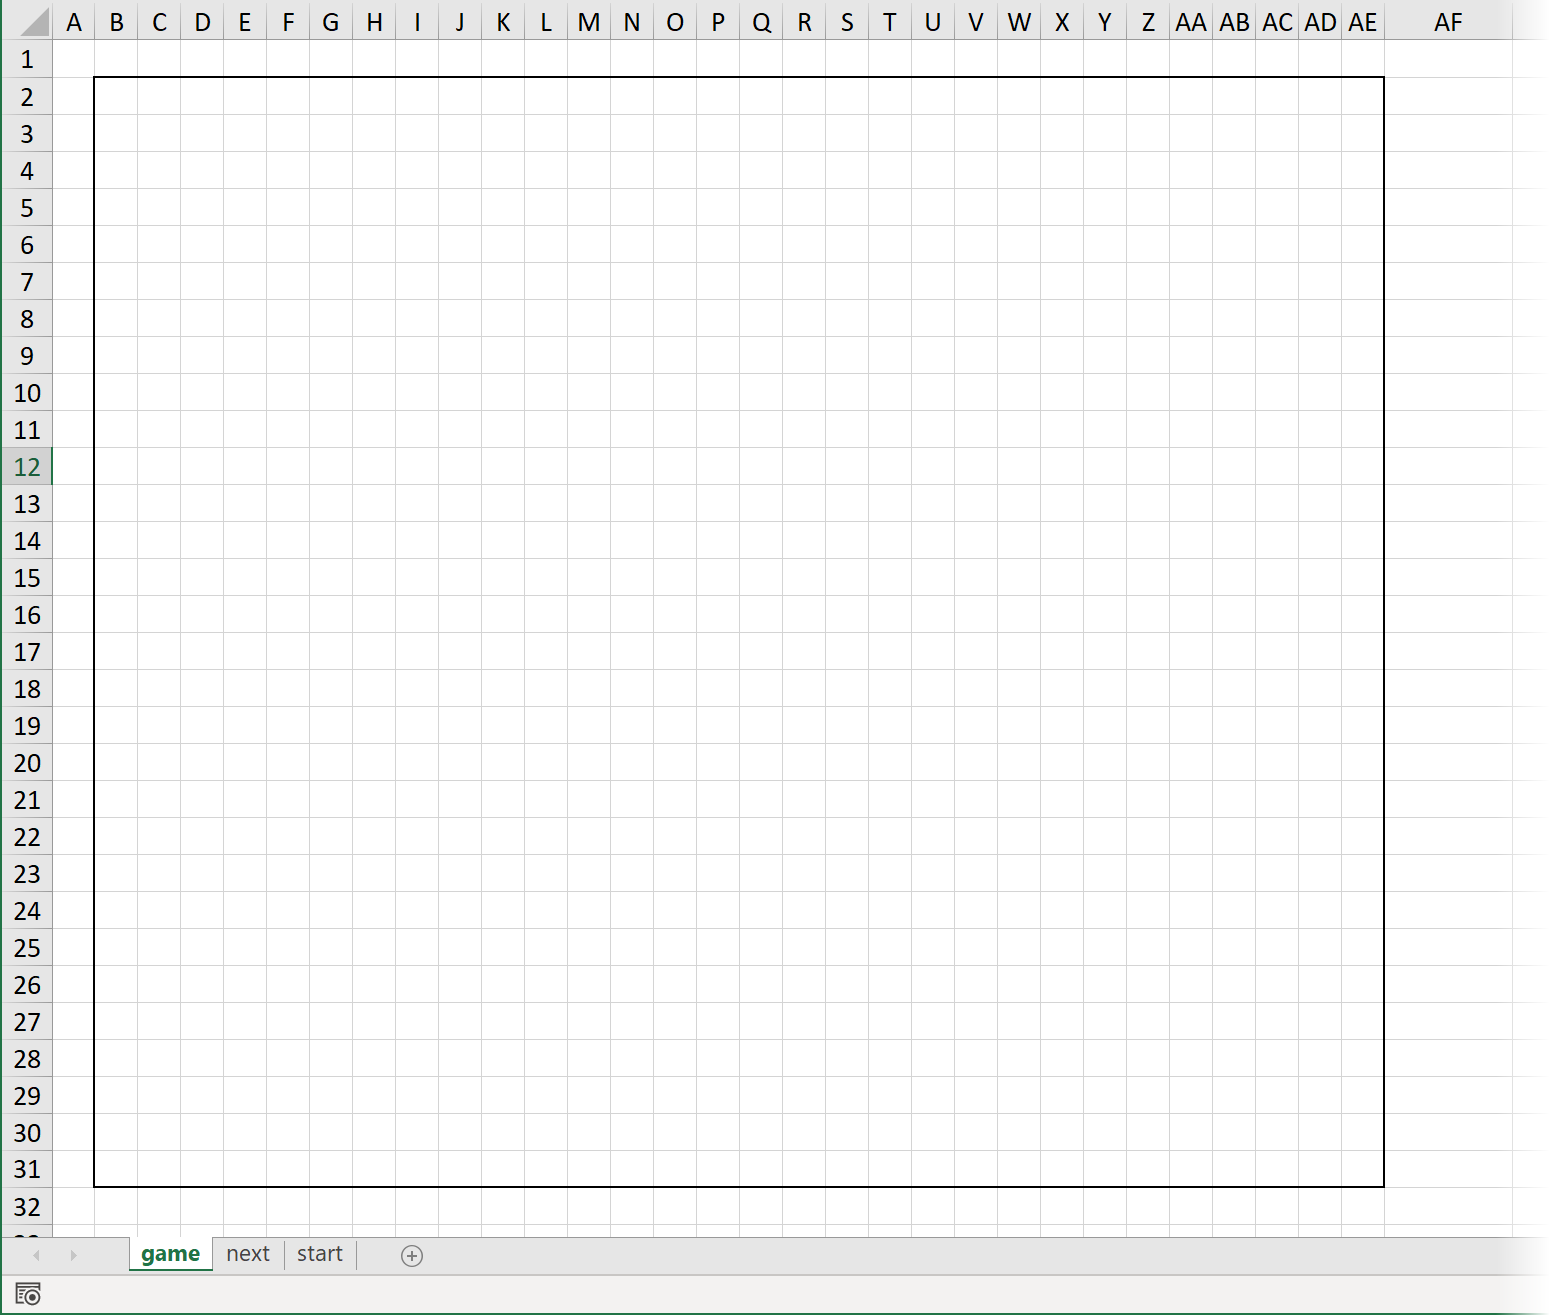
Шаг 1. Готовим игровое пространство
Создадим в новой книге три листа:
- game — это будет основной листы игры, где мы будем наблюдать за развитием нашей «колонии»
- next — этот лист будет формировать следующее поколение, которое затем придет на смену текущему
- start — на этом листе мы будем задавать начальную конфигурацию, т.е. первое поколение в нашей игре
На каждом листе (можно выделить их заранее, удерживая клавишу Shift или Ctrl , чтобы не повторять трижды одни и те же действия), разметим игровое поле размером, допустим, 30 на 30 ячеек. Впоследствии размер поля можно будет подправить в соответствии с вашими аппетитами и мощью вашего ПК:
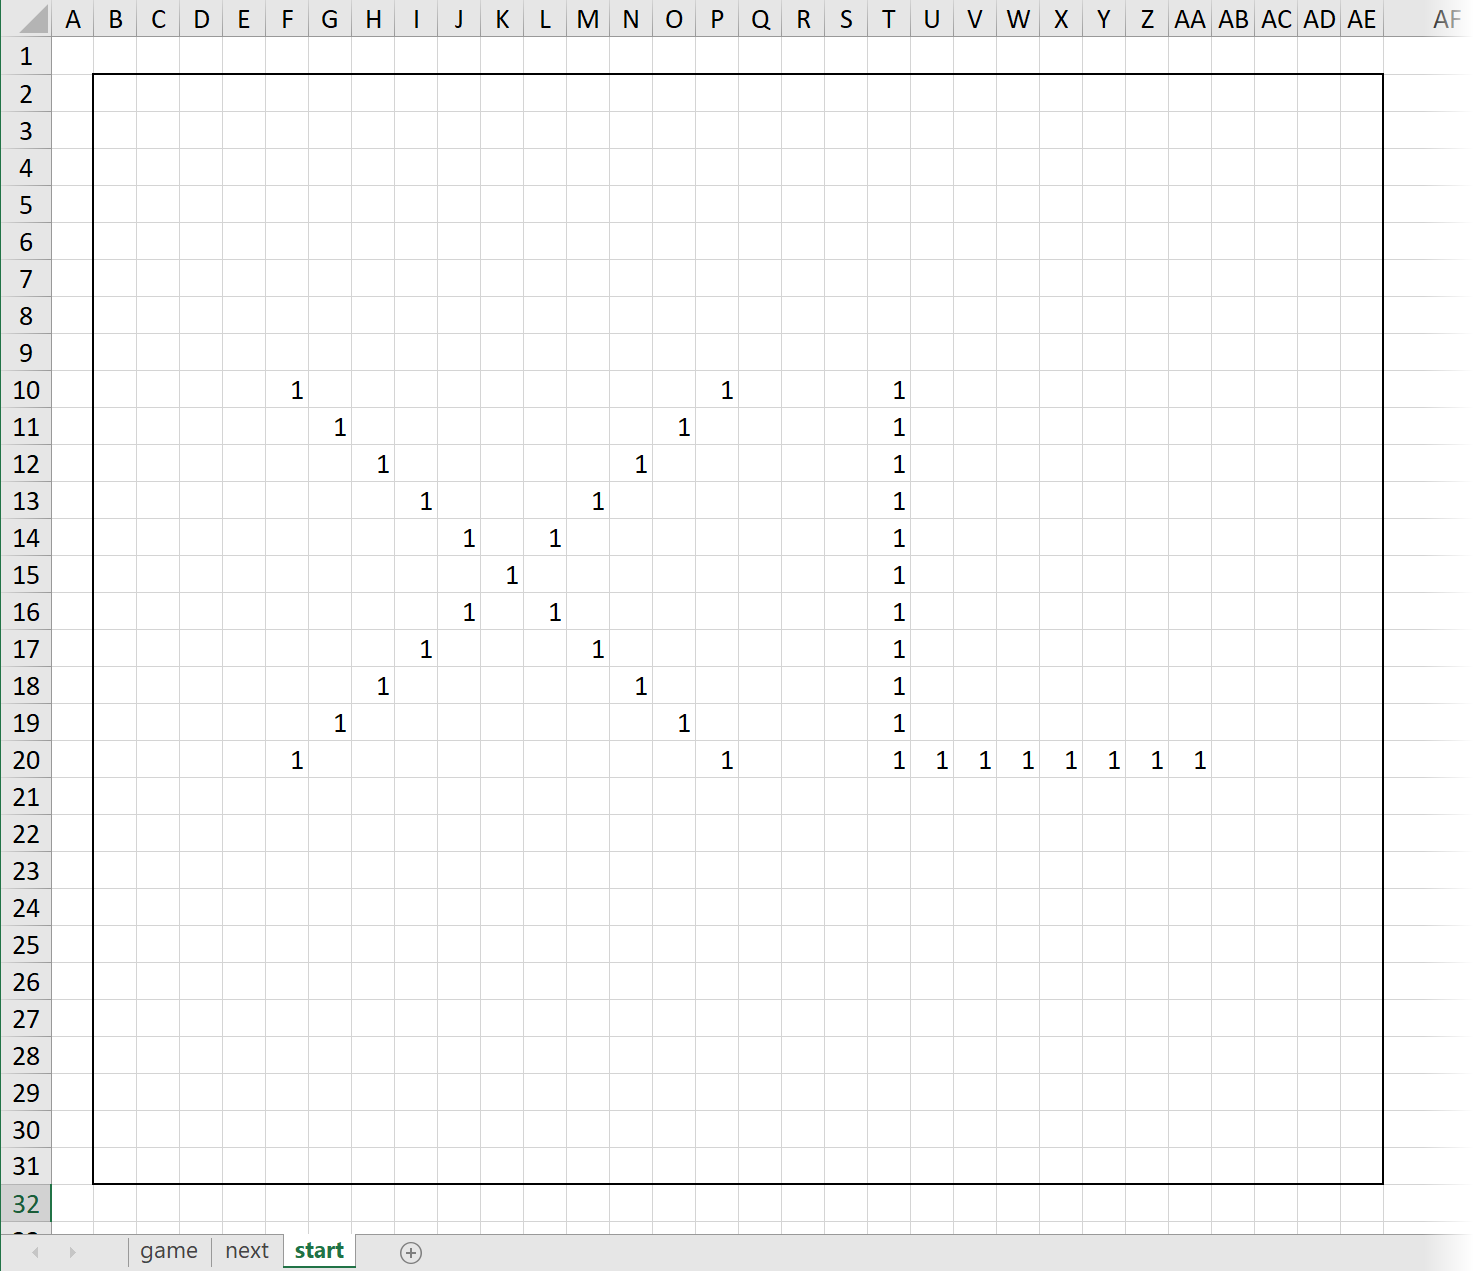
На листе start разметим с помощью единичек первое поколение любым желаемым образом:
Шаг 2. Пишем макрос
Теперь пришла пора расчехлить наш VBA и написать макрос, который и будет делать всю работу, а именно:
- Копировать первое поколение с листа start на лист game.
- Проходить по ячейкам игрового поля на листе game и проверять окружающих соседей (блок 3х3) для каждой из них.
- В зависимости от результатов проверки помечать на листе следующего поколения next ту же ячейку как живую (1) или мертвую (пусто).
- Копировать получившееся новое поколение с листа next вместо текущего на листы игры game.
- Повторять пункты 2-4 несколько раз, сменяя одно поколение другим и отображая на экране изменения в нашей «колонии».
Для начала откроем редактор Visual Basic на вкладке Разработчик (Developer) . Если такой вкладки не видно, то её нужно будет сначала отобразить через Файл — Параметры — Настройка ленты (File — Options — Customize Ribbon) , включив соответствующий флажок.
В открывшемся окне редактора создадим новый модуль с помощью команды меню Insert — Module, а затем скопируем и вставим туда код нашего макроса:
Теперь давайте разберем его построчно для понятности:
Поскольку в коде нам придется несколько раз ссылаться и много раз работать с диапазонами игрового пространства (B2:AE31) на каждом из трёх листов книги, то имеет смысл сразу оформить их как переменные. Это делается в блоке:
Заодно мы создаем ещё и переменную wNext, которая ссылается на весь лист next целиком — это нам тоже пригодится в будущем:
Затем, перед началом игры, мы должны перенести первое поколение с листа start на лист game. Это выполяется командой прямого копирования с использованием уже созданных переменных:
Поскольку мы хотим прокрутить в нашей игре не одно, а несколько (например, 50 для начала) поколений, то дальнейшие действия заключены в цикл:
А внутри этого цикла мы, во-первых, сначала очищаем рабочее пространство на листе next для формирования следующего поколения:
А, во-вторых, запускаем вложенный цикл прохода по всем ячейкам игровой вселенной на листе game, чтобы проверить каждую из них — это реализовано циклом прохода по коллекции:
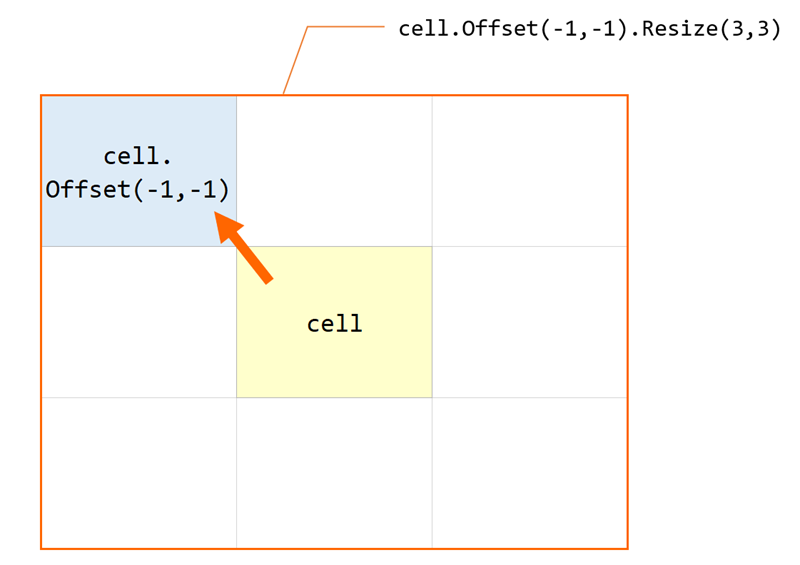
Ссылка на очередную проверяемую ячейку будет храниться в переменной cell. Для этой ячейки нам нужно сначала построить окрестность 3х3 с ней в середине. Это выполняется с помощью конструкции:
Здесь метод Offset(-1,-1) виртуально сдвигает текущую проверяемую ячейку на одну строку вверх и на один столбец влево, а потом метод Resize(3,3) опять же виртуально растягивает эту одну ячейку до новых размеров 3 на 3:
Чтобы посчитать количество заполненных ячеек в полученной окрестности применяется функция рабочего листа СЧЁТЗ (COUNTA) , которую в VBA можно вызвать с помощью объекта WorksheetFunction . Таким образом количество живых соседей в окружающей текущую ячейку области 3 на 3 мы получаем выражением (не забыв вычесть из полученного количества текущую ячейку):
Дальше нам нужно проверить полученное количество соседей и пометить на листе следующего поколения текущую ячейку как живую или мертвую, согласно правилам игры. Это выполняет блок из трёх проверок:
Когда цикл прохода по ячейкам будет завершен, то сформированное следующее поколение с листа next нужно скопировать на место текущего на листе game — делаем это уже знакомой конструкцией:
Вот, собственно, и вся логика.
Осталось вернуться в Excel на лист game, запустить нашу игру через вкладку Разработчик — Макросы (Developer — Macro) и насладиться процессом развития нашей колонии:
Источник
How can you make Game of life in Excel? [closed]
Want to improve this question? Update the question so it focuses on one problem only by editing this post.
Closed 6 years ago .
I know only little how to make macros in Excel.

7 Answers 7
You can find many examples through Google.
The very first result is a post from David Gainer’s blog that uses Conway’s Game of Life to teach about circular reference formulas and iteration (no VBA involved):
Should have done this a long time ago but here’s my version of Conway’s Life in excel.
Here’s a hack of the code. By no means a perfect solution (didn’t spend an age on this) but you might be able to pick some bits out.
To get this to work just make the background of cell A1 black, the background of cell B1 white and then add some black backgrounds in the range C2:AM20 and run the ActionLogic method.
You will need two macros. The first one should format the game sheet so the cells are square.
Have the user run this macro. After that she should enter a 1 for each cell that is alive. Use conditional formatting to turn the cell completely black (background = black if value != 0)
Now have a second macro which calculates the next step in a background sheet (another sheet). Use relative cell positioning (relative to ActiveCell) and two nested loops. When this is done, copy all values from the background sheet to the game sheet.
Search for it and look at their code. Plenty of people have made it a hobby to make full games in Excel.
Why do you say Excel is the wrong choice?
I think Excel is the best way to solve this:
Excel solves this with 1 line: IF(OR(SUM(B2:D4)-C3=3,AND(SUM(B2:D4)-C3=2,C3=1)),1,0)
*where the above is an expression that returns the next generation value for the cell C3.
If you’re in a situation where you have to implement this sort of things from scratch, then functional programming is the best way to go. Otherwise, Excel works really well. Why? Because Excel is a system that forces you to enter only pure functions. You see, the key to simulating this Game of Life is to realize that each state of the cells is a PURE FUNCTION of the previous state. Excel naturally forces you to think this way.
Источник
Gliders, Hasslers, and the Toadsucker: Writing and Explaining a Structured Excel Life Game
«Have we forgotten what’s wrong with goto statements?» asked Andrew Koenig recently. Bradford Miller had a pithy reply: you need too many «thumbs» when reading code. Better to use a language with proper control structures, not bodge them from labels that will, for all a reader can tell, leave you leaping around your program like a flea on a dog full of coffee. This reminded me of spreadsheets, which unrestricted cell references can make just as unreadable. So I’m going to show how to write and document a spreadsheet in a high-level language I’ve implemented: Excelsior, which I’ve made available here. The spreadsheet runs Life; linking a clear English-and-equations account of Life with Excel’s graphic appeal, it may interest school maths teachers, as well as those seeking to write and document safer spreadsheets.
Introduction
Spreadsheet documentation is notoriously bad, partly because you can’t embed comments in Excel as you can in a normal language. This has horrendous effects. Consider that notorious spreadsheet holding 179 «hidden» Lehman contracts which accidentally got unhidden and included in Barclays’s purchase of Lehman assets — as Debra Cassens Weiss reported for the American Bar Association Journal, Excel Error by a Cleary Gottlieb Associate Alters Lehman Asset Deal . Had there been a clear specification of what each column represented, and of the contract-selection criteria, could the mistake have been avoided? Perhaps the real culprit was a culture of rush-rush-rush, no-sleep, no-time-to-think. But it shows the cost of spreadsheet errors, and why we must prevent them.
Contents
This is a long posting. If your interest is mainly in safer spreadsheets, you may want to skim the opening sections, which explain the game of Life. But as an experiment, I have written this so it can also be used by elementary maths teachers. That’s why it’s long: I’ve tried to make it stand alone, with an intro to Life in my first two sections, John Horton Conway’s game of Life and Life simulators .
The section after that, Running the Life spreadsheet , explains how to use the Life spreadsheet I mentioned in my opening paragraph. You can run this without needing to understand the rest of this posting. The spreadsheet comes with some predefined Life patterns, explained, not surprisingly, under Predefined patterns .
I then start on how I used Excelsior to write my spreadsheet. As I said, you can download Excelsior from here, and the download includes my Life program. You can use this in several ways. First, it’s useful just as a succinct specification of what the spreadsheet does. The equations in it may, therefore, interest students who want to know how Life, or cellular automata, work.
Second, you can use it as input to Excelsior, to generate a new version of the spreadsheet. For example, you can change board sizes, or change the Life rules by adding new cell states or by changing the number of neighbours needed for life and death.
So in the next part of this posting, Writing spreadsheets in Excelsior is a general explanation of Excelsior as a programming language. The section after it, Literate Spreadsheet Programming , explains how I used it to document my spreadsheet. And the section on Iterative calculations in Excel explains how to change Excel’s normal behaviour so you can run Life without getting circular reference errors.
Then I come to The program . This is a documented program listing, and has subsections explaining different parts of the program: display_board ; board ; selected_menu_option ; index_of_selected_menu_option ; menu_options ; start_board ; next_board ; neighbour_count ; blinker ; glider ; and Layout . It may be the best-documented spreadsheet in the world.
Then, under Compiling Life , I show how to install Excelsior and compile my Life spreadsheet, and propose some ideas for changing its rules. If you’re feeling ambitious, you might also like to try the following sections: Compiling a foxes-eat-rabbits model and Compiling a science-fiction generator . These tell you how to compile a predator-prey spreadsheet and the science-fiction generator I blogged in Earth Falls Toward The Sun And Everybody Dies . I end this with a note on a novel kind of recursion.
John Horton Conway’s game of Life
Let me now start explaining the game of Life. It was invented by John Horton Conway, and must be the most famous cellular automaton ever. Life runs in a rectangular board, where each cell has two possible states: empty or occupied. Or, if you prefer, dead or live. Like this:

The game proceeds in generations. To get generation N+1 from generation N, make a table the same size and shape as the board. Let’s call this the «neighbour count». In the first cell of neighbour count, write the number of live cells immediately bordering the first cell of the board. (By immediately bordering, I mean the eight surrounding cells.) Then do the same for all the other cells.
Then make another table, also the same size and shape as the board. This will hold the next generation, so let’s call it «next board». Make each cell live or dead according to these rules, using the numbers in neighbour count:
- A live cell with fewer than two live neighbours dies.
- A live cell with more than three live neighbours dies.
- A live cell with two or three live neighbours continues to live.
- A dead cell with three live neighbours becomes a live cell.
Finally, copy next board’s cells back into the board. If you do this correctly, the shape above will evolve like this:
⇒  ⇒
⇒  ⇒
⇒  ⇒
⇒ 
Subsequent generations will continue to move, taking four steps to shift one cell along the diagonal. This is one quarter of the fastest possible speed, so Life enthusiasts call it «a quarter of the speed of light», or «c/4».
Why these particular rules? In an article that helped make Life notorious, Scientific American ‘s Mathematical Games for October 1970, Martin Gardner writes that Conway chose his rules after a good deal of experimenting, to satisfy three principles:
- There should be no initial pattern for which there is a simple proof that the population can grow without limit.
- There should be initial patterns that apparently do grow without limit.
- There should be simple initial patterns that grow and change for a considerable time before coming to an end in one of three ways: fading away completely from overcrowding or from becoming too sparse; settling into an unchanging configuration; or becoming oscillators of period two or more.
As Gardner says in a follow-up article, Mathematical Games for February 1971:
Conway was fully aware of earlier games and it was with them in mind that he selected his recursive rules with great care to avoid two extremes: too many patterns that grow quickly without limit and too many that fade quickly. By striking a delicate balance he designed a game of surprising unpredictability and one that produced such remarkable figures as oscillators and moving spaceships.
Life simulators
There are many Life simulators on the Web. I like the quick-to-load applet at Paul Callahan’s World of Math Online page, What is the Game of Life? This page is studded with buttons that run the applet on predefined patterns. I recommend the «Run 6 Gliders» button in the section headed Gliders . This sets six gliders on a collision course; from the debris, six more gliders emerge, three waddling off to top right and three to bottom left.
You should also try «Run Wickstretcher», which sends a continuous stream of pulses down a steadily elongating wick, and «Run Lightspeed». These are both under the «Artistic Life» sidebox on the right-hand side of the page.
The applet is written by Alan Hensel, and is also linked from his Conway’s Game of Life page. It has an Open button, replete with more patterns, of which you should definitely open the «Breeder». Run this on the lowest magnification, Zoom setting 0, with the applet window as big as you can make it!
Running the Life spreadsheet
Because I’m writing about structured spreadsheet programming and documentation, I’ll now turn to my own simulator, the Life spreadsheet. I am running it on XP; but because it calls only a few elementary Excel functions, and doesn’t use Visual Basic for Applications, I’d expect it to work in any Windows Excel and in Mac Excel.
When you open the spreadsheet, you should see the leftmost sheet, «Display». It contains: a blank board where you can type a starting pattern; a control menu; and, at the bottom, the main board. It should open with most of the start board out of view, and the menu near the top:

The pattern in red is a «glider gun», which I’ve preloaded into the main board. It’s famous because it’s a counterexample to a conjecture Conway made that no pattern could grow without limit. William Gosper, and his colleagues Robert April, Michael Beeler, Richard Howell, Rich Schroeppel and Michael Speciner, using a program that displayed moves on an oscilloscope — this was 1970 — discovered the glider gun, and won a $50 prize from Conway. The gun does, of course, grow without limit, because it keeps firing out gliders.
Remarkably, the glider gun can be built by firing 13 gliders at each other. I don’t know an online picture of this, but there’s a printed one in that February 1971 Mathematical Games article.
To step the glider gun through one generation, all you have to do is to press F9. Repeatedly pressing F9, or holding it down, will run more generations, and a stream of gliders will waddle out from the middle of the gun, wagging their tails behind them as they head diagonally down and to the right.
You may want to adjust the zoom. Mine is 50%, which makes all the glider gun visible, but the menu options a bit small. To change it, select View on Excel’s toolbar. This will pop up a menu which should have a Zoom option. Selecting this will open a little window with radio buttons, each with a percentage zoom. Select one, then click OK.
To run other patterns, you need to know the spreadsheet’s menu options. The first option, Start, copies a pattern that you type. Type a pattern into the start board. Use space to empty a cell you’ve previously typed into, and any non-space character to make a live cell. Then select Start, and hit F9. The pattern should appear on the main board. Then select Run, also on the menu, and hit F9 again. This will step the pattern through a generation, and you can continue as for the glider gun.
Each solid red square, incidentally, is in fact an «n». They appear as squares because I’ve switched the cells into the Wingdings font. I’ll say more about this at the end of the section on my program’s Layout .
Instead of typing your own pattern, you can load one I’ve provided. Use these options, linked here to explanations of the patterns in the following section: Blinker, Clock, Figure 8, Glider, Glider gun, Lightweight spaceship, Pulsar, Reflector, Relay, Toad, Toadsucker. Select one, then press F9. This will copy it to the board, and it will appear in the display. Then select Run and and press F9 again. Then continue as above.
The final option, Clear, clears the board. This probably isn’t very useful, but as a mathematician, I always like to implement the trivial case.
Predefined patterns
Blinker, clock, toad
These three are oscillators of period 2. The blinker and clock flip 90° on each cycle; the toad springs up and puffs itself out, then falls back. As well as being figures that every Life fan knows, they’re good tests: if they don’t work, the simulator is badly broken. (The glider is also a good test, and found an early bug in my code.) Also, the toad shows where the toadsucker gets its name.
Toadsucker
The toadsucker is an oscillator of period 60. At its centre is a toad, flanked by two patterns that repeatedly expand and «hassle» it. In Life, I learnt from Eric Weisstein’s Treasure Trove of Life, a hassler is an oscillator that can alternately change an object and then change it back.
Figure 8, pulsar
Yet more oscillators: the pulsar of period 3, and figure 8 of period 8. Mimicking the numeric designations used in star catalogues, the pulsar is sometimes called pulsar CP 48-56-72, where the numbers are the numbers of live cells in each phase.
Glider, lightweight spaceship
I’ve already said that the glider moves diagonally at a quarter of the speed of light. The lightweight spaceship moves along or across at half the speed of light. I’ve pointed the one in my spreadsheet so that it heads off to the right, eventually vanishing off the end of the long board. Both are amongst the smallest moving patterns in Life — there are, I presume, an infinite number of others. You can read about some of these in David Bell’s 1993 Web page, Spaceships in Conway’s Game of Life Of Blinkers, Jellyfish, and Everything. .
Glider gun, reflector, relay
Watching the glider gun, it’s natural to ask whether its gliders could carry information. Could we build a universal computer out of Life components? Indeed so: this page shows a Turing Machine designed by Paul Rendell. In principle, you could even implement Excel in Life, and then another Life on top of that. But the result might be rather slow. Even more difficult would be cajoling Microsoft to give you the source code of Excel.
With universal computation in mind, Life enthusiasts spend much time looking for patterns that manipulate glider pulses: the Life analogues of NOT, AND, and OR gates. But because Life is two-dimensional, we also need components to direct pulses in the right direction, and I’ve put two of these in my spreadsheet: a reflector and a relay. The reflector reflects an incoming glider through 90°. There are many reflectors known, and a bit of Web-browsing tells me that they tend to suffer from the disadvantage that, after reflecting one moving object, they take a huge number of cycles — perhaps several hundred — before they are ready to reflect another.
The relay continuously shuttles a glider between two reflectors.
Of course, the brain is a computer, and could (most computer scientists believe) be implemented on a Turing Machine, and hence in Life. There is actually a science-fiction novel that takes this idea to its limit, Greg Egan’s Permutation City , reviewed here by Cosma Shalizi. Read Egan’s novel and discover what it feels like to be implemented by a cellular automaton!
Writing spreadsheets in Excelsior
The rest of this posting is mainly about how I programmed the Life spreadsheet, and how to regenerate it. My program lives in a text file, which can be edited with a bog-standard text editor such as Windows Notepad. It consists of commentary interspersed with code, and — as I said in my introduction — combines a clear English-and-equations account of Life with Excel’s graphic appeal. If you are familiar with Excel formulae, or with conventional programming, it easy to modify the Life rules. For example, you could introduce new cell states or change how many neighbours are needed for life and death.
Before delving into the program, I’ll briefly explain Excelsior. Excelsior programs are text files. To make a spreadsheet from them, you run Excelsior as described in Compiling Life . This translates equations in the program into Excel formulae, then writes these to your new spreadsheet.
Actually, the equations are Excel formulae, except they refer to table elements instead of cells. Tables are rectangular groups of cells, like arrays in C++, Java, and other languages. In essence, a program declares tables, states their sizes, and describes how to calculate their elements with equations. Separate layout statements specify how the tables map onto worksheets. To translate a program, Excelsior works out from the layout statements and table sizes where each table goes on a worksheet, and then replaces table elements in the equations by cell references to give Excel formulae.
Literate Spreadsheet Programming
Most programming languages assume program text to be code unless inside comment delimiters. For example, C++ and Java assume stuff between // and the end of the line to be comment: exposition meaningful to a human but ignored by the computer. They do the same for anything between /* and */ .
But this is not the only way to explain a program. When we write mathematics, we write English commentary separated by indented equations. The English is primary, because we emphasise explanation over «code», that is, over equations. Some computer scientists believe we should program in the same way, as this quote on literateprogramming.com by Donald Knuth proposes:
I believe that the time is ripe for significantly better documentation of programs, and that we can best achieve this by considering programs to be works of literature. Hence, my title: «Literate Programming.»
Let us change our traditional attitude to the construction of programs: Instead of imagining that our main task is to instruct a computer what to do, let us concentrate rather on explaining to human beings what we want a computer to do.
The practitioner of literate programming can be regarded as an essayist, whose main concern is with exposition and excellence of style. Such an author, with thesaurus in hand, chooses the names of variables carefully and explains what each variable means. He or she strives for a program that is comprehensible because its concepts have been introduced in an order that is best for human understanding, using a mixture of formal and informal methods that reinforce each other.
I’ve made Excelsior work in both modes. In its default mode, it reads programs from .exc files, which use the same comment delimiters I showed above.
But Excelsior also has a Literate Programming mode, wherein it makes (and then generates a spreadsheet from) .exc files by preprocessing .lexc files. In this mode, it treats any text indented by two or more spaces as code, and everything else as commentary. It writes the former to the .exc file verbatim, and the latter enclosed in /* to */ symbols.
In this mode it also translates the .lexc files to Web pages, styling code in a «computer» font and putting it on a pale background so it stands out from the commentary. Table names get cross-referenced so that each appearence of a name in the code links to its definition. In Compiling a foxes-eat-rabbits model , I point you at an example; here is part of one page: 
You can see all the HTML files, and the spreadsheet, here.
This, in fact, is how I prepared the program description that follows the next section: I wrote it as a .lexc file, preprocessed it into HTML, and then tweaked it to fit in with the rest of this text.
Iterative calculations in Excel
I sometimes like to imagine that I am a plumber and Excel is pipework. In most spreadsheets, water enters the house from the supply pipe and passes each spot only once before arriving at the drains. Er, output cells. Though some spreadsheets, it must be said, are so badly written you might as well dump their outputs straight into a sewer. Which, really, is what I want to remedy with my research.
At any rate, my Life spreadsheet is unusual. Its calculations are organised in the way described at the start of the introduction to Life, with the board in one table, the neighbour counts in another, and the next generation in a third. Because I copy the «next board» back into the board, cells in the board depend on themselves. Excel is perfectly capable of detecting this, and in normal use, will warn about «circular reference» errors. This is partly because the circular dependencies might indicate a typo, and partly because if Excel were to try to calculate in their presence, it would be like flushing water round and round the pipes for ever. We need to tell it not to give the warning, and not to get its calculations into an infinite loop.
I’ve already done this with the ready-made spreadsheet, which is why you must press F9 to run a generation. But if you use Excelsior to make a new spreadsheet, you will need to do it yourself. Here’s how. Go to the Tools menu on Excel’s toolbar and select Options, then select the Calculation tab on the window this pops up. This has three radio buttons at the top: click the one labelled «Manual». Below them is an «Iterations» checkbox and a «Maximum iterations» field containing the number 100. Click the checkbox so it has a tick in, and change maximum iterations to 1. Then click OK.
There is a second thing we may need to do, this time in our program. Like the switch to iterative mode above, I learnt it from Iteration & Conway’s Game of Life , a blog posting by Chris Rae, a program manager on Microsoft’s Excel team. He explains:
The Game of Life is played on a board which flips state in one single move, and unfortunately what we’ve made is a board which will change as we iterate through the cells establishing their new values. The way the game is supposed to work, no changes are made as you run through the cells — you just work out what the new values will be and then set them all at once at the end of the pass. Fiddlesticks.
We need to find some way of saying to Excel that the number of neighbours the cell has should come from the board as it stood at the beginning of the iteration, not from the board as it stands now with us in the middle of modifying it. To do this we can take advantage of one of the powerful foibles of iterative calculation mode — in iterative mode, Excel will calculate worksheets one by one in alphabetical order.
So — to get around this problem, we can create a new sheet containing the number of neighbours for each cell and we know that this sheet won’t be calculated until the whole of the main grid has finished. Let’s go ahead and rename our main sheet to «1.run» and create a new «2.nbors» worksheet. I’ve used the numeric prefixes to remind myself that these sheets need to be calculated in that order. In actual fact in this instance it doesn’t matter in which order they’re calculated, but for other iterative sheets it might well, and I find it makes debugging easier.
As far as I can see, putting these different tables on different sheets should be enough, for me. I don’t think I also need to choose sheet names that make the sheets be calculated in a specific order, because with my spreadsheet, there’s only one order that makes sense. But I’m not an expert on this aspect of Excel, and may be wrong, so I have prefixed my names as Rae suggests. This will become evident under Layout .
The program
Now let’s look at the code for the Life spreadsheet. This is organised as I mentioned above: one table for the board, another for its neighbour count, and a third to hold the next generation which this determines.
Actually, I keep two copies of the board. When calculating the effect of the Life rules, I use 0 to represent an empty cell and 1 for an occupied cell. This makes it easy to work out the number of neighbours.
But when displaying a cell, I use «n» for an occupied cell, because of how it appears as a solid box in the Wingdings font. I shall explain how to switch the display board into this font at the end of the section on Layout ; for the moment, let’s just assume I have done so.
So there are two copies of the board. In general, separating display from internal workings is good discipline: it stops the workings getting cluttered by such matters as choice of natural language, plurals, character sets, colours, and output for users with poor sight. As Phil Bewig says in a safer-spreadsheets paper How do you know your spreadsheet is right? Principles, Techniques and Practice of Spreadsheet Style :
Keep input, logic, and reports in separate sections of a spreadsheet, preferably on different tabs. That way you can always see the assumptions neatly in a single place, formulas are less likely to be overwritten, you know where to go to make changes, and output can be formatted for the reader while logic can be laid out for the developer. If you can’t put the three sections on separate tabs, arrange them on a single tab in a stepped diagonal so that rows and columns can be inserted or deleted in each area without affecting the other areas. But beware the false modularity of separate worksheets; since all cells in a worksheet are globally readable, and globally writeable with a macro, using separate worksheets hides no information.
Let’s now look at the display board. The program listing is divided into sections headed by the names of tables, and this is the first.
In my code, I call this table «display_board», and I regard it as a function, which maps an (x,y) position to the contents of the cell at that position. A mathematician would write that like this:
table display_board : board_x_range board_y_range -> text.
The names «board_x_range» and «board_y_range» stand for the set of possible x and y positions. I declare them thus:
type board_x_range = 1:board_width.
type board_y_range = 1:board_height.
When programming, it’s good to plan for change. People may want to change the board size, so I’ve made that easier by coding the upper bounds of board_x_range and board_y_range as named constants. Here’s how I declare these and give them values:
constant board_width=10.
constant board_height=10.
And finally, having defined what display_board is, I must say how it gets its contents:
The table «board» in the above equation is the board in its internal representation, with empty cells stored as 0 and occupied cells as 1. It must range over the same coordinates as display_board:
table board : board_x_range board_y_range -> general.
The board can get its contents in various ways, depending which of the menu options described in Running the Life spreadsheet the user selected. These are:
- Option is «Start»: copy cells from the start board.
- Option is «Blinker» or some other predefined pattern name: copy cells from the corresponding pattern.
- Option is «Run»: calculate and display the next generation.
- Option is «Clear»: empty all cells.
In code, this becomes:
Two other things are worth remarking. First, «len(trim(. ))». These are both Excel functions. The «trim» function removes all spaces from text except for single spaces between words. And «len» returns the length of a string. So if C is a cell in the start board, «len(trim(C))» returns 0 if it contains only spaces or is empty. This lets us treat any cell that looks blank as empty, enabling the user to type any non-blank character for an occupied cell.
Second, expressions such as «upb(blinker_x_range)». The «upb» looks like an Excel function, but isn’t: it’s a functionette that Excelsior evaluates when generating formulae. It expects a type name as argument, and returns the upper bound of the type. This lets us write stuff that depends on these upper bounds, without having to wire them into the code as numbers. It’s an alternative to the use of explicit constants such as board_width.
Now I’ll deal with the menu options. The menu itself is in the following table:
table selected_menu_option : -> text.
I shall initialise the menu to the «Start» option:
In the equation for «board», I explained that the first argument of «choose» is the position of the selected menu option in the list of options. I hold this in another single-cell table, «index_of_selected_menu_option»:
table index_of_selected_menu_option : -> general.
I shall calculate it using Excel’s «match» function, with a zero third argument to say the match must be exact:
index_of_selected_menu_option[] =
match( selected_menu_option[], menu_options[all], 0 ).
And here is that table:
table menu_options : menu_options_base -> text.
menu_options[1] = «Start».
menu_options[2] = «Blinker».
menu_options[3] = «Glider».
menu_options[4] = «Run».
menu_options[5] = «Clear».
Note that these options get used in two places. One is the match function call above. The other is in the menu. Making the same table do for both eliminates one possible out-of-step error.
Let’s now turn our attention back to the board. The table «start_board» is where the user types a starting pattern. I shall make it range over the same coordinates as the board, although it need not be as large:
table start_board : board_x_range board_y_range -> text.
And I shall initialise it so its cells look empty:
This is the table where I calculate the next generation: next_board[x,y] is 1 if the next generation of the cell at (x,y) will be occupied, and 0 if it will be empty. The table must range over the same coordinates as the board:
table next_board : board_x_range board_y_range -> general.
It is here that we apply the rules of Life:
next_board[ x, y ] =
if( and( board[ x, y ] = 1, neighbour_count[ x, y ] 3 )
, 0
, if( board[ x, y ] = 1
, 1
, if( and( board[ x, y ] = 0, neighbour_count[ x, y ] = 3 )
, 1
, 0
)
)
)
).
The above equation depends on neighbour_count, which I shall now define. It holds the number of each cell’s live neighbours: neighbour_count[x,y] is the number of live cells bordering the cell at (x,y). It must range over the same coordinates as the board:
table neighbour_count : board_x_range board_y_range -> general.
The code below calculates the number of live neighbours by summing the contents of the neighbouring cells:
neighbour_count[ x, y ] =
if( and( x>1 , y>1 ) , offset( board[x,y], -1, -1 ), 0 ) +
if( x>1 , offset( board[x,y], 0, -1 ), 0 ) +
if( and( x>1 , y 1 , offset( board[x,y], -1, 0 ), 0 ) +
if( y 1 ) , offset( board[x,y], -1, 1 ), 0 ) +
if( x 1, y>1 ), offset( board[x,y], -1, 0 ), 0 ).
Now suppose instead that the equation were:
neighbour_count[ x, y ] =
if( and( x>1, y>1 ), board[x,y-1] ).
I’ve now explained how the board is updated, and how this depends on the selected menu option. If this names one of the predefined patterns, that gets copied into the board, so let’s look at them. To save paper in this small version of the program, I shall have only two. The first is a blinker, standing up:
type blinker_x_range = 1:2.
type blinker_y_range = 1:4.
table blinker : blinker_x_range blinker_y_range -> text.
The second predefined pattern is a glider, oriented to move diagonally down and to the right. It is defined in the same way as the blinker, but its table is called «glider», and its dimensions are glider_x_range and glider_y_range. To save space, I’ll omit the code.
That completes the calculations and tables. It’s now time to arrange the tables on their worksheets. The idea here is that Excelsior uses «layout» statements to define a super-grid, each super-cell of which is a table, a heading or other label, or blanks. Sometimes, a super-cell will be one Excel cell, but more often, it will be several. All super-cells in a super-row have the same depth, and all super-cells in a super-column have the same width. Excelsior ensures this by padding below and on the right with blank cells.
Let’s see this at work with my first layout statement, for the «board» table:
Its super-grid has two super-rows and one super-column. The first super-row contains a heading — as indicated by the word «heading». Excelsior will replace this by a row of labels. Each label will name the table directly below it, and is generated from the table’s name by replacing underlines in the name by spaces. So if you name your tables with meaningful words or phrases, using underlines to join words, the headings above will be useful and automatic reminders of a sheet’s contents.
The second super-row in the above layout statement holds the «board» table. Because this is more than one cell wide, Excelsior will right-pad the heading above it with board_width-1 blank cells.
Note that this layout statement, like all of them, describes one sheet. The sheet name is the first argument to «layout», «1.Board». I explained why I was giving it this funny name in my section on Iterative calculations in Excel .
The next two layout statements follow the same principle:
Now, on the Menu sheet, we lay out the menu options and the working table that holds the index of the selected option. This sheet has one super-column and four super-rows:
The next table holds the predefined blinker. It introduces a new concept, which I am using to associate the blinker with the Wingdings font. This is the «as» functionette:
Notice that the fourth argument of «as» is «life_text». This, Excelsior uses to style the blinker table’s cells, putting them into Wingdings. Here’s how.
Excel has a notion of «template file». Template files are spreadsheets, but have the extension .xlt rather than .xls. The point of a template is that you use it as a style library. If you define new styles in it, there are ways of creating a new spreadsheet and copying these styles into it. The spreadsheet will then remember them, so that you can use their names when styling its cells.
Exelsior makes use of this to provide control over formatting. I supply a predefined template, template.xlt , in which I’ve defined styles with the same names as the result types I allow for tables, shown below:

When you run Excelsior from the command line, you must give it the name of a template, using the -t option. You can use the supplied template.xlt , or a different file. For example:
excelsior -t c:lifelife_template.xlt smalllife.exc
So now look again at my layout statement for the «blinker» table:
I ought to explain the other arguments to «as». The first, clearly, is a table. The second states its orientation: how it maps onto a worksheet. My default, for two-dimensional tables, is to arrange the first dimension pointing across (the x direction), and the second dimension pointing down (the y direction). When you use «as», you have to be explicit about this, by writing «xy». You could also write «yx», which would swap the axes. One-dimensional tables are arranged either as «x» or «y».
The third argument to «as» is either [] or a table of menu options, and is used to make dropdown menus. We’ll see this shortly.
I’ve finished explaining how the blinker is laid out. The next sheet, for the glider, works the same way, so I’ll miss that out. And that leaves the final sheet, Display:
layout( ‘Display’
, rows( heading
, row( skip, as( start_board, xy, [], life_text ) )
, row( skip )
, heading
, row( as( selected_menu_option, null, menu_options ) )
, row( skip )
, heading
, row( skip, as( display_board, xy, [], life_text ) )
)
).
This is the most complicated sheet, having a super-grid of two super-columns and eight super-rows. The second super-row holds the start board. Its first super-cell is blank, which is what the «skip» means. That’s to push the board one cell to the right. The fourth super-row holds the menu, selected_menu_option. Its «as» has menu_options as its third argument. This creates a dropdown menu with the contents of menu_options as its options. The second argument of the «as» is «null», which is the default way of arranging zero-dimensional tables on a worksheet. (There are not many.) And the eighth super-row holds the display board. Like the start board, it’s pushed one cell to the right, and styled in Wingdings.
Compiling Life
I hope everything above gives you enough information to modify the program, if you want to experiment with changing the Life rules. So now, let me tell you how to generate a spreadsheet from it.
In the Excelsior download here, are two text files smalllife.exc and biglife.exc . The first is the version of Life I ran through just now, with two predefined patterns and a small board. The second has all the patterns and a much bigger board, and is what I generated the Life spreadsheet from. If you try any changes, I suggest you do so on the small file first, because it generates more quickly and the big spreadsheet is a bit unwieldy.
The download also contains life_template.xlt , which I talked about under Layout .
To install, download Excelsior and unzip it into a clean directory. Hereon, I’ll assume you’ve named this c:life . The zip file contains several subdirectories: make sure your unzip command preserves their structure, and doesn’t flatten them into the top-level directory.
You must now set three environment variables. In case you don’t know how, this is what I’d do on XP. I click on Start, then on Control Panel halfway down the righthand column in the resulting pop-up. This opens a window with icons labelled «Accessibility Options», «Add Hardware», and so on: I am viewing it in what Microsoft call Classic View, rather than Category View. I double-click on the System icon, then on the Advanced tab in the window this opens, and then on the Environment Variables button near the bottom. This makes another pop-up, with two fields headed «User Variables» and «System variables». I click the «New» button below the «System variables» field, and a pop-up appears with a «Variable name» and a «Variable value» field. Then I type (e.g.) EXCEL_HOME into the «Variable name» field, and (e.g.) c:Program FilesMicrosoft OfficeOffice11 for «Variable value». I then click «OK», and then either add another variable, or click «OK» on the pop-up below. And that’s it.
So now, set the first environment variable EXCEL_HOME to the directory your Excel is in. On my laptop, that’s c:Program FilesMicrosoft OfficeOffice11 . Every time it successfully compiles a program, Excelsior runs excel.exe from this directory, with «interface.xls» as a command-line argument. This activates a VBA routine in interface.xls (which I also supply), which will copy an intermediate file of generated formulae into your new spreadsheet.
Second, set EXCELSIOR_HOME to the directory you unzipped into, which I’ve assumed is c:life . Excelsior looks in here to find files such as interface.xls .
Third, set EXCELSIOR_TEMP to a scratch directory where files such as the intermediate file of generated formulae can safely be created and deleted. I use C:WINDOWSTEMP .
Now, open a new MS-DOS window, and change directory to c:life or your equivalent. Then type the command
But if it does work, you are now ready to compile Life! To compile the small one, type this, but with your directory instead of c:life :
excelsior -t c:lifelife_template.xlt smalllife.exc
If compilation is OK, the new Life spreadsheet will appear in front of you. If it doesn’t, one of your environment variables may be wrong.
Before you can run the new Life spreadsheet, you will need to switch it into iterative mode, as I explained under Iterative calculations in Excel . Otherwise, Excel will keep reporting «circular reference» errors.
Now try the same with biglife.exc . Be warned that this will take longer, because more cells need to be set up.
To make your new spreadsheet more congenial to read, you may want to alter the zoom setting as I described under Running the Life spreadsheet , and to resize rows and columns in the grids on the «Display» sheet. The resizing is best done visually, in Excel. Excel’s HELP for «Change column width and row height» explains how. Under the subheading «Of multiple columns», it says:
Select the columns you want to change, and then drag a boundary to the right of a selected column heading.
Select the rows you want to change, and drag a boundary below a selected row heading.
You can now experiment with altering the rules of Life. There’s a summary of the Excelsior language at the start of my user guide. The things you’re most likely to want to change are the right-hand sides of the equations, particularly that for next_board. The formula here is exactly like an Excel formula — it uses «if» in the same way, and so on — except that instead of cell references, there are table elements. (I’ve written the functions in lower-case, because it’s easier to read, but that’s inconsequential.) So if you change the numbers against which the neighbour counts are compared, for example, it will have exactly the same effect as in Excel.
Compiling a foxes-eat-rabbits model
If you’re feeling ambitious, you could also try running try_rabbits.bat . This batch file is in the Excelsior distribution, so will appear when you unzip it. It contains a command similar to:
excelsior -l rabbits -t c:kb7mm7template.xlt rabbitsrabbits.exc rabbitsfoxes.exc rabbitstime.exc rabbitslayout.exc
Compiling a science-fiction generator
Now do the same, but with try_spin.bat . This compiles spin.lexc in the «spin» subdirectory, the science-fiction generator I blogged in Earth Falls Toward The Sun And Everybody Dies . Compilation should make a spreadsheet spring up with a story like this:

To generate a new story, select the single menu option in cell B4. Some stories are gloomy; some are hopeful:
Planet 9 of Alpha-Centauri
falls toward the Sun
and is visited by evil
aliens
who
are converted by the village priest (who tells them of God) to
good ones
who
rewind time to before the disaster
and give the secret of
free fusion power
so all live happily ever after.
Mars
is struck by a comet
and is visited by evil
aliens
who
steal its reserves of
water
and
are stopped by a logician
who says ‘I am lying’
and so he must be telling a falsehood
so he must be telling the truth
and so he must be telling a falsehood
so he must be telling the truth
(STACK OVERFLOW DURING RECURSION.)
An interesting point, should you be teaching computing, is that this spreadsheet actually does use recursion, but oddly. I said above that display_board and other tables can be regarded as functions. This is true of any table, including those in the science-fiction generator. It stores possible plot events as nodes in a network, and generates a plot by recursively finding a path through this network. Using recursion to traverse networks is no novelty. But what is, is that here, regarding tables as functions, we call a table from itself. There is recursion, but it is laid out — spread out, one might say — not in time but in space.
Life links and references
The famous printed reference is Scientific American ‘s Mathematical Games for October 1970 (Volume 223), by Martin Gardner. He wrote a follow-up article, Mathematical Games for February 1971 (Volume 224), and probably has follow-ups to that.
www.fourmilab.ch/cellab/manual/chap5.html — Origins of CelLab , CellLab User Manual Chapter 5, by Rudy Rucker and John Walker. A brief history of cellular automata, from Stanislaw Ulam and John von Neumann onward, and including Conway.
www.math.com/students/wonders/life/life.html — What is the Game of Life? , Paul Callahan’s World of Math Online page. Contains the buttons that run Alan Hensel’s Life applet.
www.ibiblio.org/lifepatterns/ — Conway’s Game of Life . Alan Hensel’s applet page.
eddy/craft/weblife.html — Another Life simulator, by Eddy Welbourne
www.ellerman.org/Davids-Stuff/Maths/Math-on-SS/MathonS.htm — Math on Spreadsheets , by David Ellerman. Links to the iterative Life spreadsheet I learnt about Wingdings from.
radicaleye.com/lifepage/lifepage.html — Patterns, Programs, and Links for Conway’s Game of Life , by Paul Callahan, 2001. Lots of Life links: pattern dictionaries, people trying to build exotic oscillators, delay-line memories, all kinds of Life «engineering».
radicaleye.com/lifepage/enoexcerpt.html — Conway’s Life and generative music , by Paul Callahan. Includes part of a talk featuring Life and generative music by Brian Eno.
www.inmotionmagazine.com/eno1.html — Generative Music: «Evolving metaphors, in my opinion, is what artists do» , the talk by Brian Eno, 1996.
www.bitstorm.org/gameoflife/lexicon/ — Dictionary of Life patterns by Stephen A. Silver, modified by Edwin Martin so that they can be loaded into a Life program linked from the top of the page.
www.radicaleye.com/lifepage/picgloss/picgloss.html — A Brief Illustrated Glossary of Terms in Conway’s Game of Life . Glossary and dictionary of patterns, by Alan Hensel, with help from Achim Flammenkamp, John Conway, Dean Hickerson, David Bell, Bill Gosper, Bob Wainwright, Noam Elkies, Nathan Thompson, Harold McIntosh, and Dan Hoey. The patterns link to dot-and-star text files, which should be easy to convert into input for most Life programs.
www.ericweisstein.com/encyclopedias/life/ — Eric Weisstein’s Treasure Trove of Life. Includes a glossary and dictionary of patterns.
radicaleye.com/lifepage/patterns/p1/p1.html — The Oscillator Problem , by Paul Callahan. The engineering challenges of designing a period-k oscillator for any positive integer k.
pentadecathlon.com/lifeNews/2007/12/new_180degree_glider_reflector.html — Game of Life News , 17 December 2007, site by H. Koenig and Dave Greene. Reports on a new 180-degree glider reflector, period 4 and up.
surf.de.uu.net/people/joke/rsc/ships_toc.html — Spaceships in Conway’s Game of Life: Of Blinkers, Jellyfish, and Everything. . Edition 1.2, (Part 1-6b, Addendum 1), October 1993, by David I. Bell. Reports recent (then) results on spaceships.
rendell-attic.org/gol/tm.htm — A Turing Machine in Life, by Paul Rendell.
crshalizi/reviews/permutation-city/ — Review of Egan’s Permutation City , by Cosma Shalizi.
Источник
Развлекая — поучай.
(Гораций)
Если вы уже имели какой-то опыт программирования в прошлой жизни (привет, Basic, Pascal и т.д.), то, скорее всего, уже прошли этап «игрописательства». Однако, тряхнуть стариной и размять мозги вполне можно. Если же вы никогда не программировали игр, то никогда не поздно начать этот весьма увлекательный процесс. Всё, что нам потребуется — это Excel (любой версии) и 15-20 минут времени для начала.
Тренироваться будем на известной в узких кругах программистов игре «Жизнь» (Life). Её придумал британский математик Джон Конвей еще в 1970 году на основе работ легендарного Джона фон Неймана — прадедушки всех современных компьютеров. Если вы не сталкивались с ней раньше — не проблема, правила можно объяснить за полминуты:
-
Игра идет на большом (иногда даже бесконечном) поле в клеточку («вселенной»). Как вы понимаете, Excel для такого подходит идеально

-
В один момент времени каждая клетка может быть в двух состояниях — живой (обозначим её каким-нибудь значком или просто единичкой) или же мертвой (пустой). Начальное состояние всех клеток в игре называют первым поколением.
-
Если брать блок клеток 3х3 с текущей клеткой в середине, то вокруг неё оказывается 8 клеток-соседей. Дальнейшая судьба клетки зависит от того, сколько именно живых клеток (N) окажется в этой окружающей области. Вариантов несколько:

- Если клетка была пустая (мертвая), но у нее есть ровно 3 живых соседа, то в ней зарождается жизнь.
- Если клетка живая, но у неё меньше 2 соседей, то она умирает от одиночества.
- Если клетка живая, но у неё больше 3 соседей, то она умирает от перенаселения.
- Если клетка живая и у нее 2-3 соседа, то клетка продолжает жить.
Вот, собственно, и все правила. Можно даже сказать, что всё это неправильно называть игрой, т.к. здесь нет соперников в привычном понимании. Вы расставляете первое поколение, запускаете процесс и затем просто наблюдаете за развитием вашей «колонии» на протяжении нескольких поколений.
Однако, не стоит недооценивать обманчивую простоту этой логики — количество комбинаций, сценариев игры и многообразие фигур в такой игровой вселенной поражает своим разнообразием и поистине бесконечно. В математике подобные модели называют клеточными автоматами. А самое интересное, что реализовать подобную модель можно в любой версии Excel буквально на 20 строчках кода.
Поехали.
Шаг 1. Готовим игровое пространство
Создадим в новой книге три листа:
- game — это будет основной листы игры, где мы будем наблюдать за развитием нашей «колонии»
- next — этот лист будет формировать следующее поколение, которое затем придет на смену текущему
- start — на этом листе мы будем задавать начальную конфигурацию, т.е. первое поколение в нашей игре
На каждом листе (можно выделить их заранее, удерживая клавишу Shift или Ctrl, чтобы не повторять трижды одни и те же действия), разметим игровое поле размером, допустим, 30 на 30 ячеек. Впоследствии размер поля можно будет подправить в соответствии с вашими аппетитами и мощью вашего ПК:
На листе start разметим с помощью единичек первое поколение любым желаемым образом:
Шаг 2. Пишем макрос
Теперь пришла пора расчехлить наш VBA и написать макрос, который и будет делать всю работу, а именно:
- Копировать первое поколение с листа start на лист game.
- Проходить по ячейкам игрового поля на листе game и проверять окружающих соседей (блок 3х3) для каждой из них.
- В зависимости от результатов проверки помечать на листе следующего поколения next ту же ячейку как живую (1) или мертвую (пусто).
- Копировать получившееся новое поколение с листа next вместо текущего на листы игры game.
- Повторять пункты 2-4 несколько раз, сменяя одно поколение другим и отображая на экране изменения в нашей «колонии».
Для начала откроем редактор Visual Basic на вкладке Разработчик (Developer). Если такой вкладки не видно, то её нужно будет сначала отобразить через Файл — Параметры — Настройка ленты (File — Options — Customize Ribbon), включив соответствующий флажок.
В открывшемся окне редактора создадим новый модуль с помощью команды меню Insert — Module, а затем скопируем и вставим туда код нашего макроса:
Sub Life()
    Dim cell As Range, n As Integer, i As Integer

    Set rGame = Worksheets("Game").Range("B2:AE31")
    Set rStart = Worksheets("Start").Range("B2:AE31")
    Set rNext = Worksheets("Next").Range("B2:AE31")
    Set wNext = Worksheets("Next")

    rStart.Copy Destination:=rGame

    For i = 1 To 50
        rNext.ClearContents
        For Each cell In rGame.Cells
            n = WorksheetFunction.CountA(cell.Offset(-1, -1).Resize(3, 3)) - cell.value
            If cell = "" And n = 3 Then wNext.Cells(cell.Row, cell.Column) = 1
            If cell = 1 And (n = 2 Or n = 3) Then wNext.Cells(cell.Row, cell.Column) = 1
            If cell = 1 And (n < 2 Or n > 3) Then wNext.Cells(cell.Row, cell.Column) = ""
        Next cell
        rNext.Copy Destination:=rGame
    Next i
End Sub
Теперь давайте разберем его построчно для понятности:
Поскольку в коде нам придется несколько раз ссылаться и много раз работать с диапазонами игрового пространства (B2:AE31) на каждом из трёх листов книги, то имеет смысл сразу оформить их как переменные. Это делается в блоке:
Set rGame = Worksheets("Game").Range("B2:AE31")
Set rStart = Worksheets("Start").Range("B2:AE31")
Set rNext = Worksheets("Next").Range("B2:AE31")
Заодно мы создаем ещё и переменную wNext, которая ссылается на весь лист next целиком — это нам тоже пригодится в будущем:
Set wNext = Worksheets("Next")
Затем, перед началом игры, мы должны перенести первое поколение с листа start на лист game. Это выполяется командой прямого копирования с использованием уже созданных переменных:
rStart.Copy Destination:=rGame
Поскольку мы хотим прокрутить в нашей игре не одно, а несколько (например, 50 для начала) поколений, то дальнейшие действия заключены в цикл:
For i = 1 to 50
...
Next i
А внутри этого цикла мы, во-первых, сначала очищаем рабочее пространство на листе next для формирования следующего поколения:
rNext.ClearContents
А, во-вторых, запускаем вложенный цикл прохода по всем ячейкам игровой вселенной на листе game, чтобы проверить каждую из них — это реализовано циклом прохода по коллекции:
For Each cell in rGame.Cells
...
Next cell
Ссылка на очередную проверяемую ячейку будет храниться в переменной cell. Для этой ячейки нам нужно сначала построить окрестность 3х3 с ней в середине. Это выполняется с помощью конструкции:
cell.Offset(-1, -1).Resize(3, 3)
Здесь метод Offset(-1,-1) виртуально сдвигает текущую проверяемую ячейку на одну строку вверх и на один столбец влево, а потом метод Resize(3,3) опять же виртуально растягивает эту одну ячейку до новых размеров 3 на 3:
Чтобы посчитать количество заполненных ячеек в полученной окрестности применяется функция рабочего листа СЧЁТЗ (COUNTA), которую в VBA можно вызвать с помощью объекта WorksheetFunction. Таким образом количество живых соседей в окружающей текущую ячейку области 3 на 3 мы получаем выражением (не забыв вычесть из полученного количества текущую ячейку):
n = WorksheetFunction.CountA(cell.Offset(-1, -1).Resize(3, 3)) - WorksheetFunction.CountA(cell)
Дальше нам нужно проверить полученное количество соседей и пометить на листе следующего поколения текущую ячейку как живую или мертвую, согласно правилам игры. Это выполняет блок из трёх проверок:
If cell = "" And n = 3 Then wNext.Cells(cell.Row, cell.Column) = 1
If cell = 1 And (n = 2 Or n = 3) Then wNext.Cells(cell.Row, cell.Column) = 1
If cell = 1 And (n < 2 Or n > 3) Then wNext.Cells(cell.Row, cell.Column) = ""
Когда цикл прохода по ячейкам будет завершен, то сформированное следующее поколение с листа next нужно скопировать на место текущего на листе game — делаем это уже знакомой конструкцией:
rNext.Copy Destination:=rGame
Вот, собственно, и вся логика.
Осталось вернуться в Excel на лист game, запустить нашу игру через вкладку Разработчик — Макросы (Developer — Macro) и насладиться процессом развития нашей колонии:

Ссылки по теме
- Что такое макросы и как их программировать в Microsoft Excel
- Справочник по игре «Жизнь» — сайт LifeWiki
Purna Duggirala is better known as Chandoo. He runs a website—and newsletter, and forum, and podcast—at Chandoo.org, dedicated to teaching people how to use Microsoft Excel. Unlike some software experts who specialize only in teaching power users the minutiae of their tools, Chandoo’s work helps everyone, right down to beginners who are only just learning to understand Excel and how it can help them organize their lives in simple ways.
Chandoo believes Excel can also be a tool for helping us better understand ourselves. «Unless we can analyze our data and understand the patterns,» he said, «we are helpless.»
He started his site about a decade ago when it was just a simple personal blog. After several years of running it in his spare time, he quit his job to make Chandoo.org the focal point of his work. It’s still personal as ever, though, with references to his twin children, his wife, his cycling hobby, and his love of Legos, all mixed in with tips for mastering Microsoft Excel.

I interviewed Chandoo to ask about how he, as an Excel guru, uses the tool to organize his life and his work, and how beginners who know little to nothing about Excel can get started with the software. I laughed when I saw how many of his answers came in the form of bullet points, illustrative, perhaps, of how living and breathing in Excel blocks can influence the way one thinks.
Jill Duffy: You’ve taken a blog that you used to run in your spare time and turned it into your life’s work. How do you, as an Excel guru, manage and organize all the material you put together for the site? Can you share both some technical tips as well as larger principles that inform how you do it?
Chandoo: Yes, Chandoo.org used to be a personal blog and hobby until early 2010. Then in April 2010, I left my job with a large IT company so that I could be self-employed. It has been an exciting and enriching experience so far.

The site runs on WordPress blogging software. I have been a Web developer all my life. So I like to tinker with PHP, JavaScript, and HTML to make our site user friendly and valuable to our audience. I use a bunch of tools and concepts to create and share content with Chandoo.org readers.
Tools:
- Camtasia from TechSmith for creating and editing videos
- Audacity for creating and editing podcasts
- Paint.NET and Snagit for creating and editing images
- Excel, of course, to create downloadable workbooks and examples for my site
- Excel VBA to generate HTML code for the site
- Notepad ++ to create and edit PHP / HTML pages
- Cloudberry Explorer and WinSCP to upload files to our servers
Concepts:
- Write one article at a time. I focus on creating great content for today and tomorrow. Every time I have an article out, I ask myself, «How is this going to make someone awesome?» The keyword is someone. If you try to write for everyone every time, you won’t find many ideas. So I try to focus on helping a subsection of our audience with each article.
- Keep it simple. I write in plain English and explain the concepts clearly, often peppering them with humor. Excel can be a drab subject, so I want to keep the discussion lively and relevant. I use various formats—images, animated GIFs, videos, audios, and text—to reach our audience.
- Add my personality. I introduce a bit of my personality in everything I publish on Chandoo.org. I share important milestones in my life, my mistakes and my triumphs, with our audience so that they feel connected to me.
JD: How do you recommend someone who is using Excel for the first time get their start? Are there principles to learn first, or does it matter more what is their goal or objective in using Excel?
Chandoo: If you are absolutely new to Excel, the easiest way to get started is to open it and play with it for a while.

Once you are familiar with the user interface, head over to Excel Baby Steps(Opens in a new window) or Excel for Beginners(Opens in a new window) on our site and learn about various day-to-day uses.
Once you’re beyond the beginner stage, the best way to learn Excel is by using it every day. There is so much you can pick up by stumbling on features and menu buttons.
Also, subscribe to a newsletter(Opens in a new window) or podcast(Opens in a new window) so that you can pick up valuable skills, scenarios, shortcuts, and tips.
Whenever you learn something new about Excel, put it into practice. This way you will memorize the concepts better.
JD: I meet a lot of people who feel disorganized with their digital life. Do you have any advice, tips, or examples of using Excel to organize another aspect of one’s life or work?
Chandoo: Excel is a powerful and elegant tool for managing all aspects of one’s life. For starters, Excel is great for
- Budgeting and expense tracking
- To-do lists
- Goal tracking
- Planning personal or work projects
I started learning Excel in 2006, when I got my first job as a business analyst. In those days, I built several trackers to monitor my budgets, plan my investments, make purchasing decisions (such as car, home, etc.), and track my workouts.
Nowadays, mobile apps play a vital role in satisfying most of these needs. But one drawback with apps is that they don’t give you the flexibility to analyze and understand your own data the way Excel does.
For example, I track my workouts and sleep with Fitbit, but it doesn’t let me analyze the sleep patterns over a week or compare how my cycling is between two days. Unless we can analyze our data and understand the patterns, we are helpless.
This is where Excel shines. You can use it to track almost anything and analyze once you have some data.
Thanks to the Excel mobile app for iOS, Android, and Windows, you can easily enter data from anywhere and crunch the information from your couch.
You can build your own analytical app with Excel in four steps:
1) Structure your analytical app in to three buckets: input, calculation, and output.
2) Set up your input worksheet as simple as possible. Start with few fields, and structure your data as an Excel table. This makes adding data easy.
3) Use either formulas (for advanced users) or pivot tables (beginner to intermediate level users) to crunch the data.
4) Visualize using charts or sparklines or conditional formatting.
Then you can monitor your progress from the Excel app, or using Excel on your PC or Mac.
JD: What are some other examples of how you’ve used Excel to chart your personal life?
Chandoo: I made a baby feeding tracker(Opens in a new window) when we had twins in September 2009. It’s another story that I gave up tracking after feeling overwhelmed with the cycle of nappy change, mix formula milk, feed, and stroke them a few hundred times.
Visualizing my first 200km bicycle ride is another one.

I went on my first ever 200km bicycle ride in July 2014. I wanted to celebrate this achievement with my audience. So I made an Excel workbook with all the stats about the ride(Opens in a new window).
Another is visualizing Roger Federer’s seventh Wimbledon win. I love tennis, and I admire Roger Federer. So when he won the Wimbledon title for the seventh time, I created an awesome Excel workbook depicting the match(Opens in a new window) progress and stats.
JD: A lot of people feel they are disorganized not only with their technology, but also in how they manage learning new concepts. What advice do you have about learning something new in an organized and effective manner?
Chandoo: Learning is a valuable skill. It keeps us young and sharp. Here are a few ways to learn any new idea:
- Start. Don’t put off learning goals. Set aside as little as one hour per week to learn something new. It could be programming, new languages, carpentry or creating pivot tables.
- Squeeze learning into idle time. Subscribe to podcasts or get audiobooks and listen to them during your commute and wait times.
- Whenever you learn something new, try to link the idea to an existing concept you know well. This strengthens the narrative and helps you memorize the idea better.
- Don’t be greedy with knowledge. Share what you learn with others. This enhances your understanding of the concepts and makes you an expert in the field.
- When it comes to software (or apps), we are button shy. That means, we don’t press a button or click on a menu option unless we know what it does. Be bold and press the buttons. This can lead you down an interesting rabbit hole and teach you valuable lessons. Of course, make sure you are saving the files.
For more Excel tips, see Chandoo’s 12 Rules for Making Better Spreadsheets(Opens in a new window) and 20 Excel Tips for Becoming a Spreadsheet Pro.
Like What You’re Reading?
Sign up for Tips & Tricks newsletter for expert advice to get the most out of your technology.
This newsletter may contain advertising, deals, or affiliate links. Subscribing to a newsletter indicates your consent to our Terms of Use and Privacy Policy. You may unsubscribe from the newsletters at any time.
It’s no secret that I’m a total Excel fanboy. Much of that comes from the fact that I enjoy writing VBA code, and Excel combined with VBA scripts open up a whole world of possibilities.
In the past, here at MUO, I’ve shared a few of the things I’ve done with Excel and VBA, like exporting Excel data into Word or sending out emails straight from Excel. Of course if you aren’t much of a coder, you can always get Excel applications someone else has written, like those listed by Simon.
However, if you’re serious about using Excel to manage more of your life, then you should take the time to learn how VBA coding works. To help with that, I’ve decided to share a «Automation» spreadsheet that I’ve created to manage different areas of my life. This spreadsheet has 4 tabs and covers everything from grouping links of URLs that I want to launch all at once, to managing my debt and paying it off faster.
If you want to enhance your use of Excel, I invite you to follow along as I share a few of these designs — and simple scripts — that I used to accomplish these tasks.
Managing Your Life With Excel
Microsoft Excel is not just a data spreadsheet. It is actually a design platform for applications. If you look at it that way, you may realize just how much you can accomplish with the application.
Look at a sheet as a design board where you can place Visual Basic form objects like command buttons, dropdown boxes, textboxes and anything else at all. Not only can you place them anywhere on the sheet, but you can use those objects to interactively (or automatically) add, remove, or manipulate information on the sheet.
Monitoring Your Websites
I’ve tried a lot of different tools to ping the different websites that I manage, like the ICMP Ping Manager. But, not long ago I discovered a way to ping websites from right inside of an Excel VBA script. That meant, I could add a sheet to my «Automation» workbook that would ping all of the websites that I manage, and put the results into a cell next to the website name.
This is how I laid out the sheet.
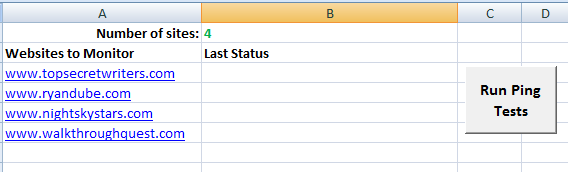
The number «4» in cell B1 is used to display the count of websites that I’ve installed on the sheet. This will allow the script to only count through the number of cells that actually have sites listed, started at A3.
The code to accomplish this looks like this:
Dim intSiteCount As IntegerDim intCount As Integer
Dim oPing As Object, oRetStatus As Object
Dim sHost As String
Dim sPing As String
Dim intCol As Integer
Dim intRow As Integer
intSiteCount = CInt(Sheet1.Cells(1, 2).Value)
intRow = 3
For intCount = 1 To intSiteCount
sPing = ""
Sheet1.Cells(intRow, 2) = sPing
intRow = intRow + 1
Next
intRow = 3
For intCount = 1 To intSiteCount
sHost = Sheet1.Cells(intRow, 1)
Set oPing = GetObject("winmgmts:{impersonationLevel=impersonate}").ExecQuery _
("select * from Win32_PingStatus where address = '" & sHost & "'")
For Each oRetStatus In oPing
If IsNull(oRetStatus.StatusCode) Or oRetStatus.StatusCode <> 0 Then
sPing = "Ping Failed"
Else
sPing = sHost & " Ping Success on " & Now() & Chr(10)
sPing = sPing & "Time (ms) = " & vbTab & oRetStatus.ResponseTime & Chr(10)
sPing = sPing & "TTL (s) = " & vbTab & vbTab & oRetStatus.ResponseTimeToLive
End If
Next
Sheet1.Cells(intRow, 2) = sPing
intRow = intRow + 1
Next
The first «For» look at the top just goes through the results cells and clears the results from the last time I ran a check. The second FOR loop counts through the rows listing the websites, starting at the third row (intRow-3), performs the Ping command (the Set oPing line), and then returns the results into column B (Sheet1.Cells(intRow,2) = sPing).
Here’s how those results look after the script runs.
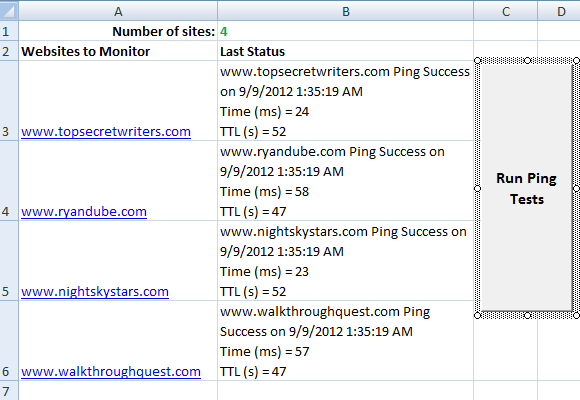
The results column shows whether the ping was successful, and the Time/TTL details.
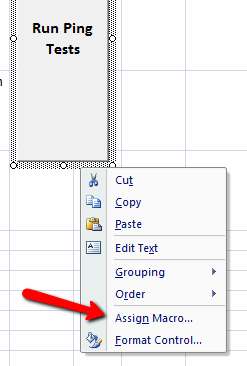
If you aren’t familiar with adding command buttons to an Excel sheet, you can add the button from the «Developer» menu, and clicking on the «Insert» button and choosing the button from the list. Draw the button onto the sheet, right click on it, and then select «Assign Macro».
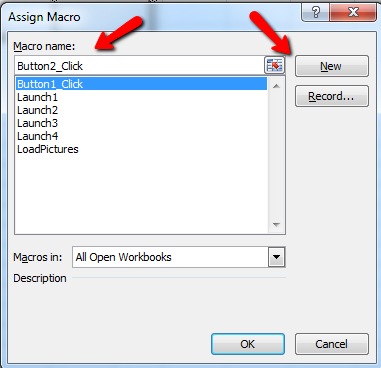
Type the name of the Macro for that button, and click on «New».
This will open up the code screen where you can insert the code from above.
Maintaining a Library of Link Groups
On another tab, I also started to organize the group of links that I use to perform certain tasks. For example, when I write for MUO, I like to open up the MUO WordPress editor, google, and our Google Docs page for topics. When I research for Top Secret Writers topics, I like to open a few standard media pages.
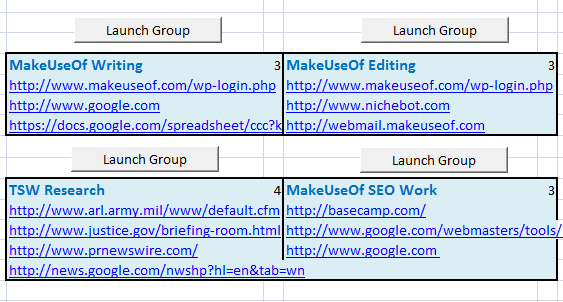
When I click the «Launch Group» button, it will launch the default web browser and open up all pages in that group. Here’s how the script for each button looks:
Dim intSiteCount As IntegerDim intCount As Integer
Dim intCol As Integer
Dim intRow As Integer
intSiteCount = CInt(Sheet2.Cells(4, 3).Value)
intRow = 5
For intCount = 1 To intSiteCount
ActiveWorkbook.FollowHyperlink (Sheet2.Cells(intRow, 2))
intRow = intRow + 1
Next
This script is simple but effective. The secret to this one is the «FollowHyperlink» function. This code will check the number of links defined in the cell just to the right of the group title, and knows to run through that many links before the title. For each button, the location of the link count, and the column being used needs to be manually typed into the code, but the rest of the code is identical for each button.
Previewing your Picture Gallery
On the next tab of my automation worksheet is where I go when I want to quickly run through all of the images in my pictures folder. I do this because I place more than just images in that folder, and want to see all of the files that I have there.
Here’s what it looks like after clicking the «Preview Pics» button.

Right now I manually update this sheet by deleting all pictures from the B column, and then clicking on the «Preview Pics» button.
The button runs the following script:
Dim myPict As StdPictureDim strFilePath As String
Dim intRow As Integer
Dim myPictName As Variant
Dim myCell As Range
Dim sPicture As String
Dim strTest As String
Dim myRng As Range
Dim intSkip As Integer
intRow = 2
strFilePath = Sheet3.Cells(1, 3).Value
Set myObject = New Scripting.FileSystemObject
Set mySource = myObject.GetFolder(strFilePath)
On Error Resume Next
With Sheet3
Set myRng = Sheet3.Range("B2", .Cells(.Rows.Count, "B").End(xlUp))
End With
For Each myfile In mySource.Files
'If picture is a file
If Right(myfile, 4) = ".gif" Or Right(myfile, 4) = ".jpg" Or Right(myfile, 4) = ".bmp" Or Right(myfile, 4) = ".tif" Or Right(myfile, 4) = ".png" Then
Sheet3.Cells(intRow, 1).Value = ""
Sheet3.Cells(intRow, 1).Value = myfile.Name
intSkip = 0
For Each myCell In myRng.Cells
If intSkip = 1 Then
With myCell.Offset((intRow - 3) + 1, 0)
Sheet3.Shapes.AddPicture myfile.Path, msoCTrue, msoCTrue, .Left, .Top, 125, 125
End With
End If
intSkip = intSkip + 1
Next myCell
End If
intRow = intRow + 1
Next
The secret of this script is using the StdPicture object, which lets you sort of overlay pictures at the location of certain cells, by defining the left and top properties of the picture to match that of the cell. Just make sure to size the cells slightly larger than what you define in the code. In my situation I used 125 height and width for the pictures, so my cells are set slightly larger than that ahead of time.
Managing Your Debt
The final tab that I want to share is actually one that I wrote a while back about using Excel to create a personal budget.
The most important concept that I wrote about in that article, and one that belongs in any article about using Excel to manage your life, is using Excel to calculate how the «snowball effect» can help you pay down your debt.
The concept is pretty simple. List all of your credit card debt side by side in a sheet, with two columns per debt — total balance and payment. The calculation for each subsequent payment cell is «PrevBalance + (PrevBalance * 0.10/12) — last payment»
Then you can drag all of the values down the sheet and they’ll recalculate, showing how quickly your balance will drop as you make those payments. As you can see, making one payment per debt until each debt is paid will eventually pay off each individual debt.
But thanks to the quick calculating power of Excel, you can determine when balances will be paid off, and at that point take the minimum balance for that card and move it over to another card not yet paid off. As the spreadsheet shows, each subsequent balance gets paid off much faster.
Excel allows you to calculate and visualize quickly how your payments will affect future payoff dates, and it also gives you a schedule to look back at while you’re trying to make sure that you’re right on track in paying off those debts.
As you can see, Excel is a very powerful tool when it comes to managing all aspects of your life — whether it’s your work, managing files, or your budget.
Do you have any unique uses for Excel to manage your own life? Share some of your own tips and advice in the comments section below.
Image Credit: magnifying glass via Shutterstock
The use of Microsoft Excel in daily life at home and office is to perform the calculation, analysis, and visualization of data and information.
Microsoft Excel is one of the most important workplace applications that help to organize the business system and processes of data and information by the use of columns and rows with formulas.
Microsoft Excel Application is developed and marketed by Microsoft Inc. for Windows, Mac OS, Cloud computing, and Android users.
In the excel spreadsheet users can do all kinds of mathematical, financial, and logical calculations, data manipulation, data analysis, and visualization of information in quick ways.
Excel is used by students, teachers, job seekers, managers, entrepreneurs, companies, retailers, distributors, freelancers, bloggers, and housewives in their daily life.
Microsoft Excel’s first version was released 31 years ago on September 30, 1985. Today, the latest version you can download is version 16.0 or Excel 2016.
Commonly people download & buy complete MS Office. Because Microsoft Office Suite includes all official applications such as Microsoft Word, PowerPoint, Excel, Publisher, and Outlook in one complete package.
The Excel spreadsheet is a group of 10,48,576 rows and 16384 columns. Excel is in a table format in which one index is called a CELL. In Excel, there are three worksheets by default. A group of worksheets is called the workbook. Workbooks and electronic spreadsheets are now synonyms of Microsoft Excel.
For a higher level of data calculation and manipulation, the use of the function library in Excel is important to utilize. The function library in Excel contains Financial, Logical, and text filtration formulas that are most important to practice for every excel learner.
Excel also provides table styles and conditional formatting options for users. That is very beneficial to the visualization of data in colors, based on a condition in the cells.
Explore: How to learn Microsoft Excel in the best way possible
Microsoft Excel software provides very wide features and functionalities for everyday official work. Let’s understand the various uses of Microsoft Excel features in daily life, based on different types of users around the world.
Top 8 Exceptional uses of Microsoft Excel
1. Uses of Microsoft Excel in Education: –
Teachers can use table styles, shapes, charts, data tools, and formulas to teach students in the classrooms. Students can learn and solve basic and logical-mathematical problems and statistics in excel.
Teachers can educate by creating a table in an Excel sheet. They can highlight more interesting cells in colors, emphasize important values and visualize data using bars and charts.
Below is the basic example 1.0 of data visualization in Microsoft Excel 2010 (Note: data used in this example is not correct it’s just for an educational example.)

The above data visualization example is easy to understand and is created by the use of two excel functions conditional formatting and chart. You can see in the first picture that the literacy rate of countries is highlighted in red color by the use of conditional formatting.
Conditional formatting is used to decorate, and design, and visually appealing data by using data bars, color scales, and icons based on figures. Such as you can see that 99% of the literacy rate cell is filled more than others and 45% of cells are filled with less color than others.
In the charts, you can see China’s data bar is bigger than the others. Charts are used to compare values visually written inside the cell. You can access this option in the Insert menu.
Another use of Excel for teachers is to schedule periods.

You can insert the above period planner by using the template function in Excel.
As a similar example if you Google then you as a teacher or student can understand the various aspects of Microsoft Excel in Education.
If you don’t want Google then visit the Template menu and select the Education category and you will find out some outstanding pre-defined templates with formulas for various educational purposes. You can see a template picture in point 2 in which I am sharing a little more about templates.
The above example can be used in a Business similar, only need to change the values. The options of Microsoft Excel are the same for all users but it depends on us, how we use a particular option.
Must Read: Importance of Microsoft Excel for Students
2. Uses of Microsoft Excel in Business: –
I don’t think the business owner, either a small or big company can be productive and managed without the use of Microsoft Excel.
Microsoft Excel application can be used in various business operations. Such as goal setting, budgeting process, and planning, team management, account management, income, and expenses calculation, product and service valuation, and management of client data, etc. in business.
The uses of Microsoft Excel in business make such daily official operations faster, more accurate, and more predictable. Because Excel provides great features such as filters, charts, conditional formatting and pivot table, and logical and financial formulas.
Let’s see below the basic account management example 2.0 in Microsoft Excel (Note: This is just for example)

In the above example 2.0 you can see the basic income and expenses report month-wise with a quote of the month at the end. In quote column I used this formula: =IF(F6>=400000,”Outstanding”,IF(F6>=300000,”Above Average”, IF(F6>=200000,”Average”,”Below Average”)))
This is just but you can understand that only with the IF formula you can create thousands of types of logic in your business calculation. The above exercise is just created manually not a big deal. But if you want to access the real power of Microsoft Excel in Business operations then visit the template menu.
As you can see in the template picture that there are various high-quality templates that business users can use in their business calculations. Such as VAT Invoices, Marketing Campaign trackers, and break-even analyses are very beneficial.
The benefit of using the template in Excel is that you don’t need to create everything from scratch, you only need to select or search and then download it. After then you can edit the downloaded template according to your choice. This is that simple!

Must Read: Importance of Microsoft Excel in Business
3. Uses of Microsoft Excel in Goal Setting and Planning: –
Goal setting and planning is a tasks that we do repeatedly each day. Goal setting and planning are very important for everyone from students to business owners. But goal setting and planning take a white paper, time, and lots of calculation but if you use Excel then it becomes very easy and environmentally friendly.
Example 3.0

In this example, you can see that it’s very easy to design the complete financial plan and goals by using formulas, raw, and columns.
Example 3.1

You can see in example 3.1 that it’s easy to track goals and plan each day on excels.
4. Uses of Microsoft Excel for Business Owners: –
Online business owners or offline can use Excel to manage their daily life work. Such as work progress, team management, payout details, and business progress. Such as if you want to track your marketing campaign progress then go to the file-new- template and search for a marketing campaign and you will be amazed by seeing pre-designed and formulated cells.
Must Read: – How to make the best use of the internet as a small business owner
5. Uses of Microsoft Excel for Housewives: –
Housewives can use Excel to manage their daily house expenses. They can create monthly expense reports. They can track their spending habits. Also if housewives learn Excel then it’s also beneficial for them to teach kids basic excel skills too.
It is because many computer teachers are unable (due to various reasons) to teach all excel skills practically to students in schools.
The use of Excel for housewives is also helpful if they are doing business or jobs or looking for part-time work. There are various online and offline jobs and projects that they can do from home by learning and using excel.
Related: –16 ways to utilize your time to become a smart housewife
6. Uses of Microsoft Excel for Data Analysis: –
Data analysis is very important to work today for an online business or website owner (eCommerce, blog, forums, etc.). Such as tracking website visitors, product sales, customer reviews, marketing campaigns, user behavior, and events Such work is very time and brain-consuming especially when things are not going according to plan.
Microsoft Excel application provides great benefits for online business owners and customers. As filtering users’ data by country, filtering users by age, adding conditional formulas in big data, etc. are common daily tasks that can be handled smartly in excel.
7. Uses of Excel in the Daily Progress Report: –
Many online and offline companies and clients make it mandatory for virtual and offline staff to maintain their daily progress reports. It is not only beneficial for employees but also for companies to track daily progress reports.
You can create a table with Date, Time, Client, Task, Duration, and status according to demand from clients or managers.
Also, the daily progress report is very beneficial for students and teachers. But all start with learning and execution. As you know the computer is a magical device that we’re using in daily life. Routinely there are various uses of computers in our life but all depend on how much you’re interested in learning.
Related: – How to teach basic computer skills
8. Uses of Excel in Career Development: –
When you learn to excel, you learn the management of daily life. In daily life, there are various things that need to be calculated. Why? Because we’re doing multiple works in daily routine. Shopping, learning, entertainment, and expenses are all small things that need to manage.
If you’re a student then it is very important for you to learn Microsoft Excel. Microsoft Excel knowledge will help you to get a job. Because as I discussed above there are almost all small and medium businesses use Excel in their daily official works.
If you’re writing about computer skills in the resume then make sure that you know about Excel and Microsoft Office and Internet research and highlight such skills.
Career Development is more about career management. Time management, learning management, work, and life management, and goal-oriented habits are very important. Such things you can learn in excel. When you create your college expenses report then at the end of the month you can analyze where you’re spending more money.
Also if you’re doing learning or doing online courses then you can use Excel to track knowledge. Such as if you learned today about Conditional formatting then create a table with Date, Topic, and Satisfaction levels. This is very beneficial because then you can understand your daily learning outcomes and the effects of knowledge on you.
For example, if you’re learning digital marketing but you’re not tracking and creating notes in one line conclusion then it’s tough to implement that knowledge later. I mean for example today you learned about PPC and CTR and then it’s really important that you can write in your diary or in Excel about it in the conclusion or in summary.
Such kind of learning management is very important. Because it happens to me often when we learn something on the internet or on blogs because of different conclusions and we often forget about the main points.
For example, if I telling you to learn English typing then it’s just a piece of advice or suggestion but if I am telling you that learning English Typing by using basic typing lessons such as ASDF; LKJ etc. then it’s really important for you to note it down and practice.
Related:- Top 11 Most important Computer Skills to learn for career development
How to use and learn Microsoft Excel for personal benefits
The 1st method is that define what you want, before googling. For example, you want to create monthly expenses report in excel then type this same line in Google and you will get tutorials. Follow the steps and you will do it.
2nd method is you can take an online course and that will be more beneficial. Because then you can learn everything stepwise.
3rd method is to take admission in a computer institute and join offline classes of basic computer or Excel basics.
Conclusions: – The more you learn about excel the more you develop the ways to use excel in your daily life. I am still learning, why you don’t learn. It’s better to spend time learning than doing likes on unnecessary things. Understand your duty as a student because learning is more important for you than entertainment in life.