

The Last Word
myminifactory
A model of The Last Word exotic hand cannon from the Destiny game. …Modelled in Fusion360 and designed to require assembly of seperate components
The Last Word
pinshape
3D printable file of The Last Word exotic hand-cannon from Destiny and Destiny 2.
3D modeled from scratch using Google Sketchup and Blender featuring full surface details and engravings. …
Destiny and its content are property of Bungie inc.
The Last Word
thingiverse
 Every relationship has it’s rocky moments, and sometimes it is important to have the last word. This object lets you have it, even if it’s not spoken.
25mm tall x 100mm long (about)
…
The Last Word coin
thingiverse
Rather than argue, I simply let them have «The Last Word.» It was really to demonstrate my technique for doing filament swaps on a printer that doesn’t support the Marlin filament change command. So, I break the gcode into multiple files and print…
H8R The Last Word SHell
thingiverse
Shell to got on H8R airsoft revolver to replicate The Last Word from Destiny and Destiny 2.
The Last Word Hand Cannon
thingiverse
The Last Word Hand Cannon from Destiny 2.
Did some mesh fixing and cleanup. Not perfect but it is printable. … I have not cut it in half but in the slicer I put half the model below the bed to print each half separately.
Destiny — The last word
thingiverse
«Yours…not mine.» — Renegade Hunter Shin Malphur to Dredgen Yor «Yours, until the last flame dies and all words have been spoken. » — Shin Malphur to you, as you journey forth into the unknown. …(Destiny 2)
The Last Word, more clear lettering
thingiverse
I liked the model of the last word however the several of the gaps were too narrow in the lettering for my painting skills. I did some quick edits in blender and widened what I felt necessary. …its not perfect but good enough for me
The Last Word Hand Cannon
thingiverse
For the trigger spring, use the spring out of a disposable ball point pen Update 07/04/19 Couple of minor modifications to the trigger bodies Left and Right where the top cover fits over (This can be cut back if you have printed already.) and made…
The Last Word
thingiverse
UNFINISHED
The Last Word prop
thingiverse
Need support. …I have to size it down to 80%
Destiny Exotic Hand Cannon The Last Word 1:1 Scale
thingiverse
This is a 1:1 scale model of the Destiny exotic hand cannon The Last Word. …The model was generated from DestinyStlGenerator.com and cleaned up using NetFabb cloud.
Destiny The Last Word — Frame Mod for Small Printers
thingiverse
When I originally tried to print this design at 75% scale, I could print all of the files except the frame. I split the frame in half and added a feature to join the two halves together. It should be scaled the same as the original design. …The…
The Last Word|Destiny gun exotic
grabcad
h
Destiny 2 The Last Word Inspired Cylinder for The Magpie (Nerf)
thingiverse
… a revolver from Destiny, so why not make it more like it’s from Destiny. … I made a basic arrow design in the style of The Last Word hand cannon, Might modify the design slightly to match it better, but I haven’t played Destiny for a while. …
The Last Word Proper Cut — Full size- Remix
thingiverse
I remixed this gun into two different packages for easier printing, depending on your printer model and bed size. …
Version 1 contains 3 parts and Version 2 contains 6 parts.
The LAst Story Customized Folding Word Pencil Case
thingiverse
http://www.thingiverse.com/apps/customizer/run?thing_id=149378 Instructions Using the following options: thickness = 5 width = 40 word = The Last Story tolerance = 1 height = 25 x_steps = 2 y_steps = 16 helper_tabs = 1 y_corner = 26 font_spacing =…
J-Head Last Word holder
thingiverse
… in place of the hot end on a 3D printer thats using J-Heads. … There is a hole on the side for a screw if needed (just a wood screw with the tip flatened should work, the Last Word shouldn’t see that much stress where you needed held that tight.)
Last Word .50cal / Nerf Conversion Barrel
thingiverse
To create this version of the barrel, I simply grabbed a model of the Last Word off of Thingiverse and added it to the existing barrel system while adjusting scale for best fit and look, I have not tested this model, but it should work just fine…
Last Word Segmented
thingiverse
the original model simply cut into 4 parts for smaller printers. … all credit of this amazing piece to DestinyStlGenerator here on thingiverse.
Last Word Segmented
pinshape
the original model simply cut into 4 parts for smaller printers. … all credit of this amazing piece to DestinyStlGenerator here on thingiverse.
Word Tracking Bookmark
thingiverse
A bookmark that tracks the last word you left off on
Destiny 2 — Last Word Cup
thingiverse
This is a cup in the form of the chamber of the hand cannon «Last Word» from Destiny. The dimensions are 80×100 I haven’t printed this yet so tell me if it works for you. … update 04.07.2019: -added more triangles to the stl-part so it will be more…
Destiny 2 — Last Word Cup
prusaprinters
This is a cup in the form of the chamber of the hand cannon «Last Word» from Destiny. The dimensions are 80×100 I hope you like it! For painting i just primed it, then got a black matt paint and finished with gold on the bottom. If you want to drink…
The Last Goodbye
cults3d
The last Good Bye
The Last Supper
grabcad
The Last Supper
The last cake
grabcad
The last cake!!
The Last Master
sketchfab
The model behind the main character of The Last Master.
The last of us
thingiverse
photo from the last of us 2 marketing
Porg The Last Jedi
thingiverse
A Porg from Star Wars the last jedi
Its called the Mateba Autorevolver. For comparison, here’s The Last Word.
The Mateba has a unique firing mechanism that uses its own recoil to rotate the cylinder and cock the hammer. What makes it so similar is its visual design and how it actually fires. So in destiny, all handcanons are like real world revolvers. As you pull the trigger the cylinder spins and the hammer is pulled back. But the Mateba does that the second you fire the gun, allowing the user to not have to do full trigger pulls with every shot. If you don’t really follow, watch this video of the gun being fired. In Destiny The Last Word is basically being used manually because your character physically fans the hammer back each shot. So its not the same in that regard, but similar in that its a unique thing in destiny, and the mechanism of the Mateba is unique to real life revolvers and thy both can be fired faster as a result. It also aligns its barrel along the bottom of the cylinder much like all the handcannons in destiny. Though that’s a pretty uncommon occurrence in real world revolvers.
I don’t ever recall anyone mentioning these kind of things here, but a lot of the weapons in destiny take some inspiration from real world guns. Like the Arminius-D, for example, looks a lot like a SCAR-H. I think this stuff is really cool and I just wanted to share this. Hope they do more of these kind of things in the future. Especially with Tex Mechanica and Hakke.
ALSO if any of you are Battlefield 4 players, you might recognize this gun as being the Unica 6. Remember long ago when revolvers in BF4 simulated the trigger delay? Well the unica 6 was the first one in the game to not have it.
(Edit: little bit of formatting)
NECROID
11.08.2022
Слушай если не сложно расставь в самом конце поста теги по типу #Destiny и пр. подходящие теме
Ответить
Развернуть ветку
Mark Kanaveev
11.08.2022
Это прям твоё изделие, не фотки из инета? Крутяк, нечасто встретишь русскоязычных дестини-энтузиастов.
По факту одна из любимых пушек в игре наверное, хоть и играть с ней не получается совсем.
Ответить
Развернуть ветку
LayerX3
11.08.2022
Автор
да, моё. люблю дустан, но играю не часто.
Ответить
Развернуть ветку
Лев Соколов
11.08.2022
Пистолет идиотский. А вот мастерство изготовления и покраса — выше всяких похвал. Браво мастеру.
Ответить
Развернуть ветку
Mark Kanaveev
11.08.2022
Чилл бро, это игра в фентези-сай-фай сеттинге. Там нет никакого реализма.
Ответить
Развернуть ветку
G N
11.08.2022
Дизайн недостаточно фентезийный и на него невольно примеряешь известные тебе механизмы работы оружия. К примеру в условной Вахе или Warframe (в последнем особенно) к оружию меньше вопросов, так как ты временами даже примерно представить не можешь как оно может работать
https://www.zbrushcentral.com/t/my-work-on-warframe/205806
Ответить
Развернуть ветку
Mark Kanaveev
11.08.2022
Ты реально пытаешься придумать реалистичное объяснение для пушек в дестини? F
Ответить
Развернуть ветку
Александр Рыбаков
11.08.2022
так так почти все пушки адекватно выглядят помимо всяких косяков типо ласт ворда
Ответить
Развернуть ветку
Mark Kanaveev
12.08.2022
Так там вон мягонькая штучка прикреплена и у неё какая-никакая площадь на задней поверхности есть. А вообще как бы очевидно что это экзотика какая-то. Первый раз это вижу, хотя много картинок и видосов с автоматиками видел.
У гридшкипера же вовсе в плечо упирается скоба какая-то своей кромкой, это будет оч больно
Ответить
Развернуть ветку
Александр Рыбаков
12.08.2022
такие приклады использует в закрытых пространствах для того что бы можно было работать с винтовкой, так как винтовки длинные обычно, а упор у ствола очевидно пятка не рама сверху. приклад должен упираться так что бы ствол был на против плеча что бы гасить отдачу
Ответить
Развернуть ветку
Лев Соколов
11.08.2022
Так тем более по-идиотски. Если источник питания можно воткнуть в любое место и подвести проводом, зачем втыкать туда, где это увеличивает силуэт лежащего бойца?
Ответить
Развернуть ветку
Лев Соколов
11.08.2022
Нет тут никакой утилитарности. Но если вам нравится — то и ок.
Ответить
Развернуть ветку
Александр Рыбаков
18.08.2022
нет никакой утилитарности в том что тебе не нужен другой разгруз для другой пушки потому что батарейки такой же формы что и магазины? бля дружище да ты прав
Ответить
Развернуть ветку
G N
18.08.2022
Про буллпап и его недостатки там подробно рассказывают
Ответить
Развернуть ветку
Александр Рыбаков
18.08.2022
ну понятно что у булпаов и свои недостатки и преимущества но ты это к чему вообще?
Ответить
Развернуть ветку
LayerX3
11.08.2022
Автор
спасибо. да, с геометрией у него проблемы это точно)
Ответить
Развернуть ветку
Никита
11.08.2022
Люди, которые разбираются в 3D принтерах — во сколько, очень примерно конечно , мне обойдётся в Питере такое чудо?( художник знакомый есть)
Ответить
Развернуть ветку
LayerX3
11.08.2022
Автор
наверно стоит спросить у знакомого художника..
Ответить
Развернуть ветку
Anipriest
11.08.2022
Я бы за такую печать (немного печатью на заказ) взял около 3к
Ответить
Развернуть ветку
Аккаунт удален
11.08.2022
Комментарий недоступен
Ответить
Развернуть ветку
LayerX3
11.08.2022
Автор
На алике видел за 10к принтеры и выше. Чем лучше соответственно.. Литр пластика стоит в районе 2к.
Ответить
Развернуть ветку
Аккаунт удален
11.08.2022
Комментарий недоступен
Ответить
Развернуть ветку
G N
11.08.2022
А потом светил ультрафиолетом?
Ответить
Развернуть ветку
Никита
12.08.2022
Я про заказную печать конечно. Просто интересны масштабы трат.
Ответить
Развернуть ветку
Кирил Мифодиев
17.08.2022
Смотря что нужно, какого размера и из какого материала — мы не умеем читать мысли.
Ответить
Развернуть ветку
Читать все 42 комментария
Ms Priyanka Chadha, Miss Lara Watson and Mr Nihull Jakharia-Shah debate the use of simulation training in aesthetics
Simulation ‘is the imitation or representation of one act or system by another’ and, according to the Society for Simulation in Healthcare, a global organisation that seeks to improve performance in patient care through simulation, in a training and educational environment, it ‘is a bridge between classroom learning and real-life clinical experience’.1
As technology becomes more advanced and affordable, the potential for its use has transitioned into training for minor procedures, including those within the aesthetic sector.
However, many aesthetic practitioners still have mixed views on the value of simulation-based training over the traditional approach of graded practice on real-life patients. Thus, the debate around the value of simulation models must be re-evaluated to determine its true value within the aesthetic specialty.
Traditional training
The traditional teaching method for clinical skills, which is based on real-life patient experience, has been documented in literature as covering the following five steps:2
- Students learn basic knowledge relating to the condition requiring the treatment, the relevant anatomy and instrumentation required.
- Students observe the procedure being completed, providing them with an overview and enabling self-evaluation.
- The students observe the procedure again with step-by-step explanation by a supervisor. This provides an opportunity to break the procedure into key steps and allows students to ask questions.
- The students talk through the procedure whilst the supervisor conducts it. This ensures a student’s understanding of the skill and the steps of the procedure prior to attempting it themselves.
- Students can perform the procedure under close supervision.3
Throughout the aforementioned steps, constant feedback and coaching should be given.
This traditional model is becoming increasingly challenged by educational providers due to concerns surrounding patient safety and its efficacy as the best method for acquiring clinical skills, especially for complex and intricate procedures such as injectable aesthetic procedures.4
Simulation training
Simulation models are commonly used throughout medicine for both surgical and non-surgical procedures. For example, simulation arms are regularly used for venipuncture and cannulation practice, which are used in almost every medical school. Simulation models are also widely used in aesthetic training courses as they can be easier to acquire than real-life patients.
The latest Health Education England training requirement recommendations state that trainees must observe, practice and be assessed in simulated clinical environments.5 However, it does not explicitly specify whether this should be on real-life patient volunteers or simulation models.
There are numerous simulation models available for aesthetics training. These vary in sophistication and, therefore, in price and availability.
High fidelity head and neck models, with muscles and additional structures, are generally used for injectable training. Nylon thread, human hair and goat skin can be added for hair transplant training.6 Silicon pads or cattle skin are often used for suturing, excision, flap surgery and skin graft training; and fruits or vegetables with thick peels can be used for dermabrasion training.13 Models resembling any part of the body can be ordered, however, in our experience, the above are the most commonly used on aesthetic training courses.
Advantages
Studies demonstrate the benefit of simulation training on skill acquisition in addition to the psychomotor performance of trainees, for instance, the manipulation of tools, dexterity, grace and speed of movement when conducting the procedure.7-11
A major advantage is that it creates a low-pressure, risk-free environment in which to learn. As students are practicing on simulation models, there is no risk to patients and simulation can allow practitioners to be better prepared when dealing with real-life patients by having prior experience of performing the procedures, thus increasing patient safety.12
Although it can be argued that simulation training does not completely emulate real-life scenarios, in our experience, there is a difference between a clinician treating a patient who only has theory knowledge without prior practical experience in performing the task, versus one who has practiced the procedure numerous times on a simulation model. The latter clinician is likely to be arguably better prepared and perform the procedure safely.7
Simulation also provides an easily accessible learning opportunity. With the traditional training model, students rely on the availability of specific clinical scenarios, such as patients with certain conditions, to ensure they receive adequate practice and exposure. With simulation training, once the simulation model has been purchased, scheduled training sessions can be undertaken at any time for as long as one desires, enabling more convenient teaching as you do not have to manage the real-life models or wait for access to one with a particular condition.
Additionally, the fact that simulation allows trainees to practice various procedures on specific parts of the body without relying on different patients to request these procedures is especially valuable for more rare or complex procedures, for which clinical practice would be difficult to come by and the stakes would be higher, for example, treating complications.1
Trainees can also create more personalised learning as they can focus on elements of the task they find most difficult, practicing it as many times as they need to, without having to repeat the entire process each time.
Although practicing the entire process on a real model helps to emulate the true clinical scenario more effectively, it is a benefit to focus on specific aspects of the task once a general familiarity/competence has been gained. Hand positioning, needle angulation and use of the microcannula, for example, can be rehearsed in a controlled setting without incurring risk or discomfort to a patient.
Disadvantages
The biggest disadvantage of simulation training is the fact that it is a simulation. Although clinical scenarios can be artificially manufactured, they will never truly reflect real-life experiences.
A successful encounter or treatment requires building a good rapport with the patient, having good communication and clinical judgement. This is especially important for aesthetic practitioners as patient satisfaction is arguably the most important outcome, unlike with the public sector, where clinical outcome and financial expenditure factor more heavily into the overall success of a treatment.13
The occurrence of patient distress or discomfort, haematoma formation and hypersensitivity reaction for example, cannot be replicated in currently accessible simulation training models which, therefore, carries some limitation to the scope of simulation in aesthetics. However, all scenarios can be mimicked to some extent and exposure to this before being in a real-life situation will, more often than not, result in increased confidence from the clinician and better outcomes for the patient.14
Tying into the argument surrounding the artificial nature of simulation-based training is the need to develop the ‘aesthetic eye’. Simulation models do not provide sufficient exposure to the variety of aesthetic outcomes that can occur from administering products. Each patient will respond differently and varying quantities and sites of injection will yield different results, which will not be reflected when a student consistently trains on a simulation model.
Simulation training is also expensive compared to clinical learning. The equipment alone can cost thousands of pounds for a simulation head and neck. Following this, there is a cost of maintaining the equipment and hiring specific areas. Simulation is also only as useful as the participant’s engagement.
Although simulation allows students to practice certain elements of procedures, this can lead to neglect of other aspects such as patient communication.
The learning process for students is also dependent on the quality of the feedback given by supervisors, therefore, the efficacy of simulation training is reliant on having high quality, engaged supervisors.15
Finally, its use as an assessment tool can only be a surrogate for real-life clinical assessment. This problem presents due to two main factors; that simulation can never truly emulate real-life scenarios and students will be aware that the scenarios are simulations. The latter disrupts a true evaluation as the simulation fails to capture the emotional elements of a clinical scenario such as stress, anxiety and natural doctor-patient rapport.
However, the initial problem can be minimised through two methods; firstly, as simulation models become more sophisticated, over time they will more closely emulate real-life scenarios, for example models that can bleed to emulate complications.
Secondly, the introduction of a validated national simulation training programme with a specific and thorough outline of what needs to be examined and how to examine it using a simulation, would enforce the validity of simulation-based training in aesthetic medicine. No validated programme exists yet, and further discussions with healthcare regulatory bodies is needed to produce this for the future.
Conclusion
There are disadvantages to simulation training, namely the cost and the artificial nature of the experience, however, as a means of supplementing the learning of simple aesthetic procedural skills, simulation training can provide an effective learning experience that preserves patient safety.
We believe simulation-based training has a significant place in the future of training in medical aesthetics, however, as there are limitations to this type of training, it is our opinion that the optimum training programme would include a combination of both simulation training and supervised training on real-life models.
Disclosure: Miss Priyanka Chadha and Miss Lara Watson are directors of the training academy Acquisition Aesthetics, which offers simulation-based training combined with supervised training on live models. Mr Nihull Jakharia-Shah is the educational and academic lead for Acquisition Aesthetics.
?
Creation quality:
5.0/5
(1 vote)
Evaluation of members on the printability, utility, level of detail, etc.
-
1.4k views
-
1
like
-
17 downloads
-
<span class=»text—light»>0</span> comments
-
<span class=»text—light»>0</span> makes
Designer
3D model description
UNFINISHED
3D printing settings
—
3D printer file information
-
Design number:
367745 -
3D design format: AMF and STL
Folder details
Close
- Last_Word.stl
- Last_Word1.stl
- Last_Word2.amf
Learn more about the formats
-
Publication date:
2021-04-16 at 00:42?
Published to Thingiverse on:
2018-08-15 at 03:30
License
CC BY — Attribution
Tags
- 3d_printing
![]()
![]()
Best 3D printer files of the Tools category
Best sellers of the category Tools
Would you like to support Cults?
You like Cults and you want to help us continue the adventure independently? Please note that we are a small team of 3 people, therefore it is very simple to support us to maintain the activity and create future developments. Here are 4 solutions accessible to all:
-
ADVERTISING: Disable your banner blocker (AdBlock, …) and click on our banner ads.
-
AFFILIATION: Make your purchases online by clicking on our affiliate links here Amazon.
-
DONATE: If you want, you can make a donation via Ko-Fi 💜.
-
WORD OF MOUTH: Invite your friends to come, discover the platform and the magnificent 3D files shared by the community!
I finally got to a point in this project that I thought was appropriate to start a build thread so here you go!
Most of this was just copied from my facebook art page. So if you’re interested in the build you can follow me at AxiomUltra Designs

Back when Destiny released I knew that I would want to build a replica of «The Last Word» at some point. I know it’s been done to death but I thought that I could add my own spin on the hand cannon by designing a replica that had a certain level of functionality. So I challenged myself to design not only a static base prop, but from that allow the trigger and hammer action to rotate (and lock) the cylinder into position. And because it needed to be extra difficult the «arm» that swings the cylinder had to drop down and telescope out like the in-game animation.
I’m happy to say that the preliminary design for these moving parts is finished and I am currently working on cleaning up the parts to prep for molding. The red parts are real world hardware that I have on hand. 2 compression springs, 2 ball bearings (to lock cylinder’s primary rotation and arm into position), 4 cut acrylic rods, and 3 gold plated aluminum bolts. All moving parts were based off of a kid’s cap gun toy which featured a double action setup. I know that TLW is supposed to be single action but I also want to be able to mod the kit to look like other hand cannons later. Based on my proportions (between head and hand size) to the reference provided by Bungie the overall length of the model will be 17.5″ with creative liberty taken on the width of the pistol grips to help with handling.
There are some other things I need to sort out like the hardware caps, the main receiver registration keys for the hardware, and the pattern on the pistol grips but I feel like the bulk of the ditch digging work is over with.
As with all of my projects this one’s probably going to go pretty slow when I find down time outside of work but I will update as it starts to come together.

Here is a photo of the printed revolving cylinder and ammo capsule. Now I don’t typically like to show straight off the printer parts because it feels kind of like seeing an untextured model or a character in t-pose but I thought that this was pretty cool.
In order to allow the ammo capsule to fall out and also allow «reloading» I needed to give the revolving cylinder keys to grab onto while the pawl pushes the ammo capsule around.
I thought about hiding these keys way in the back to ensure game accuracy but I felt like it would just make casting it harder and I wanted to guarantee a snug fit. If these two parts couldn’t work together then the entire action of the prop would fail.
The bottom right photo shows the 1/4″ ball bearings that will be locking the cylinder into it’s 60 degree rotation, because having it freely rotate could allow the part to settle in weird angles and I can’t allow that kind of stupid stuff to go down.
Some of you skateboarders might recognize the 608 bearing sitting on the top there. The printer made the hole for the bearing just a tiny bit too small but that’s an easy fix in the shop. I want to allow the owner of the prop to be able to spin that cylinder like a boss. I just wish the bearings were a bit nicer and gave off a nice click when you spin it.
I’ll be working out the details for the rest of the moving parts next.

This was an assembly and test for the first action involving the trigger and hammer. I thought it worked out pretty well considering I did the initial design in ZBrush. Getting the trigger to clear the hammer’s rotation point so it’ll snap back is going to require some additional filing but I was pretty pleased with how everything is fitting together so far.
That white material sucks for the camera and sucks for my eyes so I had to mist it with a primer. No cleanup has been done yet. I need to make sure all of the moving parts don’t need to be reworked first.
Finally got the trigger and hammer to work together properly. Next is fine tuning the pawl and cylinder action and then baby we got ourselves a stew goin’!
Forward barrel is probably the most challenging print I’ve done so far. I started right after I got back from San Francisco and it took 73 hours. Not bad terrible 3d printer, not bad.
What you see hasn’t been cleaned up. Just filed a little bit to get everything to fit and hit with a coat of primer. So lots of ugly print lines that offend my eyes.
The next phase is the smoothing part that I know everyone loves. I’ll be using spot putty and wet sanding for it just like the LMS armor. I don’t want to use XTC and risk losing all of the engraved details. The safer path would be to just slowly work around them for the next few weeks…
The emblem for «Tex Mechanica» is going to be done separately since printing any engraved text takes a nice finessed orientation that the rest of the part couldn’t do.
Thanks for following and stay tuned!
This is a continuation of a report on new ways to look at depth of field. The series starts here:
A new way to look at depth of field
When I first started my investigations into depth of field management, I was driven by two very separate things that ganged up to point me in that direction.
The first was the work I did measuring longitudinal chromatic aberration (LoCA) and focus shift. My approach to that work was to mount the camera—and in some cases the razor blade target—on a motorized rail controlled by a computer. A byproduct of tests using that set up was a very accurate look at the way that sharpness, measured in terms of MTF50, varied with subject distance. At apertures close to the optimum for the lens involved if the margins of acceptable depth of field were anywhere near what the lens was capable of, the depth of field was pathetically low. I had been used to derating the marked DOF ticks on lenses by three stops, but my measurements indicated that even this wasn’t enough for critical work. That provided motivation for me to do some further study.
While I was thinking about that, I got involved in a discussion about object-field DOF management methods in the a7x forum on DPR. I had some concerns about how some of the tenets of that approach fared under conditions where there were appreciable contributions to loss of sharpness from lens aberration, diffraction, and sampling with apertures larger than the infinitesimally small points assumed by sampling theory.
It seemed that a way to get at both those things was to do simulation studies. I happened to have a camera simulator that modeled read and shot noise, diffraction, a crude lens aberration model, a Bayer CFA, and arbitrary (assumed square) fill factors. It didn’t handle defocusing, so I modified it to do so, simply adding another convolution with a pillbox kernel to model the defocusing. Alan, Severain, AiryDiscus and others have demonstrated that that’s not an accurate way to model defocusing, but let’s set that aside for the moment. The model produced spatial frequency response (SFR) curves using the slanted edge method, and I reported on MTF50 primarily.
That model ran very slowly, taking a few hours to produce each set of results. Jack Hogan produced a model that was simpler than mine, leaving out the CFA, using a monochromatic source, and making more assumptions about various kinds of blur, but the results were close enough for what I was trying to get at. Jack’s model had one huge advantage over mine: instead of running in a few hours, it never took more than a second.
Jack’s code used a different lens model than mine. His simulated lens was better than a real Zeiss Opus 85/1.4 at the wider apertures. Mine was worse. Both produced roughly similar results from f/8 to f/22.
I switched to Jack’s model – he generously supplied me his Matlab code, which I modified and extended – and produced a set of results for both image-plane and object-field MTF50.
One of the things that came out of all this modeling is that, at MTF50’s that photographers consider sharp or close to that, lens aberrations and fill factor played an important role in determining sharpness; it wasn’t all diffraction and defocusing. That made me concerned that the inaccuracies in the way defocusing was modeled in both Jack’s and my simulations was making the results of questionable value. I don’t know if making the model more accurate will change the general nature of the results or not, and that makes me question how much further I should go with the present two models. I’d hate to do a lot of work and then have to do it over.
I didn’t feel confident extending either model to include a better defocusing algorithm, as I have hardly any background in optics. I do own a copy of the classic Fourier Optics, but unfortunately, having it on my bookshelf has not increased my skills. Alan Robinson volunteered to extend Jack’s algorithm to improve its accuracy under moderate defocusing.
Here’s Alan’s algorithm for MTF = x:
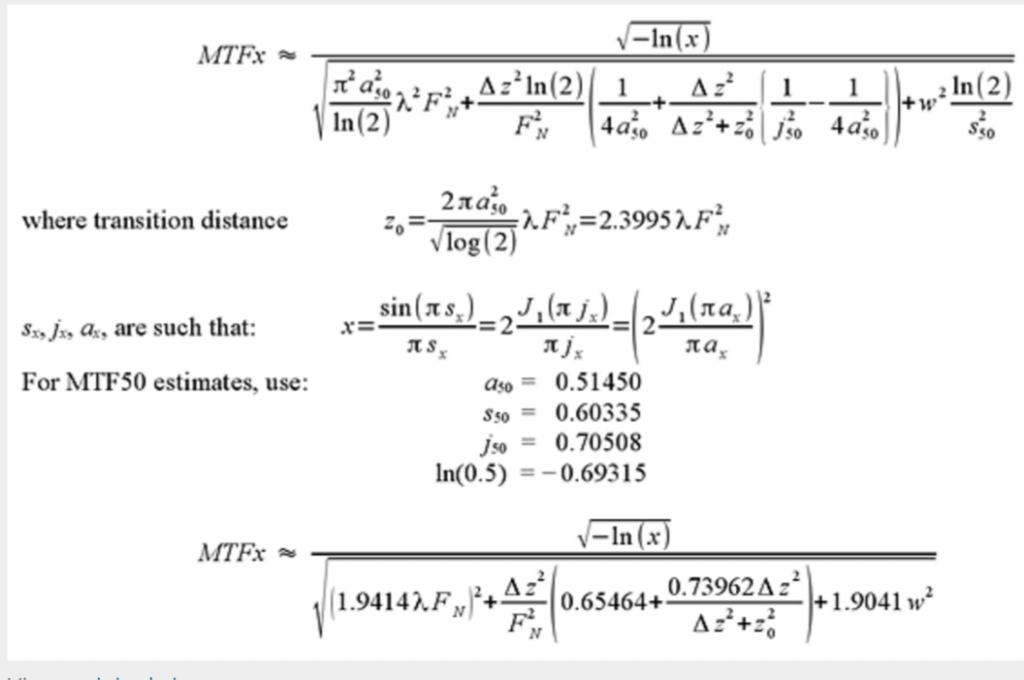
Where lambda is the wavelength of the light, delta Z the defocusing distance, and Fn the f-stop.
For MTF50, this simplifies to:

I implemented this in Matlab (Alan even provided the critical code), and made a constant change in the above at Alan’s suggestion. The 2.06 in the first term of the denominator became 1.9414. I also changed the constant in the equivilant last term of Jack’s denominator to 2.2.
Let’s compare the results, first with no aberration and a zero fill factor (point sampling). The captions all say that the lens was focused at 100 meters. That is a lie; 10 meters is the right number.
Jack’s algorithm:

Alan’s:
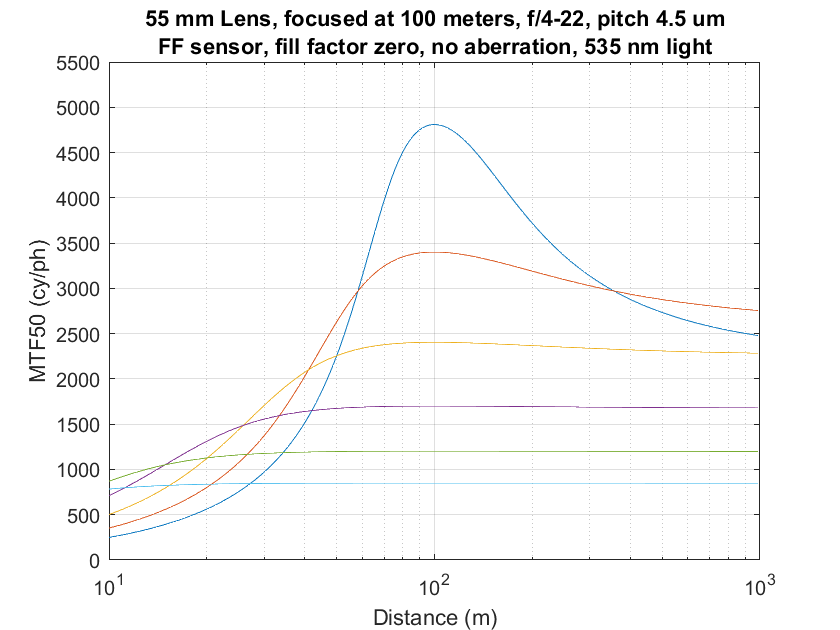
Note that the peak MTF50s are well above the Nyquist frequency for the 42MP camera that is modeled.
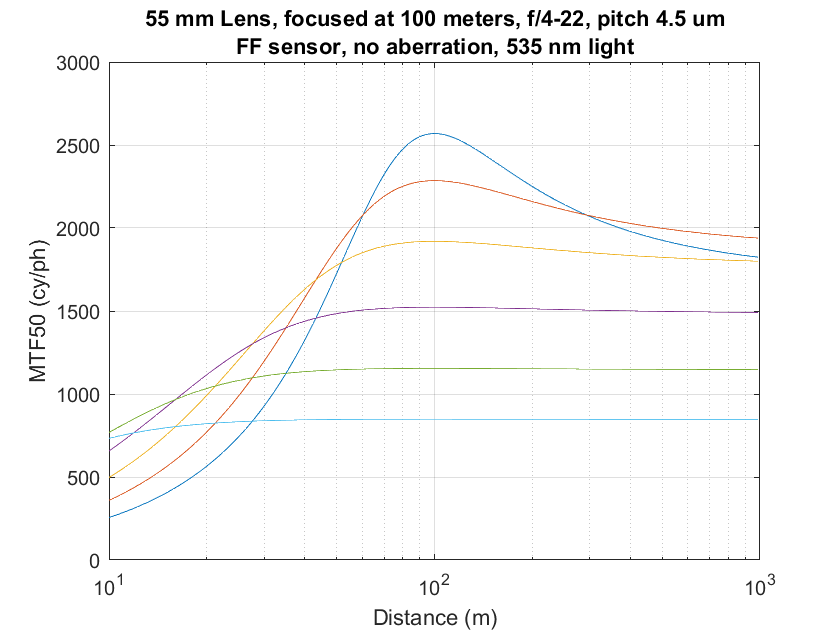
Changing the fill factor to 100% gives us a more realistic case.
Jack’s:
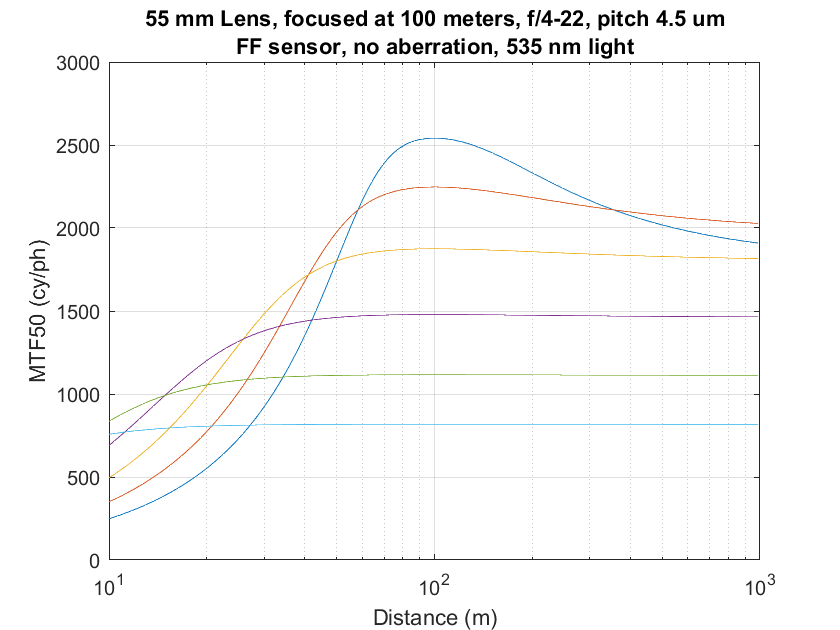
Alan’s:
And finally, adding our 1.4 micrometer (not pixel, like it says in the captions) lens aberration, which is optimistic at apertures wider than f/8 or so.
Jack’s:
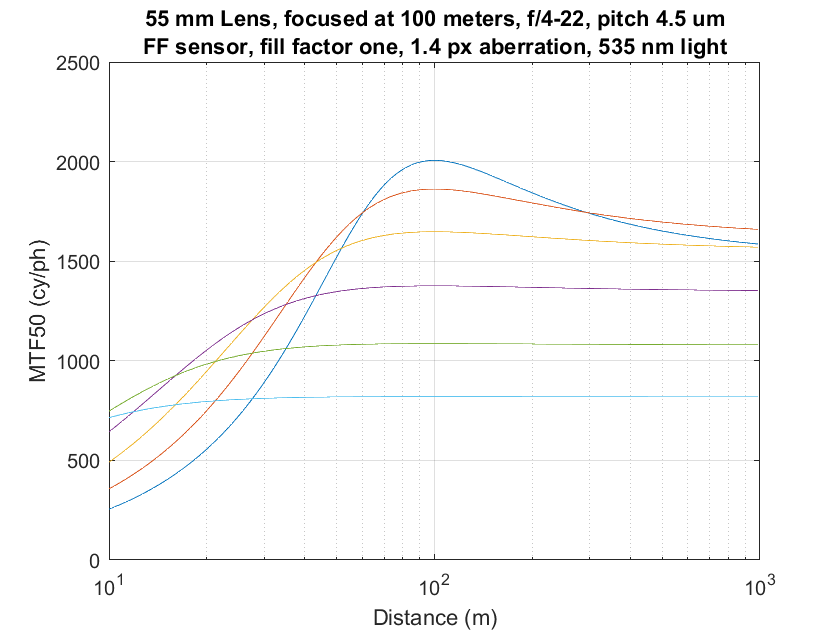
Alan’s:

Alan’s curves are somewhat broader for wide apertures. The difference is not large.
Whew! I don’t have to go back and rework the last two weeks’ worth of posts.