
Go to DestinyTheGame
r/DestinyTheGame
r/DestinyTheGame
Welcome to Destiny Reddit! This sub is for discussing Bungie’s Destiny 2 and its predecessor, Destiny. Please read the sidebar rules and be sure to search for your question before posting.
Members
Online
by
OTernary

Tips on how to use THE LAST WORD
The most effective way on using the last word
tell me about yourself guys how do you use it ?
«Yours, until the last flame dies and all words have been spoken.» —Shin Malphur to you, as you journey forth into the unknown
Knew this day would come, and with it, one last lesson…
There’s an end to all things, kid. Good and bad.
Sure, the best times seem small, and the bad tend to linger, but the only permanent is eternity.
I’m off to meet it.
If you’re lucky, someday you will too.
For now, though, you’ve got road yet traveled and lives yet lived.
I know you got hate in you. Most do. Trick is to use it, ‘stead of it usin’ you.
But you know this—vengeance is a motivator, not the motive.
Meant to—hoped to—say these words to you one last time in person, but writin’ ’em down seems the safe bet with the prey we’re trackin’.
Worst part about bein’ a good guy? As much as you may want it, you can’t always win. But that truth don’t bother me. We do the right thing, ’cause the right thing needs doin’. So, when another does harm—casts their shadow upon you or your kin—you go ‘head and hunt for the justice needed to answer any sins inflicted.
Don’t hunt ’em ’cause you been wronged.
Hunt ’em ’cause what they did was wrong.
There’s a world of difference there, kid.
One makes you selfish. The other makes you a hero.
And I see a hero in you.
And with this last good lesson, a gift. I know it feels right in your hand—its weight easy, its trigger smooth. Use it as you will—I know you’ll use it right.
It’s yours now, ’til the last flame dies and all words’ve been spoken.
‘Til that time.
Safe journeys. Straight aim. And good huntin’.
J.
—A letter to Shin Malphur from his third father, Jaren Ward, written before Ward’s ill-fated showdown with the infamous Dredgen Yor in the wooded hollow beyond Beggars’ Gulch
To the pleasure of Destiny veterans, The Last Word Exotic handgun is currently accessible in Destiny 2 for players who own the yearly pass. The Black Armory extension is tied in with making the best weapons of mankind’s Golden Age, so it just bodes well that this famous gun would return.
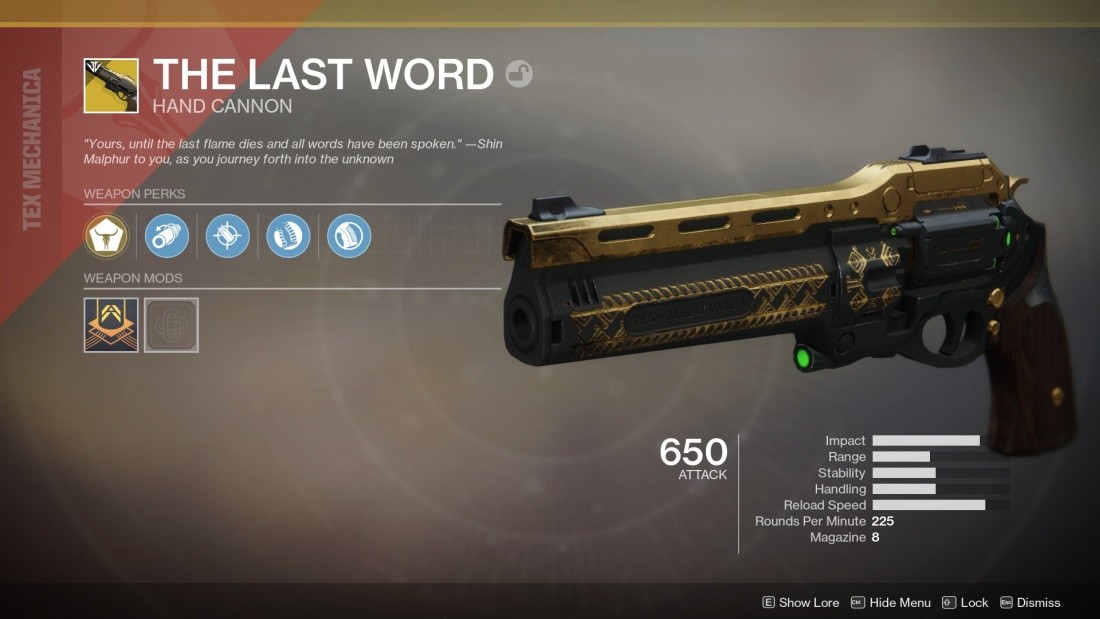
The Last Word is the quickest terminating hand cannon in the game, and you can even fan-fire it like mother lovin’ McCree. It’s a cool, amazing, darling weapon, intended to overwhelm shotgun rushers in PvP, and it’s definitely worth possessing. In this guide we’ll disclose how to obtain the weapon, offering tips to remove the pain from a portion of the means needed to finish its Exotic quest, which is known as ‘The Draw’.
Stage one

Visit the Tower and converse with the Drifter. He’ll give you a Hive curio which you’ll have to redesign on different occasions by taking care of its energy and materials, beginning with the existing power of loads of Hive. For the initial step, you need to kill 75 Hive adversaries in addition to three Hive supervisors, and you’ll have to kill a boatload of Hive with sunlight-based harm. Between Escalation Protocol and the Northern Lost Sector, Mars is the best spot to kill Hive, so head to the Red Planet and pop a few heads.
The sun-oriented kills take the longest, so prepare your most grounded sunlight-based firearms and capacities toward the beginning. The Avalanche LMG that was distributed during The Dawning occasion is a decent decision. Sharp edge Barrage, base tree Dawnblade, and top tree Hammer of Sol are for the most part great Supers, and any sunlight-based energy weapon will do the work.
For exotics, attempt Sunshot, Prometheus Lens, Hard Light, Skyburner’s Oath, or Polaris Lance. Accommodating exotics incorporate Ophidia Spathe for extra red hot blades, Hallowfire Heart for quick re-energizing Titan capacities, and Sunbracers for Warlock sun based ‘nade spam.
Also read:-
1. All About Eververse Guide: Destiny 2
2. Best Tips to Survive Grandmaster Nightfalls: Destiny 2
3.Destiny 2: How to get the Xenophage Machine gun?
Stage two

You realized this was coming: it’s the ideal opportunity for the Crucible piece of the quest. The principal Crucible part, really. Indeed, there’s additional. Yet, it’s truly not unreasonably terrible. For this progression, you need to fill an advancement bar by getting kills in the Crucible. The kicker is that withering will slow down you, so you need to go positive. Cheerfully, helps help, so make certain to go in a pack and tag however many rivals with your essential as could be expected under the circumstances.
You can get kills with anything, so as long as you keep your KDA above water, you’ll finish this progression ultimately. Simply bunch up, pick your method of decision (not Rumble as you will not get numerous help), and play generally inactive. Godspeed.
Stage three

Endured? Great. Presently it’s anything but’s a lot simpler mission. When you finish your Crucible kills, head to the Rig arrival zone on Titan. You’ll see a mission marker on the guide; select it and follow it’s anything but a Lost Sector on the north side of the Rig. The mission power level beginnings at 500 and scales to your level, so you’ll be fine.
Advance toward the core of the Lost Sector and you’ll discover a beefed-up Hive Acolyte monitored by two Wizards. To drop the Acolyte’s safeguard, you’ll need to kill the Wizards first. In this way, you know, shoot everybody. Whenever everybody’s been shot, it has returned to the Drifter.
Stage four

Fortunately, you can get the Hive Larvae and Etched Crystals by spamming the typical rendition of the Lost Sector you did in sync three. Truly, take care of business multiple times and bring forth back on the Rig after each endeavor. When you get enough Larvae, you can disregard the little fellows and simply soften the manager to speed things up.
The awful news is that the Hive Ritual public occasion just generates on Titan in the Rig and the southern area of Mars, where it’s a lovely uncommon occasion because of individuals starting up Escalation Protocol. In this way, while you’re cultivating Larvae and Crystals, continue to check the guide in those areas to check whether the Hive Ritual occasion is approaching.
This occasion generates close to the Rig arrival zone on Titan and in the top piece of the Southern area on Mars. On the off chance that you finish the Larvae and Crystals before you finish the Hive Rituals—which you most likely will—feel free to move onto the Crucible decorations and intermittently check the guide for occasions.
Note: to trigger the brave rendition of the Hive Ritual, remain on the two plates and kill the Wizards that produce once their safeguards drop. Stay on the plates and the safeguards around the gems will drop, so kill them as well.
Back in PvP, you get Blood for Blood decorations by killing players just after they kill at least one of your partners, and you get Best Served Cold awards by killing the player who killed you last. All in all, both of these decorations are dependent upon somebody passing on, so there’s no absolutely proactive approach to cultivate them.
All things considered, you can build your chances of getting these awards by remaining nearby your colleagues, monitoring who kills you, and utilizing a single-shot super like Nova Bomb and Blade Barrage to counter meandering supers like Nova Warp and Golden Gun. Quickplay is for the most part the playlist to run here, however in the event that it’s accessible, Mayhem is ideal since it gives you such countless supers. By and by, it’s anything but an issue of tolerance and time
Stage five

Practically done. Head back to the Drifter and he’ll give you another relic called The Conversation. This opens another mission in the Tangled Shore, where you’ll have an extremely noisy visit with a Hive gunsmith named Enkaar. Put down at Thieves’ Landing and head south until you arrive at the mission marker.
The greater part of the mission needs no clarification. On the off chance that you’ve killed Hive previously, you’ll realize how to continue: kill fellows, embed Worm An into Wall A, kill wizards, kill gem. Standard stuff.
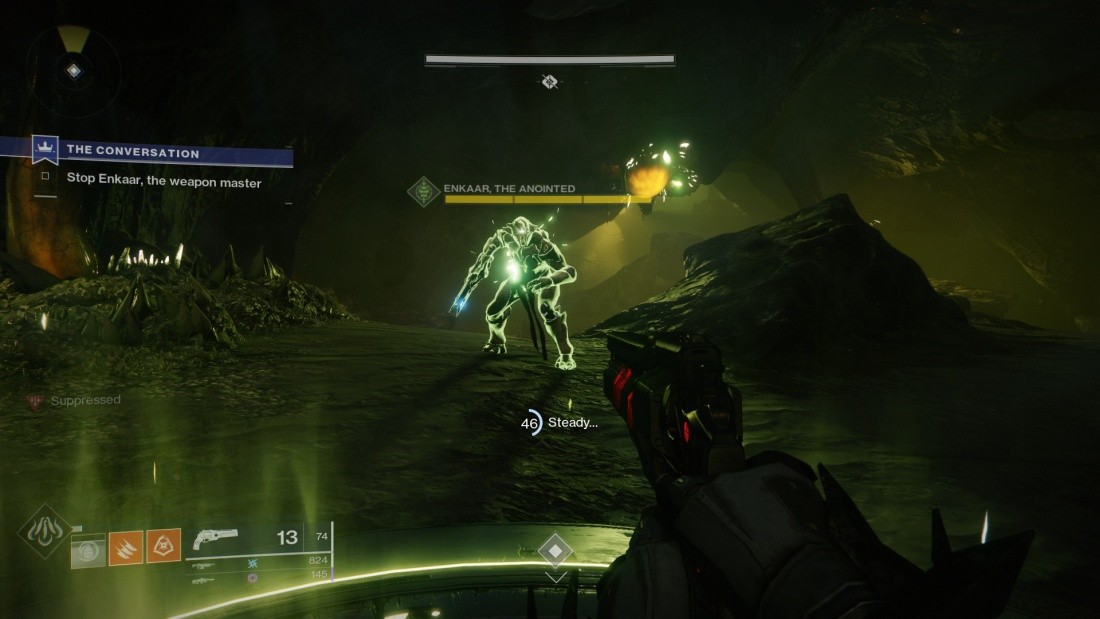
It’s after you kill that precious stone that things get. You’ll wind up in the Broodhold and you’ll see a runic plate. Remaining on the plate fills an advancement bar, and when the bar is full, The Last Word shows up. Be that as it may, it’s anything but yours yet; you must kill Enkaar first. Enkaar will produce before the plate around the time you snatch The Last Word, and in no time thereafter, he’ll pull his firearm. You got it: you must fire his weapon out of his hand utilizing The Last Word, and you must do it before he impacts you. How cool is that? It’s high early afternoon!
There are three plates in the Broodhold, and each plate accompanies an additional clone of Enkaar for you to duel. The primary plate is opened consistently, yet to utilize plates two and three, you’ll need to get out the adversaries that bring forth, taking specific consideration not to get exploded by the Cursed Thrall.
Aside from that, it’s standard system: remain on the plate, fill the bar, snatch The Last Word, and shoot Enkaar’s weapon when it shines. Note that the clones fire in the order they generate, and in case you’re excessively sluggish, you will kick the bucket, so channel your inward Clint Eastwood.
Advance toward the third plate, shoot every one of the three Enkaars in the blaster and guarantee The Last Word. It’s formally yours. Congrats! You’ll see that The Last Word is a delight to use in the Crucible—recall it’s proposed to be utilized in short proximity, terminated from the hip as opposed to ADS—so in case you’re not tired of PvP, go give it a trial.
Conclusion
This includes our guide about Destiny 2 last word. We hope now you can easily gain the rare weapon and continue your quest to dominate the game. If you liked the content then make sure to share it with your friends, who might be facing a similar issue. Also, do let us know your opinions in the comments section below.

Steps and tips to complete The Draw an exotic quest to unlock The Last Word in Destiny 2.
Nothing gets the Destiny 2 community worked up quite like a secret or Exotic quest. Today’s Exotic quest, called The Draw, is given to Guardians by the Drifter. The reward for completing this quest will be familiar to those who played a lot of the original Destiny, as The Last Word Exotic Hand Cannon is yours should you grind this one out. Below are the steps to complete the quest, and tips to help get The Last Word in your hands a bit faster.
How to get The Last Word
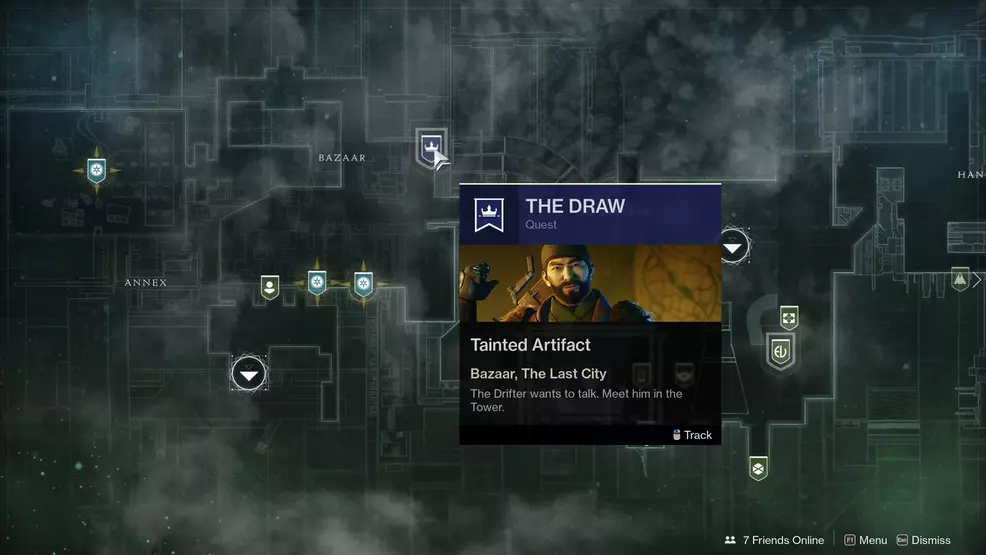
Begin by loading into the Tower and visiting the Drifter. He will have a quest called The Draw. Once you pick up the quest, open your inventory and view the first quest step, entirely centered around the Hive.
Quest Step: The Cleansing
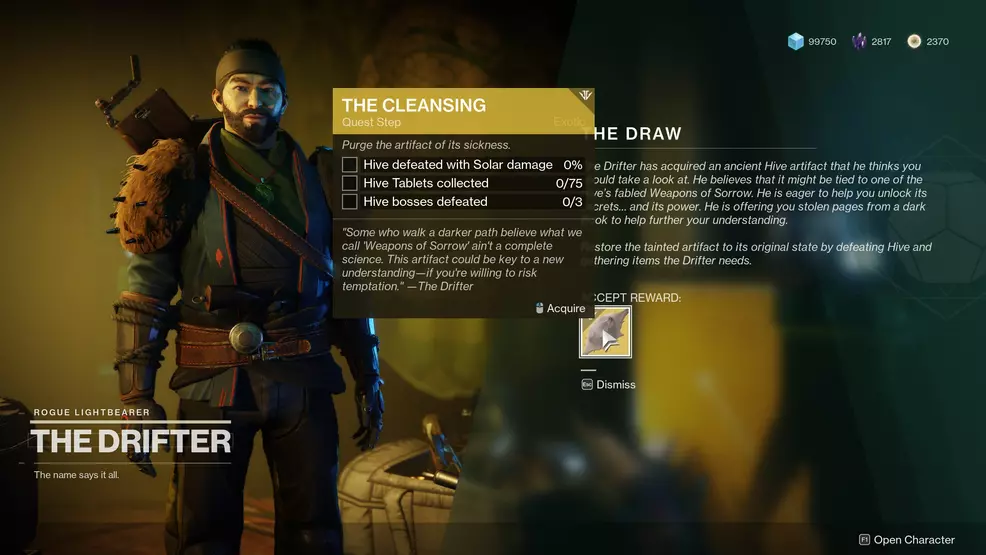
- Hive defeated with Solar damage (100%)
- Hive Tablets collected (75)
- Hive bosses defeated (3)
One of the easiest ways to complete this quest step is to fire up the Core Terminus lost sector on Mars. It’s the one just outside the Braytech Futurescape building. Make sure that your subclass, energy weapon, and power weapon are all Solar damage, then start obliterating Hive. A few runs of this and all three objectives should be completed. Unlike the Cargo Bay 3 lost sector on Titan, this Hive boss actually counts, whereas the Ogre in that one doesn’t for some odd reason. It’s also worth noting that strike bosses don’t count as Hive bosses either. It’s a confusing system, but just know that the Hive bosses (and minion Hive) that you seek are in the Core Terminus lost sector.
Quest Step: A Cleansed Artifact
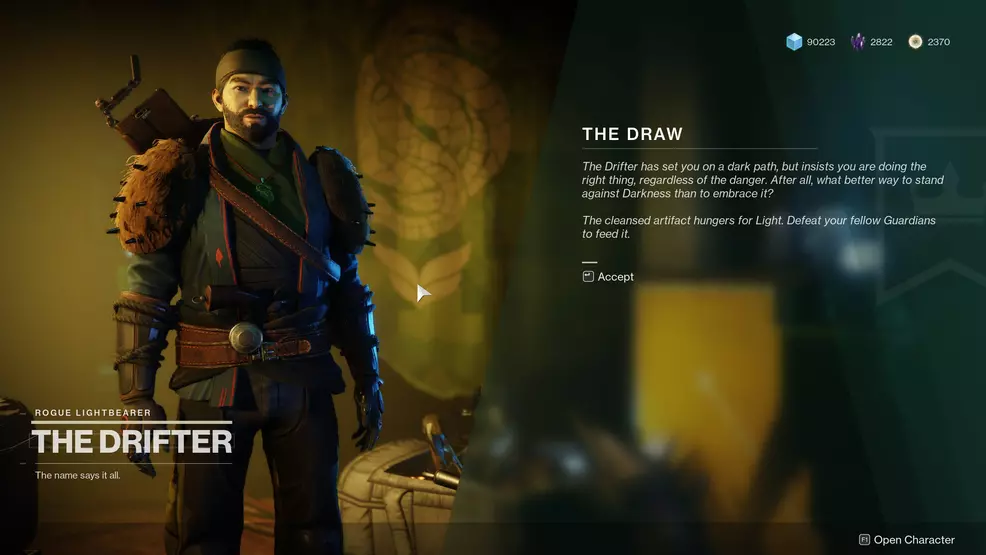
- Drifter visited
Simply return to the Drifter and speak to him. This is a transition step. Nothing more than busy work to make you waste Vanguard rocket fuel flying to the Tower and then back out where you really need to be.
Quest Step: The Temptation
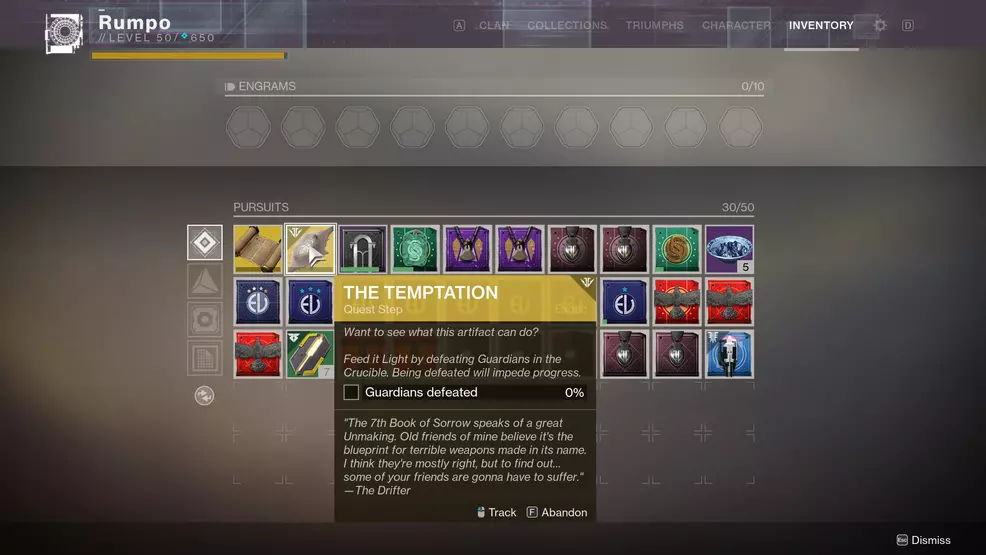
- Guardians Defeated (100%)
Head into the Crucible for the next step, which is by far the most aggravating for most Guardians. The goal here is to land final blows, defeat opponents, and limit your deaths. Skilled PvP players are going to blast through this in a few rounds, while those of us who aren’t the best in PvP might struggle for a considerable time. Death means lost progress, so it’s important to keep your final blows and defeats above your deaths. If you’re not comfortable running into the middle of the map and killing five Guardians at once, hang back with a pulse rifle and focus on doing damage to targets engaged with teammates. You don’t have to kill them to get points. If you defeat (participate in the killing of an opponent, but not land the final blow) several Guardians per life, positive progress on this step is guaranteed.
Quest Step: The Damnation
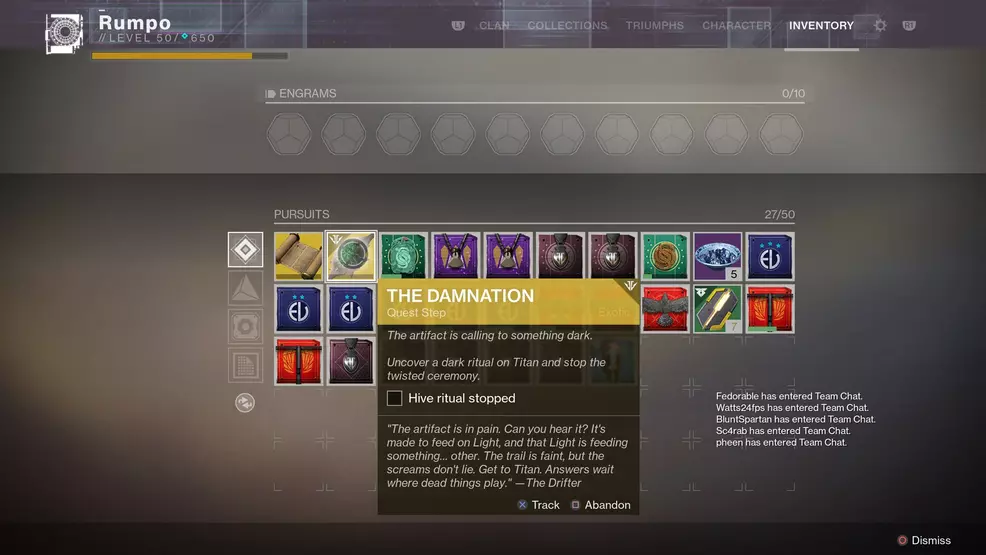
- Hive ritual stopped
The Damnation quest step tasks players with heading to Titan to stop a Hive ritual. This is a special mission that is launched from the planet. Use the map to track the blue banner, find it on Titan, and then launch the quest step. The mission involves heading into the Cargo Bay 3 lost sector. Kill the Hive Wizards in the room to lower the boss’ shield. Deal damage to the boss until the shield regenerates, then kill the Wizards again and enter another damage phase. Staying alive with the constant spawning of Hive minions is by far the most challenging part of this quest, but it’s fairly easy regardless.
Quest Step: A New Jagged Purpose
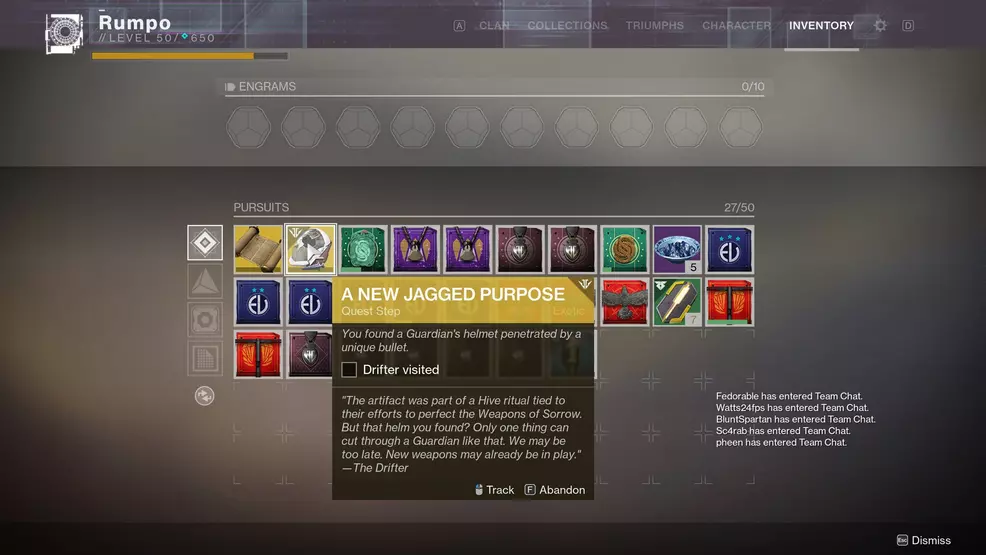
- Drifter visited
Head on back to the Drifter to show him the helmet you found. Listen to his spiel or jump to the next step.
Quest Step: Sullied Light
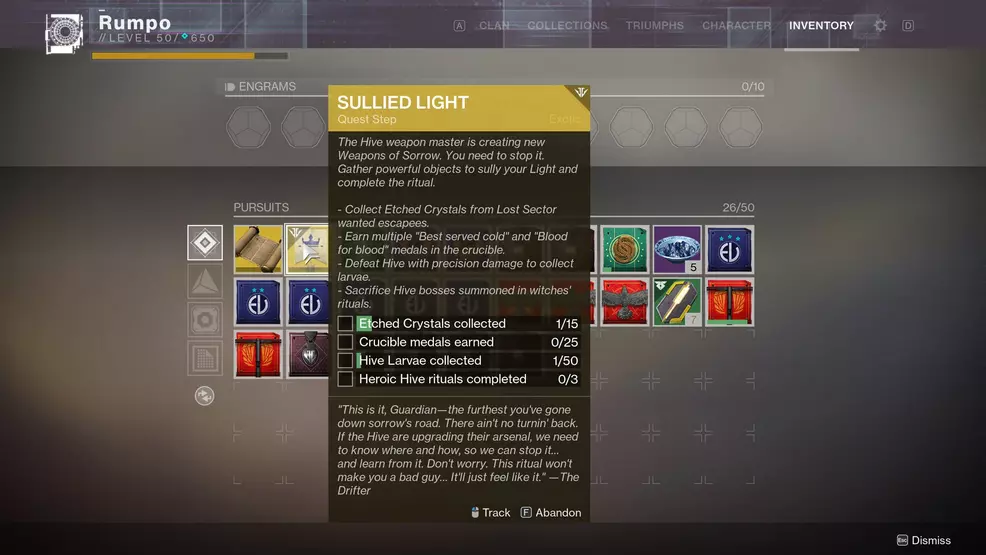
- Etched Crystals collection 0/15
- Crucible medals earned 0/25
- Hive Larvae collected 0/50
- Heroic Hive rituals completed 0/3
This next step is going to be a bit time-consuming, though far less frustrating than the Temptation portion of acquiring the Last Word. Players will need to collect Etched Crystal from Lost Sector wanted escapees, earn «Best served cold» and «Blood for Blood» medals in the Crucible, defeat Hive with precision damage, and complete the Heroic version of the Witches Ritual Public Event. The «Best served cold» medal is awarded for landing the killing blow on an enemy the last killed you. The «Blood for Blood» medal is awarded for killing an enemy that just killed an ally.
Running the Cargo Bay 3 lost sector was by far the fastest way for a buddy and I to complete the Etched Crystals and Hive Larvae portions of this quest step. Because the Hive in Cargo Bay 3 are largely made up of Acolytes, they have big heads that are easy to hit, and Hive Larvae drops on critical kills. Furthermore, we were able to run this lost sector (after finishing the Hive Larvae portion) from entry to exit in about a minute.
The Hive Rituals heroic public event is found on Titan and Mars. No way to cheese this one. Just keep an eye out for these events and head to the planet they take place on. Be fast, though, as this event can be beaten very quickly, even when turned to its heroic version. My suggest is to focus on the Hive Larvae and Etched Crystals portion, but check on Hive Ritual public events between runs. No point waiting around doing nothing if you don’t have to.
The final step requires 25 Crucible medals made up of Blood for Blood and Best Served Cold. Blood for Blood is the easier, more controllable, medal to earn. It involves killing an opponent that just killed you. To do this, stay behind teammates and focus on killing enemies that just defeated your pals. Best Served Cold is about killing the player that last killed you, which is tough to control. If Mayhem is running as a Crucible mode, head in there. Not only are people dying all over the place, but you’re able to toss up about 10 super abilities per round. I believe it took me in the range of five to seven Mayhem matches to complete this step.
Quest Step: Sorrow’s Road
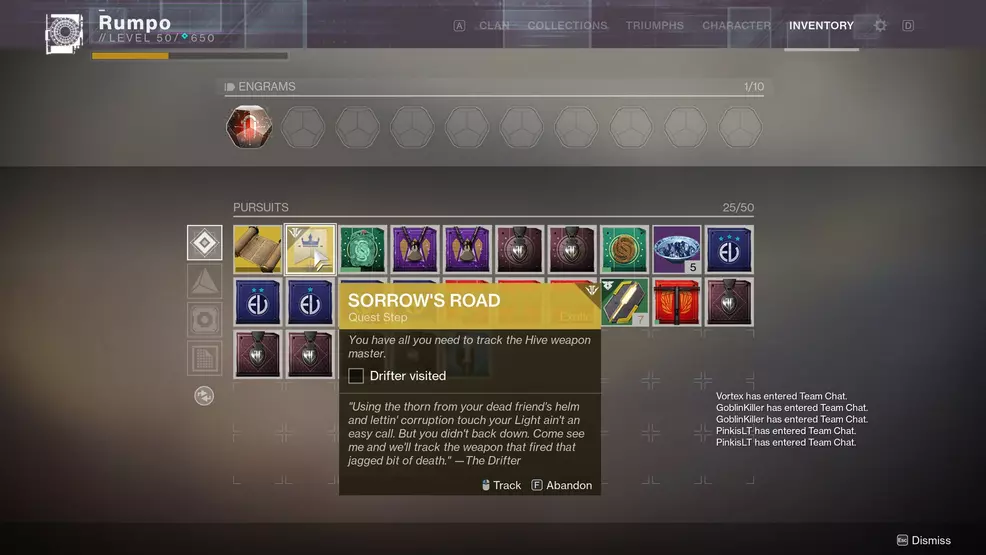
- Drifter visted
Return to the Drifter to pick up the final leg of the quest for the Last Word.
Quest Step: The Conversation
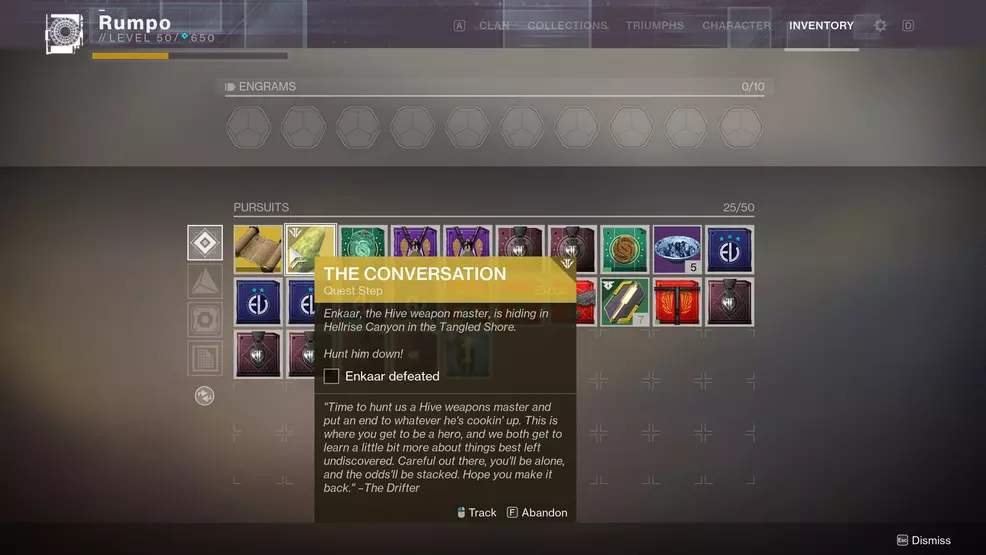
- Enkaar defeated
The final quest step for the Last Word is called The Conversation and requires players hunt down and kill Enkaar, the Hive weapon master. The mission to kill Enkaar is found on the Tangled Shore and is launched while in Patrol. Head to the Tangled Shore, open the map and track the blue banner called The Draw. The goal will be to kill all three Wizards and then kill Enkaar.
There is a problem where the «Find Enkaar, the weapon master» is bugged. To stop this bug from happening, approach the three Wizards near the crystal to get their attention. Do not shoot them from a distance. If the bug happens, exit the mission and try again.
Use your Sparrow to reach the mission location and launch it via the flag. Spawn in and start killing Hive, progressing when you kill the yellow-health Ogre which will drop a Worm. Take the Worm to the door to gain access to Enkaar’s lair. Run up and get the attention of all three Wizards and then proceed to kill them. The Wizards will spread out into different areas of the cave, hunt each of them down to progress the mission. Note that you will be suppressed while in the lair and the only way to heal will be to collect the Restorative Light that drops from enemies. With all three Wizards defeated, destroy the crystal and drop down the hole.
This next area utilizes a new mechanic involving plates and a classic western stand-off. Stand on the plate to activate the «Steady…» effect, once it completes, hold the appropriate button to «Draw» the Last Word. At this point, wait for Enkaar to raise its gun and then use the Last Word to shoot the weapon out of Enkaar’s hand. This mechanic is repeated a few more times. For each successive plate, another copy of Enkaar will appear, take note of the order that the Enkaar’s appear. The one that appears first will draw their weapon first and you will need to shoot them in the correct order. After Enkaar is defeated three times, the quest will complete and you will be rewarded with The Last Word. All thlat’s left to do is check out the Destiny 2 strategy guide we have been building since the game’s initial release for more help acquiring all the game’s goodies.

Bill, who is also known as Rumpo, is a lifelong gamer and Toronto Maple Leafs fan. He made his mark early in his career through guide writing and a deep understanding of editorial SEO. He enjoys putting in the work to create a great content, be it a wild feature or grinding out an in-depth collectible guide. Tweet him @RumpoPlays if you have a question or comment about one of his articles.
Итак, известный неплохой PvP-револьвер, который многие ждали еще с момента запуска дополнения “Черный арсенал”, наконец стал доступен в игре после прохождения местами сложной квестовой цепочки.
А также, исходя из ролика с демонстрацией “Last Word”, еще одно любимое многими оружие из первой части также появится в игре уже в грядущем дополнении. Речь, конечно же, идет про револьвер Thorn.
Для начала, чтобы вообще получить основное задание, отправляемся в башню и говорим с дрифтером, попутно читая диалоги и лор, он вам должен выдать предмет, который теперь нужно “зарядить”.
Забегая вперед, чтобы лишний раз не писать, основными противниками данного задания будут представители Улья, так что ниже под противниками я имею в виду именно их.
И кстати альтернативный скин на данное оружие чем то напоминает револьвер из произведения Триган.
Шаг первый — первое ваше задание — это собирать специальные предметы, падающие при убийстве любых воинов Улья, уничтожить Х количество представителей Улья из оружия с солнечным уроном и, наконец, просто убить трех боссов.
Пожалуй, самый простой этап всей цепочки заданий и проще всего, например, отправиться на Марс в затерянный сектор или же просто выполнить несколько волн протокола.
Шаг второй — отправляемся отчитываться о результатах к дрифтеру, после чего получаем первое PvP-задание, в нем игра попросит вас собрать свет других стражей, убивая их. Причем процентная шкала помимо заполнения также будет уменьшаться, если ваш персонаж был убит или умер, тут даже учитывается если вы просто спрыгнете в пропасть.
Первый сложный пункт, если вы, как и я не любите PvP, но важно понять, что помимо убийства тут также засчитываются ассисты. Также на момент написания статьи включен режим Mayhem, в котором очень быстро восстанавливается ульта, я как раз там и набивал проценты, связывая противников через войд с орфеем.
Шаг третий — на Титане появится специальная миссия, в которой нужно убить босса, он будет находиться в небольшом затерянном секторе, где обычно обитает голем. Изначально первая ваша задача — убить двух ведьм, чтобы снять щит неуязвимости с босса, после чего можно наносить урон, вроде как примерно на половине ХП он снова закроется щитом и призовет уже рыцарей. Их тоже нужно будет убить, но у меня босс умер до этой стадии с одной ульты.
Шаг четвертый — снова отправляемся к дрифтеру для получения указаний, и этот шаг, пожалуй, самый долгий и нудный. Всего перед пользователем ставят четыре основные задачи:
- Собрать 15 кристаллов с разыскиваемых боссов затерянных секторов.
- Собрать 25 медалей в PvP. Тут учитываются только два типа медалей, где первый — это “Blood for Blood” (убить игрока, который только что убил вашего сопартийца), а второй — “Best Served Cold” (убить игрока, который убил вас).
- 50 специальных предметов с противников, убитых критическим уроном, но учтите, что предметы падают не 100% с каждого противника.
- Завершить три героических публичных мероприятия “Ритуал” — данные активности нужно караулить на Титане или Марсе.
Шаг пятый — тут вам нужно просто пройти соло миссию в Tangled Shore и учтите, что минимальный рекомендованный уровень тут 650, так что если вы ниже, придется сложновато. Путь до босса описывать не буду, так как там просто нужно зачистить различных представителей Улья.
Пользователю предстоит сыграть несколько раз в стереотипную игру обитателей Дикого Запада “Быстрый и мертвый” вместе с мастером вооружения Улья.
Дело в том, что против непосредственно босса вам сражаться не придется, после того, как вы дойдете до комнаты с боссом, на земле появится пентаграмма, на которую нужно будет встать, чтобы призвать босса, и сам Last Word.
Через некоторое время босс начнет поднимать руку (она к тому же засветится), готовясь совершить смертельный выстрел, ваша задача — просто взять Last Word и выстрелить по руке, чтобы босс исчез.
Как только вы успешно выстрелите по руке босса, он исчезнет и появится волна врагов, после того, как всех убьете, сразу же ищите руну, на которую нужно встать. Только вот на этот раз босс с задержкой призовет свою копию, и вам нужно будет уже два раза быстро выстрелить по руке.
Еще раз убиваем всех противников и снова встаем на руну, после чего повторяем уже описанный выше процесс, только теперь уже появится две дополнительные копии босса и выстрелить необходимо три раза.
На сей раз босс окончательно умрет и вам выдадут пистолет вместе с заданием, к слову, если умереть, чекпоинт будет в самом начале перед первым призывом босса.
В итоге получается вот такая схема:
- Убиваем всех по пути к боссу.
- Встаем на руну и выстреливаем по руке босса из Last Word.
- Зачищаем мобов.
- Встаем на руну и уже выстреливаем два раза по руке босса и его копии из Last Word.
- Зачищаем мобов.
- Встаем на руну и последний раз выстреливаем по руке босса и двух его копий из Last Word.
Шаг шестой — отправляемся к дрифтеру и выслушиваем его речь, все, квест пройден, а у вас в кармане револьвер из первой части.
Также на официальные серверы был установлен патч 2.1.4, который внес ряд исправлений в различные системы игры, но так как список очень длинный, ниже я выделил несколько наиболее важных моментов.
А с полным перечнем вы можете детально ознакомиться тут (все переведено на русский).
- Команда из bungie значительно переработала баланс в игре, внеся изменения практически во все суперспособности стражей, а также затронула бонусы некоторых трейтов.
- В связи с этим команда изменила бонусы экзотической брони, влияющие на способности, в частности «Осколки Галанора» и «Жилет Гвисина».
- Помимо способностей, балансировке подверглись некоторые определенные виды оружия и целые типы вооружения, например, винтовкам разведчика и автоматам подняли урон на несколько процентов.
- И наконец, активности по всей солнечной системе получили правки.