
Excel for Microsoft 365 Excel 2021 Excel 2019 Excel 2016 Excel 2013 Excel 2010 Excel 2007 Excel Starter 2010 More…Less
You can add headers or footers at the top or bottom of a printed worksheet in Excel. For example, you might create a footer that has page numbers, the date, and the name of your file. You can create your own, or use many built-in headers and footers.
Headers and footers are displayed only in Page Layout view, Print Preview, and on printed pages. You can also use the Page Setup dialog box if you want to insert headers or footers for more than one worksheet at a time. For other sheet types, such as chart sheets, or charts, you can insert headers and footers only by using the Page Setup dialog box.
Add or change headers or footers in Page Layout view
-
Click the worksheet where you want to add or change headers or footers.
-
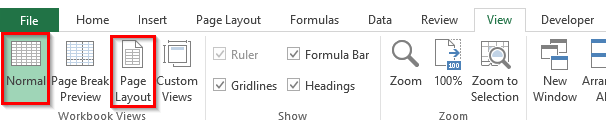
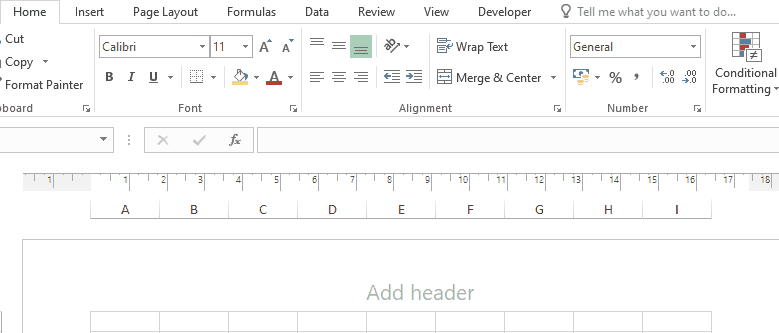
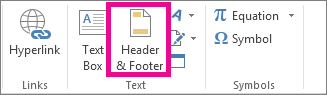
On the Insert tab, in the Text group, click Header & Footer.

Excel displays the worksheet in Page Layout view.
-
To add or edit a header or footer, click the left, center, or right header or footer text box at the top or the bottom of the worksheet page (under Header, or above Footer).
-
Type the new header or footer text.
Notes:
-
To start a new line in a header or footer text box, press Enter.
-
To include a single ampersand (&) in the text of a header or footer, use two ampersands. For example, to include «Subcontractors & Services» in a header, type Subcontractors && Services.
-
To close headers or footers, click anywhere in the worksheet. To close headers or footers without keeping the changes that you made, press Esc.
-
-
Click the worksheet or worksheets, chart sheet, or chart where you want to add or change headers or footers.
Tip: You can select multiple worksheets with Ctrl+Left-click. When multiple worksheets are selected, [Group] appears in the title bar at the top of the worksheet. To cancel a selection of multiple worksheets in a workbook, click any unselected worksheet. If no unselected sheet is visible, right-click the tab of a selected sheet, and then click Ungroup Sheets.
-
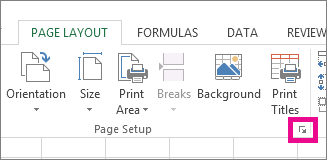
On the Page Layout tab, in the Page Setup group, click the Dialog Box Launcher
.
Excel displays the Page Setup dialog box.
-
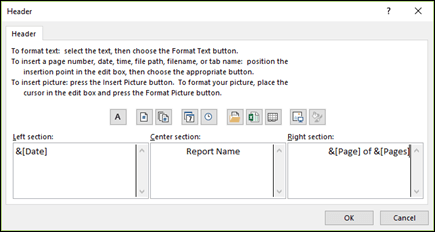
On the Header/Footer tab, click Custom Header or Custom Footer.
-
Click in the Left, Center, or Right section box, and then click any of the buttons to add the header or footer information that you want in that section.
-
To add or change the header or footer text, type additional text or edit the existing text in the Left, Center, or Right section box.
Notes:
-
To start a new line in a header or footer text box, press Enter.
-
To include a single ampersand (&) in the text of a header or footer, use two ampersands. For example, to include «Subcontractors & Services» in a header, type Subcontractors && Services.
-
Excel has many built-in text headers and footers that you can use. For worksheets, you can work with headers and footers in Page Layout view. For chart sheets or charts you need to go through the Page Setup dialog.
-
Click the worksheet where you want to add or change a built-in header or footer.
-
On the Insert tab, in the Text group, click Header & Footer.
Excel displays the worksheet in Page Layout view.
-
Click the left, center, or right header or the footer text box at the top or the bottom of the worksheet page.
Tip: Clicking any text box selects the header or footer and displays the Header and Footer Tools, adding the Design tab.
-
On the Design tab, in the Header & Footer group, click Header or Footer, and then click the built-in header or footer that you want.
Instead of picking a built-in header or footer, you can choose a built-in element. Many elements (such as Page Number, File Name, and Current Date) are found on the ribbon. For worksheets, you can work with headers and footers in Page Layout view. For chart sheets or charts, you can work with headers and footers in the Page Setup dialog.
-
Click the worksheet to which you want to add specific header or footer elements.
-
On the Insert tab, in the Text group, click Header & Footer.
Excel displays the worksheet in Page Layout view.
-
Click the left, center, or right header or footer text box at the top or the bottom of the worksheet page.
Tip: Clicking any text box selects the header or footer and displays the Header and Footer Tools, adding the Design tab.
-
On the Design tab, in the Header & Footer Elements group, click the elements that you want.
-
Click the chart sheet or chart where you want to add or change a header or footer element.
-
On the Insert tab, in the Text group, click Header & Footer.
Excel displays the Page Setup dialog box.
-
Click Custom Header or Custom Footer.
-
Use the buttons in the Header or Footer dialog box to insert specific header and footer elements.
Tip: When you rest the mouse pointer on a button, a ScreenTip displays the name of the element that the button inserts.
For worksheets, you can work with headers and footers in Page Layout view. For chart sheets or charts, you can work with headers and footers in the Page Setup dialog.
-
Click the worksheet where you want to choose header and footer options.
-
On the Insert tab, in the Text group, click Header & Footer.
Excel displays the worksheet in Page Layout view.
-
Click the left, center, or right header or footer text box at the top or the bottom of the worksheet page.
Tip: Clicking any text box selects the header or footer and displays the Header and Footer Tools, adding the Design tab.
-
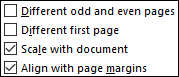
On the Design tab, in the Options group, check one or more of the following:
-
To remove headers and footers from the first printed page, select the Different First Page check box.
-
To specify that the headers and footers on odd-numbered pages should differ from those on even-numbered pages, select the Different Odd & Even Pages check box.
-
To specify whether the headers and footers should use the same font size and scaling as the worksheet, select the Scale with Document check box.
To make the font size and scaling of the headers or footers independent of the worksheet scaling, which helps create a consistent display across multiple pages, clear this check box.
-
To make sure the header or footer margin is aligned with the left and right margins of the worksheet, select the Align with Page Margins check box.
To set the left and right margins of the headers and footers to a specific value that is independent of the left and right margins of the worksheet, clear this check box.
-
-
Click the chart sheet or chart where you want to choose header or footer options.
-
On the Insert tab, in the Text group, click Header & Footer.
Excel displays the Page Setup dialog box.
-
Select one or more of the following:
-
To remove headers and footers from the first printed page, select the Different first page check box.
-
To specify that the headers and footers on odd-numbered pages should differ from those on even-numbered pages, select the Different odd & even pages check box.
-
To specify whether the headers and footers should use the same font size and scaling as the worksheet, select the Scale with document check box.
To make the font size and scaling of the headers or footers independent of the worksheet scaling, which helps create a consistent display across multiple pages, clear the Scale with Document check box.
-
To guarantee that the header or footer margin is aligned with the left and right margins of the worksheet, select the Align with page margins check box.
Tip: To set the left and right margins of the headers and footers to a specific value that is independent of the left and right margins of the worksheet, clear this check box.
-
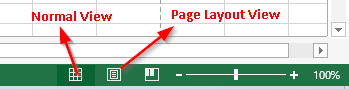
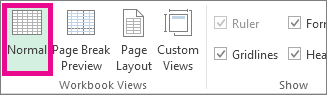
To close the header and footer, you must switch from Page Layout view to Normal view.
-
On the View tab, in the Workbook Views group, click Normal.
You can also click Normal
on the status bar.
-
On the Insert tab, in the Text group, click Header & Footer.
Excel displays the worksheet in Page Layout view.
-
Click the left, center, or right header or the footer text box at the top or the bottom of the worksheet page.
Tip: Clicking any text box selects the header or footer and displays the Header and Footer Tools, adding the Design tab.
-
Press Delete or Backspace.
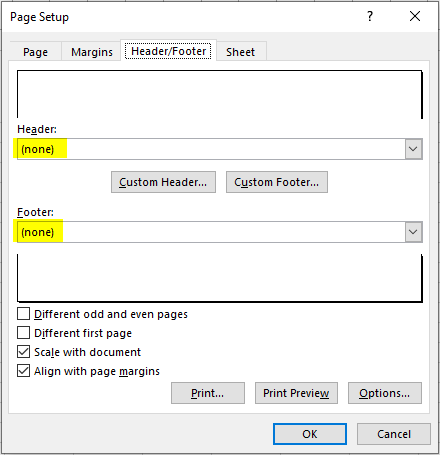
Note: If you want to delete headers and footers for several worksheets at once, select the worksheets, and then open the Page Setup dialog box. To delete all headers and footers instantly, on the Header/Footer tab, select (none) in the Header or Footer box.
Top of Page
Need more help?
You can always ask an expert in the Excel Tech Community or get support in the Answers community.
See Also
Printing in Excel
Page Setup in Excel
Need more help?
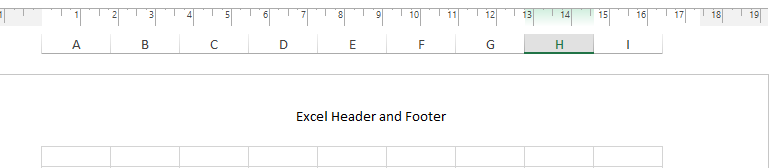
Do you know that excel also provides with the Header and Footer Feature in Excel? In this blog, we would learn how to insert or make a header in Excel. We would also go through some of the pre-defined excel header and footer and also learn how to create our own custom header or footer in Excel.
Excel Headers and Footers are the text or images placed on the top and bottom of each of the pages respectively. These texts/images provide some basic information about the pages or the document like the title of the document, page number, company logo, date/time, etc.
Table of Contents
- Brief Information on Excel Headers and Footers
- Navigating to Header and Footer Feature in Excel
- How to Insert Excel Preset Header and Footer
- Using Page Setup Dialog Box
- Using Insert Header and Footer – Design Tab
- Custom Header and Footer Using Elements
- Using Combination of Elements to Customize Headers and Footers
- Insert Picture or Image in Excel Header or Footer
- Add Headers and Footers in Multiple Sheets at One Go
- Other Miscellaneous Options In Design Tab
- How to Change Font Size and Color of Header and Footer in Excel
- Show or Hide Header and Footer in Excel
- Remove or Delete Header and Footer in Excel
Microsoft has given many standard headers and footers which are inbuilt to excel. Additionally, you can also create your own customized ones to make a more good looking excel document and reports.
In excel, the headers and footer feature is available at two places.
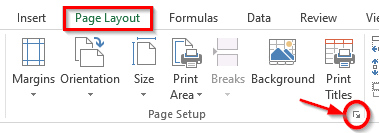
- Go to the ribbon tab Page Layout. Under the Page Setup group, you would find a small icon on the bottom right corner. This is the dialog box launcher. Click on it and the Page Setup dialog box would appear on the screen. There, you can find a specific tab named – Header/Footer.
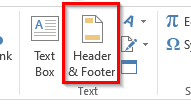
- Additionally, you would find the Excel headers and footers feature under the ‘Insert‘ Tab. Click on the ‘Insert‘ tab > ‘Text‘ group > Header & Footer Option.
Now, when you know the path for navigating to this feature, let us begin with exploring this rarely used feature.
As mentioned in the introduction of this blog, excel has provided with some pre-defined headers and footers that you can use. To insert the preset headers and footer, you can use either of the navigation paths. Let us check on both of these.
Using Page Setup Dialog Box
- Navigate to the Page Setup dialog box > Header/Footer tab (as learned in previous section).
- The option ‘None‘ (shown in the screenshot below) means at present no headers/footers are put in the worksheet.
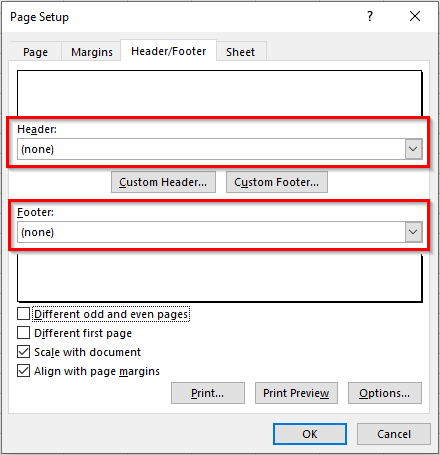
- Click on the ‘Header‘ drop-down option arrow and there you would find many available header options provided by Microsoft. Select one of your choices. Similarly, under the ‘Footer‘ drop-down option, you can find and select the one from the available default footers.
For example, I have chosen to insert the workbook or file name as headers and the current sheet’s name and the page number as the footer part. See the image below:
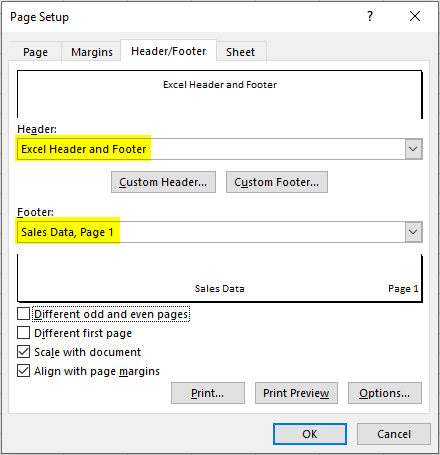
As soon as you press the OK button, the dialog box would exit, and excel would insert the headers and footer on the active worksheet.
Header looks like this:
Footer looks like this:

Using Insert Header and Footer – Design Tab
- Go to the Insert tab and click on the option – Header & Footer (under Text group).
- This would instantly and quickly create a structure of excel headers and footers in the worksheet. Simultaneously, excel also inserts a new tab in the ribbon with the name ‘Design‘ (as shown below).

- To insert preset excel headers, click on the header structure in the worksheet area. Under the Design tab, click on the option that says ‘Header‘. As a result, a drop-down list of all the available predefined excel headers would be displayed. Select one of your choices and that’s it.
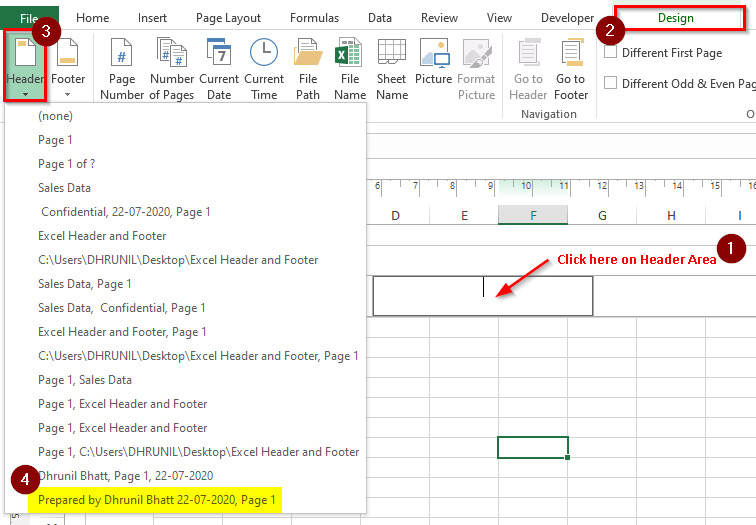
- Similarly, to insert footer from the predefined list of footers, click on the option that says ‘Footer‘ under the ‘Design’ Tab > ‘Header & Footer’ group. From the list of drop-down options, select one of your choices, and you are done.
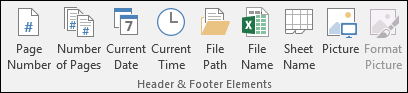
In addition to the predefined headers and footers, you can also create custom ones by using the Header and Footer Elements. These elements are available in the ‘Design‘ tab, as shown in the image below:
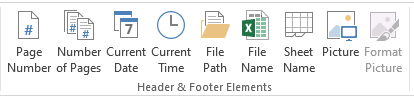
Procedure to use and insert these elements:
- Click on the appropriate header area. Let us first enter the middle part of the header.
- Now, go to the ‘Design‘ tab in the ribbon and select the element to insert, for example, FileName. Click on the option – File Name, and as a result, excel would insert the word &[File] there.
- To see the exact header text, click anywhere on the worksheet.
In a similar manner, you can insert the left and right parts of the header by selecting the part and then following the above procedure.
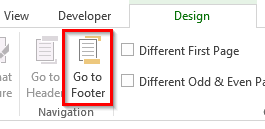
When you are on the header part and you want to move to the footer part, there are two possible ways to do so:
- The first one is to use the right scroll bar to move downwards until you see the footer.
- The second and the most prominent one is to use the option – ‘Go To Footer‘ (Design Tab). By clicking on this, you would instantly jump to the Footer part.
Using Combination of Elements to Customize Headers and Footers
One interesting thing with using the custom header or footer in excel is that you can use a combination of multiple elements. Suppose, we want to show the page number in the footer in this format – Page <Current Page No.> of <Total Pages> (For Eg – Page 1 of 19). There is no element to achieve this.
However, you can use the combination of two elements – Page Number and Number of Pages to get the required text. The below demonstration is self-explanatory.
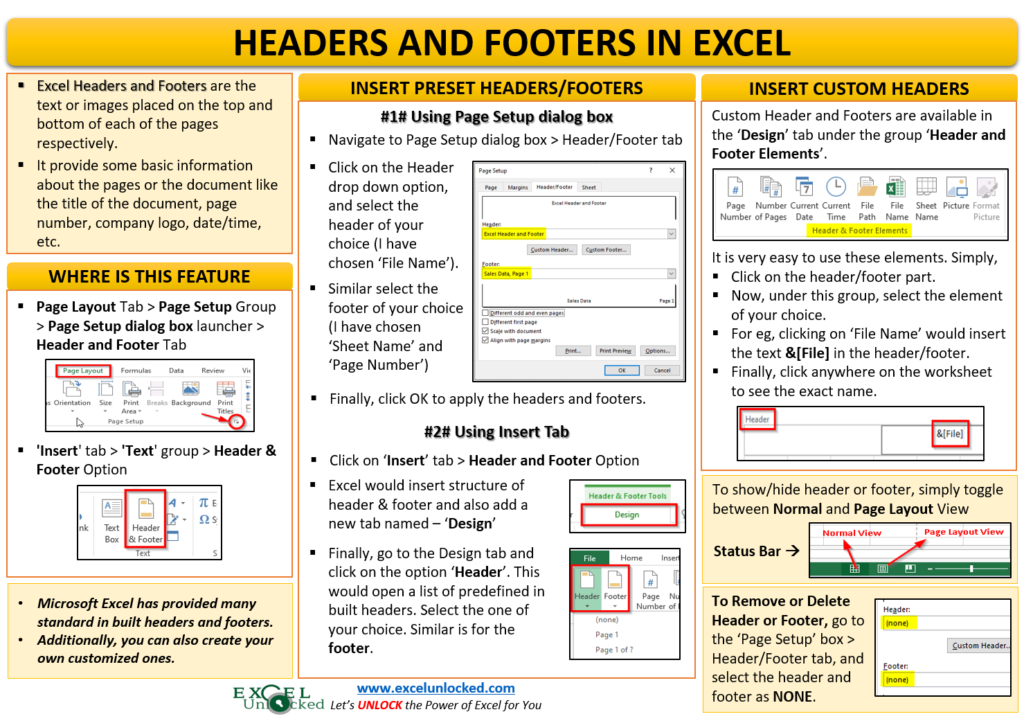
Follow Below Steps to Insert Image or Picture in Header and Footer in Excel
- Navigation
Click on the appropriate header or footer area and go to the ‘Design‘ Tab.
- Picture Element
Under the ‘Header and Footer Elements’ click on the element that says – ‘Picture‘.
- Insert Picture Dialog Box
In the ‘Insert Picture’ dialog box that appears, search for the picture that you want to insert and click on the ‘Insert’ button.
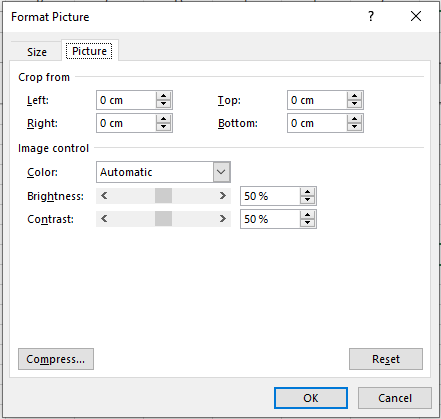
As a result, the excel would insert the picture inside the header or footer. Once the picture is inserted in the header or footer, the ‘Format Picture‘ element gets activated.
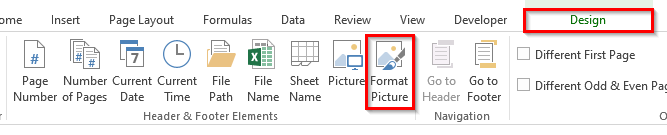
You can resize the picture inside the header or footer, increase picture height or width. You can also, set the top, left, bottom, and right alignment of the picture using this option. Excel also provides you with the option to change the color setting (including brightness and contrast).
When you insert a header or a footer using the method(s) stated above, it only gets added to the active sheet. Header and Footer do not apply to all the worksheets in the excel workbook.
To do so, you need to first group the worksheets and then perform the above steps to add header or footer to all those grouped worksheets.
Make sure that you remember to ungroup the grouped worksheets once your task is over.
I have an exclusive blog on Grouping and Ungrouping Worksheets in Excel. To read it, click here.
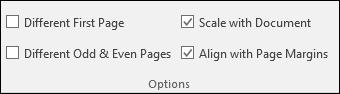
Other Miscellaneous Options In Design Tab
There are four miscellaneous but very important checkboxes in the Header and Footer Design Tab which are explained below:
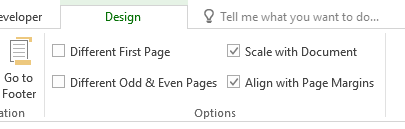
- Different First Page – When you want to have a different header or footer for the first page, tick this checkbox and then give a separate header and footer for the first page. For the other pages, you need to again give a header or footer only on the second page and it would be applicable for all the pages (except for the first page).
- Different Odd & Even Pages – As the name suggests, tick this checkbox, if you want that the odd pages (1, 3, 5, and so on) should have different headers/footers than the even pages (2, 4, 6, and so on).
- Scale with Document – The scale with document checkbox is ticked by default. A tick means when you change the scale of the document (while printing), the header and footer font size will also change accordingly. To stop changing the header and footer size while scaling the document for printing, uncheck this option.
- Align with Page Margin – It is better to have this option activated so that the headers and footers are aligned according to the page margin.
To change the font settings of the header and footer, simply select the header or footer using the mouse (keyboard shortcut selection would not work).
A small font formatting dialog box would appear on your screen. Use the font formatting options as per your need, as shown in the below demonstration.
You can show or hide the header and footer in Excel by toggling between Normal view and the Page Layout view. See the below path to toggle between the views.
- In the status bar, you can toggle between the ‘Normal’ and ‘Page Layout’ button to show or hide the Excel headers and footers.
- The same options are available in the ‘View‘ tab in the excel ribbon, as shown below.
Finally, let us learn multiple ways to remove the header and footer from Excel worksheet.
- Simply click on the header or footer and press Delete or Backspace key on your keyboard to remove the header or footer from all the pages.
- Another way is to go to the ‘Page Setup’ dialog box and set it to ‘(None)‘, as shown below:
With this you have reached to the end of this blog. Share your thoughts, views, and comments in the comments section below.
RELATED POSTS
-
An Object in Excel – Create, Insert, Edit and Link
-
19 Everyday Use Excel VBA Codes
-
Start Automation – Record A Macro in Excel
-
Insert Symbols and Special Characters in Excel
-
How to Automatically Run a Macro when Workbook is Opened?
-
Add Macro to Quick Access Toolbar and Ribbon
Содержание
- Excel Header and Footer – Add, Change, Customize
- Brief Information on Excel Headers and Footers
- Navigating to Header and Footer Feature in Excel
- How to Insert Excel Preset Header and Footer
- Using Page Setup Dialog Box
- Using Insert Header and Footer – Design Tab
- Custom Header and Footer Using Elements
- Using Combination of Elements to Customize Headers and Footers
- Insert Picture or Image in Excel Header or Footer
- Add Headers and Footers in Multiple Sheets at One Go
- Other Miscellaneous Options In Design Tab
- How to Change Font Size and Color of Header and Footer in Excel
- Show or Hide Header and Footer in Excel
- Remove or Delete Header and Footer in Excel
- Headers and footers in a worksheet
- Add or change headers or footers in Page Layout view
- Need more help?
Do you know that excel also provides with the Header and Footer Feature in Excel? In this blog, we would learn how to insert or make a header in Excel. We would also go through some of the pre-defined excel header and footer and also learn how to create our own custom header or footer in Excel.
Excel Headers and Footers are the text or images placed on the top and bottom of each of the pages respectively. These texts/images provide some basic information about the pages or the document like the title of the document, page number, company logo, date/time, etc.
Microsoft has given many standard headers and footers which are inbuilt to excel. Additionally, you can also create your own customized ones to make a more good looking excel document and reports.
In excel, the headers and footer feature is available at two places.
- Go to the ribbon tab Page Layout. Under the Page Setup group, you would find a small icon on the bottom right corner. This is the dialog box launcher. Click on it and the Page Setup dialog box would appear on the screen. There, you can find a specific tab named – Header/Footer.
- Additionally, you would find the Excel headers and footers feature under the ‘Insert‘ Tab. Click on the ‘Insert‘ tab > ‘Text‘ group >Header & Footer Option.
Now, when you know the path for navigating to this feature, let us begin with exploring this rarely used feature.
As mentioned in the introduction of this blog, excel has provided with some pre-defined headers and footers that you can use. To insert the preset headers and footer, you can use either of the navigation paths. Let us check on both of these.
Using Page Setup Dialog Box
- Navigate to the Page Setup dialog box >Header/Footer tab (as learned in previous section).
- The option ‘None‘ (shown in the screenshot below) means at present no headers/footers are put in the worksheet.
- Click on the ‘Header‘ drop-down option arrow and there you would find many available header options provided by Microsoft. Select one of your choices. Similarly, under the ‘Footer‘ drop-down option, you can find and select the one from the available default footers.
For example, I have chosen to insert the workbook or file name as headers and the current sheet’s name and the page number as the footer part. See the image below:
As soon as you press the OK button, the dialog box would exit, and excel would insert the headers and footer on the active worksheet.
Header looks like this:
Footer looks like this:
Using Insert Header and Footer – Design Tab
- Go to the Insert tab and click on the option – Header & Footer (under Text group).
- This would instantly and quickly create a structure of excel headers and footers in the worksheet. Simultaneously, excel also inserts a new tab in the ribbon with the name ‘Design‘ (as shown below).
- To insert preset excel headers, click on the header structure in the worksheet area. Under the Design tab, click on the option that says ‘Header‘. As a result, a drop-down list of all the available predefined excel headers would be displayed. Select one of your choices and that’s it.
- Similarly, to insert footer from the predefined list of footers, click on the option that says ‘Footer‘ under the ‘Design’ Tab > ‘Header & Footer’ group. From the list of drop-down options, select one of your choices, and you are done.
In addition to the predefined headers and footers, you can also create custom ones by using the Header and Footer Elements. These elements are available in the ‘Design‘ tab, as shown in the image below:
Procedure to use and insert these elements:
- Click on the appropriate header area. Let us first enter the middle part of the header.
- Now, go to the ‘Design‘ tab in the ribbon and select the element to insert, for example, FileName. Click on the option – File Name, and as a result, excel would insert the word &[File] there.
- To see the exact header text, click anywhere on the worksheet.
In a similar manner, you can insert the left and right parts of the header by selecting the part and then following the above procedure.
When you are on the header part and you want to move to the footer part, there are two possible ways to do so:
- The first one is to use the right scroll bar to move downwards until you see the footer.
- The second and the most prominent one is to use the option – ‘Go To Footer‘ (Design Tab). By clicking on this, you would instantly jump to the Footer part.
Using Combination of Elements to Customize Headers and Footers
One interesting thing with using the custom header or footer in excel is that you can use a combination of multiple elements. Suppose, we want to show the page number in the footer in this format – Page of (For Eg – Page 1 of 19). There is no element to achieve this.
However, you can use the combination of two elements – Page Number and Number of Pages to get the required text. The below demonstration is self-explanatory.
Follow Below Steps to Insert Image or Picture in Header and Footer in Excel
Click on the appropriate header or footer area and go to the ‘Design‘ Tab.
Under the ‘Header and Footer Elements’ click on the element that says – ‘Picture‘.
Insert Picture Dialog Box
In the ‘Insert Picture’ dialog box that appears, search for the picture that you want to insert and click on the ‘Insert’ button.
As a result, the excel would insert the picture inside the header or footer. Once the picture is inserted in the header or footer, the ‘Format Picture‘ element gets activated.
You can resize the picture inside the header or footer, increase picture height or width. You can also, set the top, left, bottom, and right alignment of the picture using this option. Excel also provides you with the option to change the color setting (including brightness and contrast).
When you insert a header or a footer using the method(s) stated above, it only gets added to the active sheet. Header and Footer do not apply to all the worksheets in the excel workbook.
To do so, you need to first group the worksheets and then perform the above steps to add header or footer to all those grouped worksheets.
Make sure that you remember to ungroup the grouped worksheets once your task is over.
I have an exclusive blog on Grouping and Ungrouping Worksheets in Excel. To read it, click here.
Other Miscellaneous Options In Design Tab
There are four miscellaneous but very important checkboxes in the Header and Footer Design Tab which are explained below:
- Different First Page – When you want to have a different header or footer for the first page, tick this checkbox and then give a separate header and footer for the first page. For the other pages, you need to again give a header or footer only on the second page and it would be applicable for all the pages (except for the first page).
- Different Odd & Even Pages – As the name suggests, tick this checkbox, if you want that the odd pages (1, 3, 5, and so on) should have different headers/footers than the even pages (2, 4, 6, and so on).
- Scale with Document – The scale with document checkbox is ticked by default. A tick means when you change the scale of the document (while printing), the header and footer font size will also change accordingly. To stop changing the header and footer size while scaling the document for printing, uncheck this option.
- Align with Page Margin – It is better to have this option activated so that the headers and footers are aligned according to the page margin.
How to Change Font Size and Color of Header and Footer in Excel
To change the font settings of the header and footer, simply select the header or footer using the mouse (keyboard shortcut selection would not work).
A small font formatting dialog box would appear on your screen. Use the font formatting options as per your need, as shown in the below demonstration.

You can show or hide the header and footer in Excel by toggling between Normal view and the Page Layout view. See the below path to toggle between the views.
- In the status bar, you can toggle between the ‘Normal’ and ‘Page Layout’ button to show or hide the Excel headers and footers.
- The same options are available in the ‘View‘ tab in the excel ribbon, as shown below.
Finally, let us learn multiple ways to remove the header and footer from Excel worksheet.
- Simply click on the header or footer and press Delete or Backspace key on your keyboard to remove the header or footer from all the pages.
- Another way is to go to the ‘Page Setup’ dialog box and set it to ‘(None)‘, as shown below:
With this you have reached to the end of this blog. Share your thoughts, views, and comments in the comments section below.
Источник
You can add headers or footers at the top or bottom of a printed worksheet in Excel. For example, you might create a footer that has page numbers, the date, and the name of your file. You can create your own, or use many built-in headers and footers.
Headers and footers are displayed only in Page Layout view, Print Preview, and on printed pages. You can also use the Page Setup dialog box if you want to insert headers or footers for more than one worksheet at a time. For other sheet types, such as chart sheets, or charts, you can insert headers and footers only by using the Page Setup dialog box.
Click the worksheet where you want to add or change headers or footers.
On the Insert tab, in the Text group, click Header & Footer.
Excel displays the worksheet in Page Layout view.
To add or edit a header or footer, click the left, center, or right header or footer text box at the top or the bottom of the worksheet page (under Header, or above Footer).
Type the new header or footer text.
To start a new line in a header or footer text box, press Enter.
To include a single ampersand (&) in the text of a header or footer, use two ampersands. For example, to include «Subcontractors & Services» in a header, type Subcontractors && Services.
To close headers or footers, click anywhere in the worksheet. To close headers or footers without keeping the changes that you made, press Esc.
Click the worksheet or worksheets, chart sheet, or chart where you want to add or change headers or footers.
Tip: You can select multiple worksheets with Ctrl+Left-click. When multiple worksheets are selected, [Group] appears in the title bar at the top of the worksheet. To cancel a selection of multiple worksheets in a workbook, click any unselected worksheet. If no unselected sheet is visible, right-click the tab of a selected sheet, and then click Ungroup Sheets.
On the Page Layout tab, in the Page Setup group, click the Dialog Box Launcher  .
.
Excel displays the Page Setup dialog box.
On the Header/Footer tab, click Custom Header or Custom Footer.
Click in the Left, Center, or Right section box, and then click any of the buttons to add the header or footer information that you want in that section.
To add or change the header or footer text, type additional text or edit the existing text in the Left, Center, or Right section box.
To start a new line in a header or footer text box, press Enter.
To include a single ampersand (&) in the text of a header or footer, use two ampersands. For example, to include «Subcontractors & Services» in a header, type Subcontractors && Services.
Excel has many built-in text headers and footers that you can use. For worksheets, you can work with headers and footers in Page Layout view. For chart sheets or charts you need to go through the Page Setup dialog.
Click the worksheet where you want to add or change a built-in header or footer.
On the Insert tab, in the Text group, click Header & Footer.
Excel displays the worksheet in Page Layout view.
Click the left, center, or right header or the footer text box at the top or the bottom of the worksheet page.
Tip: Clicking any text box selects the header or footer and displays the Header and Footer Tools, adding the Design tab.
On the Design tab, in the Header & Footer group, click Header or Footer, and then click the built-in header or footer that you want.

Instead of picking a built-in header or footer, you can choose a built-in element. Many elements (such as Page Number, File Name, and Current Date) are found on the ribbon. For worksheets, you can work with headers and footers in Page Layout view. For chart sheets or charts, you can work with headers and footers in the Page Setup dialog.
Click the worksheet to which you want to add specific header or footer elements.
On the Insert tab, in the Text group, click Header & Footer.
Excel displays the worksheet in Page Layout view.
Click the left, center, or right header or footer text box at the top or the bottom of the worksheet page.
Tip: Clicking any text box selects the header or footer and displays the Header and Footer Tools, adding the Design tab.
On the Design tab, in the Header & Footer Elements group, click the elements that you want.
Click the chart sheet or chart where you want to add or change a header or footer element.
On the Insert tab, in the Text group, click Header & Footer.
Excel displays the Page Setup dialog box.
Click Custom Header or Custom Footer.
Use the buttons in the Header or Footer dialog box to insert specific header and footer elements.
Tip: When you rest the mouse pointer on a button, a ScreenTip displays the name of the element that the button inserts.
For worksheets, you can work with headers and footers in Page Layout view. For chart sheets or charts, you can work with headers and footers in the Page Setup dialog.
Click the worksheet where you want to choose header and footer options.
On the Insert tab, in the Text group, click Header & Footer.
Excel displays the worksheet in Page Layout view.
Click the left, center, or right header or footer text box at the top or the bottom of the worksheet page.
Tip: Clicking any text box selects the header or footer and displays the Header and Footer Tools, adding the Design tab.
On the Design tab, in the Options group, check one or more of the following:
To remove headers and footers from the first printed page, select the Different First Page check box.
To specify that the headers and footers on odd-numbered pages should differ from those on even-numbered pages, select the Different Odd & Even Pages check box.
To specify whether the headers and footers should use the same font size and scaling as the worksheet, select the Scale with Document check box.
To make the font size and scaling of the headers or footers independent of the worksheet scaling, which helps create a consistent display across multiple pages, clear this check box.
To make sure the header or footer margin is aligned with the left and right margins of the worksheet, select the Align with Page Margins check box.
To set the left and right margins of the headers and footers to a specific value that is independent of the left and right margins of the worksheet, clear this check box.
Click the chart sheet or chart where you want to choose header or footer options.
On the Insert tab, in the Text group, click Header & Footer.
Excel displays the Page Setup dialog box.
Select one or more of the following:
To remove headers and footers from the first printed page, select the Different first page check box.
To specify that the headers and footers on odd-numbered pages should differ from those on even-numbered pages, select the Different odd & even pages check box.
To specify whether the headers and footers should use the same font size and scaling as the worksheet, select the Scale with document check box.
To make the font size and scaling of the headers or footers independent of the worksheet scaling, which helps create a consistent display across multiple pages, clear the Scale with Document check box.
To guarantee that the header or footer margin is aligned with the left and right margins of the worksheet, select the Align with page margins check box.
Tip: To set the left and right margins of the headers and footers to a specific value that is independent of the left and right margins of the worksheet, clear this check box.
To close the header and footer, you must switch from Page Layout view to Normal view.
On the View tab, in the Workbook Views group, click Normal.
You can also click Normal  on the status bar.
On the Insert tab, in the Text group, click Header & Footer.
Excel displays the worksheet in Page Layout view.
Click the left, center, or right header or the footer text box at the top or the bottom of the worksheet page.
Tip: Clicking any text box selects the header or footer and displays the Header and Footer Tools, adding the Design tab.
Press Delete or Backspace.
Note: If you want to delete headers and footers for several worksheets at once, select the worksheets, and then open the Page Setup dialog box. To delete all headers and footers instantly, on the Header/Footer tab, select (none) in the Header or Footer box.
Need more help?
You can always ask an expert in the Excel Tech Community or get support in the Answers community.
Источник
On the Insert tab, in the Text group, click Header & Footer. Excel displays the worksheet in Page Layout view. To add or edit a header or footer, click the left, center, or right header or footer text box at the top or the bottom of the worksheet page (under Header, or above Footer). Type the new header or footer text.
Contents
- 1 Why wont Excel Let me add a footer?
- 2 How do you add a footer and page number in Excel?
- 3 How do I put a header on every page in Excel?
- 4 How do I insert a Footer name in Excel?
- 5 How do I add a Footer to all sheets in Excel?
- 6 How do you create a report in Excel?
- 7 How do I add page numbers to a cell in Excel?
- 8 How do you add page numbers to a cell in Excel?
- 9 How can I wrap text in Excel?
- 10 What does clicking the paintbrush button below do?
- 11 How do I repeat headers and footers in Excel?
- 12 How do I copy a header and footer to all pages?
- 13 How do I scale an Excel spreadsheet?
- 14 How do I add a footer to a sheet name?
- 15 How do I put the sheet name code in the footer?
- 16 How do I add a file name code?
- 17 How do you use concatenate?
- 18 What are the 3 report formats in Excel?
- 19 How do I create a pivot table in Excel?
- 20 How do you generate a report?
The PROBLEM has something to do with the Margins set up on the spreadsheet.Just click on Print Preview, then click on Margins, then on Custom Margins, then click on the Header/Footer Tab – and you will be given the opportunity to do Custom Headers and Footers there (with all the shortcut Design icons).
How do you add a footer and page number in Excel?
Add page numbers
On the Insert tab, click Header & Footer. Excel automatically changes to Page Layout view. On Header & Footer tab, click either the Header or Footer, and then select the page number format you want. Header page numbers appear at the top of the printed page, and footer page numbers appear at the bottom.
Click the [Page Layout] tab > In the “Page Setup” group, click [Print Titles]. Under the [Sheet] tab, in the “Rows to repeat at top” field, click the spreadsheet icon. Click and select the row you wish to appear at the top of every page. Press the [Enter] key, then click [OK].
Go to the Page Layout, Page Setup menu and click the Header/Footer tab. Choose Custom Header or Custom Footer, depending on where you want the sheet name to appear. Put the cursor in the Left, Center or Right sections and and select the icon that looks like a spreadsheet with multiple tabs at the bottom.
Insert a Footer in Excel
If you want to add a footer to an Excel spreadsheet, click the “Insert” tab on the ribbon menu. Then click “Header & Footer” within the “Text” group of options. Click the header or footer on the page and type in the text you want.
How do you create a report in Excel?
Procedure
- In Microsoft Excel click Controller > Reports > Open Report .
- In Microsoft Excel click Controller > Reports > Run Report.
- Enter the actuality, period and forecast actuality for which you want to generate the report.
- Enter the consolidation type and company for which you want to generate the report.
How do I add page numbers to a cell in Excel?
Page Numbers
- On the View tab, in the Workbook Views group, click Page Layout, to switch to Page Layout view.
- Click Add footer.
- On the Design tab, in the Header & Footer Elements group, click Page Number to add the page number.
- Type ” of “
How do you add page numbers to a cell in Excel?
- Close the editor and return to the sheet.
- Select a cell where you want to insert page number. Click Developer>Macros>select that macro>Run. You will see the page number is inserted to that cell.
How can I wrap text in Excel?
Wrap text automatically
On the Home tab, in the Alignment group, click Wrap Text. (On Excel for desktop, you can also select the cell, and then press Alt + H + W.) Notes: Data in the cell wraps to fit the column width, so if you change the column width, data wrapping adjusts automatically.
What does clicking the paintbrush button below do?
When inserting new rows, columns, or cells, you will see a paintbrush icon next to the inserted cells. This button allows you to choose how Excel formats these cells. By default, Excel formats inserted rows with the same formatting as the cells in the row above.
How do I repeat headers and footers in Excel?
Click the sheet. On the Page Layout tab, in the Page Setup group, click Page Setup. Under Print Titles, click in Rows to repeat at top or Columns to repeat at left and select the column or row that contains the titles you want to repeat. Click OK.
How do I copy a header and footer to all pages?
Use the controls in the Navigation group to display the header or footer you want to copy. Select all the elements (text and graphics) in the header or footer. Press Ctrl+C. This copies the header or footer information to the Clipboard.
How do I scale an Excel spreadsheet?
Scale a worksheet
- Click the Page Layout tab on the ribbon.
- In the Scale to Fit group, in the Width box, select 1 page, and in the Height box, select Automatic.
- To print your worksheet, press CTRL+P to open the Print dialog box, and then click OK.
EXCEL METHOD 1. Insert sheet name into footer
- Select the sheet in which you want to insert the sheet name in the footer.
- Select the Insert tab.
- Select the Text group.
- Click on Header & Footer.
- Select the footer area in which you want to show the sheet name.
- Select the Design tab.
Step 1: Open your file in Microsoft Excel 2010.
- Step 2: Click the Insert tab at the top of the window.
- Step 3: Click the Header & Footer button in the Text section of the Office ribbon.
- Step 4: Click the section of your footer where you wish to add the worksheet name.
How do I add a file name code?
Answer
- Open the footer by double clicking in it.
- At the top of the screen there will be a Quick Parts button.
- Click on Quick Parts and then on Field.
- In the field names list, click FileName.
- To include the path, or server address, select the Add path to filename check box.
- Click OK. Topics.
How do you use concatenate?
There are two ways to do this:
- Add double quotation marks with a space between them ” “. For example: =CONCATENATE(“Hello”, ” “, “World!”).
- Add a space after the Text argument. For example: =CONCATENATE(“Hello “, “World!”). The string “Hello ” has an extra space added.
What are the 3 report formats in Excel?
There are three report formats available.
- PDF reports. PDF is the most appropriate format for printing.
- HTML reports. HTML Reports work on all systems and don’t require an external PDF viewer.
- CSV/Excel reports. Use the CSV/Excel reports to access the data in plain text format.
How do I create a pivot table in Excel?
Manually create a PivotTable
- Click a cell in the source data or table range.
- Go to Insert > PivotTable.
- Excel will display the Create PivotTable dialog with your range or table name selected.
- In the Choose where you want the PivotTable report to be placed section, select New Worksheet, or Existing Worksheet.
How do you generate a report?
Create a report
- Click Reports in the left-navigation.
- On the Reports tab, configure the following options: Type – Select the type of report to generate. Date Range – Select an automatic time span, or set specific start and end dates.
- Click Generate Report.
![]()
Download Article
![]()
Download Article
This wikiHow teaches you how to add a footer to the bottom of a printed worksheet in Microsoft Excel. Footers can include any information, including dates, page numbers, file names, and even small images.
Things You Should Know
- Open the worksheet you want to add the footer to and navigate to the ‘Page Layout’ tab.
- Start the ‘Page Setup’ dialog and go to the ‘Header/Footer’ tab.
- Select a footer design or make a custom footer.
Steps
-
1
Open your workbook in Excel. You can do this by double-clicking the file name on your computer.
-
2
Click the worksheet on which you want to add a footer. Clicking the worksheet’s tab at the bottom of Excel will bring that worksheet into view.[1]
- If you want to apply the footer to all sheets in the workbook, right-click any of the worksheet tabs, then click Select All Sheets from the menu.
- To select more than one (but not all) worksheets, hold Ctrl (PC) or ⌘ Command (Mac) as you click each tab.
Advertisement
-
3
Click the Page Layout tab. It’s at the top of Excel toward the left side.
-
4
Open the Page Setup dialog. If you’re using a Mac, click the icon that says Page Setup in the icon bar at the top of the screen.[2]
If you’re using Windows, click the small square with an arrow at the bottom of the «Page Setup» panel. -
5
Click the Header/Footer tab. It’s at the top of the window.
-
6
Select a footer design from the «Footer» menu. The options in this menu are presets that can fulfill most peoples’ needs. If the footers aren’t what you need (or you want to add custom information), skip to the next step.
-
7
Click Custom Footer to create a custom footer. If you chose a preset footer design, you can skip this step. This option shows three blank boxes (Left, Center, and Right), which correspond to an area at the bottom of each page. Here’s how to add what you need:
- Enter the text you want to appear in any (or all) of the boxes. You can click the A button to adjust the font size, face, and style.
- To add page numbers, click the desired box, then click the second button (sheet of paper with a «#«). For the total page count, click the third button (multiple sheets with one «#«).
- To add the date and/or time, click the desired spot, then click the calendar (for date) and/or the clock (for time).
- To add the file name, click the yellow folder button (for the full path), the spreadsheet with a green and white «X» (the file name), or the spreadsheet with two tabs at the bottom (the worksheet name).
- To add an image, click the image button (the second-to-last one), and then follow the on-screen instructions to find and select an image. Click the paint can button at end of the row to edit the image.
- Click OK when you’re finished to return to the Page Setup window.
-
8
Click Print Preview to see how your footer will look. This displays your new footer as it will appear when you print the worksheet.
-
9
Click the back button to return to Page Setup. If the footer didn’t look how you’d hoped, you can choose a different preset, or click Custom Footer… to edit the one you’ve created.
- You can edit the footer at any time by clicking the Header & Footer button on the Insert tab at the top of Excel.
-
10
Edit your page number settings (optional). If you want, you can display different footers on even and odd pages, and/or a different footer for the first page. Here’s how:[3]
- Check «Different odd and even pages» to create a second footer for alternating pages, and/or «Different first page» to have a different footer on the first page.
- Click the Custom Footer button. You’ll see that there are tabs for each of the footers you selected (Odd, Even, and/or First Page).
- Click the tab you want to edit, and then create your footer using the tips in step 6. Repeat this process for all custom pages.
- Click OK to return to the Page Setup window.
-
11
Click OK. Your footer is now added, and will appear at the bottom of each printed sheet.


Advertisement
Ask a Question
200 characters left
Include your email address to get a message when this question is answered.
Submit
Advertisement
Thanks for submitting a tip for review!
References
About This Article
Article SummaryX
1. Select a worksheet.
2. Click Insert.
3. Click Header & Footer.
4. Select a preset from the «Footer» menu.
5. Click OK.
Did this summary help you?
Thanks to all authors for creating a page that has been read 59,511 times.