
У Уокенбаха есть пример мастера по расчету платежей по кредиту (см вложенный файл Loan.xlsm Файл весит 108кб поэтому пришлось заинуть в облако) [moder]Файл вложен в сообщение #4[/moder]
Я решил добавить в ЮзерФорму под названием FormMain на шаге №2 полосу ScrollBar (в коде ее название: sbPurchasePrice) (см вложенный рисунок), которая связана с полем «Возвращаемая сумма» (в коде ее название: tbPurchasePrice) так, что пользователь может не только руками сумму в этом поле набивать, но и менять сумму прокручивая эту полосу прокрутки sbPurchasePrice
Вот так я добавил полосу прокрутки в форму ForMain:
[vba]
Private Sub sbPurchasePrice_Change()
With sbPurchasePrice
.Min = 0
.Max = 10000000
.SmallChange = 1000
.LargeChange = 10000
tbPurchasePrice.Text = .Value
End With
End Sub
Когда крутишь полосу прокрутки , сразу меняется и значение возвращаемой сумму в поле tbPurchasePrice
Теперь , хотелось бы сделать так, чтобы когда пользователь вручную забивает значение в поле tbPurchasePrice , чтобы в этот же момент ползунок в полосе прокрутки sbPurchasePrice тоже бы менял свое положение.
В коде формы FormMain я попытался решить задачу , добавив в изначальный код Уокенбаха вот эту закомментированную строку:
‘STEP 2 EVENT HANDLERS
Private Sub tbPurchasePrice_Change()
‘ sbPurchasePrice.Value = Val(tbPurchasePrice.Text)
Call UpdateLoanAmount
End Sub
Если ее раскомментировать, то Макрос выдает ошибку!
Хотя , например точно такой же метод работает во вложенном файле TestSB и никаких ошибок нет
[vba]
Private Sub OK_Click()
Unload Me
End Sub
Private Sub ScrollBar1_Change()
With ScrollBar1
.Min = 0
.Max = 10000000
.SmallChange = 1000
.LargeChange = 10000
TextBox1.Text = .Value
End With
End Sub
Private Sub TextBox1_Change()
ScrollBar1.Value = Val(TextBox1.Text)
End Sub
Помогите пожалуйста понять в чем затык?
У Уокенбаха есть пример мастера по расчету платежей по кредиту (см вложенный файл Loan.xlsm Файл весит 108кб поэтому пришлось заинуть в облако) [moder]Файл вложен в сообщение #4[/moder]
Я решил добавить в ЮзерФорму под названием FormMain на шаге №2 полосу ScrollBar (в коде ее название: sbPurchasePrice) (см вложенный рисунок), которая связана с полем «Возвращаемая сумма» (в коде ее название: tbPurchasePrice) так, что пользователь может не только руками сумму в этом поле набивать, но и менять сумму прокручивая эту полосу прокрутки sbPurchasePrice
Вот так я добавил полосу прокрутки в форму ForMain:
[vba]
Private Sub sbPurchasePrice_Change()
With sbPurchasePrice
.Min = 0
.Max = 10000000
.SmallChange = 1000
.LargeChange = 10000
tbPurchasePrice.Text = .Value
End With
End Sub
Когда крутишь полосу прокрутки , сразу меняется и значение возвращаемой сумму в поле tbPurchasePrice
Теперь , хотелось бы сделать так, чтобы когда пользователь вручную забивает значение в поле tbPurchasePrice , чтобы в этот же момент ползунок в полосе прокрутки sbPurchasePrice тоже бы менял свое положение.
В коде формы FormMain я попытался решить задачу , добавив в изначальный код Уокенбаха вот эту закомментированную строку:
‘STEP 2 EVENT HANDLERS
Private Sub tbPurchasePrice_Change()
‘ sbPurchasePrice.Value = Val(tbPurchasePrice.Text)
Call UpdateLoanAmount
End Sub
Если ее раскомментировать, то Макрос выдает ошибку!
Хотя , например точно такой же метод работает во вложенном файле TestSB и никаких ошибок нет
[vba]
Private Sub OK_Click()
Unload Me
End Sub
Private Sub ScrollBar1_Change()
With ScrollBar1
.Min = 0
.Max = 10000000
.SmallChange = 1000
.LargeChange = 10000
TextBox1.Text = .Value
End With
End Sub
Private Sub TextBox1_Change()
ScrollBar1.Value = Val(TextBox1.Text)
End Sub
Помогите пожалуйста понять в чем затык? t330
Сообщение Всем привет!
У Уокенбаха есть пример мастера по расчету платежей по кредиту (см вложенный файл Loan.xlsm Файл весит 108кб поэтому пришлось заинуть в облако) [moder]Файл вложен в сообщение #4[/moder]
Я решил добавить в ЮзерФорму под названием FormMain на шаге №2 полосу ScrollBar (в коде ее название: sbPurchasePrice) (см вложенный рисунок), которая связана с полем «Возвращаемая сумма» (в коде ее название: tbPurchasePrice) так, что пользователь может не только руками сумму в этом поле набивать, но и менять сумму прокручивая эту полосу прокрутки sbPurchasePrice
Вот так я добавил полосу прокрутки в форму ForMain:
[vba]
Private Sub sbPurchasePrice_Change()
With sbPurchasePrice
.Min = 0
.Max = 10000000
.SmallChange = 1000
.LargeChange = 10000
tbPurchasePrice.Text = .Value
End With
End Sub
Когда крутишь полосу прокрутки , сразу меняется и значение возвращаемой сумму в поле tbPurchasePrice
Теперь , хотелось бы сделать так, чтобы когда пользователь вручную забивает значение в поле tbPurchasePrice , чтобы в этот же момент ползунок в полосе прокрутки sbPurchasePrice тоже бы менял свое положение.
В коде формы FormMain я попытался решить задачу , добавив в изначальный код Уокенбаха вот эту закомментированную строку:
‘STEP 2 EVENT HANDLERS
Private Sub tbPurchasePrice_Change()
‘ sbPurchasePrice.Value = Val(tbPurchasePrice.Text)
Call UpdateLoanAmount
End Sub
Если ее раскомментировать, то Макрос выдает ошибку!
Хотя , например точно такой же метод работает во вложенном файле TestSB и никаких ошибок нет
[vba]
Private Sub OK_Click()
Unload Me
End Sub
Private Sub ScrollBar1_Change()
With ScrollBar1
.Min = 0
.Max = 10000000
.SmallChange = 1000
.LargeChange = 10000
TextBox1.Text = .Value
End With
End Sub
Private Sub TextBox1_Change()
ScrollBar1.Value = Val(TextBox1.Text)
End Sub
Помогите пожалуйста понять в чем затык? Автор — t330
Дата добавления — 18.04.2019 в 16:30
Sometimes we need to add a textbox into current worksheet to edit some comments for purpose. And if we want to type a long comment but with textbox length or width limit, we need to add a scroll bar for this textbox, then we can drag the scroll bar to show all contents. Adding scroll bar can prevent contents in textbox from truncating, this article will show you the method to create a textbox with scroll bar in excel.
Expectation:
Add a scrollbar for textbox control.
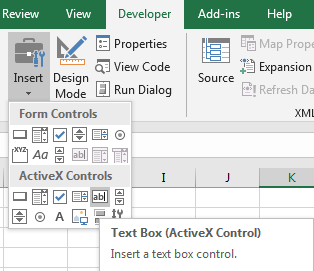
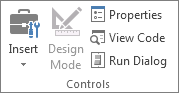
Step 1: Click Developer in ribbon, then click Insert arrow button to load Form Controls. Select Text Box control.
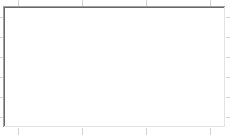
Step 2: Drag your mouse to draw a textbox.
Step 3: If you want to adjust the size of textbox, click Design Mode under Controls group.

Then click on textbox control, then selected textbox is in design mode and adjustable, you can drag any circle to extend or reduce the size.
Step 4: After adjusting textbox size, click Properties under Developer.
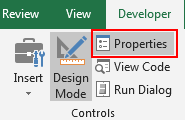
And Properties window pops up.
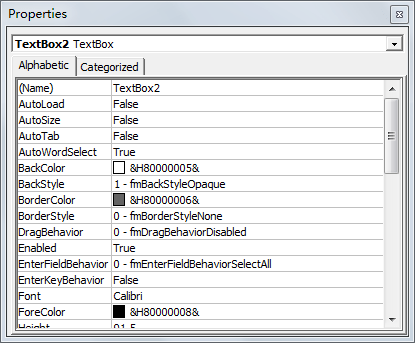
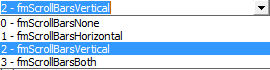
Step 5: Drag the scrollbar till MultiLine and ScorllBars show on the window. Set MultiLine with True, and in ScrollBars dropdown list, select the third choice ‘2 – fmScrollBarsVertical’.
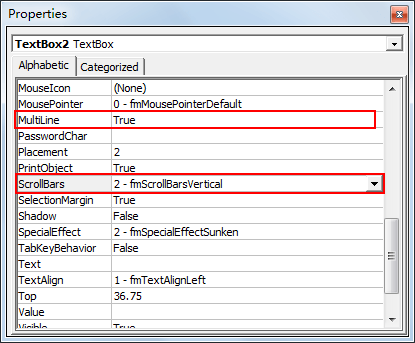
Normally we often add vertical scrollbar, if you want to add horizontal scrollbar, you can select the second choice ‘1 – fmScrollBarsHorizontal’.
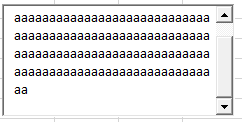
Step 6: Click Design Mode again to quit design mode. Then type a long sentence into textbox.
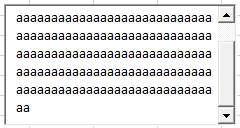
When entering texts over the textbox, a scrollbar will be displayed. You can drag scrollbar to show all texts.
Элемент управления пользовательской формы ScrollBar, применяемый в VBA Excel для создания полосы прокрутки. Свойства UserForm.ScrollBar, примеры кода.
UserForm.ScrollBar – это элемент управления пользовательской формы, представляющий из себя полосу прокрутки с кнопками, реагирующий как на перемещение ползунка, так и на нажатие кнопок.

Элемент управления ScrollBar предназначен в VBA Excel для ввода пользователем числовых данных, которые ограничены минимальным и максимальным значениями. Увеличение или уменьшение значения полосы прокрутки осуществляется с указанным шагом при помощи ползунка или кнопок.
Визуально, элемент управления ScrollBar состоит из полосы прокрутки и двух кнопок, работающих аналогично кнопкам элемента управления SpinButton. Ориентация может быть горизонтальной или вертикальной в зависимости от настроек.
Полоса прокрутки в VBA Excel используется в паре с элементом управления TextBox или Label. Вспомогательный элемент необходим, чтобы отобразить текущее значение ScrollBar на пользовательской форме.
Свойства элемента ScrollBar
| Свойство | Описание |
|---|---|
| BackColor | Цветовое оформление элемента управления. |
| Delay* | Время между последовательными событиями при удержании кнопки. |
| ControlTipText | Текст всплывающей подсказки при наведении курсора на полосу прокрутки. |
| Enabled | Возможность взаимодействия пользователя с элементом управления. True – взаимодействие включено, False – отключено (цвет стрелок становится серым). |
| Height | Высота элемента управления. |
| Left | Расстояние от левого края внутренней границы пользовательской формы до левого края элемента управления. |
| Max | Максимальное значение свойства Value. |
| Min | Минимальное значение свойства Value. |
| Orientation** | Задает горизонтальную или вертикальную ориентацию элемента управления ScrollBar. |
| SmallChange | Шаг изменения значения свойства Value. |
| TabIndex | Определяет позицию элемента управления в очереди на получение фокуса при табуляции, вызываемой нажатием клавиш «Tab», «Enter». Отсчет начинается с 0. |
| Top | Расстояние от верхнего края внутренней границы пользовательской формы до верхнего края элемента управления. |
| Visible | Видимость элемента ScrollBar. True – элемент отображается на пользовательской форме, False – скрыт. |
| Width | Ширина элемента управления. |
* По умолчанию свойство Delay равно 50 миллисекундам. Это означает, что первое событие (SpinUp, SpinDown, Change) происходит через 250 миллисекунд после нажатия кнопки, а каждое последующее событие – через каждые 50 миллисекунд (и так до отпускания кнопки).
** По умолчанию включена автоматическая ориентация, которая зависит от соотношения между шириной и высотой элемента управления. Если ширина больше высоты – ориентация горизонтальная, если высота больше ширины – ориентация вертикальная.
В таблице перечислены только основные, часто используемые свойства полосы прокрутки. Все доступные свойства отображены в окне Properties элемента управления ScrollBar.
Примеры кода с полосой прокрутки
Пример 1
Условие примера 1
- На пользовательской форме VBA Excel расположены элементы управления ScrollBar1 и Label1.
- Необходимо задать для полосы прокрутки ScrollBar1 интервал значений от -100 до 100 единиц с шагом 5 и отображением текущего значения на элементе Label1.
- При открытии формы полоса прокрутки должна быть установлена на значении 0.
Решение примера 1
Первоначальные настройки при открытии пользовательской формы:
|
Private Sub UserForm_Initialize() Me.Caption = «Пример 1» With ScrollBar1 .Min = —100 .Max = 100 .SmallChange = 5 .Value = 0 End With Label1.Caption = «0» End Sub |

Обработка события Change объекта ScrollBar1:
|
Private Sub ScrollBar1_Change() Label1.Caption = ScrollBar1.Value End Sub |
Обе процедуры размещаются в модуле пользовательской формы VBA Excel.
Пример 2
Условие примера 2
- На пользовательской форме расположены элементы управления ScrollBar1 и TextBox1.
- Интервал значений для полосы прокрутки ScrollBar1 от 0 до 1000 единиц с шагом 10 и отображение текущего значения в поле элемента TextBox1.
- При открытии формы полоса прокрутки должна быть установлена в значение 0.
- Установка соответствующего значения полосы прокрутки при ручном изменении содержимого текстового поля.
- Предусмотреть сообщение о значении TextBox1, не входящем в интервал значений элемента управления ScrollBar1.
Решение примера 2
Первоначальные настройки при открытии пользовательской формы:
|
Private Sub UserForm_Initialize() Me.Caption = «Пример 2» With ScrollBar1 .Min = 0 .Max = 1000 .SmallChange = 10 .Value = 0 End With TextBox1.Text = «0» End Sub |

Обработка события Change объекта ScrollBar1:
|
Private Sub ScrollBar1_Change() TextBox1.Text = ScrollBar1.Value End Sub |
Обработка события Change объекта TextBox1:
|
Private Sub TextBox1_Change() On Error GoTo Instr ScrollBar1.Value = TextBox1.Text Exit Sub Instr: TextBox1.Text = «Недопустимое значение» End Sub |
Если содержимое элемента управления TextBox1 не соответствует интервалу значений полосы прокрутки, возникает ошибка (преобразование в число происходит автоматически). Чтобы ее избежать и вывести сообщение о недопустимости значения, используется обработчик ошибок.

Все три процедуры размещаются в модуле пользовательской формы.
Excel for Microsoft 365 Excel 2021 Excel 2019 Excel 2016 Excel 2013 Excel 2010 More…Less
If someone’s entering data inaccurately, or you think a coworker may be confused about how to enter data, add a label. A simple name, such as «Phone,» lets others know what to put in a cell, and your labels can also provide more complex instructions.
You can add labels to forms and ActiveX controls.
Add a label (Form control)
-
Click Developer, click Insert, and then click Label
 .
.
-
Click the worksheet location where you want the upper-left corner of the label to appear.
-
To specify the control properties, right-click the control, and then click Format Control.
 .
.
-
Click Developer and then click Insert, and under ActiveX Controls, click Label
.
-
Click the worksheet location where you want the upper-left corner of the label to appear.
-
Click Design Mode
. -
Click the worksheet location where you want the upper-left corner of the label to appear.
-
To specify the control properties, click Properties
.Tip: You can also right-click the label, and then click Properties.
The Properties dialog box appears. For detailed information about each property, select the property, and then press F1 to display a Visual Basic Help topic. You can also type the property name in the Visual Basic Help Search box. This table summarizes the properties.
Summary of label properties by functional category
 .
. .
. .
.|
If you want to specify |
Use this property |
|
General: |
|
|
Whether the control is loaded when the workbook is opened. (Ignored for ActiveX controls.) |
AutoLoad (Excel) |
|
Whether the control can receive the focus and respond to user-generated events. |
Enabled (Form) |
|
Whether the control can be edited. |
Locked (Form) |
|
The name of the control. |
Name (Form) |
|
The way the control is attached to the cells below it (free floating, move but do not size, or move and size). |
Placement (Excel) |
|
Whether the control can be printed. |
PrintObject (Excel) |
|
Whether the control is visible or hidden. |
Visible (Form) |
|
Text: |
|
|
Font attributes (bold, italic, size, strikethrough, underline, and weight). |
Bold, Italic, Size, StrikeThrough, Underline, Weight (Form) |
|
Descriptive text on the control that identifies or describes it. |
Caption (Form) |
|
How text is aligned in the control (left, center, or right). |
TextAlign (Form) |
|
Whether the contents of the control automatically wrap at the end of a line. |
WordWrap (Form) |
|
Size and position: |
|
|
Whether the size of the control automatically adjusts to display all contents. |
AutoSize (Form) |
|
The height or width in points. |
Height, Width (Form) |
|
The distance between the control and the left or top edge of the worksheet. |
Left, Top (Form) |
|
Formatting: |
|
|
The background color. |
BackColor (Form) |
|
The background style (transparent or opaque). |
BackStyle (Form) |
|
The color of the border. |
BorderColor (Form) |
|
The type of border (none or single-line). |
BorderStyle (Form) |
|
The foreground color. |
ForeColor (Form) |
|
Whether the control has a shadow. |
Shadow (Excel) |
|
The visual appearance of the border (flat, raised, sunken, etched, or bump). |
SpecialEffect (Form) |
|
Image: |
|
|
The bitmap to display in the control. |
Picture (Form) |
|
The location of the picture relative to its caption (left, top, right, and so on). |
PicturePosition (Form) |
|
Keyboard and mouse: |
|
|
The shortcut key for the control. |
Accelerator (Form) |
|
A custom mouse icon. |
MouseIcon (Form) |
|
The type of pointer that is displayed when the user positions the mouse over a particular object (for example, standard, arrow, or I-beam). |
MousePointer (Form) |
-
Click Developer and then click Insert, and under ActiveX Controls, click Text Box
.
-
Click the worksheet location where you want the upper-left corner of the text box to appear.
-
To edit the ActiveX control, click Design Mode
. -
To specify the control properties, click Properties
.Tip: You can also right-click the text box, and then click Properties.
The Properties dialog box appears. For detailed information about each property, select the property, and then press F1 to display a Visual Basic Help topic. You can also type the property name in the Visual Basic Help Search box. The following section summarizes the properties that are available.
Summary of text box properties by functional category
 .
.|
If you want to specify |
Use this property |
|
General: |
|
|
Whether the control is loaded when the workbook is opened. (Ignored for ActiveX controls.) |
AutoLoad (Excel) |
|
Whether the control can receive the focus and respond to user-generated events. |
Enabled (Form) |
|
Whether the control can be edited. |
Locked (Form) |
|
The name of the control. |
Name (Form) |
|
The way the control is attached to the cells below it (free floating, move but do not size, or move and size). |
Placement (Excel) |
|
Whether the control can be printed. |
PrintObject (Excel) |
|
Whether the control is visible or hidden. |
Visible (Form) |
|
Text: |
|
|
Whether a word or a character is the basic unit used to extend a selection. |
AutoWordSelect (Form) |
|
Font attributes (bold, italic, size, strikethrough, underline, and weight). |
Bold, Italic, Size, StrikeThrough, Underline, Weight (Form) |
|
Whether selected text remains highlighted when the control does not have the focus. |
HideSelection (Form) |
|
The default run time mode of the Input Method Editor (IME). |
IMEMode (Form) |
|
Whether the size of the control adjusts to display full or partial lines of text. |
IntegralHeight (Form) |
|
The maximum number of characters a user can enter. |
MaxLength (Form) |
|
Whether the control supports multiple lines of text. |
MultiLine (Form) |
|
Placeholder characters, such as an asterisk (*), to be displayed instead of actual characters. |
PasswordChar (Form) |
|
Whether the user can select a line of text by clicking to the left of the text. |
SelectionMargin (Form) |
|
The text in the control. |
Text (Form) |
|
How text is aligned in the control (left, center, or right). |
TextAlign (Form) |
|
Whether the contents of the control automatically wrap at the end of a line. |
WordWrap (Form) |
|
Data and binding: |
|
|
The range that is linked to the control’s value. |
LinkedCell (Excel) |
|
The content or state of the control. |
Value (Form) |
|
Size and position: |
|
|
Whether the size of the control automatically adjusts to display all the contents. |
AutoSize (Form) |
|
The height or width in points. |
Height, Width (Form) |
|
The distance between the control and the left or top edge of the worksheet. |
Left, Top (Form) |
|
Formatting: |
|
|
The background color. |
BackColor (Form) |
|
The background style (transparent or opaque). |
BackStyle (Form) |
|
The color of the border. |
BorderColor (Form) |
|
The type of border (none or a single-line). |
BorderStyle (Form) |
|
The foreground color. |
ForeColor (Form) |
|
Whether the control has a shadow. |
Shadow (Excel) |
|
The visual appearance of the border (flat, raised, sunken, etched, or bump). |
SpecialEffect (Form) |
|
Whether an automatic tab occurs when a user enters the maximum allowable characters into the control. |
AutoTab (Form) |
|
Keyboard and mouse: |
|
|
Whether drag-and-drop is enabled. |
DragBehavior (Form) |
|
The selection behavior when entering the control (select all or do not select). |
EnterFieldBehavior (Form) |
|
The effect of pressing ENTER (create a new line or move focus). |
EnterKeyBehavior (Form) |
|
A custom mouse icon. |
MouseIcon (Form) |
|
The type of pointer that is displayed when the user positions the mouse over a particular object (for example, standard, arrow, or I-beam). |
MousePointer (Form) |
|
Whether tabs are allowed in the edit region. |
TabKeyBehavior (Form) |
|
Specific to Text Box: |
|
|
Whether the control has vertical scroll bars, horizontal scroll bars, or both. |
ScrollBars (Form) |
-
Click File, click Options, and then click Customize Ribbon.
-
Under Main Tabs , select the Developer check box, and then click OK.
A label identifies the purpose of a cell or text box, displays brief instructions, or provides a title or caption. A label can also display a descriptive picture. Use a label for flexible placement of instructions, to emphasize text, and when merged cells or a specific cell location is not a practical solution.
A text box is a rectangular box in which you can view, enter, or edit text or data in a cell. A text box can also be a static, and display data users can only read. Use a text box as an alternative to entering text in a cell, when you want to display an object that floats freely. You can also use a text box to display or view text that is independent of row and column boundaries, preserving the layout of a grid or table of data on the worksheet.
Label on a form control:
An ActiveX control label:
An ActiveX text box control:
Notes:
-
To create a text box with a set of placeholder characters that accepts a password, use the PasswordChar property. Make sure that you protect the linked cell or other location in which the text is stored. Use strong passwords that combine uppercase and lowercase letters, numbers, and symbols, such as Y6dh!et5, not House27. Passwords should be 8 or more characters;14 is better.
And don’t forget your password. If you do, we can’t help you retrieve it. Office doesn’t have a master key to unlock anything. Store passwords in a secure place away from the information they help protect.
-
To create a scrolling, multiple-line text box with horizontal and vertical scroll bars, set MultiLine to True, AutoSize and WordWrap to False, ScrollBars to 3, and LinkedCell to the cell address (such as D1) that you want to contain the text. To enter a new line, the user must press either CTRL+ENTER or SHIFT+ENTER, which generates a special character that is stored in the linked cell.
Need more help?
Всем привет!
У Уокенбаха есть пример мастера по расчету платежей по кредиту (см вложенный файл Loan.xlsm Файл весит 108кб поэтому пришлось заинуть в облако) [moder]Файл вложен в сообщение #4[/moder]
Я решил добавить в ЮзерФорму под названием FormMain на шаге №2 полосу ScrollBar (в коде ее название: sbPurchasePrice) (см вложенный рисунок), которая связана с полем «Возвращаемая сумма» (в коде ее название: tbPurchasePrice) так, что пользователь может не только руками сумму в этом поле набивать, но и менять сумму прокручивая эту полосу прокрутки sbPurchasePrice
Вот так я добавил полосу прокрутки в форму ForMain:
[vba]
Код
Private Sub sbPurchasePrice_Change()
With sbPurchasePrice
.Min = 0
.Max = 10000000
.SmallChange = 1000
.LargeChange = 10000
tbPurchasePrice.Text = .Value
End With
End Sub
[/vba]
Когда крутишь полосу прокрутки , сразу меняется и значение возвращаемой сумму в поле tbPurchasePrice
Теперь , хотелось бы сделать так, чтобы когда пользователь вручную забивает значение в поле tbPurchasePrice , чтобы в этот же момент ползунок в полосе прокрутки sbPurchasePrice тоже бы менял свое положение.
В коде формы FormMain я попытался решить задачу , добавив в изначальный код Уокенбаха вот эту закомментированную строку:
[vba]
Код
‘STEP 2 EVENT HANDLERS
Private Sub tbPurchasePrice_Change()
‘ sbPurchasePrice.Value = Val(tbPurchasePrice.Text)
Call UpdateLoanAmount
End Sub
[/vba]
Если ее раскомментировать, то Макрос выдает ошибку!
Хотя , например точно такой же метод работает во вложенном файле TestSB и никаких ошибок нет
[vba]
Код
Option Explicit
Private Sub OK_Click()
Unload Me
End Sub
Private Sub ScrollBar1_Change()
With ScrollBar1
.Min = 0
.Max = 10000000
.SmallChange = 1000
.LargeChange = 10000
TextBox1.Text = .Value
End With
End Sub
Private Sub TextBox1_Change()
ScrollBar1.Value = Val(TextBox1.Text)
End Sub
[/vba]
Помогите пожалуйста понять в чем затык?