
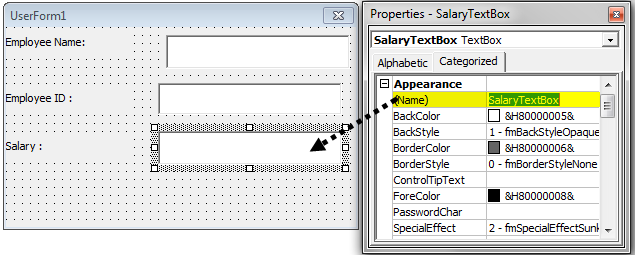
Элемент управления пользовательской формы TextBox в VBA Excel. Использование текстового поля для ввода и вывода информации, основные свойства, примеры. Привязка текстового поля к ячейке.
UserForm.TextBox – это элемент управления пользовательской формы, предназначенный для ввода, редактирования и вывода информации в текстовом формате.

Текстовое поле незаменимо, когда необходимо заполнить пользовательскую форму новой информацией. Например, это может быть ФИО нового сотрудника и его паспортные данные, сумма выручки за день, новый электронный адрес и многое-многое другое.
Если с помощью текстового поля требуется вводить заранее известную информацию, элементы которой можно сгруппировать в список, то в этом случае удобнее вместо элемента управления TextBox использовать ListBox или ComboBox.
Вводить информацию в TextBox на открытой форме можно не только с помощью клавиатуры, но и вставкой текста из буфера обмена. Когда текстовое поле применяется для ввода пароля, есть возможность отобразить все его знаки замещающим символом, например, звездочкой.
Иногда, если на пользовательской форме используется только одно текстовое поле и кнопка «OK» (или кнопки «OK» и «Отмена»), для ввода информации такую форму можно заменить функцией InputBox, а для вывода информации, когда не требуется редактирование отображаемого текста, – функцией MsgBox.
Свойства текстового поля
| Свойство | Описание |
|---|---|
| AutoSize* | Автоподбор размера текстового поля. True – размер автоматически подстраивается под длину размещаемой строки. False – размер элемента управления определяется свойствами Width и Height. |
| AutoTab | Включение автоматической табуляции – передачи фокуса следующему элементу управления при достижении максимального числа символов при значениях свойства MaxLenght > 0. True – автоматическая табуляция включена, False – выключена. |
| ControlSource | Ссылка на источник данных для поля TextBox. |
| ControlTipText | Текст всплывающей подсказки при наведении курсора на TextBox. |
| Enabled | Возможность ввода, редактирования, копирования, вставки, удаления текста. True – все перечисленные опции включены, False – выключены (цвет текста в поле становится серым). |
| Font | Шрифт, начертание и размер текста в поле. |
| Height | Высота текстового поля. |
| Left | Расстояние от левого края внутренней границы пользовательской формы до левого края текстового поля. |
| Locked | Запрет ввода, редактирования, удаления текста. True – перечисленные опции запрещены (разрешено выделение и копирование текста), False – перечисленные опции разрешены. |
| MaxLenght | Максимальная длина строки. По умолчанию – 0, что означает – ограничений нет. |
| Multiline | Устанавливает многострочный (True) или однострочный (False) режим ввода-вывода текста. |
| PasswordChar | Задает символ, который будет отображаться при вводе знаков пароля. |
| TabIndex | Определяет позицию элемента управления в очереди на получение фокуса при табуляции, вызываемой свойством AutoTab или нажатием клавиш «Tab», «Enter». Отсчет начинается с 0. |
| Text** | Текстовое содержимое (значение) поля (=Value). |
| TextAlign | Выравнивание текста: 1 (fmTextAlignLeft) – по левому краю, 2 (fmTextAlignCenter) – по центру, 3 (fmTextAlignRight) – по правому краю. |
| Top | Расстояние от верхнего края внутренней границы пользовательской формы до верхнего края текстового поля. |
| Value** | Текстовое содержимое (значение) поля (=Text). |
| Visible | Видимость текстового поля. True – TextBox отображается на пользовательской форме, False – TextBox скрыт. |
| Width | Ширина текстового поля. |
| WordWrap | Актуально при Multiline = True. Переход на новую строку при достижении границы текстового поля. True – переход включен, False – переход выключен. |
* При использовании свойства AutoSize в значении True следует учитывать, что автоматическое изменение размеров поля при вводе текста может нарушить дизайн пользовательской формы.
** Text и Value — это два обозначения одного и того же свойства. Если в окне Properties элемента управления TextBox в поле свойства Text начать ввод строки, в поле Value ввод будет дублироваться. И наоборот, при вводе текста в поле свойства Value, дублирование произойдет в поле Text.
В таблице перечислены только основные, часто используемые свойства текстового поля. Все доступные свойства отображены в окне Properties элемента управления TextBox.
Свойства BackColor, BackStyle, BorderColor, BorderStyle отвечают за внешнее оформление текстового поля и его границ. Попробуйте выбирать доступные значения этих свойств в окне Properties, наблюдая за изменениями внешнего вида элемента управления TextBox на проекте пользовательской формы.
Привязка текстового поля к ячейке
Привязать элемент управления TextBox к ячейке на рабочем листе можно двумя способами.
1. В окне Properties элемента управления TextBox в поле свойства ControlSource необходимо указать адрес ячейки:

2. Присвоить свойству ControlSource адрес ячейки в коде VBA Excel:
|
UserForm1.TextBox1.ControlSource = «C5» |
Теперь ячейка C5 активного листа будет привязана к элементу управления TextBox1. При открытии формы текстовое поле будет заполнено значением ячейки C5.
Чтобы наглядно ознакомиться с взаимозависимостью значения ячейки C5 и содержимого текстового поля, разместите на пользовательской форме еще какой-нибудь элемент управления и откройте ее в немодальном* окне:
|
Sub Test() UserForm1.TextBox1.ControlSource = «C5» UserForm1.Show 0 End Sub |
Измените значение ячейки C5 и нажмите клавишу «Tab» или «Enter» – изменения будут продублированы в текстовом поле на форме. Измените содержимое поля TextBox1, нажмите клавишу «Tab» или «Enter», передав фокус другому элементу управления, – изменения продублируются в ячейке C5.
Чтобы привязать текстовое поле к ячейке неактивного листа, необходимо в адресе указать имя листа по ярлыку с разделителем «!»:
|
UserForm1.TextBox1.ControlSource = «Лист2!A3» |
Если имя листа содержит пробел, заключите его в одинарные кавычки:
|
UserForm1.TextBox1.ControlSource = «‘Мой лист’!B6» |
Точно также адрес ячейки конкретного листа можно указать непосредственно в окне Properties элемента управления TextBox в поле свойства ControlSource (без парных кавычек).
* Отображение пользовательской формы в немодальном окне позволяет редактировать ячейки на рабочем листе Excel, не закрывая форму.
Примеры использования TextBox
Пример 1
Обмен содержимым между текстовым полем, переменной и ячейкой на рабочем листе:
|
‘Присвоение текстовому полю значения ‘ячейки A2 и переменной a1 UserForm1.TextBox1.Text = Range(«A2») UserForm1.TextBox1.Text = a1 ‘Присвоение ячейке B3 и переменной a2 ‘значения текстового поля Cells(3, 2) = UserForm1.TextBox1.Text a2 = UserForm1.TextBox1.Value ‘Свойства Text и Value элемента ‘управления TextBox равнозначны |
Пример 2
Программное создание элемента управления TextBox, размещение его по центру пользовательской формы, добавление всплывающей подсказки и текста по умолчанию.
Предположим, что текстовое поле предназначено для ввода даты, поэтому добавляем соответствующую подсказку, а в качестве текста по умолчанию – текущую дату.
Создаем новую пользовательскую форму с именем UserForm2. Если у вас другое имя формы, это не имеет значения, так как обращаться к ней будем с помощью ключевого слова «Me». Открываем модуль созданной формы и вставляем в него следующий код VBA Excel:
|
1 2 3 4 5 6 7 8 9 10 11 12 13 14 15 16 17 18 19 20 21 22 23 24 25 |
Private Sub UserForm_Initialize() Dim myTextBox As Control ‘Создаем новый TextBox и присваиваем его переменной Set myTextBox = Me.Controls.Add(«Forms.TextBox.1») ‘Задаем размеры и заголовок пользовательской формы With Me .Height = 100 .Width = 220 .Caption = «Форма №2» End With ‘Присваиваем значения свойствам текстового поля With myTextBox .Width = 100 .Height = 20 ‘Left и Top рассчитаны для Excel 2016* .Left = 60 — 5 .Top = 40 — 15 ‘Добавляем всплывающую подсказку .ControlTipText = «Введите дату подписания договора» ‘Вставляем в поле текущую дату .Text = Format(Now, «DD.MM.YYYY») ‘Выравниваем текст по центру .TextAlign = 2 End With End Sub |
В результате выполнения кода откроется следующая форма с всплывающей подсказкой при наведении на TextBox курсора:

* Значения свойств Left и Top рассчитаны для Excel 2016. Вычитаемые числа зависят от толщины границ пользовательской формы, которые в других версиях Excel могут отличаться.

What is VBA TextBox in Excel?
VBA TextBox is one of the many controls from UserForm controls in Excel. VBA TextBox can come handy when you want to have input from user like their name, age, address, salary, etc. Using TextBox control, you can allow users to input this kind of information and save many of your time as well as typo errors. VBA TextBox can consist of Static or Dynamic Data.
UserForm itself is a very useful tool which has different control options like TextBox, MsgBox, and InputBox, etc. which provide a more practical way to get data from user so that you can functionally process that data and find out some useful insights out of it.
In this article, you will be getting hands-on experience on Excel VBA TextBox.
Examples of Excel VBA TextBox
Below are the different examples of VBA TextBox in Excel.
You can download this VBA TextBox Excel Template here – VBA TextBox Excel Template
Example #1 – How to Insert TextBox in VBA?
Below are the steps to insert TextBox in Excel VBA.
Step 1: Open an excel file and hit Alt + F11 to navigate to VBA pane.
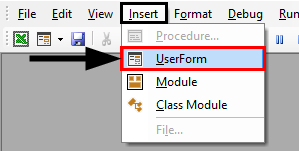
Step 2: As we already have discussed, TextBox is an option available in UserForm. So we need to insert UserForm in VBE. Go to Insert Menu > Click UserForm.
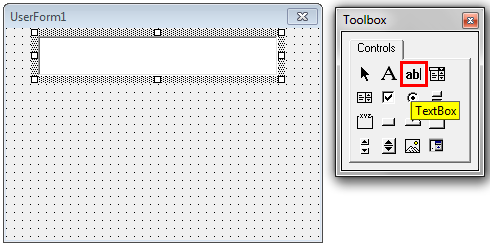
Step 3: As soon as you insert a UserForm in VBA you can see a Toolbox option associated with it and have different options associated with UserForm.

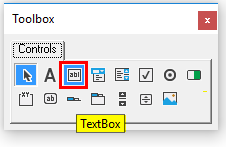
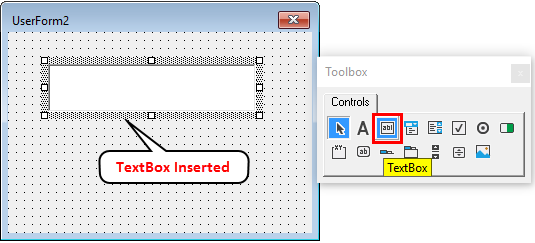
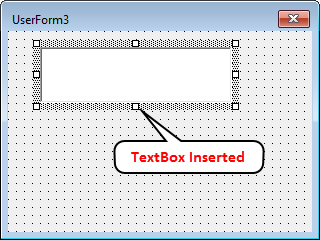
Step 4: In this toolbox select TextBox.
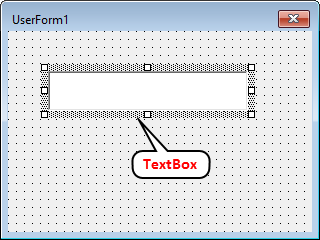
Step 5: Drag this TextBox on the user form.
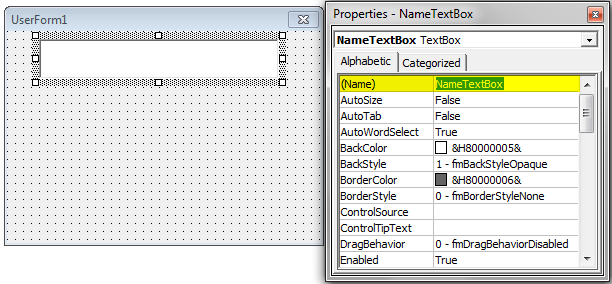
Step 6: Hit F4 to see the properties of UserForm (Alternatively you can do this by right clicking on UserForm inserted). These properties allow you to make some necessary changes like changing the name of UserForm to be able to access it easily.

Some other basic changes you can do with properties pane of UserForm are like changing the Font, Changing the size, etc.
Step 7: Input the text as “Welcome to VBA TextBox!” in TextBox under UserForm.
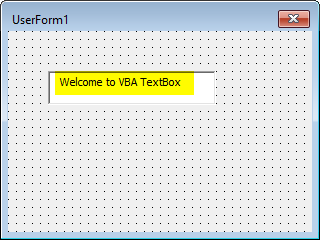
This is how you can create a VBA TextBox.
Example #2 – Setting Value to VBA TextBox
Let’s see how we can set the values for TextBox. It is sometimes mandatory to set the values otherwise, the user will input anything of their interest.
Step 1: Insert a New UserForm in VBE. Go to Insert menu > click on UserForm.

Step 2: From UserForm Tools, select TextBox and drag it to UserForm.
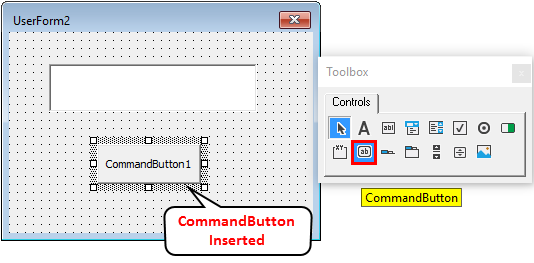
Step 3: Insert a CommandButton under UserForm in the same way you added TextBox.
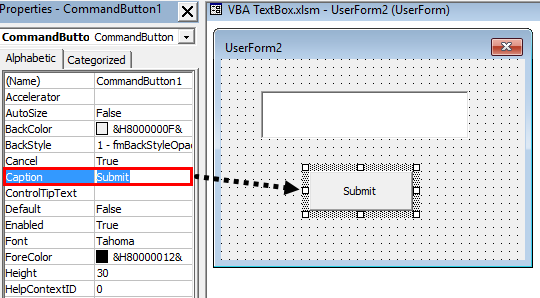
Step 4: Change the caption of the command button to “Submit” under properties. You can navigate to properties of command button by Right Click on Command Button > Click Properties.
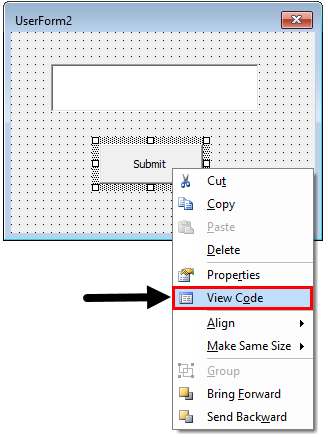
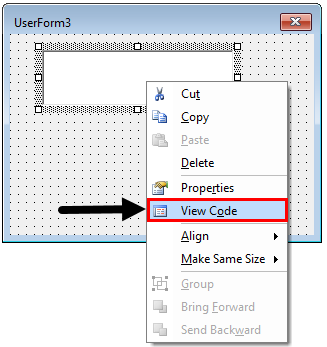
Step 5: Double click on the submit button or Right click on it and select View Code.
Step 6: In the code, insert a line of new code within sub-procedure as below.
Code:
Private Sub CommandButton1_Click()

TextBox1.Value = "My Name is Lalit!"

End Sub
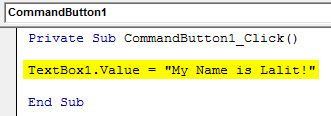
This highlighted code allows you to assign the value at right enclosed in double quotes to the TextBox. You can also use TextBox.Text property instead of TextBox.Values to set the value for TextBox.
Step 7: Hit F5 or Run button under VBE to run this code, you will see a UserForm with empty TextBox. As soon as you hit the submit button, the text assigned to TextBox will appear there in it.
Example #3 – Restrict TextBox Input to Accept only Numeric Values
Follow the below steps:
Step 1: Insert a new UserForm in your VBA and add TextBox in it.
Step 2: Change the name of TextBox under Properties section to “My_Age”.
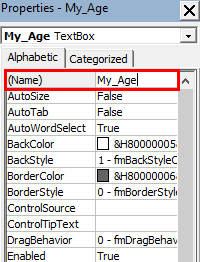
Step 3: Double click on TextBox or right click on it and select View Code.
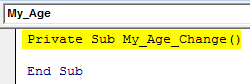
You’ll be able to see the initial sub-procedure as below:
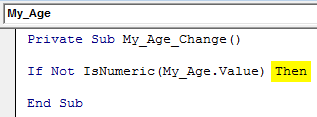
Code:
Private Sub My_Age_Change()

End Sub
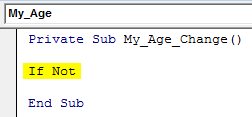
Step 4: Now, try to add an If the condition which starts with If Not.
Code:
Private Sub My_Age_Change()

If Not

End Sub
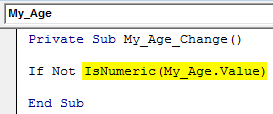
Step 5: Ask compiler to check if the value of TextBox “My_Age” is numeric or not using IsNumeric Keyword in front of If Not condition.
Code:
Private Sub My_Age_Change()

If Not IsNumeric(My_Age.Value)

End Sub
Step 6: As every IF condition asks, add a Then Keyword for it.
Code:
Private Sub My_Age_Change()

If Not IsNumeric(My_Age.Value) Then

End Sub
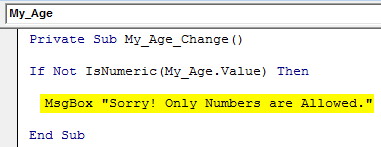
In this piece of code, you are asking the compiler to check whether the value inputted by the user under TextBox is numeric or not. If, it’s not numeric, then what to do? Follow the next step.
Step 7: With the use of MsgBox, add a comment like “Sorry! Only Numbers are Allowed.” to be displayed if, the value in TextBox is not numeric.
Code:
Private Sub My_Age_Change()

If Not IsNumeric(My_Age.Value) Then

  MsgBox "Sorry! Only Numbers are Allowed."

End Sub
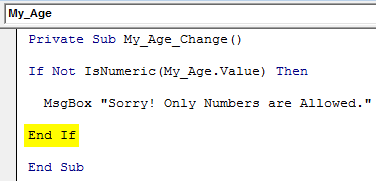
Step 8: Now, close this IF statement by using keyword End IF.
Code:
Private Sub My_Age_Change()

If Not IsNumeric(My_Age.Value) Then

  MsgBox "Sorry! Only Numbers are Allowed."

End If

End Sub
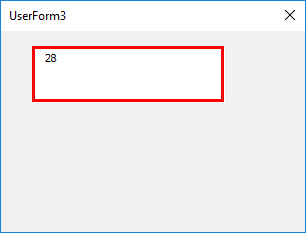
Step 9: Now, run this code by hitting the F5 button from your keyboard or Run button from VBE and see the output. You’ll get a TextBox as shown below:
Now, I try to input an Integer value in it and see whether it actually allows me to input the same or not.
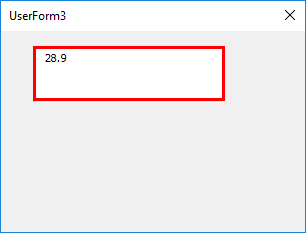
Bingo, it allows me to store the integer value.
Now, let’s try to add some float (Value with Decimal points) to this text box and see whether it allows us to input the same.
Let’s check if this text box allows us to store some negative values under it or not. I will type some negative number and check.
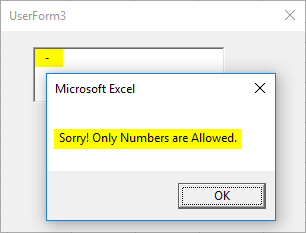
Well! Well!! Well!!!, it shoots a message me saying only numbers are allowed. It happened because this code written initially is with IF condition, it doesn’t have any workaround what to do if the number is non-positive. Moreover, Age can’t be negative. Right? Therefore, I am getting a warning message as you can see above. However, If you click OK in the message box and try inputting the number, it will allow you to do so. But I will not recommend breaking the rules over there.
Finally, let’s try some text string in the box and see if it allows the same to be stored under textbox or not.

As rightly expected, as soon as I entered the first string letter, the system prevented me to do so by throwing a message. This is because we have mentioned a condition in our code saying if the value is not numeric, please throw a message towards the user saying only numeric values are allowed.
Things to Remember
- VBA TextBox is a special option under UserForm. Which is designed to take input from the user itself.
- There are two methods to set the values for a TextBox: by using TextBox.Text and by using TextBox.Value.
- Sometimes it’s mandatory to restrict the user input so that we are getting the right type of data.
Recommended Articles
This is a guide to VBA TextBox. Here we discuss how to Create TextBox in Excel VBA along with practical examples and downloadable excel template. You can also go through our other suggested articles –
- VBA IsNumeric
- VBA UCASE
- VBA Close UserForm
- VBA Text
Содержание
- VBA Excel. Элемент управления TextBox (текстовое поле)
- Элемент управления TextBox
- Свойства текстового поля
- Привязка текстового поля к ячейке
- Get the value of a textbox to a cell
- 1 Answer 1
- Excel VBA get complete textbox value
- 5 Answers 5
- Declare a global variable
- Write your code into another macro
- Activate the macro after 3 seconds
- Final (should work) code
- Excel fetch the cell value from textbox
- 1 Answer 1
- VBA TextBox
- Excel VBA TextBox
- How to Insert TextBox in VBA UserForm?
- TextBox Properties
- Example of using TextBox in Userform
- Recommended Articles
VBA Excel. Элемент управления TextBox (текстовое поле)
Элемент управления пользовательской формы TextBox в VBA Excel. Использование текстового поля для ввода и вывода информации, основные свойства, примеры. Привязка текстового поля к ячейке.
Элемент управления TextBox
Текстовое поле незаменимо, когда необходимо заполнить пользовательскую форму новой информацией. Например, это может быть ФИО нового сотрудника и его паспортные данные, сумма выручки за день, новый электронный адрес и многое-многое другое.
Вводить информацию в TextBox на открытой форме можно не только с помощью клавиатуры, но и вставкой текста из буфера обмена. Когда текстовое поле применяется для ввода пароля, есть возможность отобразить все его знаки замещающим символом, например, звездочкой.
Свойства текстового поля
| Свойство | Описание |
|---|---|
| AutoSize* | Автоподбор размера текстового поля. True – размер автоматически подстраивается под длину размещаемой строки. False – размер элемента управления определяется свойствами Width и Height. |
| AutoTab | Включение автоматической табуляции – передачи фокуса следующему элементу управления при достижении максимального числа символов при значениях свойства MaxLenght > 0. True – автоматическая табуляция включена, False – выключена. |
| ControlSource | Ссылка на источник данных для поля TextBox. |
| ControlTipText | Текст всплывающей подсказки при наведении курсора на TextBox. |
| Enabled | Возможность ввода, редактирования, копирования, вставки, удаления текста. True – все перечисленные опции включены, False – выключены (цвет текста в поле становится серым). |
| Font | Шрифт, начертание и размер текста в поле. |
| Height | Высота текстового поля. |
| Left | Расстояние от левого края внутренней границы пользовательской формы до левого края текстового поля. |
| Locked | Запрет ввода, редактирования, удаления текста. True – перечисленные опции запрещены (разрешено выделение и копирование текста), False – перечисленные опции разрешены. |
| MaxLenght | Максимальная длина строки. По умолчанию – 0, что означает – ограничений нет. |
| Multiline | Устанавливает многострочный (True) или однострочный (False) режим ввода-вывода текста. |
| PasswordChar | Задает символ, который будет отображаться при вводе знаков пароля. |
| TabIndex | Определяет позицию элемента управления в очереди на получение фокуса при табуляции, вызываемой свойством AutoTab или нажатием клавиш «Tab», «Enter». Отсчет начинается с 0. |
| Text** | Текстовое содержимое (значение) поля (=Value). |
| TextAlign | Выравнивание текста: 1 (fmTextAlignLeft) – по левому краю, 2 (fmTextAlignCenter) – по центру, 3 (fmTextAlignRight) – по правому краю. |
| Top | Расстояние от верхнего края внутренней границы пользовательской формы до верхнего края текстового поля. |
| Value** | Текстовое содержимое (значение) поля (=Text). |
| Visible | Видимость текстового поля. True – TextBox отображается на пользовательской форме, False – TextBox скрыт. |
| Width | Ширина текстового поля. |
| WordWrap | Актуально при Multiline = True. Переход на новую строку при достижении границы текстового поля. True – переход включен, False – переход выключен. |
* При использовании свойства AutoSize в значении True следует учитывать, что автоматическое изменение размеров поля при вводе текста может нарушить дизайн пользовательской формы.
** Text и Value — это два обозначения одного и того же свойства. Если в окне Properties элемента управления TextBox в поле свойства Text начать ввод строки, в поле Value ввод будет дублироваться. И наоборот, при вводе текста в поле свойства Value, дублирование произойдет в поле Text.
В таблице перечислены только основные, часто используемые свойства текстового поля. Все доступные свойства отображены в окне Properties элемента управления TextBox.
Свойства BackColor, BackStyle, BorderColor, BorderStyle отвечают за внешнее оформление текстового поля и его границ. Попробуйте выбирать доступные значения этих свойств в окне Properties, наблюдая за изменениями внешнего вида элемента управления TextBox на проекте пользовательской формы.
Привязка текстового поля к ячейке
Привязать элемент управления TextBox к ячейке на рабочем листе можно двумя способами.
1. В окне Properties элемента управления TextBox в поле свойства ControlSource необходимо указать адрес ячейки:
2. Присвоить свойству ControlSource адрес ячейки в коде VBA Excel:
Источник
Get the value of a textbox to a cell
I have a textbox called TextBox 1 which contains paragraphs. I defined it with a name ( Insert > Name > Define. ) called profile_reference .
On a cell, I inputted the formula =profile_reference but I’m getting the value TextBox 1 . What I wanted to do is to get the actual value of that textbox. Is that possible?
I’m using a PHP parser to get values from this excel file and it can not get the value for textboxes, it can only get cell values. So I’m trying to copy the value of that textbox to a cell then parse it.

1 Answer 1
You can retrieve the contents of the textbox but this will require more than just the standard Excel user interface.
A textbox is a Shape object, and a member of the Worksheet’s Shapes collection. When you insert a textbox into a worksheet, Excel gives it a name such as «TextBox 1». Therefore, you can refer to the Shape object containing a textbox in VBA as (for example)
Because the Shape object can contain a variety of different things (such as pictures or AutoShapes) a few more objects, properties and methods are involved in retrieving the text. The full phrase required is
which delivers the contents of the textbox as a String.
However, this requires you to use the name of the textbox specified by Excel (i.e. «TextBox 1»). You have added a a name called «profile_reference» which refers to TextBox 1, so how do you get the contents of the textbox using your name rather than the one created by Excel?
A name is a Name object which is part of the Workbook’s Names collection. So you can refer to your specific Name object as (for example)
and the «refers to» part of the object (the bit you specify using the user interface) is
The Value property of a Name object is a character string in the syntax of Excel’s formulae so in your case this string is
i.e. the bit inside the single quotes. This is almost but not quite the ‘TextBox 1’ string that you want. Therefore, getting at the contents of the textbox using your name requires a little bit of VBA, such as:
I’ve used a message box to show the contents of the textbox. The contents could equally be assigned to a worksheet cell. You could, if you wanted, wrap this up in a short user-defined function (which perhaps takes your name as its input argument) providing you with a convenient mechanism for placing the contents of the textbox into a worksheet cell.
Источник
Excel VBA get complete textbox value
I am new to VBA. I have a textbox that is being populated by bar code scanner using Excel. There are different values on the form, for example:
I need to check if the code contains ‘F’ and then do a certain action, otherwise do another action. I do this on Textbox_Change() function, which is causing the 608001 code to be triggered first. How can I make it trigger the code with the ‘F’ in it first?
My code looks like this (edited for brevity, so excuse if any syntax errors):
EDIT
I decided to clarify what is happening better. When using the _Change() function, the condition when I reach character 6 is fulfilled first, meaning the the code is seen as 608001 instead of 608001F as should be the case.

5 Answers 5
After clarifying with OP, the problem is this:
- The string is not typed by the user manually, but by a code scanner which «works as a person» typing letter by letter;
- The inserted string might trigger a wrong part of the code without being still finished.
A possible solution coming to my mind is a timer which is waiting for the code scanner to write the code into the box, then running the code. Basically:
Declare a global variable
. to remember if the countdown has started yet or not.
Write your code into another macro
. add the standard code to a macro which is not related to a Change event:
Activate the macro after 3 seconds
. when the code scanner will start writing into the textbox, you «activate a countdown» (basically, you schedule your personal macro to start in 3 seconds). So, before the 3 seconds run, the code scanner will have finished to write the code and you don’t fall into the same mistake.
Of course, the 3 seconds are a mock value; your code scanner might be much faster in writing the value into the box (in that case, decrease to 1 second for example) or slower (in that case, increase to 5 seconds for example).
Final (should work) code

Is it so that the string below is all in the same, single textbox?
If so, use the SPLIT() function, passing in vbcrlf in order to get an array of each barcode, each line of text & loop through them.
If you’re meaning the textbox only holds one of those codes at a time and 608001 replaces 608001F, then use a private variable in order to store the previous textbox value.
You can use the InStr() function to find if a character exists in the string, the function returns 0 if the character doesn’t exist. Then simply check if the return value is greater than 0.
This simple example should give you a clue.

If I understood your problem, it seems you don’t want the Change event to be triggered until you don’t give some sort of confirmation to say «I finished inserting the value».
In that case, what I might suggest is to write the code using a » » separator (i.e. until you don’t press SpaceBar to confirm the successful insertion, nothing happens). In order to reach this, all you need is adding two new lines of code (see edit below):
Like that, your code will work like this:
1) You write 608001 .
Before: The Len() = 6 condition was triggered so you didn’t have the time to eventually type the F in;
Now: waiting for user confirmation
2) You write 608001F .
Before: The Len() = 7 would have been triggered, but you didn’t have the time to type the last char F ;
Now: waiting for user confirmation
3) Press SpaceBar —> the code starts running and you will not confuse the 6 char string with the 7 char string any longer. Please note that pressing the SpaceBar means «I’m submitting my barcode». Which means, you can replace the SpaceBar character with any other of the Chr() collection ( Enter , a number, a letter etc.).
Источник
Excel fetch the cell value from textbox
I would like to link my excel cell with textbox. I want the textbox content to be displayed in the excel cell. I am going to link more than 1 cell to the textbox.
My situation initially looks like shown in the image below: 
I tried simply in Excel, by writing: =»TextBox 9″, but it didn’t work.
I’ve read that it might be possible without using VBA code:
but after the right-click, i have no «Properties» options here.
On the other hand, the alternative sources say, that there is no option to do it straight away in Excel.
There are some VBA solutions available:
but they didn’t work in my case
I found the closest solution here:
but unfortunately, it applies to all the textboxes available in the workbook, which I don’t want.
I tried to specify only one textbox, which I need:
But unfortunately, I am getting an error: Type mismatch
for the line, where I defined the proper textbox
How can I get the data from textbox to my cell concerned?
1 Answer 1
I think some confusion has occurred between the type of text box. There are three main types in excel:
- Form text boxes
- ActiveX text boxes
- Text box shapes
I suspect you are using the latter, but have been looking up code to work, which would work with the the first. It probably also explains why you don’t get the properties for it.
In VBA the TextBox object only works with the ActiveX text boxes. In your case when you declare xTxtBox As TextBox, you then try to set that variable to the textbox shape, which is why you get the type mismatch error.
A way round this would be to set it to a shape instead:
You can then replace everything in you for each loop with just the one line (unless you do want to delete the shape once you’re done? I’m a bit confused with you intentions there):
Notice the extra properties TextFrame2.TextRange. Because its a shape, you have to dig into the conntaining object to find those properties.
Or for simplicity, if you just want to set the cellvalue to what is in the text box, you can skip the declaration of the variable, and assigning it to a shape and do it in one line:
Источник
VBA TextBox


Excel VBA TextBox
A TextBox is simply a box used to get input from a user. Text boxes are a part of UserForms. For example, in the Developer tab in any Excel worksheet, if we want to make text boxes in a UserForm, we can select the textbox option from user form controls in VBA, or in the worksheet, we can select it from the Design tab.
VBA TextBox is one of the many controls of the UserForm. By displaying the text box on the UserForm, we can ask them to enter the data into the text box. Furthermore, it can store the data entered by the user on the worksheet with simple codes.
Userforms are very attractive in VBA coding VBA Coding VBA code refers to a set of instructions written by the user in the Visual Basic Applications programming language on a Visual Basic Editor (VBE) to perform a specific task. read more . It helps us immensely, especially when we need input from the users. With UserForms, we have many controls. For example, to get the input value from the users, “Text Box” is the ideal option in a UserForm. By putting a text box on the UserForm, we can tell the user to enter the required value in the text box we display. If you have no idea about VBA text boxes, this article will take a tour of VBA text boxes.
Table of contents
You are free to use this image on your website, templates, etc., Please provide us with an attribution link How to Provide Attribution? Article Link to be Hyperlinked
For eg:
Source: VBA TextBox (wallstreetmojo.com)
How to Insert TextBox in VBA UserForm?
To insert a text box first, we need to insert a UserForm. To insert the UserForm, go to Insert > UserForm.

As soon as you click on UserForm, we will use UserForm just like another module.

Click on UserForm to see the controls of the UserForm.

From this “Controls” toolbox, select “TextBox” and drag on the UserForm.
With this, we can see many properties associated with this text box.
TextBox Properties
Press the F4 key to see the properties of the TextBox.

As we can see, the text box has a name, color, and border like this many. Now, give a proper name to refer to this text box while coding easily.
Example of using TextBox in Userform
Step 1: On the UserForm, draw the label.
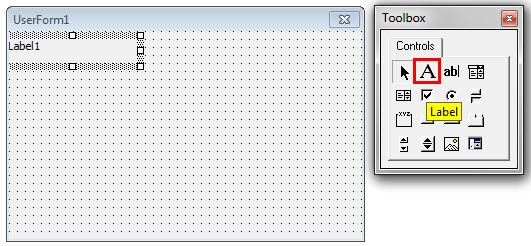
Step 2: Change the default text of the label to “Employee Name.”

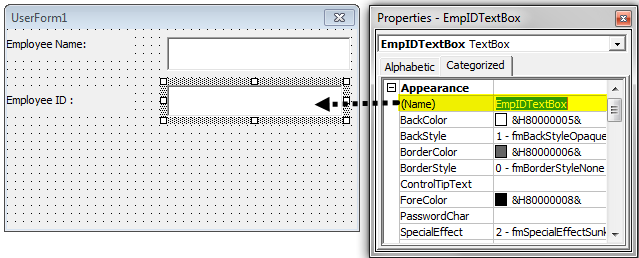
Step 3: In front of the label, draw a text box.

Step 4: Give a proper name to the text box as “EmpNameTextBox.”

Step 5: Draw one more label below the first label and enter the text as “Employee ID.”

Step 6: In front of the second label, draw one more text box and name it “EmpIDTextBox.”
Step 7: Draw one more label and enter the text as “Salary.”

Step 8: Draw one more text box in front of the “Salary” label and name it “SalaryTextBox.”
Step 9: Insert the “Command Button” from the ToolBox.

Step 10: Change the text of the command button to “Submit.”

We have completed the UserForm design part. Next, we need to write the code to store the data entered in this UserForm. As of now, run the UserForm by pressing the F5 key. We should see a UserForm like this.

Step 11: Change the caption of the UserForm in the “Properties” window.

Step 12: Now, double-click on the “Submit” command button. As soon as you double-click, you will see this auto-sub procedure like the one below.

What should happen when you click on the “Submit” button? First, we need to mention the tasks in the VBA code. In this project, we aim to store the data entered in the text box as soon as we click the “Submit” button.
For this, first, create a template like this in the worksheet named “Employees Sheet.”

Code:

Step 14: First, we will store “Employee Name” in the first column. So for this, we need to access the text box named “EmpNameTextBox.”
Code:

Step 15: We need to store the “Employee ID” in the second column. So, we may obtain this by accessing the text box “EmpIDTextBox.”
Code:

Step 16: At last, we need to store the salary part. For this, we need to access a text box named “SalaryTextBox.”
Code:
We have completed the coding part as well. Now, run the code using the F5 key. We should see a UserForm like the one below.

As of now, all the boxes are empty.
Fill in the details first.
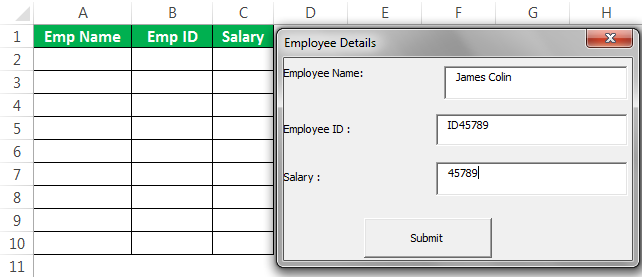
Now, click on the “Submit” button. It will store the data on the worksheet.

Like this, you can keep entering the data and press the “Submit” button. It is a simple data entry UserForm with a text box.
Recommended Articles
This article has been a guide to VBA TextBox. Here, we learn how to insert and use textbox control in UserForm through Excel VBA, practical examples, and a downloadable template. Below you can find some useful Excel VBA articles: –
Источник
Excel VBA TextBox
A TextBox is simply a box used to get input from a user. Text boxes are a part of UserForms. For example, in the Developer tab in any Excel worksheet, if we want to make text boxes in a UserForm, we can select the textbox option from user form controls in VBA, or in the worksheet, we can select it from the Design tab.
VBA TextBox is one of the many controls of the UserForm. By displaying the text box on the UserForm, we can ask them to enter the data into the text box. Furthermore, it can store the data entered by the user on the worksheet with simple codes.
Userforms are very attractive in VBA codingVBA code refers to a set of instructions written by the user in the Visual Basic Applications programming language on a Visual Basic Editor (VBE) to perform a specific task.read more. It helps us immensely, especially when we need input from the users. With UserForms, we have many controls. For example, to get the input value from the users, “Text Box” is the ideal option in a UserForm. By putting a text box on the UserForm, we can tell the user to enter the required value in the text box we display. If you have no idea about VBA text boxes, this article will take a tour of VBA text boxes.
Table of contents
- Excel VBA TextBox
- How to Insert TextBox in VBA UserForm?
- TextBox Properties
- Example of using TextBox in Userform
- Recommended Articles
- How to Insert TextBox in VBA UserForm?
You are free to use this image on your website, templates, etc, Please provide us with an attribution linkArticle Link to be Hyperlinked
For eg:
Source: VBA TextBox (wallstreetmojo.com)
How to Insert TextBox in VBA UserForm?
You can download this VBA Text Box Template here – VBA Text Box Template
To insert a text box first, we need to insert a UserForm. To insert the UserForm, go to Insert > UserForm.
As soon as you click on UserForm, we will use UserForm just like another module.
Click on UserForm to see the controls of the UserForm.
From this “Controls” toolbox, select “TextBox” and drag on the UserForm.
With this, we can see many properties associated with this text box.
TextBox Properties
Press the F4 key to see the properties of the TextBox.
As we can see, the text box has a name, color, and border like this many. Now, give a proper name to refer to this text box while coding easily.
Example of using TextBox in Userform
We will conduct one of the projects with VBA textText is a worksheet function in excel but it can also be used in VBA while using the range property. It is similar to the worksheet function and it takes the same number of arguments. These arguments are the values which needs to be converted.read more. We will create a data entry user formThe form in Excel simplifies data entry by allowing us to view, add, edit, and delete one record in a horizontal orientation. It is a hidden feature that isn’t accessible through the ribbon tools. This functionality must be added using the quick access toolbar option under the File tab.read more to store the details of the employees.
Step 1: On the UserForm, draw the label.
Step 2: Change the default text of the label to “Employee Name.”
Step 3: In front of the label, draw a text box.
Step 4: Give a proper name to the text box as “EmpNameTextBox.”
Step 5: Draw one more label below the first label and enter the text as “Employee ID.”
Step 6: In front of the second label, draw one more text box and name it “EmpIDTextBox.”
Step 7: Draw one more label and enter the text as “Salary.”
Step 8: Draw one more text box in front of the “Salary” label and name it “SalaryTextBox.”
Step 9: Insert the “Command Button” from the ToolBox.
Step 10: Change the text of the command button to “Submit.”
We have completed the UserForm design part. Next, we need to write the code to store the data entered in this UserForm. As of now, run the UserForm by pressing the F5 key. We should see a UserForm like this.
Step 11: Change the caption of the UserForm in the “Properties” window.
Step 12: Now, double-click on the “Submit” command button. As soon as you double-click, you will see this auto-sub procedure like the one below.
What should happen when you click on the “Submit” button? First, we need to mention the tasks in the VBA code. In this project, we aim to store the data entered in the text box as soon as we click the “Submit” button.
For this, first, create a template like this in the worksheet named “Employees Sheet.”
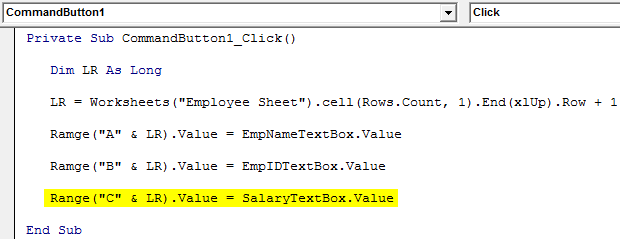
Step 13: Now, come back to the Visual Basic Editor. Inside the button, click subroutine in VBASUB in VBA is a procedure which contains all the code which automatically gives the statement of end sub and the middle portion is used for coding. Sub statement can be both public and private and the name of the subprocedure is mandatory in VBA.read more first to determine the last used row by using the below code.
Code:
Private Sub CommandButton1_Click()

   Dim LR As Long

   LR = Worksheets("Employee Sheet").cell(Rows.Count, 1).End(xlUp).Row + 1

End Sub
Step 14: First, we will store “Employee Name” in the first column. So for this, we need to access the text box named “EmpNameTextBox.”
Code:
Private Sub CommandButton1_Click()

   Dim LR As Long

   LR = Worksheets("Employee Sheet").cell(Rows.Count, 1).End(xlUp).Row + 1

   Ramge("A" & LR).Value = EmpNameTextBox.Value

End Sub
Step 15: We need to store the “Employee ID” in the second column. So, we may obtain this by accessing the text box “EmpIDTextBox.”
Code:
Private Sub CommandButton1_Click()

   Dim LR As Long

   LR = Worksheets("Employee Sheet").cell(Rows.Count, 1).End(xlUp).Row + 1

   Ramge("A" & LR).Value = EmpNameTextBox.Value

   Ramge("B" & LR).Value = EmpIDTextBox.Value

End Sub
Step 16: At last, we need to store the salary part. For this, we need to access a text box named “SalaryTextBox.”
Code:
Private Sub CommandButton1_Click()

   Dim LR As Long

   LR = Worksheets("Employee Sheet").cell(Rows.Count, 1).End(xlUp).Row + 1

   Ramge("A" & LR).Value = EmpNameTextBox.Value

   Ramge("B" & LR).Value = EmpIDTextBox.Value

   Range("C" & LR).Value = SalaryTextBox.Value

End Sub
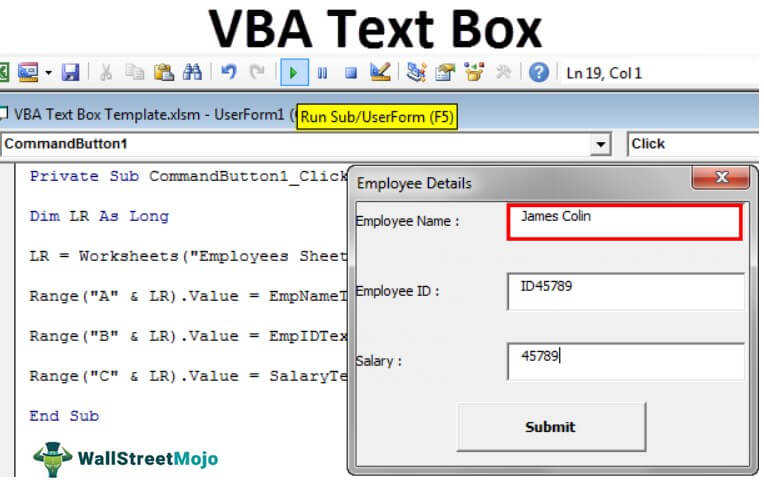
We have completed the coding part as well. Now, run the code using the F5 key. We should see a UserForm like the one below.
As of now, all the boxes are empty.
Fill in the details first.
Now, click on the “Submit” button. It will store the data on the worksheet.
Like this, you can keep entering the data and press the “Submit” button. It is a simple data entry UserForm with a text box.
Recommended Articles
This article has been a guide to VBA TextBox. Here, we learn how to insert and use textbox control in UserForm through Excel VBA, practical examples, and a downloadable template. Below you can find some useful Excel VBA articles: –
- VBA Close UserForm
- Excel VBA ArrayList
- Insert Row using VBA
- Using Not Equal in VBA
“I want to think that there is someone with sound judgement at the controls” – Martin Feldstein
The Webinar
If you are a member of the website, click on the image below to view the webinar for this post.
(Note: Website members have access to the full webinar archive.)

Introduction
In the first post on UserForms we looked at the general use of the UserForm.
In this post we are going to look at the individual VBA controls and how to use them. We will cover the most commonly used VBA controls. These are the Checkbox, ComboBox, CommandButton, Label, ListBox and TextBox. For each control, I will cover their most common uses and provide plenty of code examples you can use in your own projects.
The UserForm Controls
We add controls to the UserForms to allow the user to make selections, enter text or click a button. To add a control to a UserForm we do the following
- Go to the Toolbox dialog – if not visible select View->Toolbox.
- Click on the control icon you want to add – the icon will appear selected(pressed in) until you click another one.
- Put the cursor over the UserForm.
- Hold down the left mouse button and drag until the control is the size you want.
- To select or move a control click on the Select Objects icon(very left one) on the toolbox and this will put you in select mode.
The following table shows a list of the common controls
| Control | Description |
|---|---|
| CheckBox | Turn item on/off |
| ComboBox | Allows selection from a list of items |
| CommandButton | Click to perform action |
| Label | Displays text |
| ListBox | Allows selection from a list of items |
| Textbox | Allows text entry |
Properties of the Controls
The screenshot below shows the three important Windows when adding controls to a UserForm. These are
- The Properties Window.
- The Toolbox Dialog.
- The UserForm design Window.

UserForm Windows
If you click on any control or the UserForm itself you will see the properties of the selected item displayed in the Properties window. You can change the name, caption etc. in this Window.
To change the name of the UserForm do the following
- Click on the UserForm in the Project window or click on the UserForm itself.
- Click in the (Name) field of the Properties window.
- Enter the new name in this field.
Adding the Code
You can view the code of the UserForm in the following ways
- Double click on the UserForm.
- Right click on the UserForm itself and select View Code.
- Right click on the UserForm in the Project windows and select View Code.
Common control functions
The following table shows the most commonly used functions that are available to all controls.
| Function | Operation | Example |
|---|---|---|
| Enabled | Enable/Disable control | combobox.Enabled = True textbox.Enabled = False |
| SetFocus | Sets the focus to the control (cannot use with the Label) |
combobox.SetFocus |
| Visible | Show/Hide control | combobox.Visible = True textbox.Visible = False |
' https://excelmacromastery.com/
Private Sub checkboxAddNotes_Click()

    ' Enable texbox when checkbox set to true
    If checkboxAddNotes.Value = True Then
        textboxNotes.Enabled = True
        textboxNotes.SetFocus
    Else
        textboxNotes.Enabled = False
    End If

End Sub
The CheckBox
The CheckBox Cheat Sheet
| Function | Operation | Example |
|---|---|---|
| Caption | Get/Set the text | checkbox.Caption = «Apple» |
| Value | Get the checked state | If checkbox.Value = True Then |
| Value | Set the checked state | checkbox.Value = False |
The CheckBox is a simple control that allows the user set something to on or off. You will often see them used on web pages where you are asked to accept terms and conditions.

Turning the CheckBox on or off
We can turn the CheckBox on or off by setting it to true or false
' Set the check on
CheckBoxTerms.Value = True

' Set the check off
CheckBoxTerms.Value = False
Checkbox Event with example
If we want to create an action when the user clicks on the checkbox then we create a checkbox event. This is simply a sub that runs when the checkbox is clicked.
To create this event simply click on the checkbox in design mode and you will get the following
Private Sub CheckBoxTerms_Click()

End Sub
The following code shows an example of how we use it
' https://excelmacromastery.com/
Private Sub CheckBoxTerms_Click()

    If checkboxTerms.Value = True Then
       buttonOk.Enabled = True
    Else
       buttonOk.Enabled = False
    End If

End Sub
The Label
The Label Cheat Sheet
| Function | Operation | Example |
|---|---|---|
| Text | GetSet the text | textbox1.Text = «Apple» |
The label is the most simple control. Generally speaking, we don’t refer to it in the code. It is used to label the controls or display a short notice.
Setting the Label Text
You can set the text of the Label in the code using the Caption property
LabelAddress.Caption = "Customer Address"
The TextBox
The TextBox Cheat Sheet
| Function | Operation | Example |
|---|---|---|
| Text | Set the text | textbox1.Text = «Apple» |
| Text | Get the text | sFruit = textbox1.Text |
| Value | Set the text | textbox1.Value = «Apple» |
| Value | Get the text | sFruit = textbox1.Value |
Setting the Textbox Text
The textbox is used to allows the user to enter text. We can read or write from a text box as follows
TextBoxNotes.Value = "It was the best of times."

sNotes = TextBoxNotes.Value
The textbox has properties Text and Values. These are the same thing.
From MSDN: For a TextBox, any value you assign to the Text property is also assigned to the Value property.
The problem with the text box is that the user can enter anything. If the user is entering basic text then this is fine. If the text is to be used for a calculation or for looking up something then we need to validate it.
For example, if the user is going to pick a year between 2010 and 2019 we should use a ComboBox/Listbox that only contains valid years. Then we don’t need to validate the format and range of the user’s entry.
Making a TextBox numeric only
The following code prevents the user entering anything other than a number in the textbox
' https://excelmacromastery.com/
Private Sub textboxComments_KeyPress( _
            ByVal KeyAscii As MSForms.ReturnInteger)

    Select Case KeyAscii
        Case Is < vbKey0, Is > vbKey9
            KeyAscii = 0
            Beep
    End Select

End Sub
Using a Date Control
If you the user to select a date you can use the MonthView control. It is one of the additional controls that comes with Visual Basic. It works quite well and looks like the standard date picker you see in most applications.
To add the MonthView control:
- Go the the Visual Basic editor and make sure the Toolbox is visible(View->Toolbox if it’s not visible).
- Select Tools and then Additional Controls from the menu.
- Place a check on Microsoft MonthView Control, Version 6.0.
- The MonthView control will now appear on the Toolbox.
To get the user selection from the MonthView control you can use the DateClick event as the following code shows
' https://excelmacromastery.com/
Private Sub MonthView1_DateClick( _
     ByVal DateClicked As Date)

    ' Store date in textbox
    TextBox1.Value = MonthView1.Value

End Sub
For more information on the MonthView see these links:
Issues adding the MonthView – see top answer on this StackOverflow page
MSDN – Using the MonthView Control
The ComboBox
The ComboBox Cheat Sheet
| Function | Operation | Example |
|---|---|---|
| AddItem | Add an item | listbox.AddItem «Spain» |
| Clear | Remove all Items | combo.Clear |
| List | Add a range of items | combo.List = Range(«A1»).Value |
| ListCount | Get the number of items | cnt = combo.ListCount |
| ListIndex | Get/set selected item | Idx = combo.ListIndex combo.ListIndex = 0 |
| ListRows | Get/set number of items displayed | NoItems = combo.ListRows combo.ListRows = 12 |
| RemoveItem | Remove an item | combo.RemoveItem 1 |
| Value | Get the value of selected Item | Dim sCountry As String sCountry = combo.Value |
The ComboBox is used to allow the user to select an item from a list. It is very similar to the listbox. The main difference is the listbox allows multiple selections.
In most cases we want to do four things with the ComboBoxListBox
- Fill it with data when the Form is loaded
- Preselect an item.
- Retrieve the currently selected item(s).
- Perfom an action when the user selects a different item.
Filling the Combobox with data
We can fill the combobox one item at at a time using the AddItem property.
comboBoxFruit.AddItem "Apple"
comboBoxFruit.AddItem "Pear"
You would normally use AddItem in a loop where you are checking each item before adding it
Dim cell As Range
' Fill items with first letter is A
For Each cell In Sheet1.Range("A1:A50")
    If Left(cell.Value, 1) = "A" Then
        comboBoxFruit.AddItem cell.Value
    End If
Next
Filling the ComboBox from a range
If you want to fill the ComboBox from an entire range you can do it in one line of code
comboBoxFruit.List = Sheet1.Range("A1:A5").Value
Normally when you fill a ComboBox you want to clear the existing contents first
' Clear any existing item
comboBoxFruit.Clear
' Fill the ComboBox
comboBoxFruit.List = Sheet1.Range("A1:A5").Value
Filling the ComboBox – No duplicates
If our range has multiple entries then we want to avoid adding the same item multiple times. We can do this using a Dictionary
' https://excelmacromastery.com/
Sub TestDuplicates()

    ' clear existing values
    comboBoxFruit.Clear

    ' Fill given ComboBox from given range ignoring duplicates
    FillComboNoDuplicates comboBoxFruit, Sheet1.Range("A1:A10")

End Sub

Sub FillComboNoDuplicates(cbo As ComboBox, rg As Range)

    ' Create dictionary
    Dim dict As Object
    Set dict = CreateObject("Scripting.Dictionary")

    Dim cell As Range, sItem As String
    ' Go through each item in range
    For Each cell In rg
        sItem = Trim(cell.Value)
        ' check if item already exists in dictionary
        If dict.Exists(sItem) = False Then
            ' If doesn't exist then add to dictionary and combobox
            dict.Add sItem, 1
            cbo.AddItem sItem
        End If
    Next

    ' Clean up dictonary as we no longer need it
    Set dict = Nothing

End Sub
VBA ComboBox – Full Example 1
The easiest way to show how these work is with an example. Imagine we have a list of countries and their capitals in cells A1:B196.

We want the user to select any country. When they do our UserForm will display the capital of that country. The screenshot below shows and example of this

The first thing we want to do is fill the countries ComboBox when the form loads. We do this using the UserForm_Initialize event which we looked at in the first post on VBA UserForms.
Private Sub UserForm_Initialize()

End Sub
We can use the following code to fill the ComboBox from a range and set the selected item to be the first one. (Note we don’t need to clear the ComboBox here as the Initialize event is only used once – when the UserForm is created.)
' https://excelmacromastery.com/
Private Sub UserForm_Initialize()

    ' Add array to combobox
    ComboBoxCountry.List = Sheet1.Range("A1:A196").Value

    ' Set the first item in combobox
    ComboBoxCountry.ListIndex = 0

End Sub
When the user selects a country we want to display the capital city in the textbox. We use the Change Event of the ComboBox. To create this we simply double-click on the ComboBox and it will be automatically created.
' https://excelmacromastery.com/
Private Sub ComboBoxCountry_Change()

    ' Get the value from the combo box
    Dim sCountry As String
    sCountry = ComboBoxCountry.Value

    ' Get the range
    Dim rg As Range
    Set rg = Sheet1.Range("A1:B196")

    ' Use VLookup to find the capital of the country
    TextBoxCapital.Value = _
        WorksheetFunction.VLookup(sCountry, rg, 2)

End Sub
When the user clicks Ok we write the selected values to the Results worksheet
' https://excelmacromastery.com/
Private Sub buttonOK_Click()

    With shResult

        ' Write the country the was selected
        .Range("A1") = ComboBoxCountry.Value

        ' Write the postion of the selected country
        .Range("A3") = ComboBoxCountry.ListIndex

        ' Write the capital of the country
        .Range("A2") = TextBoxCapital.Value

    End With

    ' Close the form
    Unload Me

End Sub
VBA ComboBox – Full Example 2
A very commmon task to perform is to update a second ComboBox based on the selection of the first.

Imagine we have two ComboBoxes – one contains the name of a country and one has a list of three cities from that country.

When the user selects a country we update the city ComboBox with the cities from that country.
Our data is stored as follows

Anytime the Country ComboBox value is set to a country we update the City ComboBox to contain the three cities from that country. This happens in two places
- When we load the country combo box – the Initialize Event
- When the user selects a country – the Change Event
The code for these is as follows
' https://excelmacromastery.com/
Private Sub UserForm_Initialize()

    ' Add array to combobox
    ComboBoxCountry.List = shCity.Range("A2:A5").Value
    ComboBoxCountry.ListIndex = 0

    ' Fill the city ComboBox
    FillCityCombo ComboBoxCountry.ListIndex

End Sub

Private Sub ComboBoxCountry_Change()
    ' Fill the city ComboBox
    FillCityCombo ComboBoxCountry.ListIndex
End Sub
In both cases we call our FillCityCombo Sub to fill the city ComboBox. It takes one parameter which is the position of the current country selection.
We use the position value to count from the top row of our worksheet range.
' https://excelmacromastery.com/
Sub FillCityCombo(ByVal row As Long)

    ' Get the city range from the given row
    Dim rgCities As Range
    Set rgCities = shCity.Range("B2:D2").Offset(row)

    ' Clear current city list
    ComboBoxCity.Clear

    ' We transpose the range of columns e.g. B2:D2 to rows so
    ' we can add to the ComboBox
    ComboBoxCity.List = _
            WorksheetFunction.Transpose(rgCities)

    ' Set the first city in list
    ComboBoxCity.ListIndex = 0

End Sub
The ListBox
The ListBox is used in almost the same way as the ComboBox. The code in the ComboBox section above will work for the ListBox also.
The ListBox Cheat Sheet
| Function | Operation | Example |
|---|---|---|
| AddItem | Add an item | listbox.AddItem «Spain» |
| Clear | Remove all Items | listbox.Clear |
| ColumnCount | Set the number of visible columns | ComboBox1.ColumnCount = 2 |
| ColumnHeads | Make the column row visible | ComboBox1.ColumnHeads = True |
| List | Range to Listbox ListBox to Range |
Listbox.List = Range(«A1:A4»).Value Range(«A1:A4»).Value = Listbox.List |
| List | Update a column value | Listbox.List(1,2) = «New value» |
| ListCount | Get the number of items | cnt = listbox.ListCount |
| ListIndex | Get/set selected item | Idx = listbox.ListIndex combo.ListIndex = 0 |
| RemoveItem | Remove an item | listbox.Remove 1 |
| RowSource | Add a range of values from a worksheet | ComboBox1.RowSource = Sheet1.Range(«A2:B3»).Address |
| Value | Get the value of selected Item | Dim sCountry As String sCountry = listbox.Value |
We can use the ListBox the same way as we used the ComboBox. The difference is how they are displayed
- The ListBox displays a list of available items to select.
- The ComboBox only displays the selected item. You have to click on the ComboBox to see the other available items.
The other major difference between them is that the ListBox allows multiple selections and the ComboBox doesn’t.

We can get all the selected items in the ListBox by reading through all the items and checking if each one is selected. In the code below we add all the selected items to a Collection.
' USERFROM CODE
' https://excelmacromastery.com/
Private m_CollCountries As Collection

' OK click event
Private Sub buttonOk_Click()
    ' Get the user selections
    Set m_CollCountries = GetSelections
    ' Hide the UserForm
    Hide
End Sub

' Returns the collection of countries
Property Get Countries() As Collection
    Set Countries = m_CollCountries
End Property

' Get the selections from the ListBox
Private Function GetSelections() As Collection

    Dim collCountries As New Collection
    Dim i As Long

    ' Go through each item in the listbox
    For i = 0 To ListBoxCountry.ListCount - 1
        ' Check if item at position i is selected
        If ListBoxCountry.Selected(i) Then
            ' Add item to our collection
            collCountries.Add ListBoxCountry.List(i)
        End If
    Next i

    Set GetSelections = collCountries

End Function
' MAIN PROCEDURE CODE
' https://excelmacromastery.com/
' Sub to display the UserForm
Sub DisplayMultiCountry()

    Dim frm As New UserFormCountryMulti
    frm.Show

    ' Print the collection
    PrintCollection frm.Countries

End Sub

' Sub used to print a collection to the Immediate Window(Ctrl + G)
Public Sub PrintCollection(ByRef coll As Collection)

    Debug.Print "The user selected the following countries:"
    Dim v As Variant
    For Each v In coll
        Debug.Print v
    Next

End Sub
That concludes the two posts on UserForm(see first one here).
I hope you found them of benefit. If you have any questions or queries please feel free to add a comment or email me at Paul@ExcelMacroMastery.com.
What’s Next?
Free VBA Tutorial If you are new to VBA or you want to sharpen your existing VBA skills then why not try out the The Ultimate VBA Tutorial.
Related Training: Get full access to the Excel VBA training webinars and all the tutorials.
(NOTE: Planning to build or manage a VBA Application? Learn how to build 10 Excel VBA applications from scratch.)