
Occasionally text in paragraphs is not aligned correctly or cannot be positioned as you like. This problem could be a line break, also called soft return or text wrapping break.
A paragraph is created by entering text and pressing the Enter key. It can contain only one word or one sentence, or multiple sentences. Each paragraph ends with a paragraph mark that looks like a reverse P (¶).
The line break moves the next word to the beginning of a new line without starting a new paragraph. A line break character looks like a right-angle arrow pointing to the left ![]() .
.
For example:
- Text with two paragraphs where lines end with paragraph breaks:

- Text with two paragraphs where lines end with line breaks:

Note: You can also see a right-angle arrow between two vertical lines ![]() . This symbol shows the line break that separate text around an object, wrapping text such as a caption text or an image from the body text:
. This symbol shows the line break that separate text around an object, wrapping text such as a caption text or an image from the body text:
![]()
A line break character and other structural characters, such as spaces, paragraph marks, and tabs (also known as Whitespace characters in typography, nonprinting characters, or formatting marks) are usually hidden, but you can display them.
To insert a line break, do the following:
1. Position the cursor in front of the word you want to move to a new line.
2. Do one of the following:
- On the Layout tab, in the Page Setup group, click Breaks, and then click Text Wrapping:

- Press Shift+Enter.

Line breaks are used to delimit a specific text or break a line before a word that would otherwise be hyphenated (see more about automatic hyphenation and manual hyphenation).
To remove line breaks, follow the two-step procedure:
I. Replace two consecutive line breaks with one paragraph break:
1. Open the Find and Replace dialog box by doing one of the following:
- On the Home tab, in the Editing group, click the Find list and then choose Advanced Find…:

- Click Ctrl+H.
- On the Home tab, in the Editing group, click the Replace button:


2. In the Find and Replace dialog box, on the Replace tab:

- In the Find what field, type ^l^l (the caret symbol plus the lowercase Ls twice).
- In the Replace with field, type ^p (the code for a paragraph break).
3. Click the Replace All button.
II. Replace line breaks with spaces or remove them:
1. Open the Find and Replace dialog box.
2. In the Find and Replace dialog box, on the Replace tab:
- In the Find what field, type ^l (the caret symbol plus the lowercase Ls).
- In the Replace with field:
- Type a space if you need to place a space instead of each line break.
- Leave empty if you already have a space at the end of each line.
3. Click the Replace All button.
See more about replacing special characters.
Note: Word offers a helpful feature named AutoFormat that can format selected text with a paragraph break at the end of each full line to delete all the paragraph breaks but the last. In some cases, it can determine where the “real” paragraph breaks are and leave them intact. To run AutoFormat, click Alt+Ctrl+K.
Microsoft 365, Microsoft Office, Microsoft Office for Mac, Microsoft Word, Office 2007, Office 2010, Office 2013, Office 2016, Office 2019, Office 2021 / Office LTSC, Office 365 /
24 September 2022
When including images or other objects in a Microsoft Word document, it can sometimes be a bit fiddly getting the text to flow around them in the way you want. The text wrapping break lets you specify the point where the text should drop down below the picture.
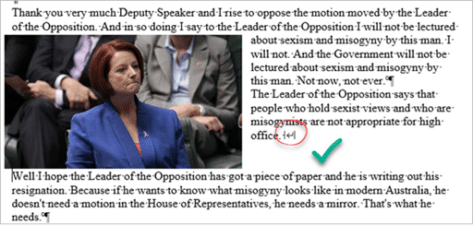
When you have text wrapping around a picture, you may be tempted to just put in extra line breaks or paragraph breaks when you want to shift text down below the picture, as below.

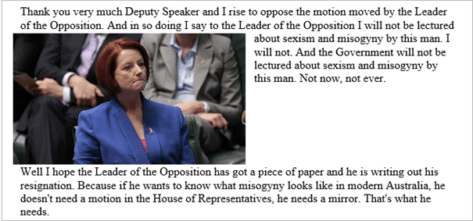
The problem with this method is that if you later make changes such as moving the picture or adding or removing text, the text wrap will no longer be in the place you wanted it. Below I have removed some of the text, and now the “Well I hope…” text is no longer below the image.

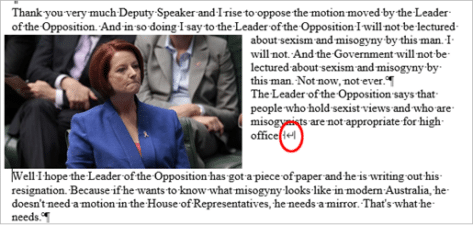
That’s why we have the text wrapping break – to ensure that when we put a break in text around an image, it stays where we want it.
To insert a text wrapping break, put your cursor where you want the text to break, and go to Layout | Page Setup | Breaks, and select Text Wrapping.

Now the text has dropped below the picture without using any superfluous paragraph breaks.
This time if we delete some of the text or make other changes, the paragraph will still drop below the picture at the same point as before.
Removing a Text Wrapping Break
It’s easiest to remove a text wrapping break if you can see it, and to see it you need to turn on Show Hidden Characters under Home | Paragraph.

Now you can see the text wrapping break, just click before the break symbol and hit Delete.
Column Breaks in Word
Section Breaks in Microsoft Word
Text formatting in Excel with wrapping, line breaks and merging
Add a Manual Page Break in Word
Microsoft Word belongs to Microsoft 365 and significantly simplifies the workday for those that work with text-based documents on a regular basis. One of the reasons for its popularity is its variety of options for formatting text. One thing that’s especially practical is the fact that Word automatically takes care of many of these formatting challenges. Among these is the insertion of an automatic link break in Word when a word goes beyond a provided line length.
In many cases it can make sense to insert a line break manually to improve the document’s overall structure. We’ll explain the differences between a soft and a hard line break (also called a return) and how you can apply both types of line breaks to structure your document. Do you work with Microsoft Word regularly? Our guide provides many more helpful articles on topics like Word macros and instructions on how to combine Word documents.
Contents
- What is a line break?
- How do you insert a line break in Word?
- Example: manual line break in Word with bullet points
- Example: manual line break in Word with justified paragraphs
- Making line breaks visible in Word
What is a line break?
The text editing program Microsoft Word offers lots of options when it comes to formatting text: such as defining the font size, line spacing, and text alignment. In addition, there are so-called spacing settings, such as the space before and after a paragraph. To start a new line within a paragraph, you can insert a line break in Word. This lets you jump to the next line, without having to change the set paragraph formatting or starting a new bullet point.
How do you insert a line break in Word?
By pressing the Enter key, you can achieve a hard return and start a new paragraph in Microsoft Word. This is probably the most used break. One that’s less common, though, is the manual line break in Word, which can be achieved by pressing down the right key combination. Using the Enter + Shift keys generates a so-called soft return. In doing so, you move to the next line while maintaining the defined formatting.

Tip
The key combination also works in other common text editing programs, as well as on different internet sites that have text and format fields.
Example: manual line break in Word with bullet points
Bullet points are a popular means of clearly structuring long sections of text and summarizing related information into a single point. However, a clear structure is also recommended within a bullet point, especially if a point covers several lines. With a manual line break in Word, a section can be clearly structured with breaks and blank lines. In this example, those places where manual line breaks are inserted are marked. Only in the case of a hard return or a new paragraph is a new bullet point inserted.

Example: manual line break in Word with justified paragraphs

If you are justifying text in Word, then you’re probably very familiar with the following problem: when you insert a manual line break at the end of a paragraph, Word stretches the last sentence over the entire width of the page. Due to the wide spacing, the text looks “patchy” and is difficult to read.
Luckily, this problem can be easily avoided. At the end of the sentence, press the Tab key and then then insert the manual line break in Word by using the key combination [Enter] + [Shift]. This will avoid Word from stretching out the sentence.
Making line breaks visible in Word
Formatting options such as font size or font color are obvious in a document. In contrast, it’s not immediately apparent whether a hard or soft return has been inserted in Word. For this purpose, the word processing program offers a practical function to highlight this kind of “invisible” formatting. To do this, activate the formatting characters.
Select the “Start” tab from the main menu and click the “¶” symbol in the “Paragraph” section. Alternatively, the function can also be activated or deactivated with the key combination [CTRL] + [Shift] + [+]. Up to version 2003 in Word, the feature to activate paragraph formatting characters is located on the standard toolbar. After clicking on it, Word marks all inserted line breaks as follows:
- The ¶ symbol marks all hard returns or paragraphs.
- A corner arrow marks a soft return in Word.
It’s not necessary to deactivate this function before printing a document since the formatting characters – as displayed on the print preview – are not printed on the final document.

Besides Microsoft Word there are also other programs like PowerPoint and Excel that are a part of Microsoft 365. Our Digital Guide is packed full of articles on topics like line breaks in PowerPoint and wrapping text in Excel.
Tip
With Microsoft 365 you’ll have access to the entire suite of Office programs, including Microsoft Word, PowerPoint, Excel und Outlook.

Wrapping text in Excel: How to display the contents of your Excel cells on multiple lines
Excel cells often contain only a few numerical values or short text. But when you’re dealing with lengthy contents, the Microsoft application often hides a portion of the information. You can prevent this by wrapping text, which Excel allows you to do in two different ways. In this article, you’ll learn everything you need to know about this feature.
Wrapping text in Excel: How to display the contents of your Excel cells on multiple lines

How to change line spacing in Word easily
The default settings for Microsoft Word line spacing are not always enough. Fortunately, the software offers several options for customizing your documents. Unfortunately, these options are often hard to find. For example, if you want to change the line spacing in Word, you might have to search for this. We’ll help you find this feature so you can learn how to double-space in Word and more.
How to change line spacing in Word easily

Word table: Creating a table in Microsoft Word
In Word, tables prove useful in the most diverse situations, and you have several options for creating them. You can either use the table templates provided by the Microsoft tool, or you can design your own. This enables you to improve your reports, invoices or the performance of household tasks. Even data from Excel can be integrated as a table into a Word file.
Word table: Creating a table in Microsoft Word
How to turn spell check on and off in Word
In this guide, you’ll learn how to turn spell check on and off in Word. If you want to check your spelling in Word, you can set the application to automatically display misspelled words and grammatical errors. Word can also suggest corrections, which you can accept or ignore. You can show or hide these highlighted errors at any time.
How to turn spell check on and off in Word
Word for Microsoft 365 Outlook for Microsoft 365 Word 2021 Outlook 2021 Word 2019 Outlook 2019 Word 2016 Outlook 2016 Word 2013 Outlook 2013 Word 2010 Outlook 2010 Word Starter 2010 More…Less
You can control where Word and Outlook position automatic page breaks by setting pagination options.
Keep lines of a paragraph together on a page or in a column
-
Select the paragraphs that contain lines you want to keep together.
-
On the Home tab in Word, or on the FORMAT TEXT tab in an Outlook email, select the Paragraph Dialog Box launcher
 .
. -
Select the Line and Page Breaks tab.
-
Under Pagination, select Keep lines together.
-
Select OK.
 .
.Keep paragraphs together on a page or in a column
-
Select the paragraphs you want to keep together on a page.
-
On the Home tab in Word, or on the FORMAT TEXT tab in an Outlook email, select the Paragraph Dialog Box launcher
. -
Select the Line and Page Breaks tab.
-
Under Pagination, select Keep with next.
-
Select OK.
Always force a page break before a paragraph
-
Select the paragraph that you want to follow the page break.
-
On the Home tab in Word, or on the FORMAT TEXT tab in an Outlook email, select the Paragraph Dialog Box launcher
. -
Select the Line and Page Breaks tab.
-
Under Pagination, select Page break before.
-
Select OK.
Control widow and orphan lines
-
Select the paragraphs in which you want to control widows and orphans.
-
On the Home tab in Word, or on the FORMAT TEXT tab in an Outlook email, select the Paragraph Dialog Box launcher
. -
Select the Line and Page Breaks tab.
-
Under Pagination, select Widow/Orphan control.
-
Select OK.
Note: This option is turned on by default.
Suppress line numbers from a paragraph or paragraphs
-
Select the paragraph or paragraphs.
-
On the Home tab in Word, or on the FORMAT TEXT tab in an Outlook email, select the Paragraph Dialog Box launcher
. -
Select the Line and Page Breaks tab.
-
Under Formatting, select Suppress line numbers.
-
Select OK.
Remove hyphens from a paragraph or paragraphs
-
Select the paragraph or paragraphs.
-
On the Home tab in Word, or on the FORMAT TEXT tab in an Outlook email, select the Paragraph Dialog Box launcher
. -
Select the Line and Page Breaks tab.
-
Under Formatting, select Don’t hyphenate.
-
Select OK.
Text box options
You can use the text box options to more tightly wrap the text that surrounds the text box. To use these options, the text box border must be transparent (no line and no fill), and the Wrap Text must be set at Tight or Through.
-
Inside the text box, right-click, and then select Paragraph.
-
Select the Line and Page Breaks tab.
-
Under Textbox options, in the Tight wrap list, select one of the following:
-
All
-
First and Last Lines
-
First Line Only
-
Last Line Only
Note: To undo changes, select None.
-
-
Select OK.
Need more help?
![]()
Download Article
![]()
Download Article
Line breaks end a current line and lets you continue the text on another line. These are useful for separating paragraphs from each other, without the space registering as an empty line that can have characters on it. Manually putting in line breaks is useful for address blocks as well as poems because they omit the extra space between lines. To learn how to add a line break in MS Word, begin with step 1.
Steps
-
1
Find a Word document. Using your computer’s file browser, find a document with the extension .doc or .docx.
-
2
Open the document. Once you’ve found it, double-click the file and it will open in Microsoft Word.
Advertisement
-
3
Locate and click on the area where you want to insert a line break. Scroll through the document until you locate where you want to insert a line break, and click the area. This will place the cursor in that area.
-
4
Insert the line break. Hit the key combination Shift + Enter to create a line break. You will now be able to add content in the line right after the break.
- Notice that the cursor will not situate itself in the blank space where the break is when you click on the space. This is the line break.


Advertisement
Add New Question
-
Question
What is the difference between a line break and a paragraph break

The line break, which is done by hitting shift and enter, is a smaller break to just hop in a new line. A paragraph break, however, makes a bigger space and looks more like a new section.
Ask a Question
200 characters left
Include your email address to get a message when this question is answered.
Submit
Advertisement
Video
-
An alternative way of opening a Word file is to launch MS Word first. Once open, click “File” at the top-left of the screen then “Open.” Search for the document you want to open in the file browser that popped up. Once you’ve found it, select the file then click “Open” at the bottom right of the window.
Thanks for submitting a tip for review!
Advertisement
About This Article
Thanks to all authors for creating a page that has been read 218,061 times.
Is this article up to date?
Lesson 14: Breaks
/en/word2016/printing-documents/content/
Introduction
When you’re working on a multi-page document, there may be times when you want to have more control over how exactly the text flows. Breaks can be helpful in these cases. There are many types of breaks to choose from depending on what you need, including page breaks, section breaks, and column breaks.
Optional: Download our practice document.
Watch the video below to learn more about using breaks in Word.
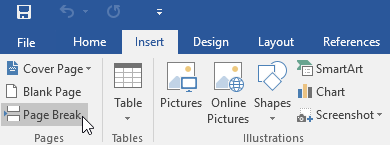
To insert a page break:
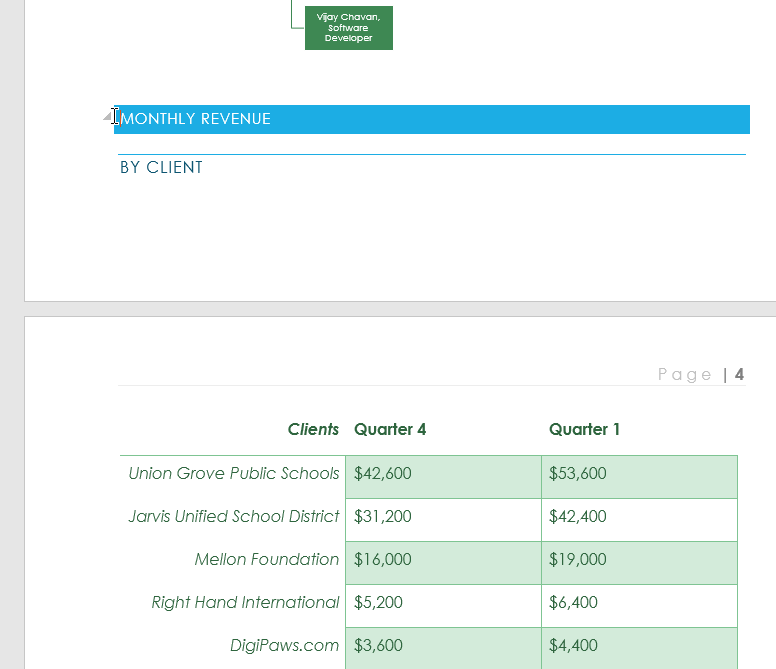
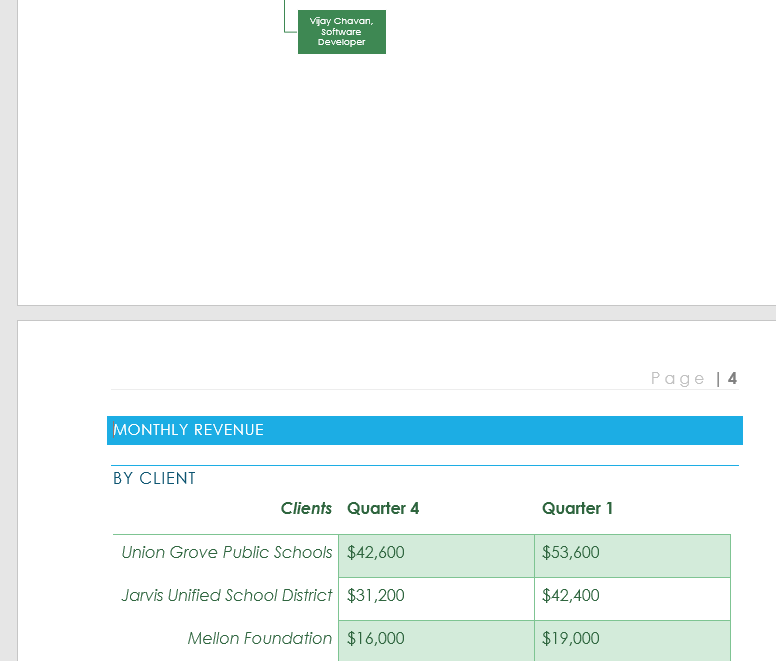
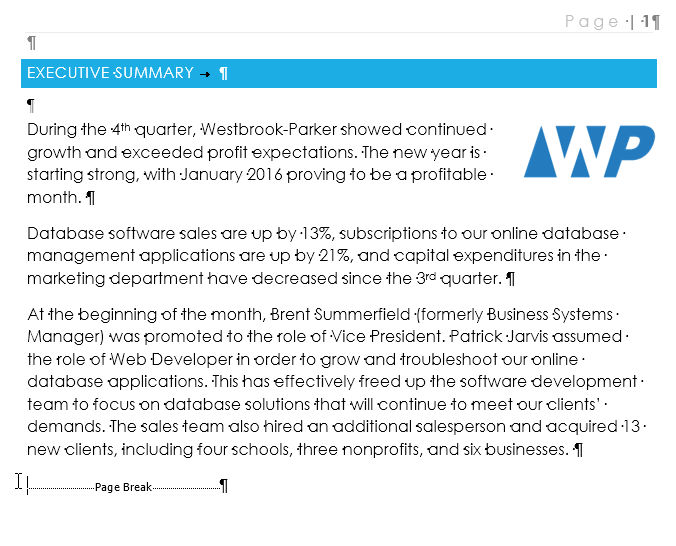
In our example, the section headers on page three (Monthly Revenue and By Client) are separated from the table on the page below. And while we could just press Enter until that text reaches the top of page four, it could easily be shifted around if we added or deleted something in another part of the document. Instead, we’ll insert a page break.
- Place the insertion point where you want to create the page break. In our example, we’ll place it at the beginning of our headings.
- On the Insert tab, click the Page Break command. Alternatively, you can press Ctrl+Enter on your keyboard.
- The page break will be inserted into the document, and the text will move to the next page.
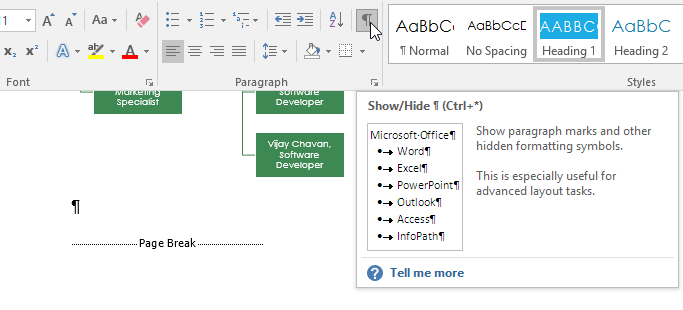
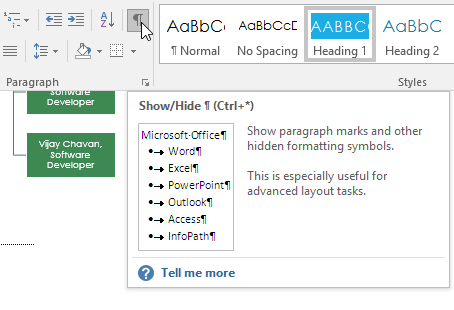
By default, breaks are invisible. If you want to see the breaks in your document, click the Show/Hide command on the Home tab.
Section breaks
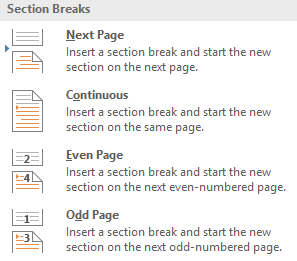
Section breaks create a barrier between different parts of a document, allowing you to format each section independently. For example, you may want one section to have two columns without adding columns to the entire document. Word offers several types of section breaks.
- Next Page: This option inserts a section break and moves text after the break to the next page of the document.
- Continuous: This option inserts a section break and allows you to continue working on the same page.
- Even Page and Odd Page: These options add a section break and move the text after the break to the next even or odd page. These options may be useful when you need to begin a new section on an even or odd page (for example, a new chapter of a book).
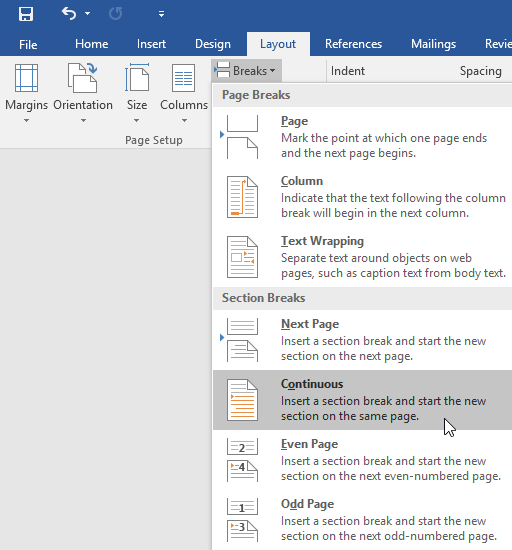
To insert a section break:
In our example, we’ll add a section break to separate a paragraph from a two-column list.
- Place the insertion point where you want to create the break. In our example, we’ll place it at the beginning of the paragraph we want to separate from two-column formatting.
- On the Page Layout tab, click the Breaks command, then select the desired section break from the drop-down menu. In our example, we’ll select Continuous so our paragraph remains on the same page as the columns.
- A section break will appear in the document.
- The text before and after the section break can now be formatted separately. In our example, we’ll apply one-column formatting to the paragraph.
- The formatting will be applied to the current section of the document. In our example, the text above the section break uses two-column formatting, while the paragraph below the break uses one-column formatting.


Other types of breaks
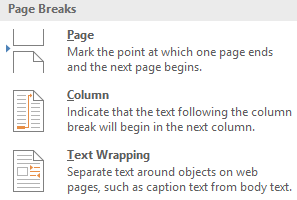
When you want to format the appearance of columns or modify text wrapping around an image, Word offers additional break options that can help:
- Column: When creating multiple columns, you can apply a column break to balance the appearance of the columns. Any text following the column break will begin in the next column. To learn more about how to create columns in your document, visit our lesson on Columns.
- Text wrapping: When text has been wrapped around an image or object, you can use a text-wrapping break to end the wrapping and begin typing on the line below the image. Review our lesson on Pictures and Text Wrapping to learn more.
To delete a break:
By default, breaks are hidden. If you want to delete a break, you’ll first need to show the breaks in your document.
- On the Home tab, click the Show/Hide command.
- Locate the break you want to delete, then place the insertion point at the beginning of the break.
- Press the Delete key. The break will be deleted from the document.

Challenge!
- Open our practice document.
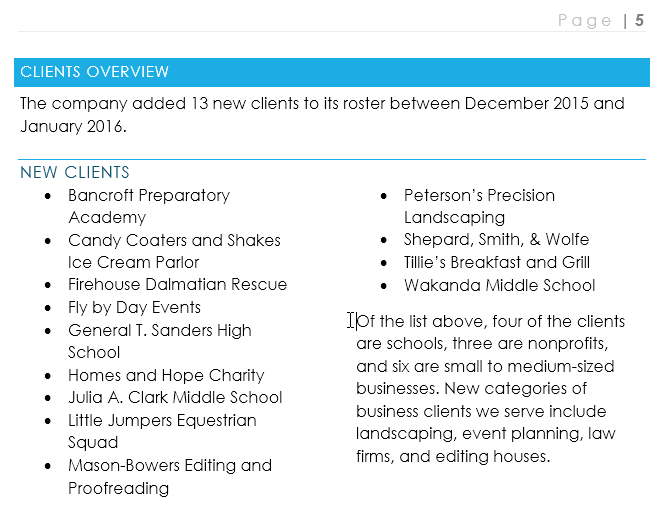
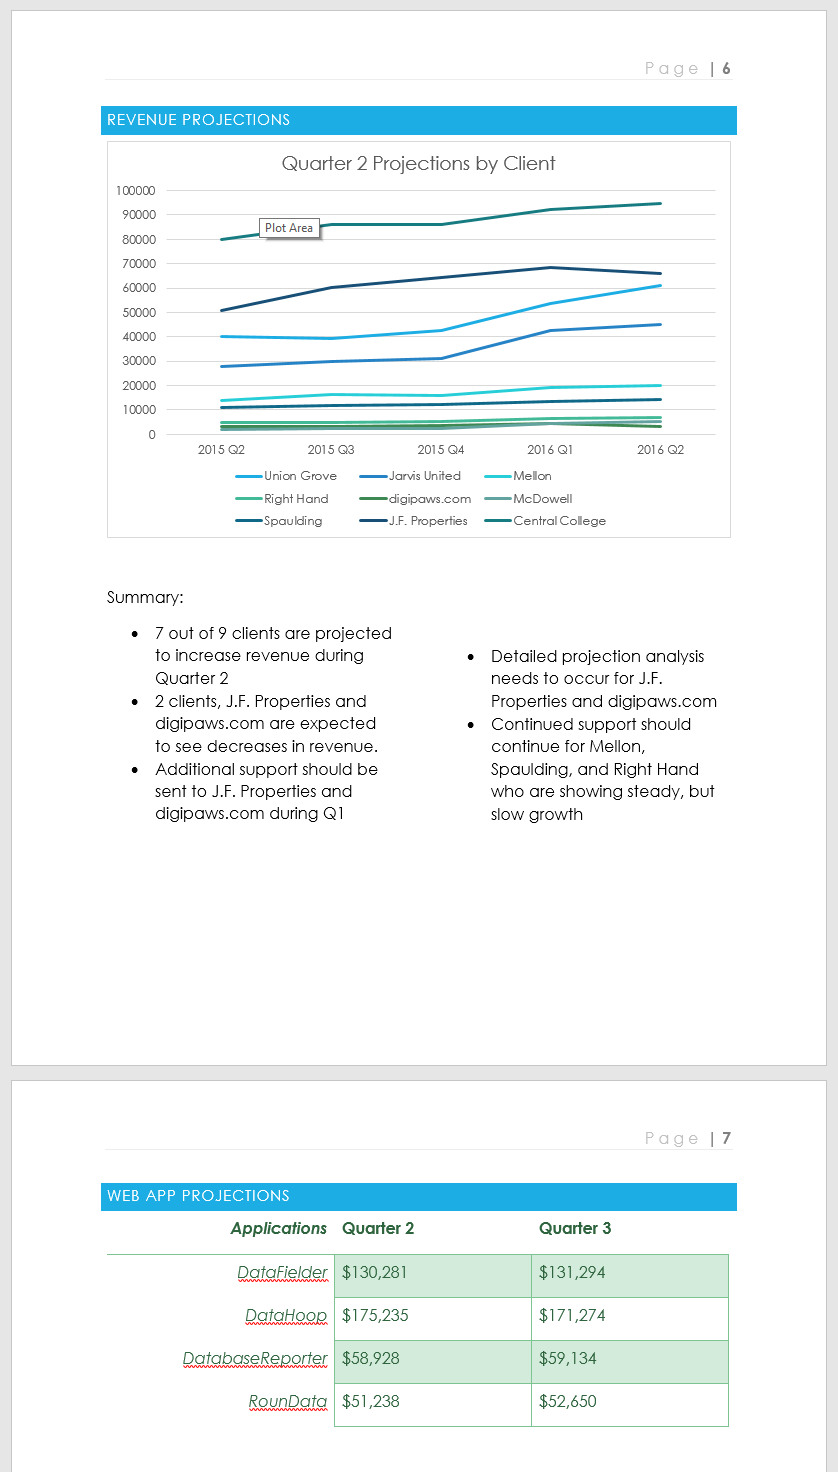
- Scroll to the Revenue Projections section near the end of the document.
- Remove the page break after the Quarter 2 Projections by Client chart.
- Place your cursor at the beginning of the header Web App Projections.
- Insert a Next Page section break.
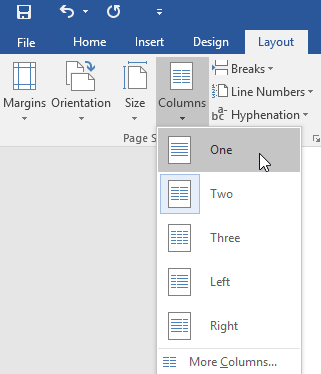
- In the Page Setup group on the Layout tab, click the Columns drop-down menu and choose One. This formats the page back to one column and should allow the Web App Projections header and the table below it to span across the page. You will learn more about columns in our next lesson.
- When you’re finished, the last two pages should look something like this:

/en/word2016/columns/content/
 Please Note:
This article is written for users of the following Microsoft Word versions: 97, 2000, 2002, and 2003. If you are using a later version (Word 2007 or later), this tip may not work for you. For a version of this tip written specifically for later versions of Word, click here: Adding a Break to Your Document.
![]()
Written by Allen Wyatt (last updated June 29, 2022)
This tip applies to Word 97, 2000, 2002, and 2003
As you are typing in Word, you will notice the program automatically keeps track of where you are. When your document no longer fits on a single page, Word automatically inserts a page break (indicated by a thin dashed line when viewing your document in Normal view) and wraps your text to the next page.
There may be times, however, when you want to insert a break in your text automatically. Word supports the following types of breaks:
- Page breaks. Causes the following text to begin at the top of the next page.
- Column breaks. Causes the following text to begin at the top of the next column. (If there is only one column in your page layout, the column break functions the same as a page break.)
- Section breaks. Causes the following text to begin a new section of your document. Where the actual break occurs depends on the type of section break you use. There are four different types of section breaks that can be inserted in your document.
- Text-wrapping breaks. These breaks, which are not available in Word 97, are closely akin to line breaks (Shift+Enter). A text-wrapping break breaks a line of text and moves the text to the next line. This type of break is intended for use with text that wraps around graphics.
To insert a break in your document, follow these steps if you are using Word 2007:
- Position the insertion point at the position where you want to insert the break.
- Display the Page Layout tab of the ribbon.
- Click the Breaks tool, in the Page Setup group. Word displays a list of breaks you can insert.
- Click the type of break you want to insert.
If you are using a version of Word prior to Word 2007, follow these steps instead:
- Position the insertion point at the position where you want to insert the break.
- Select the Break option from the Insert menu. Word displays the Break dialog box. (See Figure 1.)
- Select the type of break you want to insert.
- Click on OK.
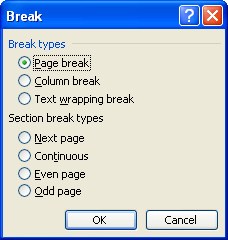
Figure 1. The Break dialog box.
WordTips is your source for cost-effective Microsoft Word training.
(Microsoft Word is the most popular word processing software in the world.)
This tip (183) applies to Microsoft Word 97, 2000, 2002, and 2003. You can find a version of this tip for the ribbon interface of Word (Word 2007 and later) here: Adding a Break to Your Document.
Author Bio
With more than 50 non-fiction books and numerous magazine articles to his credit, Allen Wyatt is an internationally recognized author. He is president of Sharon Parq Associates, a computer and publishing services company. Learn more about Allen…
MORE FROM ALLEN
Store Common Addresses in AutoText Entries
Do you write letters to lots of different people? One good place to keep those addresses is in AutoText entries. They are …
Discover More
Making AutoCorrect Automatically Recognize the Replace Word
When you select some text in your document and then display the AutoCorrect dialog box, it can seem a bit odd that …
Discover More
Limiting How Many Times a Worksheet Can Be Calculated
Excel, by default, recalculates your worksheets as you make changes in those worksheets. If you want to limit the number …
Discover More
More WordTips (menu)
Determining a Column Width
When laying out your document, you may wonder what width you should use for your text. An old typographers trick may help …
Discover More
Removing Breaks
Word allows you to add several types of «breaks» into your document. If you later want to remove any of them, you can use …
Discover More
Determining Page Layout
Getting your document onto paper is the whole purpose of word processing. Here are some concepts that are important when …
Discover More