
-

1
Drag the table onto the text. Click on the small square icon in the upper left corner of the table. Then hold and drag the table to where you want it to be within the text. Test out different positions to see if it will automatically wrap to your desire. If it doesn’t wrap how you want it to, follow along for the next steps![1]
-
2
Go to the Table Layout. Place your cursor anywhere in the table and then click on «Layout» in Word’s upper menu bar that is located directly underneath the blue title bar. You will see two different Layout buttons within this menu — you should click the one on the farthest right.[2]
Advertisement
-
3
Click on the “Properties” button. This is located on the far left of the top menu. In the pop-up window that appears, click on the “Around” button underneath the bolded header, “Text Wrapping.” This ensures that text will wrap around your table.
- Depending on your version of Word, you may have to click on the «Table» tab at the top left of the pop-up window. Do this right after clicking «Properties» so you are directed to the text wrapping buttons.[3]
- Depending on your version of Word, you may have to click on the «Table» tab at the top left of the pop-up window. Do this right after clicking «Properties» so you are directed to the text wrapping buttons.[3]
-
4
Align the table to your preference. Within this same pop-up menu, select the positioning of your table by clicking on “Left,” “Center,” or “Right” underneath the bolded text, “Alignment.” These determine where your table will appear within the wrapped text.
-
5
Click the “Positioning” button. In the same pop-up menu, click on this button. It will be located either under or to the right of “Text Wrapping.” This new pop-up window gives you further options for text wrapping. There are four categories to manipulate: “Horizontal,” «Vertical,» “Distance from Surrounding Text,” and “Options.” Click «Okay» in the bottom right corner once you are done. We recommend testing out these settings until you get the desired positioning.
- If you want to reverse a change you made, simply go back to this “Positioning” pop-up menu and revert the setting.
- This step is completely optional because you have already set up wrap text by using the “Around” button.
Advertisement
-
6
Move the table. Once you have the settings you want, click the “Okay” button in the lower right corner of the pop-up menu. Now just click on the square icon in the upper left corner of the table to move it. You should now be able to see the wrap text effects!
-
7
Unwrap text (optional). To reverse these changes, go back to «Layout,» then «Properties,» then «Table» (if applicable). In this pop-up window, click the «None» button located to the left of «Around.» After you click «Okay» in the lower right corner of the pop-up window, your text should be unwrapped.


Advertisement
Ask a Question
200 characters left
Include your email address to get a message when this question is answered.
Submit
Advertisement
Video
Thanks for submitting a tip for review!
References
About This Article
Thanks to all authors for creating a page that has been read 30,167 times.
Is this article up to date?
You can wrap the text to the column width by any of the following methods: ◦ On the Table tab, in the Format group, click Wrap Text. ◦ Right-click and click Wrap Text on the shortcut menu. ◦ On the Table tab, click Height and Width.
Contents
- 1 How do you wrap text in a table cell in Word?
- 2 How do you get text to wrap in Word?
- 3 How do I wrap text in a table in Word for Mac?
- 4 How do I format text in a Word table?
- 5 How do I wrap text in a cell table?
- 6 How do I wrap text in a table in Word 2010?
- 7 How do I turn on text wrapping?
- 8 Why is there no wrap text in Word?
- 9 Why is my text not wrapping in Word?
- 10 How do I fix text in a table in Word?
- 11 How do I wrap text around a table in Word 2007?
- 12 What is the wrap text?
- 13 How do you wrap text in one cell?
- 14 How do you wrap text in an object?
- 15 How do you wrap text in Word 2016?
- 16 How do I stop text wrapping in a table in Word?
- 17 How do I force text not to wrap?
How do you wrap text in a table cell in Word?
Wrapping text around a Word 2019 table
- On the (Table Tools) Layout tab, click the Cell Size group button.
- On the Table tab, under Text Wrapping, select the Around option.
- Click the Positioning button.
- Select the Move with Text check box and click OK.
- Click OK in the Table Properties dialog box.
How do you get text to wrap in Word?
Go to Picture Format or Shape Format and select Arrange > Wrap Text. If the window is wide enough, Word displays Wrap Text directly on the Picture Format tab. Choose the wrapping options that you want to apply. For example, In Line with Text, Top and Bottom, and Behind Text.
How do I wrap text in a table in Word for Mac?
Wrap or unwrap text in a single cell: Click the table, Control-click the cell, then choose Wrap Text from the shortcut menu. A checkmark appears when wrapping is on. To unwrap text, deselect Wrap Text.
How do I format text in a Word table?
Use Table Styles to format an entire table
- Click in the table that you want to format.
- Under Table Tools, click the Design tab.
- In the Table Styles group, rest the pointer over each table style until you find a style that you want to use.
- Click the style to apply it to the table.
How do I wrap text in a cell table?
To work around the problem with some short and some long words, you could potentially preprocess the text and wrap only long words (say, > 40 chars) in the <span> . This approach is better because doesn’t require table-layout: fixed; .
How do I wrap text in a table in Word 2010?
Right click anywhere on the table, select Table Properties from the dropdown. In the table tab, select Text Wrapping: around option. That enables the “Positioning…” button, click on it. Now you have more positioning options to play with.
How do I turn on text wrapping?
Enable or disable text wrapping for a text box, rich text box, or expression box
- Right-click the control for which you want to enable or disable text wrapping, and then click Control Properties on the shortcut menu.
- Click the Display tab.
- Select or clear the Wrap text check box.
Why is there no wrap text in Word?
The advanced options in the Word Options dialog box. Make sure the Show Text Wrapped Within the Document Window check box is cleared.
Why is my text not wrapping in Word?
It is a “feature” of Word that has been available for many, many years. You can control this feature by displaying the View tab of the Options dialog box (Tools | Options | View tab). Look for the check box labeled Wrap to Window.
How do I fix text in a table in Word?
To adjust table row and column size in Word:
- To fit the columns to the text (or page margins if cells are empty), click [AutoFit] > select “AutoFit Contents.”
- To fit the table to the text, click [AutoFit] > select “AutoFit Window.”
How do I wrap text around a table in Word 2007?
Select the text box. Click the dialog launcher in the Paragraph group of the Home tab. Click the Indents And Spacing tab and select Centered in the Alignment box. Click the Line And Page Breaks tab, select All in the Tight Wrap box (Figure D), and click OK.
What is the wrap text?
“Wrapping text” means displaying the cell contents on multiple lines, rather than one long line. This will allow you to avoid the “truncated column” effect, make the text easier to read and better fit for printing. In addition, it will help you keep the column width consistent throughout the entire worksheet.
How do you wrap text in one cell?
Answer: Select the cells that you wish to wrap text in.
- Right-click and then select “Format Cells” from the popup menu.
- When the Format Cells window appears, select the Alignment tab. Check the “Wrap text” checkbox.
- Now when you return to the spreadsheet, the selected text should be wrapped.
- NEXT.
How do you wrap text in an object?
Wrap text around imported images
- To display the Text Wrap panel, choose Window > Text Wrap.
- Select an imported image, and in the Text Wrap panel, click Wrap Around Object Shape .
- Specify offset values.
- Choose Show Options from the Text Wrap panel menu to display additional options.
How do you wrap text in Word 2016?
To wrap text around an image:
- Select the image you want to wrap text around. The Format tab will appear on the right side of the Ribbon.
- On the Format tab, click the Wrap Text command in the Arrange group. Then select the desired text wrapping option.
- The text will wrap around the image.
How do I stop text wrapping in a table in Word?
Click the “Wrap Text” button in the Alignment group to cancel the word-wrapping option.
How do I force text not to wrap?
If you want to prevent the text from wrapping, you can apply white-space: nowrap; Notice in HTML code example at the top of this article, there are actually two line breaks, one before the line of text and one after, which allow the text to be on its own line (in the code).
Microsoft Word allows you to place a table anywhere within your document.
By default, the table aligns itself to the left margin, and the text flows from above to below the table.
You can align the table any other way you want. You could align it horizontally to the middle of the page, or align it to the right margin. It is also possible to center it vertically within the paragraph. If necessary, you can make it start from the top of the paragraph, or shift it to the bottom of the paragraph.
While moving the table around in the page as above, it is also possible to make the text wrap around the table. This makes the text appear all around the table for a better-looking document.
We explain how you can do all the above in simple stepwise instructions.
Let us start.
Step #1: Open the Word document
Open the Word document that has at least one table embedded in text.

By default, Word positions the table aligned to the left margin. The text stops above the table and resumes after the table.
Step #2: Open the Table Properties dialog
Right-click anywhere within the table.
In the menu that opens, click on Table Properties.

This opens the Table Properties dialog.

Step #3: Wrap the text around the table
The Table Properties dialog offers two choices for Text Wrapping:
- None — this is the default
- Around — wrap the text around the table.

Under section Text Wrapping, click on the Around icon.
Click on Ok to exit the dialog.
Word positions the text to flow around the table.

Step #4: Align the table horizontally.
You may align the table horizontally within the text to make it look more presentable.
For this, the Alignment section in the Table Properties offers three choices:
- Left — this is the default (aligned to the left margin)
- Center — aligned midway to the left and right margins
- Right — aligned to the right margin
Select the option most suitable for your document.

Step #5: Align the table vertically.
Word also allows aligning the table vertically to make it look more presentable.
For this, click on the Positioning button within the Text Wrapping section in the Table Properties dialog.
Note: Word allows you to click the Positioning button only when you have selected Around under Text Wrapping.

This will open another dialog for Table Positioning.

The Table Positioning dialog offers more granular control of the positioning of the table. You can position the table relative to the column, page, margin, or paragraph in the document.

You can also adjust the distance between the table and the surrounding text.

Click on Ok to exit the dialog.
Conclusion
Follow our step-by-step instructions for wrapping text around a table. This will make your document more presentable.
 Please Note:
This article is written for users of the following Microsoft Word versions: 2007, 2010, 2013, and 2016. If you are using an earlier version (Word 2003 or earlier), this tip may not work for you. For a version of this tip written specifically for earlier versions of Word, click here: Fitting Text Into Cells.
![]()
Written by Allen Wyatt (last updated May 5, 2020)
This tip applies to Word 2007, 2010, 2013, and 2016
You have worked long and hard on your page design, including a couple of tables that are just right. Then, along comes a need to add a bit more text into one of the tables. The result is that the text in a cell wraps and pushes everything else down a bit. Now your whole design is thrown off. You long for a way to automatically adjust the size of the text in a cell so you won’t have the wrapping and pushing occur.
Word provides a built-in option that may do the trick. Simply follow these steps:
- Select the cell or cells that you want to format.
- Make sure the Layout tab of the ribbon is displayed. (This tab is only visible if you first do step 1.)
- Click the Properties tool in the Table group. Word displays the Table Properties dialog box.
- Select the Cell tab. (See Figure 1.)
- Click on the Options button. Word displays the Cell Options dialog box. (See Figure 2.)
- Make sure the Fit Text check box is selected.
- Click on OK to close the Cell Options dialog box.
- Click on OK to close the Table Properties dialog box.
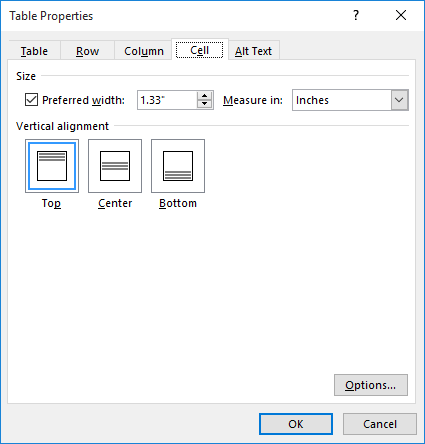
Figure 1. The Cell tab of the Table Properties dialog box.
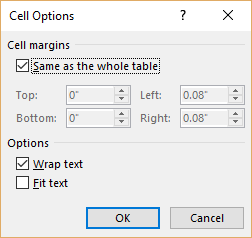
Figure 2. The Cell Options dialog box.
What Word does is to decrease the apparent size of the text so that everything fits. Word decreases the width of the text by «scrunching» (a highly technical term) the text together horizontally, without adjusting it vertically.
If you would like to know how to use the macros described on this page (or on any other page on the WordTips sites), I’ve prepared a special page that includes helpful information. Click here to open that special page in a new browser tab.
WordTips is your source for cost-effective Microsoft Word training.
(Microsoft Word is the most popular word processing software in the world.)
This tip (6081) applies to Microsoft Word 2007, 2010, 2013, and 2016. You can find a version of this tip for the older menu interface of Word here: Fitting Text Into Cells.
Author Bio
With more than 50 non-fiction books and numerous magazine articles to his credit, Allen Wyatt is an internationally recognized author. He is president of Sharon Parq Associates, a computer and publishing services company. Learn more about Allen…
MORE FROM ALLEN
Meaningless Text
The quick brown fox jumps over the lazy dog, or so the story goes. Here’s how to put this type of meaningless text into a …
Discover More
Days Left in the Year
Sometimes it is handy to know how many days are left in the current year. This tip provides a quick formula that …
Discover More
Calculating the Day of the Year
Need to know what day of the year a certain date is? You can figure it out easily using the formulas in this tip.
Discover More
More WordTips (ribbon)
Fitting Your Text In a Table Cell
Got some text you absolutely must fit on a single line in a table cell? Then you’ll appreciate this rather esoteric …
Discover More
Headings On Your Printout
If you’ve got a table that spans multiple printed pages, you probably want to repeat a row or two of that table as a …
Discover More
Last-Row Border Formatting
When the last row displayed on a page doesn’t show the borders you want, it can be confusing to figure out how to get …
Discover More
Problem
Formatting documents in Word can be extremely frustrating.
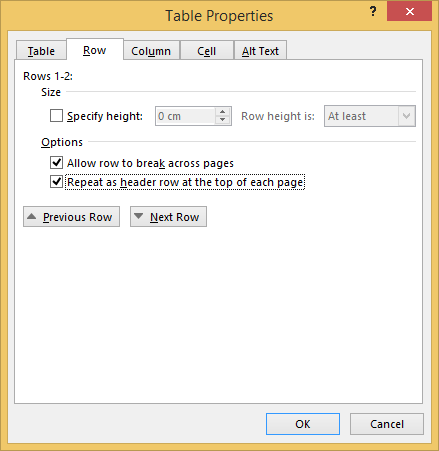
Often Word completely disregards the ‘repeat header row’ setting – leaving you with a table that just doesn’t behave.
Sometimes, no matter what options are selected the ‘Repeat as header row at top of each page’ option doesn’t work as expected, if at all.
Solution
The solution is simple, and quite baffling why it works where the other option does not.
- Select the table,
- at the top of the Window, under under ‘TABLE TOOLS’ open the ‘LAYOUT’ tab,
- click on the ‘Repeat Header Rows’ button.

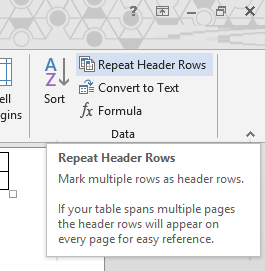
For whatever reason, where the normal option fails to work this button some how fixes the table and makes the header row repeat across pages.
Help! What if this didn’t work!
Here’s a few tips if the above didn’t help.
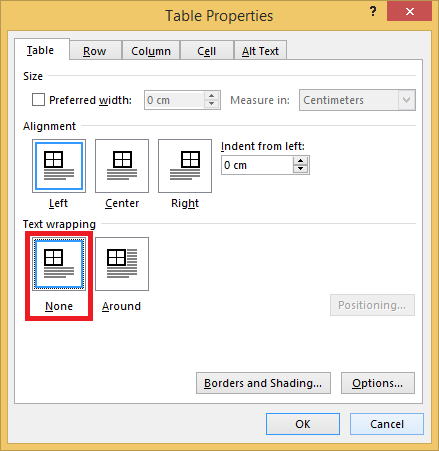
Method 1: Text wrapping must be set to ‘None’
Repeatable headers DO NOT work with text wrapping enabled.
- Right click on your table and select ‘Table Properties’
- On the ‘Table’ tab set ‘Text Wrapping’ to ‘None’

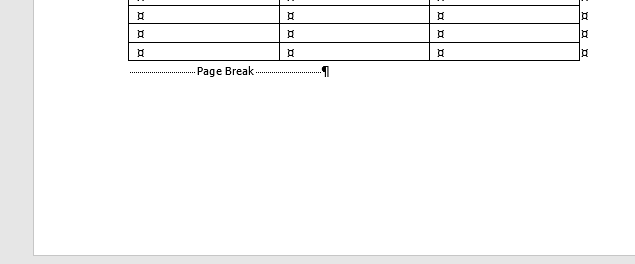
Method 2: Page breaks must NOT be in table
If a page break is inside the table repeatable headers will not work.
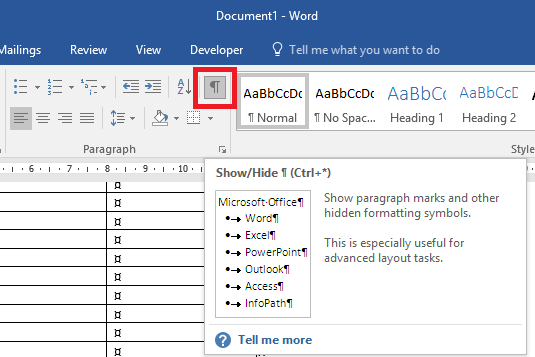
To check for page breaks:
- Enable the display formatting option on the ‘Home’ tab, under ‘Paragraph’

- Look through the table for a page break and delete it, if there is one it will be at the bottom of the page (hence being a page break). You may also need to delete an empty line to join your table together again.

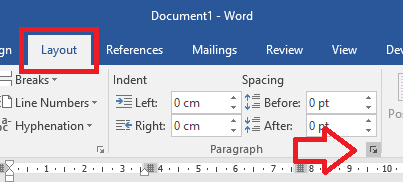
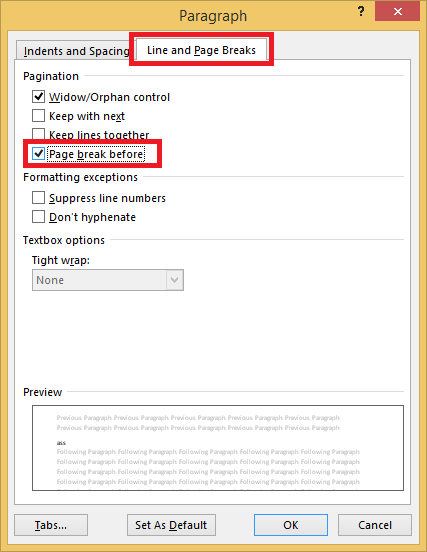
If you need the table to page break you will instead have to enable ‘Page break before’ on the table row.
- Click on the row you want to start on the new page
- Then on the ‘Layout’ tab open the ‘Paragraph’ settings window (click on the little arrow icon next to ‘Paragraph’)

- On the ‘Line and Page Breaks‘ tab tick ‘Page break before’ and click ‘OK’ to save the changes

Method 3: Nested tables
Repeatable header rows will not work for nested tables, that is, a table inside a table – make sure you only have one table.
Method 4: Turn it off and on again!
- Open the table properties
- Disable ‘Repeat as header row at top of each page’
- Save and close the file
- Open the file again
- Enable ‘Repeat as header row at top of each page’
References:
- http://answers.microsoft.com/en-us/office/forum/office_2007-word/repeat-header-row-at-the-top-of-each-page-does-not/27761a7b-fac9-4b54-a4f1-15ec80694a10?auth=1
|
03-12-2015, 03:38 AM |
|||
|
|||
|
Text Not Wrapping Properly in Table
|


|
03-12-2015, 04:24 AM |
|||
|
|||
|
Is it imported text, or did you type it? I ask because I wonder if there are non-breaking spaces in the text string.
|
|
03-12-2015, 05:03 AM |
|||
|
|||
|
It was a document supplied by someone. The only fix I have is to use the format painter on a known good cell and paste it over the offending cell. there are no non-breaking spaces.
|
|
03-12-2015, 08:48 AM |
|||
|
|||
|
I am not clear whether the format painter fixed the problem. If it did, are you still trying to find out what happened?
|
|
03-12-2015, 08:56 AM |
|||
|
|||
|
I said there were NO non-breaking spaces. I’ll just fix it with the format painter. It’s a very long document with many tables and doing this one cell at a time is very time consuming. I was hoping someone it was some sort of setting change to allow me to make a global change.
|
|
03-12-2015, 09:49 AM |
|||
|
|||
|
I meant to say no non-breaking spaces.
|
|
03-12-2015, 10:12 AM |
|||
|
|||
|
Very strange.
|
|
03-12-2015, 04:05 PM |
|
Since this is a formatting issue, you could try removing local paragraph and character formatting and apply a known good style. FWIW, it sounds suspiciously like a different language setting has been applied and Word is hiding this from you because you have not loaded the language pack that reveals this setting. See this related description — http://www.mraggarwal.com/2007/05/11…/#.VQITuPmUcQ0
__________________
|
Windows Vista Home Premium with Microsoft Office 2010.
I have a table in Microsoft Word where the row size is not specified, but the columns are fixed. When I type text that should wrap, it instead continues, invisibly, beyond the end of the row and then wraps 4 or 5 characters later. So the table looks like this:
|this is text in the 1st cell|This is the 2nd cell which |But this cell doesn't |
|                            |has wrapped appropriately, |where it should.      |
The word «wrap» is missing after the word «doesn’t» in the 3rd column. If I insert spaces at the beginning of the cell, I can watch the word «wrap» appear on the next line, while «doesn’t» begins to disappear. It’s like the table thinks the column is a few characters longer than it is so it wraps too late, but can’t show those characters that are beyond the end of the column.
Michelle Cox
unread,
Dec 12, 2001, 12:20:39 AM12/12/01
to
A friend of mine used the resume wizard to make a resume. So now he has a
table with all the resume parts in different cells. The problem we are
having is that the text isn’t wrapping. When it hits the right side of the
cell, it just cuts off. The text is still there and shows up if we make the
cell wider.
I keep thinking that there must be some word wrap setting that got turned
off, but I sure can’t find it anywhere. Could someone please point me in
the right direction?
This is for Word from Office 97.
Thanks,
Michelle
Alan Taylor
unread,
Dec 12, 2001, 4:22:52 AM12/12/01
to
Hi Michelle:
This may or may not be the same thing — in 2000, I went
through the Wizard and it left me with something very
strange. It causes text to temporarily not wrap — then
if you continue typing it seems to wrap, but some doesn’t
print.
What it is is a Style (actually several) with a Right
Indent of negative 0.25″ — which serves no use that I can
think of.
The style I noticed it in is a bulleted one
called «Achievement» and it’s based on Body Text which is
where that negative indent originates.
By Modifying Body Text to have a 0″ Right Indent that
should fix the problem.
Make sure in Tools / Templates and Add-ins you DON’T have
a check mark by «Automatically update document styles»
because that would only complicate things.
Incidentally, that negative indent may have been someone’s
plan to get text going closer to the right edge of the
cell. You can get a similar appearance by Justifying it,
although that in itself is debatable in a narrow area.
>.
>
Steve Hudson
unread,
Dec 25, 2001, 2:16:06 PM12/25/01
to
Table > Table Properties > Cell > Options
The Options vane then has Wrap Text and Fit Text.
Steve Hudson, HDK List MVP
Eyespring.com
John Muller
unread,
Jan 9, 2002, 10:24:32 PM1/9/02
to
I have the same issue with text wrap in MS Word 97.
That is, the text does not wrap at the column boundaries
so some of the text cannot be seen unless I make the column wider.
Also, in Word 97 I don’t know how to access «Table Properties».
It is not a choice I see when I select Table on the menu bar.
Has anyone else encountered and solved this issue
with tables in Word 97?
I can get around the problem by using an embedded Excel table,
but I was hoping that there is a better way.
— john muller
Steve Hudson <cru…@optushome.com.au> wrote in message news:<orng2uk8er4jcf77o…@4ax.com>…
Suzanne S. Barnhill
unread,
Jan 11, 2002, 8:47:00 AM1/11/02
to
There is no Table Properties dialog in Word 97, just Table | Cell Height and
Width. But the kind of problem you describe usually results from the
paragraph indent marker having been inadvertently dragged when the user
meant to drag the cell border marker (which is why it’s easier and safer to
drag the cell borders in the table than on the ruler). Check your paragraph
format to see if you have a negative right indent.
—
Suzanne S. Barnhill
Microsoft Word MVP
Words into Type
Fairhope, AL USA
«John Muller» <jmu…@mindspring.com> wrote in message
news:23a86193.02010…@posting.google.com…
J. Lauzière
unread,
Jan 11, 2002, 9:37:55 PM1/11/02
to
You might also check Cell Height and Width. When you drag cell borders,
the Cell Height often becomes set at Exactly 12 pt, for example, so any
text going beyond that height becomes invisible. Make sure that the Cell
Height is set to Auto.
Hope this helps.
jl