
For analysis and report preparation, we occasionally need to extract data from a variety of files in a variety of formats. In such cases, we might need to convert portion of the cell’s data to columns. There are several techniques in Excel to transform text to rows of data.
Split a Text Cell into Two or More Rows in Excel
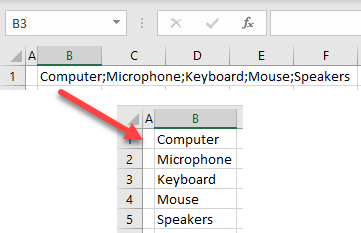
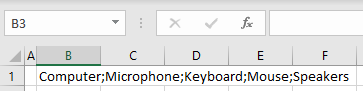
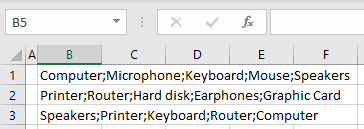
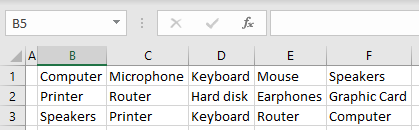
With Excel’s Text to Columns and Transpose Data functions, text in a single cell that is delimited by a certain character (such as a space, tab, semicolon, etc.) can be divided into numerous rows. Let’s say you wish to divide the semicolon-delimited product list in the image below into rows.
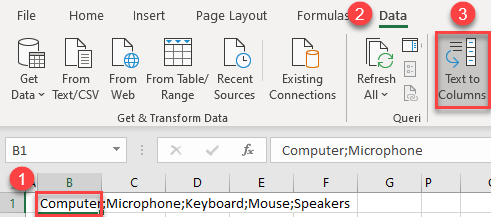
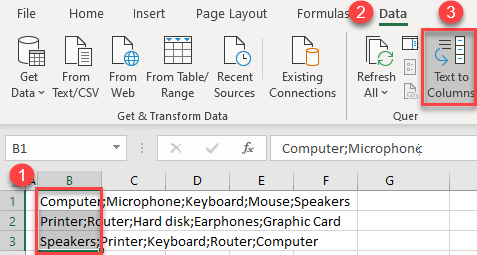
1. First, use a delimiter to divide the cell’s values into columns. Go to the Ribbon, choose a text cell (B1), and then select Data > Text to Columns.
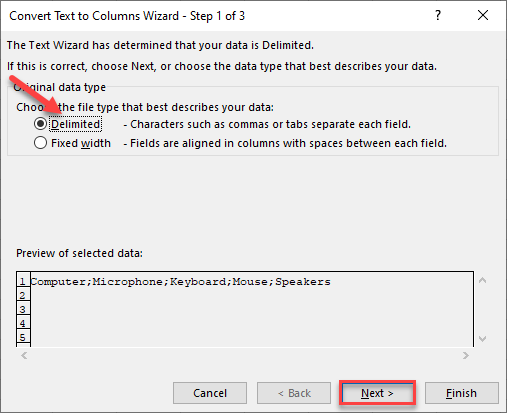
2. Click Next after leaving the default file type (Delimited) in Step 1 of the Text to Columns Wizard.
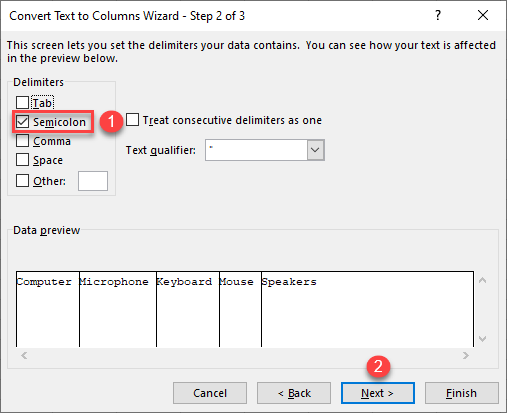
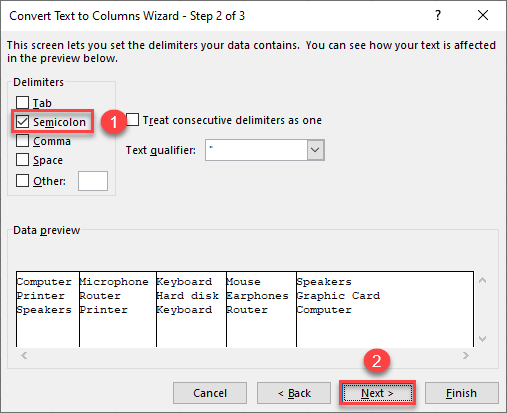
3. Click Next after selecting Semicolon under Delimiters. You can see how this data will be delimited in the Data preview. Tab, comma, space, and user-defined delimiters are additional delimiters that could be used.
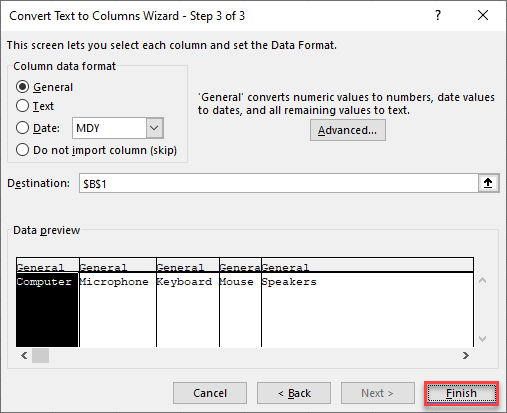
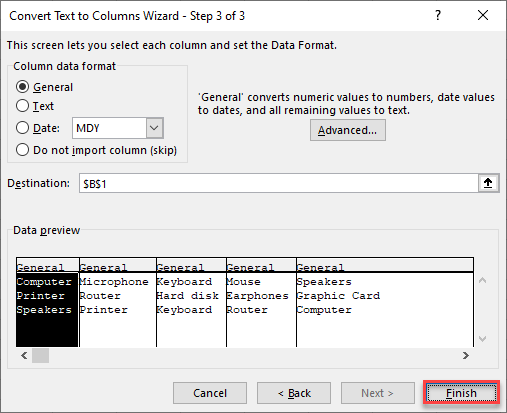
4. Leave the default data format (General) and click Finish to complete the process. Other data kinds, such text or date, are also available for selection here. In the Data preview, you may also pick out certain columns and modify their data types. Leave the first cell blank to split data for the Destination.
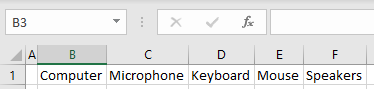
This section causes the text in cell B1 to be divided into Columns B through F at each semicolon.
5. Now move the numbers from Row 1 to Column B using the Transpose Data tool. Transpose cells C1:F1 starting in cell B1 (such that the current value in cell B1 remains there). To do this, choose and right-click the cells you want to transpose (C1:F1), then select Copy (or use CTRL + C on the keyboard).
6. Choose Transpose from the Paste Options menu when you right-click the starting cell for the transposed data (B5).
In Columns B-D, cells B5 to D9, values from cells B1 to B3 have now been reversed. Cells’ initial data can be removed.
Static method using Paste special
In this approach, Excel’s Paste Special Transpose tool is used to transpose the data. The transposed data in this case is static. It stays the same while the underlying data changes. Using Excel’s Paste Special Transpose tool, we may transpose the selected data.
Let’s rapidly comprehend with the aid of a straightforward example.
We have a list of companies having horizontally formatted revenue, profit, and margin information. This data has to be transposed in a vertical format.
1.Select the data, then copy it by pressing Control + C on your keyboard. Next, right-click your mouse on the cell you wish to paste this data into. You are given a menu of choices. choosing Paste Special.
2.The next screen appears once you choose Paste Special. Decide on the Values and Transpose option.
3.Then press OK.
You receive the table below.
The information is pasted as a vertical table.
You can now prepare the data and carry out the necessary analysis.
Did you study how to use IF statements in Excel while working with text? To discover more about the functionality of Word documents, Excel spreadsheets, and PowerPoint slides, follow WPS Academy. To edit word, excel, and PowerPoint documents for free, you may also download WPS Office. Get it now! and have a pleasant and straightforward working experience.
Содержание
- Split a Text Cell to Two or More Rows in Excel & Google Sheets
- Split a Text Cell Into Rows
- Split Multiple Text Cells Into Rows
- Split a Text Cell Into Rows in Google Sheets
- Split Multiple Text Cells Into Rows in Google Sheets
- How to Convert Excel Text to Columns and Rows – Excelchat
- How to Convert Text to Column
- How to Convert Text to Rows
- Instant Connection to an Expert through our Excelchat Service
- Text to Rows
- Text to Columns Wizard
- Converting columns to rows
Split a Text Cell to Two or More Rows in Excel & Google Sheets
In this tutorial, you will learn how to split a text cell into two or more rows in Excel and Google Sheets.
Split a Text Cell Into Rows
If you have text in a single cell delimited with some character (space, tab, semicolon, etc.), it can be split into multiple rows using Text to Columns and Transpose Data in Excel. Say you have the semicolon-delimited product list in the picture below and want to split the list into rows.
1. First, separate values from cell B1 into columns based on a delimiter. Select a text cell (B1) and in the Ribbon, go to Data > Text to Columns.
2. In Step 1 of the Text to Columns Wizard, leave the default file type (Delimited), and click Next.
3. In Step 2, check Semicolon under Delimiters, and click Next. In the Data preview, you can see how this data will be delimited.
Other possible delimiters are tab, comma, space, and user-defined delimiter.
4. In the final step, leave the default data format (General) and click Finish.
Here you could also choose other types of data, like text or date. You could also select columns individually in the Data preview and change their data types.
For the Destination, leave the initial cell to split data into columns starting from cell B1.
As a result of this part, text from cell B1 is split into Columns B–F, at each semicolon.
5. Now use the Transpose Data feature to transpose values from Row 1 to Column B. Start from cell B1 (so the current B1 value will stay there), and transpose cells C1:F1.
To do this, select and right-click the cells to transpose (C1:F1), then click Copy (or use the keyboard shortcut CTRL + C).
![]()
6. Select and right-click the cell where you want to start the transposed data (B2) and choose Transpose under Paste Options.
![]()
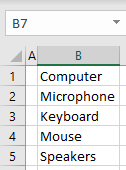
Finally, values from cell B1 are now transposed in Column B, cells B1:B6. The original list is split into rows.
Split Multiple Text Cells Into Rows
If you have data in multiple cells, like in the picture below, you can also split the text into rows in much the same way as the single-cell case above.
Follow these steps to split the text in B1:B3 to columns:
1. First, separate values from cell B1:B3 to columns based on a delimiter. Select the text cells you want to split (B1:B3) and in the Ribbon, go to Data > Text to Columns.
2. In Step 1 of Text to Columns Wizard, leave the default file type (Delimited), and click Next.

3. In Step 2, check Semicolon under Delimiters, and click Next.
4. In the final step, leave the default data format (General) and click Finish.
As a result of this part, text from cells B1:B3 is split at each semicolon into Columns B–F.
5. Now transpose values from Rows 1–3 to Columns B–D. Since the data is in multiple rows, you must transpose to a new range (and later delete the initial data range).
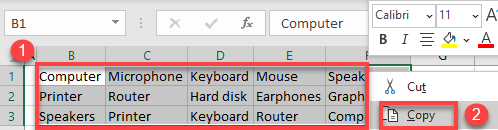
Select and right-click cells to transpose (B1:F3), and click Copy (or use the keyboard shortcut CTRL + C).
![]()
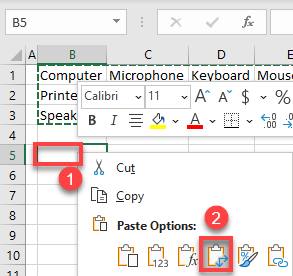
6. Select and right-click the starting cell for the transposed data (B5) and choose Transpose under Paste Options.
![]()
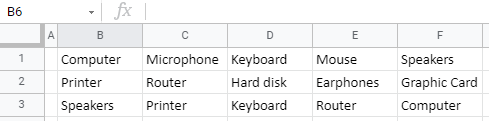
Finally, values from cells B1:B3 are now transposed in Columns B–D, cells B5:D9. You can delete the initial data from cells B1:F3.
![]()
Split a Text Cell Into Rows in Google Sheets
You can also use Split Text to Columns and Transpose features to split a text cell into multiple rows in Google Sheets.
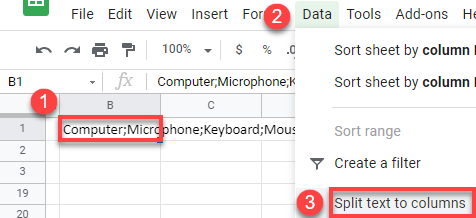
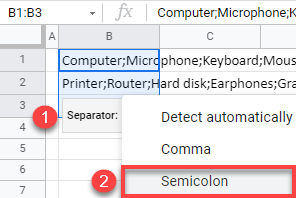
1. First, right-click a cell containing text (B1) and in the Menu, go to Data > Split text to columns.
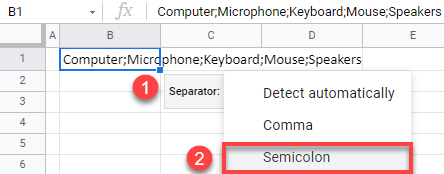
2. Click the Separator button that appears, and choose Semicolon.
As a result of this step, text from B1 is now split into columns B:F, based on a semicolon delimiter.

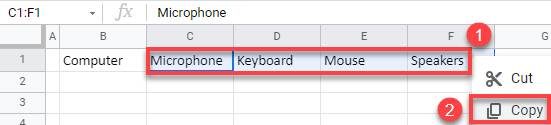
3. Now you can use the Transpose Data feature to transpose values from Row 1 to Column B. Start from cell B1 (so the B1 value will stay there), and transpose cells C1:F1.
To do this, select and right-click the cells to transpose (C1:F1), and click Copy (or use the keyboard shortcut CTRL + C).
![]()
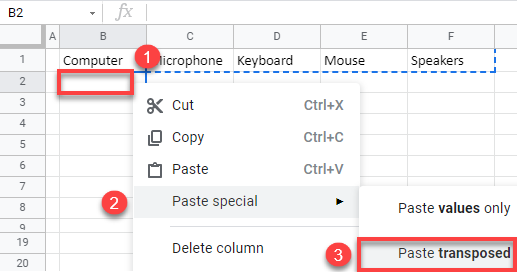
4. Select and right-click a cell from which you want to transpose data (B2), choose Paste special, then Paste transposed.
![]()
Finally, values from cell B1 are now transposed in Column B, cells B1:B6. The original list has been split into rows.
Split Multiple Text Cells Into Rows in Google Sheets
Now, you can split multiple text cells into multiple rows using the same example.
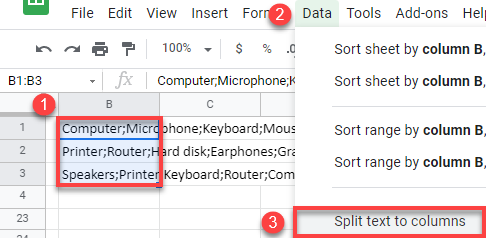
1. Select and right-click cells containing text (B1:B3) and in the Menu, go to Data > Split text to columns.
2. Click the Separator button that appears, and choose Semicolon.
As a result of this step, text from cells B1:B3 are split at each semicolon into columns B–F.
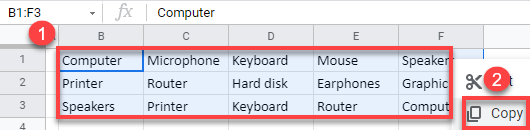
3. Now transpose the data from Rows 1–3 to Columns B–D. Since the data is in multiple rows, you must transpose to a new range (and later delete the initial data range).
Select and right-click cells to transpose (B1:F3), and click Copy (or use the keyboard shortcut CTRL + C).
![]()
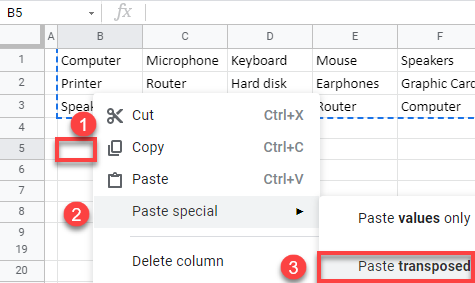
4. Select and right-click the starting cell for the transposed data (B5), choose Paste special, and click Paste transposed.
![]()
Finally, values from cells B1:B3 are now transposed in Columns B–D, cells B5:D9. You can delete the initial data from cells B1:F3.
Источник
How to Convert Excel Text to Columns and Rows – Excelchat
We can use the Text to Column tool to separate values that are not similar into separate columns and rows. This tool helps us to split our data into different columns of the excel sheet. This tutorial will walk all levels of Excel users through the process of Converting Text to Columns and Rows.
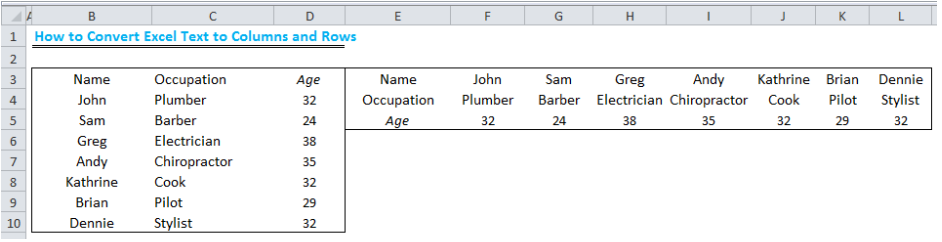 Figure 1 – How to Convert Excel Text to Columns and Rows
How to Convert Text to Column
- We will use Figure 2 to illustrate the process of converting text to column.
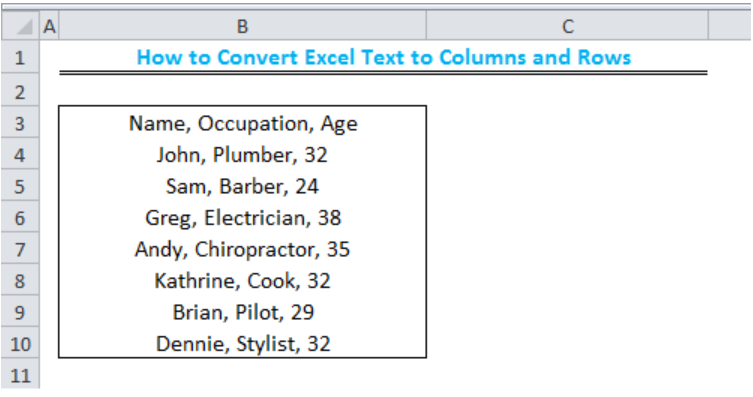 Figure 2 – Data to convert text to column
- We will select the cells containing our data
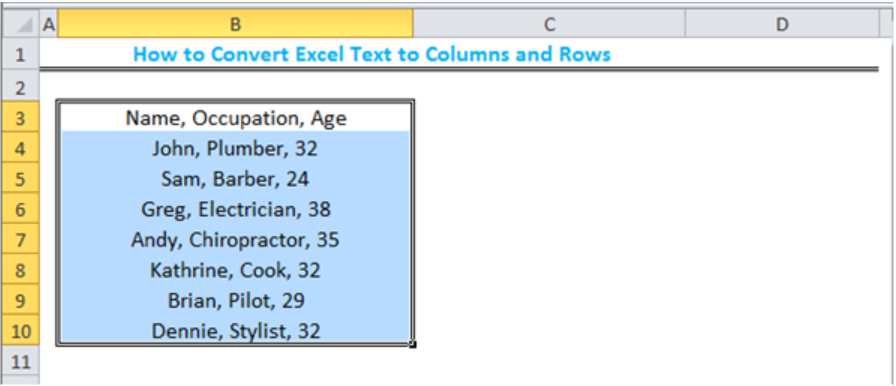 Figure 3 – Select the cells with the data
- We will click the Data tab and click Text to columns
 Figure 4 – Click Text to Columns
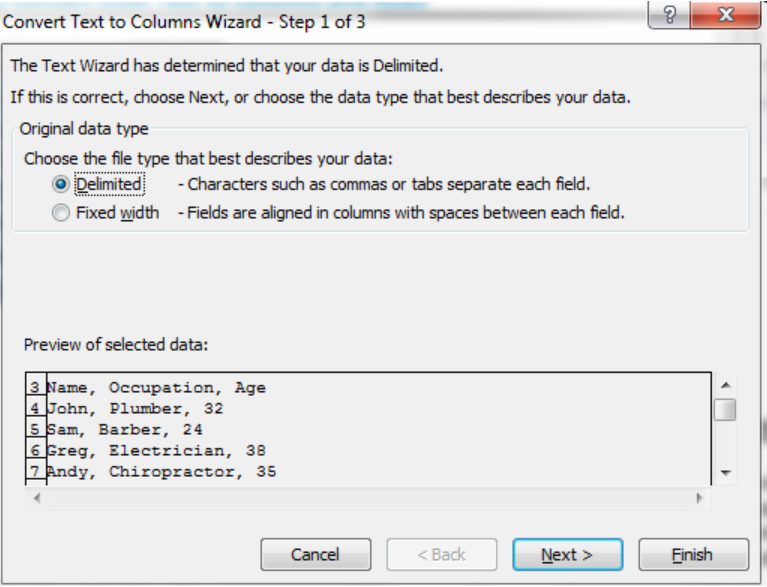 Figure 5 – Convert Text to Columns Wizard
- We will check the Comma and Space boxes
 Figure 6 – Check the Comma and Space boxes
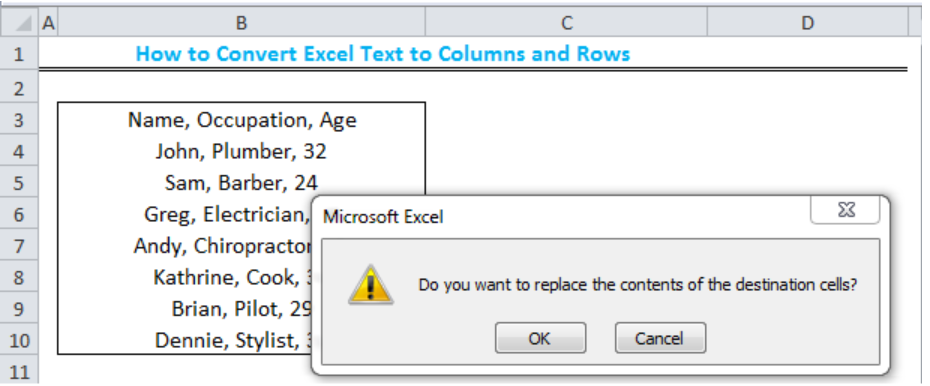 Figure 7 – Prompt to replace destination cells
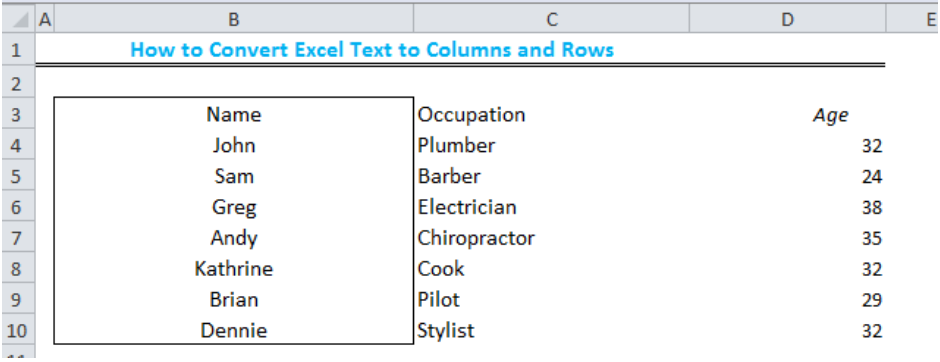 Figure 8 – Text converted to Columns
How to Convert Text to Rows
Excel does not have the Text to Row tool like Text to Column. We will use the Transpose tool to convert our Text to Rows.
- We will select and Copy the data
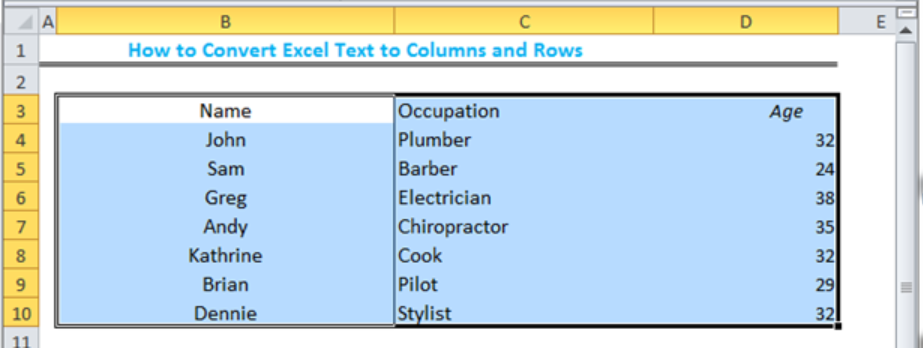 Figure 9 – How to Convert Text to Rows
- We will select a location where we want our new data to be pasted.
 Figure 10 – Select location of new data
- We will right-click and select the Transpose tool under Paste options
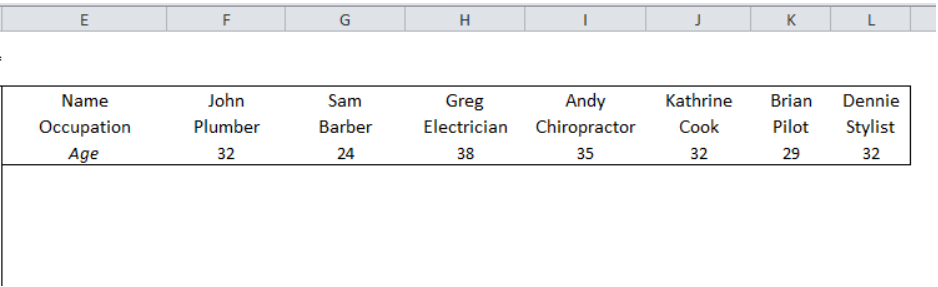 Figure 11 – How to convert Text to Rows
Instant Connection to an Expert through our Excelchat Service
Most of the time, the problem you will need to solve will be more complex than a simple application of a formula or function. If you want to save hours of research and frustration, try our live Excelchat service! Our Excel Experts are available 24/7 to answer any Excel question you may have. We guarantee a connection within 30 seconds and a customized solution within 20 minutes.
Источник
Text to Rows
There is an Excel tool that converts text to columns taking data from a single column and splitting it into multiple columns.
But you won’t find a similar tool that converts text to rows.
If you want to achieve this you have to do a trick.
Text to Columns Wizard
In order to convert text to rows, first, you need to convert text to columns.
Take a look at the following example.
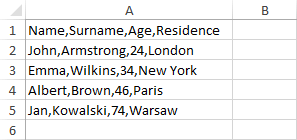
Select data from A1 to A5 and choose DATA >> Data Tools >> Text to Columns.

A new window will appear.
In the first step choose Delimited and click Next.
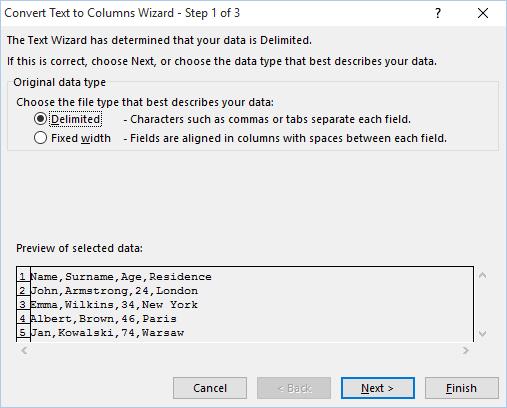
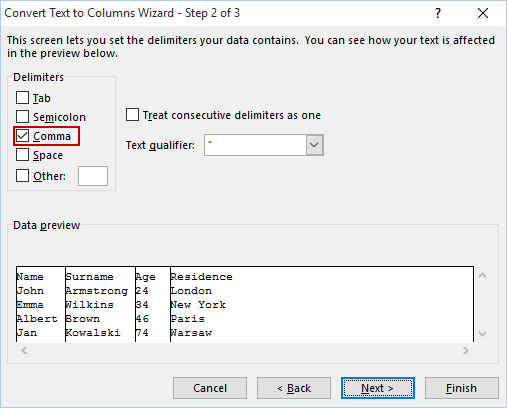
In the second step in the Delimiters, choose Comma. Under the Data preview, you can see how your data will look like.
Converting columns to rows
Now, what you need to do it to select data from A1 to D5, copy it, and right-click in a place where you want the new data to be pasted.
But instead of using normal pasting use Transpose.
![]()
This is how your data will look after applying some formatting.
Источник
In this tutorial, you will learn how to split a text cell into two or more rows in Excel and Google Sheets.
Split a Text Cell Into Rows
If you have text in a single cell delimited with some character (space, tab, semicolon, etc.), it can be split into multiple rows using Text to Columns and Transpose Data in Excel. Say you have the semicolon-delimited product list in the picture below and want to split the list into rows.
1. First, separate values from cell B1 into columns based on a delimiter. Select a text cell (B1) and in the Ribbon, go to Data > Text to Columns.
2. In Step 1 of the Text to Columns Wizard, leave the default file type (Delimited), and click Next.
3. In Step 2, check Semicolon under Delimiters, and click Next. In the Data preview, you can see how this data will be delimited.
Other possible delimiters are tab, comma, space, and user-defined delimiter.
4. In the final step, leave the default data format (General) and click Finish.
Here you could also choose other types of data, like text or date. You could also select columns individually in the Data preview and change their data types.
For the Destination, leave the initial cell to split data into columns starting from cell B1.
As a result of this part, text from cell B1 is split into Columns B–F, at each semicolon.
5. Now use the Transpose Data feature to transpose values from Row 1 to Column B. Start from cell B1 (so the current B1 value will stay there), and transpose cells C1:F1.
To do this, select and right-click the cells to transpose (C1:F1), then click Copy (or use the keyboard shortcut CTRL + C).

6. Select and right-click the cell where you want to start the transposed data (B2) and choose Transpose under Paste Options.

Finally, values from cell B1 are now transposed in Column B, cells B1:B6. The original list is split into rows.
Split Multiple Text Cells Into Rows
If you have data in multiple cells, like in the picture below, you can also split the text into rows in much the same way as the single-cell case above.
Follow these steps to split the text in B1:B3 to columns:
1. First, separate values from cell B1:B3 to columns based on a delimiter. Select the text cells you want to split (B1:B3) and in the Ribbon, go to Data > Text to Columns.
2. In Step 1 of Text to Columns Wizard, leave the default file type (Delimited), and click Next.
3. In Step 2, check Semicolon under Delimiters, and click Next.
4. In the final step, leave the default data format (General) and click Finish.
As a result of this part, text from cells B1:B3 is split at each semicolon into Columns B–F.
5. Now transpose values from Rows 1–3 to Columns B–D. Since the data is in multiple rows, you must transpose to a new range (and later delete the initial data range).
Select and right-click cells to transpose (B1:F3), and click Copy (or use the keyboard shortcut CTRL + C).
6. Select and right-click the starting cell for the transposed data (B5) and choose Transpose under Paste Options.
Finally, values from cells B1:B3 are now transposed in Columns B–D, cells B5:D9. You can delete the initial data from cells B1:F3.

NOTE: You can also use VBA code to split a text into columns.
Split a Text Cell Into Rows in Google Sheets
You can also use Split Text to Columns and Transpose features to split a text cell into multiple rows in Google Sheets.
1. First, right-click a cell containing text (B1) and in the Menu, go to Data > Split text to columns.
2. Click the Separator button that appears, and choose Semicolon.
As a result of this step, text from B1 is now split into columns B:F, based on a semicolon delimiter.
3. Now you can use the Transpose Data feature to transpose values from Row 1 to Column B. Start from cell B1 (so the B1 value will stay there), and transpose cells C1:F1.
To do this, select and right-click the cells to transpose (C1:F1), and click Copy (or use the keyboard shortcut CTRL + C).
4. Select and right-click a cell from which you want to transpose data (B2), choose Paste special, then Paste transposed.
Finally, values from cell B1 are now transposed in Column B, cells B1:B6. The original list has been split into rows.
Split Multiple Text Cells Into Rows in Google Sheets
Now, you can split multiple text cells into multiple rows using the same example.
1. Select and right-click cells containing text (B1:B3) and in the Menu, go to Data > Split text to columns.
2. Click the Separator button that appears, and choose Semicolon.
As a result of this step, text from cells B1:B3 are split at each semicolon into columns B–F.
3. Now transpose the data from Rows 1–3 to Columns B–D. Since the data is in multiple rows, you must transpose to a new range (and later delete the initial data range).
Select and right-click cells to transpose (B1:F3), and click Copy (or use the keyboard shortcut CTRL + C).
4. Select and right-click the starting cell for the transposed data (B5), choose Paste special, and click Paste transposed.
Finally, values from cells B1:B3 are now transposed in Columns B–D, cells B5:D9. You can delete the initial data from cells B1:F3.

There is an Excel tool that converts text to columns taking data from a single column and splitting it into multiple columns.
But you won’t find a similar tool that converts text to rows.
If you want to achieve this you have to do a trick.
Text to Columns Wizard
In order to convert text to rows, first, you need to convert text to columns.
Take a look at the following example.
Select data from A1 to A5 and choose DATA >> Data Tools >> Text to Columns.
A new window will appear.
In the first step choose Delimited and click Next.
In the second step in the Delimiters, choose Comma. Under the Data preview, you can see how your data will look like.
Converting columns to rows
Now, what you need to do it to select data from A1 to D5, copy it, and right-click in a place where you want the new data to be pasted.
But instead of using normal pasting use Transpose.
![]()
This is how your data will look after applying some formatting.

Post Views: 138,562
One day I opened one of my Excel files and found it really messed up. Instead of separated by cells, each data is divided with a comma which only makes the whole document can’t be processed. There are tons of data and it’s impossible to fix them manually.
Instead, as it turns out, Microsoft Excel does offer a function that lets you convert a comma-separated text into rows in an instant. The result is a lot better than I expected. Each value is now in its own cell, clean and easy to read. To learn this trick, follow the guide below!
1. Open the Excel document that wants to be fixed.

2. Select all the cells that contains a comma-separated text.

3. Now head to Data > Text to Columns.

4. Select Delimited and click Next.

5. Tick the Comma option, then hit Finish.

6. The comma-separated text has been converted into rows.

As you might have noticed, the feature is not limited to just comma. It can run from other delimiters as well, such as tab, semicolon, space, and virtually, anything else. I hope this guide helps you!
Допустим, вот таблица с тремя столбцами на рабочем листе, в первом перечислены уровни цен, во втором перечислены названия фруктов с разделителями-запятыми в ячейках, а в третьем столбце перечислены цены на фрукты. Задача состоит в том, чтобы разделить имена фруктов с разделителями на строки и повторить соответствующие уровни цен и строки цен, как показано ниже: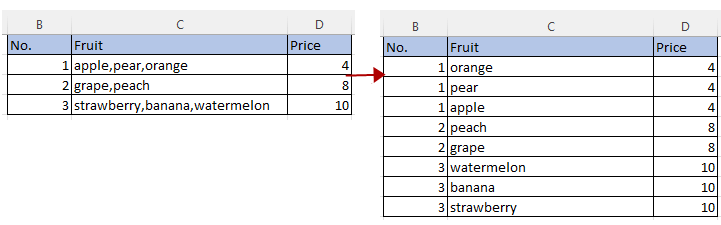
Здесь введите два метода для решения этой задачи.
Разделить текст с разделителями на строки с помощью VBA
Разделить текст с разделителями на строки с помощью Power Query
Разделить текст с разделителями на строки с помощью VBA
Вот код VBA, который может быстро разделить текст с разделителями на строки.
1. Нажмите другой + F11 ключи для включения Microsoft Visual Basic для приложений окно.
2. Нажмите Вставить вкладка> Модули для создания нового пустого модуля.
3. Скопируйте и вставьте приведенный ниже код в пустой модуль.
VBA: разделить текст с разделителями на строки
Public Sub SplitTextInCellsToRows()
'UpdatebyExtendoffice20220622
    Dim xSRg, xIptRg, xCrRg, xRg As Range
    Dim xSplitChar As String
    Dim xArr As Variant
    Dim xFNum, xFFNum, xRow, xColumn, xNum As Integer
    Dim xWSh As Worksheet
    Set xSRg = Application.InputBox("Select a range:", "Kutools for Excel", , , , , , 8)
    If xSRg Is Nothing Then Exit Sub
    xSplitChar = Application.InputBox("Type delimiter:", "Kutools for Excel", , , , , , 2)
    If xSplitChar = "" Then Exit Sub

    Application.ScreenUpdating = False
    xRow = xSRg.Row
    xColumn = xSRg.Column
    Set xWSh = xSRg.Worksheet
    For xFNum = xSRg.Rows.Count To 1 Step -1

        Set xRg = xWSh.Cells.Item(xRow + xFNum - 1, xColumn)
        Debug.Print xRg.Address
        xArr = Split(xRg, xSplitChar)
        For xFFNum = LBound(xArr) To UBound(xArr)
            xRg.EntireRow.Copy
            xRg.Offset(1, 0).EntireRow.Insert Shift:=xlShiftDown
            xRg.Worksheet.Cells(xRow + xFNum, xColumn) = xArr(xFFNum)
        Next
        xRg.EntireRow.Delete
    Next
    Application.CutCopyMode = False
    Application.ScreenUpdating = True
End Sub
4. Нажмите F5 ключ, чтобы нажать кнопку запуска ![]() чтобы активировать код, появляется диалоговое окно для выбора столбца, который исключает заголовок, содержащий текст с разделителями, необходимый для разделения на строки. Нажмите OK.
чтобы активировать код, появляется диалоговое окно для выбора столбца, который исключает заголовок, содержащий текст с разделителями, необходимый для разделения на строки. Нажмите OK.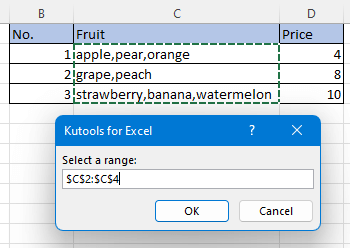
5. Затем появится второе диалоговое окно для ввода используемого вами разделителя. Здесь вводится запятая (,). Нажмите OK.
Теперь тексты с разделителями были разбиты на строки, а другие связанные столбцы были повторены.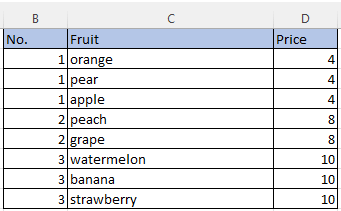
![]() VBA изменит исходные данные, перед этим лучше сохранить их копию.
VBA изменит исходные данные, перед этим лучше сохранить их копию.
Разделить текст с разделителями на строки с помощью Power Query
Если вы используете Excel 2013 или более поздние версии, Power Query будет хорошим выбором для решения этой работы.
1. Выберите диапазон данных, чтобы нажать Данные > Из таблицы/диапазона.
2. Во всплывающем Создать таблицу диалог, проверьте В моей таблице есть заголовки как вам нужно, и нажмите OK.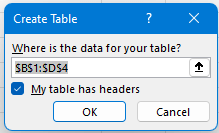
Тогда Редактор Power Query отображается окно, и данные были показаны в нем.
3. Щелкните столбец, в котором вы хотите разделить тексты с разделителями на строки, и щелкните Преобразование вкладка> Разделить столбец > По разделителю.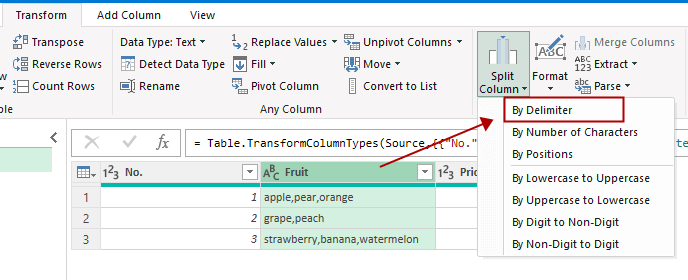
Или вы также можете выбрать столбец и щелкнуть правой кнопкой мыши заголовок столбца, чтобы выбрать эту функцию в контекстном меню.
4. в Разделить столбец по разделителю окно, выберите разделитель, как вам нужно из Выберите или введите разделитель раздел, затем выберите Каждое появление разделителя вариант, а затем развернуть Дополнительные параметры раздел на выбор Ряды вариант. Нажмите OK.
Теперь тексты с разделителями разбиты на строки.
5. Затем закройте окно, появится диалоговое окно, нажмите Сохранить кнопку.
Затем будет создан новый лист с таблицей.
Прочие операции (статьи)
Как изменить цвет строки на основе группы в Excel?
В Excel раскрашивание каждой второй строки может быть проще для большинства из нас, но, пробовали ли вы когда-нибудь раскрасить строки поочередно в зависимости от изменения значения столбца — Столбец A, как показано на следующем снимке экрана, в этой статье я расскажу о том, как для изменения цвета строки в зависимости от группы в Excel.
Как уменьшить размер файла Excel?
Иногда для открытия или сохранения требуется несколько минут, если файл Excel слишком велик. Для решения этой проблемы здесь, в этом руководстве, рассказывается, как уменьшить размер файла Excel, удалив содержимое или форматы, которые не нужны или никогда не используются.
Excel: как создать или вставить закладку
Вы когда-нибудь представляли себе создание или вставку закладки для быстрого перехода к определенному диапазону данных, когда на листе или в книге много данных?
Как применить затенение к нечетным или четным (альтернативным) строкам / столбцам в Excel?
При разработке рабочего листа многие люди склонны применять затенение к нечетным или четным (альтернативным) строкам или столбцам, чтобы сделать рабочий лист более наглядным. В этой статье будут показаны два метода применения затенения к нечетным или четным строкам / столбцам в Excel.
Лучшие инструменты для работы в офисе
Kutools for Excel Решит большинство ваших проблем и повысит вашу производительность на 80%
- Бар Супер Формулы (легко редактировать несколько строк текста и формул); Макет для чтения (легко читать и редактировать большое количество ячеек); Вставить в отфильтрованный диапазон…
- Объединить ячейки / строки / столбцы и хранение данных; Разделить содержимое ячеек; Объедините повторяющиеся строки и сумму / среднее значение… Предотвращение дублирования ячеек; Сравнить диапазоны…
- Выберите Дубликат или Уникальный Ряды; Выбрать пустые строки (все ячейки пустые); Супер находка и нечеткая находка во многих рабочих тетрадях; Случайный выбор …
- Точная копия Несколько ячеек без изменения ссылки на формулу; Автоматическое создание ссылок на несколько листов; Вставить пули, Флажки и многое другое …
- Избранные и быстро вставляйте формулы, Диапазоны, диаграммы и изображения; Зашифровать ячейки с паролем; Создать список рассылки и отправлять электронные письма …
- Извлечь текст, Добавить текст, Удалить по позиции, Удалить пробел; Создание и печать промежуточных итогов по страницам; Преобразование содержимого ячеек в комментарии…
- Суперфильтр (сохранять и применять схемы фильтров к другим листам); Расширенная сортировка по месяцам / неделям / дням, периодичности и др .; Специальный фильтр жирным, курсивом …
- Комбинируйте книги и рабочие листы; Объединить таблицы на основе ключевых столбцов; Разделить данные на несколько листов; Пакетное преобразование xls, xlsx и PDF…
- Группировка сводной таблицы по номер недели, день недели и другое … Показать разблокированные, заблокированные ячейки разными цветами; Выделите ячейки, у которых есть формула / имя…
")
Вкладка Office — предоставляет интерфейс с вкладками в Office и значительно упрощает вашу работу
- Включение редактирования и чтения с вкладками в Word, Excel, PowerPoint, Издатель, доступ, Visio и проект.
- Открывайте и создавайте несколько документов на новых вкладках одного окна, а не в новых окнах.
- Повышает вашу продуктивность на 50% и сокращает количество щелчков мышью на сотни каждый день!
")
- Remove From My Forums
-
Question
-
We have Text to Columns, but I am looking forward to have this add-in also. Someone did it out of his good will, but only for excel 2007 and 2010. Can we get this feature in excel 2016?
Answers
-
Hi,
According to your description, my understanding is that you need an add-in to help you convert Comma Separated Text Into Rows. This similar to Excel build-in feature like Text to Columns. Am I right? If yes, this might be existed add-in for Excel 2016,
but we can do it manually. Steps:- Step 1. Copy the comma delimited text into your clipboard from your text editor or Microsoft Word.
- Step 2. Fire up MS Excel and paste the comma separated text into a cell.
- Step 3. Click on the Data Tab and then select Text to Columns.
- Step 4. Now select Delimited as that is the type of Data we are working with.
- Step 5. My data is separated by comma’s so I unselected the TAB delimiter and selected the Comma delimiter and clicked NEXT.
- Step 6. Select your Data Type, mine is text so I left the default option of General selected and clicked Finish.
- Step 7. All the words have now been separated into Columns. Now highlight the entire row by clicking on the number.
- Step 8. Right click the selection and choose Paste Special.
- Step 9. Select Transpose and you are DONE!
- Step 10. Celebrate, you’re one step closer to finishing whatever you are working on!
If you want to code it by yourselves, you can ask the question on MSND forum:
https://social.msdn.microsoft.com/Forums/office/en-US/home?forum=exceldev
Regards,
George Zhao
TechNet Community Support
Please
mark the reply as an answer if you find it is helpful.
If you have feedback for TechNet Support, contact
tnmff@microsoft.com.-
Proposed as answer by
Tuesday, January 5, 2016 7:41 AM
-
Marked as answer by
George123345
Wednesday, January 6, 2016 6:49 AM