
Word for Microsoft 365 Outlook for Microsoft 365 Word 2021 Outlook 2021 Word 2019 Outlook 2019 Word 2016 Outlook 2016 Word 2013 Outlook 2013 Word 2010 Outlook 2010 Word 2007 Outlook 2007 More…Less
You can change the spacing between characters of text for selected text or for particular characters. In addition, you can stretch or compress an entire paragraph to make it fit and look the way that you want it to.
Change the spacing between characters
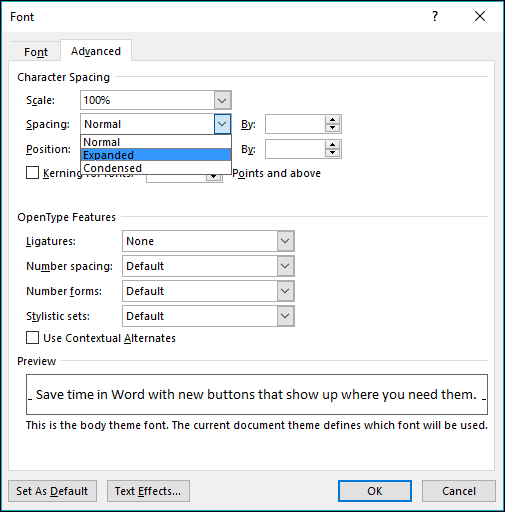
Selecting Expanded or Condensed alters the spacing between all selected letters by the same amount. Kerning alters the spacing between particular pairs of letters — in some cases reducing and in other cases expanding the space depending upon the letters.
Expand or condense the space evenly between all the selected characters
-
Select the text that you want to change.
-
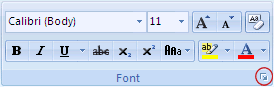
On the Home tab, click the Font Dialog Box Launcher, and then click the Advanced tab.

Note: If you’re using Word 2007 the tab is called Character Spacing.
-
In the Spacing box, click Expanded or Condensed, and then specify how much space you want in the By box.
Kern the characters that are above a particular size
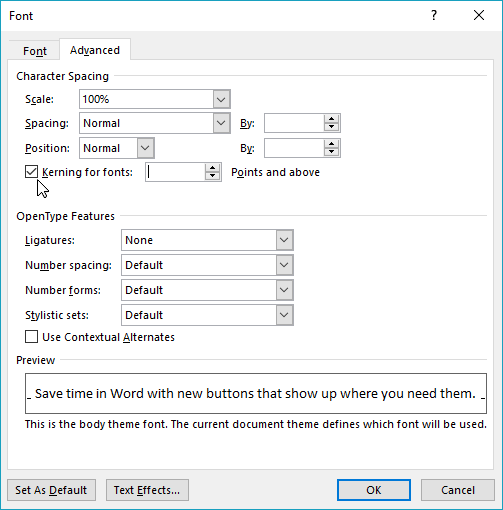
Kerning refers to the way spacing between two specific characters is adjusted. The idea is to give a better looking result by reducing the spacing between characters that fit together nicely (such as «A» and «V») and increasing the spacing between characters that don’t.
-
Select the text that you want to change.
-
On the Home tab, click the Font Dialog Box Launcher, and then click the Advanced tab.
Note: If you’re using Word 2007 the tab is called Character Spacing.
-
Select the Kerning for fonts check box, and then enter the point size in the Points and above box.
Stretch or scale the text horizontally
When you scale the text, you change the shapes of the characters by percentages. You can scale text by stretching it or by compressing it.
-
Select the text that you want to stretch or compress.
-
On the Home tab, click the Font Dialog Box Launcher, and then click the Advanced tab.
Note: If you’re using Word 2007 the tab is called Character Spacing.
-
In the Scale box, enter the percentage that you want.
Percentages above 100 percent stretch the text. Percentages below 100 percent compress the text.
Change the line spacing
To increase or decrease the amount of vertical space between lines of text within a paragraph, the best method is to modify the style the paragraph uses.
-
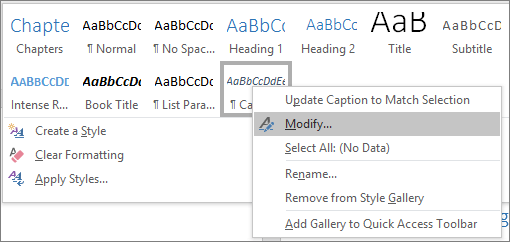
Find the style you’re using in the Styles gallery on the Home tab.
-
Right-click the style you want to change and select Modify.
-
Near the center of the dialog box you’ll find the line spacing buttons that let you select single, 1.5x or double spaced. Choose the spacing you want to apply and click OK.
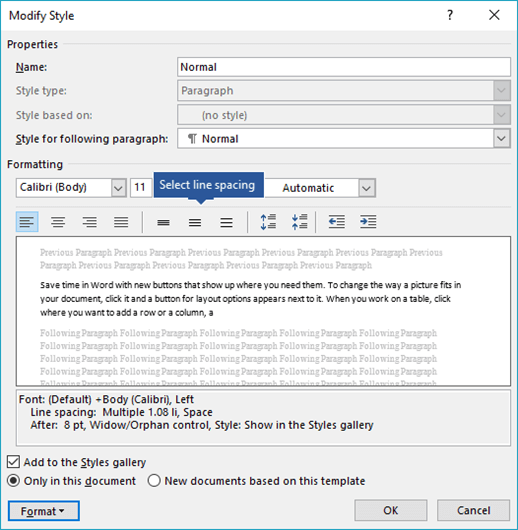
If you’d like to apply more specific line spacing to the style, clickthe Format button at the bottom left corner of the Modify Style dialog box and select Paragraph. The Line spacing drop-down lets you select or set more specific line spacing.
For more information on modifying styles in Word, see: Customize styles in Word.
See also
-
Using Styles in Word — a free, 10-minute video training course.
-
Change the font size
-
Set page margins
-
Align text left or right, center text, or justify text on a page
-
Change the line spacing in Word
Do you have a question about Word that we didn’t answer here?
Post a question in the Word Answers Community.
Help us improve Word
Do you have suggestions about how we can improve Word? Let us know by providing us feedback. See How do I give feedback on Microsoft 365? for more information.
Need more help?
Want more options?
Explore subscription benefits, browse training courses, learn how to secure your device, and more.
Communities help you ask and answer questions, give feedback, and hear from experts with rich knowledge.
Asked by: Lloyd O’Reilly
Score: 4.3/5
(50 votes)
Change the spacing between characters
- Select the text that you want to change.
- On the Home tab, click the Font Dialog Box Launcher, and then click the Advanced tab. …
- In the Spacing box, click Expanded or Condensed, and then specify how much space you want in the By box.
How do I change the spacing between letters in Word for Mac?
Change Default Font and Spacing in Mac Word
- Click on File and Style….
- Select Normal and click Modify….
- Change your font, pt, line spacing, etc. (i.e. I changed the Font to Times New Roman, 12 pt, and line spacing to single.) Click OK when done.
- Click Yes when prompted.
How do you do spacing on Word?
Change the line spacing in a portion of the document
- Select one or more paragraphs to update. …
- Go to Home > Line and Paragraph Spacing.
- Select Line Spacing Options and choose an option in the Line spacing box.
- Adjust the Before and After settings to change spacing between paragraphs.
- Select OK.
How do I double space between words in Word?
Double Spacing
- Select the text you want to be double spaced.
- Click on the Home tab.
- Look for the Paragraph options.
- Find an icon that has four horizontal lines, and two arrows pointing in opposite directions. Click the icon to expand.
- Select 2.0 to double space your text.
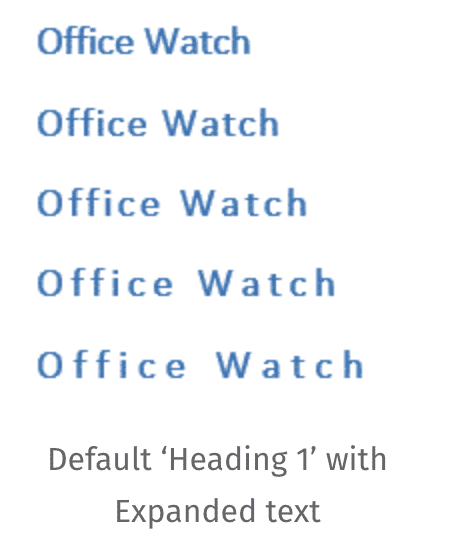
What is character spacing in Word?
Character Spacing | Spacing lets you stretch or compress text. It’s a handy trick for headings, it makes them look bigger without increasing the font size. Default ‘Heading 1’ with Expanded text. Or compress text so more fits into limited space.
24 related questions found
How do I fix weird spacing between words in Word?
Change the spacing between characters
- Select the text that you want to change.
- On the Home tab, click the Font Dialog Box Launcher, and then click the Advanced tab. …
- In the Spacing box, click Expanded or Condensed, and then specify how much space you want in the By box.
How do I change the spacing between letters in Word 2010?
Changing CHARACTER SPACING, steps:
- Select the desired text;
- Select HOME TAB from RIBBON;
- Click on the button in FONT group to open FONT dialogue window;
- FONT dialogue window is opened;
- Select CHARACTER SPACING TAB;
- SPACING drop-down list;
- Select the desired spacing : — NORMAL standard distance between characters. …
- End.
Why is there a huge space in my Word document?
This happens when the text alignment is «justified» in word. Just go to the end of the line and press enter once. This normally happens when after the sentence is over, we do not hit enter, but just keep typing «space» and the sentence starts on the next line. This gap is due to section break.
What does double space look like in Word?
1. In text formatting, a double space means sentences contain a full blank line (the equivalent of the full height of a line of text) between the rows of words. By default, most programs have single spacing enabled, which is a slight space between each line of text, similar to how this paragraph looks.
What is the normal spacing in Word?
The default line spacing in Word is 1.15. By default, paragraphs are followed by a blank line and headings have a space above them. Go to Home > Line and Paragraph Spacing. Select Line Spacing Options, and then choose the options you want under Spacing.
What is 1.5 spacing Word?
The lines in all Word documents are single-spaced by default, which is appropriate for letters and most documents. But you can easily change your document line spacing to double or 1.5 lines to allow extra space between every line. This is useful when you want to make notes on a printed document.
How do I make 1.5 spacing in Word?
To format line spacing:
- Click Format on the menu bar.
- Select Paragraph. The Paragraph dialog box appears.
- Click the Indents and Spacing tab.
- In the line spacing drop-down menu, you can select single, 1.5, or double spacing. The default is single spacing.
- Click OK.
What do you call the spacing between letters?
In typography, kerning is defined as the adjustment of space between two individual letters. It’s also not an uncommon thing to neglect when you’re reaching the end of a grueling deadline. Your clients may not know what kerning is, but they’ll know something’s amiss when their design has poorly kerned type.
How do I change kerning in Word 2020?
Enable and Adjust Kerning in Word on Windows
Open the Font Dialog Box by clicking the arrow on the bottom right corner of the Font section of the ribbon. Select the Advanced tab in the window. Check the box for Kerning for fonts under Character Spacing. To the right, enter the minimum point value you want to use.
How do you double space in Word Online 2020?
To double-space the whole document, go to Design > Paragraph Spacing, and choose Double. Tip: To double-space only part of the document, select the paragraphs you want to change, go to Home > Line and Paragraph Spacing, and choose 2.0.
Is 1.5 or 2.0 double spaced?
A 2.0 value will mean double spacing. Remember that the double spacing will take place from whatever part in the text your cursor is positioned. Place your cursor on the very top of the page if you want the entire document to be double spaced.
Why is Word double spacing between lines?
Each version of word uses the ‘normal’ style to set defaults on font sizes, page margins, paragraph spacing and more. After you install Word 2007 the default paragraph spacing is set to 10pt after a paragraph, meaning that when you type in any Word document you will appear to have double spacing.
Why can’t I delete space in Word?
When you select the paragraph then go to Format > Paragraph and check the settings for Spaces Before and Spaces After. If extra points have been added to the paragraph style you can reduce them to eliminate the extra space.
How do I get rid of large space between paragraphs in Word?
Remove the Default Space Between Paragraphs:
Set your cursor to the location of the paragraph spacing. Click on the Line and Paragraph Spacing icon in the Home Ribbon. Select «Remove Extra Space» to remove the extra space. This has to be done in each document unless you adjust your default settings.
How do I stop large spaces in Word?
Method 1: Change Layout Options
- First, click “File” then click “Options” to open “Word Options” dialog box.
- Next click “Advanced” and scroll down to the bottom of the box.
- Click “Layout Options” to bring out more choices.
- Check the “Don’t expand character spaces on a line that ends with SHIFT-RETURN” box and click “OK”.
How do I change the spacing between letters in Word 2011?
Change Character Spacing
- Select the text you want to format.
- Click the Home tab.
- Click the Font Dialog Box Launcher.
- Click the Advanced tab. …
- Click the Spacing list arrow, click an option, and then specify a point size to expand or condense spacing by the amount specified.
What does Ctrl F6 do in Word?
F6: Go to the next pane or frame in your Word window. You can use this to navigate the window without using your mouse. Shift+F6: Go to the previous pane or frame. Ctrl+F6: Go to the next open document window.
What is standard character spacing?
Defines the spacing between the characters of a block of text. default letter-spacing: normal; … letter-spacing: 0.1em; You can use em values: this allows the spacing to remain relative to the font-size.
What are the two techniques of spacing letters?
Changing kerning perception
While tracking adjusts the space between characters evenly, regardless of the characters, kerning adjusts the space based on character pairs.
Is 1.15 single spacing?
The value of «single» line spacing is 1.15 or 115%.
The Problem:
Here’s a problem I run into all the time when I’m in either Word 2003 or Word 2004 for the Mac. Let’s say I’m surfing the Web and find something really interesting. I select the text I want, copy it, open a Word document, and paste it in. Regardless of whether I use Paste Special or just plain Paste, the formatting is way off on every lineI get all sorts of weird tabs and spaces. This also happens with text from PDF files, Notepad, Text-Edit, and occasionall-y older versions of Word. Why can’t I just paste in the text without any formatting?
The Solution:
Choosing Edit » Paste Special and selecting the «Unformatted text» option should give you plain text. If not, on Windows you can try bouncing the text through Notepad first: paste it into Notepad, copy it again, and then paste it into Word. That should get rid of any formatting nasties.
If the text still contains extra spaces and tabs, they’re probably included in the PDF or web page for layout purposes. To remove them, either Alt-drag to select the column of unnecessary tabs or spaces or replace whitespace with a single space or tab, depending on the layout.
Apply Sets of Formatting Instantly
The Problem:
It’s taking me hours to format all these paragraphs by hand.
The Solution:
You need to use styles.
by updated Aug 01, 2016
Lesson 9: Line and Paragraph Spacing
/en/word2016/indents-and-tabs/content/
Introduction
As you design your document and make formatting decisions, you will need to consider line and paragraph spacing. You can increase spacing to improve readability and reduce it to fit more text on the page.
Optional: Download our practice document.
Watch the video below to learn how to fine tune line and paragraph spacing in your documents.
About line spacing
Line spacing is the space between each line in a paragraph. Word allows you to customize the line spacing to be single spaced (one line high), double spaced (two lines high), or any other amount you want. The default spacing in Word is 1.08 lines, which is slightly larger than single spaced.
In the images below, you can compare different types of line spacing. From left to right, these images show default line spacing, single spacing, and double spacing.

Line spacing is also known as leading (pronounced to rhyme with wedding).
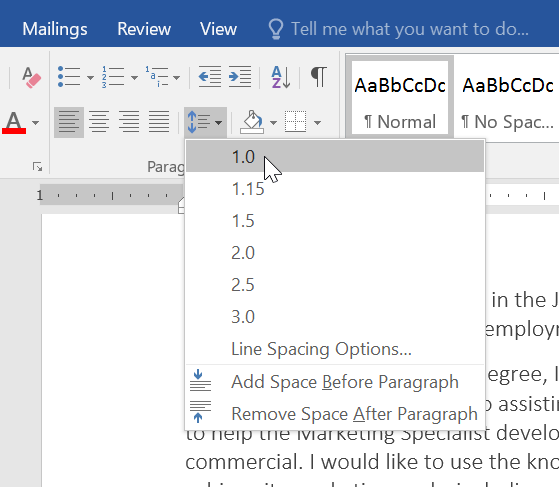
To format line spacing
- Select the text you want to format.

- On the Home tab, click the Line and Paragraph Spacing command, then select the desired line spacing.

- The line spacing will change in the document.


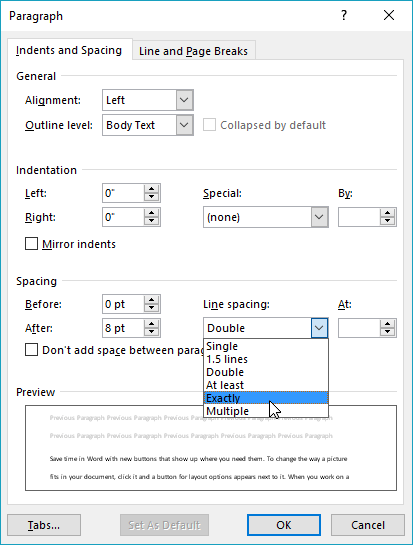
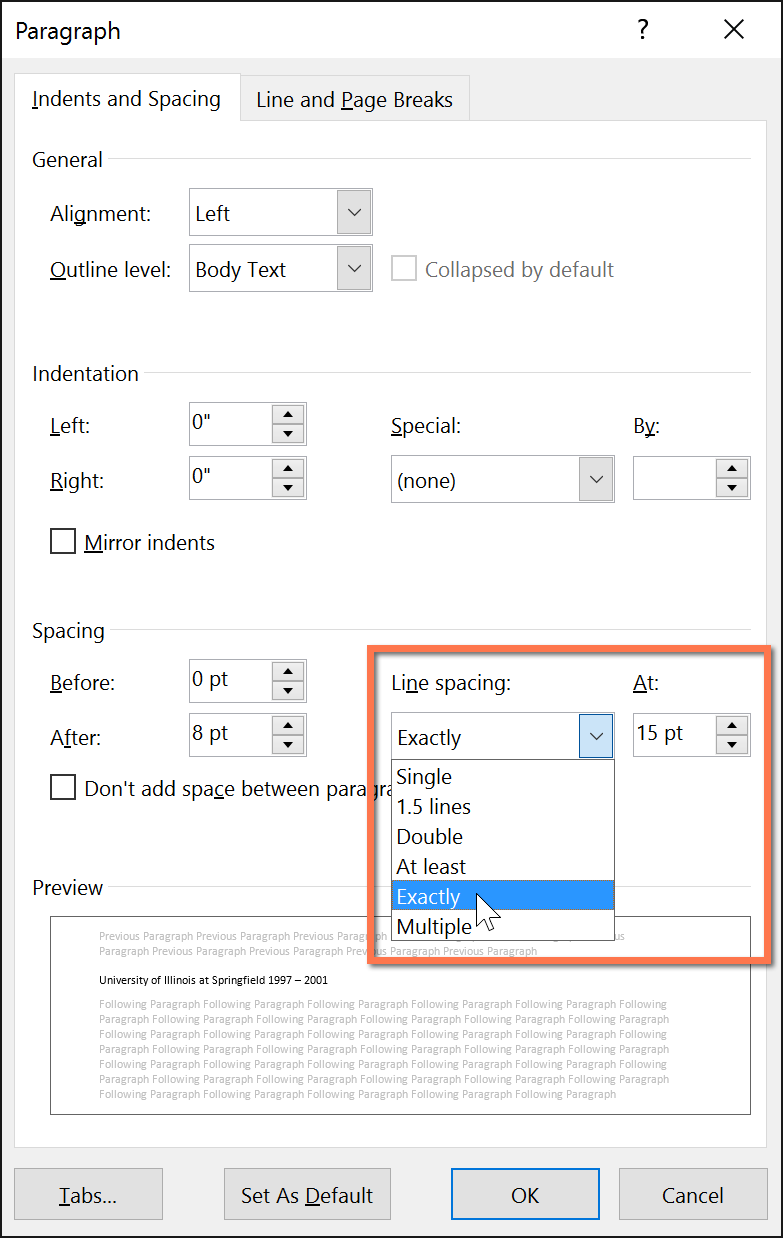
Fine tuning line spacing
Your line spacing options aren’t limited to the ones in the Line and Paragraph Spacing menu. To adjust spacing with more precision, select Line Spacing Options from the menu to access the Paragraph dialog box. You’ll then have a few additional options you can use to customize spacing.
- Exactly: When you choose this option, the line spacing is measured in points, just like font size. For example, if you’re using 12-point text, you could use 15-point spacing.
- At least: Like the the Exactly option, this lets you choose how many points of spacing you want. However, if you have different sizes of text on the same line, the spacing will expand to fit the larger text.
- Multiple: This option lets you type the number of lines of spacing you want. For example, choosing Multiple and changing the spacing to 1.2 will make the text slightly more spread out than single-spaced text. If you want the lines to be closer together, you can choose a smaller value, like 0.9.

Paragraph spacing
Just as you can format spacing between lines in your document, you can adjust spacing before and after paragraphs. This is useful for separating paragraphs, headings, and subheadings.
To format paragraph spacing:
In our example, we’ll increase the space before each paragraph to separate them a bit more. This will make it a little easier to read.
- Select the paragraph or paragraphs you want to format.

- On the Home tab, click the Line and Paragraph Spacing command. Click Add Space Before Paragraph or Remove Space After Paragraph from the drop-down menu. In our example, we’ll select Add Space Before Paragraph.

- The paragraph spacing will change in the document.

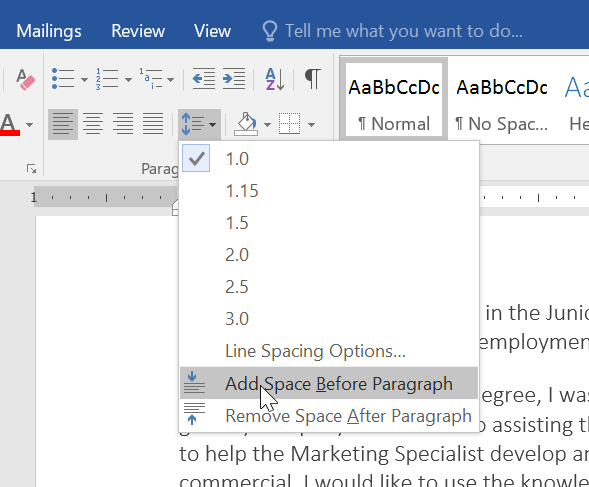

From the drop-down menu, you can also select Line Spacing Options to open the Paragraph dialog box. From here, you can control how much space there is before and after the paragraph.

You can use Word’s convenient Set as Default feature to save all of the formatting changes you’ve made and automatically apply them to new documents. To learn how to do this, read our article on Changing Your Default Settings in Word.
Challenge!
- Open our practice document.
- Select the the date and the address block. This starts with April 13, 2016, and ends with Trenton, NJ 08601.
- Change the spacing before the paragraph to 12 pt and the spacing after the paragraph to 30 pt.
- Select the body of the letter. This starts with I am exceedingly and ends with your consideration.
- Change the line spacing to 1.15.
- When you’re finished, your page should look like this:


/en/word2016/lists/content/
Paragraph formatting in Word is all about the paragraph positioning, paragraph alignment and paragraph spacing as well as line spacing, indentation and hanging text.
I’m not talking about individual letters or words, but a paragraph, as a block of text.
A paragraph could be several lines long, or indeed one line or even one word. A paragraph ends with a paragraph marker, which looks like a backward P.
In this post you’ll discover how to accurately control your paragraph formatting.
Clickable Table of Contents
1. Context & Overview
In this post I tackle paragraph formatting which covers paragraph alignment, positioning, indentation, line spacing, paragraph spacing and hanging text.
Word formatting tools to make TEXT look fantastic
How to format individual characters and words.
Headers, Footers and other useful PAGE Settings
Look at things from a document level rather than individual words and paragraphs.
2. Setting the paragraph alignment in Word
The text of your paragraph may be lined up with:
- the left margin (called left-alignment)
- the right margin (called right-alignment)
- both margins (called justified) or
- the centre of the page (called centred)
To align your paragraph:
1. Place your cursor anywhere in a paragraph.
2. Select the Home tab, if necessary.
3. Click one of the alignment icons in the Paragraph group.
![]()
Align the paragraph to the left margin.
![]()
Centre the paragraph text.
![]()
Align the paragraph to the right margin.
![]()
Justify the paragraph text. This aligns the text to the left and right margins and spaces out the words on each line equally.
3. How to set the indent distance in Word

To indent a paragraph:
1. Place the cursor anywhere in the paragraph.
2. Select the Home tab, if necessary.
3. Click the Indent icon in the Paragraph group to increase the indent distance.
4. Click the Outdent icon in the Paragraph group to decrease the indent distance.
![]()
Standard indents occur at 1.27cm increments (1.27cm = ½ inch), so with every click of the icon, the indent increases by 1.27cm.
You can also change the indent manually by clicking-and-dragging the indent marker (upward-pointing marker) on the ruler to a new position.

INTERESTING POINT
Many of the conventions used in Word originate back to the original printing press. For example, you will often see measurements of 2.56cm or 1.27cm which are metric conversions from imperial measurements. 2.56cm = 1”. 1.27cm = ½ inch. 0.l64cm = ¼ inch.
You will also see ‘pt’ used throughout Microsoft Office. ‘pt’ is short for point. There are 72 points in one inch. If you are using font size 12, there are 6 lines of printed text per inch (because 6 x 12 = 72).
Why this convention is used today is anybody’s guess. It’s a historical thing.
4. How to space out the lines in a paragraph
You may also space out the lines within a paragraph. You don’t specify a measurement here, just a unit.
1. Place the cursor anywhere in the paragraph.
2. Select the Home tab, if necessary.
3. Click the Line & Paragraph Spacing icon in the Paragraph group.
4. Select a number option from the Line Spacing drop-down list.

5. How to control spacing between paragraphs
To increase the amount of space between your paragraphs:
1. Place the cursor anywhere in the paragraph.
2. Select the Home tab, if necessary.
3. Click the Line & Paragraph Spcing icon in the Paragraph group
If the before or after paragraph spacing are zero, the available options are:
- Add Space Before Paragraph or
- Add Space After Paragraph

But if the before or after paragraph settings are not zero, the available options are:
- Remove Space Before Paragraph
- Remove Space After Paragraph or

- It is often a mix of the two

6. How’s it hanging?
Back in the old days, a school essay would be written with the first line of each paragraph indented and the rest in line with the margin, like this …

To do this, set the first line indent:
1. Click the little launcher symbol in the bottom-right of the Paragraph group.

2. Choose the Indents and Spacing tab, if necessary.
3. Locate the Indentation section:
4. Choose First Line from the Special drop-down list.
5. Set the size of the indent in the By box.

Sometimes you want the first line to be on the margin and all subsequent lines indented, like this …

This is called a hanging indent.
1. Click the little launcher symbol in the bottom-right of the Paragraph group.
2. Choose the Indents and Spacing tab, if necessary.
3. Under the Indentation section,
4. Choose Hanging from the Special drop-down list.
5. Set the size of the indent in the By box.

7. Using the Paragraph Formatting dialog box
The paragraph alignment, indentation, line spacing, paragraph spacing and hanging settings can all be set from one single dialog box.
Click the little launcher symbol in the bottom-right of the Paragraph group to display the Paragraph dialog box.
From here, all the paragraph settings can be changed in one place.

8. Key Takeaways
- Paragraphs may be aligned to the left margin, right margin, centred or justified.
- Text may be indented from the left or right margins to make it stand out.
- The lines within a paragraph may be spaced out
- Paragraphs may be spaced apart from each other.
- Text within a paragraph may be hung in 2 different ways or not at all.
- The Paragraph group on the Home ribbon contains all the tools to manipulate paragraphs.
- The Paragraph dialog box brings every paragraph setting into a single place for easy manipulation. To display the Paragraph dialog box, click the XXX symbol on the bottom-right corner of the paragraph group.
I hope you found plenty of value in this post. I’d love to hear your biggest takeaway in the comments below together with any questions you may have.
Have a fantastic day.


About the author
Jason Morrell
Jason loves to simplify the hard stuff, cut the fluff and share what actually works. Things that make a difference. Things that slash hours from your daily work tasks. He runs a software training business in Queensland, Australia, lives on the Gold Coast with his wife and 4 kids and often talks about himself in the third person!
SHARE
The default in the resume template I used was «keep with next.» I copied the column to a new document and converted it from table to text. Then I could select the entire thing and turn off widow and orphan control. I found it difficult to do it while still in the table, because I could pull up the Paragraph settings only randomly, not consistently.
Thanks to Rick for mentioning that nasty «Keep with next» setting. 
FOLLOW UP: Actually, the above described technique helped, but I still get two pages with two lines at the bottom. Table is formatted to put all text at the top. They are consecutive pages so it isn’t a folio verso thing. I copied the misbehaving likes to Notepad to strip hidden formatting, put them back, and they jumped to the bottom of their respective pages.
2ND FOLLOW UP: Word 2013 is either buggy or there is a demon in the online template I chose. I solved the last remaining problems by setting a specific (exactly, not at least) row height for each row and set each to allow breaking across pages. On the second page, the table rows went out of bounds, as if I’d set different R and L page margins. Broke it into a second table to see if that would help. Sometimes I could resize the table to be within bounds, and then it would bounce back out. I discovered I could align either the L or R edge of the table but not both reliably. I aligned the left edge and used manual line breaks on the right since I wasn’t showing the table lines. (You can use lines you establish in your header/footer for an overall box effect.)
WHEW!
Содержание
- Неразрывный пробел в Ворде
- Удаление неразрывных пробелов
- Заключение
- Вопросы и ответы

Программа Microsoft Word во время набора текста автоматически перебрасывает на новую строку, когда мы доходим до конца текущей. На месте пробела, установленного в конце строки, добавляется своего рода разрыв текста, который в некоторых случаях не нужен. Так, к примеру, если вам необходимо избежать разрыва какой-либо целостной конструкции, состоящей из слов (название чего-то) или цифр (номер телефона), разрыв строки, добавленный с помощью пробела в ее конце, явно будет помехой. Исключить возникновение описанных проблем поможет знак неразрывного пробела, установленный вместо пробела обычного. Именно о том, как его поставить, и пойдет речь ниже.
Читайте также: Как в Word добавить или убрать разрыв страницы
Неразрывный пробел в Ворде
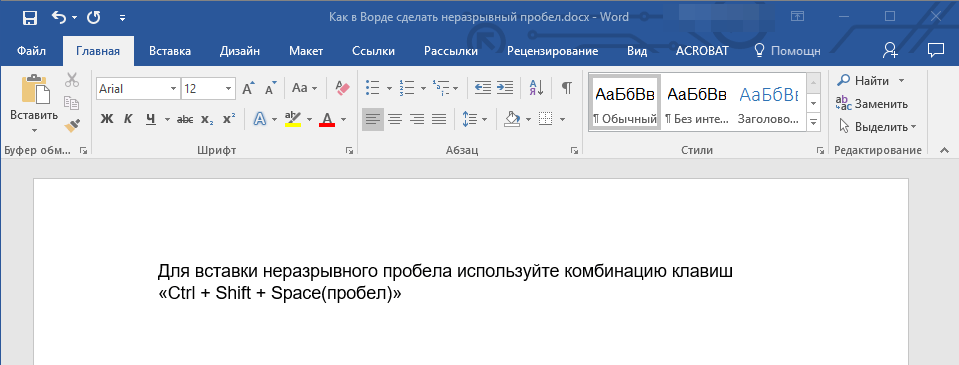
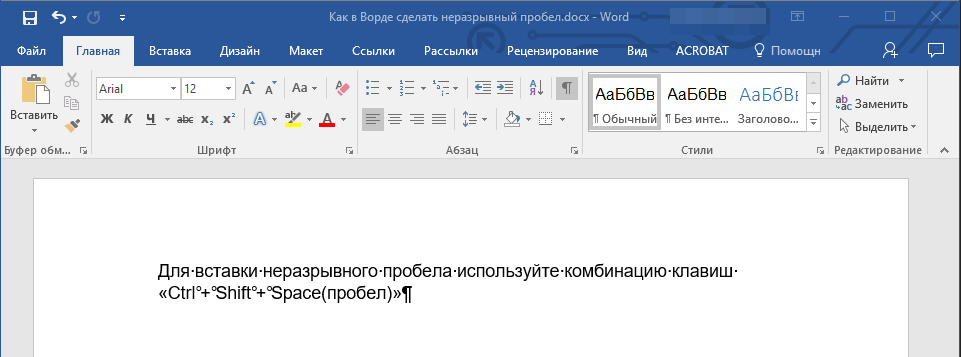
Поставить символ, который позволяет предотвратить разрыв текста, записанного в конце строки, можно с помощью специальной комбинации клавиш. Какой именно, можно понять по скриншоту ниже. На примере показанного на нем текстового документа, а точнее, конкретно этого предложения, можно наглядно продемонстрировать то, как работает неразрывный пробел.
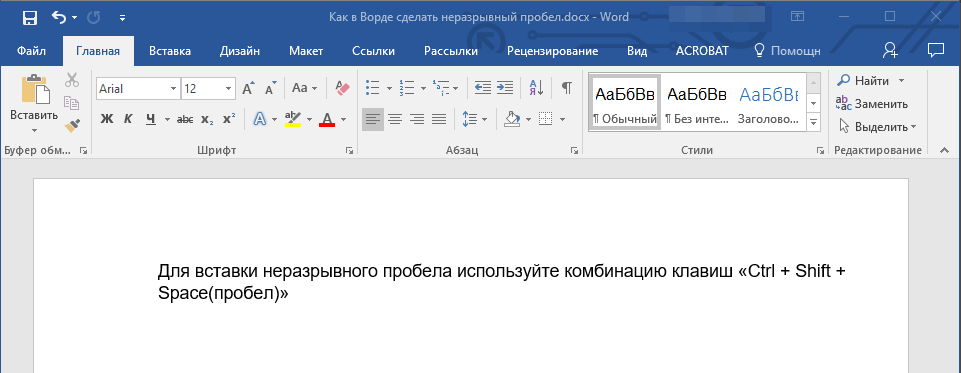
Обратите внимание, что комбинация клавиш, записанная в кавычках, разбивается на две строки, что зачастую является нежелательным. Как вариант, ее, конечно, можно записать и без пробелов, и в данном случае это исключит перенос и разрыв. Однако так происходит не всегда. Использование неразрывного пробела — решение наиболее эффективное и единственно верное, если вам важно то, как будет выглядеть и читаться текстовый документ. Для его написания выполните следующее:
- Установите указатель курсора (каретку) в то место, где необходимо поставить неразрывный пробел.
Примечание: Неразрывный пробел необходимо добавлять вместо обычного пробела, а не вместе/рядом с ним.
- Нажмите клавиши «Ctrl+Shift+Space(пробел)».
- Неразрывный пробел будет добавлен. Следовательно, конструкция, расположенная в конце строки, не будет разрываться, а целиком останется в предыдущей строке или, как это произошло в нашем примере, будет перенесена на следующую.
Для повышения эффективности «фиксации» можно повторить аналогичное действие, установив неразрывные пробелы между всеми составляющими конструкции, разрыв которой требуется предотвратить (в нашем примере это была взятая в кавычки комбинация клавиш). К тому же это сохранит ее целостность при любых изменениях текста вокруг.
Читайте также: Как в Ворде убрать большие пробелы
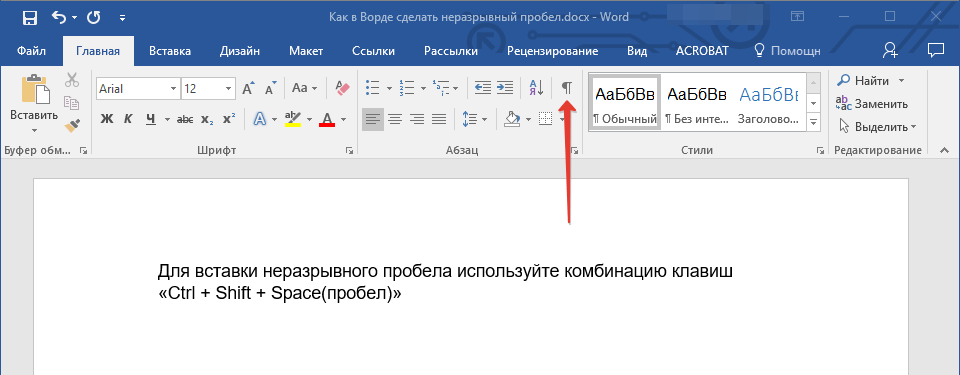
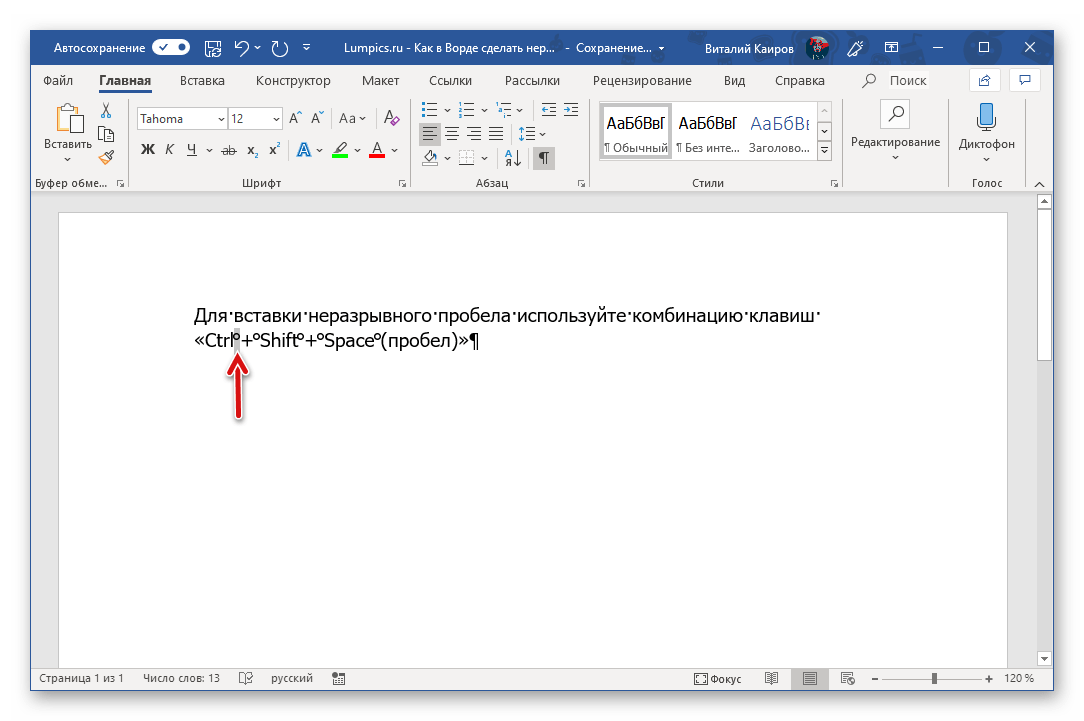
Примечание: Если включить режим отображения скрытых знаков, можно увидеть, что знаки обычного и неразрывного пробела отличаются визуально. Первые — это миниатюрная точка между словами в центре строки, второй — круг, приближенный к верхней черте написания. О том, зачем знание этого может потребоваться, расскажем в следующей части статьи.
Читайте также: Отображение скрытых символов в Ворде
Удаление неразрывных пробелов
Зная указанную нами выше комбинацию клавиш, поставить неразрывный пробел не составит труда. Но что делать в случаях, когда от него требуется избавиться? Все просто – нужно заменить его на обычный. Если таких символов буквально два-три-пять на весь документ Word, это можно сделать и вручную, просто удалив один и добавив вместо него другой, но если неразрывных пробелов довольно много, действовать нужно иным образом.
- Выделите и скопируйте (CTRL+C) любой из установленных вами неразрывных пробелов.

Примечание: Если не знаете, где находится этот символ, включите отображение скрытых знаков (показано в конце предыдущей части статьи) – это поможет его увидеть.
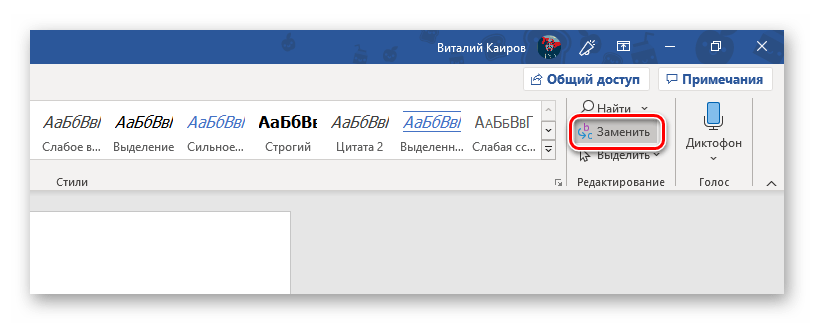
- Кликните по пункту «Заменить», расположенному в группе инструментов «Редактирование» вкладки «Главная» или же просто воспользуйтесь клавишами «CTRL+H».
- В строку «Найти» вставьте (CTRL+V) скопированный на первом шаге неразрывный пробел, а в строку «Заменить на» впишите пробел обычный.

Нажмите по кнопке «Заменить все» и ознакомьтесь с результатом проделанной программой работы.


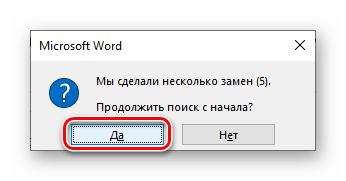
Примечание: Если поиск и замена символов была выполнена по всему документу, и в показанном выше окошке вы нажмете «Да» для ее повторного прогона, обычные пробелы будут заменены на себя же. Вследствие этого можно столкнуться с картиной, как на скриншоте ниже – количество выполненных замен окажется больше, чем изначальное количество неразрывных пробелов. Это просто информация к сведению, которая ни на что не влияет.

Окно «Найти и заменить» можно закрыть. Теперь в вашем текстовом документе между словами и символами будут установлены только обычные отступы.
Читайте также: Функция поиска и замены в Ворде
Заключение
Из этой небольшой статьи вы узнали, что представляет собой знак неразрывного пробела и для каких целей он используется при работе с текстовыми документами в Microsoft Word.
Еще статьи по данной теме:
Помогла ли Вам статья?
Are you searching for a more subtle way to make a heading or paragraph stand out, without using bold or enlarged text?
Expanding the characters may be the perfect solution for you.
Changing the spacing between the characters will make your text look bigger and bolder without actually increasing their size.
Alternatively, condensing the text will compress your text to fit into a smaller space. If you are trying to find a way to make your text fit on a single page, without reducing the text size to an un-readable size 8 font, reducing the space between the characters may be the solution you have been searching for.
Maybe you just want to reduce or expand the spacing between your characters to make your Word document more aesthetically pleasing.
Whatever your reason is for trying to change the spacing between your text characters in Word, in this post, we will show you how!
Changing the line spacing between letters in Microsoft Word
- Open your Word Document
- Highlight the text you want to change the spacing between
- Right-click on your highlighted text
- Click Font
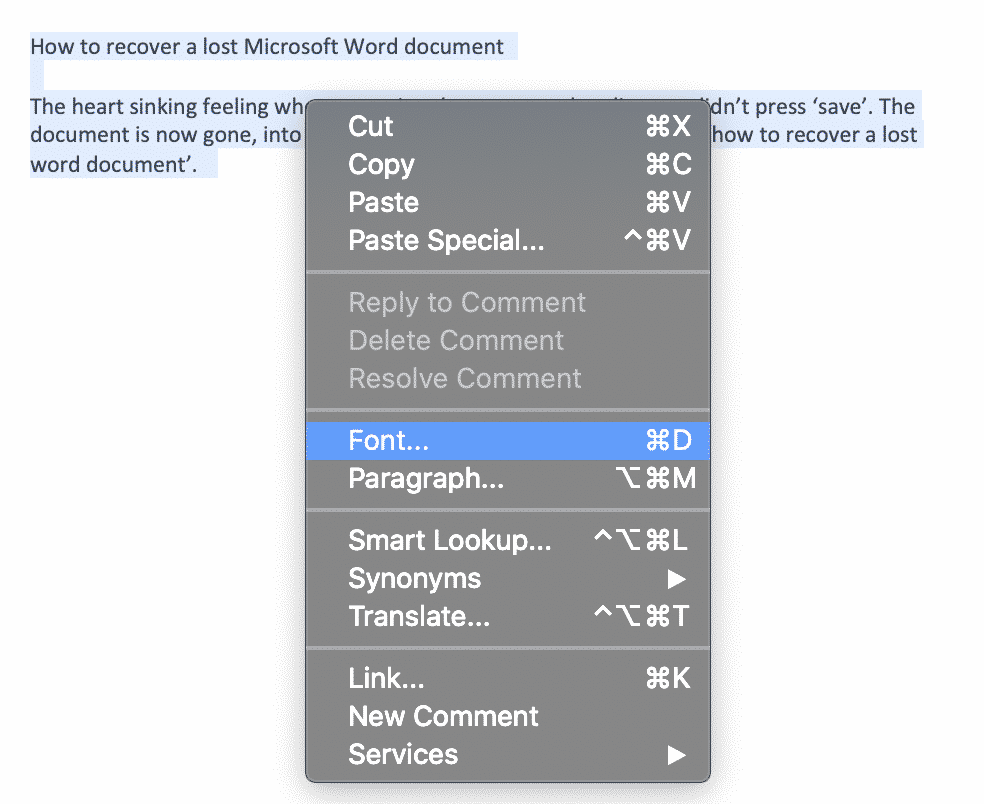
- Under Font, find and click Advanced

- Click Spacing
- Select Expanded to increase the spacing between your characters, or Condensed to reduce the size of the spacing between your characters
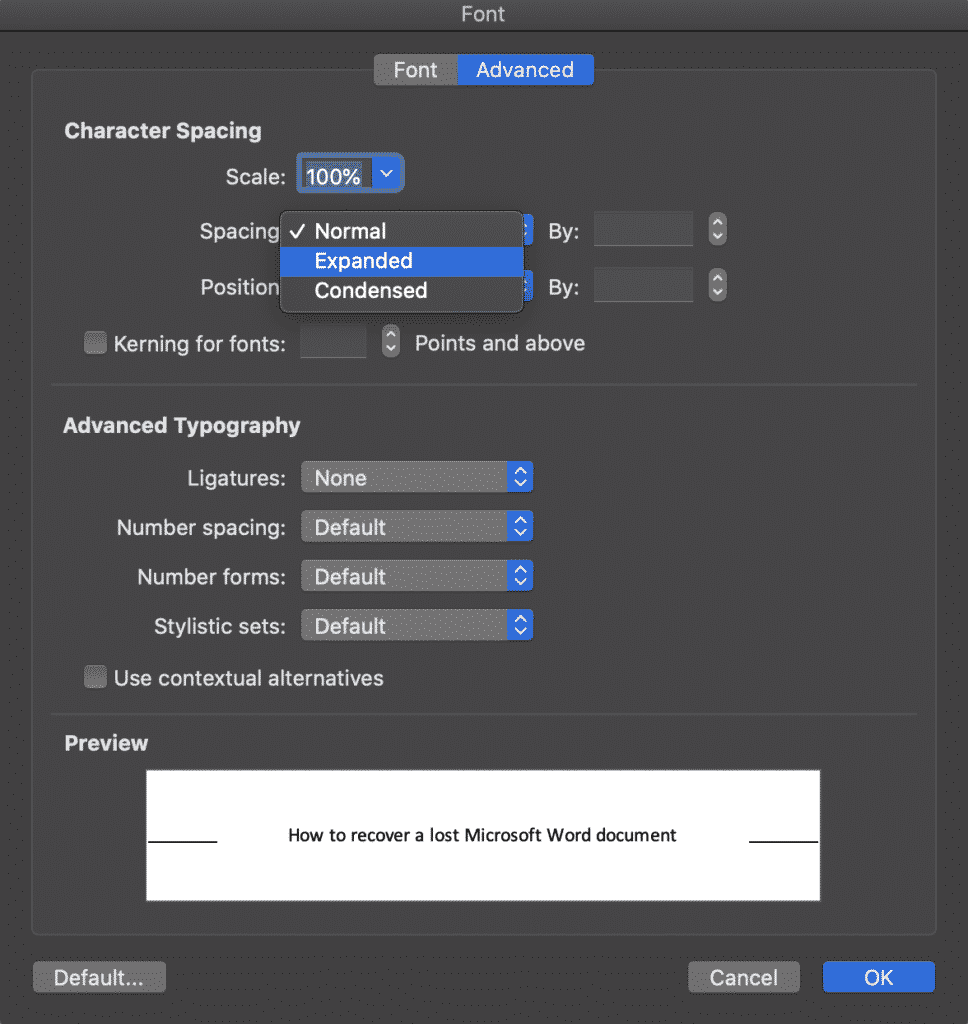
- Press OK
You have now successfully adjusted the spacing between each character selected.
If you would like to expand or condense the spacing throughout your entire Microsoft Word document you can do so by highlighting the full text body and following the steps above.
Searching for a Better Way to Manage Version Control?
We’ve all been there when you are looking for the most recent version of a particular document to send onto your boss, client or team members and just can’t find it anywhere.
I swear it was saved in the client folder last week, but since then John from Legal has taken a look, made some changes and moved the file. Leaving you with 25 different versions in your folder, but a sneaking suspicion that presentation_updated_v5final_UPDATED still isn’t the most recent one.
With no easy way to name files and everyone on the team taking a different approach version control is a problem almost all of us face.
It makes sense to use the _v1 addition on the end of a document, adding the next subsequent number next to the _v but then someone adds the word _final on the end. Honestly thinking this is the final version before another team member makes some more edits leaving you with something along the lines of _v8_final_v4 and the list goes on…
Do you think this is a frustration we have faced since the start of time?

Wonder no more, because it is not a frustration of your future.
With more than enough of us facing the same version control frustrations, the amazing team at Simul Docs decided to create a simple and perfect (we might be biased, but it’s pretty damn perfect) solution to version control in Microsoft Word.
Simul Docs manages version control for you.
When a document is created, or edited with Simul, the purpose-built tool will automatically take over your version control. A new document is created and given the version number 0.0.1, that’s easy.
Then one of your colleagues open the document, make a few changes and press save, this version automatically becomes version 0.0.2 without your colleague even thinking about a file name or where it needs to be saved.
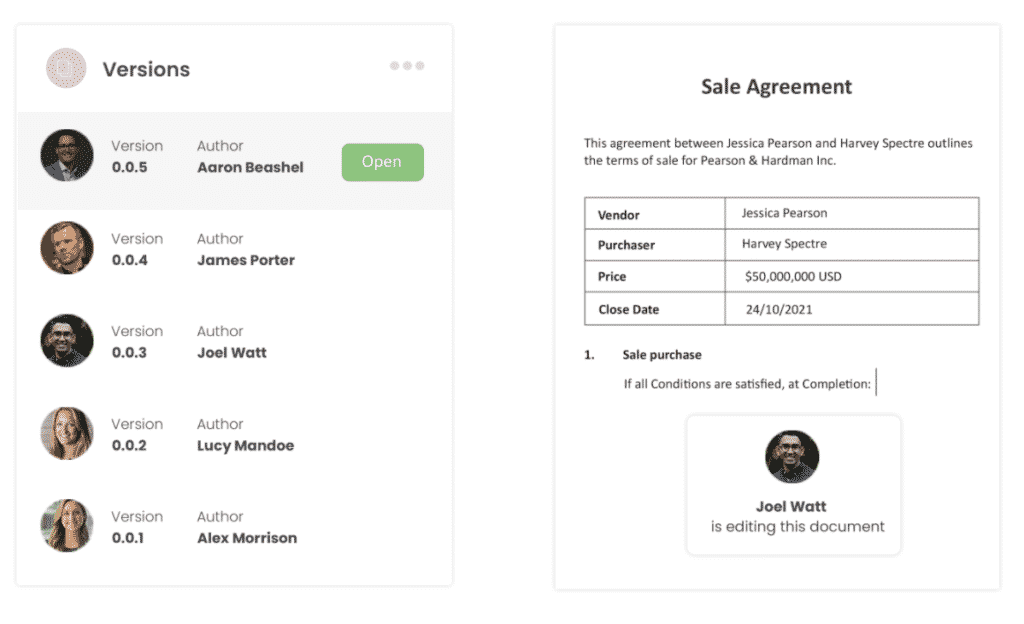
Simul takes care of your storage as well.
Each new version is neatly stored in the file’s version list, visible to any co-authors, making it easy for you to refer back to an old version anytime, or at a glance see who made edits each version and when they were done.
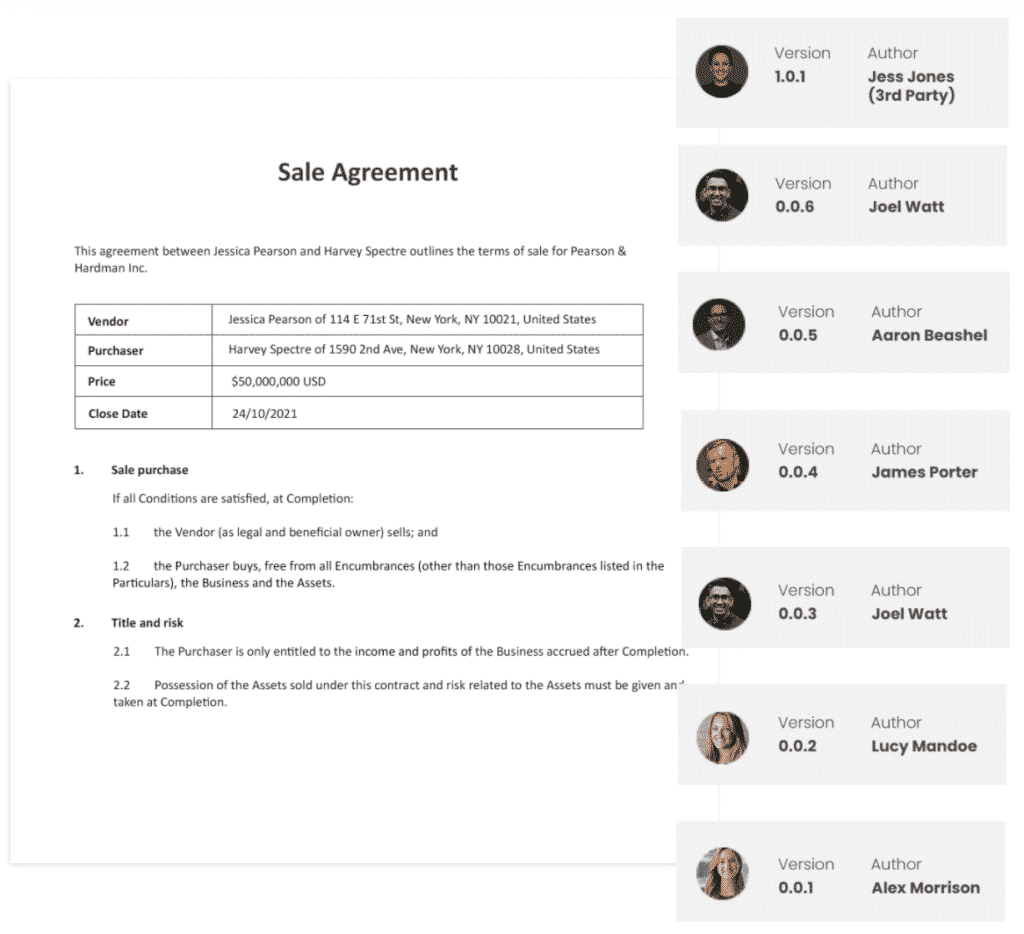
So, with Simul you can rest easy knowing your version control is under control and all of your documents are neatly stored away together, no matter who edits them opens them or requests to make a change.
Simul has you covered when it comes to version control, so why not try it out?
Currently offering a free trial, you have nothing to lose and you’ll never have to look at another document named _v4updated_FINAL-V2 again.
Simul Docs is a win win!