
Align the text left or right
- Select the text that you want to align.
- On the Home tab, in the Paragraph group, click Align Left or Align Right .
How do you put a border on Microsoft Word Mobile?
Choose a margin from the gallery in Word
- On your Android tablet, tap Layout. On your Android phone, tap the Edit icon. , tap Home, and then tap Layout.
- On the Layout tab, tap Margins.
- Select a margin from the drop-down gallery. Each selection shows the margin measurements.
How do you write on both left and right side of a Word document?
Yes! Click in the ruler to place a tab marker and then drag it over to the right hand side of your page. Now double click on the marker and change the alignment to right. Now when you press TAB while typing on that line, instead of just indenting your text a bit, you can type text aligned to the right of the page.
How do you type in front and back of a Word document?
In Word, do the following:
- Click the File tab.
- Click Print.
- Under Settings, click Print One Sided, and then click Manually Print on Both Sides. When you print, Word will prompt you to turn over the stack to feed the pages into the printer again.
How do you write two sided in Word?
Two columns, however, is a great way to get fancy and remain legible.
- Start up a new document. Or if you have an existing document, move the toothpick cursor to the document’s tippy-top by pressing Ctrl+Home.
- Click the Layout tab.
- Click the Columns button and choose Two. You’re done.
How do you make a document double sided?
Answer
- Open the Word document that you wish to print double-sided.
- Click on the option Copies and Pages so that a drop down menu appears.
- Select the Finishing option.
- From the Print Style dropdown, select 2-Sided Printing.
- To print regular (Portrait) double-sided, select Long-Edge (Left) from the Binding dropdown.
Why can’t I print double-sided?
Another thing to check is in System Preferences> Printers & Scanners. Select your printer then click the Options & Supplies button to see if there is a Duplex/Double-Sided option. If so, make sure it is enabled
How do I print a book Double-Sided in Word?
Print settings for booklets
- Go to File > Print.
- If your printer supports automatic printing on both sides, change Print One Sidedto Print on Both Sides.
- If your printer doesn’t support automatic printing on both sides, select Manually Print on Both Sides, and feed the pages back to the printer when prompted.
How do I print a double sided booklet?
Print a booklet on a double-sided printer
- Open the print dialog. This can normally be done through Print in the menu or using the Ctrl + P keyboard shortcut.
- Click the Properties…
- Under Range and Copies, choose Pages.
- Type the numbers of the pages in this order (n is the total number of pages, and a multiple of 4):
- Choose the Page Layout tab.
- Click Print.
How do I print a booklet in word with two pages per sheet?
- Open your project in Microsoft Word. Click the “File” menu, and then select “Print” from the left-hand panel.
- Navigate to the Settings panel, and then click the “1 Page Per Sheet” drop-down box and select the “2 Pages Per Sheet” option.
- Click the “Print” button at the top of the Print dialogue box to begin printing.
How do I split an a4 page into two in Word?
- On the Page Layout tab, in the Page Setup group, click the dialog launcher (the small arrow in the bottom right corner).
- On the Margins tab of Page Setup, beside “Multiple pages,” click the dropdown and choose “2 pages per sheet” as shown below.
How do I split an a4 page in half in Word?
Select the text on the page you want to split into two halves. Don’t select any text if you want to split all pages in your Word document. Click on the Layout tab. In the Page Setup group, click on the Columns button
How to show original text and a translation side by side in Word.
The recent versions of Word have had an in-built translation feature that, like so many things in Microsoft Office, doesn’t quite go far enough.
The basics are simple enough. On the Review tab there’s a Translate button. Click on that to translate the entire document or the selected text.

Choose the language you want and Word will go online and get a translation from Microsoft’s online service. You can either Insert the translation (the default) or copy to the clipboard.
Side-by-Side
What’s missing is a side-by-side option – to show the original and translated text next to each other. This allows comparison between the two texts.
There’s two obvious ways to do it in Word – columns or a table.
A two column format works for short amounts of text, less than a page. Put a column break below the original text so the translation starts at the top of the next column. More than a page and columns don’t work well because columns wrap from bottom to top of each page.
For larger side-by-side text you need a big table instead. A table column will extend down through two or more pages.
Create a table with two columns and two rows.
The top row is the heading and you’ll probably want that at the top of each page. Do that by putting the cursor in the top row then select Table | Layout | Properties | Row and check the option ‘Repeat as header row at the top of each page’.

Type in your headings then paste the original text into the large second row cell.
Selection falls short
At this point you’d expect to just select the original and use the Review | Translate option in Word … but not so fast. You can select a block of text but Word will only translate the first paragraph or so.
We tried various combinations in Word 2010 but it was always the same result – the translation was incomplete. See this attempt where we selected the entire speech text on the left and got back a translation of only the first part.

To work around that, select the original text and use the online translation service of your choice.
http://www.microsofttranslator.com/ – which is used by Word and will take you to the Bing translator if you use it outside of Word.
http://translate.google.com/
Both services have additional features you can explore at your leisure. Both have a ‘side by side’ display.
Paste the result into the other table column.
There are a few frills you can add:
- Insert some spacing so the original and translated paragraphs start on the same line.
- Change the language setting for the translated text to match the language. That will get rid of the red squiggly lines.
Is it a good translation?
Us mono-linguists have no idea whether the machine translation is accurate or not, but there’s a simple way to see if the translation is reasonable.
Simply get the service to translate the translation back into the original language. For example – An original English text is translated into Norwegian, then select the Norwegian version and translate it back into English.
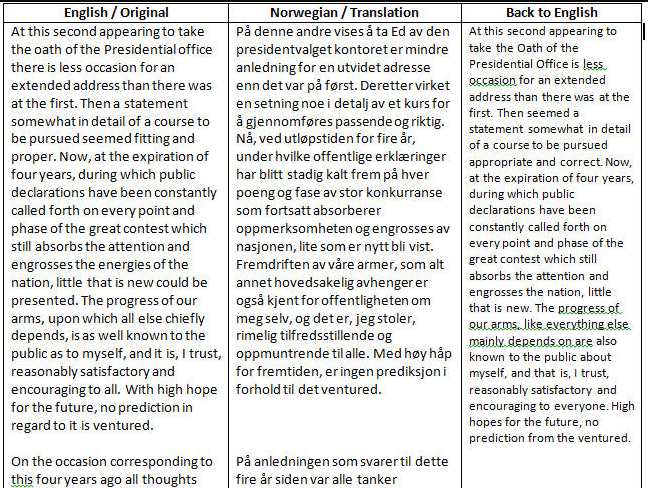
Then you can compare the original text and the return translation to see how closely they compare. As you can see above, the Microsoft/Bing translator does a good job with Lincoln’s Second Inaugural Address. Any of our Norwegian friends would accurately appreciate the great man’s words.
Word for Microsoft 365 Word 2021 Word 2019 Word 2016 More…Less
Page through a document like a book using the Side to Side command

-
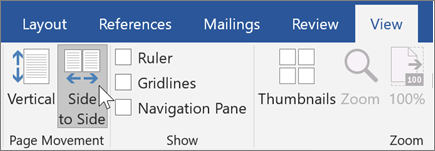
On the View tab, select
 Side to Side.
 -
Flip through pages with your finger if you have a touch screen, or use the horizontal scroll bar or mouse wheel to move through the pages.
 Side to Side.
Note: Side-to-side page movement switches off the ability to pick a zoom setting. Select Vertical page movement to be able to zoom again.
Jump quickly to the page you want
Thumbnails give you a quick peek of all the pages so you can jump to the page you want.
-
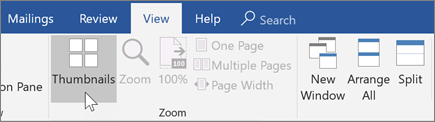
While using Side to Side page view, choose Thumbnails in the Zoom group.
-
Select a thumbnail to jump directly to that page.
If you’re using the Vertical page view
-
On the View tab, select Navigation Pane in the Show group
-
Select the Pages tab to see thumbnails.
Tip: To quickly switch between viewing a page and viewing thumbnails hold down Ctrl and use your mouse wheel. On a touch screen, pinch to zoom out to thumbnails.
Need more help?
Want more options?
Explore subscription benefits, browse training courses, learn how to secure your device, and more.
Communities help you ask and answer questions, give feedback, and hear from experts with rich knowledge.
Microsoft Office Word 2003
Show All
Flow text side-by-side with linked text boxes
You can use linked text boxes to create columns of text that flow side-by-side, instead of wrapping from one column to another.
For example, you can have text from column 1 flow to column 1 on the next page, and text from column 2 flow to column 2 on the next page.
- On the Standard
toolbar, click New Blank Document
to create a new document, or create a new document from a template. - On the Standard toolbar, click Show/Hide
to display paragraph marks. - If you want to allow room for a headline or other text before the linked text boxes, click at the top of the page, and press ENTER.
- Click where you want the linked text boxes to begin.
- On the Insert menu, click Text Box.
- Drag the pointer on the page where you want the first column.
- On the Insert menu, click Text Box again.
- Drag the pointer on the page where you want the second column.
- Press CTRL+END to move the pointer immediately before the last paragraph mark on the page, and press CTRL+ENTER to create a page break.
- Repeat steps 3 through 9 for each page that will contain side-by-side columns in your document, and then return to the first text box you created.
- Click the text box on the left once to select it.
To do this, move the pointer over the border of the text box until the pointer becomes a four-headed arrow, and then click the border.
- On the Text Box toolbar, click Create Text Box Link
.
The pointer becomes a pitcher.
- Click the text box on the left side of the second page to create a link.
- Create links for all text boxes within the same story on the left side of the document.
- In the text boxes on the right side of the page, repeat steps 11 through 14 for every text box in the right chain, or story.
 to create a new document, or create a new document from a template.
 to display paragraph marks.
 .
.
View and compare documents side by side
- Open both of the files that you want to compare.
- On the View tab, in the Window group, click View Side by Side. Notes: To scroll both documents at the same time, click Synchronous Scrolling. in the Window group on the View tab.
Contents
- 1 Can I split screen two Word documents?
- 2 How do I open two Word documents in separate windows?
- 3 Why can’t I view Word documents side by side?
- 4 How do you put two Word documents together?
- 5 How do I display two documents at the same time?
- 6 How do I split my screen into two documents?
- 7 How do I turn on view side by side?
- 8 Why view side by side is not working?
- 9 How do I open two Word documents side by side on a Mac?
- 10 Why can’t word compare two documents?
- 11 How do I put multiple documents into one PDF?
- 12 How do I combine Word and PDF documents?
- 13 How do I put two pages side by side?
- 14 How do I do side by side on Windows 10?
- 15 How do I compare two Word documents for similarities?
- 16 How do I create a subdocument in Word?
- 17 Can you split screen on Mac with Word?
- 18 How do I use two screens on my Mac?
- 19 How do I split my screen between two monitors on a Mac?
- 20 How do you redline a document?
Can I split screen two Word documents?
You can even view two parts of the same document. To do this, click on the Word window for the document you want to view and click “Split” in the “Window” section of the “View” tab. The current document is split into two parts of the window in which you can scroll and edit different parts of the document separately.
How do I open two Word documents in separate windows?
Go to File > Options > Advanced, scroll down to the Display section, and check the box for “Show all windows in the Taskbar”. Now each document will open in a separate window, and you can drag each window to a separate monitor. When that box is unchecked, all documents open in the same window (as child windows).
Why can’t I view Word documents side by side?
To enable this view, first click the “View” tab in the Ribbon. Then click the “View Side by Side” button in the “Window” button group. Notice that this is a toggle button. So, to turn off View Side by Side in Word, click the “View Side by Side” button again.
How do you put two Word documents together?
In this article
- Select the Insert tab.
- Select Object, and then select Text from File from the drop-down menu.
- Select the files to be merged into the current document. Press and hold Ctrl to select more than one document. Documents will be merged in the order in which they appear in the file list.
How do I display two documents at the same time?
See two documents side by side in Word
- Open the 2 documents.
- Select View > View Side by Side. If you scroll up or down, the other scrolls as well. If you want them to scroll separately, select Synchronous Scrolling to turn it off.
How do I split my screen into two documents?
Open two or more windows or applications on your computer. Place your mouse on an empty area at the top of one of the windows, hold down the left mouse button, and drag the window to the left side of the screen. Now move it all the way over, as far as you can go, until your mouse won’t move anymore.
How do I turn on view side by side?
View two worksheets in the same workbook side by side
- On the View tab, in the Window group, click New Window.
- On the View tab, in the Window group, click View Side by Side .
- In each workbook window, click the sheet that you want to compare.
- To scroll both worksheets at the same time, click Synchronous Scrolling.
Why view side by side is not working?
Make sure that Vertical is enabled. And of course you must have two documents open. This allows you to visually compare two documents side by side. If you want to use the Compare feature, that’s on the Review tab.
How do I open two Word documents side by side on a Mac?
Open both documents in word 2016 for mac. Click and hold the green expansion dot in the top left hand corner of the window. This puts the first document in the left hand side of a split screen and displays all other open windows on the right. Just select the document and you have side by side view.
Why can’t word compare two documents?
Sometimes, when comparing two documents using native Word, or DocXtools (while using Word as a comparison engine), Word will raise an “unable to compare” error. This is usually due to long tables, and can be overridden with a registry change.
How do I put multiple documents into one PDF?
The simplest method is to use File > New Document, and choose the option to Combine Files into a Single PDF. A file-list box will open. Drag in the files that you want to combine into a single PDF. You can add PDF files, or any combination of text, images, Word, Excel, or PowerPoint documents into the list.
How do I combine Word and PDF documents?
Combine multiple documents into one PDF file in Word
- Create an empty Word document, click Object > Text from files under Insert tab.
- In the Insert File window, select the Word documents you will combine to a PDF file, and click the Insert button.
- Then all selected documents are inserted into current document.
How do I put two pages side by side?
Open your document in Microsoft Word and then follow these steps.
- Click the View tab and in the Views section of the ribbon, select Print Layout.
- Next, on the View tab, go to the Page Movement section of the ribbon and select Side to Side.
- You’ll immediately see the window adjust to show two pages at the same time.
How do I do side by side on Windows 10?
Show windows side by side in windows 10
- Press and hold Windows logo key.
- Press the left or right arrow key.
- Press and hold Windows logo key + Up arrow key to snap the window to the top halves of the screen.
- Press and hold Windows logo key + Down arrow key to snap the window to the bottom halves of the screen.
How do I compare two Word documents for similarities?
Open one of the two versions of the document that you want to compare. On the Tools menu, point to Track Changes, and then click Compare Documents. In the Original document list, select the original document. In the Revised document list, browse to the other version of the document, and then click OK.
How do I create a subdocument in Word?
Click before the S of the title Selecting Text Quickly with a Mouse. The subdocument will be inserted above this point. In the Outlining tab, in the Master Document group, click Insert. The Insert Subdocument dialog is displayed.
Can you split screen on Mac with Word?
On the View tab, click Arrange, and then click Split. If the window is wide enough, Word displays Split directly on the View tab. To adjust the relative sizes of the panes, move the mouse pointer to the dividing line, and when you see the split pointer, click and drag the dividing line to a new position.
How do I use two screens on my Mac?
Press and hold the Option key and drag one display icon onto another display icon to mirror those two displays.
How do I split my screen between two monitors on a Mac?
How do I have a window span multiple monitors on macOS?
- Please open ‘System Preferences’ and select the ‘Mission Control’ preference pane, where you will see an option labeled ‘Displays have separate Spaces’
- When this checkbox is selected, OS X will snap a window to whichever display that window has the most area on.
How do you redline a document?
About This Article
- Click the Review tab.
- Click Track Changes.
- Click Simple Markup.
- Click All Markup.
- Click Show Markup.
- Highlight text and select New Comment.
- Edit the document and click Accept.
I have some problem with the Microsoft word.
I inserted a table with 2 column and then pasted on the 1st column ,a numerous amount of text.But now it happened that I’ve had a 1000+ page bt the texts are only in the 1st columns of the all page.the right columns are totally blank.
like I have…..
12 —
34 —
56 —
bt i need
12 56
34 78
So I need to paste the texts and the texts have to be arranged in the columns serially by horizontal order.and after filling up the columns in a page the text will be continued on the next page.
Its impossible to paste the texts individually.It will take maybe 500 hours.
please help me
asked Mar 23, 2012 at 13:22
![]()
2
Worst case scenario write a javascript that will correct the content of a text area.
I can help you write one if this solution will help you.
Basically, create an HTML page locally with a text-area and button. Paste in the text area and call javascript on the click to take the content, fix it, then put it back.
answered Mar 23, 2012 at 13:27
![]()
SullySully
14.6k5 gold badges54 silver badges79 bronze badges
1
I have a 2,000+ plus page document that I am formatting to import into an Access database for easier reading.
Only one thing is standing in my way — I have a bunch of items that look like this:
Hours: Materials:
6,708 $1329.00
Everything else in the document is well set up for importing except for that piece.
Looking for way (perhaps some advanced Find and Replace function?) to change that text in the document to read as follows:
Hours: 6,708
Materials: $1329.00
Thank you for your consideration of my issue.
asked Sep 13, 2016 at 15:25
![]()
2
You can use this wildcard find and replace to find the ones that have data for both Hours and Materials:

Then you just modify the wildcard to search again for your other possibilities:
- No figure for hours (assume just space?) but $ figure for materials
- Figure for hours but no $ figure for materials
- No figure for either, but just the titles Hours: Materials:
answered Sep 14, 2016 at 3:18
![]()
TanyaTanya
1,6601 gold badge9 silver badges5 bronze badges

When seeing two pages of your document is more efficient, you can view pages side by side in Microsoft Word and here’s how.
When you’re creating a document in Microsoft Word, you have helpful tools for using a view that works best for you. You can use a print, web, draft, or outline view as well as reading mode. But what you may not know is that you can view two pages in your document side-by-side, like a book.
This type of view is ideal when you want to see more than one page at a time. For example, you could have a school essay with many images, a business report with several charts, or a book where seeing more at once is beneficial. This also eliminates the need for scrolling.
The nice thing about the side-by-side view in Word is that this also presents you with a thumbnail view. So you can see all pages and then click to jump to the one you want. Here, we’ll show you how to use side to side view with the thumbnail feature.
To use Side to Side in Word, you’ll also need to use the Print Layout view. Open your document in Microsoft Word and then follow these steps.
- Click the View tab and in the Views section of the ribbon, select Print Layout. Alternatively, you can hit the Print Layout button if you display View Shortcuts in the Status Bar at the bottom.
- Next, on the View tab, go to the Page Movement section of the ribbon and select Side to Side.
- You’ll immediately see the window adjust to show two pages at the same time.

If your document only has one page, you obviously won’t see this until you have more than one page. But you can still enable it for when the time comes. You’ll simply see the page shrink to accommodate both its width and length in the window.

When you use Side to Side view, you can still scroll through your pages. However, scrolling will change the pages displayed rather than moving up and down a page. For instance, if you’re viewing pages one and two and scroll down, you’ll then see pages two and three.
To return to a one-page view in Word, select the View tab and in the Page Movement section of the ribbon, click Vertical.

Note: The Side to Side feature is currently only available in Microsoft Word on Windows, not Mac.
Use Thumbnail View
Only after you enable Side to Side in Word will you see the option for Thumbnails. Head back to the View tab and go to the Zoom section of the ribbon. Click Thumbnails.

You’ll then see a grid layout of all pages in your document. This is helpful for easily spotting a specific page. Simply click one to go directly to it. You can also exit Thumbnails by clicking its button in the ribbon to turn it off.

Cover More at Once, View Pages Side-by-Side in Word
There are plenty of document types where seeing two pages side-by-side can be more convenient than one page at a time. So remember this handy feature the next time you have a document with several pages.
For more help working with pages, check out how to rearrange pages in Word or how to make a one page in Word landscape view.
![]()