I was creating a Word document template for my team to use, and I wanted to include a reference number in the header to make it appear on each page. I initially created a field for the user to click and enter the value. The problem with using a simple entry field and sticking it in the header is that it’s grayed-out and easily forgotten.
So, instead of using a textbox field, I decided to prompt the user for the value by using a fill-in field. It’s an easy thing to do, and users of the template will never forget to enter the value. (Of course, they might choose to ignore the prompt, but that’s a different problem!)
To create a fill-in field in Word 2013, do the following:
- Put your cursor in the document where you want the field to appear
- In the INSERT bar in the ribbon, choose Quick Parts > Field…
- In the Field dialog, choose Fill-In as the field name, enter the prompt text, and click OK
- Be sure to save your document as a Word Template
That’s all there is to it. When you create a new document from the template, you’ll be prompted, and the value will be filled in.
Good stuff!
I’m enthusiastic and passionate about creating intuitive, great-looking software. I strive to find the simplest solutions to complex problems, and I embrace agile principles and test-driven development.
View all posts by Adam Prescott
Are you tired of typing the same blocks of text repeatedly in Word? Save yourself time with AutoText entries in Word. Store common blocks of text you type repeatedly.
Are you tired of typing the same blocks of text repeatedly in Word? If you type things often like your company name and address or paragraphs of text common to many types of documents you create, AutoText in Word is your friend.
You can store blocks of text in AutoText entries and insert them into any Word document in several easy ways. Today, we’ll show you how to create, edit, and delete AutoText entries and several ways to insert them into any Word document easily.
Show Paragraph Marks in Your Document
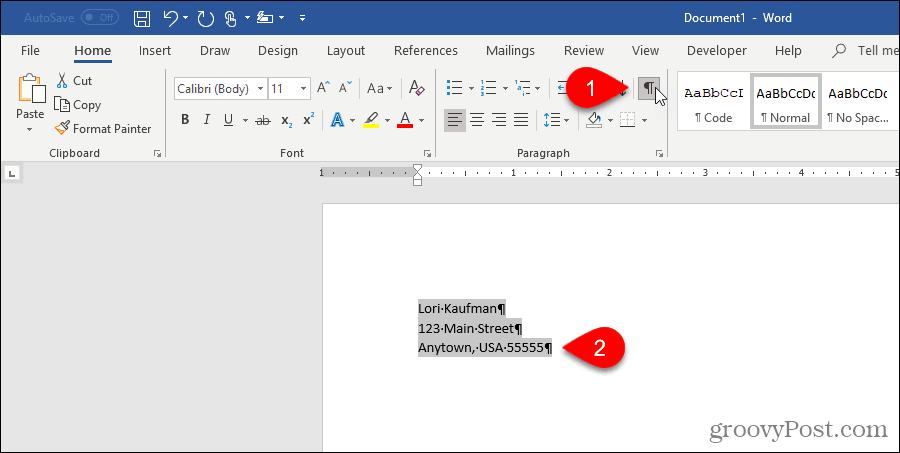
If you want the formatting for all paragraphs, including the last one, stored with the text in the AutoText entry, select the last paragraph mark. The paragraph mark at the end of each paragraph stores the formatting for that paragraph. If you applied any character formatting, like bold or italic, it’s automatically stored in the AutoText entry.
If you don’t see the paragraph marks in your document, click the Home tab. In the Paragraph section, click the paragraph symbol. Now you can see the last paragraph mark and select it.
Create a New AutoText Entry
To create a new AutoText entry, select the text you want to add to your collection of AutoText entries. Or, if you don’t have the text available, type the text into a document and then select it.
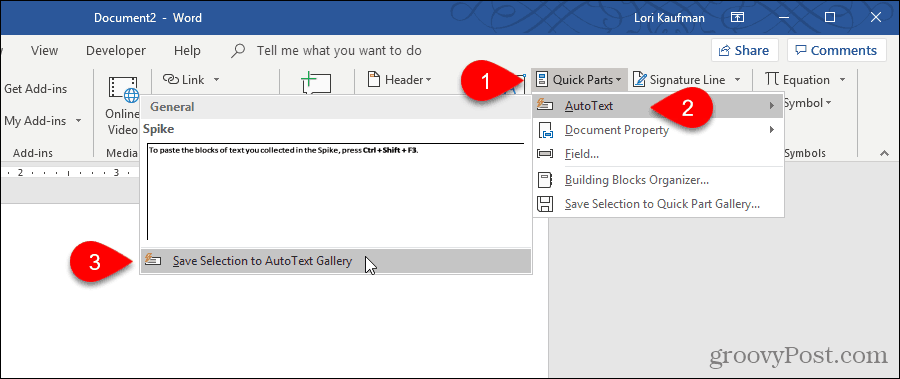
On the Insert tab, click Quick Parts in the Text section. Then, move your mouse over AutoText and select Save Selection to AutoText Gallery from the submenu.
You may see other items on the AutoText gallery, like items you copied to the Spike.
Note: You may also notice the Save Selection to Quick Part Gallery option available at the bottom of the Quick Parts menu. This option adds the selected text as a Quick Parts entry, not an AutoText entry. Quick Parts and AutoText entries are both building blocks, and both store text for later use. You could store the entry as a Quick Part, but we’re going to work with AutoText entries in this article.
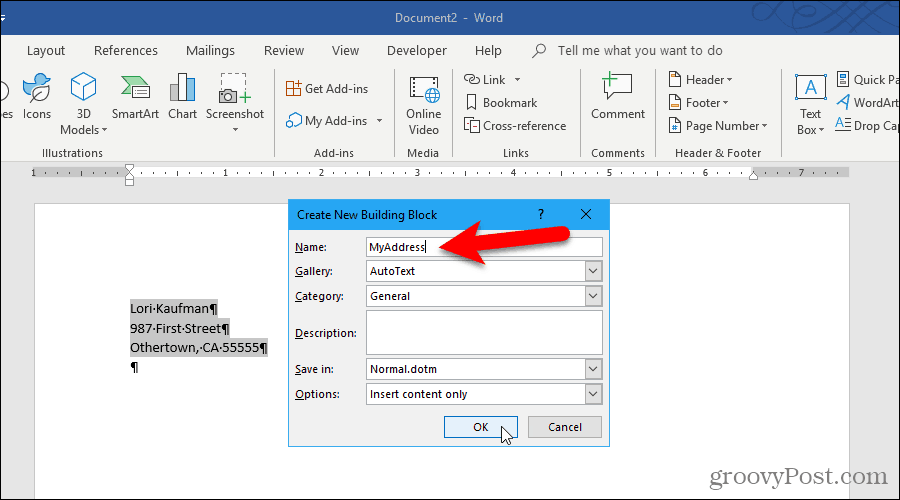
Because AutoText entries are building blocks, the Create New Building Block dialog box displays.
Enter a unique Name for the AutoText entry. Later in this article, we’ll show you how to enter an AutoText entry into your document just by typing a few characters. To do this, you must make the beginning of your AutoText entry name different from other AutoText entries. If it’s like the names of other entries, you’ll have to type more characters so Word knows which entry you want to insert.
Make sure AutoText is selected in the Gallery drop-down list. It should be by default.
General is selected by default in the Category drop-down list. Initially, it’s the only choice, and we’re going to select the General category for our example. But you can create a custom category by selecting Create New Category from the Category drop-down list. Enter a name for your custom category on the Create New Category dialog box and click OK. The new category is added and selected automatically in the Category drop-down list.
You can enter a Description for the AutoText entry if it helps to clarify what the entry is for. If the entry is self-explanatory, you don’t have to enter a description.
AutoText entries are saved in templates, not in documents. That way, they’re available in any document based on the template they’re saved in. The Normal template is the default selection in the Save in the drop-down list. You can save AutoText entries in custom templates, but we’re going to accept the default to save our new entry in the “Normal.dotm” template.
Note: To save an AutoText entry in a custom template, that template must be open to be available in the Save in drop-down list.
Finally, there are a few Options to choose from:
- To insert the AutoText entry on its own page in a document, select Insert content in its own page. This will set the text from the AutoText entry off from the rest of your document with page breaks.
- To insert the AutoText entry into its own paragraph, even if your cursor is in the middle of a paragraph, select Insert content in its own paragraph.
- For all other content, select Insert content only.
Click OK.
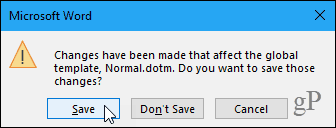
When you close the last open Word document, the following document may display if you have the option enabled to prompt you to save the Normal template.
Click Save to save the “Normal.dotm” template with your added AutoText entry.
Note: If Word doesn’t prompt you to save the Normal template when you change it, see below to turn on the option.
If you don’t get the above dialog box and want to be asked to save the Normal template when you change it, go to File > Options > Advanced. In the Save section on the right, check the Prompt before saving Normal template box. Click OK.
Insert an AutoText Entry from the Insert Tab
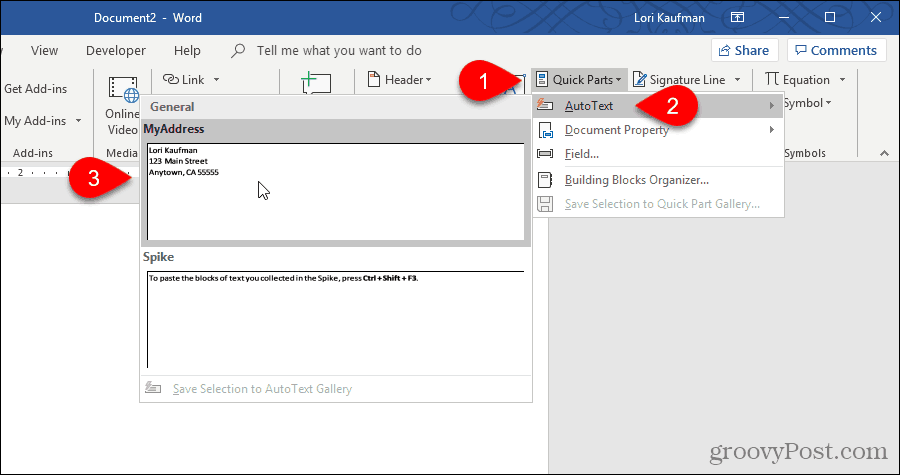
There are several easy ways to insert an AutoText entry into a Word document. One way is using the Quick Parts button.
In the Text section on the Insert tab, click Quick Parts.
Move your mouse over AutoText on the menu and click the AutoText entry you want to insert from the submenu.
Insert an AutoText Entry Using AutoComplete
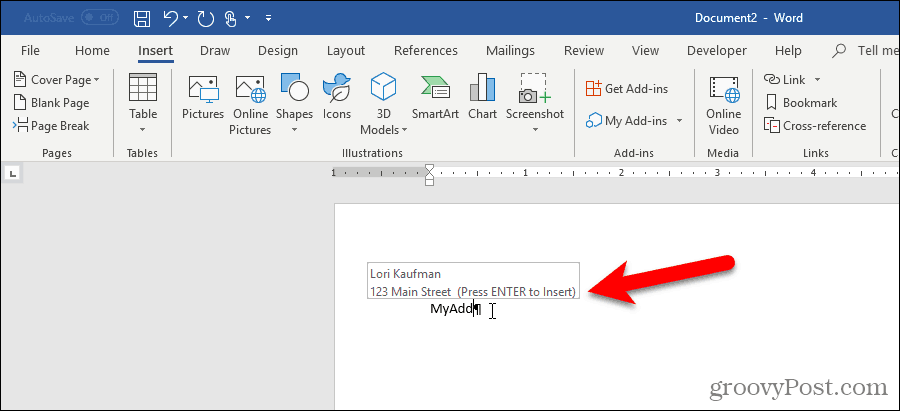
Another way to insert an AutoText entry is to start typing the name of the AutoText entry. A small popup displays showing part of the matching AutoText entry and instructing you to press Enter to insert. Press Enter to insert the entry into your document at the cursor. You can also press F3 to insert the matching entry.
The contents of the AutoText entry are inserted into your document, including the original formatting and line breaks.
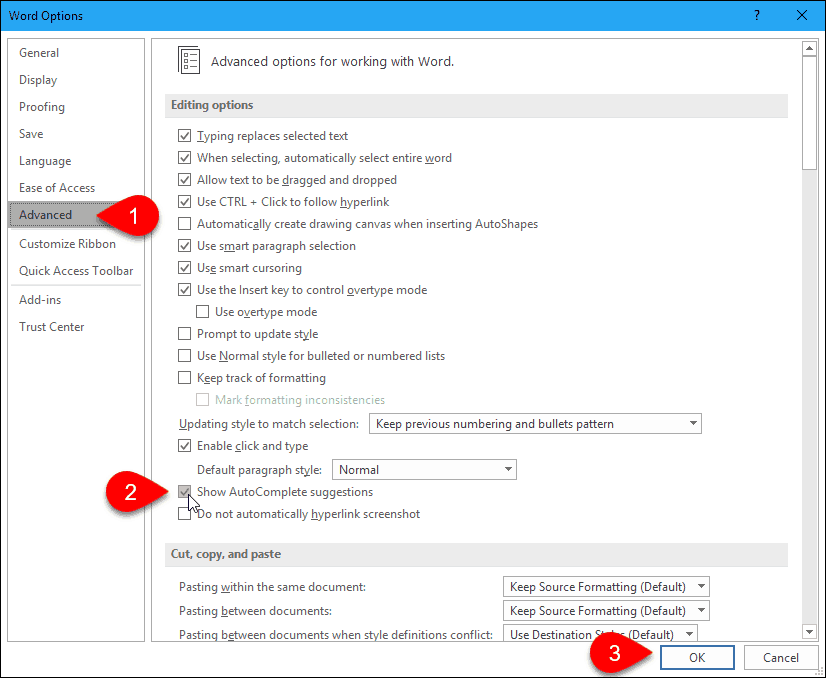
If you don’t see the AutoComplete suggestion when you start typing the name of your AutoText entry, the Show AutoComplete suggestions option is not enabled.
To enable the option, go to File > Options > Advanced.
In the Editing Options section, check the Show AutoComplete suggestions box.
Click OK.
Now, you should see your AutoText entry pop up when you start typing its name. Press Enter to insert it.
Add AutoText to the Quick Access Toolbar
You can make it quicker and easier to insert AutoText entries by adding the AutoText button to the Quick Access Toolbar.
Click the down arrow on the Quick Access Toolbar and select More Commands.
The Quick Access Toolbar screen displays on the Word Options dialog box.
Select All Commands from the Choose commands from drop-down list.
Then, select AutoText in the list on the left and click Add to add the AutoText button to the list on the right.
Click OK.
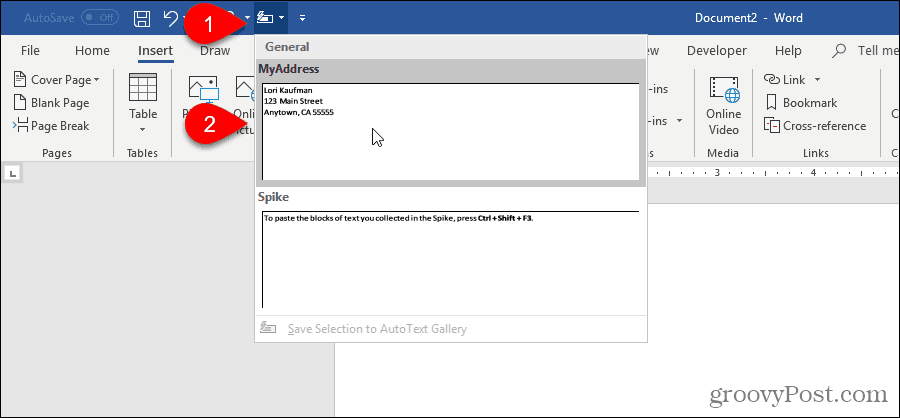
To insert an AutoText entry, click the AutoText button on the Quick Access Toolbar and click an entry on the menu.
Create a Shortcut for an AutoText Entry
If you prefer using the keyboard, you can add a keyboard shortcut for the AutoText entry you created.
Right-click on the ribbon and select Customize the Ribbon.
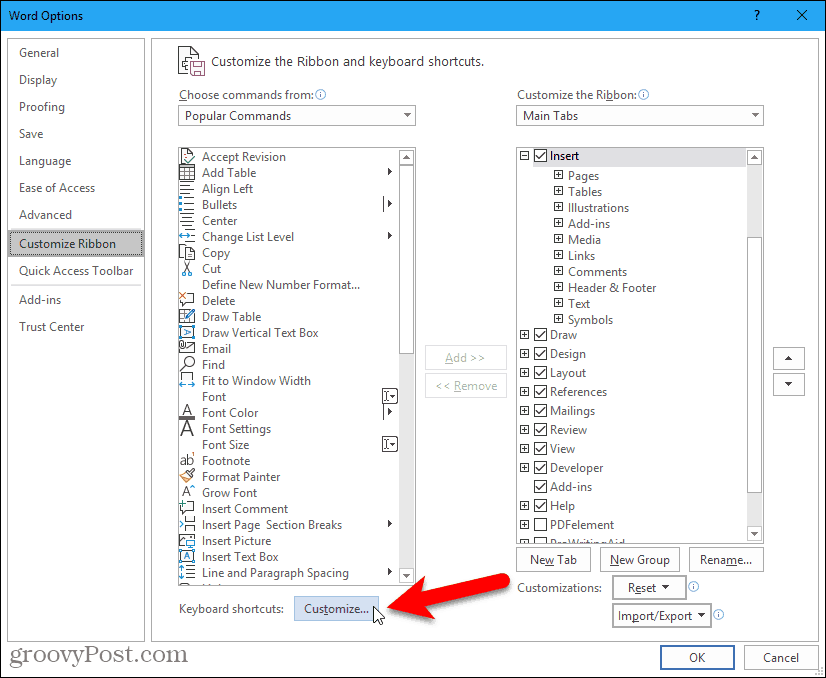
The Customize Ribbon screen on the Word Options dialog box displays.
At the bottom of the list of commands on the left, click Customize next to Keyboard shortcuts.
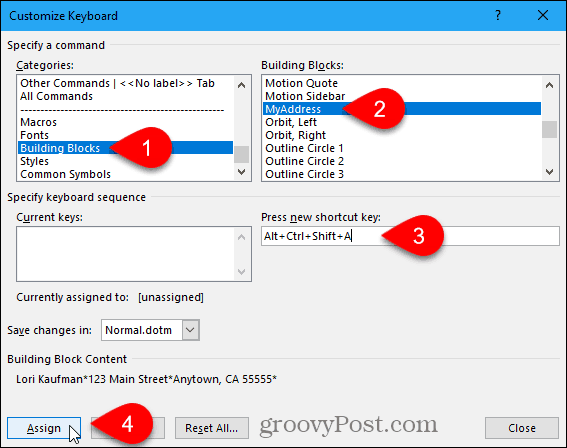
In the Categories box on the Customize Keyboard dialog box, select Building Blocks.
Then select your AutoText entry in the Building Blocks box on the right. For example, we select our AutoText entry MyAddress.
Put your cursor in the Press new shortcut key box and press the keyboard shortcut you want to use.
Click Assign.
Your shortcut is added to the Current Keys box.
Click Close.
Click OK on the Word Options dialog box to close it.
Now you can use your new keyboard shortcut to insert your AutoText entry.
Change the Content of an AutoText Entry
What if you need to change an AutoText entry you created? Maybe you moved, and you need to change your address AutoText entry.
First, type the entire changed entry in a new or existing Word document. Then, select it with the last paragraph mark if you want to keep the formatting.
On the Insert tab, click Quick Parts in the Text section. Then, move your mouse over AutoText and select Save Selection to AutoText Gallery from the bottom of the submenu.
On the Create New Building Block dialog box, enter the same name in the Name box as the existing AutoText you want to change.
Click OK.
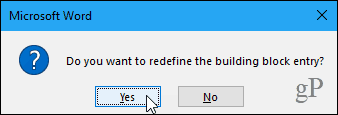
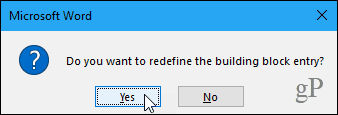
Click Yes when asked if you want to redefine the building block entry.
Now, you can insert the updated AutoText entry into any new or existing Word document.
Note: Changing an AutoText entry does NOT change the contents of that entry where you already inserted it. The changed AutoText entry is only used any time you insert it after changing it.
Edit the Properties of an Existing AutoText Entry
In addition to changing the contents of an AutoText entry, you can also change an AutoText entry’s properties, like its category and description and which template it’s saved in.
To edit the properties of an AutoText entry, click Quick Parts in the Text section on the Insert tab and select Building Blocks Organizer.
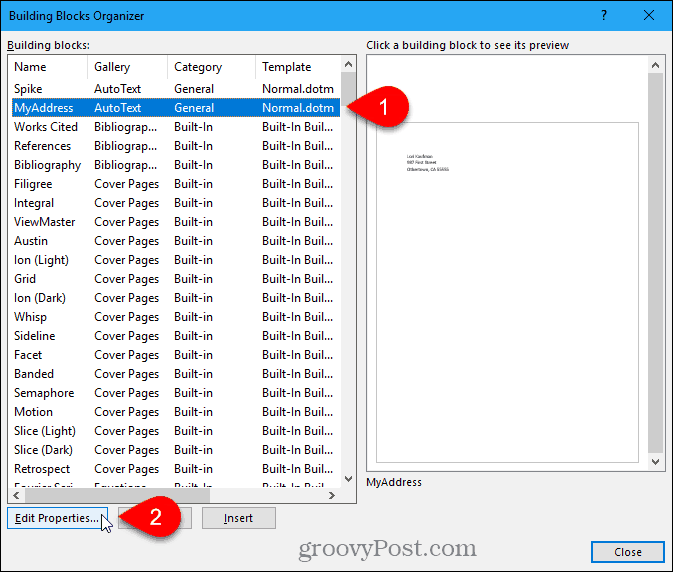
On the Building Blocks Organizer dialog box, you’ll see the full list of all available building blocks with the Name of each, and which Gallery, Category, and Template each is in. They’re listed in alphabetical order by Gallery, which defines the type of each building block.
At the top of the list, you’ll find the AutoText entries. Select the one you want to change the properties of and then click Edit Properties.
The Modify Building Block dialog box displays the same options as the Create New Building Block dialog box you used to create the AutoText entry.
Make any changes you want to the Gallery, Category, Description, Save in, and Options fields. See the Create a New AutoText Entry section at the beginning of this article for more information about these fields.
Click OK.
Click Yes on the confirmation dialog box displays to save your changes and redefine the AutoText entry.
Delete an AutoText Entry
If you decide you don’t need or want an AutoText entry anymore, you can delete it.
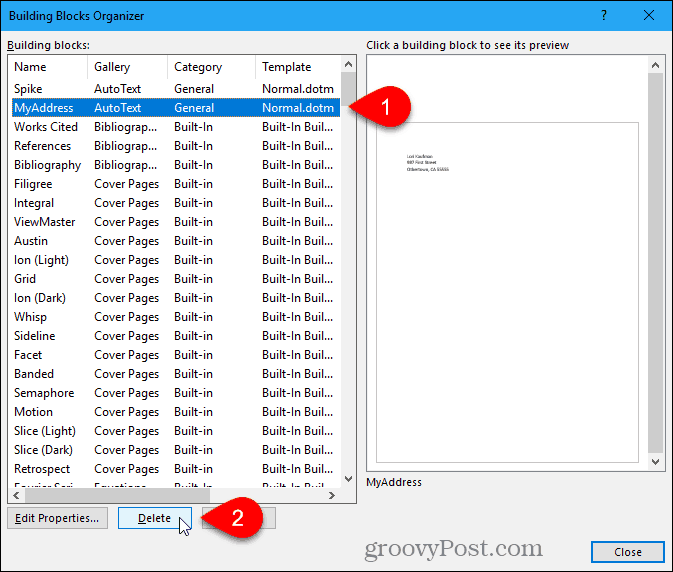
To delete an AutoText entry from the list of building blocks, click Quick Parts in the Text section on the Insert tab and then select Building Blocks Organizer.
Select the AutoText entry you want to delete in the Building blocks list.
Then, click Delete.
Click Yes on the confirmation dialog box to delete the entry and remove it from the list of Building blocks.
Click Close on the Building Blocks Organizer dialog box to return to your document.
Save Yourself Time and Reduce Errors with AutoText
AutoText entries are a great way to save yourself time and reduce errors when typing in Word. You can also automate tasks in Word using macros to save time and increase your productivity.

This article is written for users of the following Microsoft Word versions: 97, 2000, 2002, and 2003. If you are using a later version (Word 2007 or later), this tip may not work for you. For a version of this tip written specifically for later versions of Word, click here: Getting User Input in a Dialog Box.
Written by Allen Wyatt (last updated March 20, 2021)
This tip applies to Word 97, 2000, 2002, and 2003
If you need to get input from a user under control of a macro, one method you can use is to employ the InputBox function. This function displays a dialog box and allows the user to type a response. The result is a string, returned to your macro, which you can then process and use.
The syntax for the InputBox function is as follows:
sMyString = InputBox(sPrompt, sTitle, sDefault)
There are three parameters you can use with InputBox, although only the first one is absolutely required. In this syntax, sPrompt is the text you want displayed as the user prompt, sTitle is the text to display in the title bar of the dialog box, and sDefault is the default text string offered to the user in the dialog box. The user can edit or accept the default string, as desired.
As an example, the following code lines can be used to display a dialog box and ask the user for his or her name:
sPrompt = "Please check your name and make any corrections"
sTitle = "Name Entry"
sDefault = "John Doe"
sUserName = InputBox(sPrompt, sTitle, sDefault)
If you would like to know how to use the macros described on this page (or on any other page on the WordTips sites), I’ve prepared a special page that includes helpful information. Click here to open that special page in a new browser tab.
WordTips is your source for cost-effective Microsoft Word training.
(Microsoft Word is the most popular word processing software in the world.)
This tip (1356) applies to Microsoft Word 97, 2000, 2002, and 2003. You can find a version of this tip for the ribbon interface of Word (Word 2007 and later) here: Getting User Input in a Dialog Box.
Author Bio
With more than 50 non-fiction books and numerous magazine articles to his credit, Allen Wyatt is an internationally recognized author. He is president of Sharon Parq Associates, a computer and publishing services company. Learn more about Allen…
MORE FROM ALLEN
Displaying the Navigation Pane
One of the viewing modes you can use for a document involves the use of the Navigation pane. This shows a quick outline …
Discover More
Converting Forced Text to Numbers
If you have some numbers stored in cells that are formatted as text, you may get some surprises when you try to use those …
Discover More
Checking for Valid Hyperlinks
If you have a document containing a lot of hyperlinks, it would be cool if there was a way to check all those hyperlinks …
Discover More


