
Word for Microsoft 365 Word for Microsoft 365 for Mac Word 2021 Word 2021 for Mac Word 2019 Word 2019 for Mac Word 2016 Word 2016 for Mac Word 2013 Word 2010 Word for Mac 2011 More…Less
Text boxes and most shapes can include text in them. The text can be positioned horizontally or vertically, and it can appear on one line or wrap to multiple lines.
You can change the direction of the text, and you can also change the margins of text boxes and shapes for optimal spacing, or resize shapes for a better text fit.
Specify text direction in a shape or text box
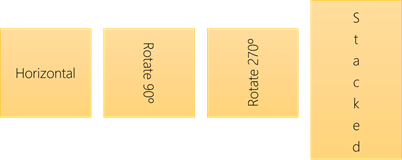
In a shape or text box, you can change the direction in which text is read. That is, you can pivot text 90 or 270 degrees so that it appears sideways.
-
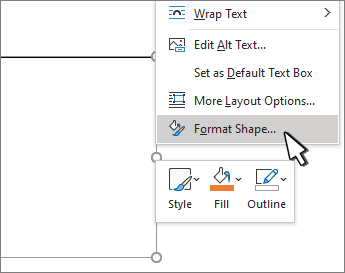
Right-click the edge of the shape or text box.
-
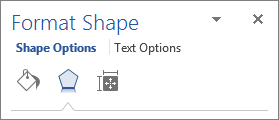
On the shortcut menu, select Format Shape.

-
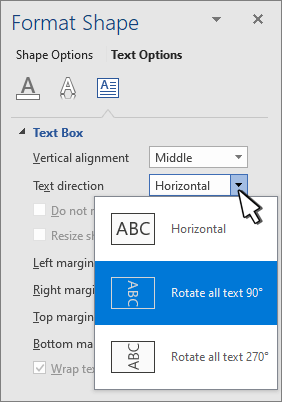
In the Format Shape pane, click Size/Layout & Properties
. -
Under Text Box, select the option that you want in the Text direction list.
 .
.
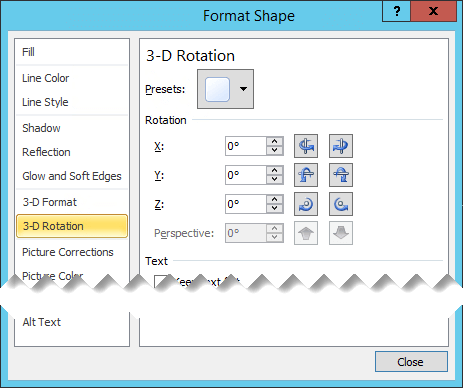
Rotate (mirror) text in a shape or text box
-
Right-click the box or shape and select Format Shape.
-
In the Format Shape pane, select Effects.
-
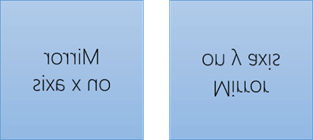
Select 3-D Rotation and in the X Rotation or Y Rotation box, enter 180.
-
(Optional) If your text box is filled with a color, you can remove the color in the Format Shape pane. Select Fill & Line
, select Fill, and then select No fill. -
(Optional) To remove the text box outline, right-click the text box, select Outline in the mini toolbar that appears, and choose No Outline.
 , select Fill, and then select No fill.
-
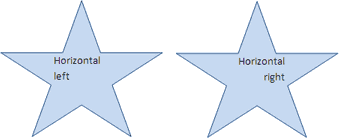
Select the paragraph, line of text, shape, or text box that you want to modify.
-
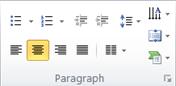
Go to Home and select the horizontal alignment option that you want.
-
Right-click the border of the shape or text box.
-
On the shortcut menu, select Format Shape.
-
In the Format Shape pane, select Size/Layout & Properties
.
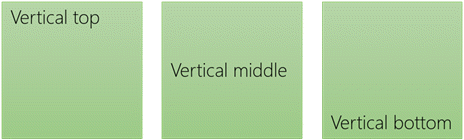
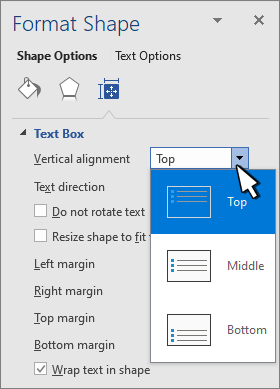
-
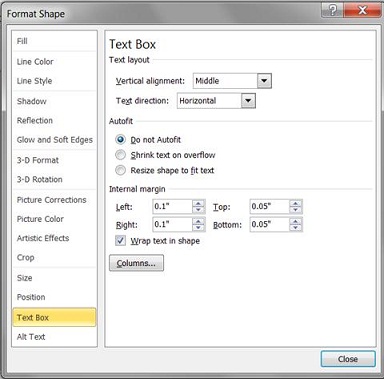
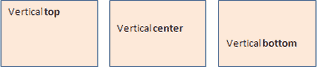
Select the option that you want in the Vertical alignment list.
When text wraps, it automatically continues on a new line as it reaches the right border of the shape or text box.
-
Right-click the border of the shape or text box that contains the text you want to wrap.
-
On the shortcut menu, select Format Shape.
-
In the Format Shape pane, select Size/Layout & Properties
, and then select Wrap text in shape.
The margin is the distance between the text and the outer border of the enclosing shape or text box.
-
Right-click the border of the shape or text box.
-
On the shortcut menu, select Format Shape.
-
In the Format Shape pane, select Size/Layout & Properties
.
-
Specify a measurement in inches or millimeters (mm) for any of the following margins:
-
Left margin
Distance between the left border of a shape and the leftmost text -
Right margin
Distance between the right border of a shape and the rightmost text -
Top margin
Distance between the top border of a shape and the uppermost text -
Bottom margin
Distance between the bottom border of a shape and the lowest text
-
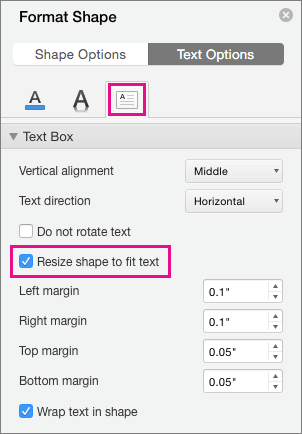
You can automatically increase the size of a shape or text box vertically so that the text fits inside it.
-
Right-click the border of the shape or text box.
-
On the shortcut menu, select Format Shape.
-
In the Format Shape pane, select Layout & Properties
, select Text Box, and then select Resize shape to fit text.

Tip: You can reduce the size of the text to fit it in the shape or text box by selecting Shrink text on overflow.
Specify text direction in a shape or text box
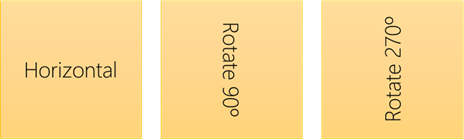
You can change direction of text in a shape or text box. For example, you can rotate text 90 or 270 degrees so that it appears sideways.
-
Right-click the edge of the shape or text box that contains the text.
-
On the shortcut menu, select Format Shape.
-
In the left pane of the dialog box, select Text Box.
-
Under Text layout, select the option that you want in the Text direction list.
-
Select Close.
Rotate (mirror) text in a shape or text box
-
Insert a text box or shape in your document, and then type and format your text.
-
Right-click the box or shape and select Format Shape.
-
In the Format Shape dialog box, select 3-D Rotation on the left.
-
In the X box, enter 180.
-
Select Close.
-
Click or tap in the paragraph, line of text, shape, or text box that you want to modify.
-
On the Home tab, select the horizontal alignment option that you want.
-
Right-click the border of the shape or text box.
-
On the shortcut menu, select Format Shape, and then select Text Box in the left pane.
-
Under Text layout, select the option that you want in the Vertical alignment list.
-
Select Close.
You can automatically increase the size of a shape or text box vertically so that the text fits inside it.
-
Right-click the border of the shape or text box that you want to resize.
-
On the shortcut menu, select Format Shape, and then select Text box in the left pane.
-
Under Autofit, select Resize shape to fit text.
-
Select Close.
Tip: You can reduce the size of the text to fit it in the shape or text box by selecting Shrink text on overflow.
The internal margin is the changeable distance between text and the outer border of a shape or text box.
-
Right-click the border of the shape or text box.
-
On the shortcut menu, select Format Shape, and then select Text Box in the left pane.
-
Under Internal Margin, choose one or more of the following:
-
Left
Specifies the distance between the left border of a shape and the text. -
Right
Specifies the distance between the right border of a shape and the text. -
Top
Specifies the distance between the top border of a shape and the text. -
Bottom
Specifies the distance between the bottom border of a shape and the text.
-
-
Select Close.
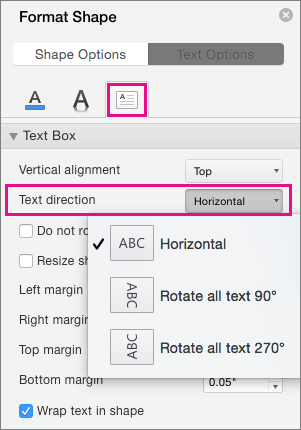
Specify text direction in a shape or text box
-
Control + Click the border of the shape or text box that contains the text, and then select Format Shape.
-
In the Format Shape pane on the right, select Text Options.
-
Select the third icon, Textbox, and then select the option that you want from the Text direction list.
Position text horizontally in a paragraph, text box or shape
-
Click or tap in the paragraph, line of text, shape, or text box that you want to modify.
-
Go to Home, and in the Paragraph group, click the horizontal alignment option that you want.

You can automatically increase the size of a text box or shape vertically so that the text fits inside it.
-
Control + Click the border of the shape or text box that you want to resize, and then select Format Shape.
-
In the Format Shape pane on the right, select Text Options.
-
Select Layout & Properties, and then select the check box next to Resize shape to fit text.
By default, the text wraps automatically as you type in a text box or shape. If you don’t want the text to wrap, do the following:
-
Control + Click the shape that contains the text, and then select Format Shape.
-
In the Format Shape pane on the right, select Text Options.
-
Select Layout & Properties, and then clear the check box next to Wrap text in shape.
Specify text direction in a shape, text box, or table cell
-
Enter the text in the shape or text box or table cell, and then select the text.
-
Ctrl+Click the selected text, and then select Format Shape. On the Text Box tab in the dialog box, choose a direction from the Text Direction box.
Position text horizontally in a shape or text box
-
Select the text in the shape or text box.
-
On the Home tab, under Paragraph, select the horizontal alignment button that you want.
(Align Left, Centered, Align Right, Justified, or Distribute Text)

-
Select the text in the shape or text box.
-
On the Home tab, under Paragraph, select
, and then select the vertical alignment that you want.
 , and then select the vertical alignment that you want.
By default, the text wraps automatically as you type in a text box or shape. If you don’t want the text to wrap, do the following:
-
Select the text in the shape or text box.
-
Go to Format > Shape.
-
On the left side of the dialog box, select Text Box.
-
Under Internal Margin, clear the Wrap text in shape check box.
-
Select the text in the shape or text box.
-
Go to Format > Shape.
On the Format menu, select Shape.
-
On the left side of the dialog box, select Text Box.
-
Under Autofit, select Resize shape to fit text.
Need more help?
Want more options?
Explore subscription benefits, browse training courses, learn how to secure your device, and more.
Communities help you ask and answer questions, give feedback, and hear from experts with rich knowledge.
![]()
Download Article
An easy-to-follow guide on changing the direction of text in Microsoft Word
![]()
Download Article
- Rotating Text
- Making Text Vertical
- Mirroring Text
- Changing Paper Orientation
|
|
|
Do you want to type vertically in word? You can create vertical text by creating a textbox and adjusting its settings to set the position. You can change the text’s direction, rotate it, and mirror it. You could also change the document’s orientation from portrait to landscape mode. This wikiHow will show you how to write vertically in word on your Windows or Mac computer.
Things You Should Know
- Create a textbox with your text. Click «Shape Format» → «Text Direction» → «Rotate all text 90°».
- To make text vertical, drag the right-center circle of your textbox towards the left.
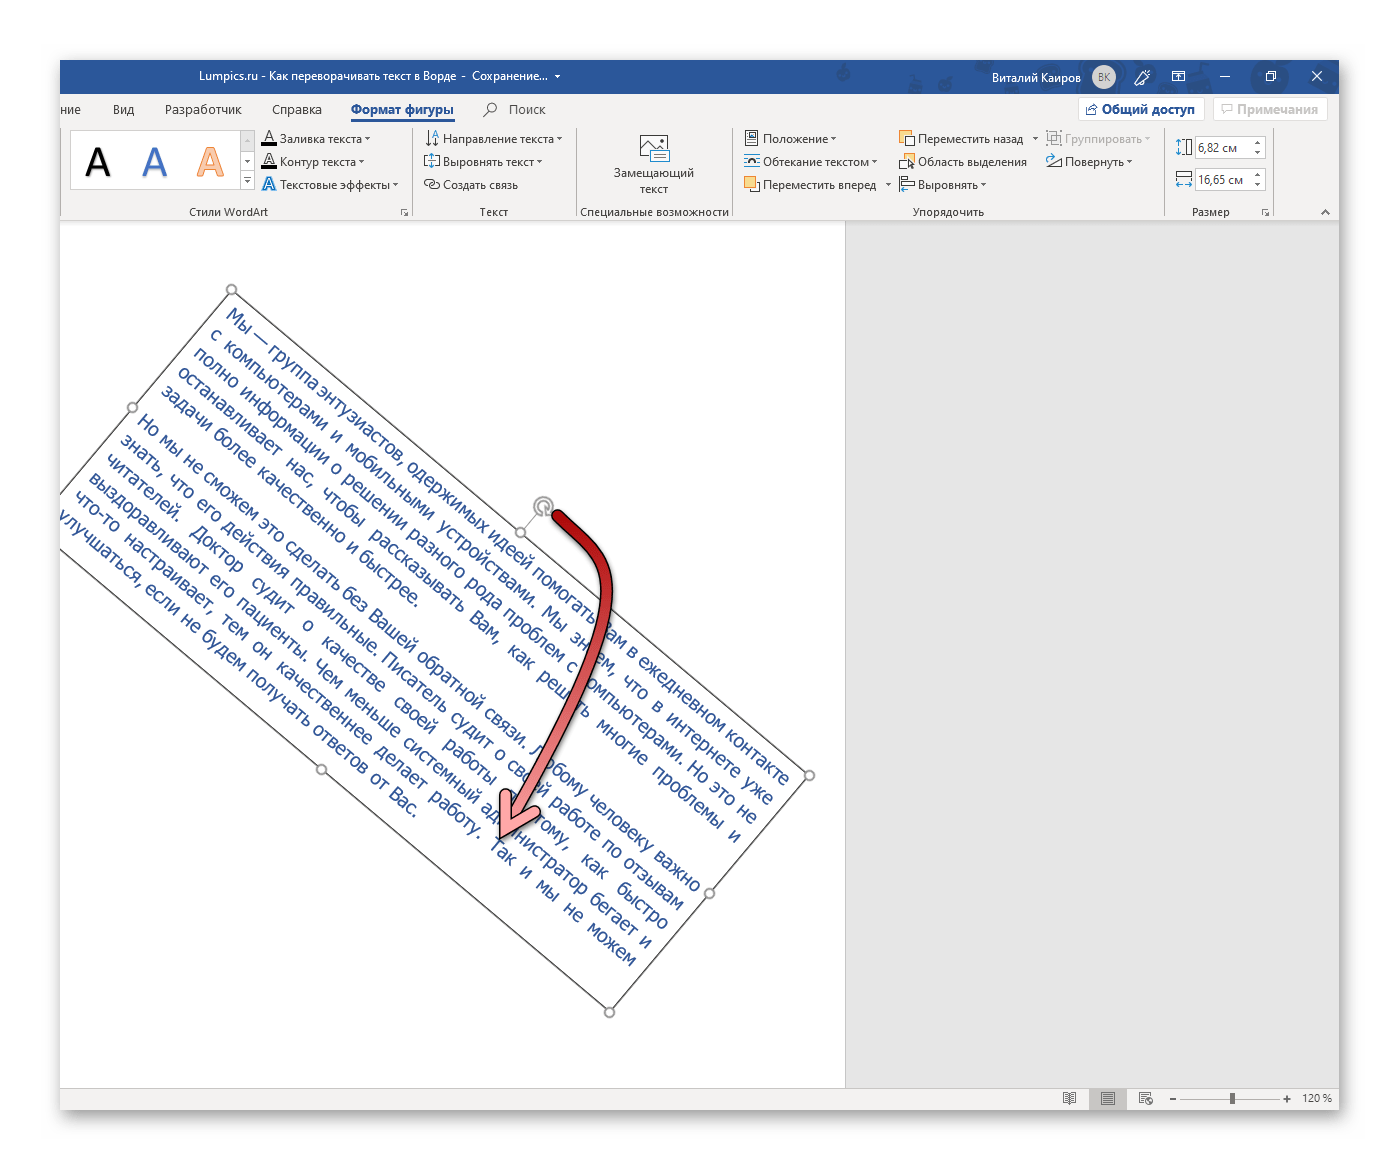
- To mirror text, right-click the textbox, then «Format Shape». Click «Effects», then input «180» into the X or Y Rotation field.
-
1
-
2
Create a textbox. To do this, click the Insert tab in the top toolbar, then click the Text Box icon in the Text section. You can select Simple Text Box from the presets.
Advertisement
-
3
Insert your text. Input the text you want to edit. You can copy and paste from another program into Microsoft Word.
- Make sure the textbox is still selected.
-
4
Click Shape Format. You can find this at the top toolbar, next to Help. Alternatively, double-click the edge of the textbox to be quickly redirected.
-
5
Click Text Direction. This will be in the Text section.
- A drop-down menu will open.
-
6
Select Rotate all text 90°. You can also select Rotate all text 270° if you want the top of the words to face the left side.
- Your text will be rotated.
- You can continue to edit your text in the textbox. The words will type in the direction set.


Advertisement
-
1
Open a project in Microsoft Word. This looks like a W on top of a blue square. Microsoft Word is available to install for Windows and Mac.
- You must have a subscription to use Office 365.
-
2
Create a textbox. To do this, click the Insert tab in the top toolbar, then click the Text Box icon in the Text section. You can select Simple Text Box from the presets.
-
3
Insert your text. Input the text you want to edit. You can copy and paste from another program into Microsoft Word.
- Make sure the textbox is still selected.
-
4
Click and drag the center circle on the right towards the left. With the textbox selected, you’ll see four circles at each point of the text box and one circle between each corner. Use the middle circle on the left side.
- As you drag the text box towards the left, it will become smaller. The text inside will adjust to fit the size of the box in vertical format.
- Make sure not to drag past the point of the left line. This could result in the words returning to their normal positions.
-
5
Remove the textbox lines (optional). If you want to remove the lines around the text, double-click the textbox to return to the Shape Format tab.
- Click Shape Outline, then select No Outline from the drop-down menu.
- The textbox lines will be hidden. Be sure to save your document if you need to return to it later.


Advertisement
-
1
Open a project in Microsoft Word. This looks like a W on top of a blue square. Microsoft Word is available to install for Windows and Mac.
- You must have a subscription to use Office 365.
-
2
Create a text box. To do this, click the Insert tab in the top toolbar, then click the Text Box icon in the Text section. You can select Simple Text Box from the presets.
-
3
Insert your text. Input the text you want to edit. You can copy and paste from another program into Microsoft Word.
- Make sure the textbox is still selected.
-
4
Right-click the textbox. A drop-down menu will open.
-
5
Click Format Shape…. This will be at the very bottom of the menu.
- A panel will open on the right side.
- If you don’t see this option, make sure the textbox is selected, not the text.
-
6
Click the «Effects» icon. This looks like a pentagon, next to the paint bucket icon.
-
7
Enter 180 in the X or Y field. If you want your text to be mirrored left-right, enter 180 into the X Rotation field. If you want your text to be mirrored up-down, enter 180 into the Y Rotation field.
- The changes will take effect immediately.
-
8
Remove the textbox lines (optional). If you want to remove the lines around the text, double-click the textbox to return to the Shape Format tab.
- Click Shape Outline, then select No Outline from the drop-down menu.
- The textbox lines will be hidden. You can print your document if needed.


Advertisement
-
1
Open a project in Microsoft Word. This looks like a W on top of a blue square. Microsoft Word is available to install for Windows and Mac.
- You must have a subscription to use Office 365.
- Use this method if you want to change your paper orientation from portrait to landscape.
-
2
Click Layout. This will be in the top toolbar, between Design and References.
-
3
Click Orientation. You can find this at the top, next to Margins.
- A drop-down menu will open.
-
4
Click Landscape. Your Microsoft Word document will change to landscape orientation.
- If you change back to portrait mode after inputting text, the text will follow the portrait mode orientation. It will not save in its landscape position.


Advertisement
Ask a Question
200 characters left
Include your email address to get a message when this question is answered.
Submit
Advertisement
Thanks for submitting a tip for review!
About This Article
Article SummaryX
1. Click Insert.
2. Click Text.
3. Click Text Box.
4. Click Draw Text Box.
5. Click and drag a text box.
6. Type text into the box.
7. Hover the mouse over the box outline.
8. Click the rotation icon and drag in any direction.
Did this summary help you?
Thanks to all authors for creating a page that has been read 1,279,262 times.
Is this article up to date?
Word offers many useful features for working with various objects, such as images, photographs, text boxes, shapes, WordArt objects. All visual objects, excluding tables and equations, are figures in Microsoft Word. One of the most challenging steps in formatting objects is placing them with the text content. The Layout dialog box controls the positioning of figures.
Position images, text boxes, shapes on the page
Word attaches the figure to the paragraph at the current cursor position when you insert a figure. However, you can move the visual object independently of the text and place it anywhere on the page.
To change the position, on the Picture Format (Graphics Format, Shape Format) tab, in the Arrange group, click the Position button:

- In Line with Text places an object in the paragraph on the same line as the surrounding text
- Position in Top Left with Square Text Wrapping places a figure in the upper left corner of the document page
- Position in Top Center with Square Text Wrapping
- Position in Top Right with Square Text Wrapping
- Position in Middle Left with Square Text Wrapping
- Position in Middle Center with Square Text Wrapping places a picture in the center of the document page
- Position in Middle Right with Square Text Wrapping
- Position in Bottom Left with Square Text Wrapping
- Position in Bottom Center with Square Text Wrapping
- Position in Bottom Right with Square Text Wrapping places a picture in the lower right corner of the document page
Using these options, position the object in a specific location relative to the page margins.
Use the anchor
When changing the text wrapping style from the In Line with Text to another one, Word adds an anchor to the object. In other words, all floating figures are anchored. Select the picture to see its anchor indicated by a small anchor icon ![]() (see how to display non-printing characters in a Word document).
(see how to display non-printing characters in a Word document).
Attention! The anchor and the figure are always on the same page but not in the same place on the page.
By default, the anchor is positioned at the beginning of the nearest paragraph above the upper-left corner of the figure. When you move the object across the page, the anchor moves, using the same logic to place the anchor.
Also, you can select the anchor and drag it to a new location on the page.
Change the layout
To choose additional options for positioning an object, choose More Layout Options… from the dropdown list:
In the Layout dialog box, on the Position tab:

Note: The available positions vary based on the selected text-wrapping option.
- In the Horizontal section, specify that a figure is positioned horizontally:
- Alignment places the object to the Left, Center, or Right relative to:
- Margin
- Page
- Column
- Character
- Left Margin
- Right Margin
- Inside Margin
- Outside Margin
For example:
- Alignment to the Left relative to Margin:

- Alignment to the Left relative to Page:
- Book layout defines where the figure appears on odd (large left margin) or even (large right margin) pages. You can position figures relative to the Inside or Outside of the Margin or Page.
This option is useful if you use the Mirrored margins.
For example, Book layout Inside of Margin:
The odd page The even page
- Absolute position specifies the exact distance to the right of:
- Margin
- Page
- Column
- Character
- Left Margin
- Right Margin
- Inside Margin
- Outside Margin
Measurements can be positive or negative. The figure will remain in the same position regardless of formatting changes.
For example:
- The Absolute position of -5 inches to the right of Right Margin:

- The Absolute position of 4 inches to the right of Page:
- Relative position specifies a percentage of the distance relative to:
- Margin
- Page
- Left Margin
- Right Margin
- Inside Margin
- Outside Margin
For example, Relative position of 20% relative to Margin:
Note: 8.5 inches page with 1-inch margins in each side = 6.5 inches * 20% = 1.3 inch
- Alignment places the object to the Left, Center, or Right relative to:
- In the Vertical section, specify that an object is positioned vertically:
- Alignment allows to set the object to the Top, Centered, Bottom, Inside, or Outside relative to:
- Margin
- Line
- Top Margin
- Bottom Margin
- Inside Margin
- Outside Margin
For example, Alignment to the Top relative to Margin:
- Absolute position specifies the exact distance to the right of:
- Margin
- Page
- Paragraph
- Line
- Top Margin
- Bottom Margin
- Inside Margin
- Outside Margin
Measurements can be positive or negative. The figure will remain in the same position regardless of formatting changes.
For example:
- The Absolute position of 3 inches to the right of Line:
- The Absolute position of -7 inches to the right of Bottom Margin:
- Relative position specifies a percentage of the distance relative to:
- Margin
- Page
- Top Margin
- Bottom Margin
- Inside Margin
- Outside Margin
For example, Relative position of 25% relative to Page:
Note: 11 inches page * 25% = 2.75 inches
- Alignment allows to set the object to the Top, Centered, Bottom, Inside, or Outside relative to:


Note: It is impossible to fix a figure on the page.
- In the Options section:
- Move object with text moves the figure along with the text in which it is located.
If this option is selected, the picture moves with a paragraph (anchored to a paragraph). When you delete or add any context before that paragraph, the figure will move with it.
If the Move object with text option is deselected, the picture is anchored to the page location. After deleting or adding context before the anchor, except when the paragraph moves to the next page — the figure moves and keeps its position relative to the page.
Note: This option works only for floating figures (see Text Wrapping for more details).
For example:
- Before moving:

- After moving with the selected Move object with text check box:

- After moving with the deselected Move object with text check box:
When you select this option, the horizontal and vertical alignment will change to Absolute positions relative to the margin (horizontal) and paragraph (vertical).
- Before moving:
- Lock anchor keeps the anchor at the same place (at the paragraph) when the figure is removed. Word changes the anchor symbol to the locked anchor
 .
.
The anchor symbol will remain to the left of the start of the anchored paragraph, regardless of the picture position.
For example:
- Before moving:

- After moving with the selected Lock anchor check box:
Note: An example is shown with hidden Headers and Footers.
However, if you select and drag a paragraph to another page, the picture shifts to another page.
- Before moving:
- Allow overlap allows to layer figures on top of each other.
For example:

To easily work with such figures, open the Selection pane. To change which figure in front or behind another one, use the Bring Forward or Send Backward buttons in the Arrange group on the Picture Format (Graphics Format, Shape Format) tab:

- Layout in table cell is the option from the older versions of Word and older file formats.
For example, in a *.doc file, you can’t put an image whose text wrapping style is set to Square inside a table cell unless the Layout in table cell option is selected:

- Move object with text moves the figure along with the text in which it is located.


To align a figure on the page simpler, see snap an object to the Grid or a Shape.
Main features of the anchor
- The anchor is related to the paragraph, not words, characters, or other objects.
- When you select the text where the figure is anchored, the figure also is highlighted.
- If you move or delete the text where the figure is anchored, the figure will also be moved or deleted.
- If the paragraph with the anchor is pushed to the next page, the anchored figure also jumps to the next page, even if the figure is located above the anchor.
Delete an anchor
The anchor cannot be deleted. An anchor is a feature of the floating figure.
If the anchor is visible, the figure is selected, and pressing the Delete key will delete the figure and anchor.
Select the figure and change the text wrapping style to the In Line with Text to remove the anchor. The figure will cease floating, and Word will stop showing its anchor when you select this figure.
Two ways to put left and right aligned text on the same line in Microsoft Word. There’s the commonly used option and the less well-known choice. BONUS: putting left, center and right aligned text on one line.
We’ll show how to make Left and Right aligned text looking like this.

You’ll often see it in Header or Footer.
As a bonus (because we can’t help ourselves) we’ll also have examples of Left, Right and Center positioning on the same line.
- Table with left and right positioning
- Table with left, center and right positioning
- Tabs with Left and Right text positions
- Tabs with Left, Right and Center positions
- Downside of tabs for right and center margin alignments
Table with left and right positioning
The easiest and most commonly used option is a table. Office Watch readers know we’ve written many times about how tables with no borders or gridlines can solve many Word formatting conundrums.
Here’s how we created the above example, this time with the table gridlines showing.

Each line is a single row table with two cells. The cells can have their own paragraph formatting (left, center, right or justified).
Make this by:
- Insert a 2×1 table with one row and two columns.

- The first cell has Paragraph Left setting. Type in the text or field codes you want.
- The second cell has Paragraph Right formatting. Add text to the cell.

- Select the table (use the handle at top left of the table) and remove all borders with Paragraph | Borders | No Border.

The Table Gridlines are visible in Word but won’t appear in any printed or PDF version.
Table with left, center and right positioning
Clever readers will have guessed the same trick can be used to have left, center and right text on the same line. Use a 3×1 table. The center cell has Center text positioning.

Word in-depth book Formatting Magic with Word has a whole chapter devoted to Tables including using them for formatting text in unusual ways.
Tabs with Left and Right text positions
The alternative is using Tabs. Tabs are a hidden formatting marks that position text along a line.
If you’re old enough to remember a manual typewriter, there was a bar with tabs that you slid along the bar. Pressing the Tab key moved the paper along to the next tab stopper.
Word also has Tab stops but they have more power than the old typewriter stops.
Modern Word has Tab stops which can have different alignment settings. The old typewriter tabs could only be Left tabs – meaning text comes to the right of the tab.

As you can see in the Tab dialog, Word has FIVE different types of tab. We’ll use three of them for single line positioning; Left, Center and Right.
Here’s some left and right text positioning using a Right align tab.

The left text is already left aligned against the left margin. Nothing needed there.
Make the right tab by clicking on the ruler to make a tab.
Double click on that tab to open the Tabs dialog.

- Click on the tab stop position you just created.
- Change Alignment to Right.
- Click Set
Now enter the text you need:
- Type the text for the left side
- Press Tab – the cursor should jump to the right side of the page.
- Type the text for the right side.
If the formatting doesn’t end up the way you want, choose Home | Paragraph | Show All – that will show the tab markers (right pointing arrows) across the page. There should only be one.

Tabs with Left, Right and Center positions
A single line with Left, Center and Right alignments is also possible with Tab stops.
Add a Tab stop in the middle of the line and change it to a Center alignment.

A Center tab alignment means the text is centered either side of the tab stop.

The great book Formatting Magic with Word has a whole chapter devoted to Tabs, all the uses and options.
Downside of tabs for right and center margin alignments
Tabs look like a great solution to positioning, but they have a major disadvantage. All Tab stops are absolute measurements in inches, centimetres etc. There’s no way to drop a tab into a relative position like Center or Right as you can with Word objects.
If the page size or left/right margins are changed, the center and right tabs will be out of position. They’ll have to be reset manually.
That’s not a problem with a table because the whole table (single row in this case) is set to 100% of the page width by default.
Four Word fixes for stretched out last line
Free sign to keep in touch with customers while in lockdown
Merge or Split cells in Word tables
Make a Table or list of Tables in a Word document
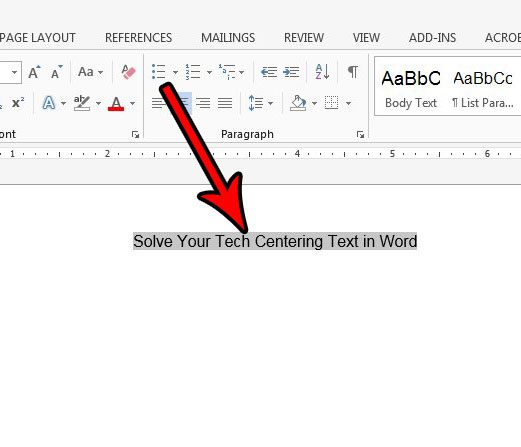
Text in a Microsoft Word document occasionally needs to be put in the center of the page between the left and right margins.
You might also need to know how to center text in Word vertically in Word documents, which means that it needs to be in the middle of the top and bottom margins.
You can vertically center text in Microsoft Word by selecting the text, choosing the Layout tab, clicking the Page Setup button, choosing the Layout tab, clicking the Vertical Alignment tab, choosing Center, then clicking Apply.
How to Horizontally Center Text in Microsoft Word
- Open the document in Word that contains the text you want to center.
- Use your mouse to select the text.
- Click the Home tab at the top of the window.
- Click the Center button in the Paragraph section of the ribbon.
How to Vertically Center Text in Microsoft Word
- Open the document containing the text to center vertically.
- Use your mouse to select the text you wish to center.
- Click the Page Layout tab.
- Click the small Page Setup button at the bottom-right corner of the Page Setup section of the ribbon.
- Click the dropdown menu to the right of Vertical alignment and choose the Center option.
- Click the dropdown menu to the right of Apply to and choose the appropriate option, then click the OK button.
Our article continues below with additional information on how to center align text in Microsoft Word, including expanded sections with pictures for the steps above.
Last update on 2023-04-13 / Affiliate links / Images from Amazon Product Advertising API
| As an Amazon Associate, I earn from qualifying purchases.
Adding content to a document in Microsoft Word can include a variety of options. You can format that text using a number of different tools and dialog box menus in the application, and many of those changes can be applied by simply selecting the text you want to change.
But if you need to align text to the center of the page, whether it is vertical alignment or horizontal alignment, then you may be wondering where that setting is found.
When you start typing in a Word document that is using the Normal template, all of the text that you enter will be left aligned by default.
This means that the first letter on each line will be against the left margin of the page. This is the standard for most corporations and institutions and is the most common alignment format used in documents.
But sometimes, a part of your document will need to be centered on the page, either horizontally or vertically.
Our tutorial below will show you how to center text in Microsoft Word using either the horizontal or vertical alignment option so that you can achieve the desired display result for your document.
You may also want to know how to get rid of space after paragraphs in Google Docs if you use that application for document editing, too.
Expanded – How to Center Text in Microsoft Word Horizontally
The summary section above gives a brief overview of how to horizontally center text in Word, but this section provides pictures as well if you would like a little more information. Note that I am using Microsoft Word 2013 in the images below, but the process is the same in most other versions of Word as well.
Find out how to use all small caps in Word if you have been struggling to manually apply that formatting in your document.
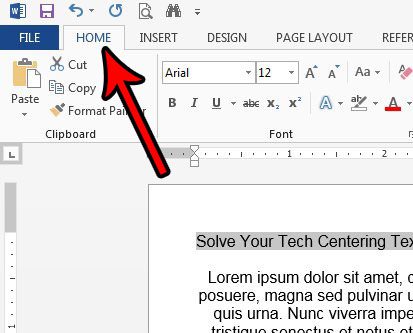
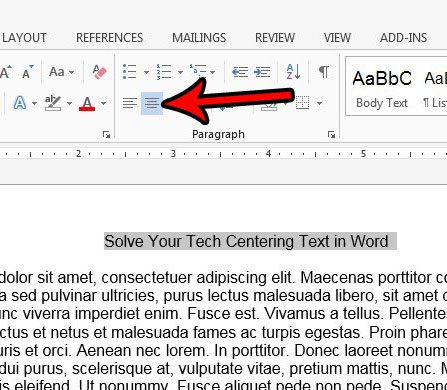
Step 1: Open your document in Microsoft Word.
Step 2: Use your mouse to highlight the text that you want to center horizontally.
Step 3: Click the Home tab at the top of the window.
Step 4: Select the Center button in the Paragraph section of the ribbon.
The next section includes information on how to center text vertically if the text you want to modify in your document needs to be in the middle of the page.
Expanded – How to Center Text in Microsoft Word Vertically
We outlined how to vertically center text in the summary section above, but this section will provide images as well. This section was performed using Microsoft Word 2013.
Step 1: Open your document in Microsoft Word.
Step 2: Use your mouse to select the text that you want to center vertically.
If you wish to center the entire document you can skip this step.
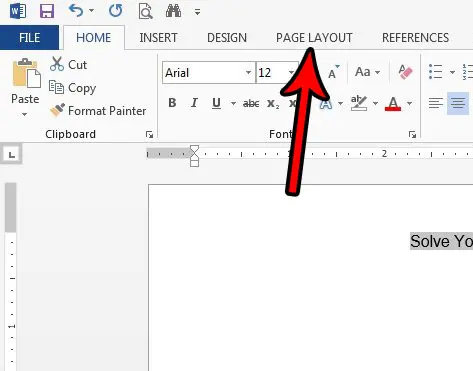
Step 3: Click the Page Layout tab at the top of the window.
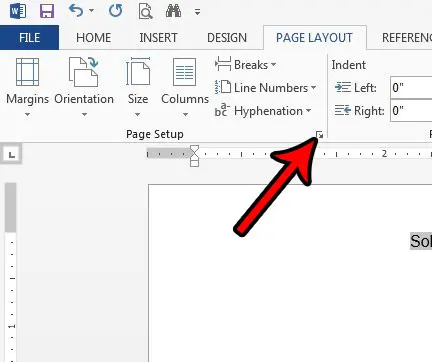
Step 4: Click the Page Setup button in the Page Setup section of the ribbon.
It’s the tiny button at the bottom-right corner of the section.
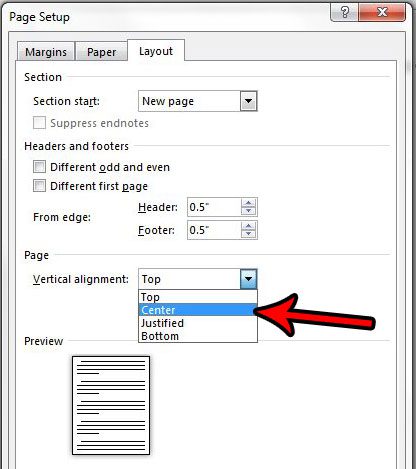
Step 5: Click the dropdown menu to the right of Vertical alignment, then choose the Center option.
Note that the vertical alignment drop down menu also has options for Top, Justified, and Bottom.
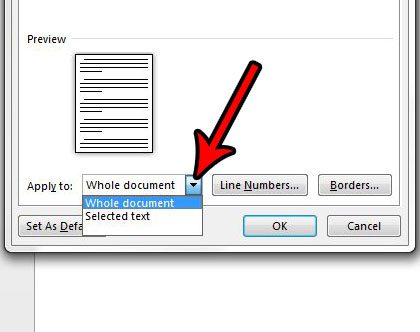
Step 6: Select the dropdown menu to the right of Apply to, then choose the option that fits your needs.
If you selected text earlier, then the Selected sections option will only vertically center that selected text. The Whole document option will vertically center the entire document, and the This point forward will vertically center all of the document text after the point at which your mouse cursor is currently located. Some of the vertical alignment options may not appear depending on the selected text’s locations, whether or not any text is selected, or the composition of the document.
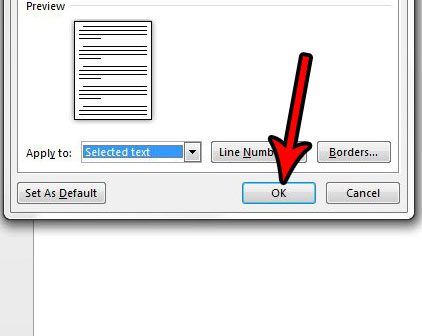
Step 7: Click the OK button to apply the vertical centering.
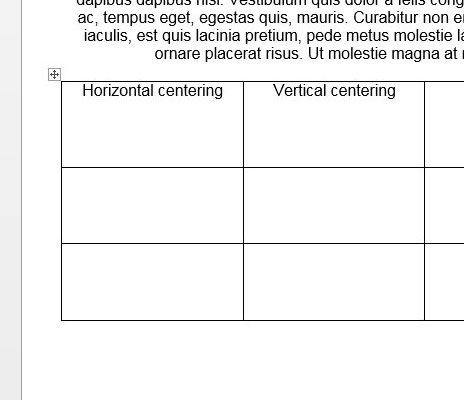
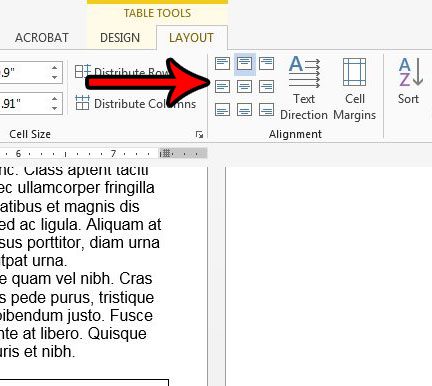
How to Center Text in a Table in Microsoft Word
If you have a table in your document and need to center the text in one of the table cells, then you get to use some table-specific centering options. By default the data in your table will be horizontally centered at the top of the table cell, but there are options that let you customize the alignment within a cell.
Step 1: Open the document containing the table text that you want to center.
Step 2: Click inside the cell containing the data you wish to center.
Step 3: Click the Layout tab at the top of the window under Table Tools.
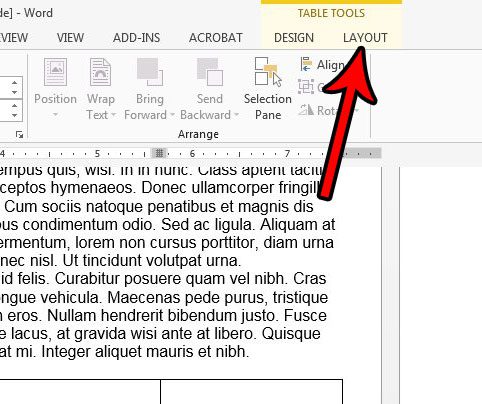
Step 4: Click the desired alignment option in the Alignment section of the ribbon.
Additional Notes on How to Center Text in Word
- You can also center text horizontally by selecting it and then pressing Ctrl + E on your keyboard.
- One of the most common reasons to align text either horizontally or vertically is to add a title. If you are adding a title, be sure to check your work or school’s guidelines on titles, as they often include additional requirements like font sizes. You can adjust font styles in the Font section of the ribbon on the Home tab.
- If you center some text in your document, the center align text setting will typically persist. You will likely need to select the Left Align option after centering your text if you want to return to normal text alignment after centering some of your text.
- If you vertically center text in Word, you will have several options concerning what parts of your document should be centered. These options include the selected text, the whole document, or “this point forward.”
If you have left aligned text on a page and you need it to be center aligned, then the keyboard shortcut option might be a little easier than using the option on the Home tab.
However, when you need to create vertical centered text on a cover page or title pages, then you will need to use the Page Setup button in the Page Setup group and make the adjustment from the Vertical alignment drop down menu on the Layout tab.
Does your document have a title page, but you need to number your pages and skip that title page? Find out how to start page numbering on the second page in Word so that a page number doesn’t display on the title page.
Additional Sources

Matthew Burleigh has been writing tech tutorials since 2008. His writing has appeared on dozens of different websites and been read over 50 million times.
After receiving his Bachelor’s and Master’s degrees in Computer Science he spent several years working in IT management for small businesses. However, he now works full time writing content online and creating websites.
His main writing topics include iPhones, Microsoft Office, Google Apps, Android, and Photoshop, but he has also written about many other tech topics as well.
Read his full bio here.
Содержание
- Выравниванием текст в Ворде
- Выравнивание по горизонтали
- Вариант 1: Кнопки на ленте
- Вариант 2: Горячие клавиши
- Вариант 3: Произвольное выравнивание
- Выравнивание по вертикали
- Вариант 1: Параметры страницы
- Вариант 2: Линейка
- Выравнивание таблиц
- Выравнивание надписей
- Заключение
- Вопросы и ответы

При работе с текстовыми документами Microsoft Word довольно часто приходится придерживаться определенных требований к форматированию. Одним из таковых является выравнивание текста, об особенностях которого мы сегодня и расскажем во всех подробностях.
Читайте также: Форматирование текста в Word
Выравниванием текст в Ворде
Выровнять текст на странице или во всем документе Word можно не только по ширине (горизонтально), но и по высоте (вертикально). Делается это по-разному, но существует и общий для обоих типов оформления способ. Рассмотрим каждый из доступных вариантов.
Выравнивание по горизонтали
Большинство инструментов и функций текстового редактора Ворд сосредоточены на панели управления (ленте), за основными из них закреплены горячие клавиши. Решить нашу сегодняшнюю задачу – выровнять текст горизонтально – можно как с помощью кнопок на ленте, так и посредством клавиш на клавиатуре. Еще один вариант – использование линейки и/или функции табуляции.
Вариант 1: Кнопки на ленте
Проще всего выровнять текст по ширине страницы с помощью специальных кнопок, расположенных во вкладке «Главная», в группе инструментов «Абзац». Вот как они выглядят:
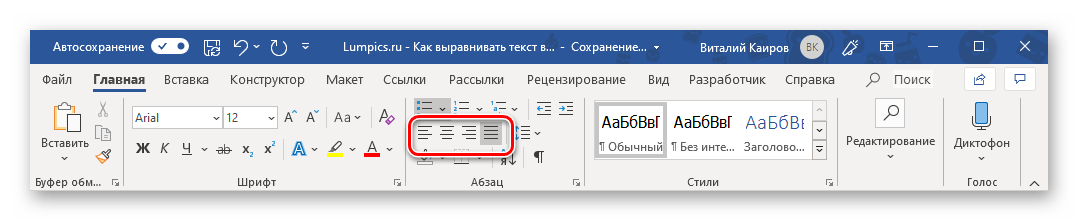
Собственно, одного взгляда на эти элементы управления достаточно для того, чтобы понять, за какой вариант выравнивания отвечает каждый из них. Идем по порядку, слева направо:
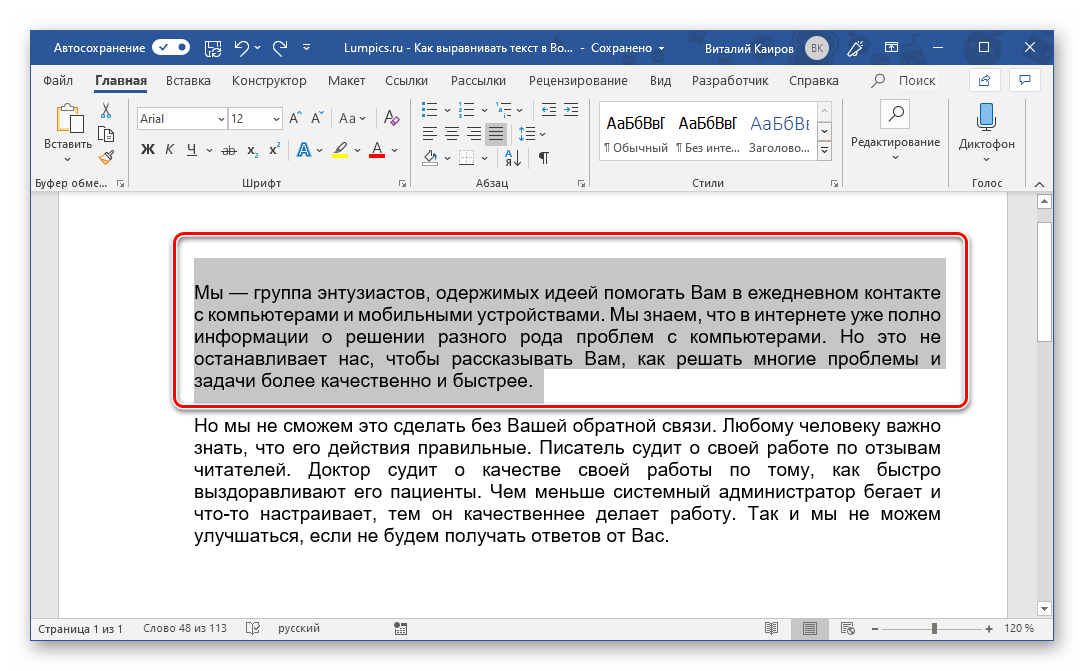
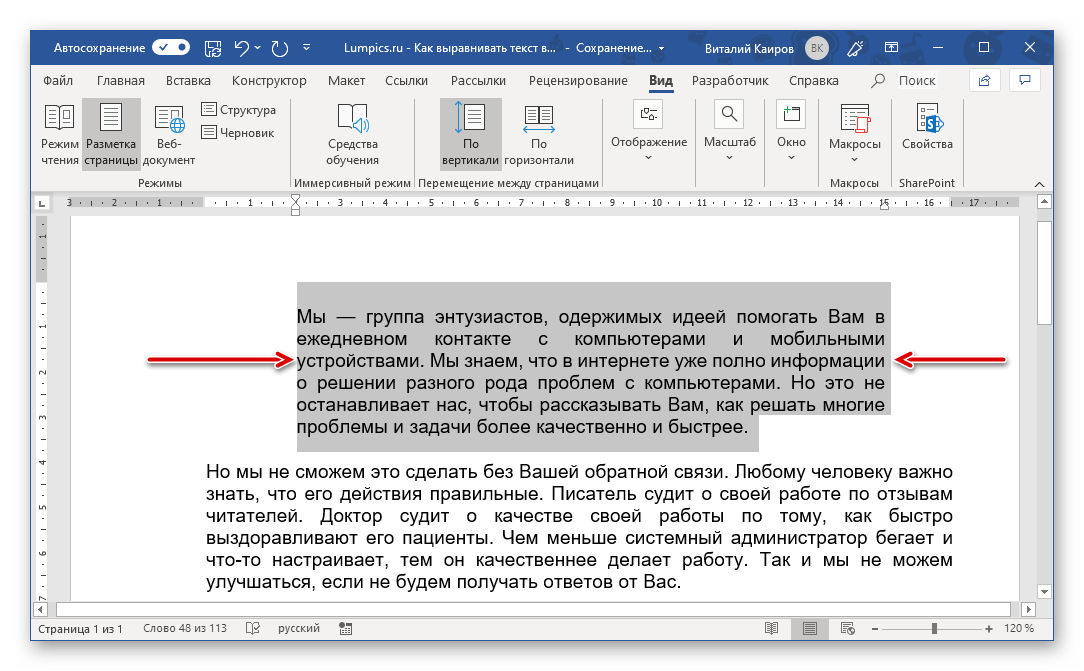
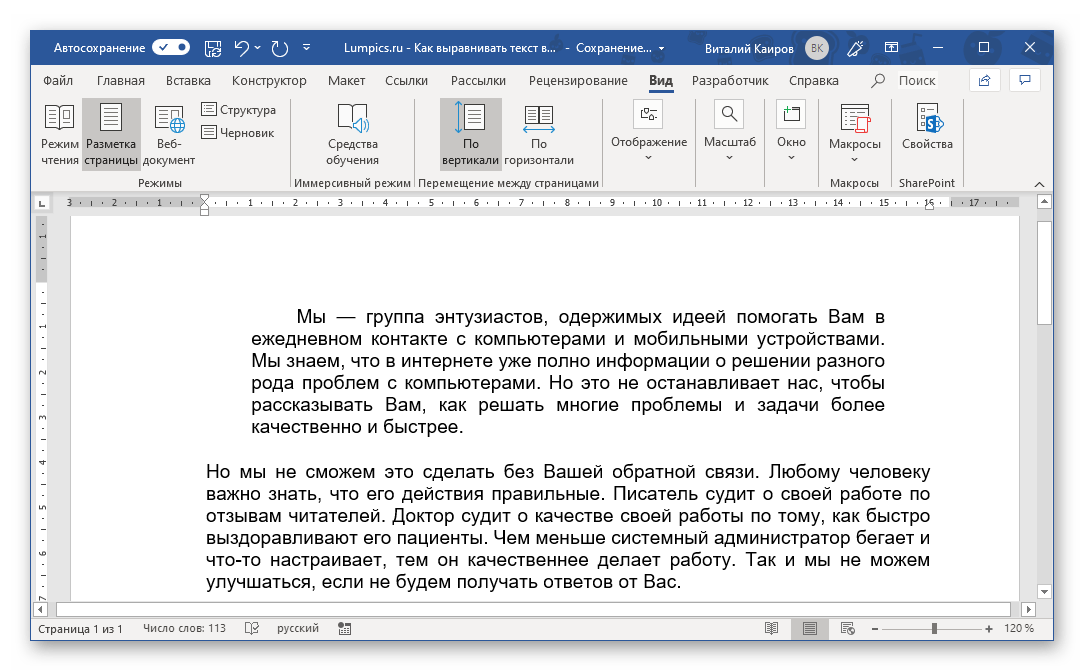
Чтобы выровнять весь текст (или отдельный фрагмент) в документе, выделите его с помощью клавиш «CTRL+A» (для всего текста) или мышки (для отдельных фрагментов, абзацев) и просто нажмите по соответствующей кнопке на ленте.
Читайте также: Как выделить весь текст или абзац в Word
Очевидно, что определить желаемый тип выравнивания можно и в пустом документе или том его месте, где текст только планируется печатать. Просто установите туда каретку (указатель курсора) и нажмите по кнопке на панели инструментов, отвечающей за необходимый тип выравнивания по горизонтали страницы.
Примечание: Выравнивание текста по ширине часто влечет за собой одну неприятную проблему – появление больших пробелов между словами. К счастью, это легко исправить. О том, как именно, рассказано в отдельной статье на нашем сайте.


Подробнее: Как убрать большие пробелы в Ворде
Вариант 2: Горячие клавиши
Как мы уже писали во вступлении, большинство задач в Word можно решить не только с помощью инструментов на ленте, но и горячими клавишами. Они помогут нам в том числе и в вертикальном выравнивании текста.
| Горячие клавиши | Выравнивание |
|---|---|
| CTRL+L | По левому краю |
| CTRL+R | По правому |
| CTRL+E | По центру |
| CTRL+J | По ширине |
Если требуется выровнять уже имеющийся в документе текст, выделите его и нажмите комбинацию клавиш, соответствующую необходимому варианту. Если текста еще нет, просто установите указатель курсора в начале строки и нажмите нужные кнопки на клавиатуре.
Читайте также: Горячие клавиши для удобной работы в Ворде
Вариант 3: Произвольное выравнивание
Методы горизонтального выравнивания текста, рассмотренные выше, позволяют определить его положение относительно левой или правой границы страниц, их центра или «растянуть» между границами, но иногда может потребоваться задать фиксированный отступ для всего текста или отдельного его фрагмента относительно одной из границ или сразу обеих.
Использование пробела или клавиши «TAB» позволяет это сделать только для первой строки (по крайней мере, если не говорить о бессмысленном создании лишних отступов в каждой из строк) и явно не является оптимальным решением. Чтобы сделать все правильно и «ровно», нужно воспользоваться горизонтальной линейкой и/или функцией табуляции.
Примечание: Прежде чем приступить к добавлению отступов от той или иной границы, определите предпочтительный тип выравнивания для текста в документе одним из рассмотренных выше способов. Это можно сделать и после, но так вы сразу будете видеть результат и избежите необходимости его правки.
Отступ от левой границы
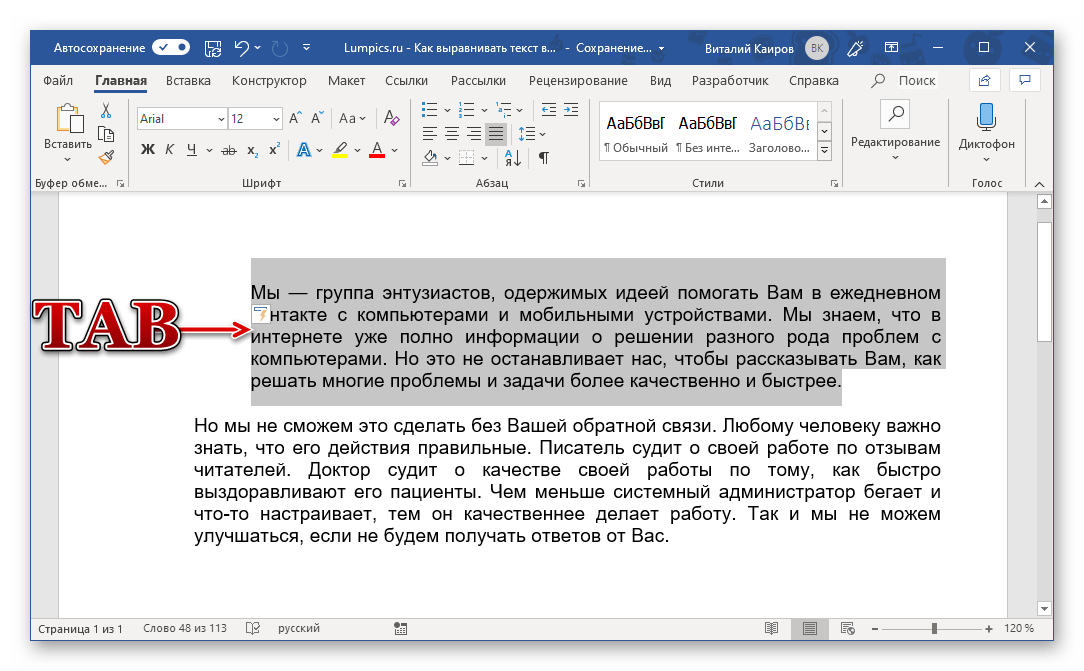
- Выделите текст (или фрагмент такового), который необходимо «отодвинуть» от левого поля страницы.
- Нажмите клавишу «TAB» один или более раз, в зависимости от того, на сколько требуется отступить.
- Текст будет отодвинут на необходимое вам расстояние, выделение с него теперь можно снять.

Узнать подробнее о функции табуляции, особенностях ее работы и использования можно в отдельной статье на нашем сайте. Там же рассказывается и о том, как изменить размер табуляции, что будет полезно знать в случаях, когда стандартный шаг «таба» не устраивает.
Подробнее: Функция табуляции в Microsoft Word
Произвольный отступ от границ
Использование табуляции для добавления отступа – метод довольно простой и понятный, но не лишенный недостатков. Во-первых, сдвиг текста осуществляется на фиксированный шаг, что не всегда удобно или же попросту не подходит, во-вторых, от правой границы таким образом его не отодвинуть. Инструмент «Линейка» позволяет сделать это более точно.
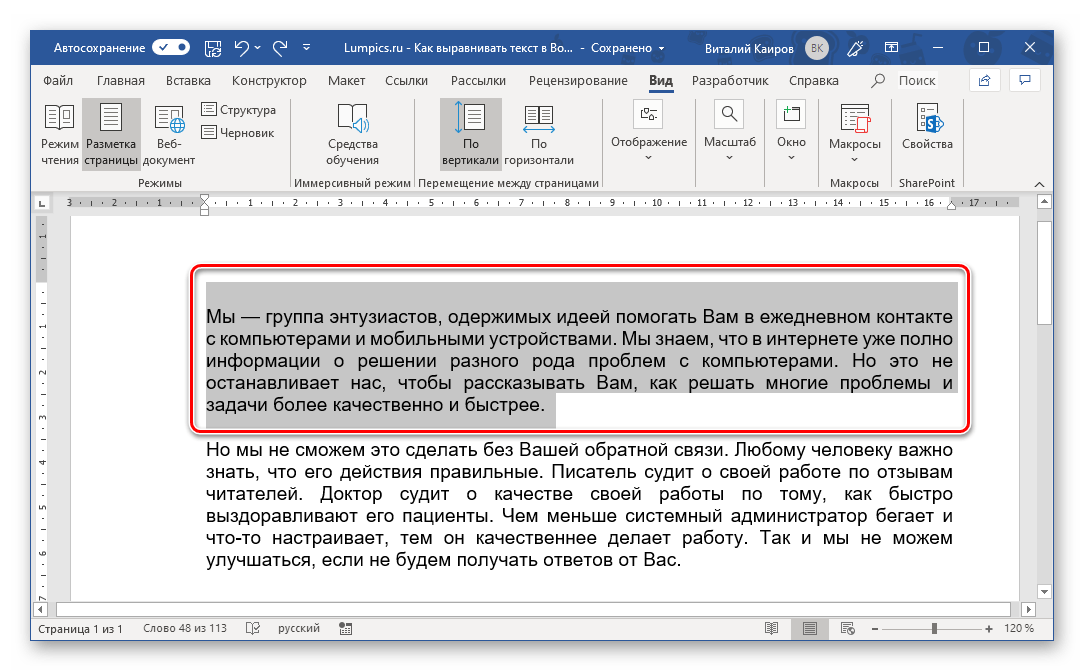
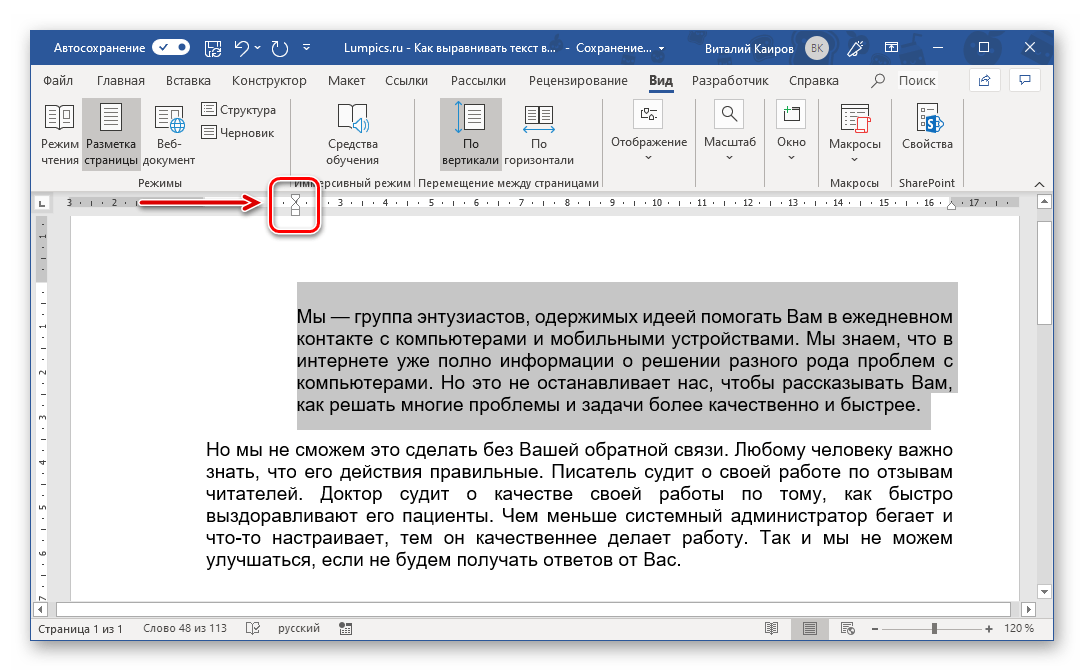
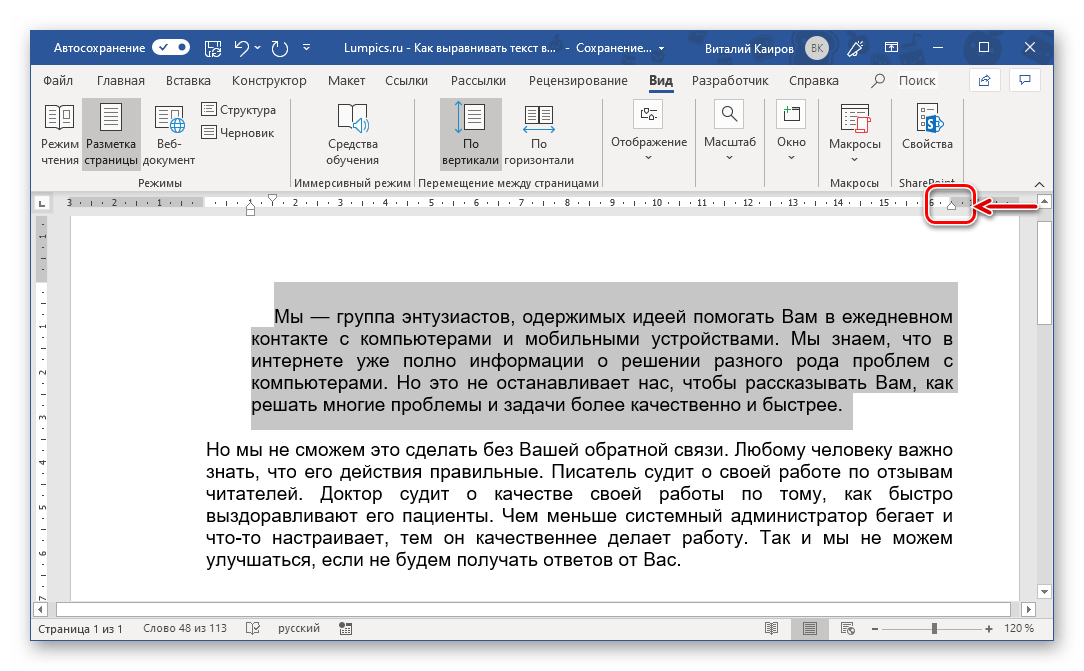
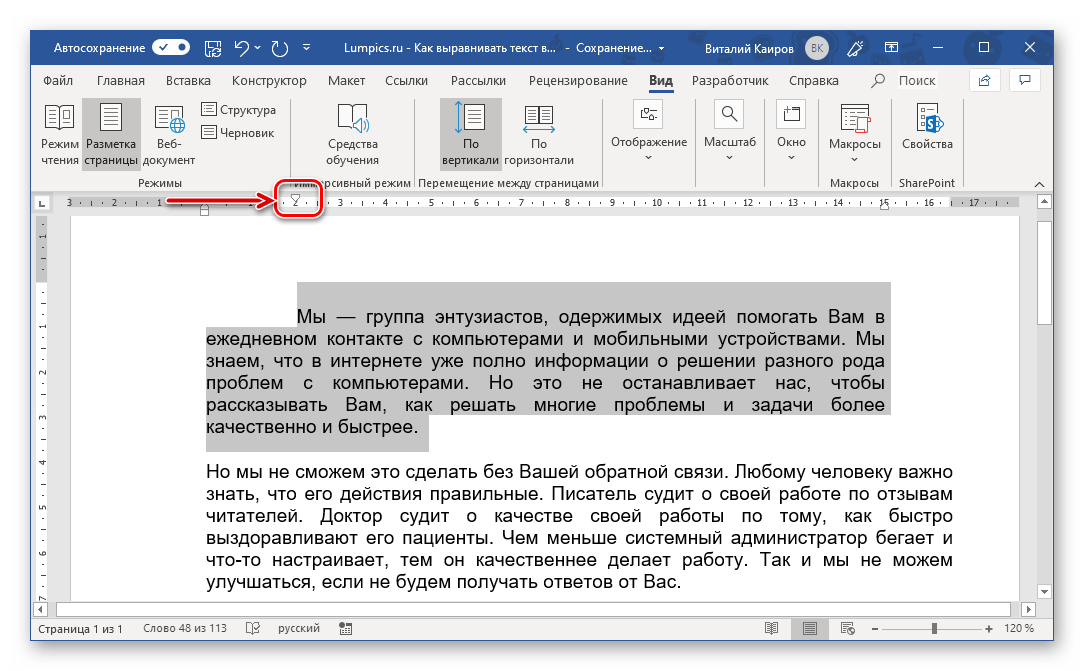
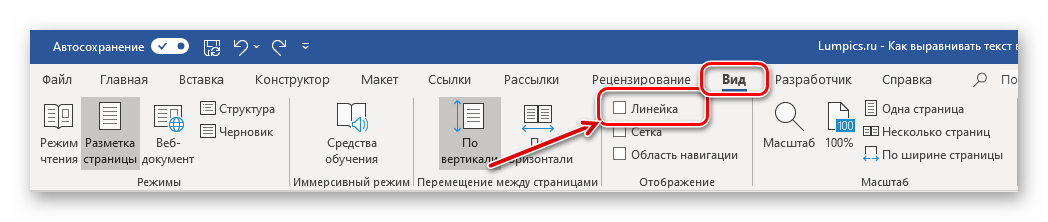
- Включите отображение «Линейки», если она скрыта. Сделать это можно во вкладке «Вид» — просто установите галочку в чекбоксе напротив одноименного пункта.

Читайте также: Включение линейки в Ворде - Выделите с помощью мышки или горячих клавиш текст, который требуется сместить в сторону.
- Потяните за нижнюю и верхнюю направляющую на линейке, с левой стороны вправо, нажав и удерживая ЛКМ прямо между ними, если требуется «отодвинуть» текст от левой границы,

или с правой в левую, если требуется «отойти» от нее.
Как вы наверняка могли догадаться, таким образом можно не только расширить, но и сузить занимаемое текстом место.
С левой стороны можно двигать не только все строки абзаца сразу, перемещая и верхнюю, и нижнюю направляющую на линейке, но и отдельно первую строку и следующие за ней. Таким образом можно создать то, что называется красной строкой.
Читайте также: Как сделать красную строку в Ворде
Примечание: С помощью линейки также можно выравнивать и отдельные строки в абзацах — достаточно поместить каретку в их начале, «схватиться» за направляющую на линейке и потянуть ее в нужную сторону.
Аналогичное проделайте с остальными фрагментами текста, если имеется такая необходимость. После этого отображение линейки можно отключить, если, конечно, она вам не нужна для других целей (например, еще и для вертикального выравнивания).
«Линейка», в сравнении с табуляцией, предоставляет куда более широкие возможности для произвольного выравнивания, позволяя точнее задать отступ текста от границы, причем как левой, так и правой, как для отдельных текстовых фрагментов документа, так и для всего его содержимого сразу. Правда, последнее куда проще сделать с помощью правильной настройки полей документа, о чем мы ранее подробно рассказывали в одной из статей.
Подробнее: Настройка полей в Microsoft Word
Выравнивание по вертикали
Выровнять расположение текста на страницах документа по вертикали чаще всего требуется для создания титульной страницы, формального документа (заявление, указ, объяснительная и т.д.) или шаблона. Значительно реже подобная необходимость может быть продиктована исключительно пользовательским пожеланием. Рассмотрим, как выровнять текст по высоте в Ворде.
Читайте также: Как сделать шапку в Word
Вариант 1: Параметры страницы
В качестве наглядного примера того, как можно выровнять текст вертикально, изменим его положение на максимально упрощенном аналоге титульной страницы (для создания серьезных проектов лучше использовать один из множества предустановленных шаблонов, которые изначально правильно оформлены и выровнены).
Читайте также: Создание титульного листа в Ворде
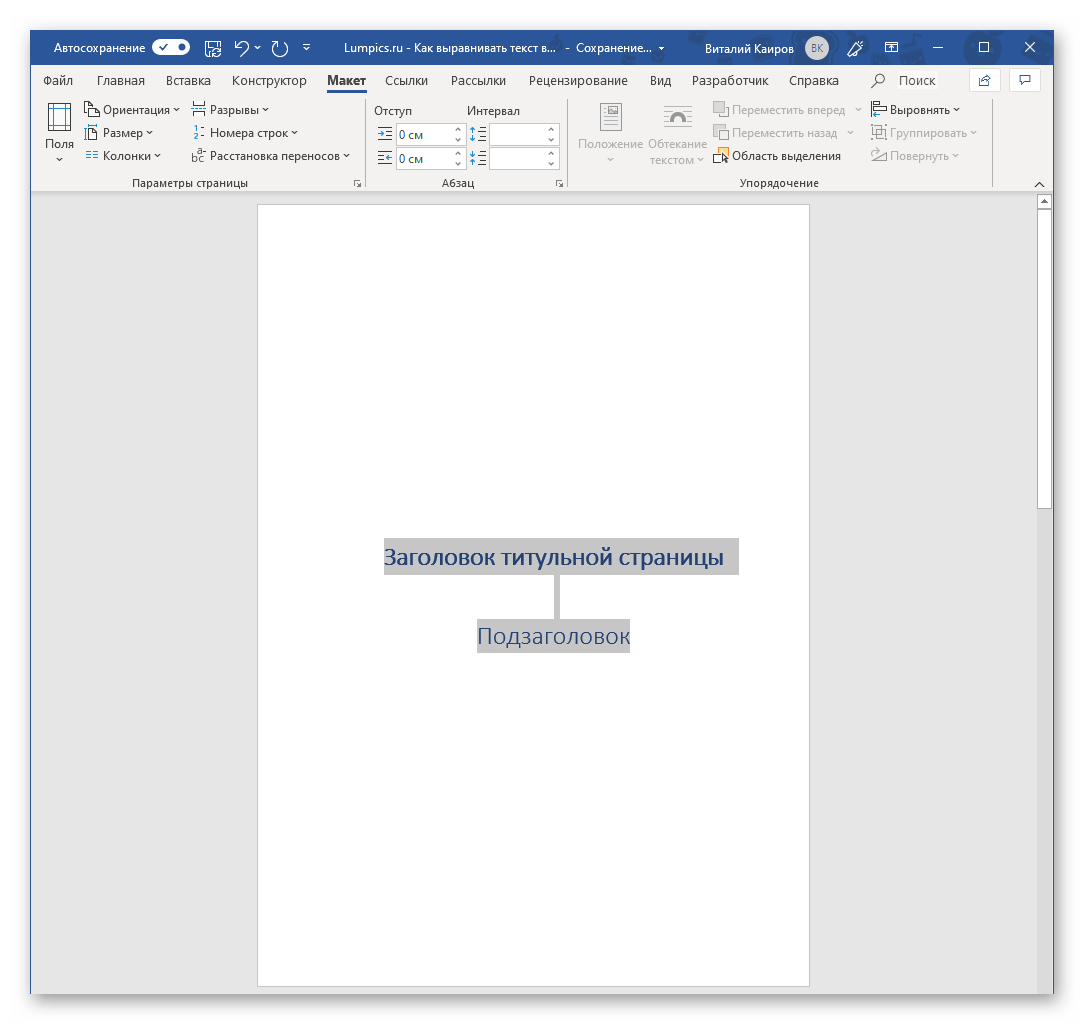
Примечание: Выровнять таким образом можно только весь текст на странице или сразу все содержимое документа. Если работать с отдельными фрагментами, они будут вынесены на отдельные страницы.
- Выделите содержимое одной страницы с помощью мышки или весь документ сразу, в зависимости от того, к чему требуется применить тот или иной стиль вертикального выравнивания.

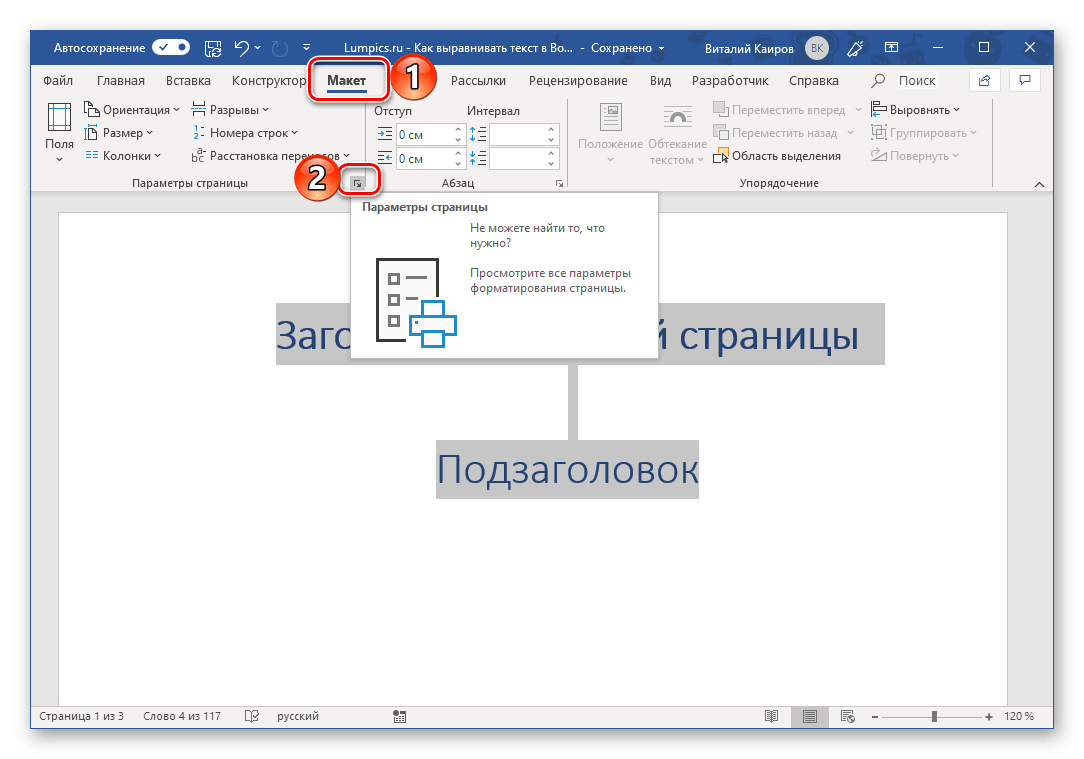
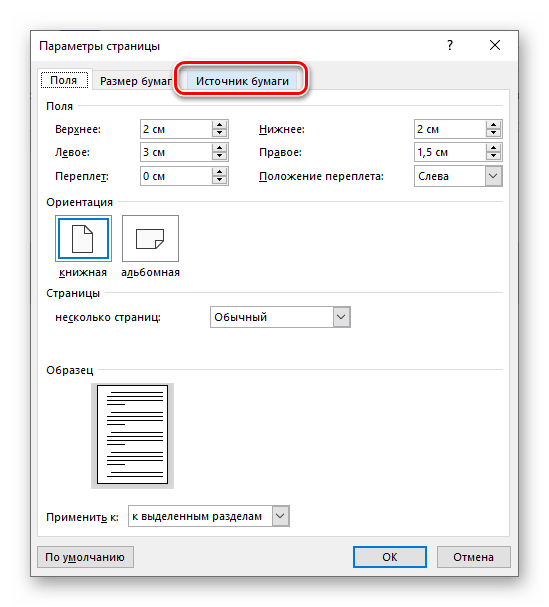
Читайте также: Как в Word выделить одну страницу - Перейдите во вкладку «Макет» и откройте меню группы инструментов «Параметры страницы», нажав на небольшой указатель, расположенный в правом нижнем углу данного блока.
- В открывшемся диалоговом окне перейдите во вкладку «Источник бумаги» и выполните там следующие действия:

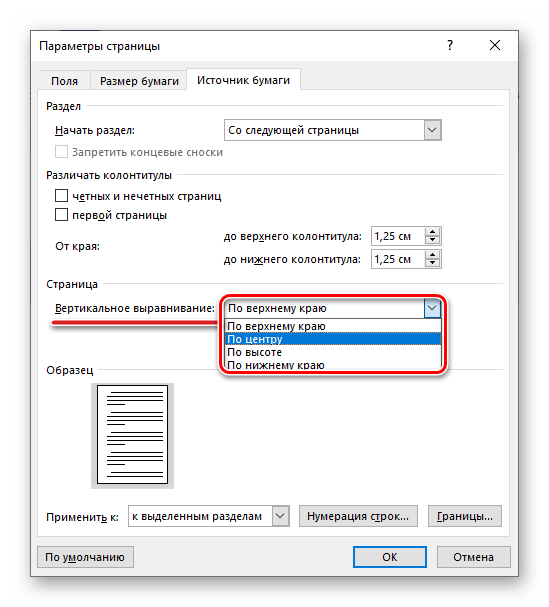
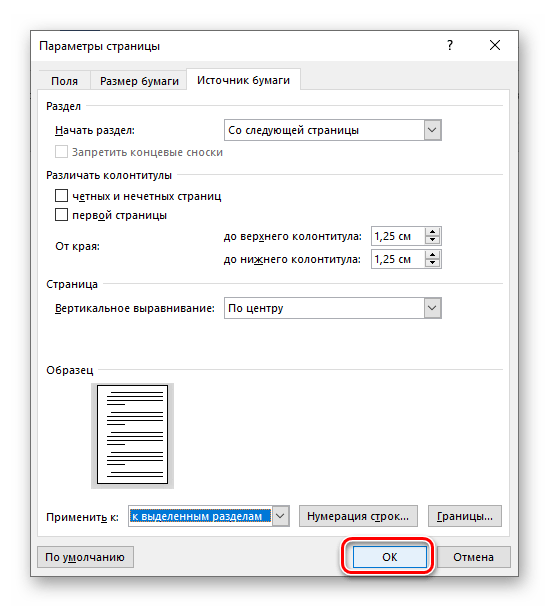
- В блоке «Страница» из выпадающего списка выберите подходящий вариант «Вертикального выравнивания»:
- «По верхнему краю»;
- «По центру»;
- «По высоте»;
- «По нижнему краю».
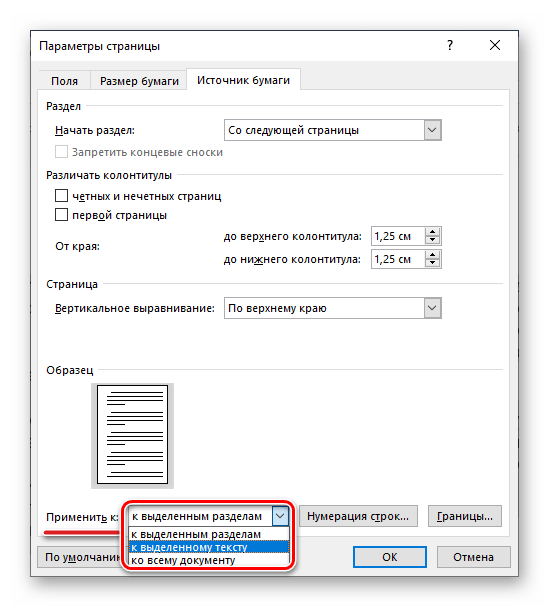
- Далее, напротив пункта «Применить» выберите вариант «к выделенному тексту» или «к выделенным разделам», если выделен именно он. Если же вам нужно, чтобы для всего документа был задан аналогичный тип выравнивания по вертикали, выбирайте в этом списке соответствующий пункт — «ко всему документу».
Нажмите «ОК» для того, чтобы заданные параметры вступили в силу, а диалоговое окно «Параметры страницы» было закрыто.
- В блоке «Страница» из выпадающего списка выберите подходящий вариант «Вертикального выравнивания»:

Выделенный вами текст будет выровнен по вертикали и примет то положение, которое вы для него сами определили. Если же ни один из представленных в данном разделе MS Word параметров вас не устраивает, текст по высоте можно выровнять произвольным образом, о чем и пойдет речь далее.
Вариант 2: Линейка
Аналогично тому, как в предыдущей части статьи («Вариант 3») мы с вами выровняли текст в документе Ворд по горизонтали относительно одной из границ или сразу обоих, можно выровнять его и по вертикали, задав необходимые отступы от верха и/или от низа страницы. Сделать это нам поможет все та же линейка.
Примечание: Описанные ниже действия позволяют задать любые желаемые значения отступов от верхней и нижней границы страницы или их обоих, которые будут применены ко всему документу или отдельному разделу, созданному с помощью разрывов страниц. Таким образом можно, например, установить любое положение для надписи на титульной странице, (чего нельзя сделать в «Параметрах страницы»), ведь она является независимым разделом.
Читайте также: Как добавить и/или удалить разрыв страницы в Word
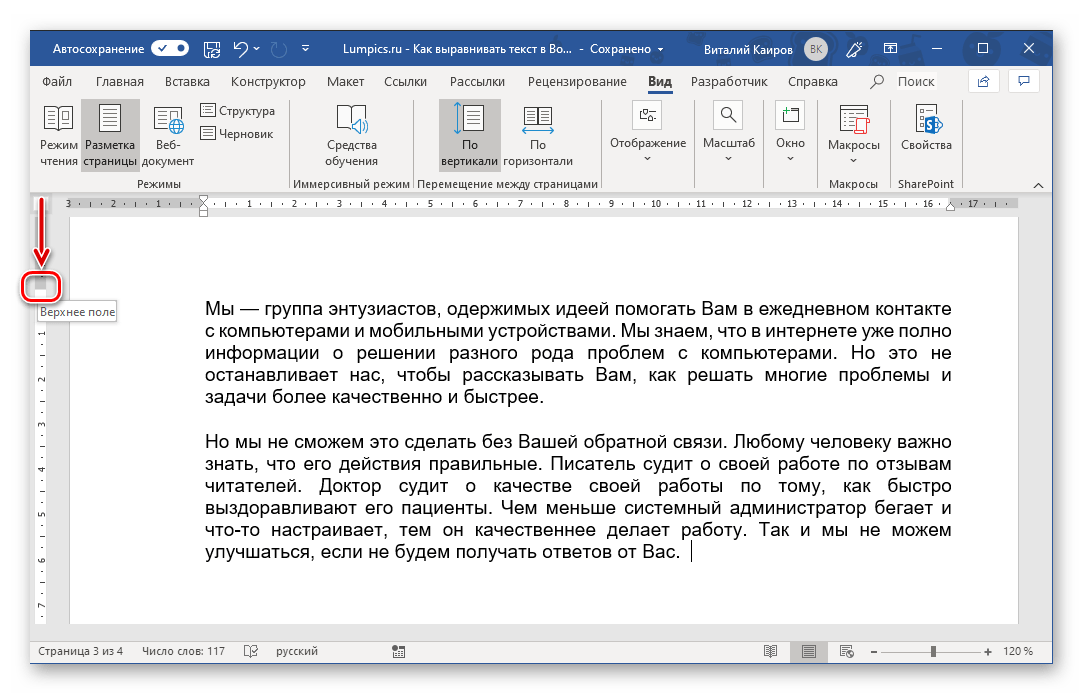
- Включите отображение линейки в документе, если этого не было сделано ранее (описано выше).
- Наведите указатель курсора на границу между серой и белой областью вертикальной линейки в ее верхней части и, когда он превратится в двунаправленную стрелку,

зажмите левую кнопку мышки (ЛКМ) и потяните вниз или вверх, в зависимости от того, нужно ли вам «отдалить» текст от верхней границы страницы или, наоборот, «приблизить» к ней. Результат может быть примерно таким: - Теперь выполните аналогичное действие с нижней частью текста, то есть в этот раз указатель курсора нужно наводить на нижнюю часть вертикальной линейки, то ее место, где пересекается белая и серая область. Зажмите ЛКМ и потяните вверх или вниз, чтобы отодвинуть текст от нижней границы или, наоборот, «прижать» поближе к ней.
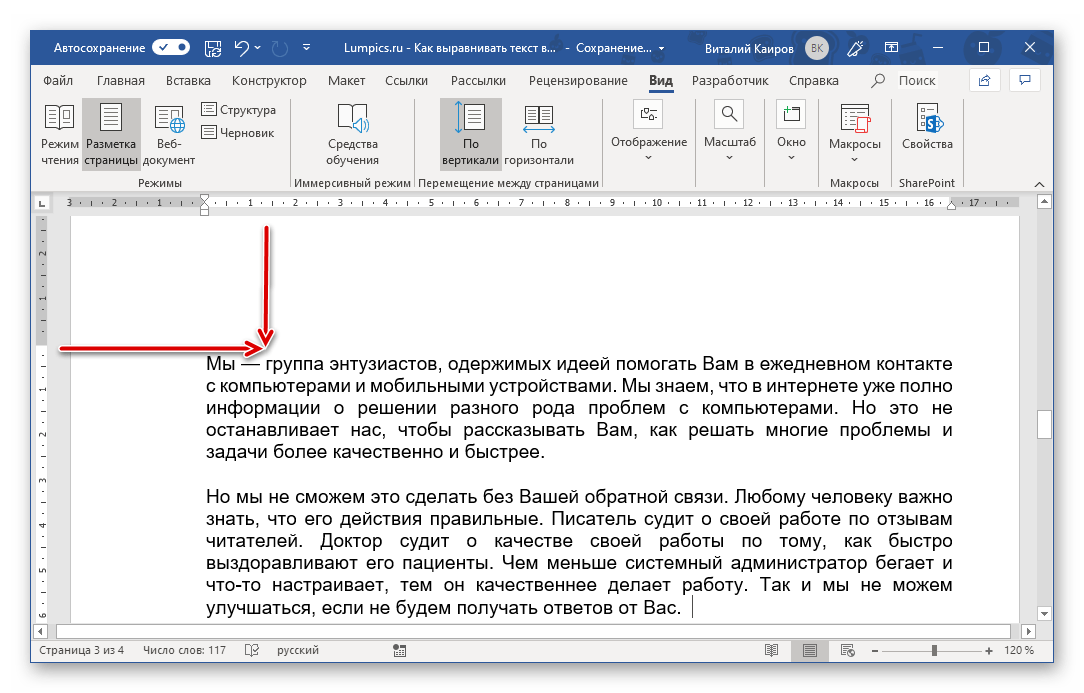
Как и в случае с горизонтальной линейкой, выравнивание положения текста относительно границ страниц таким образом дает тот же эффект, что и настройка полей.
Выравнивание таблиц
Microsoft Word, помимо непосредственно работы с текстом, позволяет еще и создавать таблицы, заполнять их данными и правильно оформлять. Записи, содержащиеся внутри ячеек, столбцы и строки, а также вся таблица целиком тоже могут нуждаться в выравнивании, причем как вместе, так и каждый из обозначенных элементов отдельно. На нашем сайте есть подробная статья о том, как выровнять таблицу и все ее содержимое, поэтому если перед вами стоит именно такая задача, просто перейдите по представленной ниже ссылке и ознакомьтесь с инструкцией.
Подробнее:
Выравнивание таблиц в Ворде
Форматирование таблиц в Ворде
Выравнивание надписей
На самом деле, в актуальных версиях Microsoft Word такое понятие как надпись отсутствует – сейчас это называется текстовым полем. Это объект, представляющий собой некую рамку с заливкой (а иногда и с дополнительными элементами оформления), внутри которого можно писать текст. Само же поле затем можно, например, вращать в произвольном направлении, поворачивать и переворачивать, отражать, о чем мы писали ранее. При этом содержимое текстового поля тоже можно выровнять как по горизонтали, так и по вертикали. Аналогичным образом можно поступить и с объектами WordArt – по сути, это более красивый вариант надписи.
Читайте также: Как повернуть, перевернуть, зеркально отразить текст в Ворде
Итак, готовая надпись у вас есть. Текстовое поле это или WordArt – не важно. Приступим к ее выравниванию. Горизонтально текст внутри такого блока выравнивается так же, как и обычный – горячими клавишами, кнопками на ленте или произвольно, а правильно расположить сам объект по вертикали можно с помощью линейки или инструментов во вкладке «Макет». Нас же интересует вертикальное выравнивание текста относительно самого поля, так как изменение «Параметров страницы» или использование «Линейки» решить эту задачу не помогут.
Примечание: Изменение размера фигуры, в которую вписан текст, тоже можно назвать своего рода выравниваем, ведь правильное определение отношения первого (текста) ко второму (фигуре) определяет общий вид надписи. Прежде чем приступить к выполнению изложенных ниже рекомендаций, сделайте так, чтобы размеры рамки соответствовали размерам занимаемого текстом места или были больше.
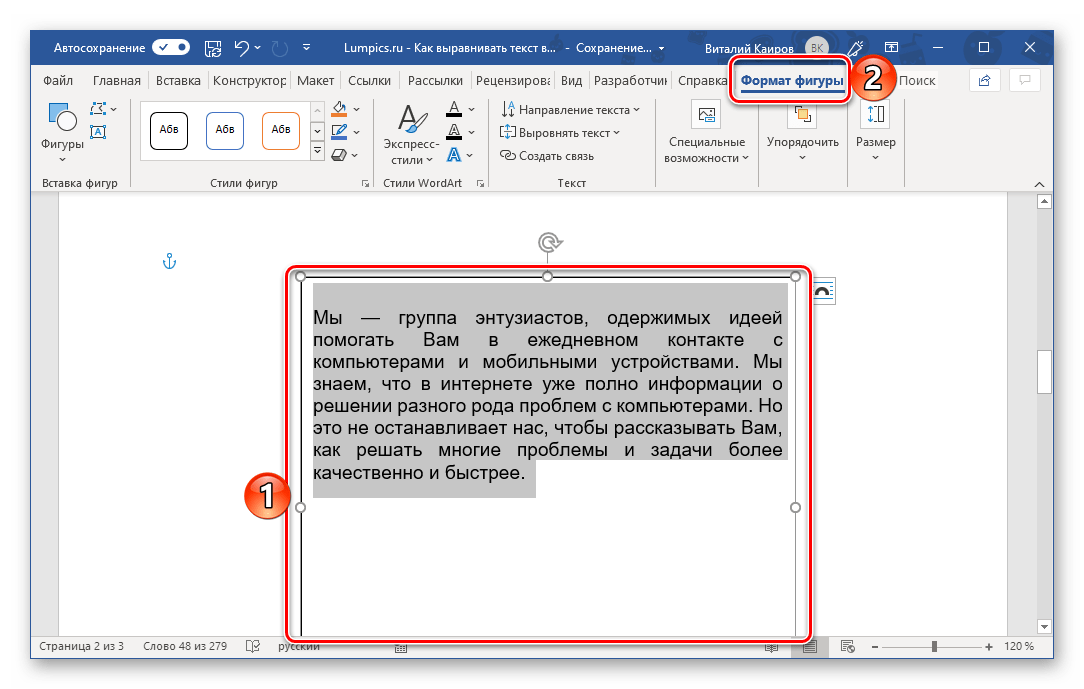
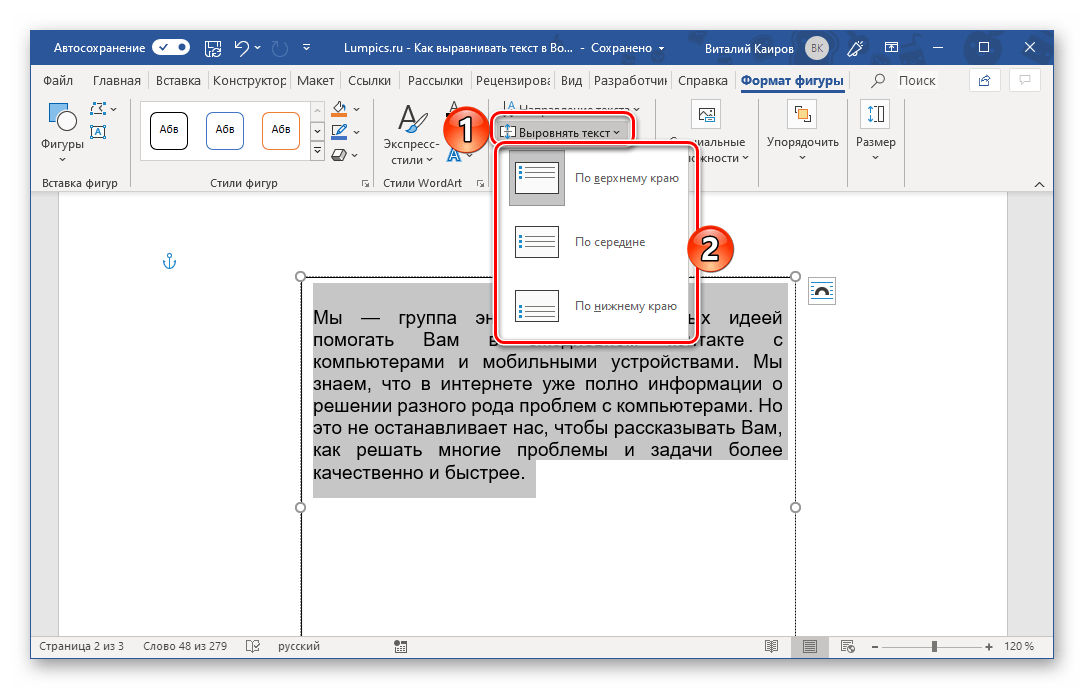
- Выделите блок с текстом (поле или WordArt) и перейдите во вкладку «Формат фигуры», которая снова появится на ленте.
- В группе инструментов «Текст» разверните меню кнопки «Выровнять текст» и выберите предпочтительный вариант:
- «По верхнему краю»;
- «По середине»;
- «По нижнему краю».
- Текст будет выровнен вертикально относительно одной из сторон поля, внутри которого он находится, или по его центру. Выделение с поля можно снять – для этого достаточно кликнуть по пустому месту в документе.
Если в документе надписи соседствуют с обычным текстом и вам также необходимо выровнять первые относительно второго или наоборот, дополнительно потребуется правильно настроить параметры «Обтекания текстом». Сделать это поможет представленная по ссылке ниже статья – несмотря на то, что работа в ней осуществлялась с изображением, с полями и WordArt-элементами будет нужно проделать ровно то же.
Подробнее: Как в Ворд сделать обтекание картинки текстом
Заключение
Мы рассмотрели все возможные варианты (а заодно и направления) выравнивания текста в Microsoft Word, затронув также и применение этой функции к таблицам и надписям.
 Please Note:
This article is written for users of the following Microsoft Word versions: 2007, 2010, 2013, and 2016. If you are using an earlier version (Word 2003 or earlier), this tip may not work for you. For a version of this tip written specifically for earlier versions of Word, click here: Exactly Positioning Text.
![]()
Written by Allen Wyatt (last updated August 14, 2019)
This tip applies to Word 2007, 2010, 2013, and 2016
Those familiar with WordPerfect may also be familiar with its advance feature. This allowed you to quickly and easily place text in a specific position relative to either the page or the preceding text. Many people coming to Word miss the advance feature.
Word folks, on the other hand, are quick to point out that Word includes an ADVANCE field which allows you to position text. For those familiar with advance’s easy interface in WordPerfect, the ADVANCE field can seem downright archaic. You basically follow ADVANCE with a series of switches that indicate, in points, how the text that follows the field is to be positioned. Some switches (l, r, u, and d) are used to move the following text relative to the foregoing text. Other switches (x and y are used to move the following text a specified distance based on something other than the foregoing text. For instance, x moves to a horizontal position relative to the column, frame, or text box in which the text is located. The y switch moves to a vertical location relative to the page as a whole.
Confusing? Much more so than in WordPerfect. To make matters worse, the y option moves not only the following text, but all the text before and after it. The switch also won’t work if the field is located within tables, text boxes, footnotes, endnotes, comments, headers, or footers. It also won’t work if the point specification you provide is outside the margins of the current page. In addition, the x option doesn’t allow you to specify a horizontal position relative to the page, but only to layout constructs within the page (column, frame, or text box).
In an effort to make the ADVANCE field a bit easier to use, Microsoft adjusted the Field dialog box so all you need to do is fill in a few text boxes. Display the Field dialog box, then choose Advance in the list of all fields. (To display the Field dialog box, select the Insert tab of the ribbon, click Quick Parts in the Text group, and then choose Field.) With the ADVANCE field selected, the dialog box shows the positioning options at the right side. Fill them in (make sure you specify distances or positions in points) and you are ready to go. (See Figure 1.)

Figure 1. The Field dialog box.
For most people, the ADVANCE field remains not only archaic, but arcane to boot. It is just plain confusing. For this reason, most people position text in a Word document by using other features, such as tables and text boxes. The positioning of tables and text boxes is much easier to control. For positioning relative to surrounding text, you can use the Before and After settings in the Paragraph dialog box to add the desired amount of space.
WordTips is your source for cost-effective Microsoft Word training.
(Microsoft Word is the most popular word processing software in the world.)
This tip (13432) applies to Microsoft Word 2007, 2010, 2013, and 2016. You can find a version of this tip for the older menu interface of Word here: Exactly Positioning Text.
Author Bio
With more than 50 non-fiction books and numerous magazine articles to his credit, Allen Wyatt is an internationally recognized author. He is president of Sharon Parq Associates, a computer and publishing services company. Learn more about Allen…
MORE FROM ALLEN
Changing a Shape
Got a drawing shape you previously added to a document, but you now want to change to a different shape? You can change …
Discover More
Where Is that Text?
Looking for a formula that can return the address of a cell containing a text string? Look no further; the solution is in …
Discover More
Creating a List of Files in a Directory
Do you need a list of all the files in a directory? It’s easy to create if you use the proper command-line commands.
Discover More
Good formatting is important. After all, you need your text to be easy to read, so it needs to be presented on the page (or screen) clearly and consistently. And text alignment is a big part of this. In this post, then, we’re looking at how to adjust the text alignment in Microsoft Word.
Adjusting Text Alignment
The alignment options in MS Word control how text is positioned in relation to the page margins. This can be controlled via the “Paragraph” section of the “Home” tab on the ribbon.
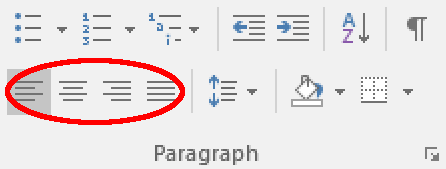
From left to right, you have four alignment options available. These are:
- Align Left – Used to align the text to the left margin
- Center – Used to position text centrally on the page
- Align Right – Used to align the text with the right margin
- Justify – Used to spread text evenly across the page so the first word on each line begins at the left margin and the last word ends at the right margin
To apply formatting, simply select the relevant text (or place the cursor where you want to type) and select an alignment option.
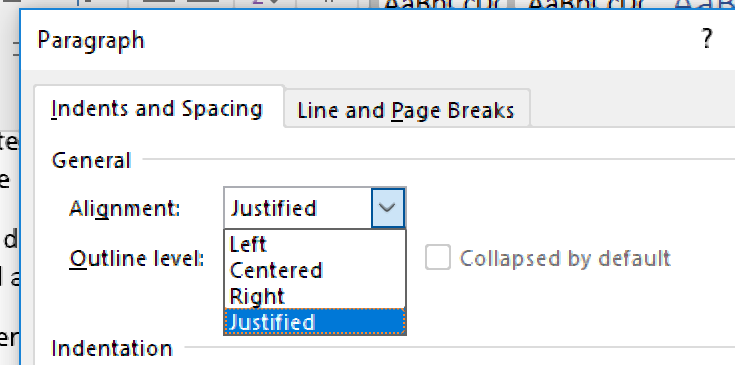
Alternatively, you can select the text you want to adjust and click the arrow in the bottom corner of the “Paragraph” section to open a new window. You can then select an option from the dropdown “Alignment” menu and click “OK.”
Which Option Should You Use?
For the main body of your work, you have two main options: Align Left and Justify. Justify is popular because it creates neat blocks of text, so it looks tidy. It is also useful if you have multiple columns of text on the page (this is why newspapers and magazines often use justified text).
Find this useful?
Subscribe to our newsletter and get writing tips from our editors straight to your inbox.
Align Left is the default for most people, though, particularly in the publishing industry. This is because it’s easy to read and prevents “rivers” (i.e., vertical blank spaces) appearing in the text.
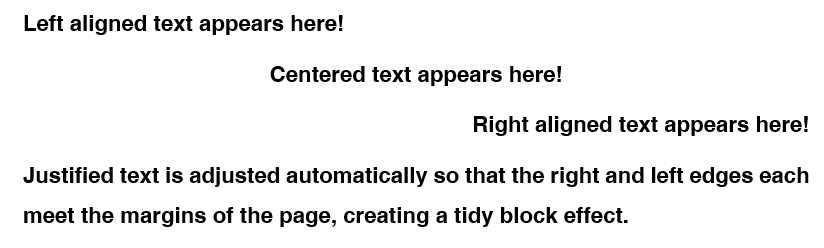
In most documents, Center should be saved for headings and subheadings. You might also use it for short passages that need to be set apart from the surrounding text. However, if you need to present a longer passage in the middle of the page, such as a block quote, you should use the indent options instead of alignment.
Align Right, meanwhile, is not used for much at all. There are some rare occasions when it is useful, such as for positioning a caption relative to an image. Usually, though, it just makes things harder to read.
The key with formatting in any document, however, is clarity and consistency. The best alignment option to pick is therefore the one that makes your document as easy to read as possible. If you need a little assistance with your formatting, though, get in touch to see how we can help.
How to fix text position in word 2016?
Adding new text in word results in pushing down the content of everything below as one expects. This creates usually problems with the formatting.
What I would like is to have fixed sections that are not affected by changes above.
Here is the problem.
Chapter 1
Bla bla
____________________________________________________end of previous 10
____________________________________________________new page 11
Chapter 2
Oops I forgot to add something Here is the problem.
Chapter 1
Bla bla
|new stuff added
|new stuff added
|new stuff added
|new stuff added
___________________________________________________end of previouspage 10
____________________________________________________new page 11
(shifted position of chapter all the stuff below and chapter 2 because of the added text )
|new stuff added
|new stuff added
|new stuff added
Chapter 2 (shifted formatting)
**Ideal would be
Chapter 1
Bla bla
|new stuff added
____________________________________________________end of previous 10
____________________________________________________beginning of page 11
automatically creates new page not to mess the
content below
|new stuff added
|new stuff added
|new stuff added
|new stuff added
____________________________________________________end of page 11
____________________________________________________page 12
Chapter 2 fixed position at top of page**
Some fonts are naturally positioned higher than others, and when you are mixing fonts or small graphics together the positioning may look awkward.
For example, in my training guides, keystrokes or button images are used a lot.
Here is a sample sentence. Notice how the bottom of TAB and ENTER sit on the baseline of the text.

After lowering TAB by 3pt and lowering ENTER by 5pt, here is the result. Notice how it flows more naturally.

To reposition text in relation to the baseline:
1. Select the text.
2. Select the Home tab.
3. Click the launcher in the bottom-right corner of the Font group.

4. Select the Advanced tab.
5. On the Position row, nudge the By arrows up or down.
When you increase the By value, Position will switch to Raised and your text will sit higher than its natural position.
When you decrease the By value, Position will switch to Lowered and your text will sit lower than its natural position.

Here are some other advanced text effects you may be interested in.
I hope you found plenty of value in this post. I’d love to hear your biggest takeaway in the comments below together with any questions you may have.
Have a fantastic day.


About the author
Jason Morrell
Jason loves to simplify the hard stuff, cut the fluff and share what actually works. Things that make a difference. Things that slash hours from your daily work tasks. He runs a software training business in Queensland, Australia, lives on the Gold Coast with his wife and 4 kids and often talks about himself in the third person!
SHARE