
I received a number of Word documents generated automatically from a third party database. Most (if not all) content is in tables. The problem is that in many cells the text is not entirely visible due to overflow. The column width and row height is set with absolute values. The column widths cannot be changed. If there is overflow, the row height should be changed to allow the text to run over more lines.
My question is: is it in any way possible to find the cells where this is the case and only for these rows set the Height to wdRowHeightAuto.
I tried just changing all rows to auto height, but this really messes up the layout.
I am now considering the following approach, but I really wonder if there is no easier way.
- For each Cell, set Cell.FitText to true
- Check if font scale has been changed
- Set FitText back to false
- If font scale was changed by FitText, set row height to Auto
Any help VBA or c# would be appreciated!
This is where I’m at, but I get runtime errors about accessing the individual column not being accessible due to different column widths. Indiviual rows are also not accessible as there are merged cells.
app = new Word.Application();

            foreach (var file in inputFiles)
            {
                var doc = app.Documents.Open(file);

                foreach (var table in doc.Tables)
                {
                    foreach (var column in table.Columns)
                    {
                        try
                        {
                            foreach (var cell in column.Cells)
                            {
                                cell.FitText = true;

                                bool textIsScaled = false;

                                if (cell.Range.Font.Scaling != 100)
                                    textIsScaled = true;

                                cell.FitText = false;

                                if (textIsScaled)
                                    cell.HeightRule = WdRowHeightRule.wdRowHeightAuto;
                            }
                        }
                        catch (Exception)
                        {
                            continue;
                        }
                    }
                }

                doc.Save();

                doc.Close();

            }
Error Word overflow table can be corrected in 2 different ways and very simple to perform, helping to bring the table in Word aligned correctly.
- How to fix: The table in Word is overflowing
- Techniques of exploiting buffer overflow errors — Part II
When we copy a table online and paste it into Word or copy this document into an unusual document, there is an error that the table overflow compared to the page margin you are setting up. The width of the Word table is then larger than the width of the paper size according to the alignment size in the current Word. So the content in the Word table is also overflowed, affecting the data view. To fix the Word table overflow error with 2 margins, we can do it in 2 different ways. The following article will guide you how to fix margin errors in Word tables.
1. Fix Word table overflow manually
This way we proceed to edit the width of the banner table to fit the width of the Word page. Click on the data table to adjust, then you will see Move Table Column icon at the top of the ruler as shown below.
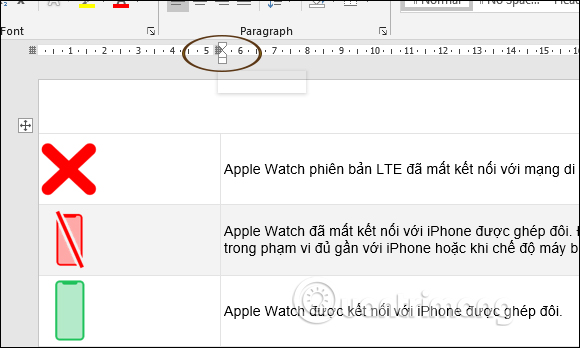
We will hold on to the icons and then move to the left or right to adjust the size of the corresponding data column. As a result, we have the correct table for the size of Word paper size.

2. Correct Word margin overflow error automatically
This way the Word table alignment is done automatically but won’t adjust to the size you want it to do manually. First, we click on the cross in the top left corner of the data table to be able to black out the entire data table , then click on the Layout tab .
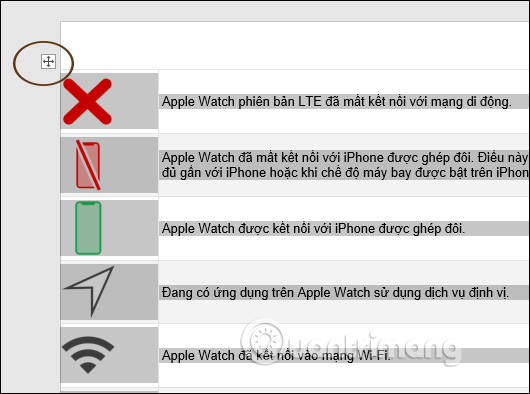
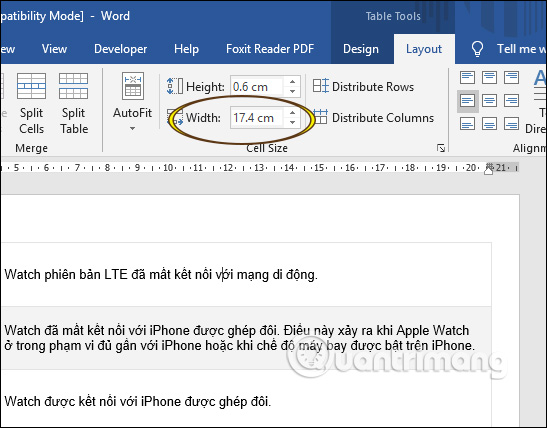
Next to the Cell Size section we proceed to adjust the horizontal size of the columns by filling the distance length in Width. As you type, the width of the columns is automatically adjusted. However, in this way, it depends on the Word table in the original document to have equal columns.
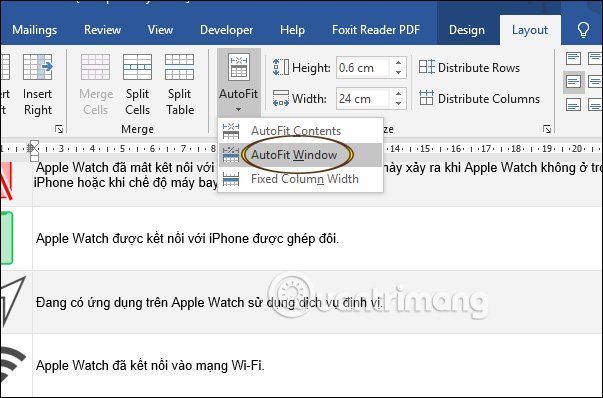
A faster way to auto-adjust columns in a table is to select AutoFit and select AutoFit Window .

The table is instantly adjusted to fit within the Word page without overflowing.
In general, two ways to fix table overflow errors in Word are easy to do, but if you want to adjust Word table better with text margins, you should choose option 1.
See more:
- How to write fractions in Word
- How to center a table cell in Word
Read more
- How to adjust the size of Word table cells equally
- Table operations in Word
- How to insert a table, create a table in Word 2016
- Instructions for deleting table paths in Word
- Navigate directly from table to table in Word 2013
- How to center the cell in the table on Word
- Create automatic table of contents in Word for Word 2007, Word 2010 to Word 2019
- Fix word sticking errors in Word 2007
- Some properties to handle Text in CSS
- 10 impressive table of contents for Microsoft Word
-

1
Drag the table onto the text. Click on the small square icon in the upper left corner of the table. Then hold and drag the table to where you want it to be within the text. Test out different positions to see if it will automatically wrap to your desire. If it doesn’t wrap how you want it to, follow along for the next steps![1]
-
2
Go to the Table Layout. Place your cursor anywhere in the table and then click on «Layout» in Word’s upper menu bar that is located directly underneath the blue title bar. You will see two different Layout buttons within this menu — you should click the one on the farthest right.[2]
Advertisement
-
3
Click on the “Properties” button. This is located on the far left of the top menu. In the pop-up window that appears, click on the “Around” button underneath the bolded header, “Text Wrapping.” This ensures that text will wrap around your table.
- Depending on your version of Word, you may have to click on the «Table» tab at the top left of the pop-up window. Do this right after clicking «Properties» so you are directed to the text wrapping buttons.[3]
- Depending on your version of Word, you may have to click on the «Table» tab at the top left of the pop-up window. Do this right after clicking «Properties» so you are directed to the text wrapping buttons.[3]
-
4
Align the table to your preference. Within this same pop-up menu, select the positioning of your table by clicking on “Left,” “Center,” or “Right” underneath the bolded text, “Alignment.” These determine where your table will appear within the wrapped text.
-
5
Click the “Positioning” button. In the same pop-up menu, click on this button. It will be located either under or to the right of “Text Wrapping.” This new pop-up window gives you further options for text wrapping. There are four categories to manipulate: “Horizontal,” «Vertical,» “Distance from Surrounding Text,” and “Options.” Click «Okay» in the bottom right corner once you are done. We recommend testing out these settings until you get the desired positioning.
- If you want to reverse a change you made, simply go back to this “Positioning” pop-up menu and revert the setting.
- This step is completely optional because you have already set up wrap text by using the “Around” button.
Advertisement
-
6
Move the table. Once you have the settings you want, click the “Okay” button in the lower right corner of the pop-up menu. Now just click on the square icon in the upper left corner of the table to move it. You should now be able to see the wrap text effects!
-
7
Unwrap text (optional). To reverse these changes, go back to «Layout,» then «Properties,» then «Table» (if applicable). In this pop-up window, click the «None» button located to the left of «Around.» After you click «Okay» in the lower right corner of the pop-up window, your text should be unwrapped.


Advertisement
Ask a Question
200 characters left
Include your email address to get a message when this question is answered.
Submit
Advertisement
Video
Thanks for submitting a tip for review!
References
About This Article
Thanks to all authors for creating a page that has been read 30,167 times.
Is this article up to date?
Improve Article
Save Article
Like Article
Improve Article
Save Article
Like Article
In this article, we will see how to use text-overflow in a table cell. A text-overflow property in CSS is used to specify that some text has overflown and hidden from view.
Approach: The white-space property must be set to “nowrap” and the overflow property must be set to “hidden”. The overflowing content can be clipped, display an ellipsis (‘…’), or display a custom string.
Syntax:
text-overflow: clip|string|ellipsis|initial|inherit;
Example: In the following example,we will consider ellipsis to use the test-overflow property in a table cell.
HTML
<!DOCTYPE html>
<html>
<head>
<style>
table,th,td {
border: 1px solid black;
}
table {
width: 100%;
}
.first {
width: 50%;
}
.ellipsis {
position: relative;
}
.ellipsis:before {
content: ' ';
visibility: hidden;
}
.ellipsis span {
position: absolute;
left: 0;
right: 0;
white-space: nowrap;
overflow: hidden;
text-overflow: ellipsis;
}
</style>
</head>
<body>
<h2 style="color:green">GeeksforGeeks</h2>
<b>
<p>text-overflow in table cell</p>
</b>
<br/>
<table border="1">
<thead>
<tr>
<th>First Name</th>
<th>Last Name</th>
<th>Age</th>
</tr>
</thead>
<tbody>
<tr>
<td class="ellipsis first">
<span>
Free Tutorials, Millions of Articles, Live,
Online and Classroom Courses ,Frequent Coding
Competitions ,Webinars by Industry Experts,
Internship opportunities and Job Opportunities.
</span>
</td>
<td class="ellipsis">
<span>
Free Tutorials, Millions of Articles, Live,
Online and Classroom Courses ,Frequent Coding
Competitions ,Webinars by Industry Experts,
Internship opportunities and Job Opportunities.
</span></td>
<td class="ellipsis">
<span>
Free Tutorials, Millions of Articles, Live,
Online and Classroom Courses ,Frequent Coding
Competitions ,Webinars by Industry Experts,
Internship opportunities and Job Opportunities.
</span>
</td>
</tr>
</tbody>
</table>
</body>
</html>
Output:

Like Article
Save Article
Свойство text-overflow определяет параметры видимости текста в блоке, если текст целиком не помещается в заданную область.
Возможны два варианта: текст обрезается; текст обрезается и к концу строки добавляется многоточие. text-overflow работает в том случае, если для блока значение свойства overflow установлено как auto, scroll или hidden.
Демо
Интерфейс
- appearance
- box-sizing
- caret-color
- cursor
- outline
- outline-width
- outline-style
- outline-color
- outline-offset
- resize
- text-overflow
- user-select
Синтаксис
/* Overflow behavior at line end
       Right end if ltr, left end if rtl */
text-overflow: clip;
text-overflow: ellipsis;
text-overflow: '…';
text-overflow: fade;
text-overflow: fade(10px);
text-overflow: fade(5%);

/* Overflow behavior at left end | at right end
       Directionality has no influence */
text-overflow: clip ellipsis;
text-overflow: '…' '…';
text-overflow: fade clip;
text-overflow: fade(10px) fade(10px);
text-overflow: fade(5%) fade(5%);

/* Global values */
text-overflow: inherit;
text-overflow: initial;
text-overflow: unset;
Значения
clip- Текст обрезается по размеру области.
ellipsis- Текст обрезается и к концу строки добавляется многоточие.
Значение по-умолчанию: clip
Применяется к блочным элементам
Спецификации
- CSS Basic User Interface Module Level 4
- CSS Basic User Interface Module Level 3
Описание и примеры
<!DOCTYPE html>
<html>
  <head>
    <meta charset="utf-8" />
    <title>text-overflow</title>
    <style>
      p.clip {
        white-space: nowrap; /* Запрещаем перенос строк */
        overflow: hidden; /* Обрезаем все, что не помещается в область */
        background: #fc0; /* Цвет фона */
        padding: 5px; /* Поля вокруг текста */
        text-overflow: ellipsis; /* Добавляем многоточие */
      }
    </style>
  </head>
  <body>
    <p class="clip">
      Магнитное поле ничтожно гасит большой круг небесной
      сферы, в таком случае эксцентриситеты и наклоны орбит
      возрастают.
    </p>
  </body>
</html>
 Не помещается текст в ячейке таблицы созданной в Word? А точнее, не весь текст виден в ячейке, поскольку часть его прячется за ее границами. Причина этого может быть как в настройках таблицы, так и в настройках параметров абзаца. Поэтому, чтобы избавиться от этой проблемы нужно изменить названные настройки.
Как может выглядеть таблица
Например, таблица со списком учебников должна выглядеть таким образом.

А на самом деле получается вот так:

То есть высота строк в этой таблице слишком мала для того, чтобы в ней отражалась полная информация о книгах.
Таблица может выглядеть и вот так:

Здесь уже не только малая высота строк, но и по ширине текст, как бы наползает на границы ячейки (второй столбец) или вообще прячется за них (третий столбец). Кроме того видим, что высота третей строки слишком велика. Конечно, такое происходит не часто, но все же встречается, особенно когда приходится редактировать уже готовые созданные кем-то ранее таблицы.
Высота строк и ширина ячеек таблиц в документе Word может корректироваться автоматически в зависимости от размера текста, об этом мы говорили ранее. Но в данном случае этого нет, и вся неприглядность таблицы обусловлена неверной настройкой свойств таблицы и абзаца.
Настройки таблицы
Чтобы изменить свойства всей таблицы или отдельной ячейки нужно выделить эту таблицу или ячейку, настройки которой нас не устраивают, и, нажав в этом месте правой кнопкой мыши, перейти в выпадающее меню. В котором (выпадающем меню), нужно найти «свойства таблицы» и кликнуть по нему уже левой кнопкой. Что вызовет открытие окна «свойства таблицы».
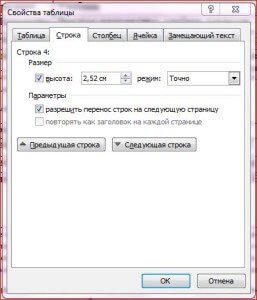
Для увеличения или уменьшения высоты строки во вкладке «строка» нужно установить галочку напротив параметра высота и выбрать режим «минимум» теперь высота строки будет изменяться в зависимости от текста, находящегося в ячейке (чем больше текст, тем выше высота строки таблицы).
Если же высота строки слишком большая и текст даже не заполняет ее всю, то возможно в свойствах таблицы установлен точный размер высоты строки и/или указано слишком большое его значение. Тогда следует установить режим «минимум» и уменьшить (или удалить) значение высоты строки таблицы.
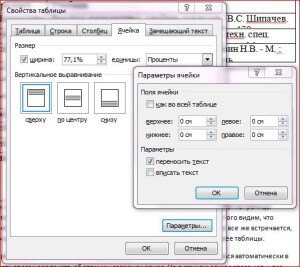
В случае если текст «наползает» на границы ячейки, возможно, неправильно выставлены поля ячейки, а точнее ширина полей равна нулю. Чтобы установить поля ячейки или изменить их нужно пройти во вкладку «ячейка», «параметры» и изменить здесь этот показатель.
Настройки абзаца
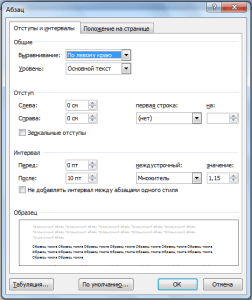
Если же текст в таблице не просто «наползает» на границы ячейки, но часть его вообще прячется за нее, вероятно, нужно изменить параметры абзаца этого теста. Для этого выделяем требуемую ячейку или весь столбец и в главном меню входим в окно настройки «Абзац».
В окне настройки абзаца потребуется изменить отступ (слева, справа и первой строки), обычно везде требуется выставить нулевые значения. При этом положение текста в ячейке будет зависеть только от настройки полей ячейки (которые мы уже изменили).
Таким образом, изменяя свойства таблицы и абзаца можно делать таблицы более аккуратными и привлекательными. Это можно сделать с помощью текстового процессора Word. К тому же часть ценной информации не спрячется за границами ячеек таблицы. И это тоже хорошо!
Видео
 Please Note:
This article is written for users of the following Microsoft Word versions: 2007, 2010, 2013, and 2016. If you are using an earlier version (Word 2003 or earlier), this tip may not work for you. For a version of this tip written specifically for earlier versions of Word, click here: Fitting Text Into Cells.
![]()
Written by Allen Wyatt (last updated May 5, 2020)
This tip applies to Word 2007, 2010, 2013, and 2016
You have worked long and hard on your page design, including a couple of tables that are just right. Then, along comes a need to add a bit more text into one of the tables. The result is that the text in a cell wraps and pushes everything else down a bit. Now your whole design is thrown off. You long for a way to automatically adjust the size of the text in a cell so you won’t have the wrapping and pushing occur.
Word provides a built-in option that may do the trick. Simply follow these steps:
- Select the cell or cells that you want to format.
- Make sure the Layout tab of the ribbon is displayed. (This tab is only visible if you first do step 1.)
- Click the Properties tool in the Table group. Word displays the Table Properties dialog box.
- Select the Cell tab. (See Figure 1.)
- Click on the Options button. Word displays the Cell Options dialog box. (See Figure 2.)
- Make sure the Fit Text check box is selected.
- Click on OK to close the Cell Options dialog box.
- Click on OK to close the Table Properties dialog box.
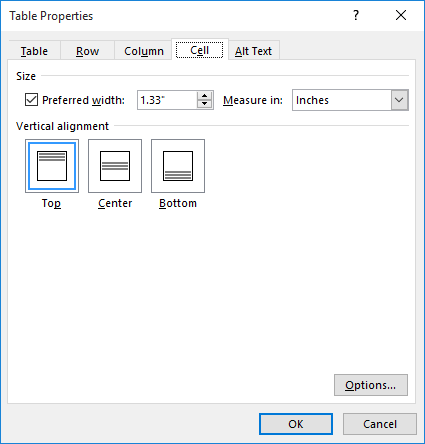
Figure 1. The Cell tab of the Table Properties dialog box.
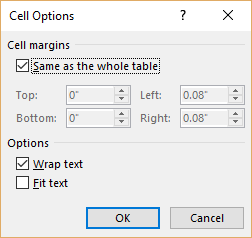
Figure 2. The Cell Options dialog box.
What Word does is to decrease the apparent size of the text so that everything fits. Word decreases the width of the text by «scrunching» (a highly technical term) the text together horizontally, without adjusting it vertically.
If you would like to know how to use the macros described on this page (or on any other page on the WordTips sites), I’ve prepared a special page that includes helpful information. Click here to open that special page in a new browser tab.
WordTips is your source for cost-effective Microsoft Word training.
(Microsoft Word is the most popular word processing software in the world.)
This tip (6081) applies to Microsoft Word 2007, 2010, 2013, and 2016. You can find a version of this tip for the older menu interface of Word here: Fitting Text Into Cells.
Author Bio
With more than 50 non-fiction books and numerous magazine articles to his credit, Allen Wyatt is an internationally recognized author. He is president of Sharon Parq Associates, a computer and publishing services company. Learn more about Allen…
MORE FROM ALLEN
Meaningless Text
The quick brown fox jumps over the lazy dog, or so the story goes. Here’s how to put this type of meaningless text into a …
Discover More
Days Left in the Year
Sometimes it is handy to know how many days are left in the current year. This tip provides a quick formula that …
Discover More
Calculating the Day of the Year
Need to know what day of the year a certain date is? You can figure it out easily using the formulas in this tip.
Discover More
More WordTips (ribbon)
Fitting Your Text In a Table Cell
Got some text you absolutely must fit on a single line in a table cell? Then you’ll appreciate this rather esoteric …
Discover More
Headings On Your Printout
If you’ve got a table that spans multiple printed pages, you probably want to repeat a row or two of that table as a …
Discover More
Last-Row Border Formatting
When the last row displayed on a page doesn’t show the borders you want, it can be confusing to figure out how to get …
Discover More