
Word for Microsoft 365 Word for Microsoft 365 for Mac Word 2021 Word 2021 for Mac Word 2019 Word 2019 for Mac Word 2016 Word 2016 for Mac Word 2013 Word 2010 Word 2013 Developer Word Starter 2010 More…Less
Sometimes, putting a border around text will work better in your document than inserting a text box or a one-cell table, to achieve a similar look.
-
Select a word, line, or paragraph.
-
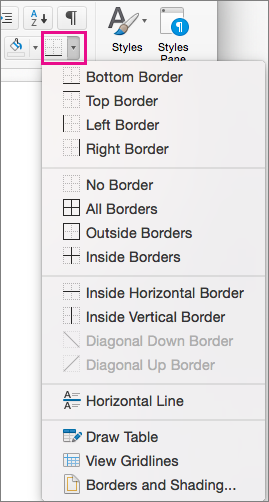
Go to Home > Borders, and then open the menu of border choices.

-
Choose the type of border you want:
Customize the border
-
After you’ve selected your text and found the basic type of border you’d like, open the Borders menu again, and choose Borders and Shading.
-
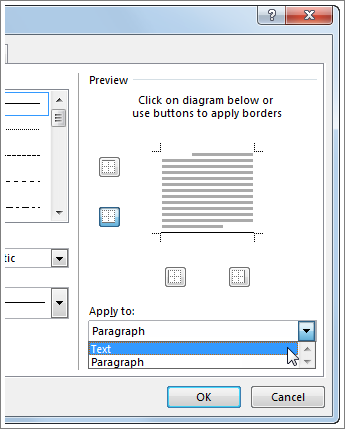
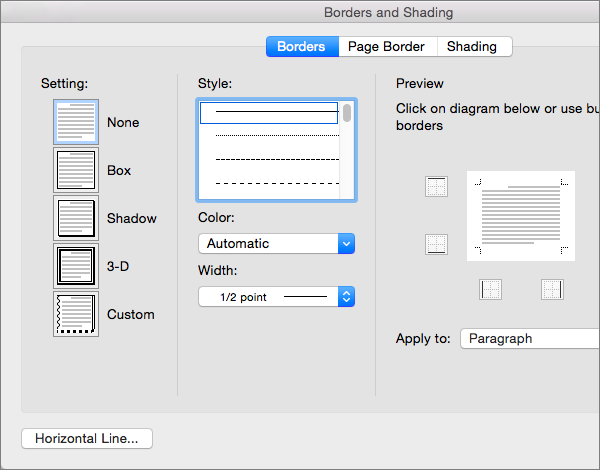
Make your choices for style, color, and width, and then apply the choice with the buttons in the Preview section of the dialog box. When the preview is the way you want it, click OK.
Note: Make sure that the Apply to box has the correct setting: Text or Paragraph.
See Also
Add, change, or delete borders from documents or pictures
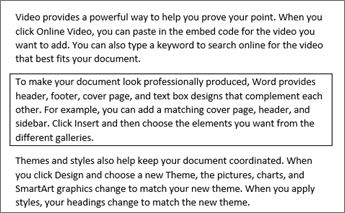
You can add a border to an individual word, a line of text, or an entire paragraph. You can make borders as plain or fancy as you want.
You can also add a border to a picture, put a border around a table, add a border to an individual page.
Add a border to selected text
-
Select a word, line, or paragraph.
-
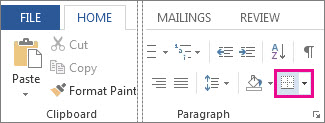
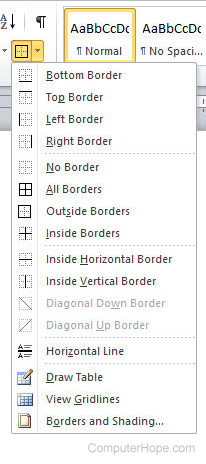
On the Home tab, click the arrow next to the Borders button.
-
In the Borders gallery, click the border style that you want to apply.
Customize the text border
-
After you’ve selected your text and found the basic type of border you’d like, click the arrow next to the Borders button again, and then click Borders and Shading.
-
In the Borders and Shading dialog box, change Setting, Style, Color, and Width to create the border style that you want.
Note: To make sure the border style is correctly applied, set Apply to to Text or Paragraph. If you haven’t selected any text, you can only set Apply to to Paragraph.
-
Click OK to apply your selected border styles.
Tip: You can also fill the area of your selected text with color. In the Borders and Shading dialog box, click Shading to select a color and patterns. The color you pick in the Fill list fills the rectangular area; the color you select from the Color menu is applied to the rectangular area in a pattern you select from the Style list.
See Also
Add, change, or delete borders from documents or pictures
Add a border to a table
Need more help?

When you need to highlight a portion of text, it’s not always convenient to use a text box. To emphasize a paragraph while keeping it within the main content, you can put a border around that text in Word instead.
You can put a border around specific text, such as a single sentence, or an entire paragraph. Let’s look at how to do both as well as customize the border.
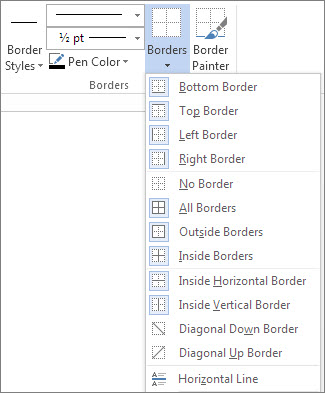
Select the text you want to surround with a border and go to the Home tab. Click the drop-down arrow next to Borders and choose “Borders and Shading.”

Use a Setting option on the left or the buttons below Preview on the right to add the border around the text. You can also adjust the Style, Color, and Width settings in the center of the window to customize the line for the border.
RELATED: How to Add Borders to or Change Borders on a Table in Word
In the Apply To drop-down box on the right side, select “Text” and when you finish, click “OK” to apply the border.
You’ll then see your text outlined with a border.
Put a Border Around a Paragraph
If you have an entire paragraph you’d like to place a border around, the process is similar. However, you have a few extra customization options.
RELATED: How to Put Borders Around Images in Microsoft Word
Select the paragraph you want to surround with a border and head to the Home tab. Click the Borders drop-down arrow and pick one of the quick border options such as Outside Borders or All Borders.
This places the border around the paragraph from margin to margin on each side and gives you a fast way to add the border. But you can also customize the border and adjust the space between the border and the text.
Select the bordered paragraph, click the drop-down arrow next to Borders on the Home tab, and choose “Borders and Shading.”
Like with customizing the border for specific text, you can change the Style, Color, and Width for the border line. Confirm that “Paragraph” is selected in the Apply To drop-down box. Then, to adjust the spacing, click “Options” on the right side of the window.
At the top, use the arrows or enter the number of points for the spacing on the top, bottom, left, and right of the border in relation to the text. As you make the changes, you’ll see a preview directly below. Click “OK” when you finish.
Make any other adjustments you want in the Borders and Shading window and click “OK” when you’re done to apply the border.
RELATED: How to Change Page Margins in Word
Remove a Border From Text in Word
If you decide later to remove a border you’ve added, it takes only a few clicks. Select the text or paragraph containing the border and revisit the Home tab. Click the drop-down arrow next to Borders and pick “No Border.”
Text boxes in Word are great ways to call out portions of text. But if you want to keep your text in line with the rest and simply highlight a small piece, consider surrounding it in a border. For other types of borders, take a look at how to create a page border in Word.
READ NEXT
- › How to Mirror or Flip Text in Microsoft Word
- › How to Outline Text in Adobe Photoshop
- › This New Google TV Streaming Device Costs Just $20
- › How to Adjust and Change Discord Fonts
- › HoloLens Now Has Windows 11 and Incredible 3D Ink Features
- › Google Chrome Is Getting Faster
- › The New NVIDIA GeForce RTX 4070 Is Like an RTX 3080 for $599
- › How Long Do CDs and DVDs Last?
How-To Geek is where you turn when you want experts to explain technology. Since we launched in 2006, our articles have been read billions of times. Want to know more?
![]()
Download Article
Learn how to insert a lined or art border in Microsoft Word documents on desktop
![]()
Download Article
- Adding a Page Border (Windows)
- Adding a Page Border (Mac)
- Adding a Text Border
- Q&A
|
|
|
Do you want to make an outside border in your Microsoft Word documents? You can easily add a solid or dotted border to an entire page or selected content. You can also use Microsoft Word’s included designs to create an artistic border for themed event flyers. This wikiHow will show you how to create a border around text, images, or pages in Microsoft Word using your Windows or Mac computer.
Things You Should Know
- To add a page border, click «Design» → «Page Borders». Select a border setting, style, and page application. Click «OK».
- To add a border around text or images, select the content. Click the «Home» tab and click the arrow next to the border icon. Click «Borders and Shading…»
- Select a border setting, style, and page application. Click «OK».
-
1
Open a project in Microsoft Word. This looks like a W on top of a blue square. Microsoft Word is available to install for Windows.[1]
- You must have a subscription to use Office 365.
- Use this method to add a lined border around a Microsoft Word document. This is different from changing the margins.
-
2
Click Design. This will be in the top toolbar, between Draw and Layout.
Advertisement
-
3
Click Page Borders. You can find this at the left side of the Design section, next to Page Color. It will have an icon of a page with a yellow border.
- A new window will open.
-
4
Click Page Border. This is the middle tab on the Borders and Shading window. You may already be on this tab.
-
5
Select a border setting. In the left-most column, click the border option that you want to use. Select from: None, Box, Shadow, 3-D, and Custom.
- If you want a simple border to go all the way around your page, select Box.
- To add a border with fun images, click the Art drop-down menu and select from Word’s art gallery. This border can be used for themed flyers for holidays and events.
-
6
Select a border style. In the «Style» column, scroll down until you find the border style you want to use, then click the style. Select from the various solid and dotted line styles.
- If needed, you can also change the border’s color and width from the Color and Width drop-down menus, respectively.
-
7
Select pages to use. If you created a new section earlier in this method, click the «Apply to» drop-down box, then click the section to which you want to apply the border in the resulting drop-down menu.
- To apply the border to the first page of your section, click This section — first page only in the drop-down menu.
-
8
Click OK. It’s at the bottom of the page. This will apply the border to your document’s specified page(s).

Advertisement
-
1
Open a project in Microsoft Word. This looks like a W on top of a blue square. Microsoft Word is available to install for Mac.[2]
- You must have a subscription to use Office 365.
-
2
Click Design. This will be in the top toolbar, between Draw and Layout.
-
3
Click Page Borders. You can find this at the left side of the Design section, next to Page Color. It will have an icon of a page with a yellow border.
- The Borders and Shading window will open, set to the Page Border tab. If it isn’t already on the Page Border tab, click it now.
-
4
Select a border setting. In the left-most column, click the border option that you want to use. Select from: None, Box, Shadow, 3-D, and Custom.
- If you want a simple border to go all the way around your page, select Box.
- To add a border with fun images, click the Art drop-down menu and select from Word’s art gallery. This border can be used for themed flyers for holidays and events.
-
5
Select a border style. In the «Style» column, scroll down until you find the border style you want to use, then click the style. Select from the various solid and dotted line styles.
- If needed, you can also change the border’s color and width from the Color and Width drop-down menus, respectively.
-
6
Select pages to use. If you created a new section earlier in this method, click the «Apply to» drop-down box, then click the section to which you want to apply the border in the resulting drop-down menu.
- To apply the border to the first page of your section, click This section — first page only in the drop-down menu.
-
7
Click OK. This is the blue button. This will apply the border to your document’s specified page(s).
Advertisement
-
1
Open a project in Microsoft Word. This looks like a W on top of a blue square.
-
2
Click Home. This is in the top toolbar, between File and Insert.
-
3
Select content. Click and drag your mouse across the text or image(s) around which you want to place a border.
- This method will place a border around an entire selection of images and text together.
- If you want to place a border around a single image, double-click the image. Select a preset style from the Picture Styles section, or click Picture Border to set the color, weight, and design of the border.[3]
-
4
Click
next to the «Borders» button. The Borders button resembles a square divided into four smaller squares; you’ll find it in the «Paragraph» section of options in the toolbar, just right of the paint bucket icon. A drop-down menu will open.
- On a Mac, click the Format menu item at the top of the screen instead.
-
5
Click Borders and Shading…. It’s at the bottom of the drop-down menu. A new window will open.
- On a Mac, you’ll find this option in the middle of the Format drop-down menu.
-
6
Select a border setting. In the left-most column, click the border option that you want to use. Select from: None, Box, Shadow, 3-D, and Custom.
- If you want a simple border to go all the way around your text, select Box.
-
7
Select a border style. In the «Style» column, scroll down until you find the border style you want to use, then click the style. Select from the various solid and dotted line styles.
- If needed, you can also change the border’s color and width from the Color and Width drop-down menus, respectively.
- To add a border with images, click the Art drop-down menu and select a design.
-
8
Select pages to use. If you created a new section earlier in this method, click the «Apply to» drop-down box, then click the section to which you want to apply the border in the resulting drop-down menu.
- To apply the border to the first page of your section, click This section — first page only in the drop-down menu.
-
9
Click OK. This will apply the border to your document’s specified page(s).
- Be sure to save your document when you’re finished.
- You can also use Microsoft Word to create a booklet or another handout flyer.


Advertisement
Add New Question
-
Question
How can I place a border around a picture I’ve inserted into a document?

You do what is shown above, but instead, you click on the picture before you go through the steps.
-
Question
How do I put a border around a table in Microsoft Word?
Go into Format —> Borders and Shading. There you’ll find options for borders you can apply to the table.
-
Question
What three options can I set regarding a picture border?
The three option you can set are: small, medium and large.
Ask a Question
200 characters left
Include your email address to get a message when this question is answered.
Submit
Advertisement
Thanks for submitting a tip for review!
About This Article
Thanks to all authors for creating a page that has been read 971,538 times.
Is this article up to date?
You shall already know the method to underline text in Word. But addition to this, you may also have the demand to overline specified characters sometimes. For example, if you want to enter an average number in a mathematical document, a short line over a given variable is necessary.
In this post, I will provide several simple methods based on Word 2016.
1. Insert Shapes
The most direct way is to draw a line over the specified text.
Click Insert – Shapes. Find the icon of straight line in Lines.

Select it. Drag your cursor to draw a straight line over the text.
![]()
Then you can choose the color and effect of the line you drew.


The bright spot of this method is the high degree of freedom. You can draw any kind of line in anywhere you want.
2. Borders
You can also regard the overline as a part of a border.
First, select the text and find the icon of Borders in Home tab.

Click the small triangle beside it to see the drop-down list, choose Top Border.

Then a overline is added to the whole row.

Adjusting the width of it requires you to use the horizontal Ruler. You can enable it by checking Ruler in View tab.

Put your cursor at the row of the text you want to overline. Then drag the small triangle on the ruler to adjust the length of the line.


3. Equation Editor
Click Insert – Equations to enable the Equation Tools in Design, and a textbox will be added to your document.

Click Accent in Design (Equation Tools) tab, select Bar in Accent or Overbar in Overbars and Underbars.

Then the underline will be inserted in the equation textbox. You can click the dotted pane to input any text you want.


Copyright Statement: Regarding all of the posts by this website, any copy or use shall get the written permission or authorization from Myofficetricks.
Text boxes in an MS Word document are a very useful feature. Text within a box acts as a highlight for the reader. Here, we will show you how to:
- Add a Text Box
- Remove a Text Box
- Customize a Text Box Border
- Change Border Color
- Create Dashed Border
- Change Border Thickness
Let us begin.
Step #1: Open the Word document.
Open the Word document where you want to add the text box.
Step #2: Add the Text Box
Position the cursor where you want the text box to appear.
In the top menu bar, click on the Insert tab to change the ribbon.

In the section Text, click on the Text Box icon to open a dialog box for Built-In text boxes.

Click on the text box you find suitable. We select the Simple Text Box.

Word adds the text box in the document.

Remove a Text Box
Step #1: Open the Word document.
Open the Word document that has at least one text box.
Step #2: Remove the text box
Click on the text box boundary to select it.

Press the Delete button on your keyboard.
Word will delete the text box from your document.
Customize a Text Box Border
Step #1: Open the Word document.
Open the Word document that has at least one text box.
Step #2: Customize the text box border
Click on the text box boundary to select it.

Right-click on the text box boundary to open a menu.
Click on Format AutoShape/Picture.

This opens a dialog box for Format Text Box.
Click on the Colors and Lines tab.

Change Border Color
Under Line, click on the down arrow on the right-hand side of Color:.

This opens a dialog box for Theme Colors and Standard Colors.
Click on the color of your choice.

The chosen color will appear against the Color: tab under Line.

Note: At this point, you can click on OK at the bottom of the dialog box to exit. Word will change the color of the box to your chosen color. Else, move to the next step to make more changes.
Create Dashed Border
In the Format Text Box dialog box, under Line, click on the down arrow on the right side of Dashed:.

This opens a choice for different dashed lines.
Select the most suitable dashed line.

The chosen dashed line will appear against the Dashed: tab under Line.

Note: At this point, you can click on OK at the bottom of the dialog box to exit. Word will make the changes to the text box as per your choices above. Else, move to the next step to make more changes.
Change Border Thickness
In the Format Text Box dialog box, under Line, click on the down arrow on the right side of Style:.

This opens a choice for lines of a different style.
Each line style has its weight in points on its left.
Select the line most suitable to you.

The chosen line style will appear against the Style: tab.
The weight of the chosen line style will appear against the Weight: tab under Style:.

The choice of line styles offers only a few discrete weights.
To change the line weight, select the number next to Weight:.
Change the number as you like.

Click on OK at the bottom of the Format Text Box dialog box to exit.
Word will make the changes to the text box according to all your choices.

Conclusion
Follow our step-by-step instructions to add or delete text boxes in your Word document. Beautify your text boxes with our instructions. We have shown you how to change the border color, style of the border line, and the thickness of the border.
Updated: 08/31/2020 by
You can create borders around any word, sentence, paragraph, or other text in a document. Follow the steps below to create a border around your text.
- Open Microsoft Word.
- Highlight the text you want to create a border around.
- How to highlight or select text.
- Once the text is highlighted, click the Home tab.
- On the Home tab, click the down arrow on the border to get border options, like those shown in the picture.
- Select the type of border you want to use. If you want a single border around the text, click Outside Borders.
If you need more options than those shown (e.g., you want to make a thicker border, a dotted border, or a dashed border), click Borders and Shading. In the Borders window that opens, you can select from hundreds of border options.

Фото: Depositphotos
Microsoft Word – одна из самых популярных программ в мире для работы с текстовыми файлами, и если знать дополнительные возможности этого редактора, то работа с ним может стать легкой и непринужденной.
Для того, чтобы узнать, как сделать рамку для текста в Word, сначала необходимо выяснить, какая версия текстового редактора установлена на вашем компьютере.
В зависимости от версии, сделать это можно по-разному, а самый простой и быстрый способ – зайти в меню «Пуск» и ввести в поиске слово «Microsoft». Компьютер отобразит среди найденных программах название установленного пакета и его версию.

Как сделать рамку вокруг текста с помощью вкладки «Разметка страницы» или «Дизайн»
Сделать рамку вокруг текста Word как для реферата, так и для другого визуального оформления можно, используя
вкладку «Разметка страницы».

Если же ваша версия Word младше 2015 года, – используя вкладку «Дизайн». Перейдите в меню «Фон страницы» и нажмите на панель «Границы страниц». Перед вами откроется меню «Границы и заливка».

Здесь можно выбрать тип и цвет линии, которая будет использоваться для оформления, а также необходимую ширину линии. Для того чтобы применить выбранные параметры для всего документа необходимо выбрать вкладку «Страница».
Если вы желаете применить параметры только для одного абзаца, то выбирайте вкладку «Граница».
Где в Word рамки для оформления
Если вы хотите красиво оформить какую-то открытку, то для этого в Word предусмотрены различные рисунки, которыми можно ее обрамить. В этом же меню «Границы и заливка» перейдите в подпункт «Рисунок» и выберите понравившееся изображение.


Как сделать рамку вокруг текста с помощью Таблицы
Рамку в Word можно создать с помощью меню «Нарисовать таблицу». Для этого на вкладке «Вставка» перейдите в меню «Таблицы» и выберете команду «Нарисовать таблицу». Затем с зажатой левой кнопкой мыши потяните курсор в виде карандаша вокруг объекта до требуемой величины.

Как сделать рамку поверх текста в Word с помощью фигур
Необычное обрамление Word для вашего документа можно сделать с помощью команды «Фигуры», которая находится во вкладке «Вставка» меню «Иллюстрации».

Выберите нужную фигуру для вашей будущей рамки и протяните курсор до требуемой величины. По умолчанию фигура отобразится перед текстом, скрывая его.

Чтобы это исправить, перейдите в меню «Упорядочить», выберите пункт «На задний план». Укажите редактору «Поместить за текстом».
После этого вы можете выбрать для вашей фигуры различные эффекты. Например, можно добавить эффект объема или тень.

Как сделать рамку для курсовой по ГОСТ
Для того чтобы сделать рамку для курсовой работы или реферата по ГОСТ:
- перейдите во вкладку «Разметка страницы» и укажите настраиваемые поля со следующими значениями;

- затем перейдите в «Границы страниц» меню «Фон страницы», выберите тип «Рамка»;
- в пункте «Параметры» укажите следующее значение полей относительно текста;

- затем укажите тип рамки и примените указанные значения «К этому разделу»;

- перейдите во вкладку «Вставка»;
- в меню «Колонтитулы» выберите «Нижний колонтитул» и нажмите «Изменить нижний колонтитул»;
- вернитесь во вкладку «Вставка;
- в меню «Таблица» выберите пункт «Вставить таблицу» со значениями 9 столбцов и 8 строк;

- осталось задать необходимые значения ячеек созданной таблицы и объединить нужные ячейки для заполнения;
- для этого перейдем во вкладку «Макет»;

- в меню «Размер ячейки» указываем параметры слева направо: 0,7 см / 1 см / 2,3 см /1,5 см / 2,3 см / 6,77 см /1,5 см / 1,5 см / 2 см. Высота строк – 0,5 см.

Готово! Теперь вы знаете как сделать рамку вокруг текста Word и сможете самостоятельно создавать как красочно оформленные открытки, так и профессиональные текстовые документы.
Это тоже интересно:
Во время загрузки произошла ошибка.
Type over text in Word for Windows
- In Word, choose File > Options.
- In the Word Options dialog box, choose Advanced.
- Under Editing options, do one of the following: To use Insert key to control Overtype mode, select the Use Insert key to control overtype check box.
Contents
- 1 How do you type over an existing text in Word?
- 2 How do you type over a document?
- 3 How do I toggle between insert and overtype mode?
- 4 How do you type the symbol for over?
- 5 How do you change overwrite text?
- 6 What do you mean by over typing text?
- 7 How do you put a symbol above a letter in Word?
- 8 How do I insert text without box in Word?
- 9 How do I turn on the Insert key on my keyboard?
- 10 How do you type plus or minus on a keyboard?
- 11 How do I put a line over text in Word 2016?
- 12 What is colon key?
- 13 Where is the INS key?
- 14 What is insertion mode?
- 15 Why does text disappear in Word?
- 16 How do you put a line above and below text in Word?
- 17 How do I type the dots above a letter?
- 18 How do we wrap text around the object?
- 19 How do you type over on a Mac?
- 20 How do you turn on inserts?
How do you type over an existing text in Word?
Word Options
- Click “File,” “Options” and then the “Advanced” tab.
- Check “Use Overtype Mode” in the Editing Options section.
- Click “OK” to enable Overtype and close the Word Options window.
- Click anywhere in the document and start typing to overwrite text to the right of the cursor.
How do you type over a document?
If you have the free Adobe Acrobat Reader app installed, you can type on PDFs on your Android device.
- Open the Adobe Acrobat reader app and select Files in the bottom toolbar.
- Find the PDF you want to type on and tap to select it.
How do I toggle between insert and overtype mode?
One way to switch between insert mode and overtype mode is to double-click on the OVR letters on the status bar. Overtype mode becomes active, the OVR letters become bold, and you can proceed to make any edits you desire.
How do you type the symbol for over?
These keyboard shortcuts will help you display text more accurately in your business documents.
- Open a document in Microsoft Word.
- Press “Ctrl-Shift” and the caret (” ^ “) key and then the letter to insert a circumflex accent.
- Press “Ctrl-Shift” and the tilde (” ~ “) key and then the letter to insert a tilde accent.
How do you change overwrite text?
Press the “Ins” key to toggle overtype mode off. Depending on your keyboard model, this key may also be labeled “Insert.” If you simply want to disable overtype mode but keep the ability to toggle it back on, you are done.
What do you mean by over typing text?
overtype. (ˌəʊvəˈtaɪp) vb (tr) to replace (typed text) by typing new text in the same place.
How do you put a symbol above a letter in Word?
You’ll use the Ctrl or Shift key along with the accent key on your keyboard, followed by a quick press of the letter. For example, to get the á character, you’d press Ctrl+’ (apostrophe), release those keys, and then quickly press the A key.
How do I insert text without box in Word?
Removing the Box from a Text Box
- Either click on the border of the text box or position the insertion point within the text box.
- Select the Text Box option from the Format menu.
- Click on the Colors and Lines tab, if necessary.
- In the Color drop-down list, select No Line.
- Click on OK.
How do I turn on the Insert key on my keyboard?
How to Enable the Insert key in Microsoft Word:
- Go to file > word options > advanced > editing options.
- Check the box that says, “use the Insert key to control overtype mode”
- Now the insert key works.
How do you type plus or minus on a keyboard?
Using a shortcut key: Microsoft Word offers a pre-defined shortcut key for some symbols such as plus-minus sign and minus-plus sign: Type 00b1 or 00B1 (does not matter, uppercase or lowercase) and immediately press Alt+X to insert the plus-minus symbol: ± Type 2213 and press Alt+X to insert the minus-plus symbol: ∓
How do I put a line over text in Word 2016?
Type the text you want to overline into your Word document and make sure the “Home” tab is active on the ribbon bar. Click the down arrow on the “Borders” button in the “Paragraph” section of the “Home” tab. Select “Top Border” from the drop-down menu.
What is colon key?
A colon is a symbol that resembles two vertical periods ( : ) and found on the same key as the semicolon on standard United States keyboards.Keyboard help and support.
Where is the INS key?
Sometimes displayed as Ins, the Insert key is a key on most computer keyboards near or next to the backspace key. The Insert key toggles how text is inserted by inserting or adding text in front of other text or overwriting text after the cursor as you type.
What is insertion mode?
Updated: 08/02/2020 by Computer Hope. Insert mode is a mechanism that allows users to insert text without overwriting other text. This mode, if it’s supported, is entered and exited by pressing the Insert key on a keyboard. Tip.
Why does text disappear in Word?
Turn off overtype mode: Click File > Options. Click Advanced. Under Editing options, clear both the Use the Insert key to control overtype mode and the Use overtype mode check boxes.
How do you put a line above and below text in Word?
To insert a line in Word above and / or below a paragraph using the Borders button:
- Select the paragraph(s) to which you want to add a line.
- Click the Home tab in the Ribbon.
- Click Borders in the Paragraph group. A drop-down menu appears.
- Select the line you want to use.
How do I type the dots above a letter?
Hold down the “Ctrl” and “Shift” keys, and then press the colon key. Release the keys, and then type a vowel in upper or lower case. Use Office’s Unicode shortcut combination to put an umlaut over a non-vowel character.
How do we wrap text around the object?
Wrap text around simple objects
- To display the Text Wrap panel, choose Window > Text Wrap.
- Using the Selection tool or Direct Selection tool , select the object you want to wrap text around.
- In the Text Wrap panel, click the desired wrap shape:
How do you type over on a Mac?
On the Word menu, click Preferences. Under Authoring and Proofing Tools, click Edit, and then in the Edit dialog box, select Replace existing text as you type (Overtype mode). Note: To turn off overtype mode, clear the check box next to Replace existing text as you type (Overtype mode).
How do you turn on inserts?
Enabling overtype mode in the options
- In Microsoft Word 2010, 2013, and later, click File and then Options.
- In the Word Options, click Advanced.
- Check the box for Use the Insert key to control overtype mode to allow the Insert key to control the Overtype mode.
- Click Ok.