
This article is a consolidation of the following previously available article: 211272
For a Microsoft Word 97 version of this article, see
184143.
For a Microsoft Word 7.0 for Windows 95 version of this article, see
184142.
When you view your document in Microsoft Word, some characters may be missing, or the top (or bottom) of some characters may be cut off.
This problem may affect the following types of characters:
-
Underscore
-
Character with an ascender
-
Character with a descender
-
International character that contains an umlaut, acute accent, grave accent, circumflex, or tilde
-
Object that is inline with the text of your document—for example, a picture that is not inserted in a frame or text box
NOTE: This problem does not affect printing; that is, underscores, characters with ascenders or descenders, and international characters are printed correctly although they may not be displayed correctly.
Symptoms
This problem may be caused by one of the following.
Case 1
The line spacing of your text may be set to an exact height. When you set the line spacing to Exactly and select a measurement that is equal to or less than the height of the font, underscore characters may not be displayed and characters that have an ascender, descender, or an umlaut may be cut off. For example, if you set line spacing to Exactly 9-point for a 10-point font, underscore characters may be cut off.
NOTE: This problem may occur differently with different fonts.
Case 2
The printer driver may incorrectly substitute screen fonts at certain view percentages. If you change the printer driver, you may notice an immediate difference, depending on the view you are using.
Case 3
The zoom percentage that the document is set to may cause characters to have the top or bottom portion of the screen font cut off. You can adjust the zoom percentage from 75 percent to 100 percent in most cases to correct this visually.
Cause
This problem is a display-only problem. Use one or more of the following methods appropriate for your situation.
Method 1: Change the Document Zoom Setting
When you change the zoom percentage, Word may allow you to view the full height of your text. To do this, use one of the following methods depending on the version of Word you are using:
Microsoft Office Word 2003, Microsoft Word 2002, or Microsoft Word 2000
-
On the View menu, click Zoom.
-
Do one of the following:
-
Under Zoom to, change to a larger setting. For example, change to 200% and then click OK.
-
Under Percent, change the percentage to a larger setting. For example, change it to 120%.
-
Microsoft Office Word 2007
-
On the View tab, click
Zoom in the Zoom group. -
Do one of the following:
-
Under Zoom to, change the value to a larger setting. For example, change the value to 200%.
-
Under Percent, change the percentage value to a larger setting. For example, change the value to 120%.
-
-
Click OK.
Method 2: Change the Document View
When you change the view of your document to outline view, Word shows the full height of your text.
To change the view of your document in Word 2003, in Word 2002, or in Word 2000, click Outline on the View menu.
To change the view of your document in Word 2007, click Outline in the
Document Views group on the
View tab.
NOTE: This problem may occur in normal, print layout, and Web layout views. When you view your document in outline view, paragraph formatting is ignored.
Method 3: Change the Line Spacing
Word 2003, Word 2002, or Word 2000
-
Select the text and then click Paragraph on the Format menu.
-
Do one or both of the following:
-
On the Indents and Spacing tab, change the Line spacing box to something other than Exactly. For example, change the Line spacing setting to Single.
-
Change the At setting to a setting slightly larger than the font point size you are using in your document. For example, if your font point size is 10 point, then change the At setting to 11 point.
-
Word 2007
-
Select the text.
-
On the Hometab, click the
Paragraph dialog box launcher in the Paragraph group. -
Do one or both of the following:
-
On the Indents and Spacing tab, change the setting in the Line spacing box to a setting other than
Exactly. For example, change the setting in the Line spacing box to Single. -
Change the At setting to a setting slightly larger than the font point size that you are using in your document. For example, if your font point size is 10 point, then change the
At setting to 11.
-
Method 4: Change the Font or Point Size
Word 2003, Word 2002, or Word 2000
-
Select your text and then click Font on the Format menu.
-
On the Font tab, do one or both of the following:
-
Change the Font setting to a different font.
-
Change the Size setting to a smaller size than what you have your line spacing set to. For example, if you have your line spacing set to Exactly 12 point, change the font size to 11 point.
-
Word 2007
-
Select the text.
-
On click the Hometab, click the
Font dialog box launcher in the Font group. -
On the Font tab, do one or both of the following:
-
Change the Font setting to a different font.
-
Change the Size setting to a smaller size than what you have your line spacing set to. For example, if you have your line spacing set to Exactly 12 point, change the font size to 11 point.
-
Resolution
Line spacing determines the amount of vertical space between lines of text. Word uses single line spacing by default. The line spacing that you select affects all lines of text in the selected paragraph or the paragraph that contains the insertion point. The following table describes the line spacing options:
This option Results in
————————————————————————
Single Line spacing for each line that accommodates the largest
font in that line, plus a small amount of extra space.
The amount of extra space varies depending on the font
used.
1.5 Lines Line spacing for each line that is one-and-one-half
times that of single line spacing. For example, if
10-point text is spaced at 1.5 lines, the line spacing
is approximately 15 points.
Double Line spacing for each line that is twice that of single
line spacing. For example, in double-spaced lines of
10-point text, the line spacing is approximately 20
points.
At Least Minimum line spacing that Word can adjust to accommodate
larger font sizes or graphics that otherwise do not
fit within the specified spacing.
Exactly Fixed line spacing that Word does not adjust. This
option makes all lines evenly spaced.
Multiple Line spacing that is increased or decreased by a
percentage that you specify. For example, setting line
spacing to a multiple of 1.2 increases the space by
20 percent, and setting line spacing to a multiple of
0.8 decreases the space by 20 percent. Setting the
line spacing at a multiple of 2 is equivalent to setting
the line spacing at Double. In the At box, type or
select the line spacing you want. The default is three
lines.
At The amount of line spacing you select. This option is
available only if you select At Least, Exactly, or
Multiple in the Line Spacing box.
NOTE: If a line contains a large text character, graphic, or formula, Word increases the spacing for that line. To space all lines evenly, click Exactly in the Line spacing box, and then select the line spacing in the At box that is large enough to fit the largest character or graphic in the line. If characters or graphics still appear cut off, select a larger number in the At box.
For more information, click the following article number to view the article in the Microsoft Knowledge Base:
192973 Definitions of typography terms in Word 2000
More Information
A Word document is used to record text or information, pictures, charts, tables, etc. No matter how crucial information you have saved in the Word file, it can turn blank or show no text under various circumstances.
Whenever your Microsoft Word does not display text or appears blank then you might have tried different methods to fix the word text not showing up. But remember, verifying the default font color of your text with the background color might work for you if the text color and background color are the same.
When the Word file is corrupted, then you would find the word not showing text. However, this does not mean that the content present in the Word file is lost forever.
In case, if none of the methods works to fix word files not showing content then, here is an article with the proven method to fix your corrupt Microsoft Word not displaying text or content using Remo Repair Word.

Tool to Fix Word File not Showing Content | Remo Repair Word
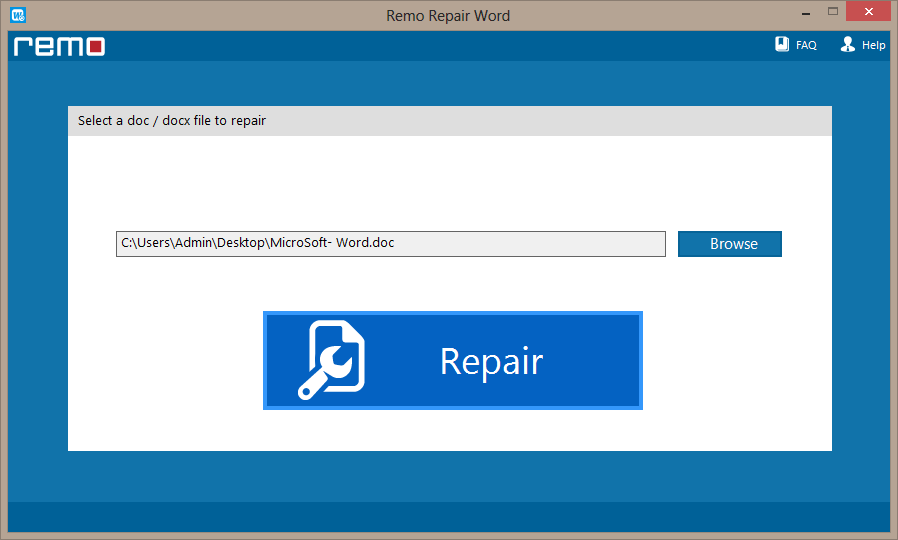
Utilize Remo Repair Word software that is meticulously designed to fix corrupt Word files that are not showing any content or text. The tool is specially built to work on read-only mode that makes sure your original files are intact.
The tool is compatible with the latest version of Windows 11, 10, 8.1, 8, 7 and previous versions. And also, on all versions of Word application such as 2019, 2016, 2013, 2010, etc.
Remo Repair Word application is entirely free to use.
Free Download For Windows
You can also make use of Remo Repair Word to not only repair corrupt and damages .doc and .docx files but also Word files that refuse to open
- Download and install Remo Repair Word software on your Windows to fix Word files not showing text.
- Launch the tool and click on the Browse button to select the Word file that is not displaying content or text.
- Click on the Repair button and wait till the repair process completes.
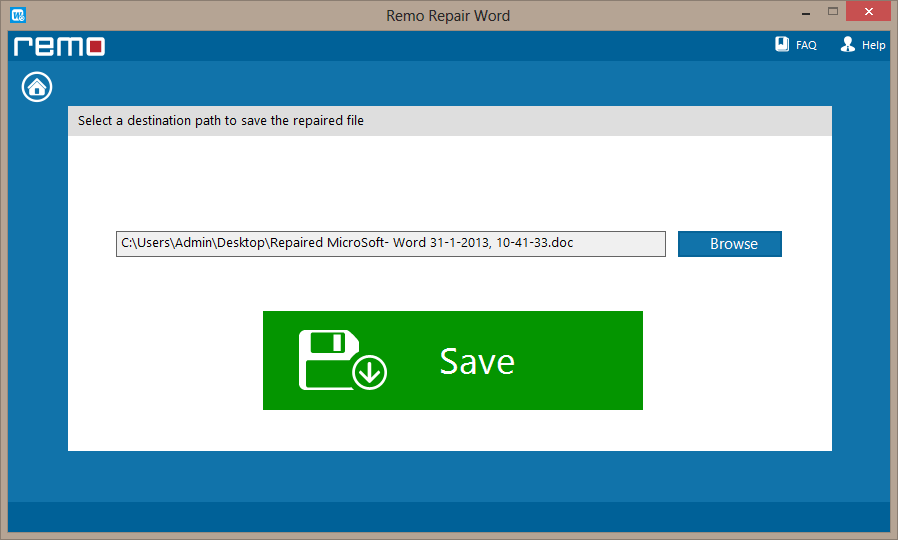
- Now, Click the Save button to restore it to your desired location.
Common Reasons for Word Document not showing text
- Repeatedly upgrading Word docs from one version to another.
- Interruptions like abrupt removal of storage device while transferring Word files from system to storage device or vice versa.
- Header corruption of Word file due to virus infection.
- Trying to open DOC / DOCX file on an incompatible application.
- Microsoft Word errors or application crash while working on Word document.
- Round tripping of Word file, and so on.
Windows 10: Text not showing in outlook or word
Discus and support Text not showing in outlook or word in Windows 10 BSOD Crashes and Debugging to solve the problem; My laptop has suddenly stopped displaying text in email and word documents.When I click on an email its just showing me the first line and the rest is…
Discussion in ‘Windows 10 BSOD Crashes and Debugging’ started by EmmaYZ, May 11, 2021.
-
Text not showing in outlook or word
My laptop has suddenly stopped displaying text in email and word documents.When I click on an email its just showing me the first line and the rest is blank.When I open a word doc its also just showing me the first line.Does anyone have any idea how to fix this?PS. I am not great with computers at all!

-
outlook opens word?
If you use a version of Outlook prior to v. 2007, there’s a checkbox in one of the preferences tabs which controls this. You can choose Word or Outlook Editor.
V. 2007 no longer includes Outlook Editor, though. It has it’s own ‘light’ verson of Word 2007 built in.
Pete
-
three word suggestions
Hi,
Thank you for writing to Microsoft Community Forums.
I understand that you want to disable word suggestions when you type any word. I’ll certainly help you with the steps.
To disable text suggestions, I would suggest you to refer the steps mentioned below:
- Press Windows Logo key + I, to open
Settings. - Click on Devices, and click on
Typing on the left pane. - Now, under Typing toggle the switch to off for
Show text suggestions as I type on the software keyboard. - Under Hardware keyboard, toggle the switch to on for
Show text suggestions as I type.
Let us know if you need any further assistance, we will be glad to help you further.
Regards,
Nikhar Khare
Microsoft Community — Moderator
- Press Windows Logo key + I, to open
-
Text not showing in outlook or word
outlook opens word?
Yes it does. *Smile
Outlook uses word for message composition.

 Outlook uses word for message composition.
Text not showing in outlook or word
-
Text not showing in outlook or word — Similar Threads — Text showing outlook
-
Text Cursor In A Word
in Windows 10 Gaming
Text Cursor In A Word: So i got intrerrupted by this text cursor which always uses it i restared the computer it didnt work please help mehttps://answers.microsoft.com/en-us/windows/forum/all/text-cursor-in-a-word/3cc9f86b-b63a-4bd9-93fc-2f2196052cf7
-
Text Cursor In A Word
in Windows 10 Software and Apps
Text Cursor In A Word: So i got intrerrupted by this text cursor which always uses it i restared the computer it didnt work please help mehttps://answers.microsoft.com/en-us/windows/forum/all/text-cursor-in-a-word/3cc9f86b-b63a-4bd9-93fc-2f2196052cf7
-
Word is highlighting all text
in Windows 10 Gaming
Word is highlighting all text: Word has just started highlighting all text in documents so that I cannot edit at all. Sometimes I can open up a new blank Word doc and click on the page and then switch back to the document I am working on and then I can make edits for a bit before it highlights all the text… -
Word is highlighting all text
in Windows 10 Software and Apps
Word is highlighting all text: Word has just started highlighting all text in documents so that I cannot edit at all. Sometimes I can open up a new blank Word doc and click on the page and then switch back to the document I am working on and then I can make edits for a bit before it highlights all the text… -
Removing side texts in word
in Windows 10 Gaming
Removing side texts in word: Is there any way I can remove those side text and numbers from my word document?https://answers.microsoft.com/en-us/windows/forum/all/removing-side-texts-in-word/1e5e01bb-d71a-4b6a-bc76-460a5bd36414
-
Outlook & Word 2016
in Windows 10 Customization
Outlook & Word 2016: The last week or there abouts when I receive an email message in outlook it seems to play the default sound rather than the one I’ve assigned. The sounds ‘Desktop mail notification’ and ‘New Mail Notification’ were set back to default in control panel – sounds. So, I set them… -
In a word document texts within a chart is misaligned and showing the header on top of the text
in AntiVirus, Firewalls and System Security
In a word document texts within a chart is misaligned and showing the header on top of the text: In a word document texts within a chart is misaligned and showing the header on top of the texthttps://answers.microsoft.com/en-us/windows/forum/all/in-a-word-document-texts-within-a-chart-is/18fbcbf8-7ed4-489b-b0f8-d19cce46152e
-
Word and outlook are gone
in Windows 10 Installation and Upgrade
Word and outlook are gone: I recently got an error when trying to start up outlook. Someone on a thread told me to reinstall it. So I uninstalled it. When I looked for the download on the windows website it said to install office so I did that. I can access the apps on the office app, but I cant search… -
Add words to text prediction.
in Windows 10 Customization
Add words to text prediction.: You can apparently add words to the personal dictionary for Android devices …. the procedure for doing it is published. My Q is… why is it not possible for users like myself, who sometimes type with a mouth op mouse on the OSK on my laptop, able to do it? We need to be…
| Workable Solutions | Step-by-step Troubleshooting |
|---|---|
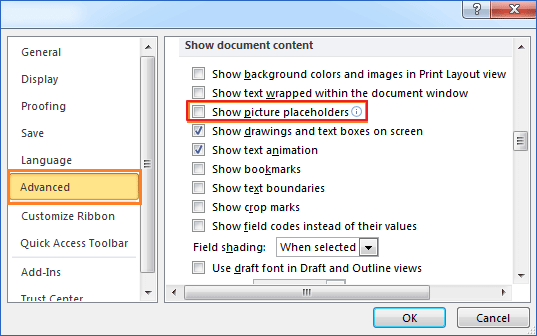
| Fix 1. Show hidden images in a Word | Click «File» > «Options» in Word. Click «Advanced» on the left pane, uncheck «Show picture placeholders»…Full steps |
| Fix 2. View hidden texts in Word | Click «File» > «Options» in Word 2013/2010 (for Word 2007, click Office button > «Word Options»)…Full steps |
| Fix 3. Recover hidden Word/photos | Unhide a Word Document in File Explorer. Or recover hidden Word with data recovery software…Full steps |
Q: Pictures not showing in Word, how to find hidden images in Word document?
«I have a four-page Word document with several images inserted. When I opened it this morning to see only white rectangles instead of pictures in the Word. Why are my pictures not showing up in the Word document? Are they hidden? How to show hidden images in a Word?»
Images or texts not showing in a Word document happens from time to time because they are hidden intentionally or unintentionally. This article shows you a detailed guide on how to show hidden images and texts in a Word document. What’s more, If you want to recover hidden Word documents and photos on Windows PC and laptop, you can use an ultimate EaseUS Data Recovery Wizard tool to help you make it effortlessly.
How to Find Hidden Images/Pictures in Word
When you can’t see a picture or image in a Word document, you can try the tips below to find hidden pictures or images.
Step 1: Open your Microsoft Office Word > «Word Options» in Word 2007. (Click «File» > «Options» in Word 2016/2013/2010.)
Step 2: Click «Advanced» on the left pane, uncheck «Show picture placeholders» under Show document content. Then you should be able to see your hidden images or pictures in Word document again.
How to hide images in a Word document?
Sometimes you need to insert pictures in Word to supplement the text message. On the contrary, sometimes, when you just want to scroll and read text quickly, they can become an additional obstacle. In this case, you can hide pictures in your Word document with the «Show picture placeholders» feature. using the same steps above.
How to View Hidden Text in Word Document
If you’ve hidden some text lines in a Word document, or some content was set to hide in Word, is it possible to show the hidden text content? How? You’ll find two options for showing hidden text in Word 2016/2013/2010/2007. (If you are using an older version of Word, please find more solutions from Microsoft Office support team or Google.)
Method 1. Show Hidden Text in Word 2016
The first way is to view the hidden text from Print settings.
Step 1. Open the Word document in Word 2016 in which you have hidden text.
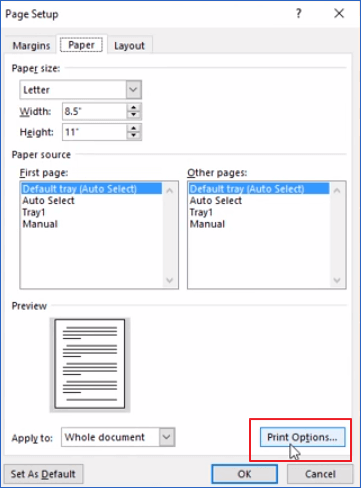
Step 2. Go to «Print» settings and select «Page Setup».
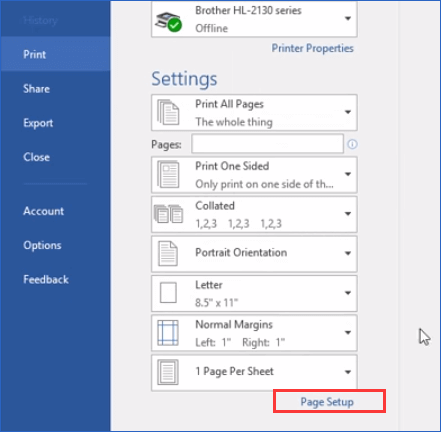
Step 3. Go to «Paper» settings, click «Print Options…».
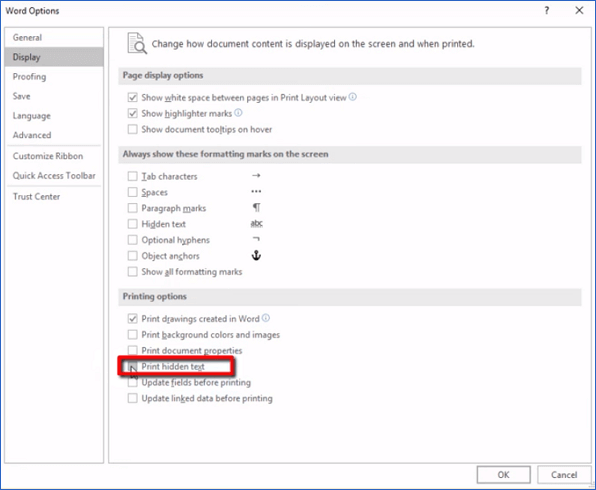
Step 4. In Display, check «Print hidden text» and click «OK» to save changes.
By doing so, those hidden texts will only show up in the Print preview window. But still hidden in Word document. If you want to unhide text in Word 2016, follow the below tips.
Step 1. Press Ctrl + A to select all content in Word document.
Step 2. Right-click on content and select «Font…».
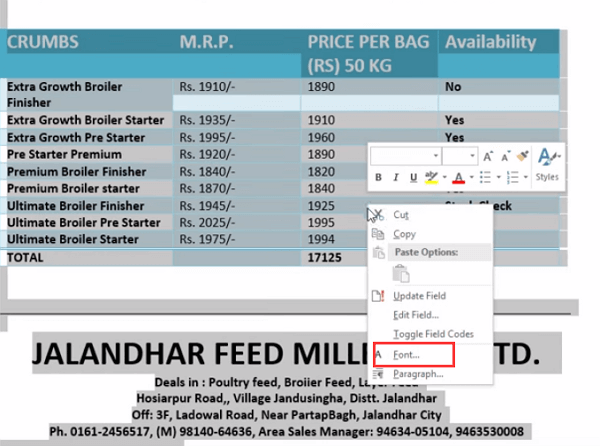
Step 3. Click the «Hidden» box twice, uncheck it and click «OK» to save changes.
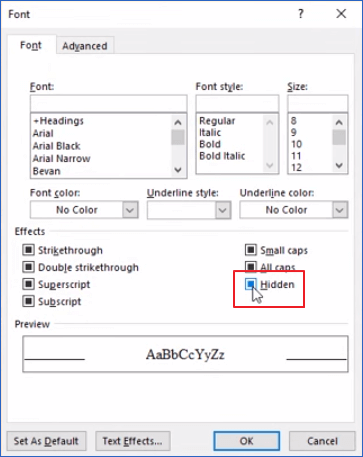
Now you can see all hidden content displaying in your Word document again.
Method 2. Display Hidden Text in Word 2013/2010/2007
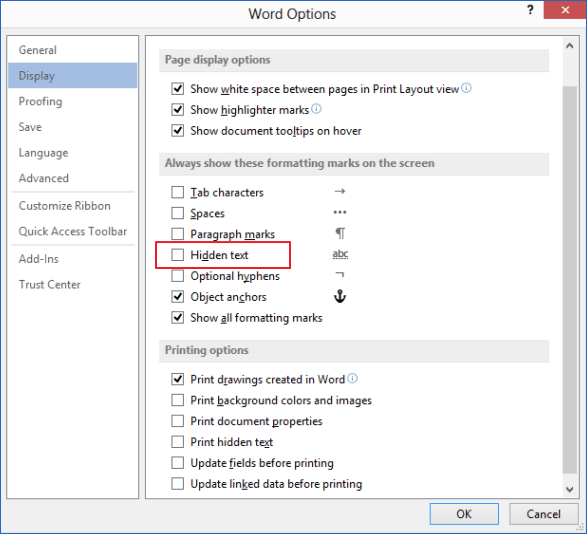
Step 1. Click «File» > «Options» in Word 2013/2010. For Word 2007, click Office button > «Word Options».
Step 2. Click «Display» at the left pane. Check and uncheck the Hidden text box, leaving it empty.
Step 3. Click «OK» to save all changes.
How to Recover Hidden Word Document/Photos in Windows 10/8/7
In this part, we’ll provide you with two reliable methods for recover hidden Word documents in Windows computer or external storage devices. Let’s see how to do it now.
Method 1. Unhide a Word Document in File Explorer
For Windows 10/8/8.1 users:
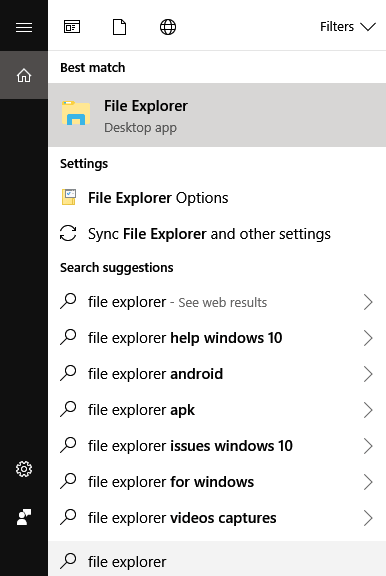
Step 1. Type file explorer in the Search box and select «File Explorer».
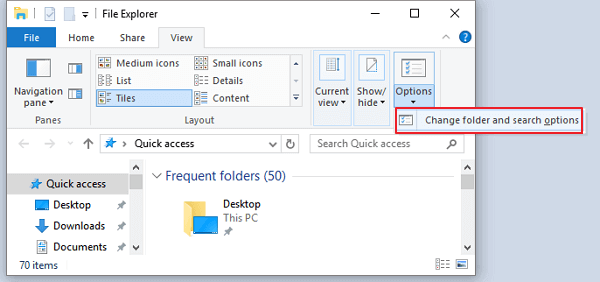
Step 2. Select «View» > «Options» > «Change folder and search options».
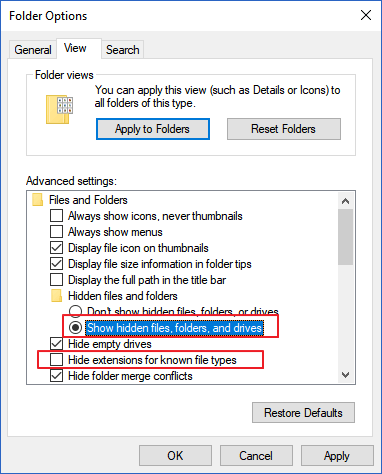
Step 3. In «Folder Options», select «Show hidden files, folders, and drives» under Hidden files and folders. Also, uncheck Hide extensions for known file types. Click «Apply» to save all changes.
For Windows 7 users:
Step 1. Open Windows Explorer by clicking «Start» > «Computer».
Step 2. Click «Tools» > «Folder Options» > «View».
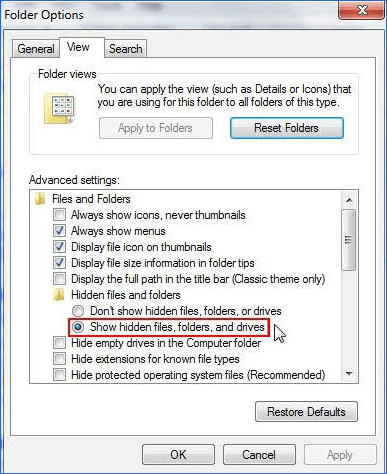
Step 3. Under the View tab, select «Show hidden files, folders, and drives» below Hidden Files and Folders. Uncheck Hidden extensions for known file types and apply the changes. By doing so, you see all file extensions, and it will help you quickly locate the hidden Word documents or pictures.
Method 2. Recover Hidden Word Documents and Photos with Data Recovery Software
If you can’t view hidden Word documents, pictures, audios, videos, or other files in File Explorer, there is still a great chance to restore hidden files by using professional file recovery software — EaseUS Data Recovery Wizard. This competent and user-friendly data recovery program allows you to fully scan computer or storage devices, finding all existing, lost, formatted, and hidden files with two scanning modes — Quick Scan and Deep Scan.
In addition to restoring normally deleted files, EaseUS file recovery software also enables you to recover permanently deleted files in HDD, SSD, USB flash drive, SD card, pen drive, external hard drive, etc. Download and install it on your PC, then follow the guidelines below to restore your hidden Word document or pictures within three steps.
Step 1. Select the virus infected drive to scan
Run EaseUS virus file recovery software on your Windows PC. Select the disk attacked by the virus to scan for lost or hidden files. Note that:
- If it’s an HDD where files were hidden or deleted by virus, it’s better to install the software on a different volume or an external USB drive to avoid data overwriting.
- If the infected device is an external hard drive, flash drive or memory card, it doesn’t matter to install the software on the local drive of the computer.

Step 2. Check all scanned results
EaseUS Data Recovery Wizard will immediately start a scan process to find your deleted or hidden files on the virus infected hard drive. To quickly locate the wanted files, you can use the Filter or type grouping feature to display only the pictures, videos, documents, emails, etc.

Step 3. Preview and recover deleted/hidden files
When the process finishes, you can preview the scanned files. Select the files you want and click the «Recover» button. You should save restored files to another secure location on your computer or storage device, not where they were lost.

-
#1
I searched for this but didn’t come up with anything. Also, I hope I putting this question in the correct area.
every time I open up a word document created by someone else the document has all the formatting and text, but the text is invisible. it seems like if there are things underlined the underlining still shows up, but not the text. although it’s hard to tell since I can’t see the text.
it doesn’t matter what view I use or if I change the color, but if I copy and paste it into another program the info is there.
has anyone heard of this, its only been happening in the last few months that I can remember, but its not usable… I need to be able to see documents people are sending me.
please help, I don’t know what to do!!
-
#2
What program are they using to create the documents?
-
#3
they are using Microsoft Word for Windows.
I messed with some of the compatibility settings but it didn’t fix anything

jacg
macrumors 6502a
-
#4
I wonder if this is an issue with your installation of word? What happens if you open the docs in Textedit? Or Pages if you have it? Or Preview if you are on Lion?
Or switch to the ‘guest user’ and try in a fresh account.
What version of word are you using? Have you checked that it is up to date by running Microsoft autoupdate?
-
#5
if I open it in text edit I can see everything as it was meant to be seen.
I just updated the software yesterday, it’s Word 2008 version 12.3.2
it seems weird that it would be an installation issue, as its been loaded on my macbook since I got it in August of 2009.
I don’t have pages and I’m not running lion at the moment.
thanks for helping out
jacg
macrumors 6502a
-
#6
I’m sorry, I’m not an expert, and I suffer from similar problems myself (bullets don’t show up in word documents people send me, although they do in Textedit, or in Word in the guest account).
I would guess we are both suffering from some sort of font issue or possibly something to do with the ‘normal’ template.
You could try clearing the font cache for Word. Not sure how you do this manually but you could download ‘Onyx’ (free, from macupdate.com) and go to ‘Cleaning’ then ‘Fonts’.
Good luck.
-
#7
have you tried scrapping word and re-installing it?
I’m thinking of just trying that… I was hoping for a different solution since I never unpacked my software boxes since the last time I moved. So now I gotta go digging around trying to find it lol
thanks for the help though. it used to work, so hopefully re-installing it will fix the problem.
jacg
macrumors 6502a
-
#8
Installing 2008 then 2011 over the top of 2004 still hasn’t fixed it for me.
-
#9
did you completely delete the files before reinstalling 2008?
that’s weird, maybe I’ll just have to find a new office suite, but I’m used to the interface and it usually plays well with .doc files created on windows machines…
I have set up a new user with a brand new Dell desktop with Windows 10 on it. It was ordered from the CDW so the OS was pre-installed. I set it up and installed Microsoft Office Standard 2016 64 bit on it and it seemed to be all good. Now recently,
this user has issues where text and (some) graphics do not display correctly.
The first time this happened, the user was forwarded a calendar in an email which was made up of several jpg files (one for each day). Nothing displayed except a big blank space where the images were supposed to be. I tried several things but could not get
it to display. I then logged into a different computer (with Windows 10 and Office 2016) and the images displayed just fine.
HERE IS THE PROBLEM: http://i.imgur.com/xVlH3Qo.png
Second time this happened, the user was attempting to open a document (created in Office 2010 standard) which contains a simple table with a few items laid out, which the user uses as a template for other things. When the user opens it on her computer, many
of the items are missing. But then, trying from another computer with Win 10 and Office 2016, it works fine.
It seems like the problem is something with the user’s computer or installation of Office 2016. So I re-installed Office 2016 and then it appeared to be working as the text and images would properly display. But then shortly after the re-install, Office
2016 would freeze continually. So then I ran the «Troubleshoot Compatibility» Office tool and it actually found a problem: it said Winword.exe is not compatible with this system! So then I just clicked «fix problem» or whatever and it did
it’s thing and Office seemed to work after that.
I also got a message that said, «The Microsoft Office Upload Center found a problem while accessing the Microsoft Office Document Cache and needs to repair it before it can continue.» None of my users use the Upload Center, nor do they use any
accounts to sign in with Microsoft products.
I also tried going to the Upload Center settings and clicked «Delete cached files» and also selected the option to have the cache cleared when docs are closed, but still no dice.
Again, this problem only happens on the user’s new computer. If I log into ANY OTHER COMPUTER with Office 016 as this user, I can view the same documents just fine that the user was having problems with.
Also worth mentioning is that the event logs of this user’s computer look a little strange. A TON of errors:
- Perflib (Event 1008) — The Open Procedure for service «BITS» in DLL «C:WindowsSystem32bitsperf.dll» failed. Performance data for this service will not be available. The first four bytes (DWORD) of the Data section contains the
error code. - Office 2016 Licensing Service — The description for Event ID 0 from source Office 2016 Licensing Service cannot be found. Either the component that raises this event is not installed on your local computer or the installation is corrupted. You can
install or repair the component on the local computer. Subscription licensing service failed: -1073418220 - Search (Event 3104) — Enumerating user sessions to generate filter pools failed. Details: (HRESULT : 0x80040210) (0x80040210)
- Application Error (Event 1000) — Faulting application name: WINWORD.EXE, version: 16.0.4266.1001, time stamp: 0x55ba1919
Faulting module name: igd10iumd64.dll, version: 21.20.16.4627, time stamp: 0x58c1a060
Exception code: 0xc0000005
(Yes, this is a legal copy of Office 2016. I have purchased the volume licensing for 5 systems as I am testing Office 2016 out in our environment)
I am having trouble fiding out what exactly is going on.. any help is much appreciated
-
Edited by
Wednesday, September 6, 2017 3:41 PM
check
Best Answer
Look for windows update to word KB4011039 we had users loose text in tables because of this update, Had to uninstall it and decline it on our update server so it wouldn’t install again.
1 found this helpful
thumb_up
thumb_down
View Best Answer in replies below
2 Replies
-
Look for windows update to word KB4011039 we had users loose text in tables because of this update, Had to uninstall it and decline it on our update server so it wouldn’t install again.
1 found this helpful
thumb_up
thumb_down
-
Thanks Eric7615, that worked!
Was this post helpful?
thumb_up
thumb_down
We ran into a strange problem today, and thought we’d share the solution.
The Problem
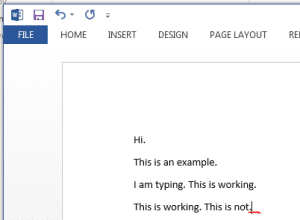
When you enter a space, a line return, or other paragraph mark, nothing happens until you enter the next character. For instance, you type «This is not working.», then <space>, but the cursor is still right next to your period.
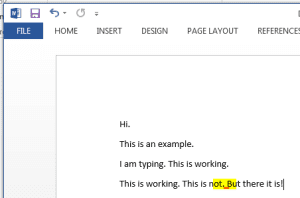
However, as soon as you type «B» for «But», the space you had already typed appears.
At first this may not seem like a big deal, but it can get very frustrating, very quickly.
The Cause
It turns out there is a fairly simple cause for this: You have a Section Break at the point in your document where you’re seeing this behaviour. You can verify this by hitting ctrl+* (ctrl+shift+8) to show Formatting Marks.

We’re not sure why this is the behaviour that Word exhibits under this circumstance, but there it is.
The Solution
Once you know the cause, the solution is pretty easy. Just put a few additional blank lines in front of your Section Break to make sure you’re not typing right up against it. Voilà! Problem solved.
You may sometimes need to find out whether your text or part of it is formatted with the same font, font size, paragraph style or other formatting properties. This can be as easy as selecting the text in question and checking which values Word shows for the properties in question. But it may not always work as you want or expect.
This article explains the rules that apply to the way Word shows or does not show formatting information. You will also find suggested solutions plus a macro that can automatically perform the check for you, also when Word fails to do so.
Summary of rules —
when does Word show formatting values and when not?
If you are only interested in the rules that apply to Word’s display of formatting property values for selected text — without all the details — here they are:
- RULE NO. 1
In general, Word will show a specific paragraph or character property value as long as the same value applies to the entire selection. - RULE NO. 2
In general, a blank field, a gray check box or the text (No color) in a color field indicate that different formatting property values have been applied to different parts of the selection. - RULE NO. 3
Word stops showing paragraph formatting property values when the number of selected paragraphs exceeds 49. - RULE NO. 4
Word stops showing character formatting property values when the number of selected paragraphs exceeds 50.
Rules no. 3 and 4 are based on the results I have found by testing. Microsoft has confirmed that it works that way «by design».
Read on for more details about how it works.
About paragraph and character formatting
When talking about formatting of text in Word, you will often need to distinguish between formatting of entire paragraphs and formatting of characters.
Any paragraph in a Word document is applied a paragraph style (paragraph formatting). On top of the paragraph style, the entire paragraph or part of it may be applied a character style (character formatting). Paragraph and character formatting may also be applied as direct formatting by selecting text and applying special formatting to the selection.
There are several places in Word where you can see which paragraph and character property values have been applied to the selected text. Examples are the Font field and the Font Size field on the Home tab and the information in the Paragraph and Font dialog boxes. The Paragraph dialog box lets you set paragraph properties. The Font dialog box lets you set character properties.
The rules that apply to Word’s display of formatting property values — details
According to my testing, the four rules below apply to the way Word displays paragraph and character formatting values.
The rules seem to apply to all versions of Word. I have tested in Word 2003, Word 2007, Word 2010, Word 2013, and Word 2016 / Word for Microsoft 365.
No doubt that the described behavior makes it more difficult to check the formatting in some situations. But then the macro you can download from this page may be useful.
- RULE NO. 1
In general, Word will show a specific paragraph or character property value as long as the same value applies to the entire selection.
See Figure 3, Figure 5, and Figure 7 below.
See also the comments about theme fonts below Figure 7.
- RULE NO. 2
In general, a blank field, a gray check box or the text (No color) in a color field indicate that different formatting property values have been applied to different parts of the selection.
See Figure 4 and Figure 6 below.
For example, the font name Calibri will be shown in the Font field on the Home tab if all text in the selection is formatted with the font Calibri. But the Font field will be blank if different fonts are used.
However, the general rules above do not always apply. There are more rules.
- RULE NO. 3
Word stops showing paragraph formatting property values when the number of selected paragraphs exceeds 49.
This is true even if the selection has been applied the same paragraph property value (e.g. the same paragraph style or the same line spacing). The display of values stops as soon as any part of paragraph 50 is included in the selection.
See Figure 4 below.
Note that VBA also returns a blank string or another undefined value if checking a paragraph formatting property of a selection that includes more than 49 paragraphs. The display of values stops as soon as any part of paragraph 51 is included in the selection.
Example — checking the following VBA-code in the macro editor:
Selection.Range.ParagraphFormat.Style
will return an empty string instead of a paragraph style name if more than 49 paragraphs are selected.
It does not matter whether all of or some of the selected paragraphs are in e.g. a table. It is the total number of paragraphs that are partly or fully included in the selection that matters. For more details, see How word counts selected paragraphs — special cases and oddities below.
See Figure 1-2 below for illustrations of the display results with 49, 50, and 51 selected paragraphs, respectively.
- RULE NO. 4
Word stops showing the character formatting property values when the number of selected paragraphs exceeds 50.
This is true even if the selection has been applied the same character property value (e.g. the same font or the same font size).
See Figure 6 below.
Note that VBA also returns a blank string or another undefined value if checking a character formatting property of a selection that includes more than 50 paragraphs.
Example — checking the following VBA-code in the macro editor:
will return an empty string instead of a font name if more than 50 paragraphs are selected.
It does not matter whether all of or some of the selected paragraphs are in e.g. a table. It is the total number of paragraphs that are partly or fully included in the selection that matters. For more details, see How word counts selected paragraphs — special cases and oddities below.
See Figure 1-2 below for illustrations of the display results with 49, 50, and 51 selected paragraphs, respectively.
Illustrations of paragraph and character values you will see depending on the number of selected paragraphs

Figure 1. (1), (2), and (3) shows 49, 50, and 51 selected paragraphs, respectively. The gray color shows the selection. In Figure 2 below you will see examples of which information Word displays.

Figure 2. (1), (2), and (3) relate to the corresponding numbers in Figure 1 above and illustrate what Word displays in Style, Font, and Font Size fields that have been added to the Quick Access Toolbar (QAT). Note that the results comply with the rules described above: Style is a paragraph property in this case (the selected paragraphs have not been applied a character style in this case) — it shows no values if more than 49 paragraphs are selected (rule no. 3). Font and Font Size are character properties — they show no values if more than 50 paragraphs are selected (rule no. 4).
Special case: If the entire selection had been applied a character style on top of the paragraph style, the Style field would have shown the name of the character style instead of the paragraph style. Since Word’s limit for showing character properties is 50 (rule no. 4) and not 49 (rule no. 3), such character style name would have been shown in (2) above (50 paragraphs selected) instead of a blank Style field.
Illustrations of paragraph property display in the Paragraph dialog box

Figure 3. Paragraph dialog box showing all values. See rule no. 1 above.

Figure 4. Paragraph dialog box showing blank and grayed out values only. See rules no. 2 and 3 above.
Illustrations of character property display in the Font dialog box

Figure 5. Font dialog box showing all values. See rule no. 1 above.

Figure 6. Font dialog box showing blank and grayed out values only. See rules no. 2 and 4 above.

Figure 7. Special case of font value in the Font dialog box. Note that the Font field shows +Body and note the text marked by orange near the bottom of the dialog box. See the explanation below.
Font inherited from theme versus font set directly
- +Body is shown for text with outline level Body Text if the font in use is based on the document’s theme font for Body Text. Correspondingly, +Headings is shown for text formatted with e.g. one of the built-in Heading 1-9 styles if the font in use is based on the document’s theme font for Headings.
The Font field on the Home tab shows the font name followed by (Body)or (Headings) in those situations, for example Arial (Body).
- When it comes to the display of a font property value, Word will consider a specific font to be the same no matter whether or not it is inherited from a theme. This means that the Font field will not be blank even if the selection contains a mixture of the two.
Example: The theme font for Body Text is Arial. Two paragraphs are selected, one that uses the font from the theme and shows Arial (Body) in the Font field and one that has been applied the font directly and shows Arial in the Font field. When selecting both paragraphs, the Font field will not be blank but show the font name from the topmost of the two paragraphs. See Figure 8 below.
")
The following VBA code will return Arial in both situations:
Figure 8. Value in Font field if both theme font and non-theme font is used in selection. The gray color shows the selection.
What you can do if you see blank formatting property values —
incl. macro solution
Solution 1 — select fewer paragraphs at a time
If blank formatting property values are caused by the number of selected paragraphs exceeding the limits of 49 or 50 as described in rules no. 3 and 4 above, try to change the selection so it includes fewer paragraphs. Perform the checks you need. Change the selection to include the next chunk of paragraphs and repeat the checks as many times as needed.
If you have not selected more than 49 paragraphs, a blank field, a grayed out check box or (No color) indicate that the selection does include mixed formatting property values.
See also How word counts selected paragraphs — special cases and oddities below.
Solution 2 — use a macro to check the formatting
I have created a macro you can use to check the selection for the following three formatting properties:
- Font name
- Font size
- Paragraph style
The macro works on any number of paragraphs. Note however, that the more paragraphs you have selected, the longer the check may take. It should take only a few seconds to check e.g. 100 paragraphs.

Figure 9. The dialog box that opens when you start the macro.
The macro is not meant to cover everything but it may help you in your work.
The main purpose of the macro is to make it easy to detect whether or not the same font, font size, and/or paragraph style have been applied to the entire selection. As rules no. 3 and 4 tell, Word will not provide that information if your selection includes more than 49 or 50 paragraphs.
The macro compares the font name, font size, and paragraph style of each paragraph in the selection with the values applied to the start of selection. A message shows the resulting values when finished.
- If a value is the same for the entire selection, the exact value will be shown.
- If a value deviates, [Mixed values] will be shown. Extra information will be shown if the selection includes tables and/or shapes.
See the examples below.

Figure 10. Example of final result after running the macro — identical formatting property values were found in the entire selection.

Figure 11. Examples of final result after running the macro — mixed formatting property values were found in the selection.
More details and considerations about the macro
- The macro includes comments that explain what is going on.
- The macro could be extended to check for more formatting properties.
- It might seem smarter and faster to check the selection in chunks of 49 paragraphs at a time instead of checking each individual paragraph. However, since the initial selection to be checked may contain all kinds of content, this could cause problems.
The macro
Below, you will find the macro code. If you need help on installing macros, see How to install a macro.
Option Explicit


Sub CheckFormattingOfSelection_FontName_FontSize_ParagraphStyle()

'=========================
'Macro created 2018 by Lene Fredborg, DocTools - www.thedoctools.com
'THIS MACRO IS COPYRIGHT. YOU ARE WELCOME TO USE THE MACRO BUT YOU MUST KEEP THE LINE ABOVE.
'YOU ARE NOT ALLOWED TO PUBLISH THE MACRO AS YOUR OWN, IN WHOLE OR IN PART.
'=========================
'Before running the macro, select the paragraphs you want to check
'The macro checks font name, font size, and paragraph style of all paragraphs in the selection
'A message shows the resulting values when finished
'If a value is the same for the entire selection, the exact value will be shown
'If a value deviates, '[Mixed values]' will be shown
'NOTE: The result may not be accurate if the selection contains e.g. inline shapes or floating shapes
'The source document remains unchanged
'NOTE: If values deviate, the check will stop as soon as all three values are found to deviate
'=========================

    Dim rngToCheck As Range
    Dim oPara As Paragraph
    Dim lngPara As Long
    Dim lngParasSelected As Long

    Dim strFontName_First As String
    Dim lngFontSize_First As Long
    Dim strStyleParagraph_First As String

    Dim strFontName As String
    Dim lngFontSize As Long
    Dim strStyleParagraph As String

    Dim strMsg As String

    Const strTitle As String = "Check Font Name, Font Size, Paragraph Style of Selection"
    Const strMsgMixed As String = "[Mixed values]"

    On Error GoTo ErrorHandler

    lngParasSelected = Selection.Paragraphs.Count

    strMsg = "The selection includes " & lngParasSelected & " paragraph(s)." & vbCr & vbCr & _
        "You can use this command to check whether the same font, font size, and paragraph style have been " & _
        "applied to the entire selection." & vbCr & vbCr & _
        "The Status Bar will show the progress." & vbCr & vbCr & _
        "NOTE: The more paragraphs you have selected, the longer the check may take. " & _
        "If needed, you can stop the check by pressing Ctrl+Break and clicking End in the dialog box that opens."

    If MsgBox(strMsg, vbOKCancel, strTitle) <> vbOK Then
        GoTo ExitHere
    End If

    Set rngToCheck = Selection.Range
    'Even if the code does not change the display in Word, it may speed up things
    'turning off Application.ScreenUpdating
    Application.ScreenUpdating = False
    System.Cursor = wdCursorWait

    'Initialize values
    lngPara = 0

    With rngToCheck
        'Store data for first paragraph - used for comparison during check
        strFontName_First = .Characters.First.Font.Name
        lngFontSize_First = .Characters.First.Font.Size
        strStyleParagraph_First = .Paragraphs.First.Range.ParagraphFormat.Style
    End With

    strFontName = strFontName_First
    lngFontSize = lngFontSize_First
    strStyleParagraph = strStyleParagraph_First

    'Show info in the Status Bar
    Application.StatusBar = "Checking formatting of paragraphs. Please wait..."

    For Each oPara In rngToCheck.Paragraphs
        With oPara.Range
            lngPara = lngPara + 1

            'Show info in Status Bar - update for every 20 paragraphs only
            If lngPara Mod 20 = 0 Then
                Application.StatusBar = "Checking formatting of paragraph " & lngPara & " of " & lngParasSelected & ". Please wait..."
            End If

            'The end of row marker in table rows includes a paragraph that is to be ignored
            'Skip in case of an end of cell marker in a table
            If .Tables.Count > 0 Then
                If .Cells.Count = 0 Then
                    'Paragraphs is end of row marker
                    GoTo SkipParagraph
                End If
            End If
            a
            'Check whether font name, font size, paragraph style is the same as is _First
            'If a value deviates from _First, store a value to keep track of this and do not check that type anymore

            'If strFontName has been set to "" then do not check
            If strFontName <> "" Then
                If .Font.Name = strFontName_First Then
                    strFontName = strFontName_First
                Else
                    'Set value to "" and do not check more
                    strFontName = ""
                End If
            End If

            'If lngFontSize has been set to 0 then do not check
            If lngFontSize <> 0 Then
                If .Font.Size = lngFontSize_First Then
                    lngFontSize = lngFontSize_First
                Else
                    lngFontSize = 0
                End If
            End If

            'If strStyleParagraph has been set to "" then do not check
            If strStyleParagraph <> "" Then
                'Style is nothing if mixed
                If .ParagraphFormat.Style Is Nothing Then
                    strStyleParagraph = ""
                Else
                    'If same as strStyleParagraph_First
                    If .ParagraphFormat.Style = strStyleParagraph_First Then
                        strStyleParagraph = strStyleParagraph_First
                    Else
                        strStyleParagraph = ""
                    End If
                End If
            Else
                strStyleParagraph = ""
            End If
        End With

        'Stop all checks if all values now deviate from _First
        If strFontName = "" And lngFontSize = 0 And strStyleParagraph = "" Then
            Exit For
        End If
SkipParagraph:
    Next oPara

    'Even if the selection isn't changed by the code, Word tends to lose it
    'Make sure original selection is selected
    rngToCheck.Select

    Application.ScreenUpdating = True
    System.Cursor = wdCursorNormal
    Application.StatusBar = ""

    'Show msg with result
    strMsg = "Finished checking the selected " & lngParasSelected & " paragraph(s)." & vbCr & vbCr

    'Append info about end of row paragraphs if the selection includes table(s)
    With rngToCheck
        'Append info about end of row paragraphs if relevant
        If .Tables.Count > 0 Then
            strMsg = strMsg & "NOTE ABOUT TABLES: The selection includes table row(s). All table rows end with an end of row marker that includes a paragraph mark. " & _
                "Such end of row marker paragraphs are included in the total count of selected paragraphs above but they were ignored during the check." & vbCr & vbCr
        End If

        'Append info about shapes and inline shapes if relevant
        If .ShapeRange.Count > 0 Or .InlineShapes.Count > 0 Then
            strMsg = strMsg & "NOTE ABOUT SHAPES: The selection includes one or more shapes that may contain text. The values below may not be correct, e.g. if text is found inside shapes that are nested inside other shapes." & vbCr & vbCr
        End If
    End With

    'Append further general info
    strMsg = strMsg & "If a value is the same for the entire selection, that specific value is shown. Otherwise, '" & strMsgMixed & "' is shown." & vbCr & vbCr & _
             "The following values apply to the selection:" & vbCr & vbCr

    'Append font name info
    If strFontName = "" Then
        strMsg = strMsg & "Font name:" & vbTab & strMsgMixed & vbCr
    Else
        strMsg = strMsg & "Font name:" & vbTab & strFontName & vbCr
    End If

    'Append font size info
    If lngFontSize = 0 Then
        strMsg = strMsg & "Font size:" & vbTab & strMsgMixed & vbCr
    Else
        strMsg = strMsg & "Font size:" & vbTab & lngFontSize & vbCr
    End If

    'Append style info
    If strStyleParagraph = "" Then
        strMsg = strMsg & "Paragraph style:" & vbTab & strMsgMixed & vbCr
    Else
        strMsg = strMsg & "Paragraph style:" & vbTab & strStyleParagraph & vbCr
    End If

    'Show msg
    MsgBox strMsg, vbOKOnly, strTitle

ExitHere:
    Set rngToCheck = Nothing
    Application.ScreenUpdating = True
    System.Cursor = wdCursorNormal
    Application.StatusBar = ""

    Exit Sub
    '=========================
ErrorHandler:
    MsgBox "An error occurred during the check.", vbOKOnly + vbExclamation, "Error - " & strTitle
    Resume ExitHere
End Sub
How word counts selected paragraphs — special cases and oddities
The Word Count dialog box does not include all selected paragraphs in the count but VBA counts all paragraphs
There are some oddities when it comes to the count of paragraphs Word shows in the Word Count dialog box.
If you check the number of selected paragraphs in the Word Count dialog box and compare it with the number found via VBA, you will see that Word does not always show the same result.
- Word ignores some types of selected paragraphs in the result shown in the Word Count dialog box. The main principle is that that the dialog box counts only paragraphs that are visible when formatting marks are turned off. However, see the details below.
- All selected paragraphs are counted when checking via VBA.
IMPORTANT: The limits of 49 and 50 paragraphs described in rules no. 3 and 4 above are based on all paragraphs in the selection being counted, i.e. the number that will be returned when using the following VBA code:
Selection.Paragraphs.Count
About special paragraphs in tables
If you turn on formatting marks (Ctrl+Shift+8) in Word, a paragraph will, in general, end with a Pilcrow Sign, ¶. But tables are special as described below.
- All table cells end with an end of cell marker that includes a paragraph mark.
- All table rows end with an end of row marker that includes a paragraph mark.
- When checking via VBA, both an end of cell marker and an end of row marker consists of two characters: Chr(13) + Chr(7). Chr(13) is a normal paragraph mark. Even if you turn on formatting marks, you will not see those special paragraph marks as Pilcrow Signs, ¶. They are invisibly included in the marker which appears as a Currency Sign, ¤.
Types of paragraphs that are ignored by the Word Count dialog box
Some types of paragraphs seem to always be ignored in the count of paragraphs shown in the Word Count dialog box. I have found the following rules:
- Empty paragraphs, i.e. paragraphs that consist of a paragraph mark only (may include non-printing characters like spaces and tabs too), are not included in the paragraph count in the Word Count dialog box.
- Empty end of cell marker paragraphs in tables, i.e. paragraphs that consist of an end of cell marker only (may include non-printing characters like spaces and tabs too), are not included in the paragraph count in the Word Count dialog box.
- If the selection includes the last paragraph in the document. that paragraph is not included in the paragraph count in the Word Count dialog box even if the paragraph contains text or other content.
- End of row marker paragraphs are not included in the paragraph count in the Word Count dialog box.
As mentioned above, VBA counts all paragraphs.
The illustrations below show examples of the different results of paragraph count in the Word Count dialog box and in VBA.
![]()
VBA result in this example:
Selection.Paragraphs.Count = 6
Figure 12. Word and VBA results — counting selected paragraphs — empty table cells. The gray color shows the selection.

VBA result in this example:
Selection.Paragraphs.Count = 6
Figure 13. Word and VBA results — counting selected paragraphs — including a cell with a single paragraph. The gray color shows the selection.

VBA result in this example:
Selection.Paragraphs.Count = 7
Figure 14. Word and VBA results — counting selected paragraphs — including a cell with two paragraphs but only one with text. The gray color shows the selection.
Related information
So, you opened the MS Word and noticed that the fonts are missing from the fonts menu. Newly installed fonts are not showing up in the Microsoft Word at all.
Well, don’t get tensed. Some users have reported this issue, and we’ve got the simple fix for this issue in Windows and Mac.
Here’s how to fix MS Word missing fonts issue in Windows:
Step 1: Close all Microsoft Programs
First, close all the Microsoft Word documents. If you have other Microsoft program open, then close them, too.
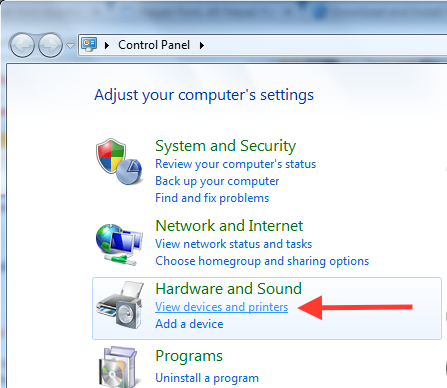
Step 2: Go to Printers Option
Go to the Control Panel and click on View Devices and Printers under ‘Hardware and Sound’ section.
Step 3: Set the default printer
Right click on Microsoft XPS Document Writer and click on Set as default printer.
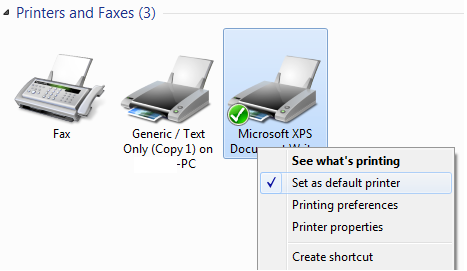
This problem usually occurs when you hook a second printer to your computer. The printer gets selected as the default Generic Text printer for your PC.
Here’s how to fix MS Word missing fonts issue in Mac:
Step 1: Quit all Microsoft Applications.
Step 2: Go to Finder > Go > Go to Folder. Insert the following path:
LibraryPreferencesMicrosoftOffice 2011
Replace ‘2008’ with whichever version of Microsoft Word you have.
Step 3: Click and drag the ‘Office Font Cache 2011’ file into the trash.
Fonts still not visible? Try restarting your computer after closing all the applications on your Mac. Some fonts needs a quick restart to complete the installation. Make sure you don’t have too many fonts stored in your library. If that is the case, then delete some unnecessary fonts see if this fix the issue.
Still same problem? Create a new user account and install the font there. Some apps may conflict causing disappearance of fonts in Word for Mac.
Got the fix? Let us know your solution in the comments below! We’d be glad to hear it.
- Related: Fix “failure configuring windows updates” on Windows