
5 советов по устранению сбоев Excel при печати в Windows

Microsoft Excel — это популярное приложение для работы с электронными таблицами с мощными инструментами визуализации и анализа данных. Однако несколько пользователей сообщали о сбоях Excel во время печати с помощью пакета Microsoft Office.
Эта проблема обычно возникает, если драйверы принтера устарели или файлы Microsoft Office повреждены. Многие пользователи сообщали о подобных проблемах в сообществе Microsoft .
Это последняя версия Windows 10 и последние версии Word и Excel с подпиской Office 365.
Каждый раз, когда открывается экран «Печать», либо вручную, либо с помощью Ctrl + P, программа останавливается и зависает.
Если вас также беспокоит эта проблема, вот несколько способов устранения неполадок Excel, возникающих при печати.
Что я могу сделать, если приложение Excel зависает и вылетает при печати?
1. Обновление Microsoft Office

- Проверьте, есть ли в вашей программе Microsoft Office ожидающие обновления. Microsoft выпускает обновления, исправляющие ошибки в программе, поэтому убедитесь, что она актуальна.
- Запустите любое из приложений Microsoft Office.
- Нажмите на файл и нажмите на учетную запись .
- Нажмите « Обновить» и выберите « Включить обновления», если он еще не включен.
- Снова нажмите « Обновить параметры» и выберите « Обновить сейчас».
- Microsoft Office проверит наличие любых ожидающих обновлений и загрузит их. Пройдите процесс установки.
- После установки обновления снова запустите приложение Excel и проверьте, работает ли функция печати.
2. Запустите Excel в безопасном режиме

- Запуск приложения Excel в безопасном режиме может помочь определить, связана ли проблема с программой или сторонним приложением.
- Нажмите и удерживайте клавишу Ctrl на клавиатуре, а затем нажмите значок Excel .
- Подтвердите действие в безопасном режиме, когда будет предложено.
- Попробуйте напечатать любой документ и проверьте, прошел ли он.
- Если задание на печать выполнено успешно, у вас может быть стороннее приложение, вызывающее проблемы с программой Excel.
- Проверьте свой компьютер на наличие недавно установленных приложений или надстроек для Excel и удалите все подозрительные приложения.
3. Ремонт поврежденной книги

- Откройте приложение Excel .
- Нажмите на Файл и выберите Открыть.
- Перейдите к месту, где находится книга, и выберите ее.
- Нажмите кнопку рядом с кнопкой «Открыть» и выберите « Открыть и восстановить».
- Это должно решить любые проблемы с Рабочей книгой и разрешить печать.
4. Удалите и переустановите драйвер принтера.

- Если проблема связана с вашим принтером, удаление и переустановка принтера могут решить проблему.
- Вы можете удалить принтер из Диспетчера устройств или Настройки.
- Переустановите принтер и проверьте, не происходит ли сбой Excel во время устранения ошибки печати.
5. Ремонт Microsoft Office

- Нажмите Windows Key + R, чтобы открыть Run.
- Введите control и нажмите ОК.
- Перейдите в Программы> Программы и компоненты.
- Выберите Microsoft Office и нажмите « Изменить».
- Сначала на экране «Восстановление» выберите « Быстрое восстановление» и нажмите « Далее». Если это не помогает, выберите Online Repair и попробуйте снова.
Итак, вот 5 советов, которые помогут вам решить проблему сбоев Excel при печати документов. Дайте нам знать, какое исправление сработало для вас в комментариях.
Disabling the reliability options should fix this issue quickly
by Matthew Adams
Matthew is a freelancer who has produced a variety of articles on various topics related to technology. His main focus is the Windows OS and all the things… read more
Updated on December 15, 2022
Reviewed by
Alex Serban

After moving away from the corporate work-style, Alex has found rewards in a lifestyle of constant analysis, team coordination and pestering his colleagues. Holding an MCSA Windows Server… read more
- If Excel is not printing your documents, it might be because of the file type or outdated drivers.
- You can fix this issue by disabling the reliability options that are protecting some file types.
- Another excellent fix to this problem is to repair your Office installation online.
XINSTALL BY CLICKING THE DOWNLOAD FILE
This software will repair common computer errors, protect you from file loss, malware, hardware failure and optimize your PC for maximum performance. Fix PC issues and remove viruses now in 3 easy steps:
- Download Restoro PC Repair Tool that comes with Patented Technologies (patent available here).
- Click Start Scan to find Windows issues that could be causing PC problems.
- Click Repair All to fix issues affecting your computer’s security and performance
- Restoro has been downloaded by 0 readers this month.
Some users have stated in forum posts that Excel is not printing their spreadsheets. In some cases, they can print documents on Word and other apps, but only Excel cannot print.
While this problem can be pretty frustrating, it is easy to fix, as we will show in this guide.
Why is my Excel File not printing?
There are a few reasons Excel might not be printing your documents. This can be due to your configuration or issues with the app. Below are some of the known causes in detail:
- Outdated printer driver: If Excel is not printing all your document’s rows, columns, and images, it might due to issues with your printer driver. The solution to this is to update the driver to the latest version.
- Issues with the file format: For some reason, Excel might have problems printing your spreadsheets in their normal format. You need to change the format to XPS before printing.
- Problems with Excel: In some cases, it might be hard to pinpoint the cause of this issue, especially if the printer prints with other apps but Excel. You need to repair or uninstall the app using an uninstaller program and reinstall it later.
What can I do if Excel is not printing?
1. Check the Printer Selection
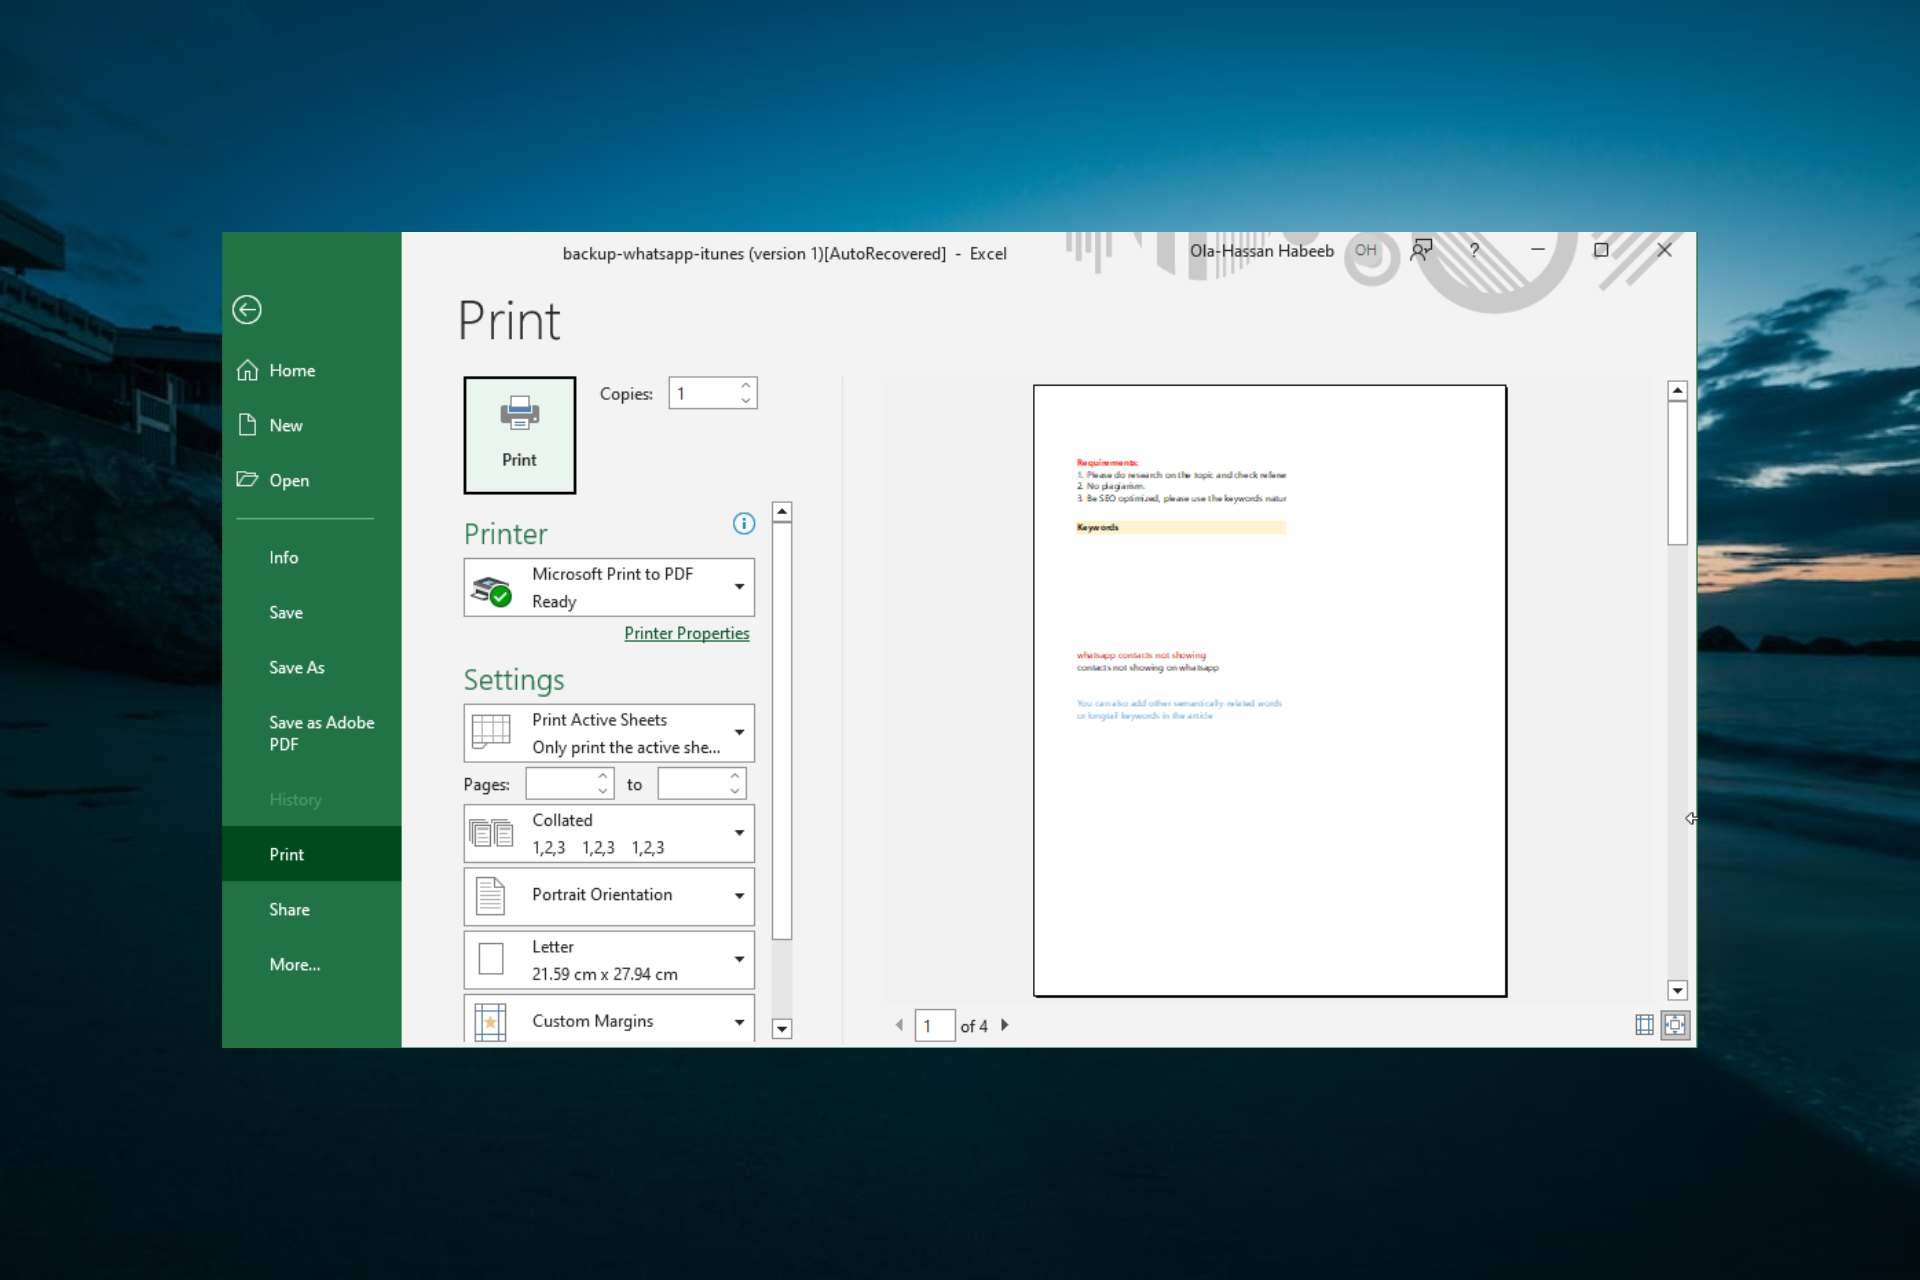
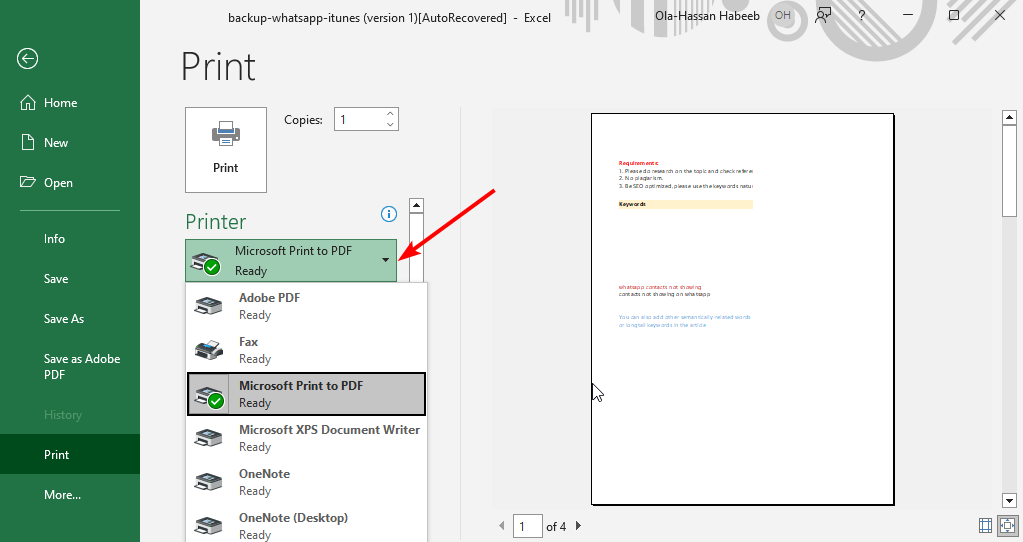
- Press the Ctrl key + P to open the print menu on Excel.
- Select the dropdown under Printer on Excel’s print tab.

- Now, select the default printer from there before printing.
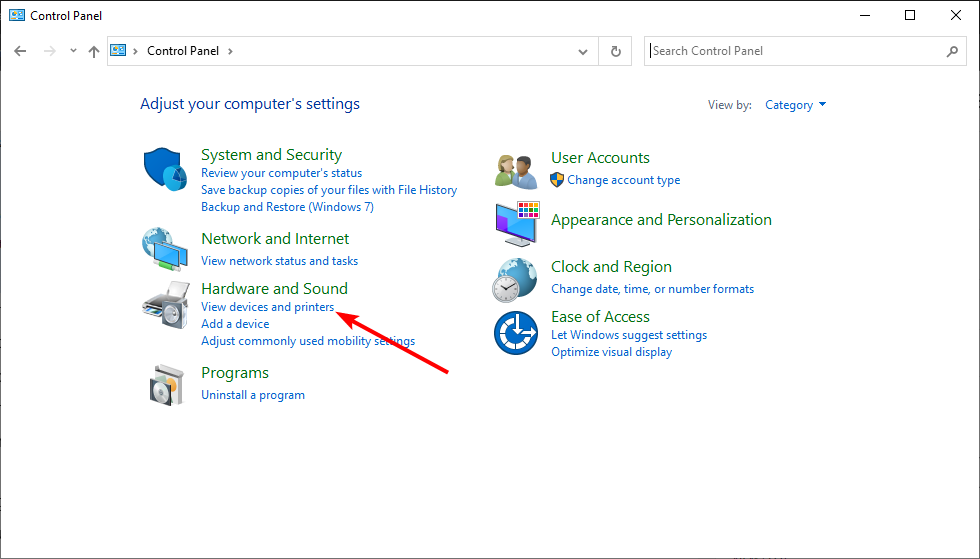
- If unsure of your default printer, press the Windows key, type control, and select Control Panel.

- Select View devices and printers under the Hardware and Sound option.

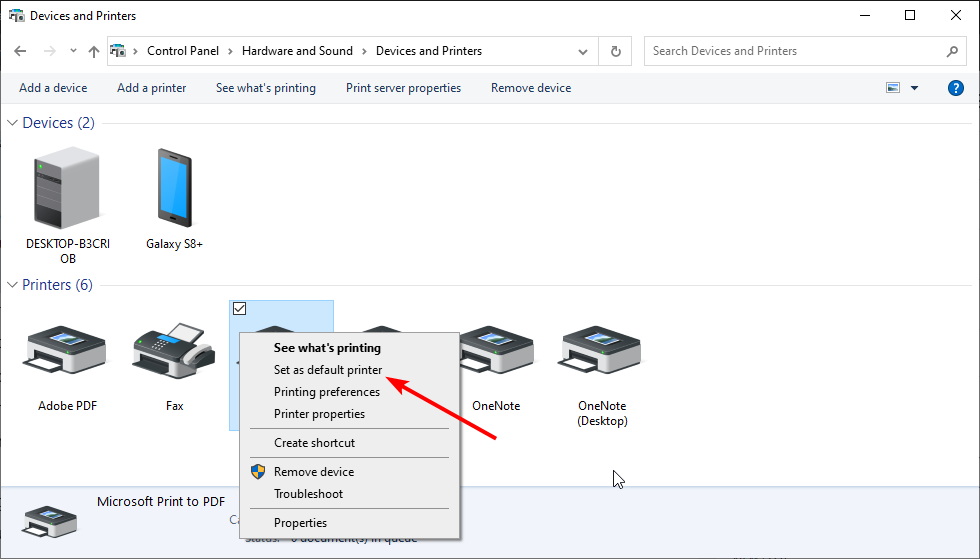
- Now, right-click your printer and select Set as default printer.
- Finally, go back to the print page and try to print again.

Sometimes, Excel is not printing texts and your files because you are not printing with the default printer. Following the steps above should rectify that quickly.
Also, if you already have your printer as the default, some users have found a way around this issue by setting other printers as the default. Now, they use their printer, a normal printer, to print on Excel with great success. So, you can try the reverse process too.
2. Save the Spreadsheet as an XPS File
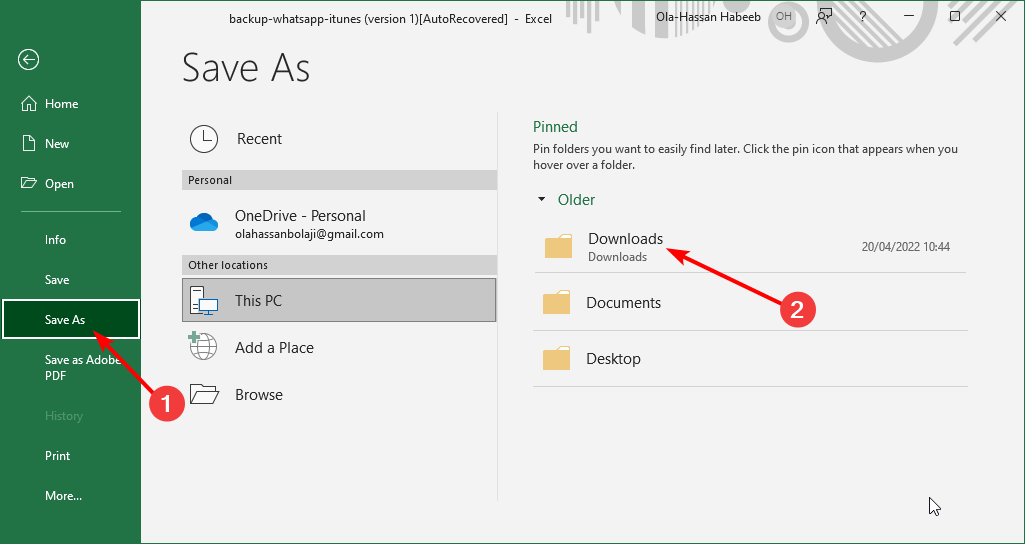
- Click the File tab at the top and select the Save as option.
- Choose your preferred location.

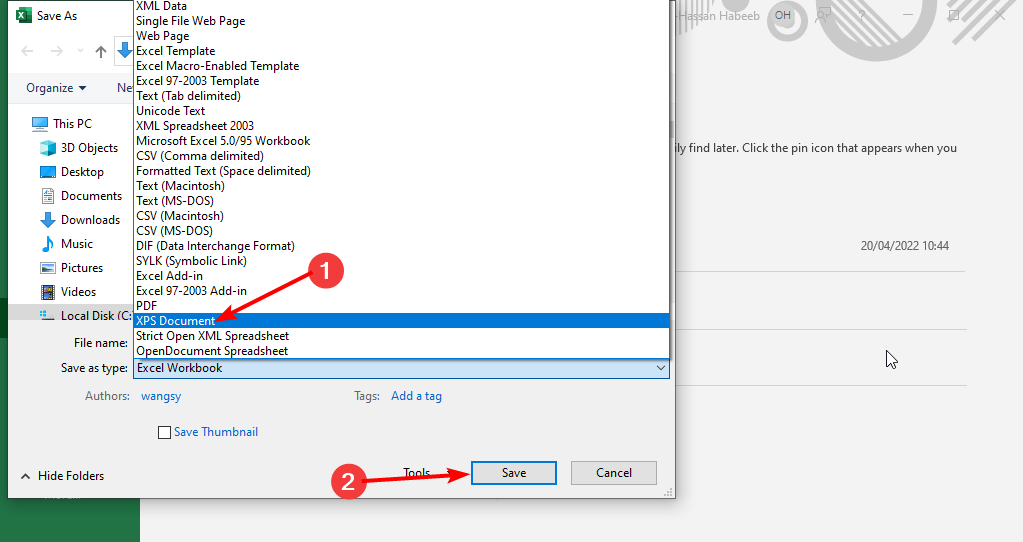
- Click the Save as type dropdown.
- Now, select XPS Document from the options and click Save.
- Finally, press the Ctrl key + P to open the print menu and try to print the document again.
Some users have reported that Excel is not printing their files because of the file type. Changing to the XPS file seems to do the trick here.
3. Update the printer driver
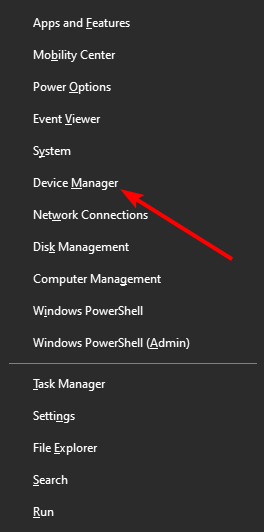
- Press the Windows key + X and select Device Manager.

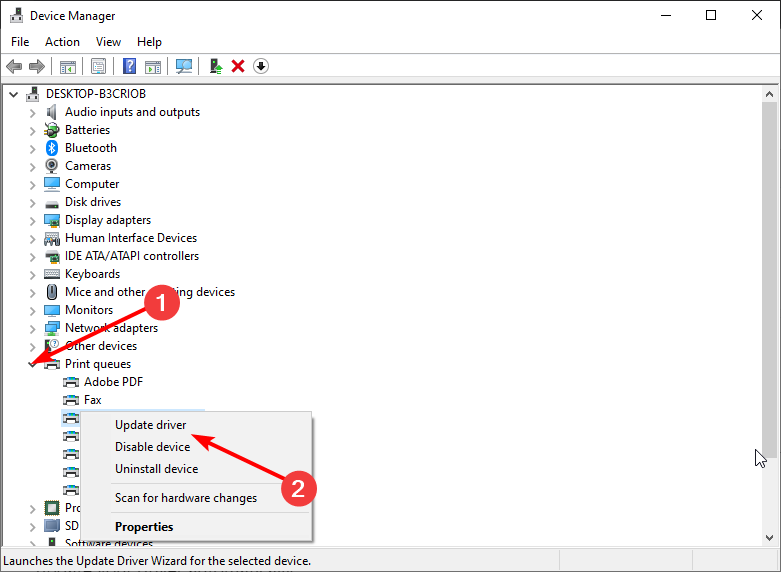
- Double-click the Print queues option to expand it, and right-click your printer driver.
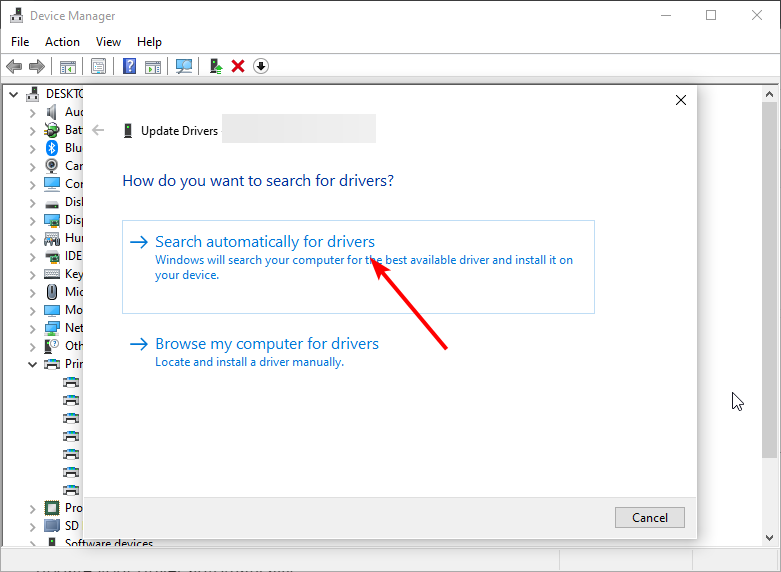
- Now, select the Update driver option.

- Finally, select the Search automatically for drivers option and install any available updates.
Drivers are important for the smooth communication between your hardware and software components. So, if Excel, Word, and PDF files are not printing on your PC, it might be because your driver is outdated.
Some PC issues are hard to tackle, especially when it comes to corrupted repositories or missing Windows files. If you are having troubles fixing an error, your system may be partially broken.
We recommend installing Restoro, a tool that will scan your machine and identify what the fault is.
Click here to download and start repairing.
If you can’t find the updated driver using the method above, you can go to the printer’s manufacturer’s website to download the latest version.
Alternatively, you can save yourself the stress by updating the driver using a reliable tool in DriverFix to update your driver automatically.

DriverFix
Try using DriverFix to locate the right driver versions for your computer in a matter of seconds.
4. Disable reliability options
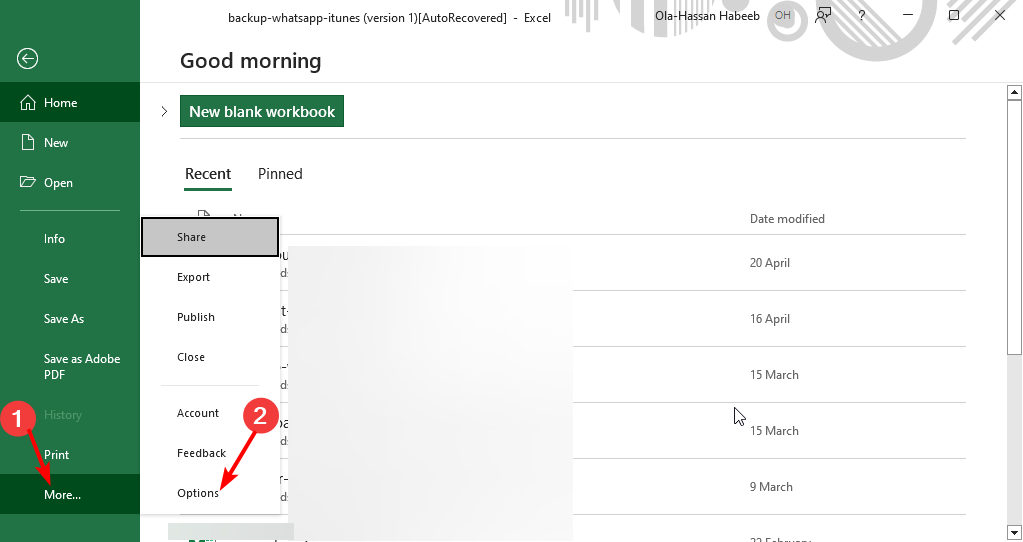
- Launch Excel and click the File tab at the top.
- Select More in the left pane, followed by Options.
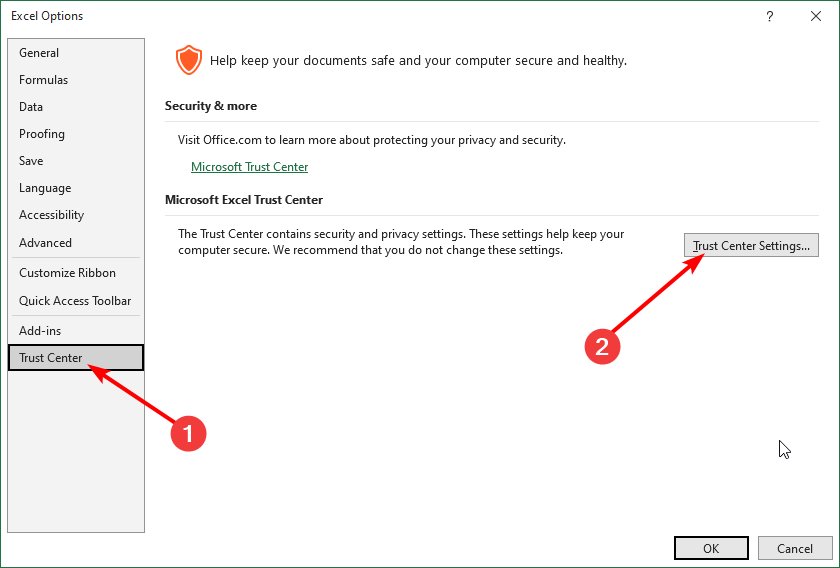
- Now, choose Trust Center.
- From here, click on the Trust Center Settings button.

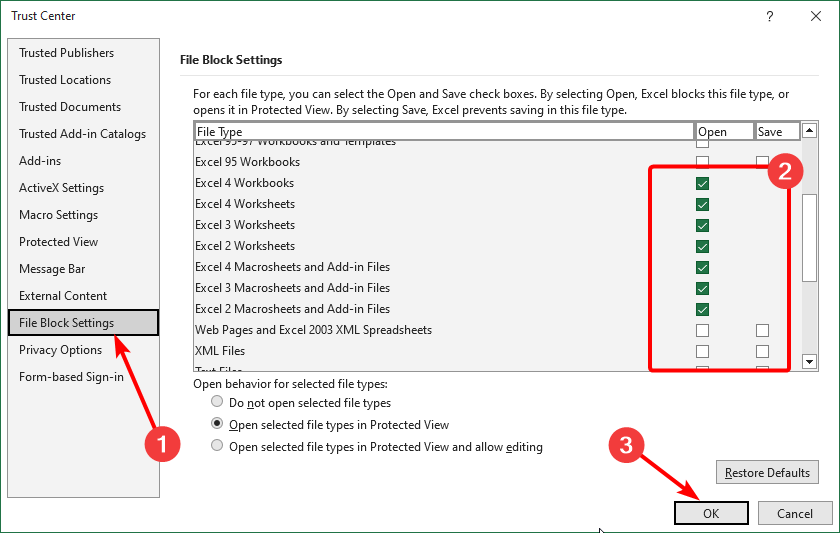
- Select File Block Settings in the left pane.
- Now, uncheck all the boxes for the options provided for different file types and click OK.

- Choose the Protected View option in the left pane.
- Uncheck the boxes for all the options there.
- Finally, click the OK button and close Excel.

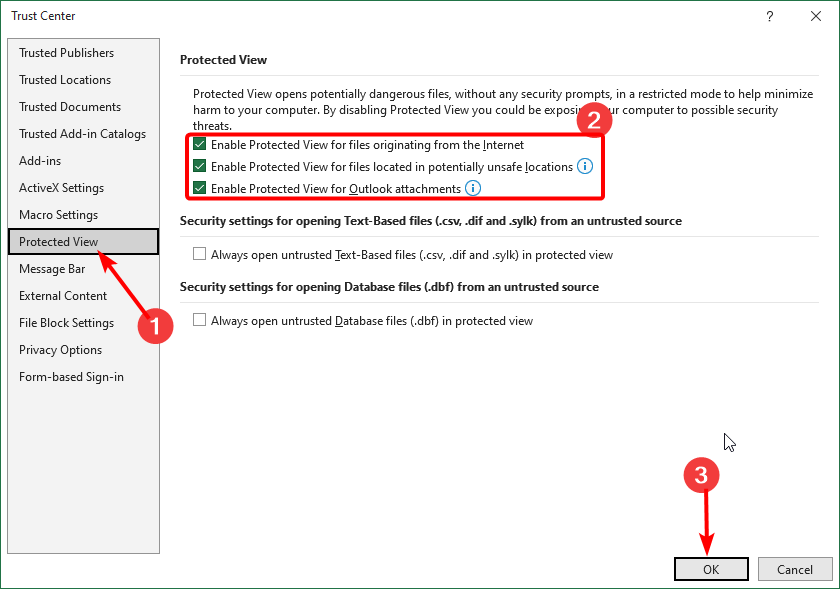
At times, Excel is not printing your document because the file type is protected. You need to undo this setting and relaunch Excel to be able to print.
- Evr.dll is Missing? How to Fix or Download It Again
- Dynamiclink.dll: What Is It & How to Fix It if It’s Missing
- 0x00000b11: How to Fix This Error on Windows 10 & 11
- Fix: Operation Failed With Error 0x00001B
- Fix: Operation Failed With Error 0x00004005
5. Repair Office
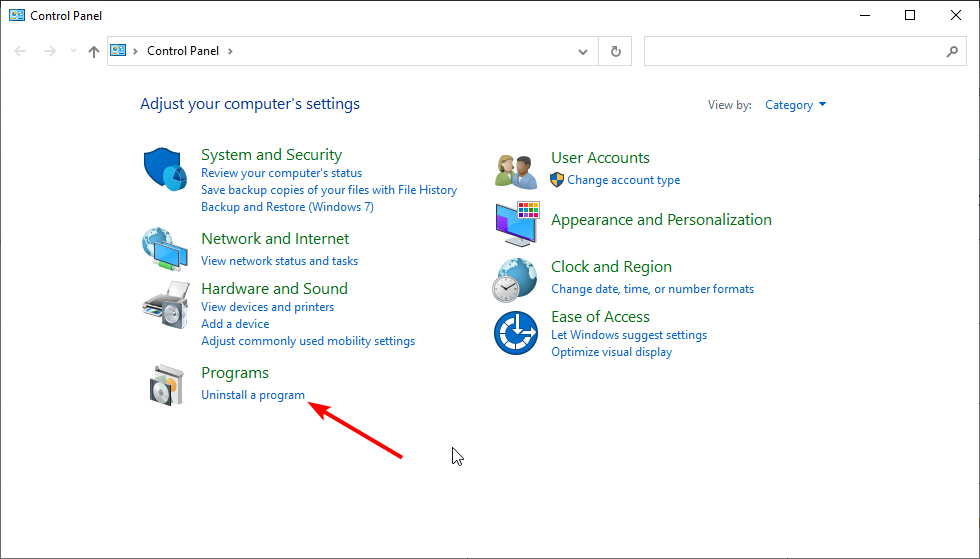
- Press the Windows key + S, type control, and choose Control Panel.
- Click Uninstall a program under Programs.
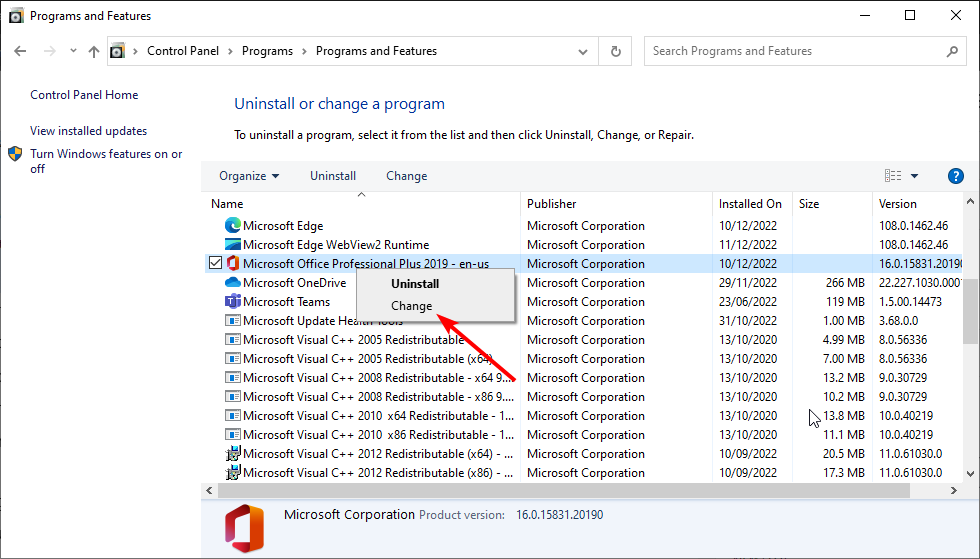
- Now, right-click the Office program and select Change.
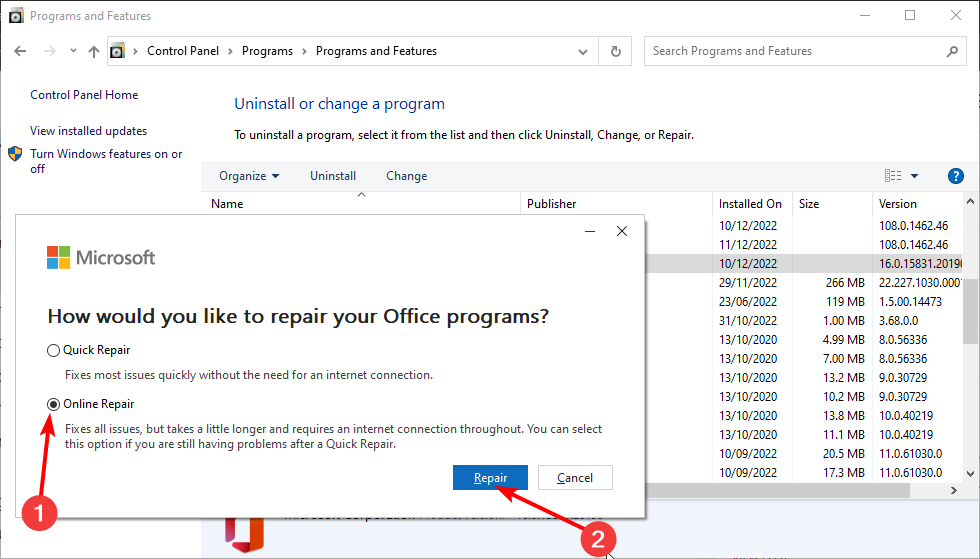
- From here, select Online Repair and click the Repair button.
- Wait for the process to finish and relaunch Excel.
If the above fixes prove abortive and Excel is still not printing your documents, you might need to repair your Microsoft Office installation. This will detect any glitch causing this issue and fix it.
Printing problems on Excel can be annoying, especially if your printer works on other apps. However, it is an issue that has proven solutions, as shown in this guide.
If you still can’t print after applying the fixes above and still have the installation disk, you might need to uninstall Office and reinstall it. Hopefully, it does not come to that.
Feel free to let us know the solution that worked for you in the comments below.
![]()
Newsletter
-
09-14-2016, 11:40 AM
#1

Registered User
Excel Text Not Printing
I have an issue with some of the sheets we use in the office. The worksheet will print formats just fine, but once in a while, It does not print text. Before I thought it was just colored text. With this new document I see it is all text except for two cells. when I publish files to a pdf this does not happen. Any of the documents that this happened to before needed to go out to customers as a pdf anyways so I just told people to publish as a pf and print that since they were doing it anyways. This is just an internal document that does not go out, but needs to be printed. I would rather not have people creating a pdf every time just to print, because quite honestly, they will just complain to me about it. I dont really think they should have to anyways if I can fix this. Does anybody know what is happening or how to fix it. My best thought is an issue with the printer driver. Please see the attached example.
Excel Sample.png
-
09-14-2016, 11:58 AM
#2
Re: Excel Text Not Printing
An image attachment has very little value. Just attach the Excel file.
Under the text box where you type your reply click the
Go Advanced button. On the next screen scroll down and click on Manage Attachments, which will show a pop-up window to Select and Upload a file. Then close the window.
«but once in a while» ? Yeah, I am guessing printer driver issues. Do you have a different printer you can try this on?
Jeff
| | |?| |?| |?| |?| | |:| | |?| |?|
Read the rules
Use code tags to [code]enclose your code![/code]
-
09-14-2016, 12:10 PM
#3
Registered User
Re: Excel Text Not Printing
————————————————
Last edited by Nprezzato; 09-14-2016 at 12:19 PM.
-
09-14-2016, 12:18 PM
#4
Registered User
Re: Excel Text Not Printing
Sorry, Can’t post it, I’m going to follow up on the driver issue.
-
09-14-2016, 12:45 PM
#5
Re: Excel Text Not Printing
Then, it’s tough to say what’s happening there. Try removing all formatting and then save as PDF. Then let me know if you are having the same issue.


Excel печатает пустые листы
Каждый лист книги Excel разбивается на печатные страницы. Их границы одновременно служат границами листов, которые будут выводиться на печать на принтере. Просмотреть, как именно делится документ на страницы, можно перейдя в режим разметки или в страничный режим работы Excel. Сделать это довольно просто.
В правой части строки состояния, которая расположена внизу окна Excel, находятся иконки смены режима просмотра документа. По умолчанию включен обычный режим. Значок соответствующий ему, самый левый из трех иконок. Для того, чтобы переключится в режим разметки страницы, кликаем по первой иконке справа от указанного значка.
После этого включается режим разметки страницы. Как видим, все страницы разделены пустым пространством. Для перехода в страничный режим следует кликнуть по самой правой кнопке в ряду указанных выше иконок.
Как видим, в страничном режиме видны не только сами страницы, границы которых обозначены пунктиром, но и их номера.
Также переключение между режимами просмотра в Excel можно совершить, перейдя во вкладку «Вид». Там на ленте в блоке инструментов «Режимы просмотра книги» будут находиться кнопки переключения режимов, которые соответствуют значкам на панели состояния.
Теперь давайте конкретно разбираться, какими способами можно удалить пустые страницы из документа, в случае их обнаружения, при выполнении указанных выше действий.

Мнение эксперта
Витальева Анжела, консультант по работе с офисными программами
Со всеми вопросами обращайтесь ко мне!
Задать вопрос эксперту
Обратите внимание, чтобы распечатать несколько листов рабочей книги, выделите необходимые листы, удерживая клавишу Ctrl, выберите пункт Напечатать активные листы и щелкните кнопку Печать. Если же вам нужны дополнительные объяснения, обращайтесь ко мне!
Если же высота строки слишком большая и текст даже не заполняет ее всю, то возможно в свойствах таблицы установлен точный размер высоты строки и/или указано слишком большое его значение. Тогда следует установить режим «минимум» и уменьшить (или удалить) значение высоты строки таблицы.

Не помещается текст в ячейке таблицы | Компьютер плюс
Ответ от |Аннушка|
EXEL НА ТО И EXEL,ЧТО В КАЖДОЙ ЯЧЕЙКЕ МОЖЕТ БЫТЬ ТОЛЬКО ОДНА СТРОКА
ТАК, КАК ХОЧЕШЬ СДЕЛАТЬ ТЫ, УВЫ, НЕВОЗМОЖНО
А ЕСЛИ ДЕЛАТЬ КАК YANA Цветочек ТО ПОТОМ БУДЕТ ВИДНА ТОЛЬКО ЧАСТЬ НАБРАННОГО ТЕКСТА
Как написать текст в ячейке в несколько строк в Excel
Часто перед пользователями табличного редактора встает такая задача, как написание текстовой информации в ячейке в несколько строк. Существует несколько методов, позволяющих реализовать эту простую задачу. В статье мы детально рассмотрим каждый из них.
Если в ячейке находится много текстовой информации или же располагается сложнейшая вычислительная формула, то целесообразнее произвести процедуру редактирования. Для осуществления процедуры редактирования существует специальный режим. Разберемся во всем более подробно.
Редактирование строчки текста в ячейках
Существует два способа, позволяющих произвести редактирование содержимого ячеек. Подробная инструкция первого способа выглядит так:
- В строчке для написания формул возникло наполнение ячейки, которое мы можем отредактировать.
- Производим все необходимые операции по редактированию.
- Кликаем на «Enter» или же на кнопку «Ввод», находящуюся в начале строчки для написания формул.
- Отменить реализованные изменения можно при помощи нажатия на «Ecs» или же на кнопку «Отмена», расположенную рядом с элементом «Ввод».
- Здесь предполагается использование самой ячейки. Производим выделение необходимой нам ячейки при помощи левой клавиши мышки.
- Щёлкаем на «F2» или же используем двойное нажатие на левую клавишу мышки.
- В ячейке отобразился указатель клавиатуры, а ее величина изменилась на период редактирования.
- Вносим все необходимые изменения.
- После реализации всех изменений щелкаем на «Enter». Альтернативные варианты – использование клавиатурной кнопки «Tab» или же клик левой клавиши мышки на какую-нибудь другую ячейку рабочего листа табличного документа.

Важно! При изменениях не стоит забывать о кнопках повторения и отмены действий, расположенных на панели быстрого доступа. Альтернативный вариант – использование сочетания клавиш «CTRL+Y» и «CTRL+Z».
Реализация нескольких строк в ячейке табличного редактора
Используя режим редактирования, можно реализовать процедуру написания текстовой информации в ячейке в несколько строк. Дело в том, что информация, расположенная в ячейке, может быть отредактирована как в обычном текстовом редакторе. Основное отличие – разбиение тестовых данных на строчки.
Для разбиения текстовых данных на строчки в 1-ой ячейке табличного редактора необходимо зажать сочетание кнопок «Alt+Enter». Эта процедура позволяет осуществить переход на новую строчку в ячейке. В месте, где располагается указатель клавиатуры, образуется перенос строки и начало новой строчки.
В стандартных редакторах текстовая информация разделяется на строчки щелчком на «Enter». В табличном редакторе Эксель для осуществления такой операции используется комбинация клавиш «Alt+Enter».

Стоит заметить, что при таком разделении автоматическим образом включается опция переноса по словам. Причем сама опция не разделяет строчку на слова, а оптимизирует ее отображение. Включить перенос по строкам можно и самостоятельно. Подробная инструкция выглядит так:
- Выбираем необходимую ячейку при помощи левой клавиши мышки.
- Жмем ПКМ. На дисплее возникло небольшое специальное контекстное меню.
- В предложенном перечне находим элемент, имеющий наименование «Формат ячеек…» и кликаем по нему левой клавишей мышки.
- Передвигаемся в подраздел под названием «Выравнивание».
- Ставим галочку около надписи «переносить по словам».
- Подтверждаем внесенные изменения нажатием на кнопку «ОК», расположенную в нижней части интерфейса табличного редактора.

Существует еще один метод, позволяющий реализовать отображение текстовой информации, находящейся в ячейке, в несколько строчек. Подробная инструкция выглядит так:
- Выбираем необходимую ячейку при помощи левой клавиши мышки.
- Передвигаемся в подраздел «Главная». Находим здесь блок команд «Выравнивание» и раскрываем перечень при помощи левой клавиши мышки.
- Щёлкаем ЛКМ на элемент под названием «Перенести текст».


- Существует один неприятный момент. Если пользователь решит отредактировать ширину ячейки, то текстовая информация будет отображаться некорректно.
- Нам необходимо сделать так, чтобы этого не происходило. Ставим указатель в ячейку с текстовой информацией, а затем наводим курсор на место после крайнего слова будущей первой строчки.
- Зажимаем комбинацию кнопок «Alt+Enter». Текстовая информация перенеслась на другую строчку.
- Готово! Текстовые данные стали корректно отображаться при редактировании ширины выбранной ячейки.
Мнение эксперта
Витальева Анжела, консультант по работе с офисными программами
Со всеми вопросами обращайтесь ко мне!
Задать вопрос эксперту
В нижней части программы справа можно увидеть значки, которые позволяют изменить вид документа, режим разметки можно увидеть если кликнуть на центральный значок. Если же вам нужны дополнительные объяснения, обращайтесь ко мне!
Для того, чтобы убрать область печати даже выделять диапазон не нужно. Просто переходим во вкладку «Разметка», кликаем по кнопке «Область печати» в блоке «Параметры страницы» и в появившемся меню выбираем пункт «Убрать».
Excel печатает пустые листы
Не помещается текст в ячейке таблицы созданной в Word? А точнее, не весь текст виден в ячейке, поскольку часть его прячется за ее границами. Причина этого может быть как в настройках таблицы, так и в настройках параметров абзаца. Поэтому, чтобы избавиться от этой проблемы нужно изменить названные настройки.
|
ambi Пользователь Сообщений: 44 |
Текст виден в предварительном просмотре, но не идет на печать, границы и заливки печатаются, а текст — нет. Спасибо. |
|
GIG_ant  Пользователь Сообщений: 3102 |
давайте ваш файл посмотрим |
|
GIG_ant Пользователь Сообщений: 3102 |
и какой именно текст не печатается ? |
|
ambi Пользователь Сообщений: 44 |
названия должностей и имена с фамилиями |
|
GIG_ant Пользователь Сообщений: 3102 |
я распечатал, все что в предварительном просмотре есть на листе, может что пропустил ? |
|
У меня тоже распечаталось нормально (я первый лист попробовал). У меня эксель 2010. Может 2007 глючит? |
|
|
У нас 2003, и конвертер, может дело в этом… |
|
|
GIG_ant Пользователь Сообщений: 3102 |
Скорее всего. У меня 2007 — полет нормальный ) |
|
ambi Пользователь Сообщений: 44 |
|
|
Владимир Пользователь Сообщений: 8196 |
{quote}{login=}{date=26.09.2011 04:47}{thema=}{post}У нас 2003, и конвертер, может дело в этом…{/post}{/quote} У меня конвертер. Всё печатается. P.s.: Зря только картридж потратил. «..Сладку ягоду рвали вместе, горьку ягоду я одна.» |

|
Den Пользователь Сообщений: 48 |
У меня примерно такая же проблема, график указанными значениями — графикик печатаются, а текст нет. При чем текст в ячейках печатается нормально, а вот подписи на графике, или если сделать надпись с текстом, то не печатается. Так на 2х компах с 2007 офисом. |
|
vikttur Пользователь Сообщений: 47199 |
Автор давно не появляется. Ответ от других устроит? |
|
Den Пользователь Сообщений: 48 |
{quote}{login=vikttur}{date=22.12.2011 04:44}{thema=}{post}Автор давно не появляется. Ответ от других устроит? |
|
Печать из 2007 на виртуальный принтер. Вроде ОК? |
|
|
Den Пользователь Сообщений: 48 |
У меня, к сожалению, изображение с виртуального совпадает с печатным, но не совпадает с предпросмотром ) |
|
Den Пользователь Сообщений: 48 |
{quote}{login=}{date=11.01.2012 01:59}{thema=}{post}А так попробуйте{/post}{/quote} |
|
Попробуйте поменять шрифт в самой диаграмме. |
|
|
Guest Гость |
#20 11.01.2012 14:52:41 {quote}{login=}{date=11.01.2012 02:24}{thema=}{post}Попробуйте поменять шрифт в самой диаграмме. |
-
#9
Re: Text in a cell visable on screen but BUT doesn’t get pri
You could try making the cell font white before print and change it back like:
for cell A4
In the vbCode:
Workbook section:
Private Sub Workbook_BeforePrint(Cancel As Boolean)
‘Chas Weber 4/9/04
Range(«a4»).Font.Color = vbWhite
End Sub
Private Sub Workbook_Open()
‘Chas Weber 4/9/04
Range(«a4»).Font.Color = vbBlack
End Sub
In the Sheet section for sheet cell is on:
Private Sub Worksheet_Activate()
‘Chas Weber 4/9/04
Range(«a4»).Font.Color = vbBlack
End Sub
Private Sub Worksheet_SelectionChange(ByVal Target As Range)
‘Chas Weber 4/9/04
Range(«a4»).Font.Color = vbBlack
End Sub
You’ve just sent an Excel spreadsheet to your printer, but when you check it, you discover that the spreadsheet didn’t print right. Maybe it printed in portrait mode when it should’ve printed landscape; perhaps a certain section of your spreadsheet never printed or the spreadsheet took too many pages to print. Whatever went wrong, you can avoid many printing problems in Excel by following certain tips, such as tweaking the margins, setting the print area, scaling the sheet to print and choosing the right sheet options.
What you need to print from Excel
For these steps, I’m using Microsoft Excel as part of a Microsoft 365 subscription, but most of the advice here applies to the past few versions of Excel as well.
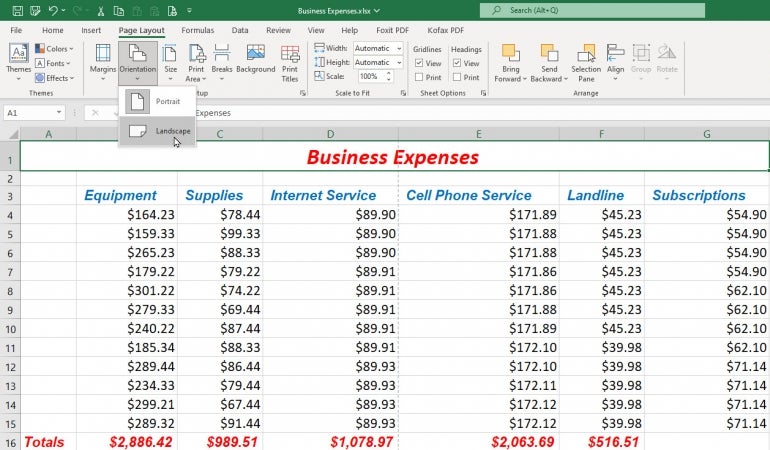
How to check the orientation before printing Excel spreadsheets
This may seem obvious, but check the orientation before you print. That usually — but not always — means landscape mode. To check this, select the tab for Page Layout and click the icon for Orientation (Figure A).
Figure A
Next, look at your page margins. From the Page Layout Ribbon, click the icon for Margins. To minimize the number of printed pages, choose the option for Narrow or select Custom Margins and set up your own. Remember to leave at least a little space for margins to give your printed spreadsheet room to breathe (Figure B).
Figure B
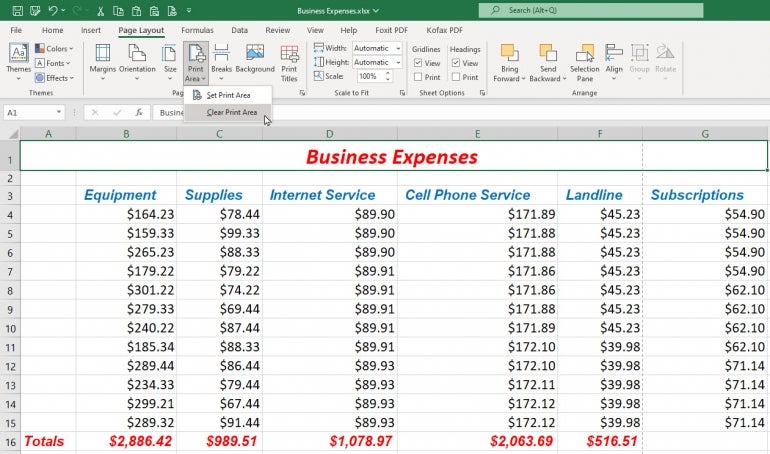
How to clear or set the print area before printing Excel spreadsheets
If your Excel spreadsheet isn’t printing properly, clearing or setting a print area can often help. Sometimes the wrong print area has already been set, in which case you want to clear it.
SEE: Google Workspace vs. Microsoft 365: A side-by-side analysis w/checklist (TechRepublic Premium)
To do this from the Page Layout Ribbon, click the Print Area icon and select Clear Print Area. If you now want to redefine the print area, select the cells that you want to print. Click the Print Area icon and select Set Print Area (Figure C).
Figure C
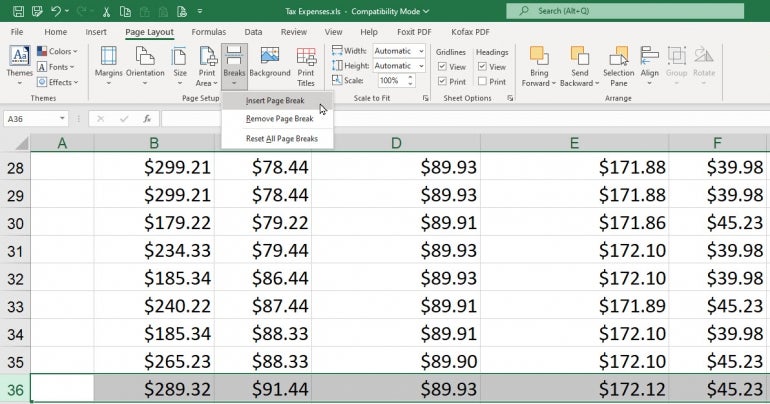
How to set a page break before printing Excel spreadsheets
If your spreadsheet contains a lot of rows or columns, it may break at an inappropriate place when you print it. To fix that, you can manually set a page break.
To set a horizontal page break, select the row where you want the printed page to break. To set a vertical page break, select an entire column. At the Page Layout Ribbon, click the Breaks icon and select Insert Page Break (Figure D).
Figure D
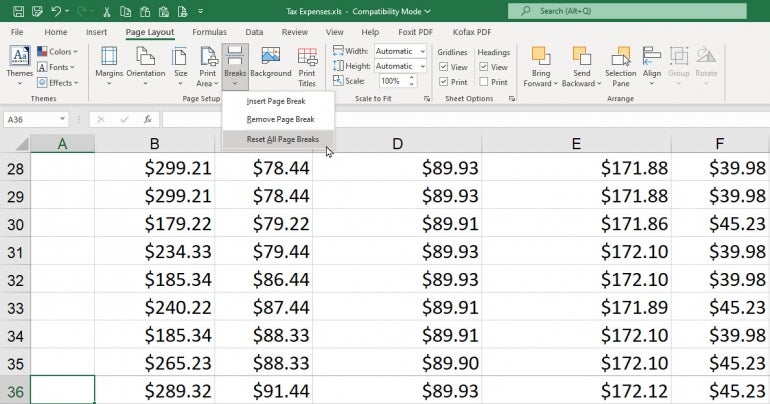
To remove the break, select the same row or column, click the Breaks icon, and select Remove Page Break. If you’ve created multiple page breaks that you want to remove, choose the option to Reset All Page Breaks (Figure E).
Figure E
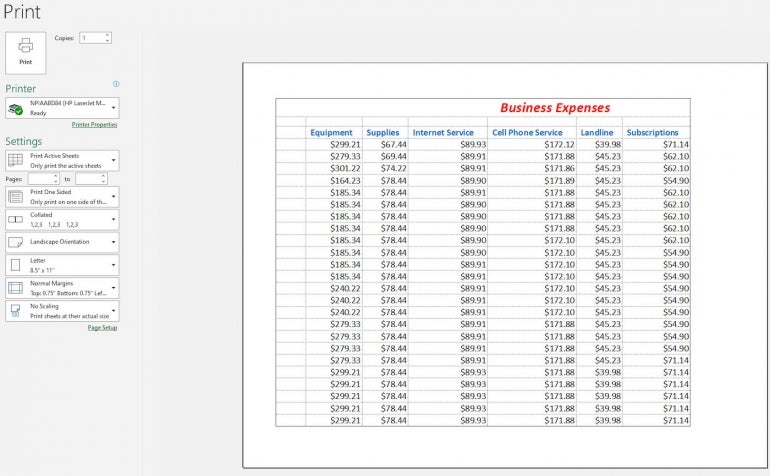
How to check preview before printing Excel spreadsheets
Now might be a good time to see how your spreadsheet will look when printed. Press Ctrl+F2 to jump into Print mode where you can preview the spreadsheet. You can then bounce from one page to another. When done, click the left arrow at the top to return to regular view (Figure F).
Figure F
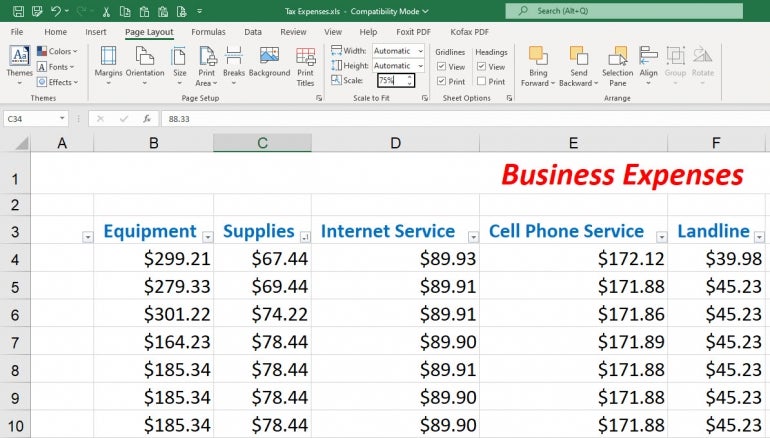
How to scale to fit before printing Excel spreadsheets
Another way to control the printing on multi-page spreadsheets is by setting a certain width, height or scale.
At the Page Layout Ribbon, click the dropdown box next to Width. From here, you can set a specific number of pages to print across. For example, if you want to squeeze a wide two-page spreadsheet onto one printed page, select the option for 1 page. Click the dropdown box next to Height. If you want to squeeze a long two-page spreadsheet onto one printed page, select the option for 1 page.
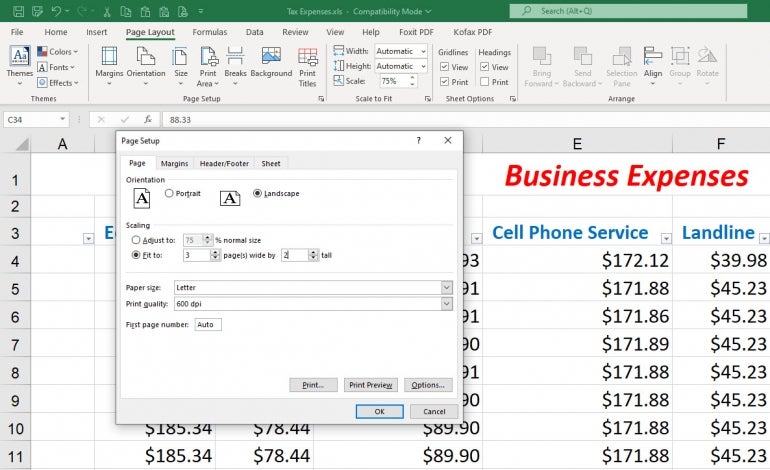
If you want to shrink your spreadsheet to a certain percentage both in width and height, click the down arrow next to Scale or type a specific number, such as 75% (Figure G).
Figure G
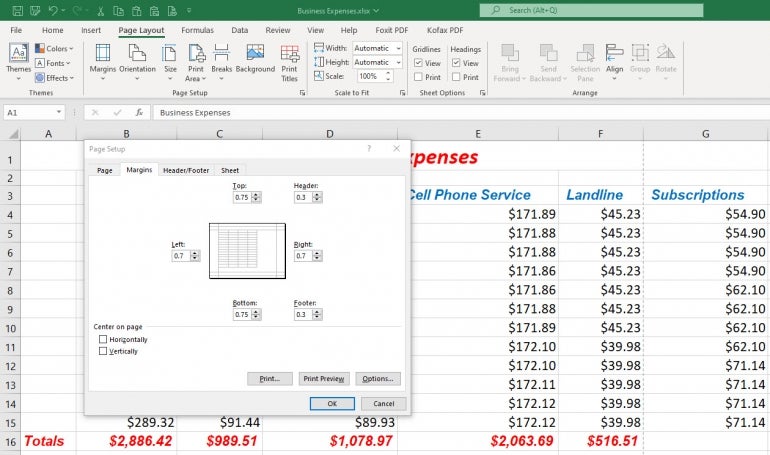
How to set advanced options before printing Excel spreadsheets
You can tweak your printed pages further by delving into the full Page Setup dialog box.
To get there, click the small square in the lower right corner of the Page Setup section of the Page Layout Ribbon. At the tab for Page, you can adjust the scaling to a certain percentage as you did from the Ribbon, but you can also set a specific number of pages for both the height and the width (Figure H).
Figure H
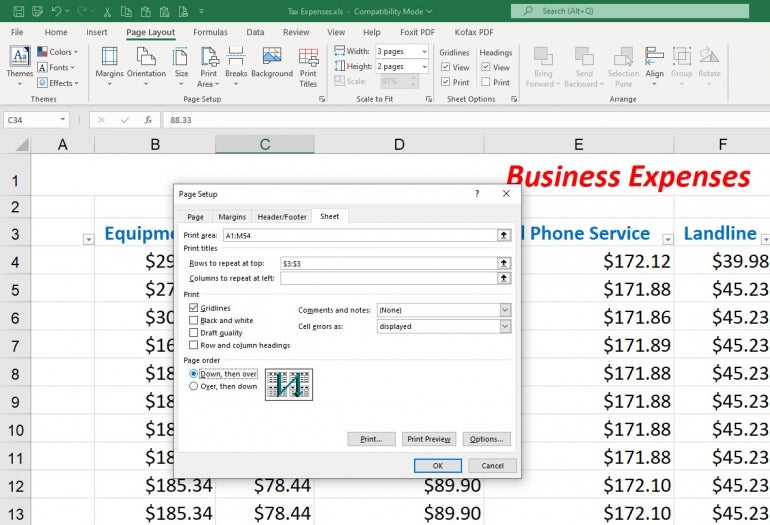
Click the Margins tab to adjust the margins or center the rows or columns for a small spreadsheet. Click the Header/Footer tab to create, revise, or remove a header or footer. Finally, click the Sheet tab. Here, you can set the print area and print titles. You can opt to print or not print gridlines and other visual marks, and you can choose the order of pages to print, either Down Then Over or Over Then Down (Figure I).
Figure I
If you’re on the hunt for more Excel-lent tips, have a look at a quick way to delete or remove blank rows and how to import Excel records into an Outlook Calendar.
Some users are experiencing issues with Microsoft Excel. When they try to print from Excel, nothing happens. Whereas, some users have reported that a small window appears and disappears immediately after giving the print command to Excel. If you cannot print from Excel, the suggestions provided in this post may help you fix printing problems in Microsoft Excel.

Fix Excel printing problems of Windows 11/10
If you cannot print from Excel but Word can or maybe you see a Not enough memory error message then here are some suggestions to help you fix Excel printing problems. Before you proceed, make sure that you are using the latest version of Microsoft Office. You can also try to update Office manually and see if it fixes the problem. If the problem persists, try the solutions provided below.
- Try to print via Microsoft XPS Document writer
- Update your printer driver
- Edit permissions in the Registry Editor
- Troubleshoot Excel in Safe Mode
- Remove and add your printer again
- Repair Office
Let’s see all these solutions in detail.
1] Try to print via Microsoft XPS Document Writer
Before printing a spreadsheet, Excel shows us an option to select the printer. If you are unable to print from Excel via your default printer, try to print via Microsoft XPS Document Writer. The steps to do this are as follows:
- Launch Microsoft Excel and open your spreadsheet.
- Go to “File > Print.”
- Click on the Printer drop-down and select Microsoft XPS Document Writer.
- This will save your Excel spreadsheet in the XPS format.
Now, open the saved file. You should be able to print it.
2] Update your printer driver
You might be experiencing printing issues with Excel due to the corrupted or outdated printer driver. We suggest you update your printer driver and see what happens.

You have the following choices when it comes to updating the printer driver.
- Open the Windows Optional Update page and update your printer driver from there (if any update is available).
- Visit the official website of your printer manufacturer and download the latest version of your Printer driver. Now, double-click on the installer file to install the printer driver manually.
3] Edit permissions in the Registry Editor
Windows Registry is a hierarchical database that stores the Windows settings and configurations. Any mistake while modifying the Windows Registry can lead to serious damage to the system. Therefore, before you proceed, we recommend you create a System Restore Point and backup Windows Registry.
Follow the instructions carefully.
Press the Win + R keys. This will open the Run command box. Type regedit and click OK. Click Yes in the UAC prompt.

When the Registry Editor appears on your screen, go to the following path. Simply copy the path given below and paste it into the address bar of the Registry Editor. After that, press Enter.
ComputerHKEY_CURRENT_USERSoftwareMicrosoftWindows NTCurrentVersionWindows
Right-click on the Windows key and select Permissions. The Permissions dialog box will appear. Now, click on the Allow checkbox next to the Full Control option. Click Apply and then click OK.
4] Troubleshoot Excel in Safe Mode
If the problem still persists, there might be a problematic add-in. To confirm this, launch Excel in Safe Mode and print your spreadsheet. If you are able to print your spreadsheet in the Safe Mode, an add-in is causing the problem.
Now, close Excel and open it again in the normal mode. Start disabling all the COM add-ins one by one and print your spreadsheet every time you disable an add-in. This will let you know which add-in is causing the problem. According to the feedback of affected users, the Acrobat PDFMaker Office Com add-in was causing the problem. If you have installed such an add-in, disable it and then see if you can print the spreadsheet. If yes, remove that add-in.

The following steps will help you disable COM Add-ins in Excel:
- Open your spreadsheet in Excel.
- Go to “File > Options > Add-Ins.”
- Select COM Add-ins in the drop-down at the bottom and click GO.
- The COM Add-ins dialog box will appear. Now, simply uncheck the checkbox to disable a particular add-in.
- Click OK.
Read: Fix Excel keeps flickering on Windows 11/10.
5] Remove and add your printer again
Sometimes, removing and adding the printer again fixes the printer-related issues. Completely remove or uninstall your printer and then add it again. Check if this helps. You can completely remove a printer from your Windows 11/10 machine via:
- Settings
- The Control Panel
- Print Server Properties
- The Command Prompt
- The Registry Editor
6] Repair Office
If nothing helps you, repair Microsoft Office. Sometimes, the problem occurs due to corrupted Office files. If this is the case with you, repairing Microsoft Office will fix the problem. First, run a Quick Repair. If this does not fix the problem, run an Online Office Repair.
Read: Microsoft Excel displays High CPU usage.
Fix Excel printing problems in Windows 11/10
Above, we have seen the solutions to fix the problem when Excel does not print on receiving the print command from the user. Now, let’s see some common printing problems that you may experience in Microsoft Excel. Sometimes, when we print a spreadsheet from Excel, we do not get the desired printout. Some of you might have experienced such a problem. Such types of problems occur when the print settings are incorrectly configured before printing a spreadsheet.
Here are some tweaks that you can do to avoid some common printing problems in Microsoft Excel.
- Fit your spreadsheet on one page
- Set the print area in Excel
- Configure print settings before printing the spreadsheet
1] Fit your spreadsheet on one page

Some of you might have experienced that despite configuring the correct page settings, Excel prints a spreadsheet on more than one page. This problem can be fixed by changing the scaling in Excel. If you want to print all the rows or columns on one page in Excel, you have to change the No Scaling option in Excel to Fit all rows on one page and Fit all columns on one page option respectively.
2] Set the print area in Excel
If you want to print selected cells in your spreadsheet, you can set the print area for the same. The steps to set the print area are as follows:

- Open Excel.
- Open your worksheet in Excel.
- Select the range of cells that you want to print.
- Go to “Print Layout > Print Area > Set Print Area.”
Now, when you give the print command to Excel, it will print only the selected cells on a page. You can extend the print area by adding more cells to it. If the cells that you want to add are adjacent to the existing print area, Excel will print them on the same page (if space is available). If the selected cells that you want to add are not adjacent to the existing print area, Excel will print them on another page, no matter whether the space is available on the existing print area or not.
To add cells to the existing print area, follow the steps below:

- Select the range of cells that you want to add to the existing print area.
- Go to “Page Layout > Print Area > Add to Print Area.”
To clear the print area, go to “Page Layout > Print Area > Clear Print Area.”
3] Configure print settings before printing the spreadsheet
You can configure the print settings before printing your spreadsheet. To do so, go to “File > Print” or simply press the Ctrl + P keys. There you will see different print settings. You can change the page orientation (landscape or portrait), select your paper size such as Letter, Legal, A4, A3, etc., change page margins, etc. Every time you make a change to the print settings, Excel will show you the print preview in the preview window.
Why can I print from Word but not from Excel?
If you are able to print from Word but not from Excel, there might be a problematic add-in in Excel. You can confirm this by opening Excel in the Safe Mode. If you will be able to print in the Safe Mode, one of the add-ins is the culprit. Now, disable add-ins installed in Excel one by one. Print your spreadsheet every time you disable an add-in. This will help you identify the problematic add-in.
Other solutions that you can try are removing and adding the printer again, updating your printer driver, etc.
Why won’t Excel print all the columns?
To print all the columns on one page in Excel, you have to configure the page settings before printing your spreadsheet. The steps for the same are as follows:

- Open your spreadsheet in Excel.
- Go to “File > Print.”
- By default, the page setup is set to No Scaling. You have to change this option. Click on it and select Fit all columns on one page.
After that, you will be able to print all the columns on one page in Excel.
Print preview is not available because Microsoft Excel could not connect to the selected printer
If you see the “Print preview is not available because Microsoft Excel could not connect to the selected printer” error message while printing a spreadsheet from Excel, make sure that your computer is running on the latest version of the Windows operating system. Open Windows 11/10 Settings and check for updates. If updates are available, download and install them.
We also suggest you update Microsoft Office manually and see if it helps. If the problem persists, repair Microsoft Office.
Cannot print from Excel, Not enough memory
Some of you might have seen the “Not enough memory” error message while printing a spreadsheet in Microsoft Excel. The error message is self-explanatory. When the printer from which you are printing the jobs does not have enough memory, you will see this error. However, there are other causes too that trigger this error. To fix this issue, you can try the following fixes.
- Copy the data from your spreadsheet to a new spreadsheet
- Change your default printer
- Update your printer driver
- Print in Draft Mode
- Save your Excel file in ODS format
- Reset your printer memory
- Clear print spooler
- Repair Office
Let’s see all these fixes in detail.
1] Copy the data from your spreadsheet to a new spreadsheet
This method has fixed the issue of some users. You can also try this. Copy the data from your spreadsheet to a new spreadsheet and see if it helps.
2] Change your default printer
If the problem still persists, change your default printer. You can set any virtual printer as a default printer, such as Microsoft Print to PDF, Microsoft XPS Document Writer, etc.
3] Update your printer driver
Sometimes the problem persists due to the outdated or malfunctioned printer driver. If this is the case with you, updating the printer driver will solve your problem. To do so, follow the steps written below:
- Open the Device Manager.
- Expand the Print queues node.
- Right-click on your printer driver and select Update driver.
- Select the “Search automatically for drivers” option. Let Windows install the latest version of your printer driver.
If this does not work, visit the official website of your printer manufacturer and download the latest version of your printer driver from there. Now, run the installer file to install the latest version of your printer driver manually.
4] Print in Draft Mode
For some users, printing the spreadsheet in the Draft mode fixed their problem. You can also try this and see if it helps. To do so, you have to change the Fast mode to Draft mode. By default, the print quality is set to Fast mode. Open your print quality settings and change the Fast mode to Draft mode.
5] Save your Excel file in ODS format
Another effective solution to fix this problem is to save the Excel spreadsheet in ODS (OpenDocument Spreadsheet) format. The steps to do this are as follows:

- Launch Microsoft Excel and open your spreadsheet.
- Go to “File > Save As.”
- Click on the Save as type drop-down menu and select OpenDocument Spreadsheet.
- Click Save.
Now, open the ODS file and print it. The problem should not appear this time.
6] Reset your printer memory
If your printer is running low on memory, resetting its memory will help fix the issue. Resetting the printer memory will clear the print jobs in the queue. To do so, follow the steps given below:
- Disconnect your printer from your computer.
- Turn off your printer.
- Disconnect the power cable of your printer and wait for a few minutes.
- Connect the power cables again and turn on your printer.
- Connect your printer to your computer.
If the above method did not help, cold reset your printer. The method to cold reset printers is different for the printers of different brands. Therefore, you have to refer to the user manual of your printer to know the correct way to cold reset your printer.
7] Clear the Print Spooler
In Windows, Print Spooler is a service that stores the printing jobs temporarily. If Excel is showing the “Not enough memory” message while printing a spreadsheet, clearing the Print Spooler may fix the problem. The steps to clear the Print Spooler are as follows:
- Press the Win + R keys to launch the Run command box.
- Type services.msc and click OK. This will launch the Services Management window.
- Scroll down and locate the Print Spooler service.
- Once you find it, right-click on it and select Stop.
- Open the File Explorer and go to the “C:WindowsSystem32spool” path. Simply copy this path and paste it into the address bar of the File Explorer. After that, hit Enter.
- Open the PRINTERS folder and delete all the files inside it. Do not delete the PRINTERS folder.
- Return to the Services Management window and right-click on the Print Spooler service.
- Select Start.
8] Repair Office
Check if you are getting the same error message in other Office apps, like Word. If not, some of the Excel files may be corrupted. To fix this problem, run an online repair for Microsoft Office.
Hope this helps.
Read next: Excel freezing, crashing, or not responding.