
Aligning text in Microsoft Word is one of the primary features of the popular app. Many users tend to use the Justify option to get the job done, but there may come a time when it fails to work. The question is, then, what can be done to get this issue under control? There are a few things we can do, and luckily for you, we have the sauce. Just know we’re going to focus on the latest version of Microsoft Word in this article. But that shouldn’t be a problem if you’re an advanced user.
If Justify Text or Paragraph is not working in Microsoft Word, then here are the steps you need to take to fix the issue:
- Open the preferred Microsoft document
- Choose the paragraph you want to Justify
- Navigate to Advanced Find
- Go to the Replace tab
1] Open the preferred Microsoft document
To begin, you must launch the affected document. To do this, open Microsoft Word on your Windows computer, then you should see a list of recent documents. The one you want should be in that list, so seek it out, then click on it to open.
2] Choose the paragraph you want to Justify
In order to select the paragraph, please click and hold the left mouse button at the beginning of the paragraph, then drag to the end, and release. If the texts are highlighted, then you can be sure the paragraph has been selected.
3] Navigate to Advanced Find

How do we get this done? Well, simply look to the top-right corner of the document. You should see the Find icon in that section. Just click on the arrow next to it then select Advanced Find.
4] Go to the Replace tab
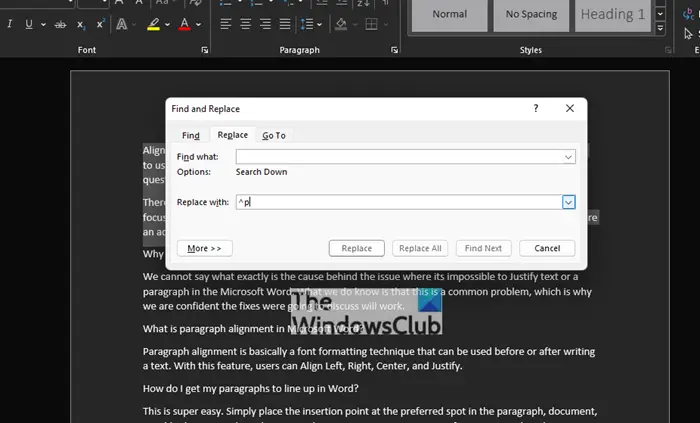
After you’ve fired up the Advanced Find section, you are required, then, to select the Replace tab. From there, go to the Find box, then enter the following:
^p
Finally, hit Replace All. Ensure the Replace With field is 100 percent empty before adding anything to it. The problem with the inability to Justify should now be solved once and for all, or until next time.
Alternatively, use the Word Advanced Options to justify Text & Paragraphs
Another way to get things working again is to take advantage of the Advanced Options section via the Microsoft Word settings area. So, let us look at how to get this done right now.
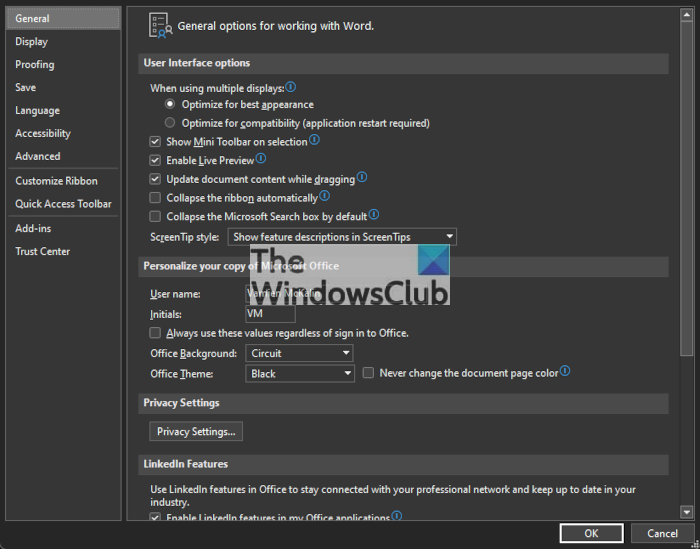
First thing, you must navigate to the Options area of Microsoft Word. To do this, click on File from the top-left corner of the document, then from there, select Options to fire up a new window.
Via the left menu, you should see several tabs to choose from, but you only need to click on Advanced. It is located below Ease of Access and above Customize Ribbon, so you cannot miss it.
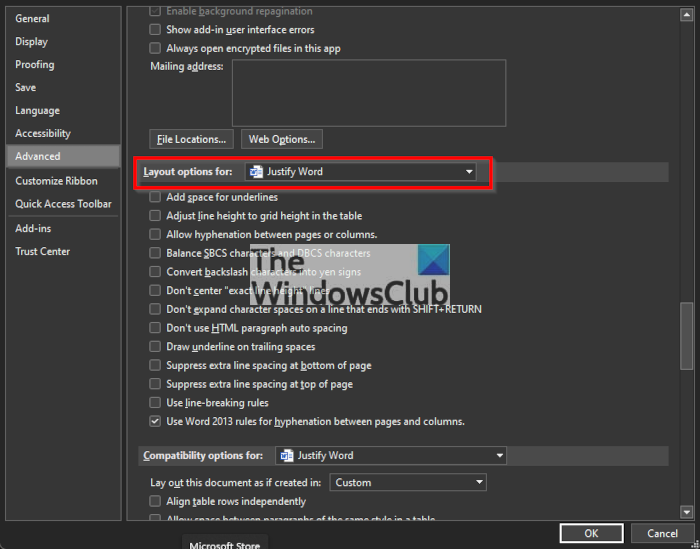
Finally, you’ll be required to navigate to the section named, Layout options for. Below it, please tick the box next to Don’t expand character spaces on a line that ends with SHIFT Return, then hit the OK button.
That’s it, your problems with Justifying text in Microsoft Word should now be rectified.
Why is my Justify not working in Word?
We cannot say what exactly is the cause behind the issue where it’s impossible to Justify text or a paragraph in Microsoft Word. What we do know is that this is a common problem, which is why we are confident the fixes were going to discuss will work.
What is paragraph alignment in Microsoft Word?
Paragraph alignment is basically a font formatting technique that can be used before or after writing a text. With this feature, users can Align Left, Right, Center, and Justify.
How do I get my paragraphs to line up in Word?
This is super easy. Simply place the insertion point at the preferred spot in the paragraph, document, or table that you wish to align. From there, you must press CTRL + I. If you want to align the text right, press CTRL + R, and if left is the best option, then hit CTRL + L, and that’s it.
Read: How to remove a Watermark in Microsoft Word.
DeRieux
-
#1
Version: 2008
Operating System: Mac OS X 10.5 (Leopard)
Processor: intel
I do not know how else to describe this. I am creating a document in Word using the notebook side of the program. Well I want my text to line up on the next line to coordinate with text on the top line. The text is not lining up. Any thoughts on how I can fix this? I tried typing in the exact same spacing and words as the top line to see if that made a difference, but it didn’t. Is there a setting I can adjust to fix this? Thanks!
DeRieux
Advertisements
CyberTaz
-
#2
Have you changed your font size to be different from the default (12 pt.)?
If so you’ll have to adjust the Rule Lines — Distance: value in teh
Formatting Palette of the Toolbox accordingly. About 125% of the font size
(give or take a point) seems to work pretty well. The two values are
obviously related but they don’t adjust in unison or automatically.
Want to reply to this thread or ask your own question?
You’ll need to choose a username for the site, which only take a couple of moments. After that, you can post your question and our members will help you out.
Ask a Question
Table of Contents
- How do I fix bullet alignment in Word?
- How do I turn on automatic numbering in Word?
- How do I fix number alignment in Word?
- How do you align text in Word?
- What is page number alignment?
- What is word aligned?
- How do I indent without tab?
Right-click, and then click Adjust List Indents. Change the distance of the bullet indent from the margin by clicking the arrows in the Bullet position box, or change the distance between the bullet and the text by clicking the arrows in the Text indent box.
How do I fix bullet alignment in Word?
Click one of the alignment options, which are small icons with tiny lines, in the “Paragraph” section of the ribbon/toolbar. Click the “Right Alignment” button to right-align the bullets, click the “Center Alignment” button to center the bullets.
How do I turn on automatic numbering in Word?
Turn on or off automatic bullets or numbering
- Go to File > Options > Proofing.
- Select AutoCorrect Options, and then select the AutoFormat As You Type tab.
- Select or clear Automatic bulleted lists or Automatic numbered lists.
- Select OK.
How do I fix number alignment in Word?
Word doesn’t align the numbers as expected.
- Click anywhere inside the list.
- From the Numbering dropdown (in the Paragraph group), choose Define New Number Format (at the bottom).
- In the resulting dialog, change the Alignment setting from Left to Right, as shown in Figure G.
How do you align text in Word?
Change text alignment
- Place the insertion point anywhere in the paragraph, document, or table that you want to align.
- Do one of the following: To align the text left, press Ctrl+L. To align the text right, press Ctrl+R. To center the text, press Ctrl+E.
What is page number alignment?
If you let Word create a table of contents, table of figures, or index for you, you will see that, by default, it puts the page numbers at the right page or column margin, with a row of dots between the titles and the page numbers. To do this, it uses a right-aligned tab stop with a period leader.
What is word aligned?
Bitext word alignment or simply word alignment is the natural language processing task of identifying translation relationships among the words (or more rarely multiword units) in a bitext, resulting in a bipartite graph between the two sides of the bitext, with an arc between two words if and only if they are …
How do I indent without tab?
Don’t use Tab to indent paragraphs in a Word document
- From the Format menu, choose Paragraph.
- Click the Indents And Spacing tab.
- In the Indention section, select First Line from the Special control’s drop-down list.
- Specify the size of the indention using the By control’s drop-down list.
 One of the most common mistakes that people make while formatting a document in Word is to use spaces to align text. Many of us have been frustrated by things not lining up perfectly, and we’re left dissatisfied by the slightly meandering edges.
Because proportional-font characters take up different amounts of space, the text in that font cannot be aligned correctly using spaces. Using tabs will ensure that your text is aligned perfectly and is easy to modify if you change your mind!
The chief advantage to using tabs rather than spacing is that after the tabs are in your document, you can move or change the tab stops and then the selected text moves or realign. Each of the tab settings that you create or modify are specific to that paragraph. And remember, a new paragraph is created every time you press Enter. That means that you’ll have to select multiple paragraphs and create tabs stops for all of them, or you could create different tab stops for different paragraphs to get that perfect look!

Word documents are set up with default tab stops every 1/2-inch across the document, but you can set your own tab stops anywhere you choose. In fact, there are several different types of tab stops that you can use. Ever wonder what that little button in the upper-left where the rulers intersect does? You can click it and toggle through the tab options!
Left-aligned: Begins test at the tab stop (This is the default tab setting).![]()
![]() Center-aligned: Centers text on the tab stop.
Center-aligned: Centers text on the tab stop.
![]()
Right-aligned: Ends the text at the tab stop.
![]()
Decimal: Center the text over decimal point for a list of numbers.
![]() Bar: Creates a vertical line through a selected paragraph at the tab stop.
Bar: Creates a vertical line through a selected paragraph at the tab stop.
To try this out for yourself, you’ll want the ruler to be visible. Simply click on the View Tab and check the Ruler box in the Show Group.
Watch our Word Expert demystify the power of tab stops and perfect alignment! You can even create leaders to help the reader easily scan across the page.
Update: 5/10/2017
We had a site visitor (thank you William) recently ask about aligning text to the right of a page. We thought a short video would help users that would like to accomplish what William was requesting. We hope this helps you too.
We’ve got all sorts of Microsoft Office training available. Check out our free trial to see our many videos and attend a free training webinar taught by an expert.
You might also like…
Topics:
Word
Most of the time, we want the text in a Microsoft Word document to automatically wrap, that is, to move to the next line when it is too long to fit on one line. Word wrap is great, except when it breaks up text we want to stay together, such as dates, names, phone numbers, phrases, formulas, titles, or other text that should remain together on the same line. Fortunately, Word has some easy ways to keep text together. To learn these tricks to keep text together in Microsoft Word, continue reading or watch my how-to video:
 Some examples of text you might want to keep together and not break up on separate lines:
- September 2, 2019
- Christopher A. Jones, Ph.D.
- (555) 123-4567
- State-of-the-art
Your options for keeping text together in Microsoft Word include:
- Non-breaking spaces
- Non-breaking hyphens
- Non-breaking paragraphs & lines
Non-Breaking Spaces & Non-Breaking Hyphens
The common solution: what most people do to keep text together is move to the beginning of the text and press [Enter] to start a new line. This is fine until any of the text changes and causes breaks in the wrong place. Now you’re wasting time going back to remove these extra lines when you no longer need the forced break to the text. And this manual approach doesn’t work well if you have paragraph formatting or styles that add space between paragraphs.
The right solution: keep text together with special characters. Specifically, delete the spaces or hyphens and replace normal spaces and hyphens with non-breaking spaces or non-breaking hyphens:
- Non-breaking space: [Ctrl] + [Shift] + [Spacebar]
- Non-breaking hyphen: [Ctrl] + [Shift] + [Hyphen]
As the name implies, non-breaking characters connect the text together, and the entire phrase or group of characters will all automatically move to the next line together but only as needed.
To view non-breaking space and hyphen characters in a document, click Show/Hide in the Paragraph group (Home tab). Word represents non-breaking space characters with a degree symbol (°) and non-breaking hyphen characters with a double‑length hyphen (these are a bit harder to distinguish from regular text).
Non-Breaking Paragraphs and Lines
Next, let’s go one step further. When you don’t want a paragraph or even several lines of text to break between two pages, don’t press multiple [Enter] keys to move the text to the next page. Instead, try the following Word techniques to keep text automatically together:
- Select the paragraph or section of text you want to keep together.
- On the Home tab in Word, click the Paragraph group’s dialog launcher (the small arrow at the bottom-right of the group).
- Pick the Line and Page Breaks
- Check the Keep lines together option, and click OK.
- If you have multiple paragraphs selected, for instance, a title with following text, also click on Keep with next which will keep the paragraphs together on the same page.
Bonus Word Tricks
To find non-breaking spaces and non-breaking hyphens in your text, use the Find feature as follows:
- On the Home tab, click the Find icon in the Editing group on the right or press the keyboard shortcut [Ctrl] + F.
- In the Navigation Pane to the left, enter one of the following: ^s to find non-breaking space; ^~ to find non-breaking hyphens.
- Use the Navigation Pane to move through the results.
Make sure you have the Show/Hide non-printing characters features turned on so you can see the hidden characters for these non-breaking symbols.
Discover more ways to save time editing and formatting your Word documents at: TheSoftwarePro.com/Word.
© Dawn Bjork, MCT, MOSM, CSP®, The Software Pro®
Microsoft Certified Trainer, Productivity Speaker, Certified Speaking Professional
Dawn Bjorkhttps://www.TheSoftwarePro.com
A Microsoft Certified Trainer (MCT) and Certified Speaking Professional (CSP), Dawn Bjork is known as The Software Pro® for her work as a productivity speaker, software trainer, virtual presenter, and author of numerous training courses and videos. In addition to these credentials, Dawn is also a certified Microsoft Office Specialist Master (MOSM) and Certified Virtual Presenter (CVP).
When she’s not busy sharing her expert knowledge on software with the world, Dawn can be found hiking the Colorado mountains, trying to master Pilates, or attempting to play golf.
Table of Contents
- 1 Why are my columns not lining up in Word?
- 2 What if columns are not aligned?
- 3 How do I align text in two columns in Excel?
- 4 How do I check for lists against each other in Excel?
- 5 How do you compare two lists in python and return Non matches?
- 6 How does kotlin compare two ArrayLists?
- 7 How do you remove duplicates from a linked list?
Why are my columns not lining up in Word?
Double-check the column settings you have in place to make sure the formatting is configured as required. Select the section of the text you’re working with, then choose “Columns” and “More Columns” from the Page Layout menu tab.
What if columns are not aligned?
When columns are not aligned vertically this does not happen resulting in transfer of loads to other structural members which may not be designed for such type of un anticipated loads. This may weaken or cause failure to structure.
How do I get columns to line up in Word?
Select the cells, columns, or rows, with text that you want to align (or select your entire table). Go to the (Table Tools) Layout tab. Click an Align button (you may have to click the Alignment button first, depending on the size of your screen).
How do you match data in Excel from 2 columns and align?
Aligning duplicates on the same rows in Excel
- Insert a new column between columns ‘A’ and ‘B’
- Paste the formula shown above in cell ‘B1’ and drag the formula down to the last populated cell in column A.
- All values in column C will be brought over to column B and aligned with values in column A.
How do I align text in two columns in Excel?
Right-click and then select “Format Cells” from the popup menu. When the Format Cells window appears, select the Alignment tab. Click on “Center Across Selection” in the drop-down box called Horizontal. Now when you return to your spreadsheet, you should see the text centered across the cells that you selected.
How do I check for lists against each other in Excel?
How to check if one list against another in Excel?
- In the adjacent cell to the first list you want to check, type this formula =IF(ISNA(VLOOKUP(A2,$C$2:$C$6,1,0)),”No”,”Yes”), and drag fill handle down to the cells you want to check.
- Click Kutools > Select > Select Same & Different Cells.
- D:
How do you check if a number is repeated in a list Python?
Using Count() The python list method count() returns count of how many times an element occurs in list. So if we have the same element repeated in the list then the length of the list using len() will be same as the number of times the element is present in the list using the count().
How do you compare two lists equal in Python?
Check Equality of Lists in Python Using the Equality == Operator. A straightforward way to check the equality of the two lists in Python is by using the equality == operator. When the equality == is used on the list type in Python, it returns True if the lists are equal and False if they are not.
How do you compare two lists in python and return Non matches?
- Using Membership Operator. We can compare the list by checking if each element in the one list present in another list.
- Using Set Method.
- Using Sort Method.
- Return Non-Matches Elements with For Loop.
- Difference Between Two List.
- Lambda Function To Return All Unmatched Elements.
How does kotlin compare two ArrayLists?
Compare two lists in Kotlin for equality
- fun isEqual(first: List, second: List): Boolean {
- if (first. size != second. size) {
- return false.
- }
- return first. zip(second). all { (x, y) -> x == y }
How do you know if two Hashmaps are equal?
If we want to compare hashmaps by keys i.e. two hashmaps will be equals if they have exactly same set of keys, we can use HashMap. keySet() function. It returns all the map keys in HashSet. We can compare the hashset of keys for both maps using Set.
Which is better ArrayList or linked list?
ArrayList is faster than LinkedList if I randomly access its elements. ArrayList has direct references to every element in the list, so it can get the n-th element in constant time. LinkedList has to traverse the list from the beginning to get to the n-th element. LinkedList is faster than ArrayList for deletion.
How do you remove duplicates from a linked list?
Algorithm
- Create a class Node which has two attributes: data and next.
- Create another class RemoveDuplicate which has two attributes: head and tail.
- addNode() will add a new node to the list:
- removeDuplicate() will remove duplicate nodes from the list.
- display() will display the nodes present in the list:
You shall already know the method to underline text in Word. But addition to this, you may also have the demand to overline specified characters sometimes. For example, if you want to enter an average number in a mathematical document, a short line over a given variable is necessary.
In this post, I will provide several simple methods based on Word 2016.
1. Insert Shapes
The most direct way is to draw a line over the specified text.
Click Insert – Shapes. Find the icon of straight line in Lines.

Select it. Drag your cursor to draw a straight line over the text.
![]()
Then you can choose the color and effect of the line you drew.


The bright spot of this method is the high degree of freedom. You can draw any kind of line in anywhere you want.
2. Borders
You can also regard the overline as a part of a border.
First, select the text and find the icon of Borders in Home tab.

Click the small triangle beside it to see the drop-down list, choose Top Border.

Then a overline is added to the whole row.

Adjusting the width of it requires you to use the horizontal Ruler. You can enable it by checking Ruler in View tab.

Put your cursor at the row of the text you want to overline. Then drag the small triangle on the ruler to adjust the length of the line.


3. Equation Editor
Click Insert – Equations to enable the Equation Tools in Design, and a textbox will be added to your document.

Click Accent in Design (Equation Tools) tab, select Bar in Accent or Overbar in Overbars and Underbars.

Then the underline will be inserted in the equation textbox. You can click the dotted pane to input any text you want.


Copyright Statement: Regarding all of the posts by this website, any copy or use shall get the written permission or authorization from Myofficetricks.

on
February 22, 2021, 12:31 PM PST
How to prevent text from wrapping in a Word document
Microsoft Word’s automatic word wrap is convenient but sometimes unwanted. Here are two ways to keep text from breaking at the end of a line.

Microsoft Word automatically wraps from the end of the current line to the beginning of the next as you type. If you insert or delete text, everything automatically adjusts to accommodate the change. You don’t even think about it as you work. As convenient as this behavior is, you won’t always want to wrap text when Word does. In this article, I’ll show you two easy ways to force Word to keep text together instead of breaking it in the middle by inserting nonbreaking characters.
I’m using Microsoft 365 on a Windows 10 64-bit system, but you can use earlier versions. There’s no demonstration file; you won’t need one. The browser edition supports existing nonbreaking characters, but you can’t enter them.
How to insert a nonbreaking space in Word
Some words need to stay together. For example, you might not want to separate a street number from the street name, or you might want to keep a person’s first and last name together. These are more choice than need, but Word gives you the control. When wanting to keep words together, insert a nonbreaking space instead of a regular space between the words.
To insert a nonbreaking space, press Ctrl+Shift+Spacebar—it really is that easy. Now, let’s look at a simple example. Figure A shows “Jane Doe, Ph.D” separated at the right margin. To keep the name together, remove the space between Jane and Doe and press Crl+Shift+Spacebar. Next, delete the space between the comma and Ph.D and press Ctrl+Shift+Spacebar. As you can see in Figure B Word couldn’t keep the three words together on the first line, so it forced the group to the next.
Figure A

Figure B

The results of adding the second nonbreaking space aren’t apparent; without it, Word will pull Doe up to the end of the first line and wrap “Ph.D” to the beginning of the second line if you delete a word in the first line. Because of the initial position, you might not think you need the second nonbreaking space, but remember, you don’t know where those three words will end up in the final document.
Keeping a space from breaking works with whole words, but what can you do if you don’t want Word to wrap a hyphenated word at the right margin? That’s what we’ll learn next.
How to insert a nonbreaking hyphen in Word
In purpose, a nonbreaking hyphen is the same as a nonbreaking space, but it keeps Word from breaking a hyphenated word at the hyphen when wrapping at the right margin. By inserting a nonbreaking hyphen instead of a regular hyphen, Word will force the entire word to the next line rather than wrap at the hyphen. Don’t confuse this character with hyphenation in general. This character works whether hyphenation is enabled or not; they aren’t the same thing at all.
To enter a nonbreaking hyphen, press Ctrl+Shift+-. Now, let’s look at a simple example. Figure C shows the word “x-ray” wrapping at the right margin. To keep that hyphenated word together, delete the hyphen character and press Ctrl+Shift+-. As you can see in Figure D, Word forces both sides of the hyphen to the beginning of the next line.
Figure C

Figure D

How to find nonbreaking characters in Word
Removing these two special characters isn’t difficult if you know where they are. To see them, click Show/Hide in the Paragraph group (on the Home tab). Figure E shows what they look like. Specifically, the degree symbol (°) represents a nonbreaking space, and a longer hyphen represents a nonbreaking hyphen. Unfortunately, the latter is difficult to detect. You can use Word’s Find feature instead. Press Ctrl+F and enter ^s to find a nonbreaking space and ^~ to find a nonbreaking hyphen.
Figure E

Stay tuned
Once you’re familiar with these two characters, you’ll probably start inserting them as you type content rather than making a substitution later. The process quickly becomes a bit intuitive. In a future article, I’ll show you how to keep lines and paragraphs together in two ways: manually applying a property and adding that property to a style.
Also See
-
How to become a software engineer: A cheat sheet
(TechRepublic) -
Zoom vs. Microsoft Teams, Google Meet, Cisco WebEx and Skype: Choosing the right video-conferencing apps for you (free PDF)
(TechRepublic) -
Hiring Kit: Application engineer
(TechRepublic Premium) -
Microsoft 365 (formerly Office 365) for business: Everything you need to know
(ZDNet) -
Must-read coverage: Programming languages and developer career resources
(TechRepublic on Flipboard)
-
Microsoft
-
Software