
-
Place your cursor at the spot where you want to insert the symbol.
-
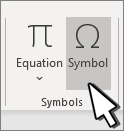
Go to Insert > Symbol.

-
Select a checkmark symbol to insert or do the following
-
Select More Symbols.
-
Scroll up or down to find the checkmark you want to insert.
-
Different font sets often have different symbols. Use the Font selector above the symbol list to pick the font you want.
-
-
Double-click the symbol to insert it into your document.
-
Select Close.
Tip: If you want to make your checkmark larger or smaller, select it and use the Font Size setting.
-
Place your cursor at the spot where you want to insert the checkmark.
-
Go to Insert > Advanced Symbol > Symbols.
-
Choose the checkmark symbol that you want.
-
Select Insert.
-
Select Close
In a printed document, characters such as spaces, tabs and paragraph marks are invisible. However, Word lets you display such formatting marks on the screen. Formatting marks are also known as nonprinting characters or codes.
In this article you will learn how the formatting marks work and why they are useful.
Latest updated 22-Oct-2019. Video renewed in order to work without using Adobe Flash Player.
The basics about formatting marks
Some of the basic formatting marks
When formatting marks are turned on, you will see spaces, tabs, paragraph marks and other formatting marks on the screen. Some of the basic formatting marks are illustrated below.

Keyboard shortcut
Ctrl+Shift+8 can be used to turn formatting marks on and off.
You can also turn formatting marks on and off by clicking the pilcrow symbol ¶ on the Home tab of the Ribbon (found in the Standard toolbar in Word 2003).
Where to find the options for formatting marks:
- Word 2010 and later versions: File > Options > Display
- Word 2007: Office button > Word Options > Display
- Word 2003: Tools > Options > View tab
For an introduction to the formatting marks and for information about how to turn them on and off, view the video below.
View video — see how formatting marks work
Note that the video below was originally made using Word 2003. The formatting marks work the same way in Word 2007 and later versions of Word. Information about where to find options for formatting marks in Word 2007 and later versions has been added in the video. You will also find that information in written text in this article.
Visible formatting marks help you keep track of formatting
Many users who are not familiar with formatting marks get confused if they by incident turn on the formatting marks. However, if you need to control the formatting of documents down to the last detail, visible formatting marks are a must.
It may take some time getting used to work with visible formatting marks but it is well worth the effort.
About display of text boundaries
In addition to the formatting marks, the video illustrates how the option Text boundaries works. In Word 2003, Word 2007 and Word 2010, you can turn on text boundaries to have dotted lines shown around margins. This is very useful for layout purposes. Unfortunately, Word 2013 and newer Word versions display text boundaries as dotted lines around each paragraph instead which makes the option very little useful in those versions of Word.
Where to find the option for text boundaries:
- Word 2010 and later versions: File > Options > Advanced > Show document content group > Show text boundaries
- Word 2007: Office button > Word Options > Advanced > Show document content group > Show text boundaries.
- Word 2003: Tools > Options > View tab > Text boundaries
Hide Paragraph Marks (¶) and Other Nonprinting Symbols in Microsoft Word
by Avantix Learning Team | Updated April 5, 2021
Applies to: Microsoft® Word® 2010, 2013, 2016, 2019 and 365 (Windows)
You can show or hide paragraph marks (¶) or symbols and other nonprinting characters (such as tabs, spaces and soft returns) in your Microsoft Word documents using the Ribbon or a keyboard shortcut. It’s generally a good idea to display paragraph marks and other formatting symbols when working on Word documents. Formatting symbols display only on screen and do not print.
Recommended article: How to Quickly Remove Hard Returns in Word Documents
A paragraph in Word is anything with a hard return after it (you have pressed Enter or Return).
The following symbols are typically displayed when you turn on formatting symbols :
Paragraph – 
Space (dot) – .
Tab – →
In the following sample Word document, Show/Hide ¶ is turned on:

Hiding paragraph marks and other nonprinting symbols using the Ribbon
To show or hide paragraph marks and other nonprinting symbols in Word using the Ribbon:
- Click the Home tab in the Ribbon.
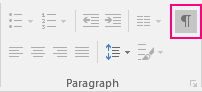
- In the Paragraph group, click ¶ (Show/Hide ¶).
Below is the Paragraph group in the Ribbon:

Hiding paragraph marks and other nonprinting symbols using a keyboard shortcut
To show or hide paragraph marks and other nonprinting symbols in Word using a keyboard shortcut, press Ctrl + Shift + 8 (the asterisk key at the top of the keyboard).
When you display formatting symbols, Word will also display manual page breaks and section breaks in your document.
Subscribe to get more articles like this one
Did you find this article helpful? If you would like to receive new articles, join our email list.
More resources
How to Insert a Watermark in Word (like DRAFT)
How to Insert Today’s Date in Word (with Shortcut)
14 Shortcuts to Quickly Select Text in MIcrosoft Word
How to Find and Replace in Word (and Use Wildcards)
How to Keep Text Together in Word (Paragraphs, Lines or Word)
Related courses
Microsoft Word: Intermediate / Advanced
Microsoft Excel: Intermediate / Advanced
Microsoft PowerPoint: Intermediate / Advanced
Microsoft Visio: Introduction
VIEW MORE COURSES >
Our instructor-led courses are delivered in virtual classroom format or at our downtown Toronto location at 18 King Street East, Suite 1400, Toronto, Ontario, Canada (some in-person classroom courses may also be delivered at an alternate downtown Toronto location). Contact us at info@avantixlearning.ca if you’d like to arrange custom instructor-led virtual classroom or onsite training on a date that’s convenient for you.
Copyright 2023 Avantix® Learning
Microsoft, the Microsoft logo, Microsoft Office and related Microsoft applications and logos are registered trademarks of Microsoft Corporation in Canada, US and other countries. All other trademarks are the property of the registered owners.
Avantix Learning |18 King Street East, Suite 1400, Toronto, Ontario, Canada M5C 1C4 | Contact us at info@avantixlearning.ca
Как использовать маркеры в ворде?
Когда при работе с текстовым редактором Microsoft Wordнам нужно выделить какие – либо отдельные кусочки текста, например когда мы пишем о видах чего – либо, перечисляем что — либо или просто выделяем определенный абзац и по каким – либо причинам не хотим использовать циферную нумерацию можно использовать маркеры в ворде.
Что такое маркеры? Это в принципе то же самое, что циферная нумерация, только в место цифр, здесь используются разнообразные миниатюрные графические иконки. Маркеры как и циферная нумерация ставится сразу около нового абзаца и могут ставится до бесконечности, то есть у вас, если это нужно, может быть хоть весь документ в маркерах.
Как вставить маркеры в ворде?
Это делается очень просто и быстро. Вам нужно открыть документ, в котором нужны маркеры, набрать в этом документе абзацы для маркировки, выделить этот текст и перейти в верхнее меню программы (см. скриншот) и выбрать нужный вам маркер (я открыл меню маркеров, чтобы вы могли увидеть их все), как только вы нажмете на маркер, текст будет промаркирован.

Как сделать свой маркер в word?
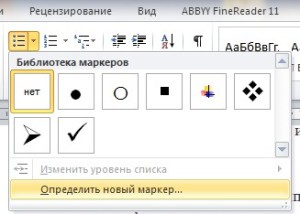
Как вы видите, маркеров доступно слишком ограниченное количество. То есть каких – то особых символов в списке нет, но они там и не нужны. Каждый пользователь может сам определить себе символ, который будет служить маркером. (Также вы этом меню вы можете определить, где будет находится ваш маркер, слева как обычно, по центру или даже справа). Для этого вы опять открываете меню маркеров и находите там пункт, который называется «определить новый маркер».
 Перед вами появится окошечко настройки нового маркера. Здесь вы можете определить новый символ в библиотеке символов ворда для маркера или выбрать новый рисунок опять – же из библиотеки рисунков ворда.

Если нужного вам графического изображения не нашлось, вы можете загрузить изображение маркера с вашего компьютера в этом же меню. (Это находится в «Рисованный маркер»-«Импорт»).
Старайтесь использовать маркеры в тексте там, где это возможно и уместно, так вы сделаете свой текст намного более читаемым и понятным.
Посмотрите также

Как удалить пустую страницу в ворде?
Сегодня многие пользуются ПК. Однако далеко не все знают как правильно им пользоваться. Эта умная …
As we know in MS Word there is a lot of so-called «formating characters”: spaces, tabs, paragraph breaks ets. We can see them by toggling Show/Hide formating characters button:

This button has a ScreenTip «Show/Hide ¶.” and in Word 2007
is in the Paragraph group on the Home tab.). So, the shortkeys are (Ctrl+*) and (Ctrl+Shift+8).When turn on showing nonprinting characters, you see many «interesting» symbols. So what do all these marks represent?
Paragraph marks
The paragraph mark or pilcrow (¶) represents a paragraph break. You should
see one at the end of each paragraph (if there is not one, you’ll likely find
that you have a problem). Ordinarily you should not see one anywhere else. By
this I mean that you should not be ending lines with paragraph breaks, nor
should you be using «empty paragraphs” to create «blank lines” between
paragraphs (in most cases this is better accomplished with Space Before or
After).
The ¶ contains all the paragraph formatting. You can select it, copy it, and
paste it onto another paragraph to copy and paste formatting (though there are
other ways to do this as well). The last ¶ in the document contains formatting
for the entire document (header/footer and margin information, for example) or
for the last section if there are more than one.
Line breaks
A right-angle arrow pointing to the left
![]()
represents a line break, inserted with Shift+Enter. You
can use a line break to start a new line without starting a new paragraph.
A right-angle arrow between two vertical lines
![]()
represents a text-wrapping break. This new break type, introduced in Word
2000 and intended primarily for Web pages, is used to force subsequent text
below an adjacent text-wrapped object. For example, if you have a caption beside
a picture and end it with a text-wrapping break, the text following the caption
will start below the picture regardless of how long or short the caption is.
Pagination breaks
More obvious in their meaning are manual column, page, and Section Breaks. To
delete these, you can simply select them and press the delete key (or you can
use
Find and Replace). The examples below show how they appear in Word 2003 and
earlier; the display is a little different (but still recognizable) in Word
2007.
![]()
![]()
![]()
![]() Finally,
Finally,
you will sometimes see a small black bullet
![]() in
in
the margin next to a paragraph.
This indicates that the paragraph is formatted with the «Keep with
next,” «Keep lines together,” «Page break
before,” or «Suppress line numbers” property.
These settings are found on the Line and Page Breaks tab of
the Paragraph dialog (Format | Paragraph in
Word 2003 or earlier; accessed through the dialog launcher in the bottom right
corner of the Paragraph group on the Home tab
in Word 2007); if you double-click on the «bullet” itself, you will bring up
this dialog with the Line and Page Breaks tab selected. Word’s built-in Heading
styles by default are formatted as «Keep with next,” so you will always see
these bullets next to them.
Space characters
In most fonts, and certainly all Windows «core fonts”, a∙
small∙
raised∙ dot∙
represents∙
an∙ ordinary∙
space∙ (some∙
fonts,∙ such∙
as∙ Arial
Special G1, don’t
include a character
to represent a space;![]() and
and![]() some
some![]() use
use![]() a
a![]() large
large![]() square,
square,
which can be very distracting).
Be sure you don’t have space ∙ ∙
characters ∙ ∙
where ∙ ∙ they are
∙ ∙ not
∙ ∙ needed. If you are tidy-minded, for
example, you won’t want a string of them at the end of a paragraph where your
thumbs relaxed on the spacebar while you stopped to think.∙
∙ ∙ ∙ ∙ ∙ ∙ ∙ ∙ ∙ ∙ ∙ ∙
A degree symbol °
represents a nonbreaking space (Ctrl+Shift+Spacebar), which you
can use to prevent words from being separated at the end of a line.
This is useful for keeping dates together (so you don’t end up with September
5, 2000), as well as initials such as J. P.
V. D. Balsdon.
En and em spaces (on the Special Characters tab of the
Symbol dialog) are also represented by the degree symbol, but
there is extra space to the left of the symbol for an en space
°and extra space both left
and right for an em °
space.
Tabs
An arrow pointing to the right →
represents a tab character, where you have pressed the Tab key. As
explained in the article on
setting tabs,
in a well-formatted document you should not see more than one of these in a row.
→ → →
Hyphens
A conditional hyphen (one that is printed only if it falls at a line break,
entered with Ctrl+Hyphen) is shown as ¬.
A nonbreaking hyphen (Ctrl+Shift+Hyphen), which is useful for phone numbers
and any hyphenated compound you don’t want to break at the end of a line, is
displayed as a dash whose length is intermediate between an en (–) dash and an
em (—) dash. This is one of the most confusing symbols because it is very
difficult to tell, with nonprinting characters displayed, whether you have
actually entered a nonbreaking hyphen or a dash.
Cell markers
In tables you will see one additional character, the universal monetary
symbol (¤), which displays variously at various point sizes and magnifications
but upon close inspection is seen to be a circle with four lines radiating from
the corners. ¤
| This is the end-of-cell marker. It is a little like the paragraph mark in that it contains paragraph formatting for the last (or only) paragraph in the cell, but it also holds formatting for the cell. The same mark at the end of each row is the (wait for it) end-of-row |
¤ |
Hidden text
One other type of «nonprinting character” that is toggled by the Show/Hide
button
![]()
is Hidden text.
![]()
Even when it is displayed, Hidden text is not printed unless you check the
box for it on the Print tab of Tools | Options (in Word 2007, this setting is at
Office Button | Word Options | Display: Printing options)
There are a number of clever formatting tricks you can do by formatting text
(especially paragraph breaks) as Hidden, but you must hide it in order to see
how the document will look when printed. It is especially important to hide it
before generating a table of contents or index; if there is enough of it to
affect the pagination, then the page numbers in your TOC or index may be
incorrect. Note in particular that the XE (index entry) fields
used to generate an index and the TC fields that can be used to
generate entries in a TOC are formatted as hidden text, so it is important to
hide these before generating the index and TOC.
Coloured underlines
In addition to the dotted underline indicating hidden text, Word uses a
variety of different types of colored underlines—solid, dotted, and wavy—to give
information about the text. For an explanation of the meaning of these various
underlines, see the Help topic «What do the underlines in my
document mean?” or the Microsoft Knowledge Base article «Unusual
marks that may appear in a Word document.”
Anchors
Another very important nonprinting character is the
anchor symbol –
when working with
floating objects it’s often crucial to know where these are
![]()
There are two other types of nonprinting characters that are not (usually)
toggled with the Show/Hide ¶ button:
Field codes
A field is a set of codes that instructs Microsoft Word to
insert text, graphics, page numbers, and other material into a document
automatically. For example, the
DATE field
inserts the current date. Ordinarily Word displays the result of a field (the
date, page number, number of pages, number of words, etc.), but if you press
Alt+F9 or select Toggle Fields on the shortcut
menu, you will see the code itself, enclosed in curly braces, such as { DATE @ «dddd, MMMM d» }.
As mentioned above, there are two types of field codes that are toggled with
the Show/Hide ¶ button rather than the Toggle Fields command.
Both TC (table of contents entry) and XE
(index entry) fields are formatted as Hidden text; when you insert either type
of field, the display of nonprinting characters is toggled on by default so that
you can see these codes.
Bookmarks.
When the box for «Bookmarks ” is checked on the View tab of
Tools | Options (in Word 2007, find this setting at
Office Button | Word Options | Advanced: Show document content),
user-defined bookmarks are indicated by heavy square gray brackets. A
single-point bookmark has the brackets reversed so that it looks like a capital
I.

Even if you choose to keep nonprinting characters hidden most of the time,
displaying them can be very helpful in
troubleshooting
obstreperous documents. If your pages are not breaking as you like, perhaps
it is because you have too many (or the wrong) paragraphs set as «Keep with
next.” If your printer is
adding a blank page
at the end of your document, it could be that you have a string of empty
paragraphs at the end that are forcing an extra page. Accidentally deleting the
paragraph break before a manual page break or Section Break can cause very
peculiar problems. And if an automatic number insists on being bold even though
you have applied bold formatting to only a part of the numbered paragraph, it
could be that you need to select the paragraph mark and unbold it, since
automatic bullets and numbering take on the formatting of the paragraph mark.
All of these problems are much easier to diagnose if you can see what you’re
dealing with.
In general, it’s best to proofread your documents twice; once for content,
with nonprinting characters off (as they can be distracting when reading); and a
second time with nonprinting∙
characters ∙
visible, ∙ so
∙ that
∙ you
∙ can
∙ check
∙ for redundant
![]()
line breaks, space ∙ ∙ ∙
characters ∙ and
∙ the like.
Microsoft Word as we all know has been the most used Word processing application worldwide. Formatting marks in Word is a very useful feature for aligning your Word document into an organized structure.
Microsoft Word comes with the formatting marks feature in which the formatting marks reveal spaces, tabs, and paragraph breaks in your document. Spaces are shown as a dot between words and punctuation, tabs are shown as arrows, and paragraphs are shown with the paragraph symbol.
If you are wondering how to show formatting marks in your Word document, this article is for you. In this read-up, you will learn effective methods on how to display formatting marks in Word documents.
There are two approaches to go about showing formatting or paragraph marks in Word:
- Using the button on the Paragraph ribbon to show formatting on Word
- Utilizing Word – Option to show formatting marks in your Word document.
- Show formatting marks on Word in Mac
Method 1: Show formatting on Word Using the button on the Paragraph ribbon
Using the button, you can toggle the display of the marks and it only affects currently opened documents. To implement Paragraph ribbon
- Press on Control + Shift + *. Press those three keys to activate Paragraph ribbon formatting marks.
- Alternatively, click the Home tab: and paragraph mark as mentioned in the below image.

Note – By pressing Control + Shift + * alternatively you can hide or show the formatting marks on the Word.
Method 2: Show formatting marks in your Word document using Word options
- Go to File

- Click on Options > Display
- Once you click on the Display option, in the left-hand menu and you’ll see a section called Always show these formatting marks on the screen.

- Under Always show these formatting marks on the screen, select the check box for each formatting.
Method 3: How to show formatting marks on Word on Mac
- Go to Word > Preferences > View
- Under Sow Non-printing characters, select the check box for each formatting mark that you always want to display regardless if the show/hide button is turned on or off.
Though the above-mentioned methods are simple and effective ways to show formatting marks on your Word while implementing these procedures If you happened to accidentally damage or corrupt your Word document you will need an effective Word repair tool to resolve the issue
Remo Repair Word is the right solution to repair such Microsoft Word documents. It scans and extracts the text from damaged or corrupt Word files (.doc, .docx) that may refuse to open. Once a file is repaired using Remo Repair Word, the extracted text can be saved in a new healthy blank Word file. The tool is capable of resolving multiple issues like Word file crashing, unable to open, and other scenarios
- Repairs all types of DOC and DOCX files
- Repairs DOC files, which refuse to open due to any corruption
- Repair and recovers text, formatting, OLE objects, and fields including hyperlinks from corrupt DOC files
- Once the repair process is over, you can preview the lost data that can be recovered from the damaged / corrupt Word file


Conclusion
The article summarizes how to show the formatting marks on your Word document with the effective manual solutions provided in the above section. In case of Word file corruption, you can always utilize a reliable Word repair tool like Remo Repair Word. If you have any further queries regarding the article, make use of the comment section below.
Tony Landry is a Web Content Editor at Remo Software. He loves to write, edit, and manage content for users trying to troubleshoot and fix problems on Windows, Outlook, storage drives and Cloud storage networks.
He has published more than 200 articles in Remo Software blog. He actively engages in research and problem-solving techniques to consistently generate great web content. Fixing various hardware problems on computer and storage devices along with a great knack for fixing Outlook errors, Tony is also the fun-time IT guy for all his work friends. He lives in the San Francisco Bay Area and enjoys cycling.
Articles: 199
Formatting marks like dots (…) for spaces or arrows (→) for tab characters are used in Word to show the text layouts of documents. You might find these formatting marks useful when you’re designing content with a specific look in mind.
Note: Publisher uses some formatting marks.
What are formatting marks?
Formatting marks are a set of symbols that provide a visual representation of specific formatting in a document.
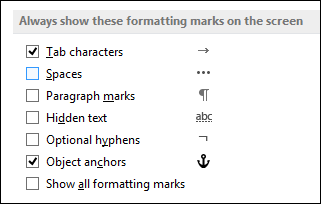
Tab characters
Display tab characters as arrows.
Spaces
Display spaces between words as dots.
Paragraph marks
Display the ends of paragraphs with the paragraph symbol.
Hidden text
Display a dotted line under text that is formatted as hidden.
Optional hyphens
Display hyphens that indicate where to divide a word at the end of a line. Optional hyphens are not printed unless a word actually breaks at the end of a line. When a word breaks at the end of the line, the optional hyphen is printed as a regular hyphen.
Object anchors
Display object anchors, which indicate that an object is attached to a specific paragraph.
Optional breaks
Control where a word or phrase breaks if it falls at the end of a line. If you use Word with an East Asian language, this option prevents the incorrect breaking of text. This option is available only if an East Asian language is enabled for editing text.
Show (turn on) or hide (turn off) formatting marks in a document
The Show/Hide button is like a switch that lets you turn on or turn off a view.
-
On the Home tab, in the Paragraph group, choose Show/Hide.
Note: The background of the Show/Hide button is shaded when it’s turned on.
Turn on the display of formatting marks
You can choose which formatting marks always are displayed on the screen, regardless if the Show/Hide button is turned on or turned off. For example, you can display paragraphs and spaces at all times, but can hide tab characters and hidden text when Show/Hide is turned off.
Note: The background of the Show/Hide button is shaded when it’s turned on.
-
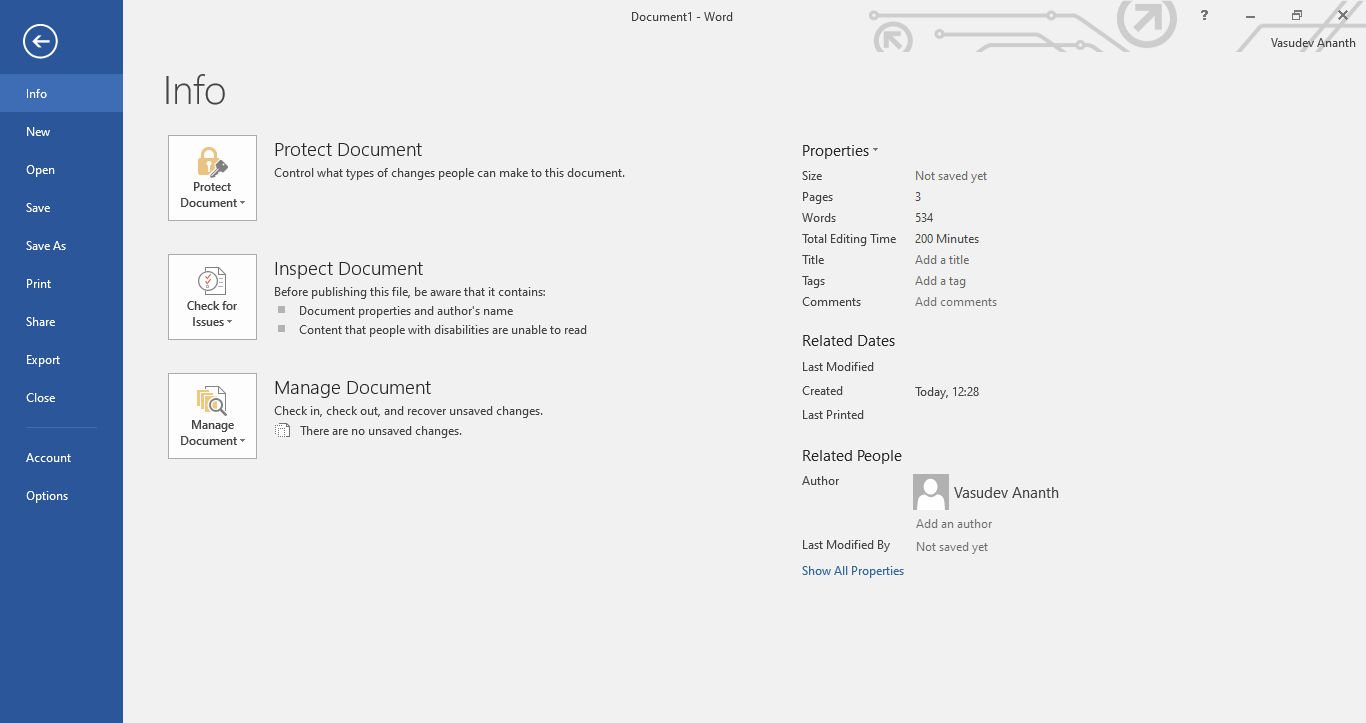
On the File tab, choose Options > Display.
-
Under Always show these formatting marks on the screen, select the check box for each formatting mark that you always want to display, regardless if the Show/Hide button is turned on or turned off.
-
On the File tab, under Help, click Options > Display.
-
Under Always show these formatting marks on the screen, select the check box for each formatting mark that you always want to display, regardless if the Show/Hide button is turned on or turned off.
-
Click the Microsoft Office Button
, and then click Word Options. -
Click Display.
-
Under Always show these formatting marks on the screen, select the check box for each formatting mark that you always want to display, regardless if the Show/Hide button is turned on or turned off.
 , and then click Word Options.
Turn off the display of formatting marks
You can clear any formatting mark you select to display on the screen at all times. Once you clear a check box for a formatting mark, that mark no longer displays on the screen at all times, regardless if the Show/Hide button is turned on or turned off
-
On the File tab, choose Options > Display.
-
Under Always show these formatting marks on the screen, clear the check box for each formatting mark that you don’t always want to be displayed on the screen.
-
On the File tab, under Help, click Options > Display .
-
Under Always show these formatting marks on the screen, clear the check box for each formatting mark that you don’t always want to be displayed on the screen .
-
Click the Microsoft Office Button
, and then click Word Options. -
Click Display.
-
Under Always show these formatting marks on the screen, select the check box for each the formatting mark each formatting mark that you don’t always want to be displayed on the screen .
Turn off squiggly lines in Word
The red squiggly lines in Word indicate potential spelling or grammar errors. The blue squiggly lines indicate words that might be incorrect in their context—a «pear» of shoes versus a «pair» of shoes, or «there» report versus «their» report.
-
On the File tab, click Options > Proofing.
-
Under When correcting spelling and grammar in Word, clear the check box next to an item you want to turn off.
-
Click the Microsoft Office Button
, and then click Word Options. -
Click Proofing.
-
Under When correcting spelling and grammar in Word, clear the check box next to an item you want to turn off.
-
On the File tab, click Options > Proofing.
-
Under When correcting spelling and grammar in Word, clear the check box next to each item you want to turn off.
Turn off squiggly lines in Publisher
The red squiggly lines in Publisher indicate potential spelling errors. .
-
On the File tab, click Options > Proofing.
-
Under When correcting spelling in Publisher, clear the Check spelling as you type check box
-
On the Tools tab, click Spelling > Spelling Options.
-
Under When correcting spelling in Publisher, clear the Check spelling as you type check box.
Download PC Repair Tool to quickly find & fix Windows errors automatically
Formatting marks are special characters that are hidden by default that affect how text is displayed in a Microsoft Word document; its purpose is to reveal spaces, tabs, and paragraph breaks in your document. The formatting tab is unprintable; if any of the formatting marks are turned on in Word, it displays hidden characters such as Tab characters, Spaces, Paragraphs marks, Hidden text, Optional hyphens, Object anchors, and you can choose to show all formatting marks.
Follow the steps below to show and hide formatting marks or non-printing characters in Word:
- To show the formatting marks, click the File tab
- Click Options on the backstage view
- A Word Options dialog box will open
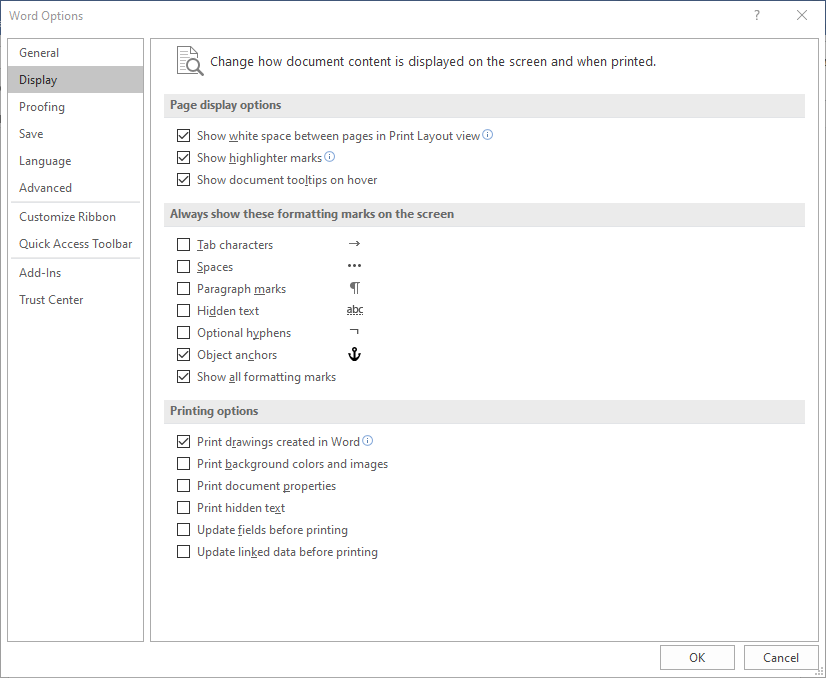
- Click Display on the left pane.
- Under the section “Always show these formatting marks on screen,” you can enable one or more formatting marks if desired by checking the checkboxes.
- You can also click the checkbox for Show all formatting marks to display all formatting marks.
- Then click OK.
- To hide the formatting marks follow the same procedure above and uncheck the formatting mark or marks you have enabled, then click OK.
Let us see this in detail.
How to Show or Hide Non-Printing Characters in Word
To show the formatting marks, click the File tab.
Click Options on the backstage view.
A Word Options dialog box will open

Click Display on the left pane.
Under the section “Always show these formatting marks on screen,” you can enable one or more formatting marks if desired by checking the checkboxes.
You can also click the checkbox for Show all formatting marks to display all formatting marks.
Then click OK.
To hide the formatting marks follow the same procedure above and uncheck the formatting mark or marks you have enabled, then click OK.
Turn on or off Formatting Marks in Word using a Hotkey
This is the quickest way to show/hide formatting marks in a Microsoft Word document. Here are the steps:
- Open Microsoft Word
- Open a blank document or a saved document
- Press the Ctrl+Shift+* hotkey.
This will instantly turn on Formatting Marks and all the used formatting marks will visible in the document. You will see dots for spaces, pilcrow for paragraph marks, right arrows for tabs used in the document, and other available formatting marks.
To hide or turn off formatting marks again, press the same Ctrl+Shift+* hotkey.
Show or hide Formatting Symbols using the Home tab in Microsoft Word

If you want to temporarily display formatting marks or formatting symbols in a Word document, then you can use the Home tab of MS Word. Here are the steps:
- Open MS Word
- Open a saved document in MS Word or a blank document
- Switch to the Home tab available in the Ribbon menu
- Click on the paragraph mark icon (or pilcrow symbol) available in the Paragraph group of the Home tab.
That will reveal all the formatting symbols present in your Word document. To hide the formatting symbols, you can use the same paragraph mark icon or symbol.
Show or hide Formatting Marks in Word Online

If you want to show or hide formatting marks in Word Online, then it can be done in three different ways. For this, first, open Word Online and then open a document. After that, use any of the following ways to show/hide formatting marks or symbols:
- Click on the More Options icon (three vertical dots) available in the top right corner and use the Show/Hide option
- Right-click on the Word document and click on the Show/Hide option
- Type formatting marks in the Search box of Word Online and select the Show/Hide option in the search result.
Hope this helps.
How do you reveal formatting codes in Word?
If you want to reveal formatting codes or formatting marks in the Microsoft Word desktop application and Word Online, then you can use the Home tab, hotkey, right-click menu, Word Options, and other ways. All these ways to show/hide formatting marks in a Microsoft Word document are covered in this post with step-by-step instructions.
Which button do you press to show non-printing characters formatting marks and breaks?
You can open the Paragraph marks a formatting mark by using the combination keys Ctrl + Shift + 8, and you will see the Paragraph mark symbol displayed on your screen. The formatting mark follows any new paragraph in a document.
We hope this tutorial helps you understand how to show and hide formatting marks in Word; if you have questions about the tutorial, let us know in the comments.

Shantel has studied Data Operations, Records Management, and Computer Information Systems. She is quite proficient in using Office software. Her goal is to become a Database Administrator or a System Administrator.