
In a paragraph, leading is the space between one line and another. When doing work in Word, whether it’s a simple letter or even a a certificate or diploma , it is important to adjust the line spacing so that the document looks more professional; This is why we will show you how to put spaces or leading in Word in a simple way.
Steps to set text line spacing in Word
- Choose the paragraph for which you want to adjust the leading.
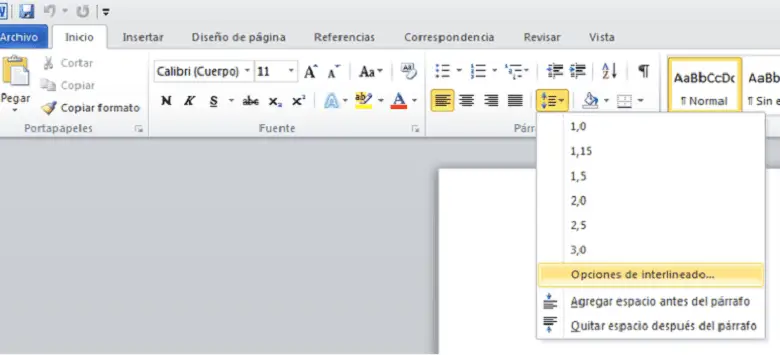
- Hover your mouse over the tab «Home» , then tap the box that says “Line and paragraph spacing”.
- In this box, a menu will be displayed where you will have to choose the amount of space you want between the lines. By moving the mouse over each option, you will see what each line in the paragraph looks like.
- When you decide what is the right amount of space for your item, you click on the amount and the change will be automatic.
Another way to adjust the spacing is to click on the box «Spacing between lines and paragraphs» , when the menu is displayed, click on the «Spacing options» , a box will automatically open where you can configure the spacing in single, 1.5 lines, exact, multiples and doubles; alternatives other than those proposed in the previous step.
Even in the «Set as default» box, you can choose whether you want these settings to affect only the document you are creating or for all Word documents.
What you need to keep in mind is that Word adapts the spacing based on the size of the font you choose, but it also gives you some types of spacing so that you can tailor your document to suit your needs. . The most common type of leading is single, but 1,5 and double lines are also used.
Steps to insert paragraph spacing in Word document
- Select the paragraphs whose spacing you want to change.
- Go to the tab «Home» and look for the box «Spacing between lines and paragraphs» ; In this option, a menu is displayed and you must choose the option «Add a space before the paragraph».
- The spacing between paragraphs will automatically change.
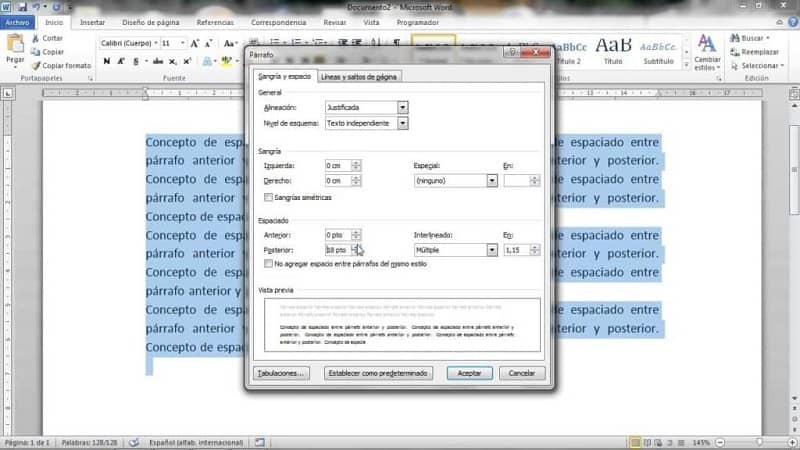
If you want to configure paragraph spacing, click on the » Spacing between lines and paragraphs “, Where a menu appears in which you must select“ spacing options ”; A box will quickly open where you can configure the space you want to have between each paragraph.
If you want these changes to appear in all of your Word documents, you must check the «Set as default» box. Another detail to keep in mind is that sometimes by changing the spacing between paragraphs you can inadvertently create a blank page at the end of your document, but this is not a major problem as you can delete or eliminate these blank pages .
Another way to put space between paragraphs:
Click on «Layout» and choose the option «Paragraph spacing» ; here you have the option to choose the useful spacing for your document. As you move the mouse through each option, you will be able to view the changes it makes in the document. If you want to define a single space for the whole document, you must choose «No space between paragraphs».
If these options don’t match the spacing you need, go to the option that appears at the bottom called «Space between custom paragraphs» ; There a box will open where you can adjust the numbering until you get the spacing you need.
If you want to change the spacing only in certain paragraphs and not in the whole document, you can do it very easily; Go to «Layout», you will find an option that says «Spacing», you can change the numbering of the spacing you need before or after each paragraph.
It is very easy to put spaces or leading in Word , just follow these practical steps and you can give your document a stylish touch. Another way to make your work look more professional is to download templates for your Word documents .
The Word program is a very versatile tool that allows you to do all kinds of documents or work where you can include graphics, charts or images, and even insert text on images très easyment. Go ahead and create amazing articles using the Word program.

 Please Note:
This article is written for users of the following Microsoft Word versions: 97, 2000, 2002, and 2003. If you are using a later version (Word 2007 or later), this tip may not work for you. For a version of this tip written specifically for later versions of Word, click here: Understanding Leading.
![]()
Written by Allen Wyatt (last updated December 23, 2019)
This tip applies to Word 97, 2000, 2002, and 2003
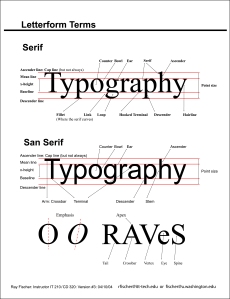
Leading is a typographical term referring to the vertical space from the same point on one line to the same point on the next, within the same paragraph. Typically, this distance is measured from baseline to baseline, where the baseline is the reference line on which your characters rest.
Leading is typically measured in points. In Word, leading is referred to as Line Spacing, although this is not technically correct. Line spacing is more comprehensive, implying less exacting terms or measurements than required by traditional typesetting.
When you want to specify your leading, you should follow an old typographical convention that states that line leading should be 120% of the point size of your font. Thus, according to this rule, if the font you are using is 10-point Arial, then your line leading should be 12 points. In typographical terms, this is referred to as 10/12 Arial (pronounced «10 on 12 Arial»). Likewise, if you are using 28-point Courier, then your leading should be 33.6 points. You can round this to 34 points, even though Word will accept fractional point sizes.
There are several methods Word can use for leading. Typically, the default leading type (as specified in the Line Spacing field of the Paragraph dialog box) is Auto. This means that line leading will be adjusted, automatically, based on the largest font size or element on each individual line. Word does this by applying the 120% rule to the largest font size or element on the line.
The problem with Auto leading is that it can leave your paragraphs looking uneven and choppy, particularly if you mix fonts and point sizes within the same paragraph. To overcome this, always specify that Line Spacing should be Exactly, and then set a point size in the At box.
WordTips is your source for cost-effective Microsoft Word training.
(Microsoft Word is the most popular word processing software in the world.)
This tip (1133) applies to Microsoft Word 97, 2000, 2002, and 2003. You can find a version of this tip for the ribbon interface of Word (Word 2007 and later) here: Understanding Leading.
Author Bio
With more than 50 non-fiction books and numerous magazine articles to his credit, Allen Wyatt is an internationally recognized author. He is president of Sharon Parq Associates, a computer and publishing services company. Learn more about Allen…
MORE FROM ALLEN
Selecting a Column or Row in a Table
Selecting rows and columns in tables is a common task. Because of this, Word provides a couple of ways you can accomplish …
Discover More
Exporting Latitude and Longitude
A handy way to store latitude and longitude values in Excel is to treat them as regular time values. When it comes around …
Discover More
Professional Looking Fractions
Professional typesetting has, in many ways, spoiled us. One way this is evident is in the preference we show for making …
Discover More
No matter what line of work you’re in, knowing how to change the leading, or line spacing, of documents in Microsoft Word can be quite useful. Decreasing the line spacing allows you to fit more text into the same space and can come in handy while designing a flier or brochure. Increasing the line spacing will make large blocks of text easier to read and will allow you more space for hand-written corrections in printed drafts of documents. Furthermore, certain audiences for your document, such as the publishing industry, may have very specific requirements for line spacing. In Microsoft Word, you can adjust the line spacing to be the same across the entire document or change it for specific parts.
-
Launch Microsoft Word and open the document you want to modify.
-
Select the text for which you want to adjust the line spacing using your mouse or your keyboard. If you want to change line spacing for the entire document, press «Ctrl-A» to quickly select all text.
-
On the Home tab, click the «Line and Paragraph Spacing» button found in the Paragraph group.
-
Click one of the numbers in the menu to change the line spacing of the text you selected. Hovering your mouse over a number without clicking it will show you a preview of the changes. If you are not satisfied with any of the options provided in the menu, click «Line Spacing Options» and adjust the spacing to your liking using the «Line Spacing» drop-down list and «At» text box.

Last updated December 8, 2020
If you work with Adobe InDesign every day, this blog post may not interest you, especially if you are part of the design gentry offended by a sentence that contains both “design” and “Microsoft Word.”
Ah yes, from the design perspetive, there is much to lament about MS Word. However we can still create good pages with MS Word . The principles of layout and typography remain the same, regardless of your medium or application.
Typography Animated Tutorial
Design with MS WORD
While it does not have the elegance and workhorse qualities of InDesign, MS Word can still be used to create well-designed pages. This word-processing application is still the most popular software for writing documents, and it is possible to design the look of the page if you use design principles and take time to learn the tools for paragraph formatting, character and paragraph styles, and other layout functions. The goal of this blog post is to persuade you that it is possible to design better pages in MS Word, but it will take some hunkering down to learn whys and wherefores and then to study how to use the tools available in Word. There are references at the end of this blog that can be helpful.

Are there design strategies that don’t work as well in Word? Yes, but since so many of us are using Word as our frequent go-to writing tool, why not use it to the peak of what it is capable of and get our words in Word to look better than what the default offers us?
We make many choices when starting to write in any application. Some of these are already determined for us when we create our document. To get out from under the “Automatic/Default” settings is how you can start creating better-designed pages, that is, pages that communicate the ideas you started with when you began to write.
The first automatic setting to change is the size of your text (font size) and the space between the lines of text (aka leading). When you create a new document in Microsoft Word, a font and font size are chosen for you.
Usually, the default font is Calibri or Times New Roman, and the default font size is either 11 or 12 point. One introduction to choosing fonts and font sizes can be found at https://venngage.com/blog/how-to-choose-fonts/.
Leading = Line Spacing
In typography, leading (pronounced ledding, rhymes with heading) refers to the distance between the baseline of one line of type and the baseline of the next line. The term comes from the days when typesetters placed by hand thin strips of lead into the presses to increase the vertical distance between lines of type.
The term “leading” is used in page-layout and other design software such as InDesign. In word processing software, it is usually called line spacing.
No to Automatic Line Spacing

For a good annotated image of what metal leading looks like, see James Felici’s photograph below where the strip of added lead is flagged in yellow. His article, Just Say “No” to Automatic Leading, is also an excellent explanation of why not to use the default leading (set at 120%) suggestion. Also, if my explanations here are not clear or you want more information, a quick reading of his article may clarify things for you.

Leading is measured from baseline to baseline and expressed in points. Changing the leading affects appearance and readability. For example, lines of type jammed closely together or too far apart can be difficult to read, and typefaces with long ascenders and descenders generally read better with increased leading.
Step Back
If this is all sounding too technical, you might first read The PC (Mac) Is Not a Typewriter (4,5) by the well-known designer Robin Williams.
If you already know that two spaces no longer should follow a period, you could move right to The Non-Designer’s Design Book, (6). A PDF of the 2012 edition is available at the end of this blog post.
Changing Line Spacing


In these three different versions (leading too tight, just right, and too loose) of the same Robert Bringhurst quote,3
Robert Bringhurst, The Elements of Typographic Style, Version 3.2, 2005:19. you can see what a difference leading can make.
Line spacing in MS WORD
So, even if it is just a quick snail-mail thank you letter to your grandmother, consider paying attention to leading in order to improve readability of your message.
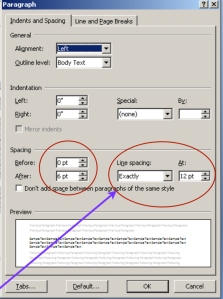
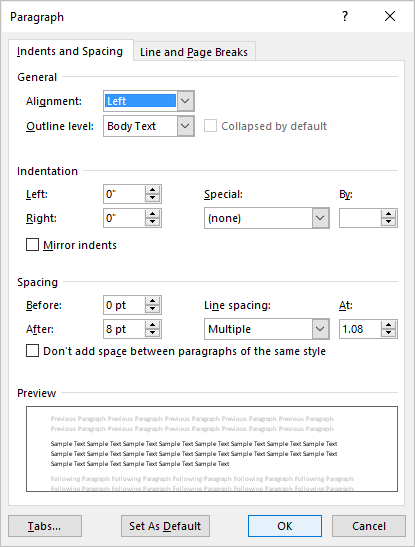
Sometimes the default will work fine. Other times, you may want manual control. To get manual control of line spacing in Word, go to the drop-down menu for Format > Paragraph > Indents and Spacing, and you will find the panel where you can control line spacing and other parameters.
If you are changing the leading for text already in the Word document, remember to select (highlight) all the text that you want changed.
Change the line spacing to “Exactly” and determine the point size for leading. A good start is to add 2 points to the font size. So if your font size is 11, set the “Line Spacing” at 13 or 14 points.
The dialogue boxes for “Spacing” indicate how much white space will be “Before” the paragraph and how much space “After.” A good start for paragraphs set at 11 points and not indented is to enter zero for “Before” the start of the paragraph and 6 points for “After” the paragraph.
If you are indenting paragraphs, you may want to also set “After” to zero.
Your Typography Choices
Your choice of typeface family, letter spacing, text alignment, background color, text color, line length, and written copy—all of these choices will affect the line spacing requirements. While you can find mathematical rules to follow (typesetters, printers, and writers have been looking at these issues since before the 1400s and Gutenberg’s press), setting good line spacing (the best for readability) is a matter of aesthetic judgement and personal reading preferences, based on who our potential readers will be as well as history: what we know about how people of different times, cultures, and alphabets read texts.

Posters & Flyers
Sources
- Cutherell, Josh. “Six Things You Didn’t Know Word Could Do: Design and Microsoft Word Part 1,” Open Box 9.com, April 17, 2015, accessed August 29, 2020, https://openbox9.com/2015/04/17/design-and-microsoft-word-1/.
- Felici, James. “Just Say No to Automatic Leading.” Creative Pro.com (blog), February 3, 2010, accessed August 29,2020, http://creativepro.com/just-say-no-automatic-leading/.
- Bringhurst, Robert. The Elements of Typographic Style. Version 3.2. Vancouver, BC: Hartley & Marks, 2005: 19.
Other Resources
PDFs to Download
© Barbara Kristaponis 2014-2022. The Good Page.
August 1, 2010 at 2:17 pm
In Word, there are two types of spacing: line spacing and paragraph spacing. Both are attributes of paragraph formatting that can be configured via the Paragraph dialog,[1] but they work differently. Line spacing affects the distance between lines of text within a paragraph, and paragraph spacing affects the distance (i.e., the white space) between paragraphs.
Line Spacing
Line spacing options in Word include conventional single and double spacing, plus a few additional choices. Before exploring the other choices, it’s worth discussing single and double spacing, which are not — contrary to what you might think — entirely self-explanatory.
The Role of “Leading” in Single and Double Spacing
Many people probably assume that the “simple” line-spacing options — single and double spacing — merely reflect multiples of the point size of the font they are using. If that were so, single-spacing with any 12-point font would produce lines of text that are 12 points in height and double-spacing would produce lines of text that are 24 points in height. (As a reminder, there are 72 points to an inch; thus, 12 points is 1/6 of an inch and 24 points is 1/3 of an inch.)
However, that formulation leaves out one crucial factor. In order to improve readability, single and double spacing add a certain amount of vertical distance — in the form of white space — between lines of text, an aspect of typography known as “leading” (pronounced as if it were spelled “ledding”). The amount of leading varies depending on which font you are using (not all 12-point fonts are equal). Typically, single-spaced lines range from 110% to 135% of the font size. For example, let’s say you select Times New Roman, a font that is common in legal documents. If you set the font size at 12 points and apply single spacing, the true height of your lines of text will be roughly 115% to 120% of the point size, or 13.8 to 14.4 points.[2] The line height might be different with a different font, such as Arial, Courier New, or Helvetica, even if you set the font size at 12 points.
Similarly, double spacing usually runs 220% to 270% of the size of your chosen font. So, sticking with our example, using Times New Roman at 12 points and applying double spacing will result in lines that are spaced approximately 27.6 to 28.8 points apart.
This phenomenon — the vertical expansion caused by “leading” when you use single spacing or double spacing in Word — explains a number of confusing issues, including why it can be difficult to align text with the line numbers in pleading paper. (The Pleading Wizard, a utility used to generate pleading paper in versions of Word prior to Word 2007, sets an “Exact” point size for the numbered lines, such as 22.75 points, that is smaller than standard double spacing. Because double-spaced body text is “taller” than the line numbers, the text and the numbers quickly get out of sync.)
To get a feel for how much extra spacing leading adds, select a 12-point font and type a brief paragraph (make sure it’s at least two lines long). First, set the line spacing to single. Then change the line spacing to Exactly 12 points. Try the same experiment with the line spacing set to double and then to Exactly 24 points. You’ll notice a tremendous difference.
The moral of the story: If you don’t want Word to expand your text vertically, don’t use single or double spacing. Instead, use an “Exactly” setting, such as Exactly 12 points or Exactly 24 points. (In pleadings, you’ll need to choose a setting for the body text that matches the spacing of the numbered lines. For a longer discussion of this point, see my earlier post, “Aligning text with pleading line numbers”.)
The New Default Line Spacing
As if matters weren’t confusing enough, Microsoft changed the default line spacing to 1.15 lines in Word 2007 and Word 2010 and to 1.08 lines in Word 2013 and Word 2016.[3] The default setting in older versions is single spacing, which — notwithstanding the additional vertical space resulting from leading — is substantially more compact than the new setting.
It’s easy to change the default line spacing, however. Simply open the Paragraph dialog, set the spacing according to your preferences, then (1) in Word 2007, click the “Default” button, then click “Yes” and click “OK”; (2) in Word 2010, click the “Set As Default” button, click the “All documents based on the normal.dotm template” option, then click “OK” twice.
Additional Line Spacing Options
Besides single spacing and double spacing, Word offers four additional line spacing options: 1.5 lines, “Exactly,” “At Least,” and “Multiple.” The 1.5 line option is similar enough to single and double spacing that it doesn’t merit further discussion here.
As for the other options, “Exactly” enables you to choose a highly precise line spacing that remains fixed, whereas “At Least” gives you the option of specifying a minimum line spacing and letting Word adjust the height if necessary to accommodate graphics such as drop caps (or other characters) that wouldn’t otherwise fit. (This option presumably is used widely in desktop publishing but, for obvious reasons, isn’t suitable for pleadings or any similar type of document that is subject to strict formatting rules.)
The “Multiple” option is used for setting line spacing at an interval other than single, double, or 1.5. For example, if you wanted triple spacing, you would use the “Multiple” option and type “3” in the “At” box. (The new default line spacing of 1.15 involves the “Multiple” option.)
“Exactly” can be important when you are working on pleadings. As mentioned earlier, the process of generating pleading paper usually results in line numbering that does not use true double-spacing. For technical reasons, the line numbers on pleading paper often are spaced 22.75 points apart (or some similar figure). In order to get the text of the pleading to align properly with the line numbers, you have to make sure the line spacing of the text matches that of the line numbers (which you can determine by going into the document’s header, clicking somewhere within the line numbering, and then launching the Paragraph dialog and viewing the setting for the line spacing). If it doesn’t match, you’ll have to select the text and change the setting via the “Exactly” option.
Paragraph Spacing (“Before” and “After” Spacing)
By contrast with line spacing, paragraph spacing refers to the space between paragraphs. You can tell Word to insert extra space automatically before a paragraph, after a paragraph, or both. For example, if you want Word to insert one blank line between paragraphs, you can set the “Spacing After” to 12 points, the rough equivalent (as we now know) of a standard single-spaced line. Or you can set both the “Spacing Before” and the “Spacing After” to 6 points (about half a line).[4]
When using one or both of these options, test them first to see if they work in a given situation. Sometimes you can end up with too much (or not enough) space between paragraphs.
“Before” and “After” spacing often are incorporated into styles for body text and headings in order to achieve uniform spacing between paragraphs in a document.
Because “Before” and/or “After” spacing automatically add white space between paragraphs, you’ll have to get into the habit of not pressing the Enter key twice to move the cursor to the next paragraph.
“Don’t add space between paragraphs of the same style”
In all versions of Word from 2007 through 2016, there is an additional item in the Paragraph dialog labeled “Don’t add space between paragraphs of the same style.” If the option is enabled (i.e., the box to the left of the option is checked), Word will ignore your “Before” and/or “After” settings.[5]
Microsoft applies this setting to certain built-in styles but not to others. It is disabled by default for the Normal paragraph style, which means you can increase the “Before” and/or “After” paragraph spacing for text using the Normal style and your changes will go into effect as you expect. On the other hand, the setting is enabled by default for bulleted and numbered lists, which means that items (paragraphs) in the list will not be separated by white space unless you specifically insert such space manually.
If you have configured Before and/or After spacing to add space between paragraphs but Word appears to be ignoring your settings, open the Paragraph dialog and note whether “Don’t add space between paragraphs of the same style” is checked. If it is, close the dialog, select the list (or other text) to which you want to add Before and/or After spacing, reopen the Paragraph dialog, uncheck the option, reset the Before and/or After spacing if necessary, and click “OK.” Now your extra Before and/or After spacing should go into effect as you intended.
________________________________________________________________
[1] In all versions of Word, you can open the paragraph dialog by using the keyboard shortcut Alt O, P. In versions of Word prior to Word 2007, you also have the option of clicking the Format menu, Paragraph; in Word 2007 and Word 2010, you can click the dialog launcher at the lower right corner of the Paragraph group in the Home tab.
[2] There is some confusion / disagreement over the exact amount of leading typically produced with Times New Roman. Pinpointing this figure is less important to me than making sure that readers understand the general concept and also have a sense of the approximate degree to which the text will expand if you use single or double spacing, rather than an “Exact” figure.
[3] Microsoft also changed the “Normal” paragraph style by adding 10 points of “After” spacing in Word 2007 and Word 2010 and 8 points of “After” spacing in Word 2013 and Word 2016. See the following sections for an explanation of “Before” and “After” spacing.
[4] “Before” and “After” spacing can be configured independently, of course.
[5] Note that even with the box checked, you’ll be able to add space between paragraphs manually—i.e., by pressing the Enter key.
Entry filed under: Uncategorized.
Download PC Repair Tool to quickly find & fix Windows errors automatically
Have you tried to type over a line in Microsoft Word, but the text is not staying on the line but keeps on moving and creating space, and you are wondering how can I get the text on the line without the line moving and creating space? In this tutorial, we will discuss some techniques to write over the line.
Open Microsoft Word.
Draw a line in your document.
The first technique we will use is to write on the line; notice, when you are typing on the line the text, is not staying on the line, and the line keeps on moving.
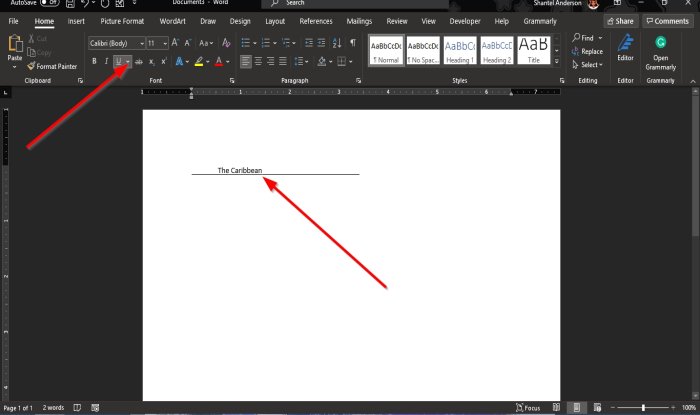
Highlight the text and click the Underline button on the Home tab in the Font group, and you will notice that the text will be on the line.
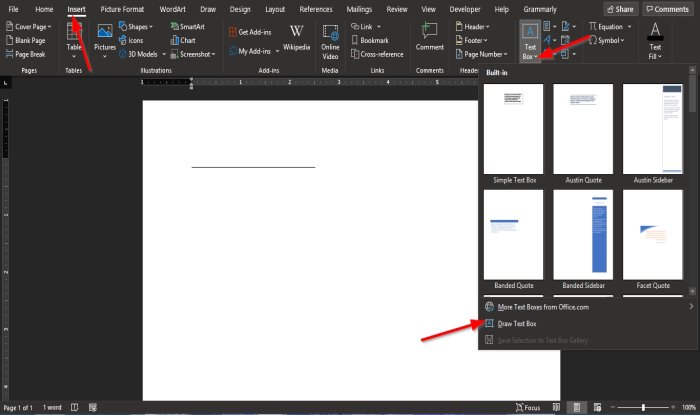
The second technique is to click the Insert tab and click the Text box button in the Text group.
In the drop-down list, select Draw Text Box.
A text box will appear in the document.
Move the text box over the line; ensure that the bottom of the text box matches the line.
We do not want the text box to have an outline; we will click the Shape Format tab.
The Shape Format tab appears whenever the shape is selected, including the text box.

On the Shape Format tab in the Shape Styles group, click the Shape Outline button, and in the drop-down list, select No Outline.
Notice that the text box lines become invisible.
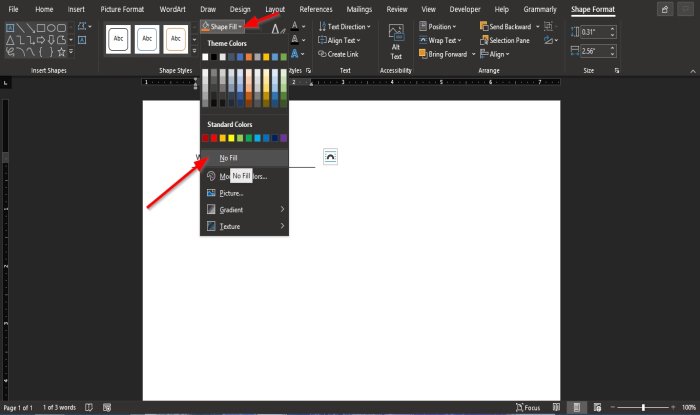
Then click the Shape Fill button, and in the drop-down list, click No Fill.
Drag the text box closer to the line.
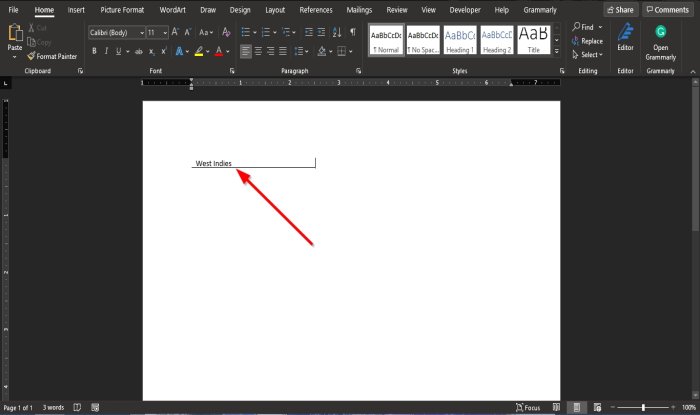
Now, we have the text on the line.
We hope this tutorial helps you understand how to type over lines in Microsoft Word.
Read next: How to add Citations & References in Word.
Shantel has studied Data Operations, Records Management, and Computer Information Systems. She is quite proficient in using Office software. Her goal is to become a Database Administrator or a System Administrator.
![]()
Download Article
A user-friendly guide to making different types of lines in Microsoft Word
![]()
Download Article
- Using Shapes to Draw a Line
- Using Borders to Add a Line
- Using Keyboard Shortcuts
- Using the Mobile App
- Q&A
- Tips
|
|
|
|
|
Do you want to create a horizontal line in your resumé or other Microsoft Word document? If you want to customize the color and format of the line, you can use the Shapes tool. If you need to make a quick, basic line, you can use the keyboard shortcut. While you can use the keyboard shortcut on Windows and Mac, you cannot use it on the mobile app. This wikiHow will show you how to insert different lines in Microsoft Word on your Windows, Mac, iPhone, or Android device.
Things You Should Know
- On desktop, go to the Insert tab. Click Shapes, then select a line. Click and drag across the document to create a line.
- To customize the line, double-click it. Click Shape Outline to change the color.
- On mobile, click the three dots. Tap Home and select Insert. Tap Shapes to select a line. Tap and drag across the document to create a line.
-

1
Open Microsoft Word on your Windows or Mac computer. Click or double-click the Word app icon, which resembles a white «W» on a dark-blue background.
- If you want to draw a line in an existing Word document, double-click the Word document to open it and skip the next step.
- You’ll need a subscription to use Office 365.
-
2
Click Blank document. It’s in the upper-left side of the page.
Advertisement
-
3
Click the Insert tab. This tab is in the blue ribbon at the top of the Word window, between Home and Draw.
-
4
Click Shapes. It’s in the Insert toolbar, next to the icon of an overlapping circle and square.
- A drop-down menu will appear.
-
5
Select a line shape. In the «Lines» heading, click one of the line templates. You can choose a line, line arrow, double line arrow, and more.
-
6
Draw your line. Click and drag across the document to create your line.
- If you need to adjust the line’s length and orientation, click the left or right circle. Drag it left or right to adjust the length, or drag it up and down to adjust the orientation.
- To move the line, double-click and drag it to the desired position.


Advertisement
-
1
Open Microsoft Word on your Windows or Mac computer. Click or double-click the Word app icon, which resembles a white «W» on a dark-blue background.
- If you want to draw a line in an existing Word document, double-click the Word document to open it and skip the next step.
-
2
Click Blank document. It’s in the upper-left side of the page.
-
3
Click the Home tab. This tab is in the blue ribbon at the top of the Word window, between File and Insert.
- You may already be on this tab by default.
-
4
Click the «Borders» arrow. This is next to the icon of the dotted square with a solid bottom line.
- A drop-down menu will open.
-
5
Click Horizontal Line. This will be towards the bottom, above Draw Table.
- A horizontal line will be added.
-
6
Format your line. Double-click the line; a dialogue box will appear.
- To change the line thickness, use the up and down arrow below Height. The higher the number, the thicker the line will be.
- To change the color, click the color box underneath Color. Select your desired color.
- Click OK to save and apply your changes.
- To move the line, double-click and drag it to the desired position.


Advertisement
-
1
Open Microsoft Word on your Windows or Mac computer. Click or double-click the Word app icon, which resembles a white «W» on a dark-blue background.[1]
- If you want to draw a line in an existing Word document, double-click the Word document to open it and skip the next step.
-
2
Click Blank document. It’s in the upper-left side of the page.
-
3
Place your cursor where you want your line to appear. You’ll need to be on a blank line, as this won’t work if there is text before or after your cursor on the same line.
- You’ll be creating a horizontal line that spans from one edge of your page to the other. The line will stop at your set margins.
- If you want to make the line span the whole page, you’ll need to change your document margins.
-
4
Type three dashes in a row. Use your dash key on the number row at the top of your keyboard, or on the numeric pad.
-
5
Press ↵ Enter to convert the dashes into a line. AutoCorrect will automatically create a solid line that will situate itself directly beneath the previous line of text.
- Note that the line does not occupy the space of a line of text, but instead exists between lines of text.
- If you do not have AutoCorrect enabled, do so by clicking File → Options → Proofing → AutoCorrect Options…. This will open a new window.
- Make sure the Border Lines box is checked. This can be found underneath Apply as you type.
- If you want to turn off AutoCorrect, uncheck the boxes.
-
6
Use different characters for different line styles. There are a variety of different lines that you can create by using characters other than the dash:[2]
- Thin line: Three hyphens (-).
- Thick line: Three underscores (_).
- Double line: Three equal signs (=).
- Dotted line: Three asterisk (*).
- Triple line: Three pound signs (#).
- Squiggly line: Three tildes (~).
-
7
Move the line by entering text above it. You can prompt the line to move down by typing text above it and then pressing Enter.
- Deleting text above the line will prompt it to move upward.


Advertisement
-
1
Open a document in the Microsoft Word app. This looks like a blue notebook next to a W.
- Microsoft Word is available for iOS in the App Store and for Android in the Google Play Store.
- Tap Blank document to open a new document or tap a file to open an existing document.
-
2
Tap ••• . This can be found above the keyboard, to the right.
- If you don’t see your keyboard, tap the document to bring it up.
- A new menu will open.
-
3
Tap Home. This will be to the left of the formatting window.
- A drop-down menu will open.
-
4
Tap Insert. You’ll see a list of all objects you can insert.
-
5
Tap Shapes. This is next to the icon of an overlapping circle and square.
-
6
Select a line shape. In the «Lines» heading, tap one of the line templates. You can choose a line, line arrow, double line arrow, and more.
-
7
Draw your line. Tap and drag across the document to create your line.
- Use two fingers to pinch and zoom out to view the entire document.
- If you need to adjust the line’s length and orientation, tap the left or right circle. Drag it left or right to adjust the length, or drag it up and down to adjust the orientation.
- To move the line, tap and drag it to the desired position.


Advertisement
Add New Question
-
Question
How do I view all available symbols in Microsoft Word?

Click «Insert» and then click «Symbols» and you should be shown a box with all of the symbols in it.
-
Question
How do I add a line on the first page, and no lines on the second?
Click «Insert» and then click «Symbols» and you should be shown a box with all of the symbols in it.
-
Question
How do I change the color of the line?
In the paragraph section, open the drop-down menu on the «Borders» button. At the very bottom is a «Borders and Shading» option. In that option, change the color of the bottom border to your specified color. Click the «Borders» button.
See more answers
Ask a Question
200 characters left
Include your email address to get a message when this question is answered.
Submit
Advertisement
-
Looking for money-saving deals on Microsoft Office products? Check out our coupon site for tons of coupons and promo codes on your next subscription.
Thanks for submitting a tip for review!
Advertisement
About This Article
Article SummaryX
1. Click Insert.
2. Click Shapes.
3. Select a line template.
4. Click and drag across your Microsoft Word document to draw the line.
Did this summary help you?
Thanks to all authors for creating a page that has been read 2,043,531 times.
Is this article up to date?
Apply Left, Center, Right or Justify Alignment to Text in Microsoft Word
by Avantix Learning Team | Updated April 13, 2022
Applies to: Microsoft® Word® 2010, 2013, 2016, 2019, 2021 and 365 (Windows)
You can align or justify text or other content in Word in several ways including using keyboard shortcuts, selecting commands in the Ribbon, using the Paragraph dialog box or modifying a style. It’s important to note that alignment or justification is paragraph formatting so applies to entire paragraphs. You can align text or inline graphics in paragraphs that are followed by a hard return (you pressed Enter or Return).
To see where paragraphs have been created in a Word document, it’s helpful to turn on Show/Hide ¶ on the Home tab in the Ribbon.
In this article, we’ll review 4 different ways to change horizontal alignment or justification in Word documents.
Recommended article: How to Insert a Line in Word (3+ Ways)
Do you want to learn more about Microsoft Word? Check out our virtual classroom or in-person Word courses >
There are 4 types of alignment that can be applied to paragraphs:
- Align left – aligns text or inline graphics with the left margin or indent
- Center – centers text or inline graphics between the left and right margins or indents
- Align right – aligns text or inline graphics with the right margin or indent
- Justify – distributes text evenly between the left and right margins or indents
A paragraph aligns within the indents (indent markers appear on the Ruler). The indents may be different from the margins. Paragraphs are also entered in cells in tables and each paragraph in a cell may have different indents and alignment settings.
1. Align or justify using keyboard shortcuts
To align or justify paragraphs using keyboard shortcuts:
- Align left – select the paragraph(s) and press Ctrl + L to align to the left.
- Align right – select the paragraph(s) and press Ctrl + R to align to the right.
- Align center – select the paragraph(s) and press Ctrl + E to align center.
- Justify – select the paragraph(s) and press Ctrl + J to justify.
2. Align or justify using the Ribbon
To align or justify paragraphs using the Word Ribbon
- Select the paragraph(s) to which you want to apply alignment or justification. If you would like to select all paragraphs, press Ctrl + A.
- Click the Home tab in the Ribbon and then click Align Left, Center, Align Right or Justify in the Paragraph group.
Align and Justify commands appear on the Home tab in the Ribbon in the Paragraph group:
![]()
3. Align or justify using the Paragraph dialog box
To align or justify paragraphs using the Paragraph dialog box:
- Select the paragraph(s) to which you want to apply alignment or justification. If you would like to select all paragraphs, press Ctrl + A.
- Right-click and select Paragraph. The Paragraph dialog box appears.
- From the Alignment drop-down menu, select Left, Center, Right or Justify.
- Click OK.
You can also display the Paragraph dialog box by clicking the Home tab in the Ribbon and then clicking the dialog box launcher on the bottom right of the Paragraph group.
The Paragraph dialog box includes a drop-down menu to select Alignment:
4. Align or justify by modifying a style
When you create a new blank document, it starts out using the Normal style which contains default paragraph and character formatting.
If you want to apply alignment or justification to multiple paragraphs throughout a document (such as a heading), you can modify a style (such as Heading 1).
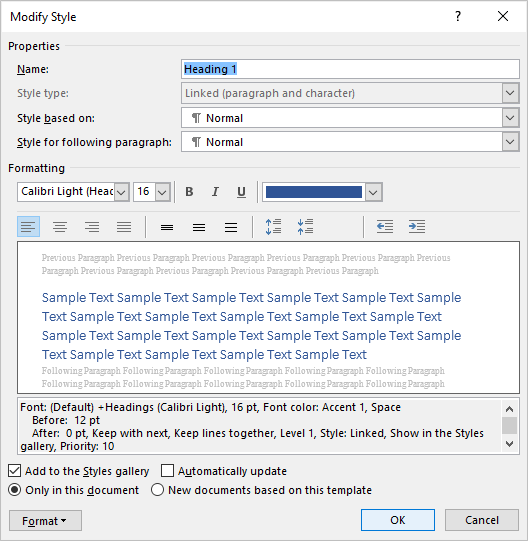
To change the alignment for a heading style (such as Heading 1):
- Click in a paragraph using the heading style (typically applied through the Home tab in the Ribbon).
- Click the Home tab in the Ribbon.
- In the Styles group, right-click the heading style. A dialog box appears.
- Click Format. A drop-down menu appears.
- Click Paragraph. The Paragraph dialog box appears.
- From the Alignment drop-down menu, select Center or your preferred alignment.
- Click OK twice.
Below is the Modify Style dialog box with align and justify commands:
There may be issues if you modify alignment or justification in the Normal style since other styles are based on this style by default. Cells in tables would likely be affected and so would other styles that are based on the Normal style (such as Header, Footer and Heading styles). Paragraphs using these styles would then inherit the alignment or justification (unless alignment or justification has been specifically modified in these styles). If you are comfortable using styles, you could create your own style or modify a different Word style to avoid this issue.
Subscribe to get more articles like this one
Did you find this article helpful? If you would like to receive new articles, join our email list.
More resources
How to Double Space in Word (4 Ways + Shortcut)
How to Hide Comments in Word (or Display Them)
How to Find and Replace in Word (and Use Wildcards)
How to Create a Hanging or First Line Indent in Word (3 Ways)
How to Superscript or Subscript in Microsoft Word (with Shortcuts)
Related courses
Microsoft Word: Intermediate / Advanced
Microsoft Excel: Intermediate / Advanced
Microsoft PowerPoint: Intermediate / Advanced
Microsoft Word: Long Documents Master Class
Microsoft Word: Styles, Templates and Tables of Contents
Microsoft Word: Designing Dynamic Word Documents Using Fields
VIEW MORE COURSES >
Our instructor-led courses are delivered in virtual classroom format or at our downtown Toronto location at 18 King Street East, Suite 1400, Toronto, Ontario, Canada (some in-person classroom courses may also be delivered at an alternate downtown Toronto location). Contact us at info@avantixlearning.ca if you’d like to arrange custom instructor-led virtual classroom or onsite training on a date that’s convenient for you.
Copyright 2023 Avantix® Learning
Microsoft, the Microsoft logo, Microsoft Office and related Microsoft applications and logos are registered trademarks of Microsoft Corporation in Canada, US and other countries. All other trademarks are the property of the registered owners.
Avantix Learning |18 King Street East, Suite 1400, Toronto, Ontario, Canada M5C 1C4 | Contact us at info@avantixlearning.ca