
If you accidentally turned on “track changes” (or someone sent you a document with “track changes” on), your words will now be red and underlined. If that is the problem, accept the changes and turn off track changes.
How do you ignore red underline in Word?
Remove All Red and Green Underlines from Word Document
- Open the document.
- Go to File > Options.
- A box will appear.
- In the “Exceptions for” section, select the document in which you don’t want to see spell mistakes.
- Check either or both of the following check boxes as per your need:
- Click OK.
What’s the green underline in Word?
By default, Word automatically checks your document for spelling and grammar errors, so you may not even need to run a separate spelling and grammar check. These errors are indicated by colored wavy lines. The red line indicates a misspelled word. The green line indicates a grammatical error.
What is the file extension of MS Word 2010?
docx
How do I get rid of the red and green wavy underline in Word?
Remove red and green wavy underlines from all Word documents: Uncheck the box next to Check spelling as you type, the box next to Mark grammar errors as you type, and the box next to Check grammar with spelling. Then click OK. Then all the red and green wavy underlines should be gone.
How do you put a vertical line in the middle of a word document?
Vertical Lines in Word
- Display the Insert tab of the ribbon.
- Click the Shapes tool and then click one of the line shapes from the Line group.
- Click at one end of where you want your line, but don’t release the mouse button.
- Drag the mouse to where you want the other end of the line positioned.
- Release the mouse button.
How do you insert a solid line in Word?
Another way to add a solid line in Microsoft Word is via the Shapes tool. You can find this by choosing the Insert tab at the top of the window, choosing the Shapes option, then clicking a line and drawing it at the desired location in the document.
How do I make a line thicker in Word?
Word
- Click the line that you want to change, and then click the Format tab.
- Under Shape Styles, click the arrow next to Line. , point to Weights, and then click the width that you want.
Last Updated: December 11, 2021 | Author: Kurt Damiano
Contents
- 1 How do I get rid of the red underline in Word?
- 2 Why is my Word document underlining everything in red?
- 3 Why is Microsoft Word typing in red?
- 4 How do I get my Word document back to normal?
- 5 How do I stop Word from underlining?
- 6 How do I turn off underline in Word?
- 7 How do I reset Microsoft Word to default settings?
- 8 Why does my Word document look weird?
- 9 Which is the default layout of Word document?
How do I get rid of the red underline in Word?
Click on the name of the language in the status bar at the bottom of the screen. 2. Add a check mark in the Do not check spelling or grammar option and click OK. All the red and green squiggly underlines should be gone.
Why is my Word document underlining everything in red?
You have the Track Changes feature turned on – red underlining is the default markup used to identify Insertions. Go to the Review tab, turn Track Changes OFF, then Accept all changes in the document & save the file.
Why is Microsoft Word typing in red?
This issue occurs if the track changes is enabled. Turn off the track changes by clicking on (ctrl+shift+E) . Click on ‘Review’ tab on the ribbon and click on ‘Track Changes’ and accept the changes.
How do I get my Word document back to normal?
How do I stop Word from underlining?
When you want to stop underlining, press Ctrl+U again. You can also underline text and spaces in several other ways.
How do I turn off underline in Word?
In the “Font” tab, click the down arrow under the “Underline Style” option. Click “None” in the drop-down menu, then select the “OK” button. The underline is now removed from the selected hyperlinked text.
How do I reset Microsoft Word to default settings?
Open the template or a document based on the template whose default settings you want to change. On the Format menu, click Document, and then click the Layout tab. Make any changes that you want, and then click Default.
Why does my Word document look weird?
You need to turn on the view of white space between pages. It is easy to accidentally toggle this setting by double-clicking at the top or bottom of a page in Print View. You can also manage it by Word Options > Display and turn on the checkbox for “Show white space between pages in Print Layout view”.
Which is the default layout of Word document?
In Microsoft Word, switches to normal view, which is the default document view for most word-processing tasks, such as typing, editing, and formatting.
GAPROF55
-
#1
In the middle of many Word documents, suddenly my text is red and underlined
and there are formatting messages to the right. These messages are not
invisible but print out with the document, which is not what I want. I am
unable to make this start once it begins happening. If you can, please tell
me how to disable this feature. Thanks!
Advertisements
Advertisements
Jay Freedman
-
#3
You’re turning on Track Changes, probably by pressing the shortcut
Ctrl+Shift+E unintentionally. Read
http://www.shaunakelly.com/word/trackchanges/HowTrackChangesWorks.html.
If the shortcut is too easy for you to press by accident, you can disable
it. Go to Tools > Customize > Keyboard (or in Word 2007, Office button >
Word Options > Customize > Keyboard). In the left-hand list, click on All
Commands. Then in the right-hand list click on ToolsRevisionMarksToggle.
When the shortcut Ctrl+Shift+E appears in the Current Keys box, click on it
and click the Remove button. The Track Changes function will still be
available from the Tools menu (or the Review ribbon in Word 2007) if you
need to use it.
—
Regards,
Jay Freedman
Microsoft Word MVP
Email cannot be acknowledged; please post all follow-ups to the newsgroup so
all may benefit.
Want to reply to this thread or ask your own question?
You’ll need to choose a username for the site, which only take a couple of moments. After that, you can post your question and our members will help you out.
Ask a Question
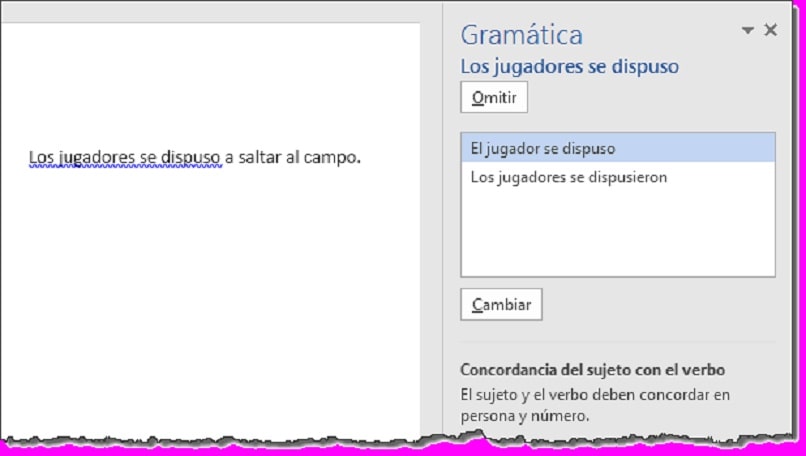
Suppose you are typing, you make a mistake, and you see the red wavy underline.
Suppose you correct the mistake, but meanwhile you’ve already lost the beat and the idea. To avoid these distractions, you can disable spell checking and manually check spelling when you’re done typing. It is done like this.
Click File > Options > Proofing , clear the Check spelling as you type check box, and click OK .
To activate spell checking again, repeat the process and select the Check spelling as you type check box .
To check spelling manually, click Check > Spelling and Grammar .
But remember to turn on spell checking again. Spelling and grammar mistakes can seriously undermine what you’re trying to communicate, especially if your boss, or your teacher, or that HR person sees them.
When you are working on writing a text that includes foreign or slightly colloquial words to highlight a point in your writing, it is likely that the red or blue line will be automatically marked under those words or in a phrase or sentence. This is due to the spell checking activated on your computer.
Many dislike those red and blue lines, they even it is annoying and distracting, that’s why they deactivate it. If you want to know how to remove the red underline from spell checking and the blue underline from contextual errors in Word, read on, because in this article we will tell you how you can do it.
How to make single document red underline not appear in Word?
Spelling is very important when writing a text, because it allows it to be legible and understandable, it also says a lot about whoever writes it. Therefore, when you work with the Microsoft Word program you can easily see those errors and correct them, because it indicates to you by means of the red underline. But many do not like this because it distracts them in the writing process so they decide to disable it. If this is your case, see how it is done.
From Windows
From the Windows operating system you can remove the red underline in a current Word document. You follow the following route: File, Options and Review. In that option you must check the box to Hide spelling errors only in this document and hide grammar errors only in this document and click OK. This will apply the action implemented to that single Word document.
On Mac
On the other hand, if you have a Mac computer, then the procedure to remove the red underline in a Word document differs a bit. But there is no need to be alarmed, we show you how to do it. You go into the Word document and you click on the Tools option, located at the top. You will see a drop-down menu where you must select Spelling and grammar.
Immediately a side menu will be displayed with several options, choose Hide spelling errors. That way your Word document won’t show the red underline. As you can see, it is very easy to do it, you can enable or disable Word’s auto spell checker on Mac.

In Word online
In the case of Word online or for the web, if you want to eliminate the red underline in that document, what you should do is go to the option on the top bar of Review, click there and then on Editor. Next, you must click on set revision language. You will see a language box where you should select the option do not check spelling or grammar and click on OK for the changes to be made.
What boxes are unchecked to disable spell checking for all documents?
There are many functions that you can implement when you use the Word tool, such as when writing a text, you can find all the repeated words in a Word document. But also, you can use the spell checker, which is an excellent tool that allows you to write texts with a grammar and spelling error free.
But there are situations in which you may want to deactivate this option, especially when you do some work in Word in another language or with somewhat difficult words. In that case, it is better disable spell checking so you can work without having to see that red line under each word, signaling your poor spelling and writing.
This action can not only apply to a document, also you can disable spell check to all Word documents. That is why we show you which boxes you must uncheck to deactivate this spell check function. Take a look at the following:
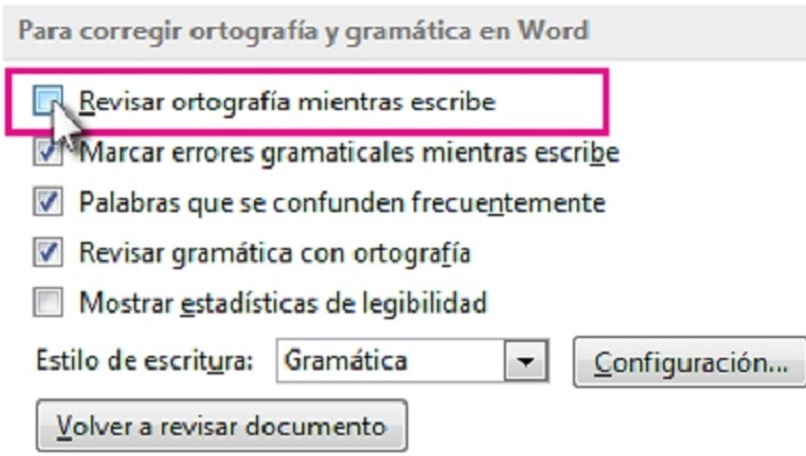
Check spelling as you type
By unchecking the Check spelling while writing box, you are disabling this function, so you will not see the red line in the document you are writing at the moment as well as in all Word documents because simply the system will not spell check the document. After you have entered Files and then Options and Review. And in the To correct spelling and grammar in Word section, uncheck the Check spelling as you type box, and click OK.
Check grammar
On the other hand, when you uncheck the Check grammar box, the spell checker will not recognize misspelled words and that do not have concordance. Because the option that performs this function is disabled. So you will not know if your document meets the rules of grammar. But this is not a problem either because you can easily activate this action again and thus your documents have a better presentation.
How do you prevent the blue underlining of contextual errors from being marked?
The Word tool allows you to edit coherent and understandable texts because it has functions that are predetermined for automatically correct the writing and spelling of the writing. And it does so by means of the blue underline that appears below the words, pointing out the contextual error. For this reason, when writing, some words in a sentence of the text may be highlighted with blue lines to indicate that an inconsistency has been verified in the checker, that is, a grammatical error, which you must correct.
Although this consistency marker may be activated by default on your computer, you can also deactivate it whenever you like. Take a good look at what you must do so that the blue underline of contextual errors is not marked.
You go to File, click on Options, Review and there uncheck the Mark grammar errors box while you write and click OK. As you can see, there are many functions that you can enable or disable in Word and all from the toolbar. That is why it is convenient for you to know the Word toolbar, its parts and what it is for.