
Formatting text in MS Word is both pleasingly simple and annoyingly complicated. Take text indentation, for example. The basics are very easy to grasp. But there are many extra options that you may miss if you’re not already a confident Microsoft Word user. To help out, then, we’ve prepared this complete guide on how to indent text in a document.
The Tab Key
One simple way to indent text is to place the cursor at the start of a paragraph and hit the tab key on your keyboard. In Microsoft Word, this adds a 0.5” (1.27cm) indent at the left margin. It also automatically formats the text so that subsequent paragraphs have a first-line indent.
If all you want to do is begin each paragraph with a half-inch indent, this is fine. But for more control over text indentation in your document, read on.
How to Indent Text
You can find the basic indentation options in Microsoft Word on the main ribbon. This includes the Paragraph section of the Home tab, where you will find Increase Indent and Decrease Indent buttons.
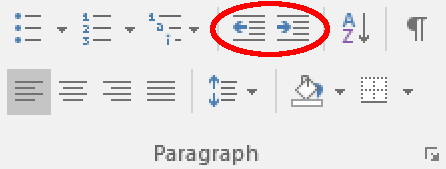
The Increase Indent button adds a 0.5” (1.27cm) indent at the left margin for the entire paragraph (not just the first line). The Decrease Indent button, meanwhile, does the exact opposite.
Alternatively, go to Layout > Paragraph on the ribbon and adjust the values in the left and right indent boxes as required. This has the added bonus of letting you indent text by a custom amount.
Find this useful?
Subscribe to our newsletter and get writing tips from our editors straight to your inbox.

Special Indentations
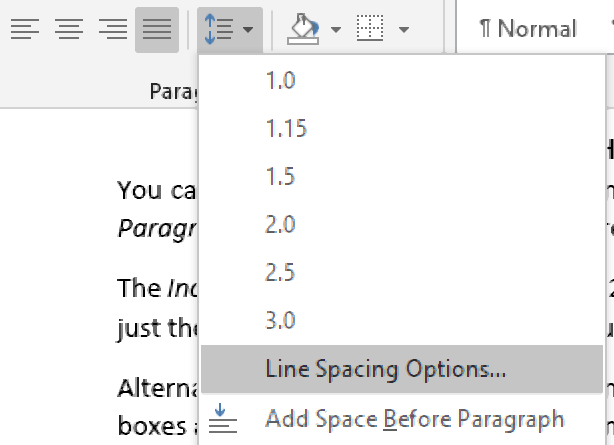
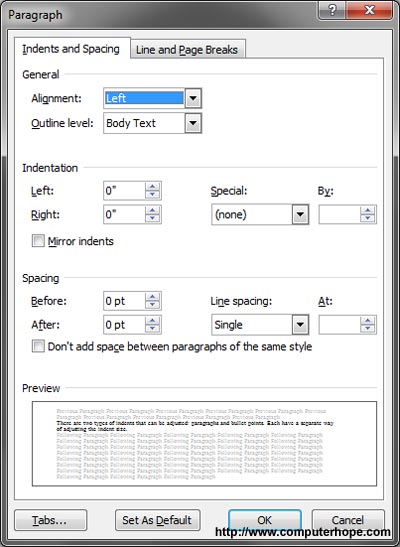
For even more control over the indentation in your document, you can open the main Paragraph menu. This can be accessed by going to Home > Paragraph, clicking the Line and Paragraph Spacing button, and then selecting Line Spacing Options… from the dropdown menu.
In the new window, you will find an Indentation section. The left and right indent options here work the same as in the Layout tab on the ribbon.
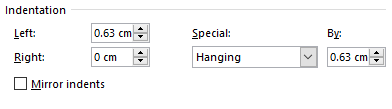
The other settings here can be used to add special indentations to your document. These include:
- First line – This option indents the first line of each paragraph to a custom value. Typically, this type of indent would be used as an alternative to paragraph spacing.
- Hanging – This will indent each line after the first in a paragraph. The most common use for this is to add a hanging indent in a reference list (e.g., as required in APA referencing).
- Mirror indents – Clicking this will change the left and right indent options to say Inside and Outside This will mean that indents are “mirrored” on odd and even pages, which helps ensure consistent formatting when printing something in a book format.
To use these options, simply select the text you want to format with the cursor, open the paragraph menu, choose the type and size of indent you want to apply, and click OK to change the indentation for the selected text.
Change paragraph indents and spacing
-
Select one or more paragraphs that you want to adjust.
-
Go to Home and then select the Paragraph dialog box launcher
 .
. -
Choose the Indents and Spacing tab.
-
Choose your settings, and then select OK.
 .
.The Paragraph dialog box options are described in Adjust indents and spacing.
-
Select the text you want to adjust.
-
Go to Home and select Line and Paragraph Spacing > Line Spacing Options at the bottom of the menu.
The Paragraph dialog box opens.
-
On the Indents and Spacing tab, select the options you want, and click OK.
The Paragraph dialog box options are described in Adjust indents and spacing.

You can quickly adjust indents and spacing in Word for the web.
-
If you’re not already in Editing View, select Edit Document > Edit in Word for the web. The doc will switch from Reading View to Editing View.
-
Select Page Layout and notice the Indent left and right and Spacing before and after options.
-
Place your cursor at the beginning of the paragraph you want to adjust.
-
To indent the paragraph, type the distance you want in the Left or Right box under Page Layout.
For example, type 0.1 to indent the paragraph one tenth of an inch.
-
To change the amount of space before or after the paragraph, type a number in the Before or After box.

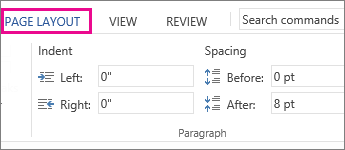
Tip: To change the indents for an entire document, it’s much faster to adjust the margins. Under Page Layout, select Margins, and choose the margin settings you want.
Updated: 03/05/2023 by
There are two types of indents that can be adjusted: paragraphs and bullet points. Each has a separate way of adjusting (increasing and decreasing) the indent size. Below are the different ways you can move the indentation in Microsoft Word.
First line indent with tab
The first line indent can always be created using the Tab on the keyboard. To change the first line indent size or indent the full paragraph, continue reading the below suggestions.
Tip
Pressing Tab multiple times increases the indent each time it’s pressed.
Indent paragraph with shortcut key
A complete paragraph can be indented with the keyboard shortcut Ctrl+M and pressing the keyboard shortcut more than once will indent the paragraph further.
Tip
To reverse the indent, you can also press Ctrl+Shift+M.
Adjusting indents using the ruler
To adjust a paragraph indent size, use the Ruler, which is below the menu bar and resembles the picture below. If this feature is not visible, see our document on how to enable the Ruler.
- How to enable and disable the Ruler in Microsoft Word.
Towards the left side of the Ruler, look for indent markers that resemble an hourglass, like the image below.
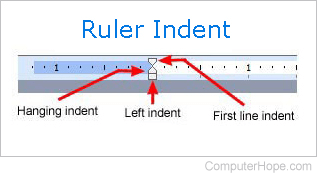
The top marker (down arrow) controls the first line indent, and the middle marker (up arrow) controls the hanging indent (the indent for lines after the first line in each paragraph). The bottom marker (small box) controls the left indent. To adjust these indents, you can click-and-drag each marker to the right or left.
Tip
To change the indentation for an entire document, select all text in the document (press Ctrl+A), then adjust the indent spacing in the ruler as detailed above.
Note
If a large indent is created when pressing the Tab and adjusting the indent on the Ruler doesn’t work, adjust the Left Tab Stop in the Ruler.
Changing indents in the Paragraph window
- Microsoft Word Online.
- Microsoft Word desktop application.
Microsoft Word Online
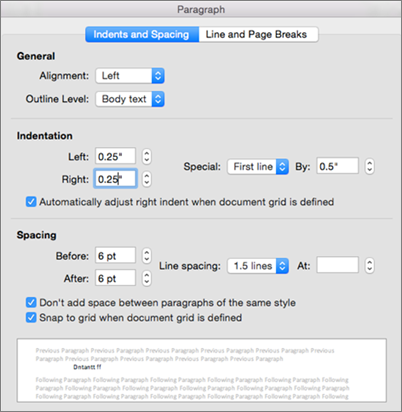
In Microsoft Word Online, the web version, you can adjust the indents through the Paragraph settings. To view these settings, right-click with your mouse anywhere in the document and select Paragraph Options.
The Paragraph settings window is displayed. In the Indentation section, the left and right indent settings can be adjusted. You can also adjust the first line indent and hanging indent size with the Special drop-down list and By option.
Microsoft Word desktop application
In the Microsoft Word desktop application, another way to adjust the indents is through the Paragraph settings. To view this window, double-click the markers in the ruler, click Format and then Paragraph. You can also place the cursor in the paragraph, right-click with your mouse, and chose Paragraph.
As seen below in the Paragraph window, under the Indentation section, the left and right indent settings can be adjusted. You can also adjust the first line indent and hanging indent size under the Special option in the Indentation section.
At the bottom of the Paragraph settings window, you can preview the look of the indent sizes you are setting and make changes accordingly until you get it the way you want.
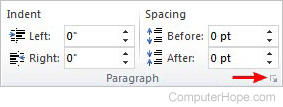
Adjust the indent on the Ribbon in Word 2007 and later
If you’re using a newer version of Microsoft Word that uses the Ribbon, such as Word 2007 or 2013, Word 365, or Word Online (the web version), do the following.
- Click the Layout or Page Layout tab.
- Adjust the indent settings in the Paragraph section.
To view the Paragraph window mentioned in the above section, click the small down arrow indicated by the red arrow in the picture below.
Adjusting the bullet and numbering indentation
Tip
The easiest method of adjusting the bullets and number list in all versions of Word is to adjust the left indent through the Microsoft Word ruler bar.
Note
To adjust the spacing between the bullet and the text in a list, you may need to adjust the Left Tab Stop in the Ruler.
Microsoft Word Online
In Word Online, the web version, the only way to adjust bullet list indentation is to adjust the left indent spacing through the horizontal ruler.
Microsoft Word 2007 and later
In Word 2007 and later versions of the Word desktop application, follow the steps below.
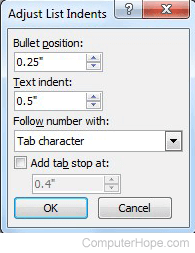
- Click one of the bullets at the level you want to change in the document.
- Right-click the bullet and select Adjust List Indents in the pop-up menu.
- In the Adjust List Indents window, change the Bullet position to adjust the bullet indent size or change the Text indent to adjust the text indent size after a bullet. As shown, the Bullet position is at .25 inches and the Text indent is at .5 inches (or one-half inch).
Microsoft Word 2000 and earlier
- Place your cursor in a bulleted or numbered line in the document.
- Click the Format menu at the top of the Word program and select the Bullets and Numbering option.
- In the Bullets and Numbering window, click the Customize button on one of the first three tabs, depending on the type of list you are changing.
- In the window that opens, adjust the indent size for the bullet position and the text position. At the bottom of the window, you can preview how the indentation sizing looks and make changes accordingly until you get it the way you want.
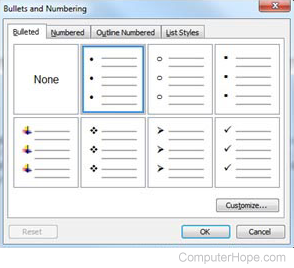
You can also access the Bullet and Numbering window by placing your text cursor on a bulleted or numbered line and right-clicking in the Word document. In the pop-up menu, select the Bullets and Numbering option.
Microsoft Word is a graphical word processing program used to create text-based documents. It’s included in all of the Microsoft Office application suites and is one of the most widely-used word processors.
The importance of indenting
When creating a body of text in a Word document, indenting the first line adds structure and is the most common way to signal the start of a new paragraph or topic.
Block paragraphs are the default in Word, meaning that each line within a paragraph is aligned with the left margin, and the paragraphs only visually separated by line spaces. As a general rule, block paragraphs are more common when writing for an online platform, and indented paragraphs are more common in print publishing and academic research.
The images featured in this article are from Microsoft 365 (formerly Office 365), which is the same as Word 2019. The steps are the same for Word 2016, Word 2013, and Word 2010.

Aside from indenting the first line, it’s also possible to indent every line except for the first line, known as a hanging indent or second line indent. Hanging indents are typically used in bibliography or reference sections.

6 ways to indent in Microsoft Word
There are multiple ways to indent in Microsoft Word depending on the style of document you’re creating and your preferences. But first, ensure the Ruler feature is displayed. This allows you to better position and customize your text spacing. To display the Ruler:
- Click the View tab
- Click the checkbox next to Ruler in the left hand corner

-
Indent using the tab key
The quickest way to indent is to use the Tab key. This will create a first-line indent of ½ inch.
1. Place your cursor at the very beginning of the paragraph you want to indent.
2. Press the Tab key. On the Ruler at the top of the screen, the first-line indent marker (the marker pointing down toward the text) will move to the right by ½ inch.
3. Continue placing the cursor at the beginning of paragraphs and repeat. If there is nothing yet written on the document, press Tab before beginning a new paragraph. -
Indent using Microsoft’s indent markers
If you want a customized indent (an indention more or less than ½ inch), Word provides indent markers that allows users to indent paragraphs to the measurement of their choosing. The markers look like this on the Ruler at the top of the screen:

There are several indenting options with these markers:
– First line indent marker adjusts the first-line indent
– Hanging indent makeradjusts the second line indent
– Left indent marker moves both the first-line indent and hanging indent markers at
the same time (moving the margins of the text).1. Place the cursor anywhere in the paragraph you want to indent, or select one or more paragraphs.

2. Click and drag the indent marker, whether the first, hanging, or left indent marker, and drag it to the desired location. For this example, we’ve dragged the first-line indent marker to ¾ inch.
-
Indent using indent commands
Microsoft Word features indent command buttons, moving every line in a paragraph left or right in ½ inch increments.
1. Place your cursor on the text you want to indent. If multiple paragraphs need indenting, highlight them all.
2. On the Home tab, click the Increase Indent or Decrease Indent button
3. The entire paragraph will indent ½ inch. To return to the original margins or decrease the indent by ½ inch, click Decrease Indent.*To customize the spacing of the indent for the buttons, click the Layout tab and enter your desired values in the boxes under Indent in the middle of the ribbon.

-
Indent using tab stops
A tab stop describes the location the cursor stops at after the Tab key is pressed. The left side of the screen shows the Tab Selector.

When clicked, it will cycle through all the possible options of tab stops that determine whether the text is left aligned, centered, etc. Types of tab stops include:
– Left Tab left-aligns the text at the tab stop
– Center Tab centers the text around the tab stop
– Right Tab right-aligns the text at the tab stop
– Decimal Tab aligns decimal numbers using the decimal point
– Bar Tab draws a vertical line on the document1. To add a tab stop, select the paragraph(s) you want to add tab stops to.
2. Click the Tab Selector until the tab stop you want to use appears. For this example, we’ve selected the Right Tab.
3. Click the location on the horizontal ruler at the top where you want your text to appear. More than one tab stop can be added.
4. Place your cursor in front of the text you want to tab, the press Tab. The text will jump to the closest tab stop you’ve created.
-
Set the indent by default
To set the a first-line indentation as a default, modify the normal style:
1. Move your cursor to anywhere in the paragraph.
2. On the Home tab, right click the Normal style box and select Modify.
3. In the drop-down menu in the bottom left of the pop-up window, click on Format, then choose Paragraph.
4. On the Indents and Spacing tab, under Indentation, select First line under the Special drop-down menu.
5. Type in the amount of spacing you want the indent to be next to the By box, and click OK, and then click OK again. 4. -
Create a hanging indent
1. Select the paragraph where you want to add a hanging indent.
2. Go to Format and then Paragraph. This can also be done by right clicking on the Normal style box as mentioned above.
3. On the Indents and Spacing tab, under Indentation, select Hanging under the Special drop-down menu and enter in your spacing requirements
4. Select OK. The outcome should look like this:


Abby Braden
Abby Braden is an award-winning writer and editor for websites such as TechnologyAdvice.com, Webopedia.com, and Project-Management.com, where she covers technology trends and enterprise and SMB project management platforms. When she’s not writing about technology, she enjoys giving too many treats to her dog and coaching part-time at her local gym.
An indentation or indent is an empty space at the beginning of a line of
written or printed text recommended to use instead of spaces or tabs at the beginning of lines. Automatic text indentation makes Word documents formatting consistent and easy to change.
There are several types of indents in the Word document:
- The First Line Indent indicates the first line of the paragraph.
Instead of using the first-line indents, a
space between paragraphs
or even an empty line is often used. In modern word-processing, it is not
recommended to use the first-line indents and the
spaces between paragraphs in the same document.Notes:
- The first-line indent in the first paragraph of any text
is optional since it is obvious where the paragraph begins.
However, the
Drop caps
may apply for such paragraphs. - Do not use spaces or tabs to indent the first line — when you
change the style of different paragraphs. It will be difficult
to reconcile them.

- The first-line indent in the first paragraph of any text
- Professionally printed material in English typically does not indent the first
paragraph but indents those that follow. So, a negative indent or
hanging indent is used, as an indent that indents all text except the
first line:
The hanging indents are used in Bibliographies, Reference pages, and sometimes in scripts, dictionary entries, and footnotes.
- Another standard modern English style is the lack of indentation, and the addition of vertical white space to create «block paragraphs»:
The block paragraphs are commonly used for block quotations.


Customize the paragraph format
1. Click the paragraph you want to format or select
multiple paragraphs.
2. Do one of the following:
- On the Home tab, in the Paragraph group, click the dialog box
launcher:
- Choose Paragraph… from the shortcut menu (right-click or press
Shift+F10) to display the Paragraph dialog box:


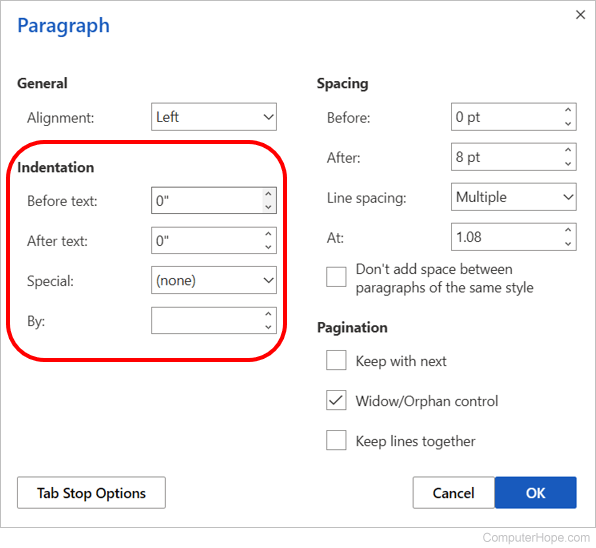
3. In the Paragraph dialog box, choose or
type the appropriate values for Left, Right, or Special
(First line or Hanging) indents:

Use the ruler
To do so, click in the paragraph you want to format or select multiple paragraphs, and
then drag the First Line Indent marker left or right to the desired location.
Increase/decrease text indentation
- Using the keyboard:
You can press Ctrl+T to create a hanging indent that aligns body text with the first tab marker. (By default, tabs are set every 0.5 inches).
You can press Ctrl+Shift+T to “unhang” an indent, regardless of how the hanging indent was created.
Press Ctrl+Shift+M to decrease a paragraph’s indent by one tab stop. By default, tab stops are set every 0.5 inches.
Press Ctrl+M to increase a paragraph’s indent by one tab stop. By default, tab stops are set every 0.5 inches.
You can instantly add a full line space before a paragraph by selecting the paragraph(s) you want to format and pressing Ctrl+0 (zero). If you select multiple paragraphs, pressing Ctrl+0 adds a blank line space before each paragraph in the selection.
- Using the mouse:
To increase/decrease text indentation for the selected text, on the Home tab, in the Paragraph group, click the Decrease Indent or Increase Indent button:

or


See also this tip in French:
Comment
créer un retrait négatif de première ligne.
While preparing a document in Word, you may find yourself having to add a hanging indent or first line indent. They’re used to set off one paragraph from each other. In that way, indents help make your document more pleasant to look at and easier to read.


This tutorial shows you, step-by-step, how to add a hanging indent in Word. You’ll also learn the steps for adding a first line indent.
As you’ll soon see, you can use different methods to make indents and hanging indents in Word. I’ll walk you through each of those methods and when to use one or the other. Plus, I’ll share a bit about how premium Word templates can help you work more quickly and produce a better-looking document.
Note: In this tutorial, I’m using Microsoft Word for Mac version 16.46. If you’re on a different version, the interface may look a little different for you.
What Is a Hanging Indent and Why Would You Use It?
A hanging indent is when the first line of the paragraph is flush at the margin, and all succeeding lines of the paragraph are indented. It’s also known as a “second line indent” and “reverse indent.”
Hanging indents are typically used in bibliographies, citations of works, and reference lists. They’re required by style guides like:
- American Psychological Association (APA)
- Associated Press Stylebook
- Chicago Manual of Style
- Modern Language Association (MLA)
Hanging indents are usually used in academic and scholarly works. But even in a business document, you may also decide to use hanging indents. They’re helpful because they visually separate citations, making it easy to quickly scan through the author names or works titles.
First Line Indent: Another Type of Indentation
A more common kind of indentation is the first line indent. As the name implies, only the first line of the paragraph is indented. The rest of the lines are set to the left margin.
First line indents visually separate one paragraph from another. Now that word processing software like Microsoft Word makes it easy to increase the spaces between paragraphs, first line indents are no longer in popular use.
But the Chicago Manual of Style, APA, and other style guides still recommend first line indents instead of extra spacing between paragraphs. Check the style you’re using to know if you should use first line indents of paragraph spacing.
Let’s get started by making a hanging indent in Microsoft Word.
How to Make a Hanging Indent in Word
There are three methods you can use to make a hanging indent. In this section, I’ll explain the steps for each method:
Method 1. Keyboard Shortcut
This method is fast and easy. It’s best to use this method if you’ve already typed or pasted all the citations in your document. The keyboard shortcut for a hanging indent is Cmd+T in Mac and Ctrl+T in Windows.
By default, the succeeding lines are indented by 0.5 inch. If that’s what your style guide recommends, then you can use this method.
1. Click and drag the mouse to select the text where you’d like to apply the hanging indent.


2. Type the Cmd+T (Mac) or Ctrl+T (Windows).
The selected paragraphs now have a hanging indent, with succeeding lines indented by 0.5 inch (the default).


Method 2. Paragraph Format
If you want more control over the hanging indent, then use this method. As with the first method, this works best after you’ve typed or pasted the citations into your document. Here are the steps:
1. Select the text.
2. Go to Format > Paragraph.


The Paragraph settings window opens.
3. Beside Special, open the dropdown menu, and select Hanging.


4. Specify the amount of indentation you want. Then click OK.


Note that the indentation is now only 0.25 inch, as I specified.


Method 3. Paragraph Styles
Another way to add a hanging indent in Microsoft Word is by using paragraph styles. Use this method if you’ll be adding more citations to the document later.
1. Follow the steps in either Method 1 or 2 to add a hanging indent to a paragraph.
2. With the cursor on the formatted paragraph, go to Format > Style.


The Style settings window opens.
3. Click New.


The Create New Style from Formatting window opens.
4. Give the new paragraph style a name.


Look at the paragraph preview and Microsoft Word indent settings to make sure they’re what you want. If everything looks the way you’d like them to look, click OK.
5. Back in the Styles window, click Apply.


Now all you’ve got to do is apply the Citation paragraph style to new citations.
Whichever method you choose to create a hanging indent, new paragraphs will automatically have a hanging indent. After you’ve applied the hanging indent, follow these steps:
Place the cursor at the end of an existing citation.


Hit the Return key, then type or paste the new citation on the next line. It’ll automatically have a hanging indent.


How to Make a First Line Indent in Word
There are three ways to make a first line indent. Here are the steps for each method:
Method 1. Tab
This is the simplest way to create a first line indent. But it’s not a convenient method to use if you’ve already typed the entire document. It’s also more suitable for shorter documents with just a few paragraphs.
1. Place the cursor before the first letter of the paragraph.


2. Click the tab key.


Now the first line has been indented to the first tab of the document.
When you hit return at the end of the paragraph, the next paragraph you type will automatically have a first line indent as well.


The next two methods for adding a first line indent in Word are more suitable for longer documents.
Method 2. Paragraph Format
This method works well for longer documents after you’ve typed or pasted the text.
1. Select the text.


2. Go to Format > Paragraph.


The Paragraph settings window opens.
3. Beside Special, open the dropdown menu and select First Line.


Specify the amount of indentation you wish to apply, then click OK.
Now all the selected paragraphs have first line indents.


Method 3. Paragraph Styles
This method of adding first line indents is good for long documents that already use paragraph styles.
1. Follow any of the previous methods to add a first line indent in an existing paragraph.


2. With the cursor on the paragraph, right-click on the style name on the ribbon.


3. Click Update Normal to Match Selection.


Now all paragraphs with the Normal style will have a first line indent.


3 Tips for Using Indents in Word
Style guides recommend hanging indents and first line indents because they make documents easier to scan and read. Microsoft Word helps you create indents easily, but as with other features, indents can be abused and misused. Keep these tips in mind to make sure you’re using indents properly.
1. Stick to One Style Guide
Follow one style guide and use it consistently in the entire document. Don’t mix up styles! Your school or business may specify which style guide you should use. If not, pick one and stick to it.
You may also decide to create your own style guide for your business or organization. If you do, remember to document it well so that anyone in your team or institution will be able to create documents that follow your style.
Study the tutorial below for tips on how to write your document:
2. Choose Only One Way to Separate Paragraphs
Don’t use both first line indents and paragraphs spacing. If using first line indents, don’t put extra spaces between paragraphs.
And if you’ve placed extra spaces between paragraphs, don’t use first line indents. Use only one way to separate paragraphs from each other.
When in doubt, follow the style guide you’re using.
3. It May Not Be Necessary to Indent the First Paragraph
Some experts say some paragraphs don’t need to have a first line indent. For example, if a paragraph is preceded by a title or heading, then a first line indent is unnecessary to set the paragraph apart from it.
Again, follow the recommendation of the style guide you’re using. Whatever you decide, apply it consistently throughout your document.
The Easiest Way to Create an Impressive Word Document: Use a Word Template
Microsoft Word delivers robust features and tools at your fingertips. But there’s an even easier way to create an impressive document in Word. That’s by starting with a template for Word.
Whatever type of document you’re creating—whether it’s a resume for job hunting, a brochure to promote your services, or the invitation to your child’s birthday party—you’ll find hundreds of Word templates that meet your needs.


The best source of templates for Word that I know of is Envato Elements. You’ll find thousands of Word templates that are designed by professional graphic artists. This means the biggest and hardest design decisions have already been made for you! All you have to do is to personalize the text, images, and colors to align with your branding. You can even change the design and layout if you’re inclined to do so.
With millions of creative assets for various types of projects, Elements offers tremendous value. Get unlimited downloads for one small monthly subscription. That includes unlimited downloads of Word templates as well as fonts, stock photos, graphics, and so much more. And you can cancel your subscription at any time.
Elements is a valuable tool to use in your MS Word workflow. It’ll cut down the amount of time you spend hunting for creative assets you need in your document.
Use Microsoft Word Indents to Create an Effective Document
You’ve just learned how to do a hanging indent on Microsoft Word. Hanging indents and first line indents are only two of the ways to make your document visually pleasing and easier to read.
Microsoft Word indents make your document attractive by visually separating paragraphs from each other. Hanging indents make it easy to scan through a list of references or citations. But first line indents give readers a visual cue of where each paragraph begins. Note that you don’t have to use first line indents if you’ve already added spacing between each paragraph.
You can also have a terrific-looking document by building it from a Word template. Professionally designed templates, like the ones you’ll find in Envato Elements, have the design decisions made for you. At the same time, you’ll still be able to change the formatting settings as you see fit. To get unlimited downloads of templates for Word and other creative assets, get an Elements subscription.
Whether creating a Word document from scratch or starting from a Word template, follow the steps in this tutorial to create a first line indent or hanging indent in Word.
Indentation in Word refers to adding extra spaces between one or more lines of text and the left or right margins. In most cases, you use indentation for automatically indenting the first line of paragraphs, indenting quotes, and setting up hanging indents for list text.
In today’s article, I will show you the proper way to indent your paragraphs in Word instead of pressing the spacebar exactly 7 times every time.
Without further ado, let’s get started.
Option 1: Add and remove indents from paragraphs in Word
One of the easiest ways of indenting paragraphs in Word is to use the Indentation buttons in the Paragraph group of the Home tab. However, this method will indent the whole paragraph. Jump to the next options if you are looking to do hanging indents or first-line indentation.
To add indents to paragraphs in Word:
- Select the paragraph or paragraphs you wish to indent.

- Go to the Home tab, in the Paragraph group, click the Increase Indent button once.

Clicking on the Increase indent button will move the paragraph farther away from the margin.

- Click on the decrease indent button to move your paragraph closer to the margin. Clicking this button will remove or reduce the indent.

Using Indentation Controls
You can also indent your paragraphs using the Indent Left and Indent Right controls in the Paragraph group of the Layout tab.

Left indent: Use this to specify how far you want to move the paragraph away from the left margin.
Right indent: Use this to specify how far you want to move the paragraph away from the right margin.

Before indent: Use this control to specify how much space should appear above the selected paragraph.
After indent: Use this control to specify how much space should appear below the selected paragraph.
This is how you may indent paragraphs in Word using the Increase and Decrease Indent buttons and the paragraph controls on the Layout tab.
How to indent second line in word (Hanging Indent)
This indentation is well known as the hanging indent. It is when the indentation of a paragraph starts from the second line. In other words, when all the lines in a paragraph are indented except for the first line.
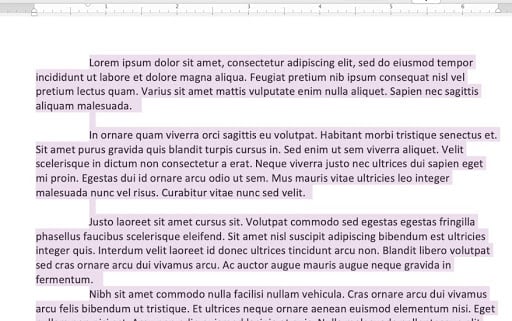
The below screenshot illustrates an example of a hanging indent:

Below are the steps to make hanging indents in Word:
- Select the paragraph or paragraphs you want to indent.
- Go to the Home tab, in the Paragraph group, click the Paragraph Settings icon.

The Paragraph dialog box will appear. It should look like the one in the screenshot below:

- Click to activate the Indents and Spacing tab.
- In the Indentation group, click the Special drop-down list and select Hanging from the list.
- The By: field will change to ½ inch by default. You can change it further by indicating how much inches you want for the indents.

- Click OK.
On clicking the OK button, the first line of the paragraph won’t be indented, but the rest of the paragraph will get indented by the default length which is 0.5 inch or by the value you specified.
- To remove a hanging indent setting from a paragraph, launch the Paragraph dialog again and select (none) from the Special drop-down list under the Indentation group.

- Click OK.
This is how you may add or remove hanging indents or second-line indents in Word.
How to indent first line of paragraph in word
To automatically create the first-line indentation as you type paragraphs, place your cursor at the beginning of the paragraph you want to indent and press the tab key once. Now when you press the Enter key to begin a new paragraph, Word will automatically indent its first line.
You can also use the Paragraph dialog box to create first-line indents in Word. Obey the steps below:
- Select the paragraph or paragraphs you want to indent.
- Go to the Home tab, in the Paragraph group, click the Paragraph Settings icon.
The Paragraph dialog box will appear.
- Click to activate the Indents and Spacing tab.
- In the Indentation group, click the Special drop-down list and select First line from the list.

- The By: field will change to ½ inch by default. You can change it further by indicating how much inches you want for the indents.
- Click OK.
On clicking the OK button, only the first line of the paragraph will be indented.
- To remove the first-line indent from a paragraph, launch the Paragraph dialog again and select (none) from the Special drop-down list under the Indentation group.
- Click OK.
Indenting paragraphs in Word with a ruler
Aside from using the other approaches, there’s yet another simple method for creating indents in Word – using the ruler.
The horizontal ruler in Microsoft Word provides a mouse-based way to create indents. It is especially easy for creating first-line indents and hanging indents (or second-line indents).
Another good thing about indenting with the ruler is that it enables you to visualize how the text will change as you drag. This way, as you drag the ruler, you can judge how far to go with the length of the indentation.
Obey the instructions below to create indents using the ruler:
- Display the ruler.
To display the ruler in Word, go to the View tab and click to check the Ruler check box in the Show group. The ruler checkbox controls the visibility of the ruler in the current document only.

- Select the paragraph or paragraphs to indent.
- Drag the indent handles on the ruler to make the desired indentation.

To create First Line Indent, click and drag the corresponding handle to the right to indent only the first line of the selected paragraph. Drag to the left to reduce or remove indentation.
Also, to create Hanging Indent, click and drag the corresponding handle to the right to indent all but the first line of the selected paragraph. Drag to the left to reduce or remove indentation.
The Left and Right indents will add or remove indentation for all lines of the paragraph relative to the left and right margins respectively.
These are the amazing ways you can indent paragraphs in Word using the ruler.